Introduction
JSON Web Token (JWT) is an open standard (RFC 7519) that defines a compact and self-contained way for securely transmitting claims between parties as a JSON object. The information in the JSON object is digitally signed using either a secret (with the HMAC algorithm) or a public/private key pair (using RSA or ECDSA encryption) allowing the JWT to be used for client authentication.Key Benefits
- Stateless Authentication: Eliminates the need for server-side session storage, improving scalability.
- Flexible Integration: Works with multiple identity providers including Auth0, Okta, and custom JWT issuers.
- Enhanced Security: Supports multiple signature validation methods (RSA, ECDSA, HMAC) and claim verification.
- Granular Access Control: Leverage JWT claims for policy enforcement and scope-based permissions.
- Performance Optimized: Efficient token validation with minimal overhead and support for JWKS caching.
How JWT Authentication works with Tyk
JWTs are commonly used in OAuth 2.0 and OpenID Connect flows to authenticate users and authorize access to APIs. The following diagram and steps outline the flow when using JWT Auth to secure access to your API through Tyk.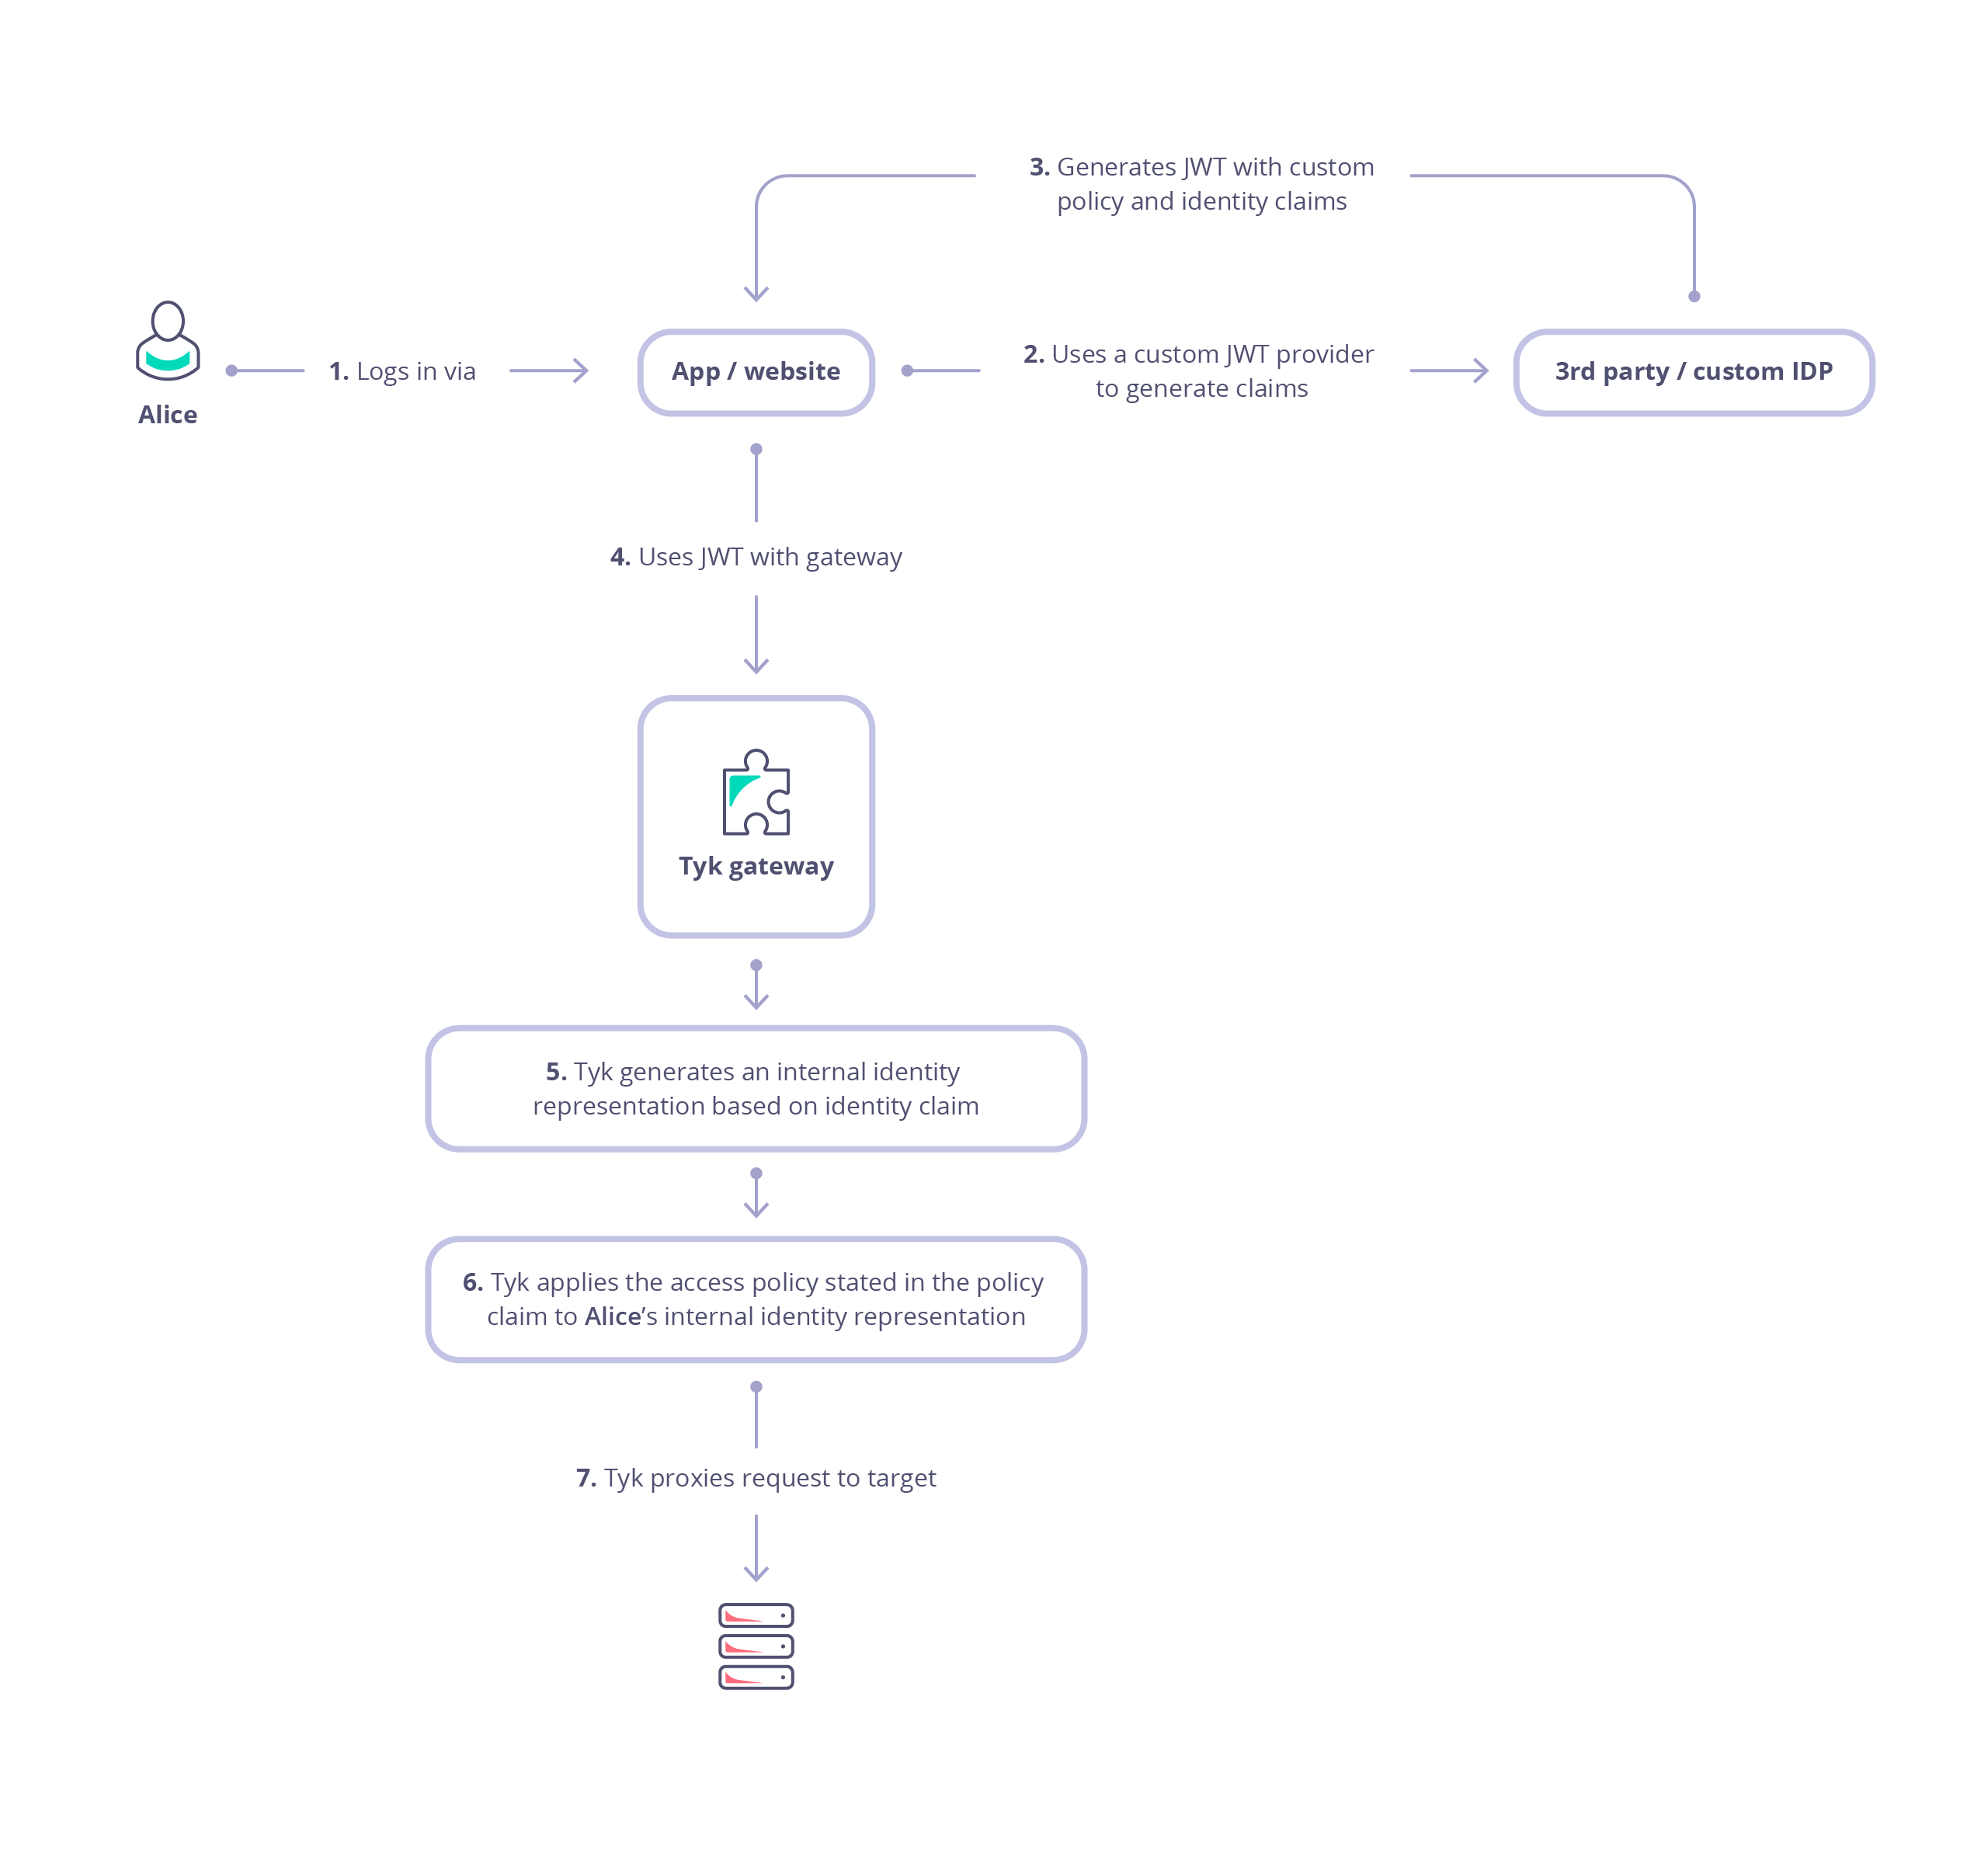
-
Authentication and Token Issuance
Alice (the user or resource owner) authenticates with an Identity Provider (IdP) via the client application (steps 1 and 2).
- The IdP issues a JWT containing specific claims (permissions delegated by the user).
- The client application receives this authorization code and exchanges it for an access token (step 3).
- The client acts as the Token Bearer, holding the token to access protected resources on Alice’s behalf.
-
Request to Gateway
When the client sends a request to the API gateway, it includes the access token (JWT) in the request, usually in the
Authorizationheader as a Bearer token (step 4). -
Token Validation
Tyk validates the token’s signature using the shared secret or public key(s) of the trusted issuer (IdP). This process typically involves:
- Locating the JWT in the request (header, cookie, or query parameter).
- Decoding the JWT header to extract the
kid(Key ID). - Fetching public keys from configured JWKS URIs (or using a local static key).
- Searching the retrieved keys for a match to the
kid. - Validating the signature using the matching JWK.
- Ensuring the token is valid and not expired.
- If any validation step fails, the request is rejected immediately.
- Internal Identity Creation Once validated, Tyk creates an internal session for the request (step 5). This session is used to control access rights, consumption limits, and analytics. Tyk does not store user credentials; instead, it links the session to Alice using an identity extracted from the JWT claims. To know more about how Tyk authorizes requests using JWT claims, see JWT Authorization.
-
Policy Enforcement
Tyk enforces authorization by inspecting specific claims to determine which Security Policies apply (step 6):
- Tyk checks the Policy Claim (identified by the value stored in
basePolicyClaims). - It maps this claim to a configured Tyk Security Policy. If no direct map exists, a
defaultPolicymay be applied. - The applied policy configures the specific Access Rights (ACLs), rate limits, and usage quotas for that specific session.
- Tyk checks the Policy Claim (identified by the value stored in
- Proxy to Upstream If the token is valid and the policy allows the request, Tyk proxies the traffic to your upstream target service (step 7).
JWT Workflow
Configuration Options
The OpenAPI Specification treats JWT authentication as a variant of bearer authentication in thecomponents.securitySchemes object using the type: http, scheme: bearer and bearerFormat: jwt:
Authorization header, but Tyk is configurable, via the Tyk Vendor Extension, to support custom header keys and credential passing via query parameter or cooke.
authentication.stripAuthorizationData field (Tyk Classic: strip_auth_data).
With the JWT method selected, you’ll need to configure Tyk to handle the specific configuration of JSON Web Tokens that clients will be providing. All of the JWT specific configuration is performed within the authentication.jwt object in the Tyk Vendor Extension.
Locating the JWT in the Request
The OpenAPI Specification provides asecuritySchemes mechanism that lets you define where the JWT should be located, for example in the request header. However, in practice, different clients may supply the token in different locations, such as a query parameter.
While OAS does not support this natively, the Tyk Vendor Extension does this by allowing configuration of alternative locations in the JWT entry in server.authentication.securitySchemes. Building on the previous example, we can add optional query and cookie locations as follows:
Using Tyk Classic APIs
As noted in the Tyk Classic API documentation, you can select JSON Web Token authentication using theuse_jwt option. Tyk Classic APIs do not natively support multiple JWKS endpoints, though a custom authentication plugin could be used to implement this functionality.