Event categories
There are four different categories of events that can be fired by Tyk:API events
Tyk can generate (or fire) a variety of built-in API events due to activity triggered by an API request, such as exceeded rate limits, depleted quotas or attempts to access using expired keys. The full list of standard API events is available here.Token lifecycle events
Alongside the events that are fired in response to API requests, Tyk will also mark the creation, update or deletion of access tokens (keys) with dedicated events as indicated here.Advanced quota usage events
Tyk will generate standard quota events when a client quota has been consumed, but what if you want to have more granular notification of quota usage as your clients are approaching their quota limit? For this, Tyk provides advanced quota monitoring that can be configured to trigger a dedicated event handler when the API usage exceeds different thresholds approaching the quota limit.Custom events
The event subsystem has been designed to be easily extensible, so the community can define additional events within the Tyk codebase which can then be handled using the exsiting event handling system.Handling events with Tyk
Tyk has a simple event handling system where event handlers are assigned (or registered) to the different events that Tyk can generate. These handlers are assigned per-API so when an event is generated for an API and there is an event handler registered for that event, the handler will be triggered. Three different categories of event handler can be registered for each event:- a webhook that will call out to an external endpoint
- an event log that will write to the configured log output
-
your own custom event handler that will run in a JavaScript virtual machine on the Tyk server
Remember that quota usage monitoring has a dedicated mechanism for handling these special events.
Event Types
The built-in events that Tyk Gateway will generate are:Rate limit events
RatelimitExceeded: the rate limit has been exceeded for a specific keyOrgRateLimitExceeded: the rate limit has been exceeded for a specific organizationRateLimitSmoothingUp: the intermediate rate limit allowance has been increased for a specific keyRateLimitSmoothingDown: the intermediate rate limit allowance has been decreased for a specific key
Standard quota events
QuotaExceeded: the quota for a specific key has been exceededOrgQuotaExceeded: the quota for a specific organization has been exceeded
Authentication failure events
AuthFailure: a key has failed authentication or has attempted access and was deniedKeyExpired: an attempt has been made to access an API using an expired keyUpstreamOAuthError: an error occurred when trying to authenticate with an upstream using an OAuth provider
API version events
VersionFailure: a key has attempted access to a version of an API that it does not have permission to access
Circuit breaker events
BreakerTripped: a circuit breaker on a path has tripped and been taken offlineBreakerReset: a circuit breaker has reset and the path is available againBreakerTriggered: a circuit breaker has changed state, this is generated when either aBreakerTripped, or aBreakerResetevent occurs; a status code in the metadata passed to the webhook will indicate which of these events was triggered
Uptime events
HostDown: the uptime checker has found that a host is down/not availableHostUp: the uptime checker has found that a host is available again after being offline
Token lifecycle events
TokenCreated: a token has been createdTokenUpdated: a token has been changed/updatedTokenDeleted: a token has been deleted
Certificate expiry events
CertificateExpiringSoon: a certificate has been used within the expiry threshold and should be updatedCertificateExpired: an expired certificate has been used in a request
Event Metadata
When an event is fired, and an event handler is registered for that specific API and event combination, Tyk Gateway provides the handler with a rich set of metadata. The external system (webhook) or custom (JavaScript) code can then use this metadata to decide what action to take. Most events provide common metadata as follows:message(string): a human-readable message from Tyk Gateway that provides details about the eventpath(string): the path of the API endpoint request that led to the event being firedorigin(string): origin data for the source of the request (if this exists)key(string): the key that was used in the requestoriginating_request(string): a Base64-encoded raw inbound request
Specific Event Metadata
Some events provide alternative metadata specific to that event. The following sections detail the event-specific metadata provided for such events.Using the metadata
The metadata are exposed so that they can be used by the event handler (webhook or custom) using Go templating. For details of how each type of event handler can access these data, please see the appropriate section for webhook or custom event handlers.Raw Request Data
TheOriginatingRequest metadata is a Base64-encoded wire-protocol representation of the original request to the event handler. If you are running a service bus or queue that stores failed, throttled or other types of requests, you can decode this object and parse it in order to re-create the original intent of the request (e.g. for post-processing).
Logging API Events
Tyk’s built-in logging event handler is designed primarily for debugging purposes and will store details of an API event to the configured logger output. The Tyk platform can be configured to log at various verbosity levels (info, debug, warn, error) and can be integrated with third-party log aggregation tools like Sentry, Logstash, Graylog, and Syslog. For full details on configuring the Tyk logger, see this section.Logging event handlers are currently only supported by Tyk Classic APIs.
Configuring the event handler
Registering a logging event handler to your Tyk Classic API is the same as adding any other event handler, within theevent_handlers section of the API definition.
The handler_name for the logging event handler should be set to: eh_log_handler.
The handler_meta for the logging event handler contains a single field:
prefixis a label that will be prepended to each log entry
AuthFailure and KeyExpired events you might add the following to your API definition:
- the
AuthFailureevent will trigger the event handler to generate a log with the prefixAuthFailureEvent - the
KeyExpiredevent will trigger the event handler to generate a log with the prefixKeyExpiredEvent
Event handling with webhooks
Overview
A webhook is a mechanism for real-time, event-driven communication between different systems or applications over the internet. It is an HTTP callback, typically an HTTP POST request that occurs when something happens. Webhooks are real-time, automated and lightweight. Notifications are sent immediately when events occur without the need for the receiving service to poll. In the context of Tyk Gateway, webhooks are event handlers that can be registered against API Events. The webhook will be triggered when the corresponding event is fired and will send a customizable fixed payload to any open endpoint.When to use webhook event handlers
There are many occasions when you might use webhooks for event handling, here are just a few examples.Rate limit violations
When an API consumer exceeds their allocated rate limit, theRatelimitExceeded event will be fired. A webhook event handler can be employed to notify an upstream system to take actions such as updating a dashboard, notifying the account manager, or adjusting the client’s service tier.
API key lifecycle events
When an expired API key is used to access an API, the client will receive an error and theKeyExpired event will be fired. A webhook event handler can be employed to notify an upstream system to take actions such as renewing the key, logging the failure in a CRM or notifying the account manager to initiate customer communication.
Upstream service problems
When an API circuit breaker triggers due to an unresponsive upstream service, theBreakerTripped event will be fired. A webhook event handler can be employed to update monitoring dashboards or to trigger automated recovery scripts or processes.
How webhook event handlers work
With Tyk Gateway, the webhook event handler is a process that runs asynchronously in response to an API event being fired. It will issue an HTTP request to any open endpoint and is fully configurable within the API definition. The HTTP method, body, header values, and target URL can all be configured in the API definition. The request body is generated using a Tyk template file that has access to the event metadata. The webhook event handler runs in its own process and so does not block the operation of the Gateway.Webhook cooldown
It is very likely that anAuthFailure event will fire on the same endpoint more than once if the requesting client is automated. If this event triggered a webhook that caused an email to be sent, then if this event occurred 10 times a second, the email recipient would be flooded with emails. In an attempt to mitigate against events such as this, you can set a cooldown timer, in the webhook handler. This prevents the webhook from being triggered again if the event is fired again within the time period specified.
Webhook payload
When your webhook event handler is triggered, it will send an HTTP request to the configured target. For HTTP methods that support a request body, for examplePOST, the event handler will process a Go template to produce the payload.
If no template is provided in the webhook event handler configuration in the API definition, Tyk Gateway will look for the default file templates/default_webhook.json. Any text file accessible to the Gateway can be used to store the Go template to be used by the event handler when constructing the payload.
The event handler has access to the event metadata and this can be accessed by the template using the {{.Meta.XXX}} namespace.
The event type that triggered the event handler can be accessed as {{.Type}}.
For most event types, the default webhook template has this form:
Using webhooks with Tyk Dashboard
Webhook event handlers are configured within the API definition, which is used by Tyk Gateway to determine the appropriate action to be performed in response to a Gateway event. When using Tyk Dashboard, you are able to create global webhooks that can be re-used across multiple events and APIs, allowing you to modify the webhook configuration for a batch of APIs and/or events from one location.Local and global webhooks
Tyk Dashboard supports the declaration of webhooks globally and locally:- Global webhooks are declared outside the API definition and linked via a webhook id; changes to the global webhook definition will be reflected in all APIs that reference that webhook id
- Local webhooks are fully defined within the API definition; changes to the local webhook configuration will affect only the API within which it is defined
Creating a global webhook definition using Tyk Dashboard
To create a global webhook definition from the Dashboard UI you should follow these steps: Steps for Configuration-
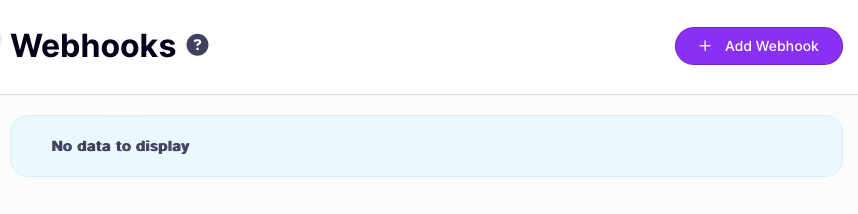
Create the webhook definition
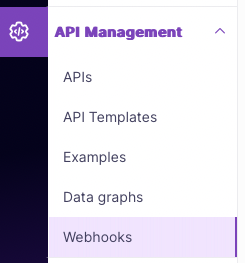
Select Webhooks from the API Management Menu:
-
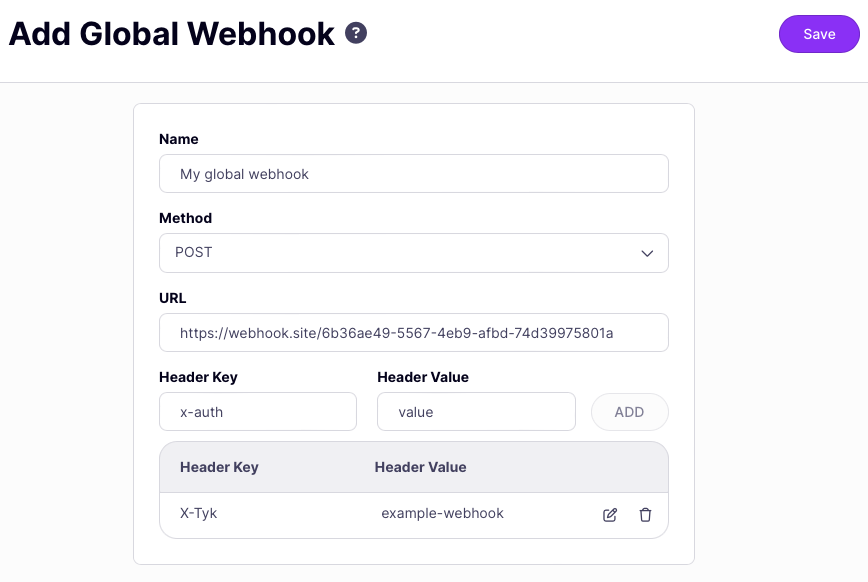
Configure the webhook
Now you need to tell Tyk how and where to send the request. You can include custom headers, for example to inform the target service that the request has come from Tyk - remember to click ADD to add the custom header to the configuration.
If you’re using Tyk OAS APIs, then you can find details and examples of how to configure webhook event handlers here. If you’re using Tyk Classic APIs, then you can find details and examples of how to configure webhook event handlers here.
Webhook event handlers with Tyk OAS APIs
Webhooks are event handlers that can be registered against API Events. The webhook will be triggered when the corresponding event is fired and will send a customizable fixed payload to any open endpoint. Webhooks are configured in the Tyk OAS API Definition. You can do this via the Tyk Dashboard API or in the API Designer. If you’re using the legacy Tyk Classic APIs, then check out the Tyk Classic page.Set up a webhook event handler in the Tyk OAS API Definition
Event handling is configured by adding theeventHandlers object to the server section of the Tyk OAS Extension (x-tyk-api-gateway) in your Tyk OAS API Definition.
The eventHandlers object is an array containing configurations for all event handlers registered with the API.
Local webhook configuration
When using a local webhook, the event handler element in theeventHandlers object has the following configuration which fully declares the webhook behaviour:
enabled: enable the event handlertrigger: the API event that will trigger the webhooktype: the type of event handler, in this case should be set towebhookcooldownPeriod: the webhook cooldown for duplicate events (in duration format, e.g. 10s, 1m30s); use this to prevent flooding of the target endpoint when multiple events are fired in quick successionname: a human readable name for the webhook, which will be displayed in Tyk Dashboardurl: this is an absolute URL to which the request will be sentmethod: this can be any ofGET,PUT,POST,PATCHorDELETEand will be the HTTP method used to send the request; methods that do not support an encoded request body will not have the event metadata provided with the request; we advise usingPOSTwhere possiblebodyTemplate: this is the path to the webhook template that will be used to construct the request bodyheaders: a map of custom headers to be provided with the request
RatelimitExceeded event is fired. The request rate limit has been set at 2 requests per 10 seconds, so simply make three requests in quick succession to trigger the webhook.
The configuration above is a complete and valid Tyk OAS API Definition that you can import into Tyk to try out the local webhook feature.
Note that to test this you will need to provide a valid target URL for your webhook to send the request; we’ve used http://webhook.site.
Global webhook configuration
When using a global webhook, the event handler element in theeventHandlers object has the following configuration, which references the externally declared webhook using its id:
enabled: enable the event handlertrigger: the API event that will trigger the webhooktype: the type of event handler, in this case should be set towebhookcooldownPeriod: the webhook cooldown for duplicate events (in duration format, e.g. 10s, 1m30s); use this to prevent flooding of the target endpoint when multiple events are fired in quick successionid: the webhook id assigned by Tyk to the global webhook when it was created (this can be determined using the list webhooks endpoint in the Tyk Dashboard API)
RatelimitExceeded event is fired. The request rate limit has been set at 2 requests per 10 seconds, so simply make three requests in quick succession to trigger the webhook.
The configuration above is a complete and valid Tyk OAS API Definition that you can import into Tyk to try out the global webhook feature.
Note, however, that to test this you will need to create a global webhook in your Tyk Dashboard and replace the value in id with the webhook id that Tyk Dashboard has allocated to your webhook. You can find this by querying the list webhooks endpoint in the Tyk Dashboard API.
When a global webhook is registered to a Tyk OAS API, Tyk will create a read-only copy of the webhook configuration (
If the global webhook is subsequently deleted from the Tyk Dashboard, the webhook will automatically be converted to a local webhook in any API definition that was using it.
url, method, bodyTemplate, headers) within the API definition. This is so that Tyk Gateway knows how to handle the event, as it does not have access to the store of global webhooks registered with Tyk Dashboard.If the global webhook is subsequently deleted from the Tyk Dashboard, the webhook will automatically be converted to a local webhook in any API definition that was using it.
Set up a webhook event handler in the Tyk Dashboard
It is very simple to register webhooks to be triggered in response to specific API events when using Tyk OAS APIs with the Tyk Dashboard. The API Designer in the Dashboard allows you to define local webhooks and to register global webhooks to handle events. If you want to use a global webhook then you’ll need to declare it first, following these instructions.-
Add event handler
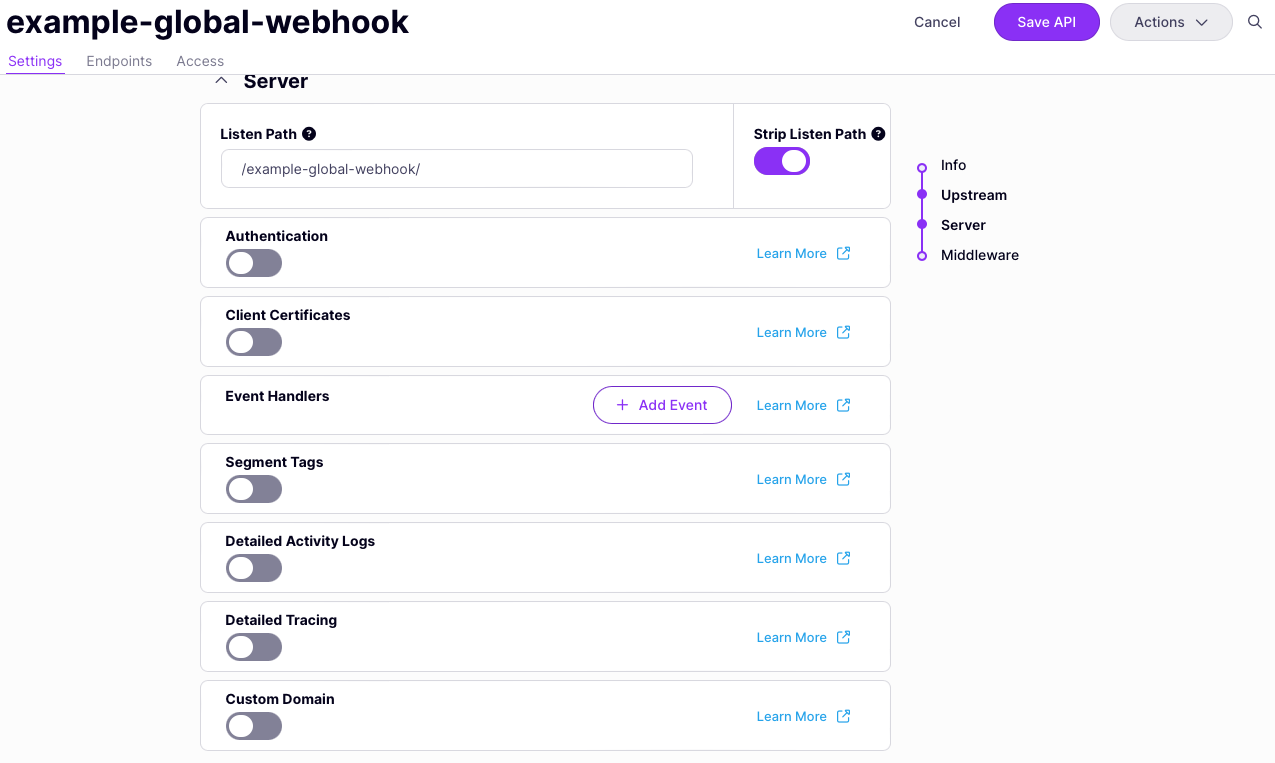
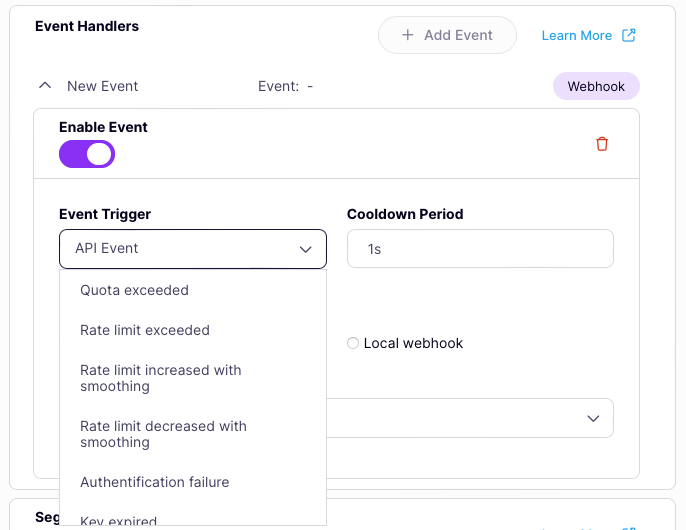
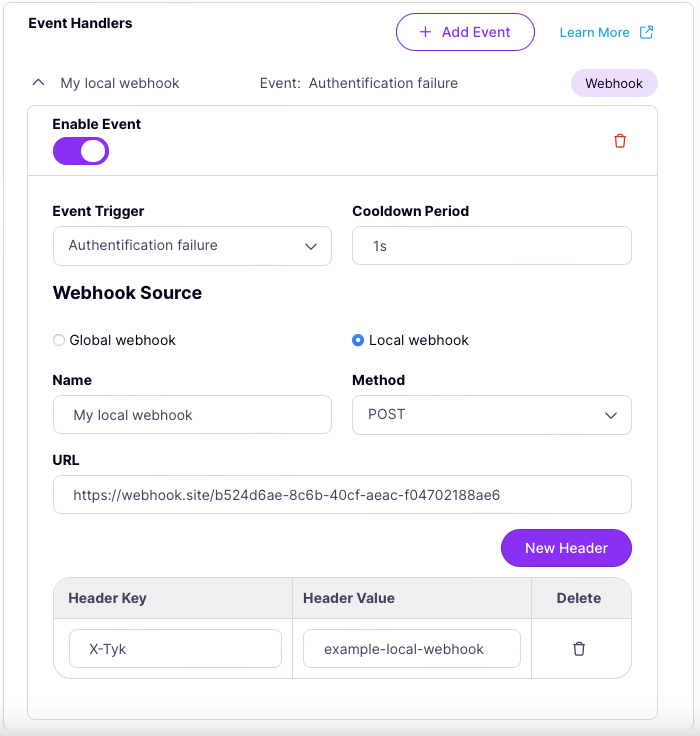
From the Settings tab in the API Designer, scroll down to the Server section to find the Event Handlers pane. Select Add Event.
-
Choose the event to be handled
This will add an event handler to the API. You’ll need to select which event you want to handle from the drop-down list. Note that currently Tyk OAS only supports webhook event handlers, so this will default to webhook type.
-
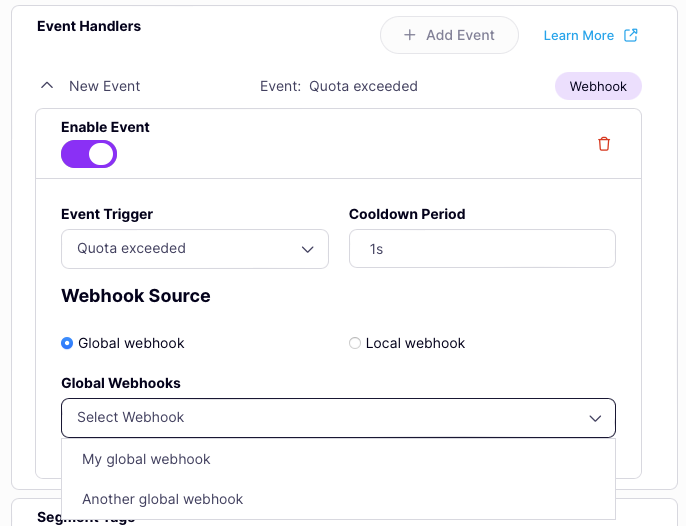
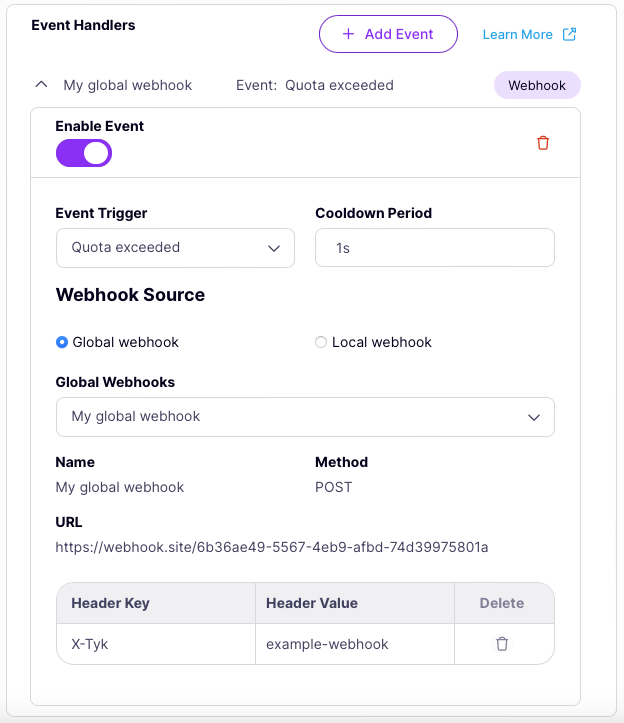
Choose and configure global webhook
If you want to use a webhook that you’ve already registered with Tyk Dashboard, ensure that the Webhook source is set to Global webhook then select from the drop-down list.
The only other thing you’ll need to configure is the cooldown period.
-
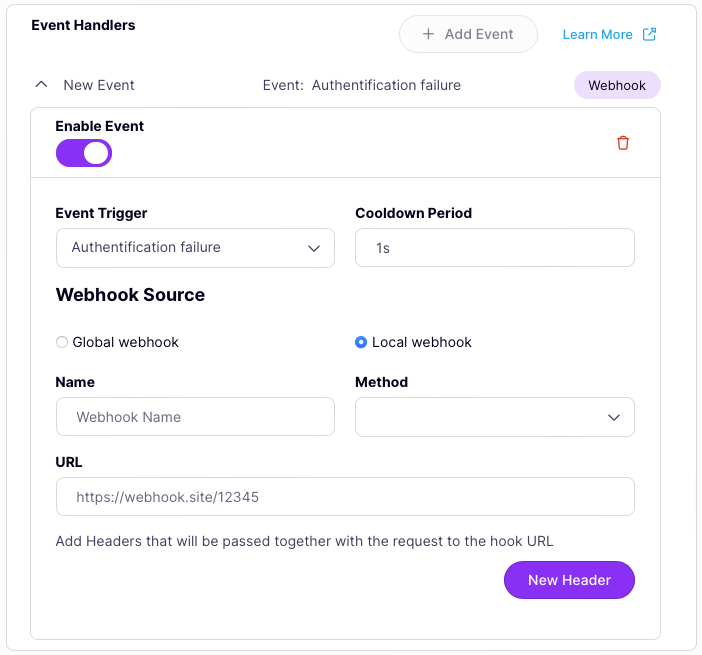
Configure local webhook
If you don’t want to use a shared global webhook but instead want to configure a local webhook only available to this API/event then you should ensure that the Webhook source is set to Local webhook.
Webhook event handlers with Tyk Classic APIs
Webhooks are event handlers that can be registered against API Events. The webhook will be triggered when the corresponding event is fired and will send a customisable fixed payload to any open endpoint. Webhooks are configured in the Tyk Classic API Definition. You can do this via the Tyk Dashboard API or in the API Designer. If you’re using the newer Tyk OAS APIs, then check out the Tyk OAS page.Set up a webhook event handler in the Tyk Classic API Definition
To add a webhook event handler you must add a new event handler object within theevent_handlers.events section of the
API definition for the appropriate API event.
The event handler object has the following configuration:
handler_name: this identifies the type of event handler and must be set toeh_web_hook_handlerhandler_meta: this structure configures the HTTP request that will be sent when the webhook is triggered
handler_meta object has the following configuration:
method: this can be any ofGET,PUT,POST,PATCHorDELETEand will be the HTTP method used to send the request; methods that do not support an encoded request body will not have the event metadata provided with the request; we advise usingPOSTwhere possibletarget_path: this is an absolute URL to which the request will be senttemplate_path: this is the path to the webhook template that will be used to construct the request bodyheader_map: a map of custom headers to be provided with the requestevent_timeout: the webhook cooldown for duplicate events (in seconds); use this to prevent flooding of the target endpoint when multiple events are fired in quick succession
AuthFailure event is fired, the webhook event handler will send a request to
POST http://posttestserver.com/post.php?dir=tyk-event-test and then start a 10 second cooldown before another webhook
request can be sent.
The request will have one custom header X-Tyk-Test-Header: Tyk v1.BANANA and the body will be constructed from the
webhook template located at templates/default_webhook.json.
This manually configured webhook event handler is private to the API within which it has been defined, it is not a
global
webhook.
Set up a webhook event handler in the Tyk Dashboard
It is very simple to register webhooks to be triggered in response to specific API events when using Tyk Classic APIs with the Tyk Dashboard. The API Designer in the Dashboard allows you to register global webhooks to handle events. Note that Tyk Gateway does not have access to the global webhook definitions registered with Tyk Dashboard and can only operate on the configuration within the API definition. Dashboard will manage the conversion of global webhooks to locally defined webhook handlers within the Tyk Classic API definition, automatically updating the configuration in each API definition when the APIs are reloaded to the Gateway.- Define the webhook Before you can configure a webhook event handler for your API, you must first create a global webhook from the Webhooks screen in the API Management menu, as described here.
-
Register the webhook with the event
From the API Designer select the Advanced Options tab and locate the Webhooks panel:
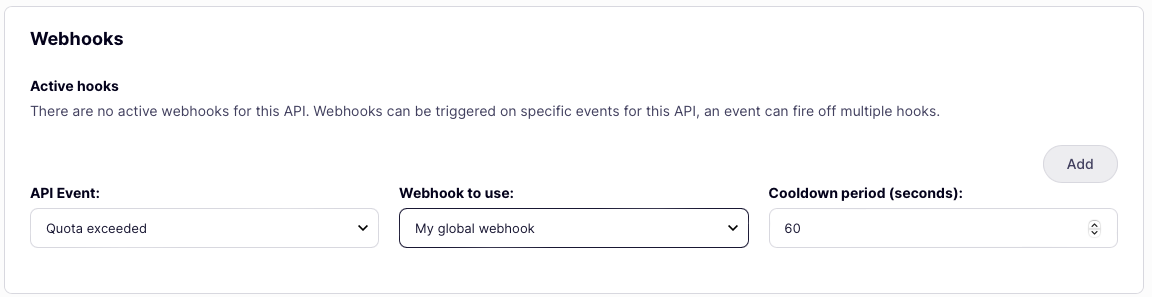
- select the API Event for which you want to trigger the webhook from the dropdown list
- select the Webhook to use when the event fires, again from the dropdown list
- finally, configure the required Cooldown period
- click Add
Set up a webhook event handler in Tyk Operator
Tyk Operator supports event handler integration for Tyk Classic API Definition. Configuring theevent_handlers field
in ApiDefinition Custom Resource Definition (CRD) enables webhooks to be triggered by specific
API events.
The process for configuring webhook event handlers using Tyk Operator is similar to that explained in
Set up a webhook event handler in the Tyk Classic API Definition.
The example API Definition below enables the event handler by setting spec.event_handlers.
Logging API events
Tyk’s built-in logging event handler is designed primarily for debugging purposes and will store details of an API event to the configured logger output. The Tyk platform can be configured to log at various verbosity levels (info, debug, warn, error) and can be integrated with third-party log aggregation tools like Sentry, Logstash, Graylog, and Syslog. For full details on configuring the Tyk logger, see this section.Logging event handlers are currently only supported by Tyk Classic APIs.
Configuring the event handler
Registering a logging event handler to your Tyk Classic API is the same as adding any other event handler, within theevent_handlers section of the API definition.
The handler_name for the logging event handler should be set to: eh_log_handler.
The handler_meta for the logging event handler contains a single field:
prefixis a label that will be prepended to each log entry
AuthFailure and KeyExpired events you might add the following to your API definition:
- the
AuthFailureevent will trigger the event handler to generate a log with the prefixAuthFailureEvent - the
KeyExpiredevent will trigger the event handler to generate a log with the prefixKeyExpiredEvent
Custom API event handlers
Tyk supports you to script your own custom code in JavaScript (JS) that will be invoked in response to API events. This is executed asynchronously so you don’t need to worry about it blocking the Gateway handling requests. Event handlers like this can be very powerful for automating session, user and API-level functions. It is important to note that unlike custom JavaScript plugins, custom event handlers execute in a global JavaScript environment. This means that you need to be careful when naming the event handlers: if you use the same event handler name for different event handling code across two APIs, only one of them will execute, as the other will be overridden when loaded. Custom event handlers have access to the JavaScript API which gives access to the session object and enables your code to make HTTP calls. This is particularly useful if you want to interface with another API with a complex request/response cycle.Custom event handlers are currently only supported by Tyk Classic APIs.
Creating a custom event handler
A custom event handler consists of a function that accepts two variables (event and context) and has no return value.
Creating an event handler is very similar to creating custom JS plugins, simply invoke the correct constructors with a closure in the TykJS namespace:
The event object
This contains the event metadata in the following structure:
The context Variable
Tyk injects a context object into your event handler giving access to more information about the request. This object has the following structure:
event metadata to interact with the Tyk REST API functions, for example:
Registering a custom event handler
Registering a custom event handler to your Tyk Classic API is the same as adding any other event handler, within theevent_handlers section of the API definition.
The handler_name for a custom event handler should be set to: eh_dynamic_handler.
The handler_meta for a custom event handler consists of two fields:
nameis the unique name of your middleware objectpathis the relative path to the file (it can be absolute)
sessionHandler to be invoked in response to the KeyExpired event you would add the following to your API definition:
Loading custom event handlers
The JavaScript files are loaded on API reload into the global JSVM. If a hot-reload event occurs, the global JSVM is re-set and files are re-loaded. This could cause event handlers that are currently executing to get abandoned. This is a measured risk and should not cause instability, however it should be noted that because of this, in an environment where reloads occur frequently, there is risk that event handler may not fire correctly.Monitoring quota consumption
Tyk provides the ability to actively monitor both user and organization quotas, using a dedicated webhook to notify your stakeholders, your system stack or the requesting API client when certain thresholds have been reached for a token. Unlike API event webhooks the quota monitor is configured at the Gateway level.Advanced quota threshold monitoring is currently only supported by Tyk Classic APIs.
Configuring the quota consumption monitor
To enable advanced quota monitoring you will need to add a newmonitor section to your Tyk Gateway configuration file (tyk.conf).
This has the following fields:
enable_trigger_monitors: set totrueto have the monitors start to measure quota thresholdsconfiguration: a webhook configuration objectglobal_trigger_limit: this is a percentage of the quota that the key must consume for the webhook to be firedmonitor_user_keys: set totrueto monitor individual tokens (this may result in a large number of triggers as it scales with the number of user tokens that are issued)monitor_org_keys: set totrueto monitor organization quotas
POST http://posttestserver.com/post.php?dir=tyk-monitor-drop when 80% of the API-level quota has been consumed. This request will have the x-tyk-monitor-secret header (set to a value of 12345) and will provide the content of the template file found at templates/monitor_template.json in the request body. A minimum of 10 seconds will elapse between successive monitor webhooks being fired.
If you are using our Classic Developer Portal, developers registered in the portal will also receive emails about quota threshold limits being reached.
Setting advanced thresholds
The default quota consumption monitor will be triggered at the same level of quota usage for all users. Sometimes you might want to have a more granular approach with different triggering thresholds per user or organization. Sometimes you might want to fire the event at multiple thresholds, for example when the user hits 50%, 75% and 90% of their allowed quota. You can set user specific trigger levels for a user by additionally adding amonitor section to the Key’s Session. This has one field, which is an array of trigger_limits (thresholds) that must be in descending order and represent the percentage of the quota that must be reached in order for the trigger to be fired, for example:
monitor section to the organization session object.
Webhook payload
When the quota consumption monitor is fired, the webhook request that is issued will have the following payload:trigger_limitwill indicate which threshold has been reached (as defined in the session object’smonitorsection).orgwill contain the OrgID for the user or organization that triggered the eventkeywill contain the raw API key used in the request only if the event was triggered by a user quota
key will be blank.