Documentation Index
Fetch the complete documentation index at: https://tyk.io/docs/llms.txt
Use this file to discover all available pages before exploring further.
Overview
Tyk’s Multi Data Center Bridge (MDCB) is a separately licensed extension to the Tyk control plane that performs management and synchronization of logically or geographically distributed clusters of Tyk API Gateways. We use it ourselves to support our Tyk Cloud offering.Challenges in Distributed Environment
When your users are spread geographically and want to access your APIs from different parts of the world you can optimize the performance, value and utility of your APIs by deploying API Gateways in data centers local to them.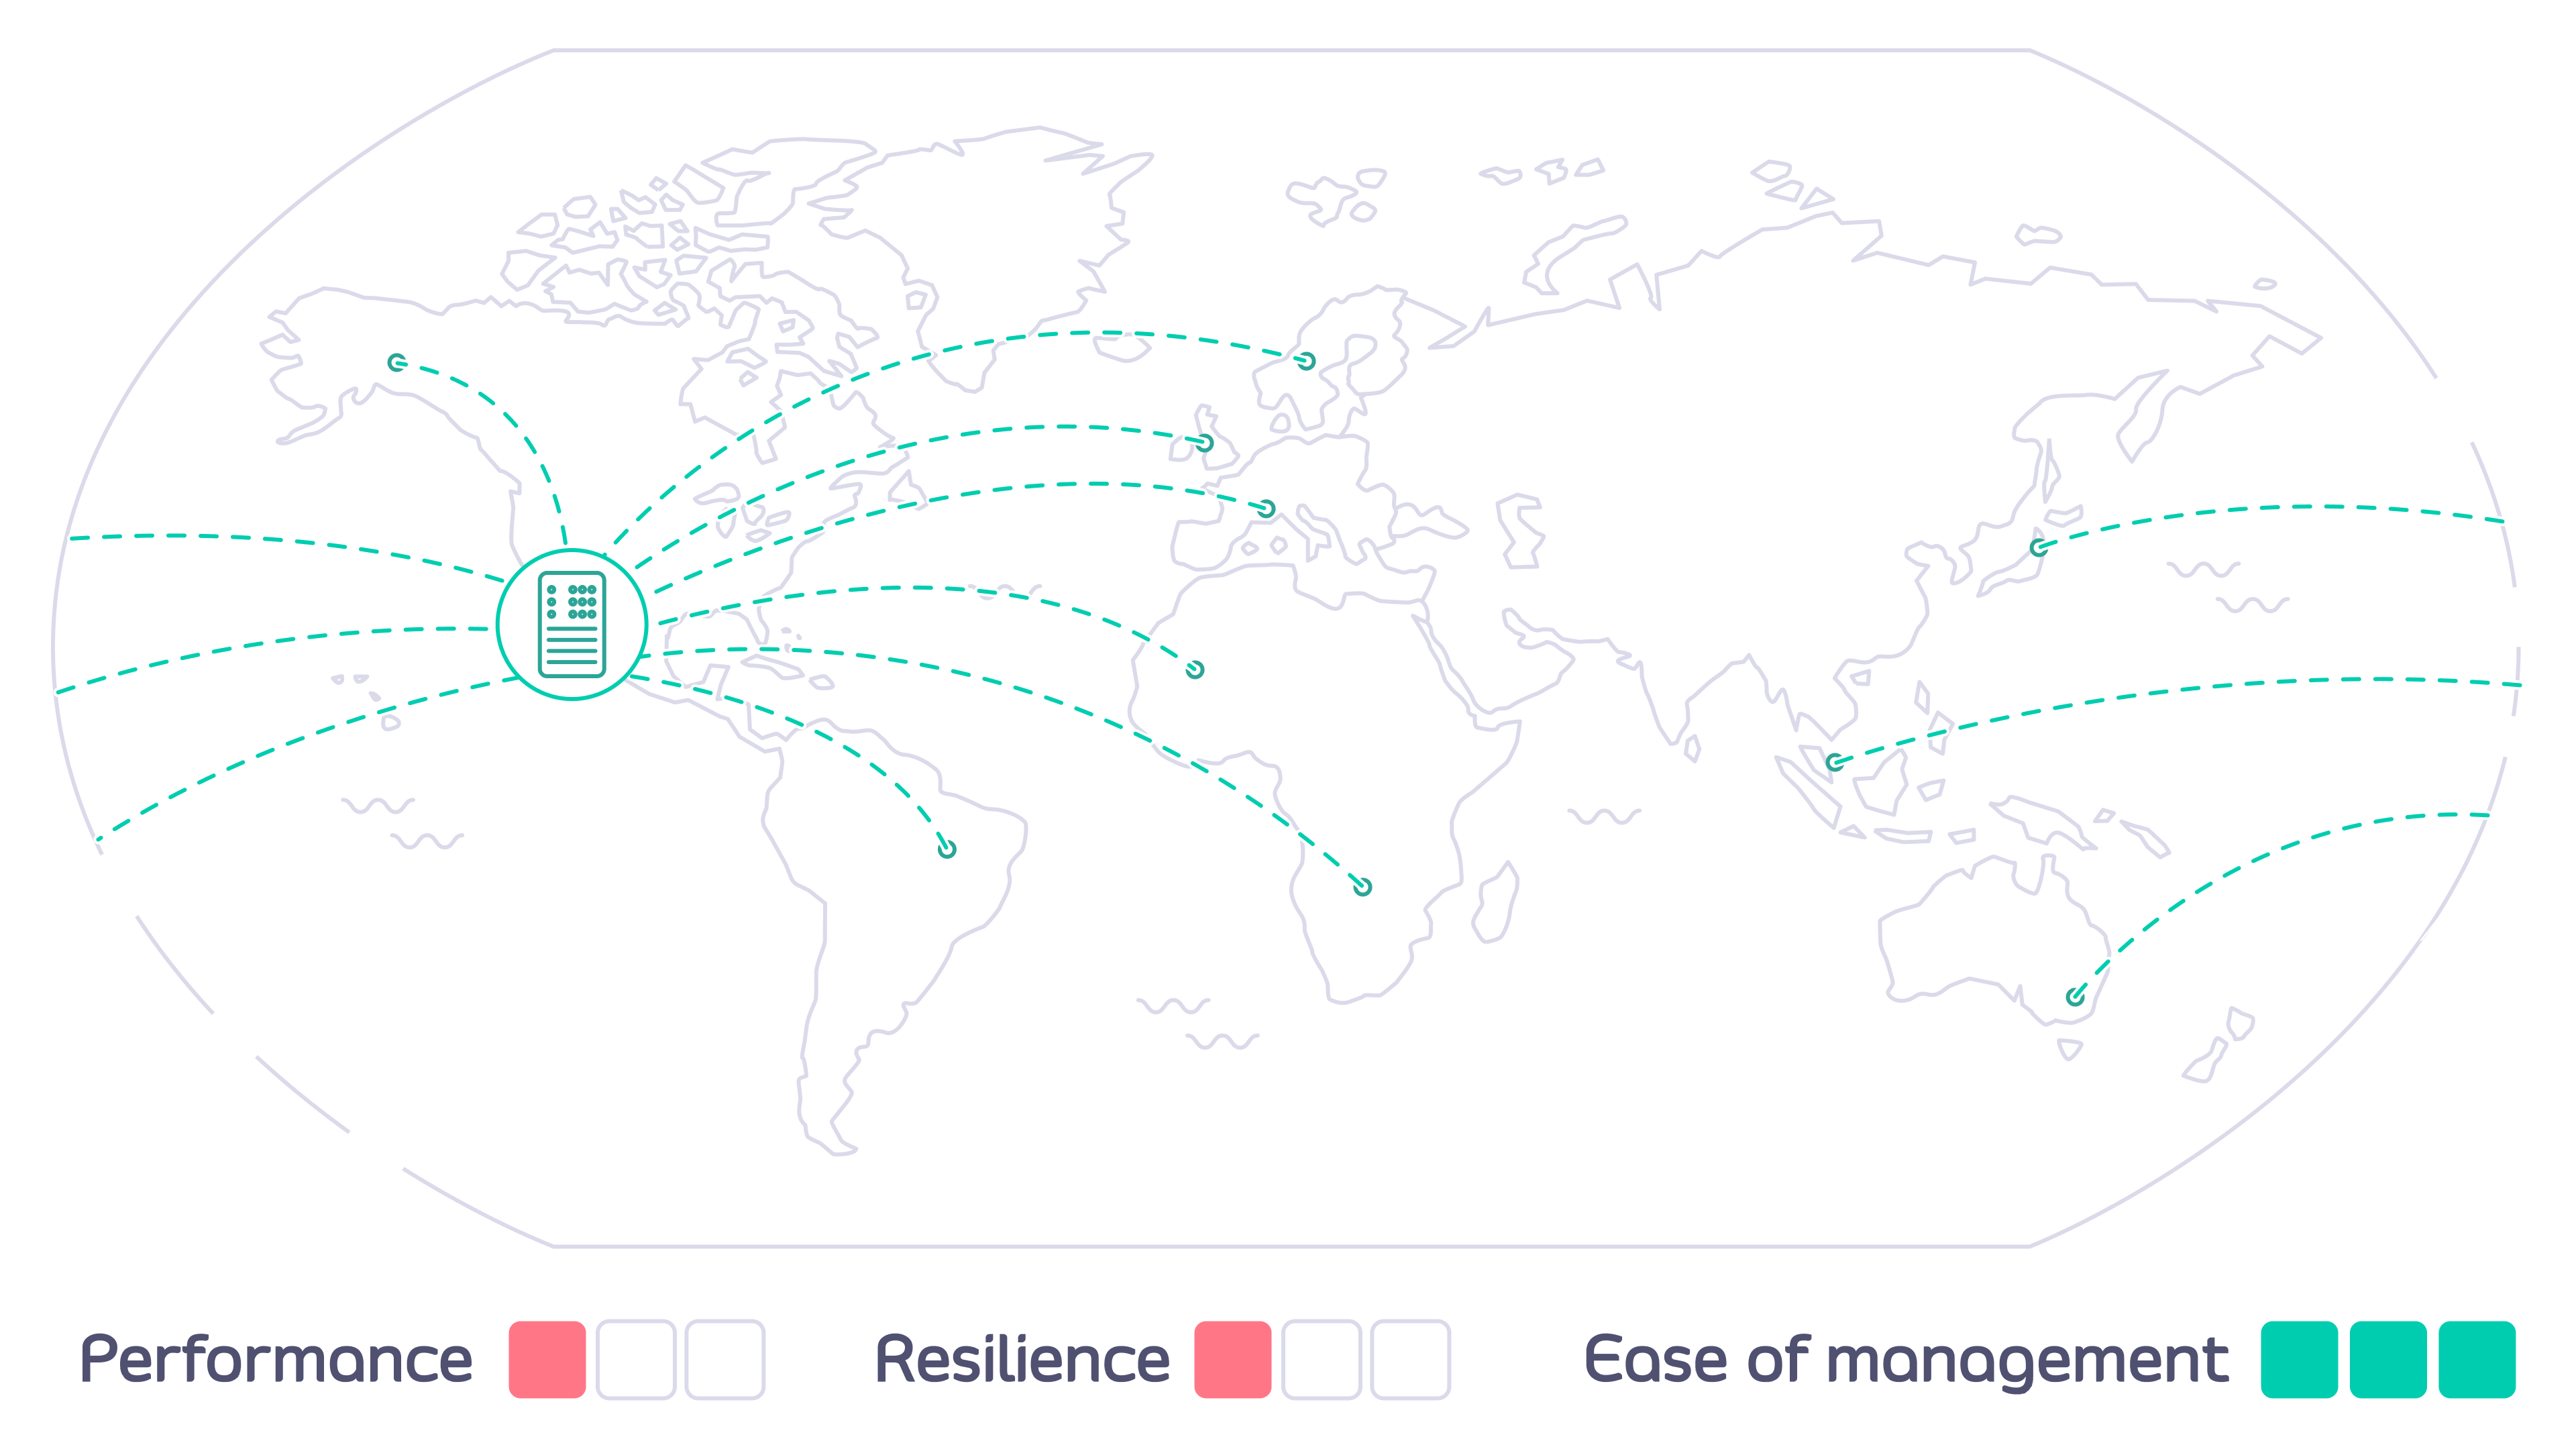
- Reduced latency (roundtrip time) for users by accessing a local data center
- Deployment close to backend services, reducing interconnect costs and latencies
- Increased availability across your estate - if one region goes offline the rest will continue to serve users
- Compliance with data residency and sovereignty regulations
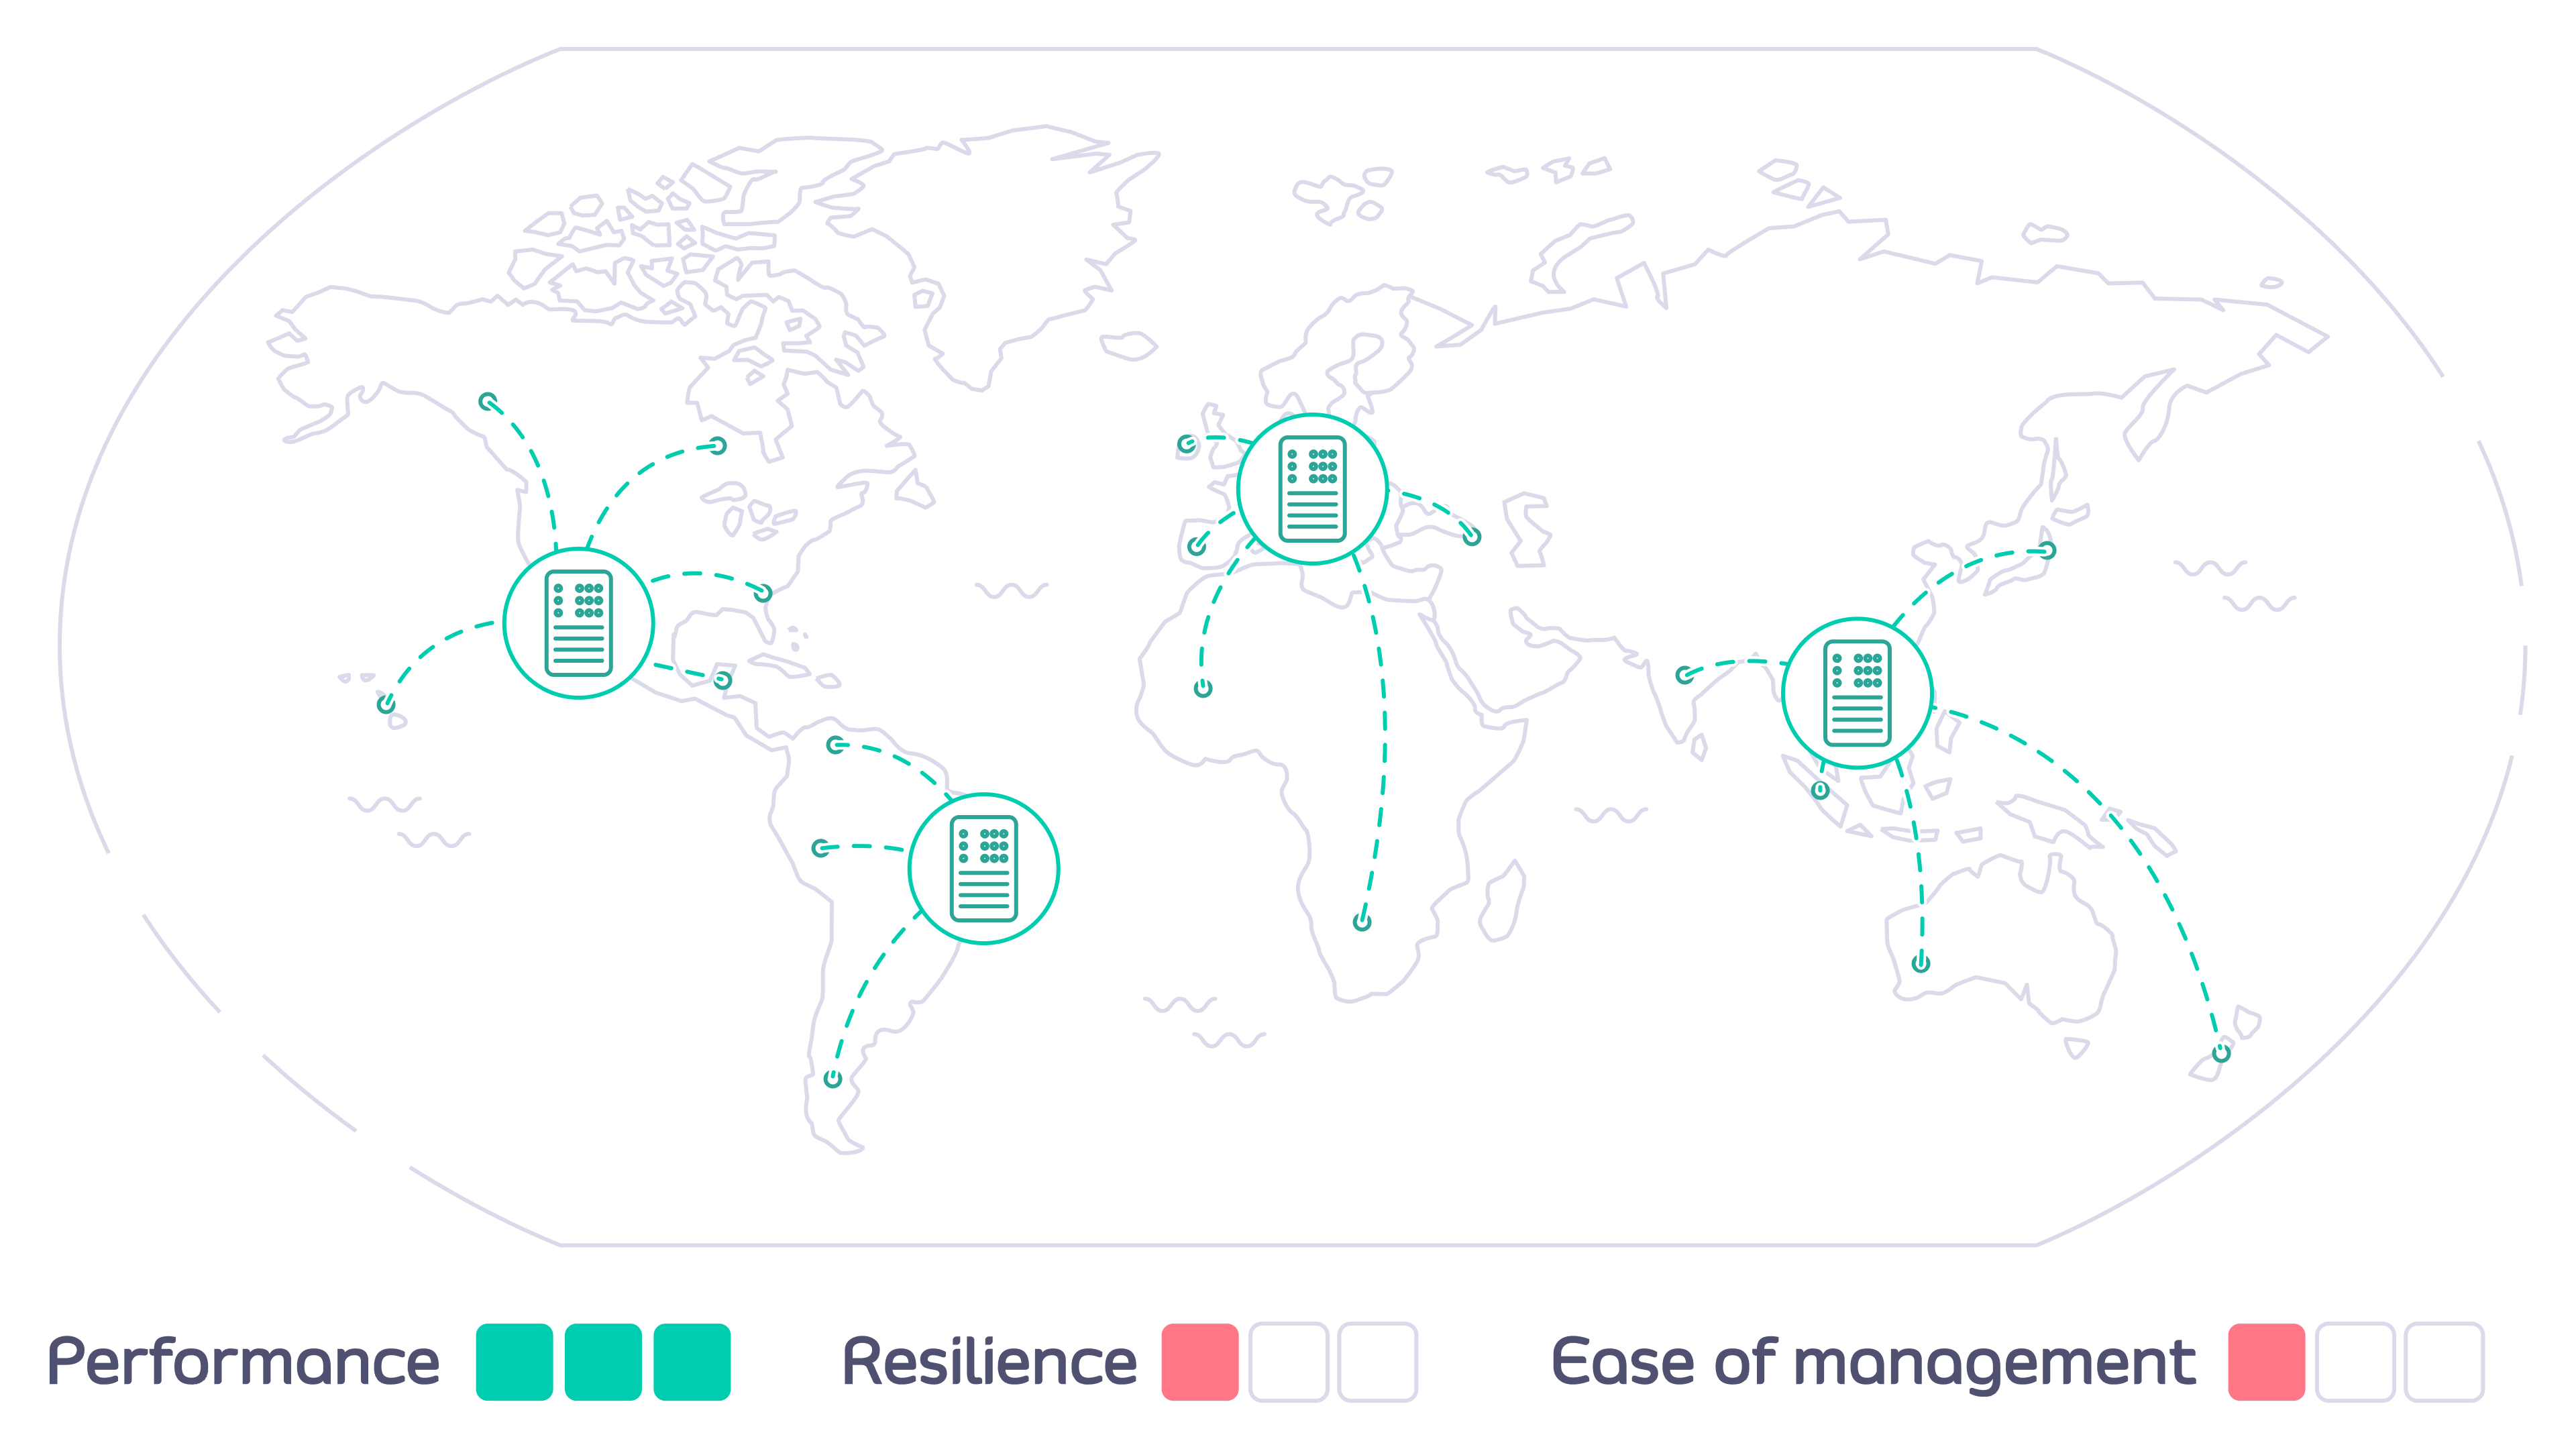
- How do you configure each of the Tyk API Gateways to ensure that a user can access only their authorized APIs, but from any location?
- How can you ensure that the correct APIs are deployed to the right Gateways - and kept current as they are updated?
How does Tyk Multi Data Center Bridge help?
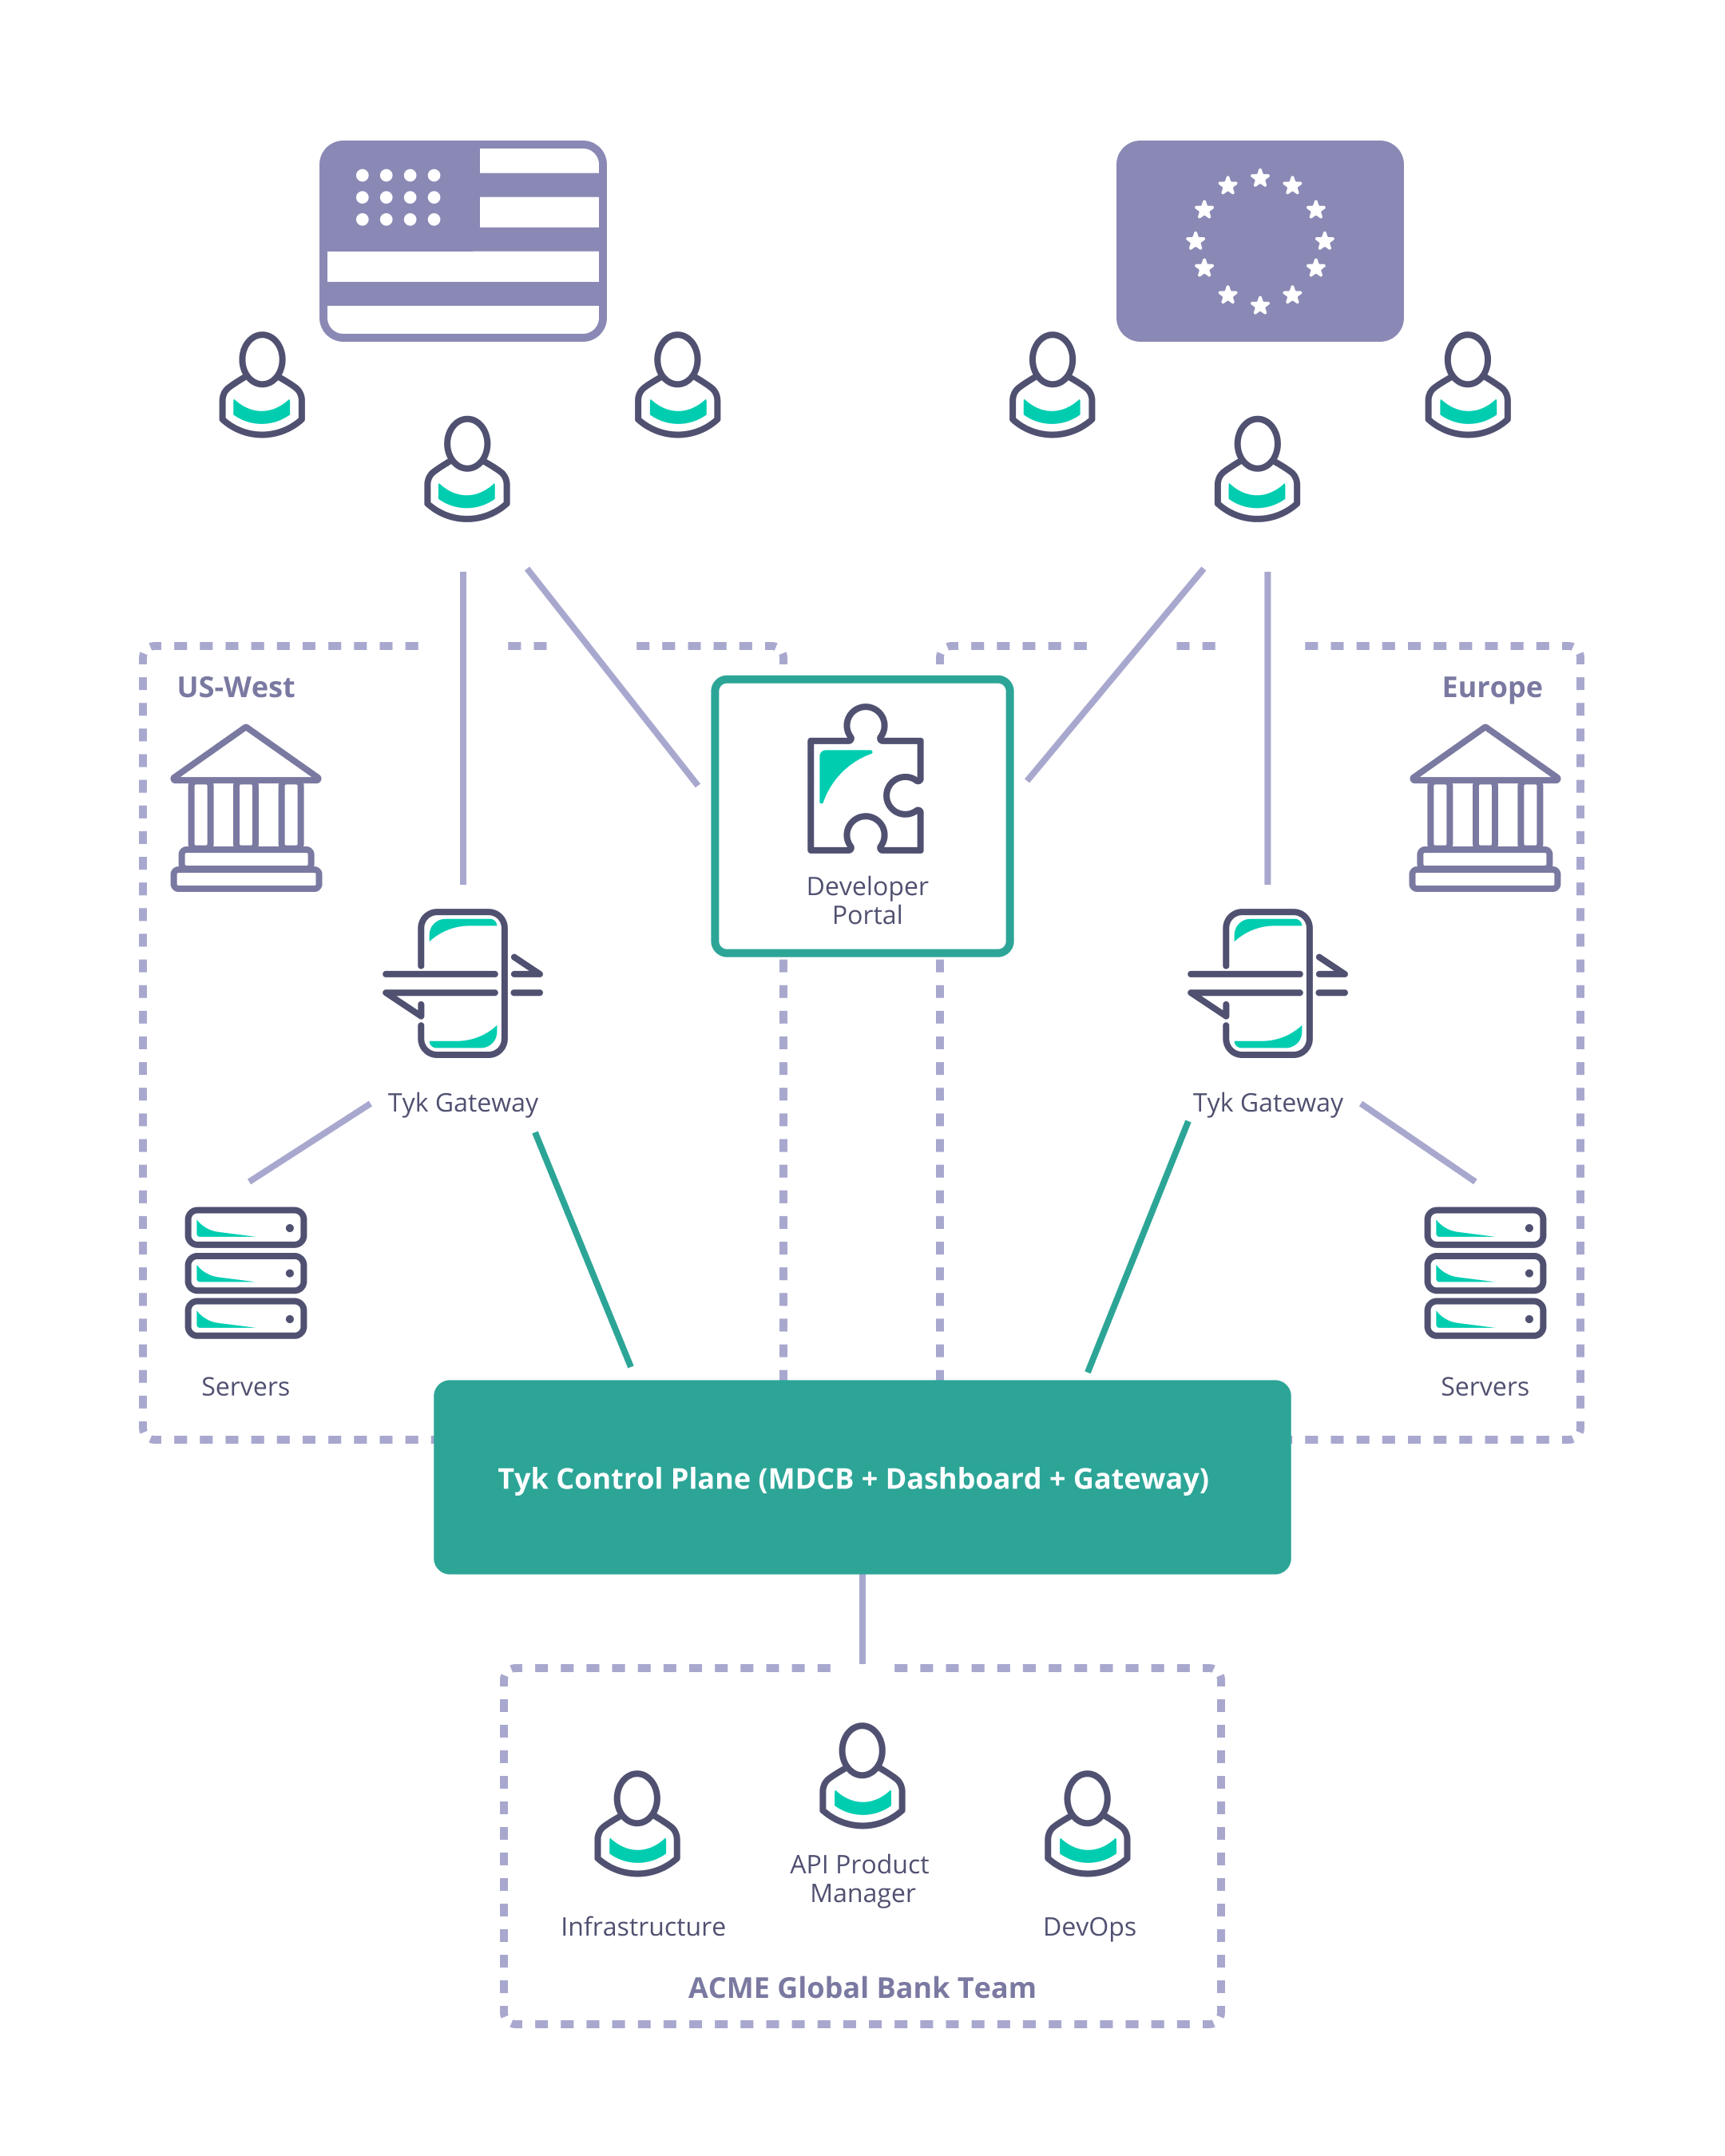
The Tyk MDCB makes it possible to manage federated global deployments easily, from a central Dashboard: you can confidently deploy a multi-data center, geographically isolated set of Tyk Gateway clusters for maximum redundancy, failover, latency optimization, and uptime. Combining Tyk Dashboard with MDCB, you are provided with a “single pane of glass” or control plane that allows you to centrally manage multiple Tyk Gateway clusters. This has many advantages over having separate gateways and corresponding dashboard/portals, which would require manual synchronization to roll out any changes (e.g. new APIs) across all the individual gateways. By deploying MDCB, API Management with Tyk becomes a service that can be easily offered to multiple teams from a centralised location.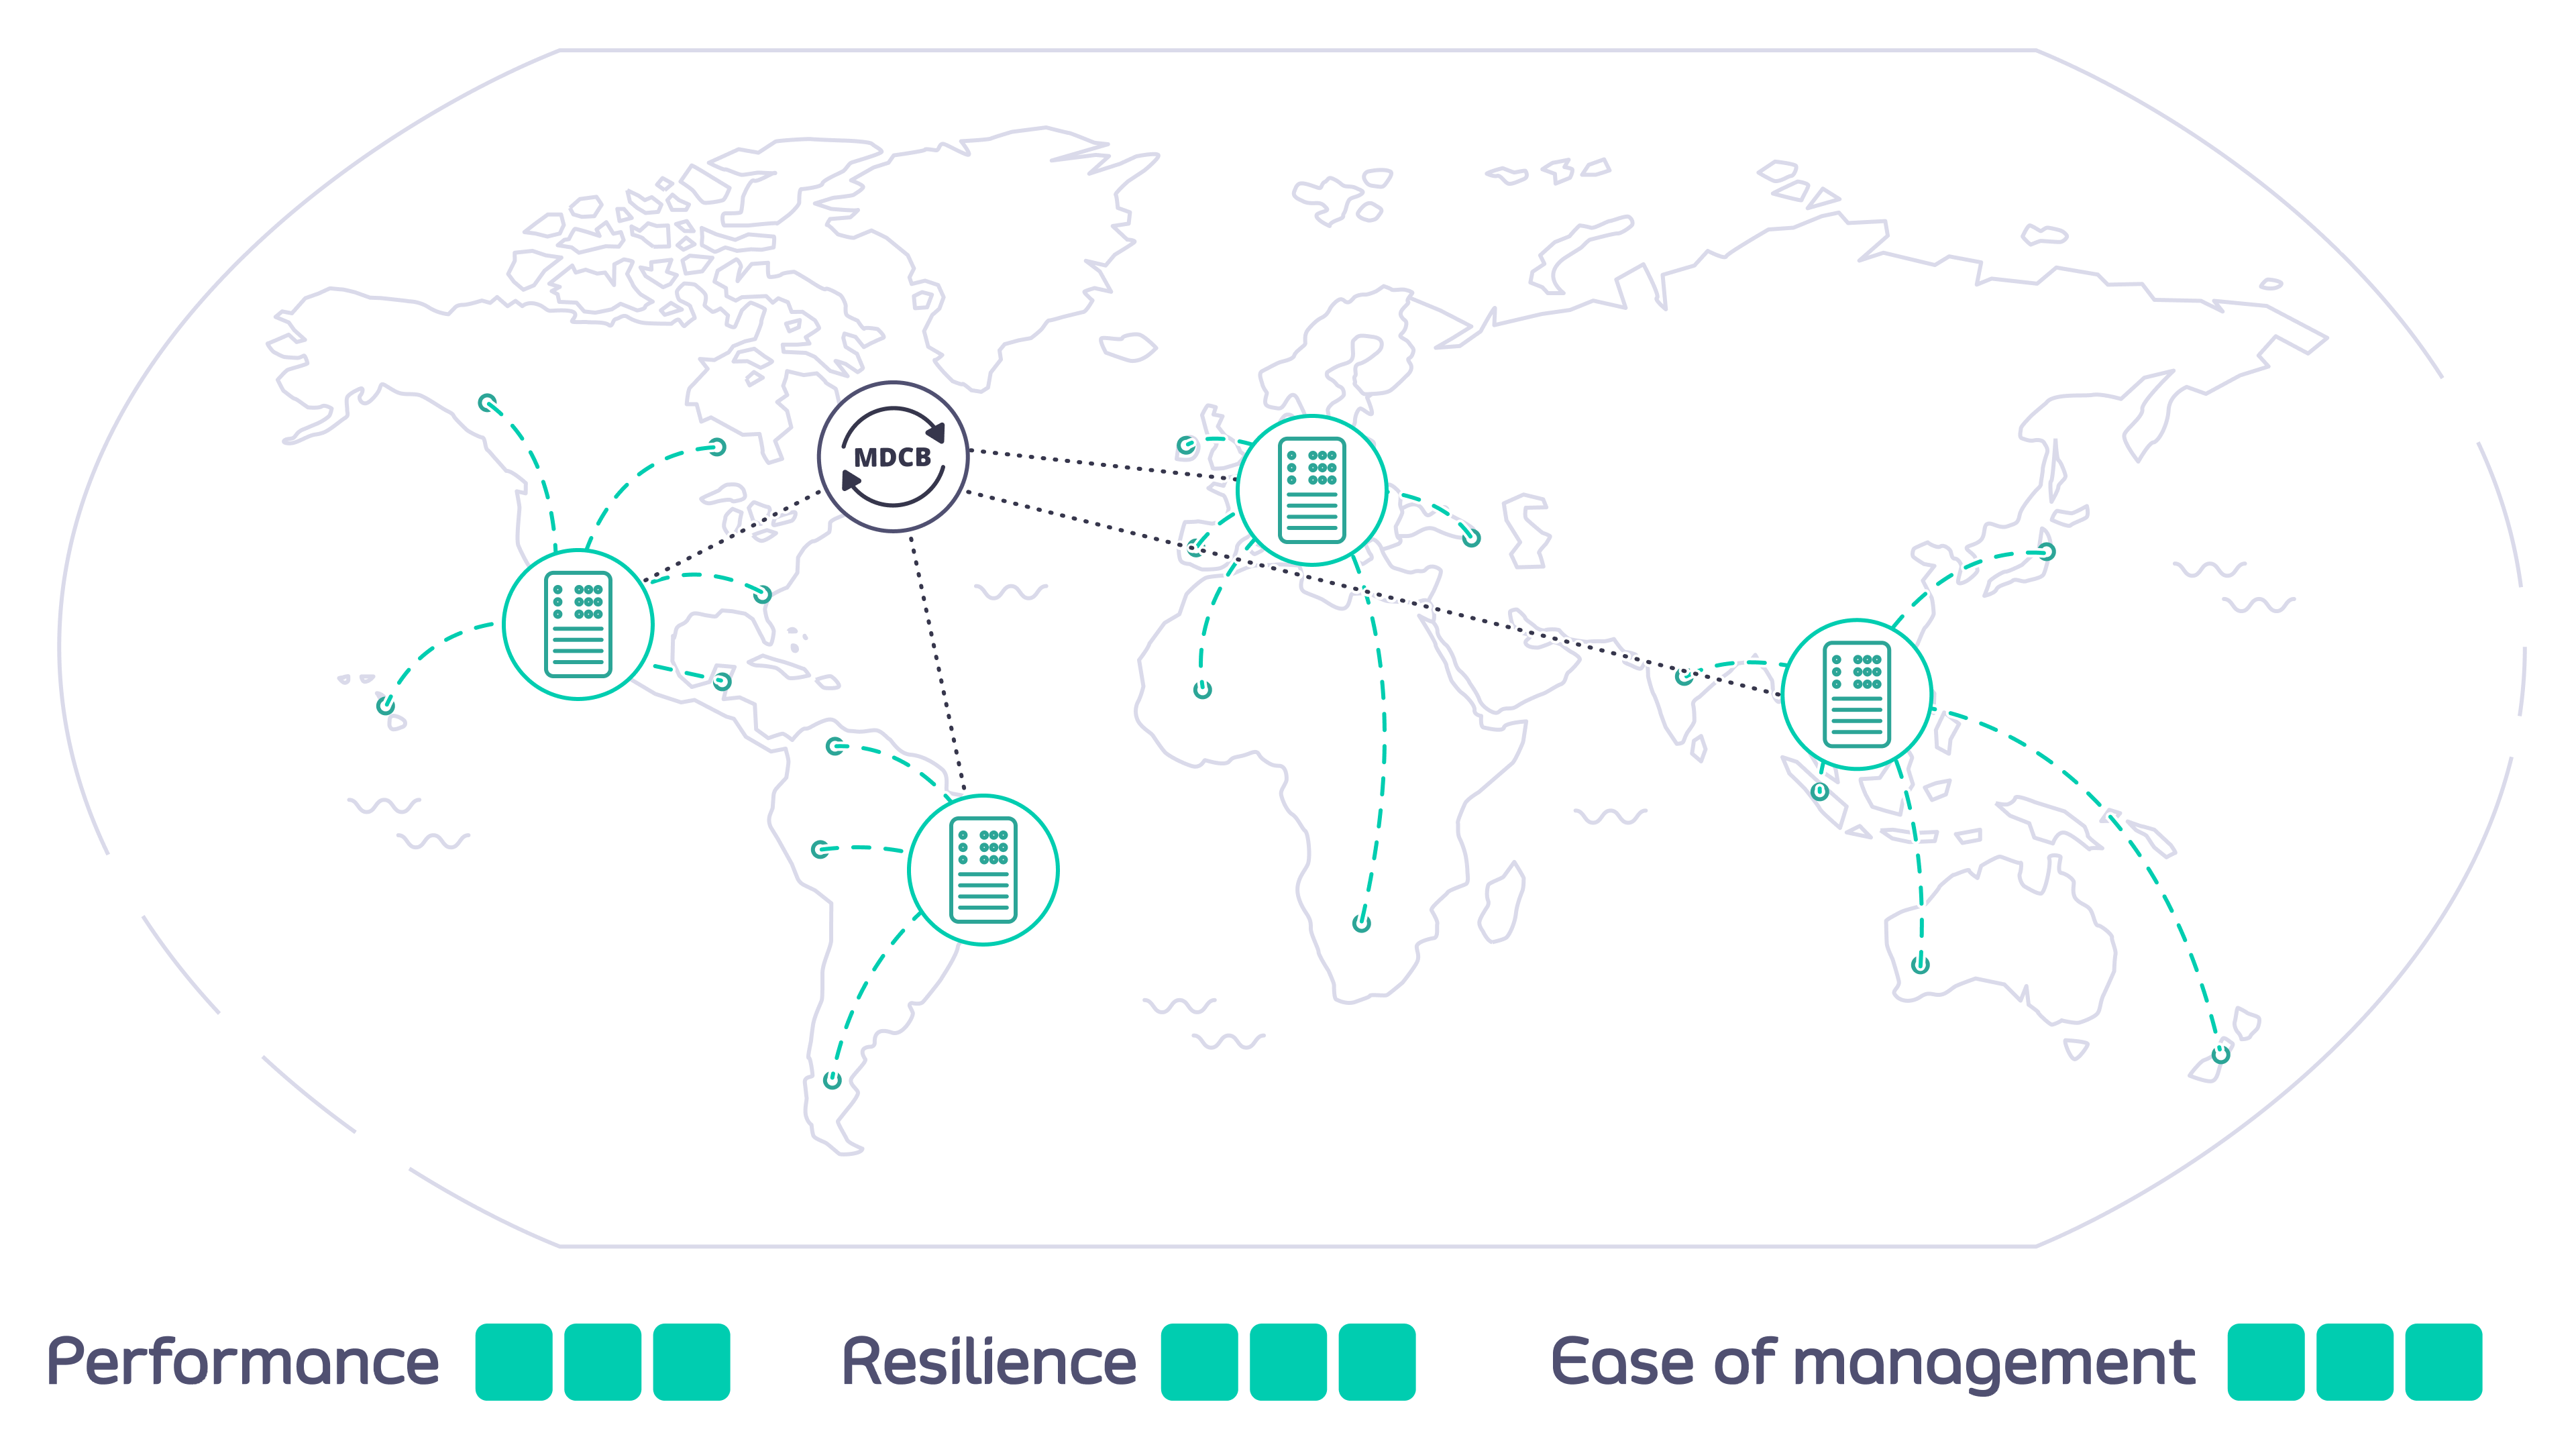
How does MDCB work?
MDCB acts as a broker between the Tyk Gateway instances that you deploy in data centers around the world. A single Control Plane (Management) Gateway is used as reference: you configure APIs, keys and quotas in one central location; MDCB looks after the propagation of these to the Data Plane Gateways, ensuring the synchronization of changes. MDCB is extremely flexible, supporting clusters of Tyk Gateways within or across data centers - so for example two clusters within the same data center could run different configurations of APIs, users etc. MDCB keeps your Tyk API Gateways highly available because all the Data Plane Gateways, where your users access your APIs, can be configured and run independently. If the MDCB link back to the Management Gateway goes down, the Data Plane Gateways will continue to service API requests; when the link is back up, MDCB will automatically refresh the Data Planes with any changes they missed.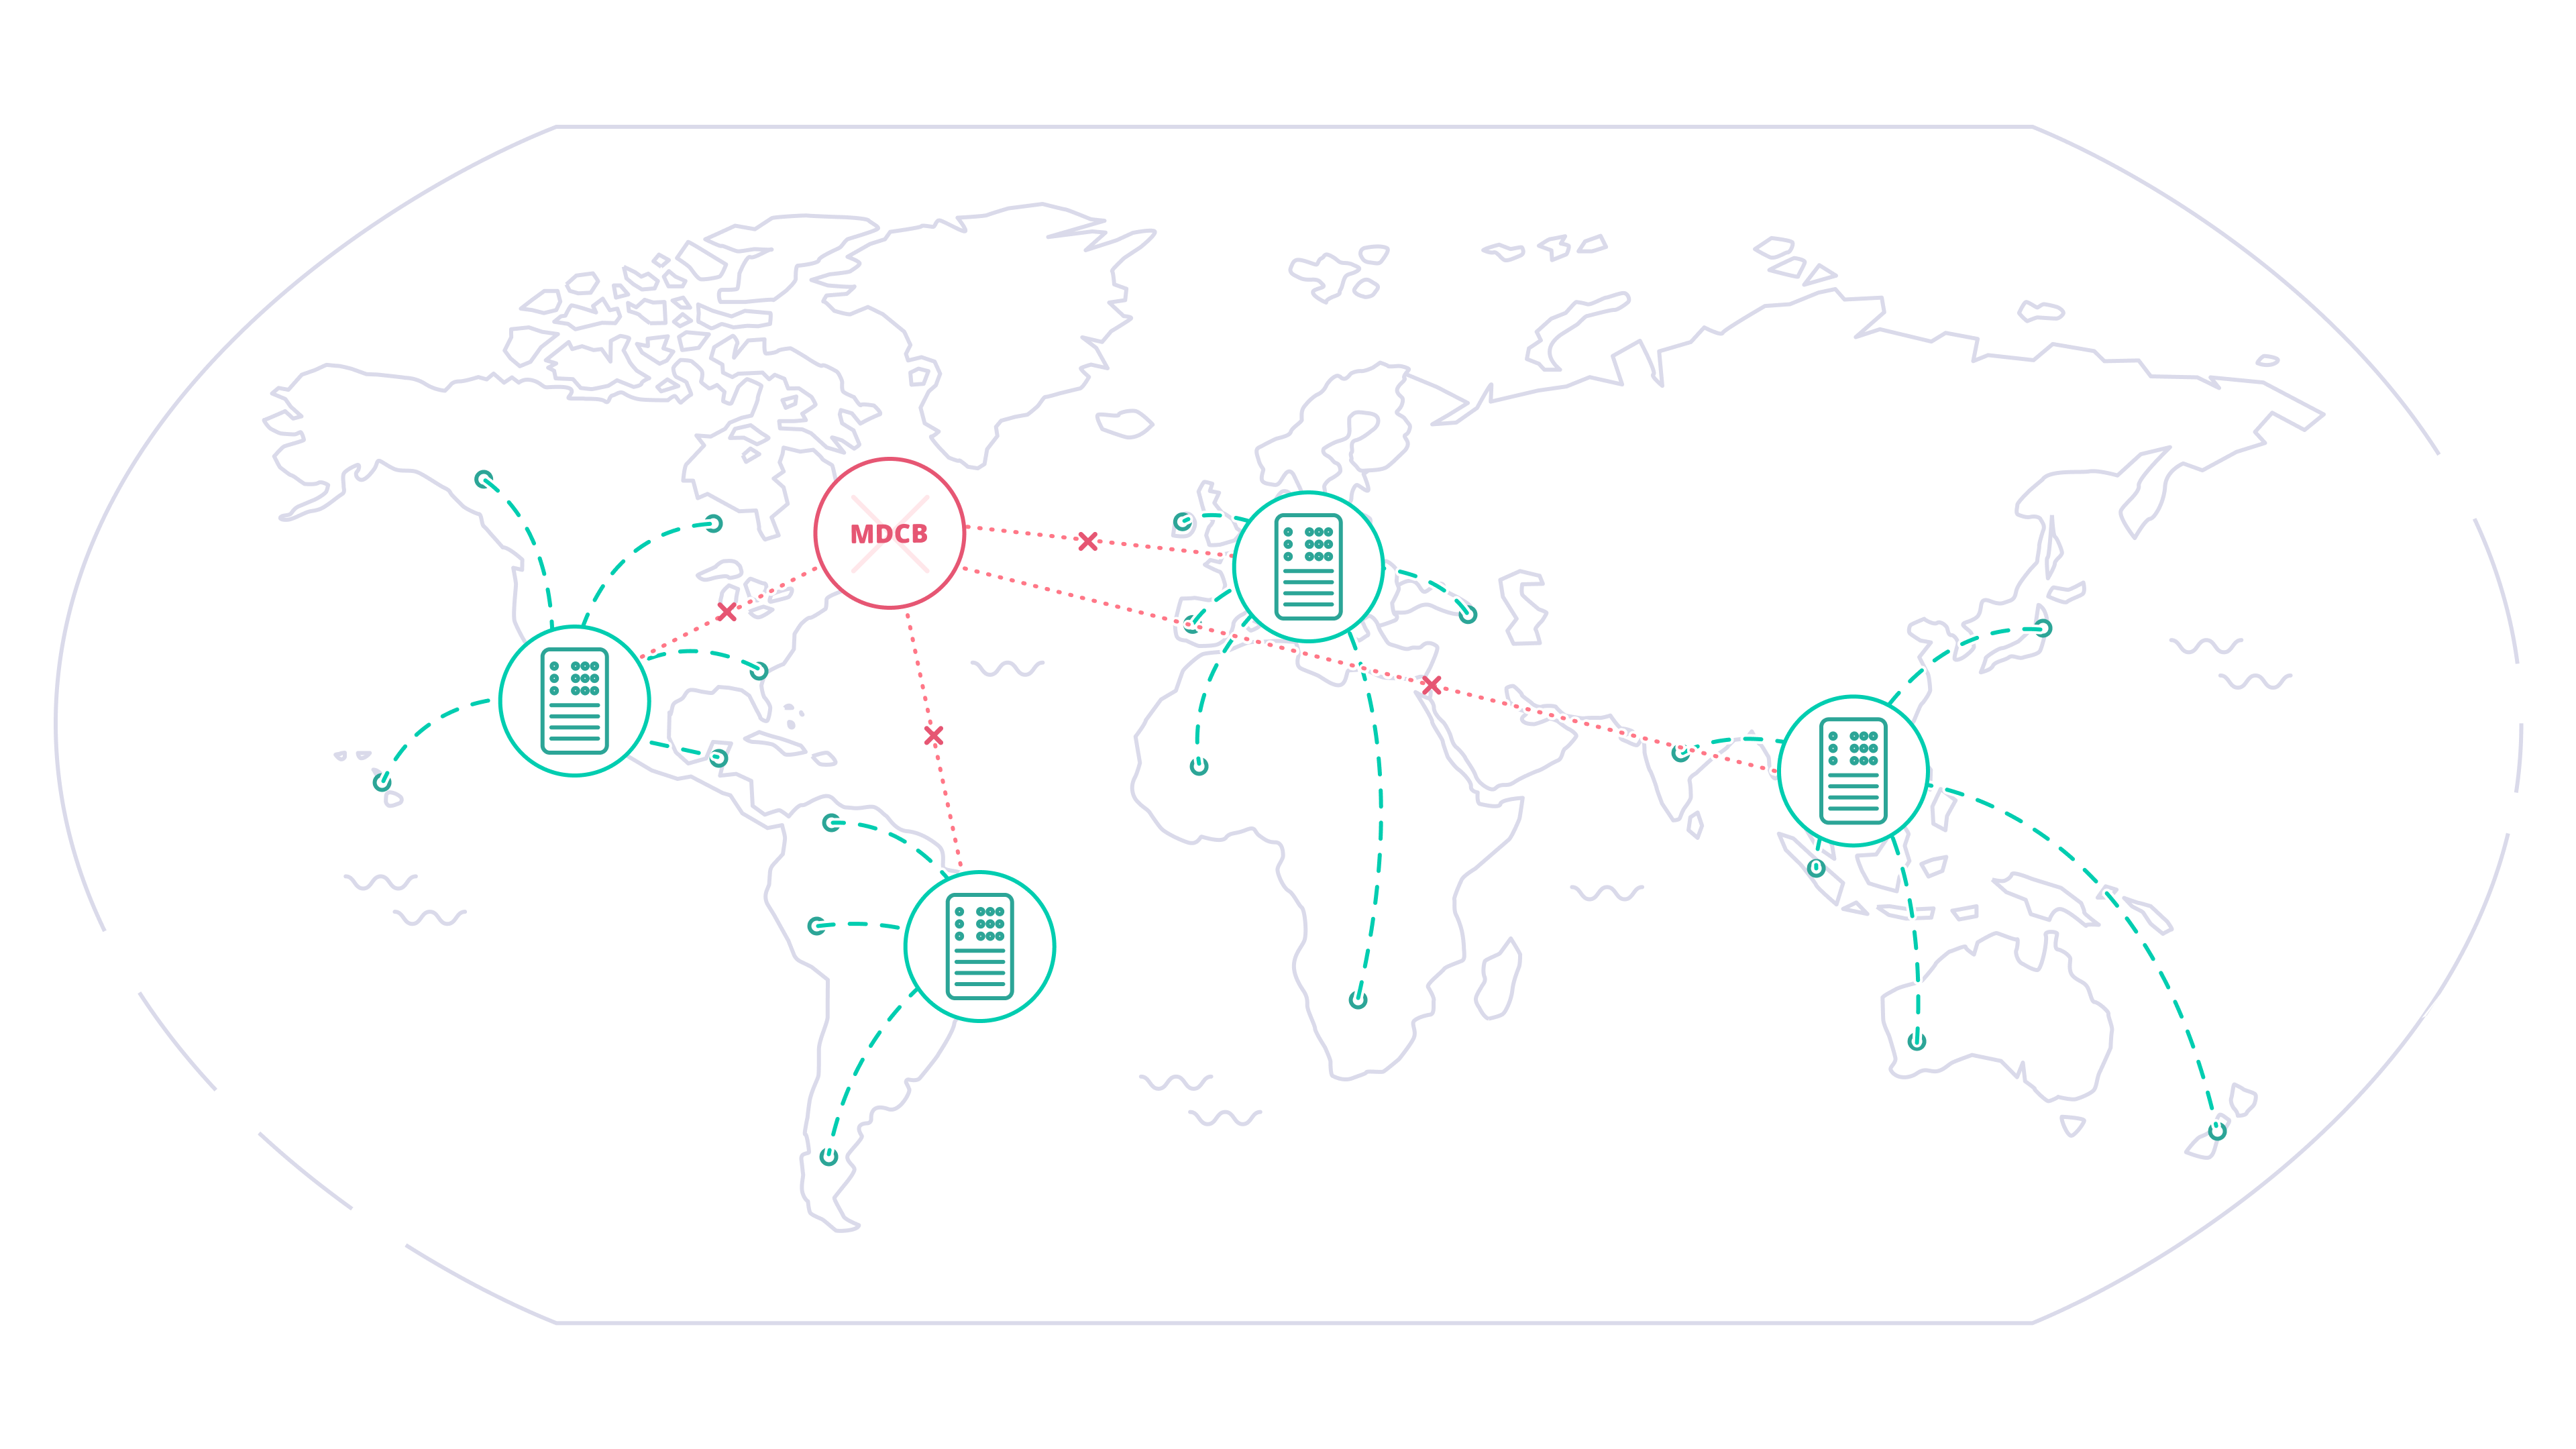
When might you deploy MDCB?
Managing geographically distributed gateways to minimize latency and protect data sovereignty
Consider Acme Global Bank: they have customers in the USA and the EU. Due to compliance, security and performance requirements they need to deploy their Tyk API Gateways locally in each of those regions. They need to manage the deployment and synchronization of APIs and associated resources (e.g. keys, policies and certificates) between the data centers to ensure global service for their customers.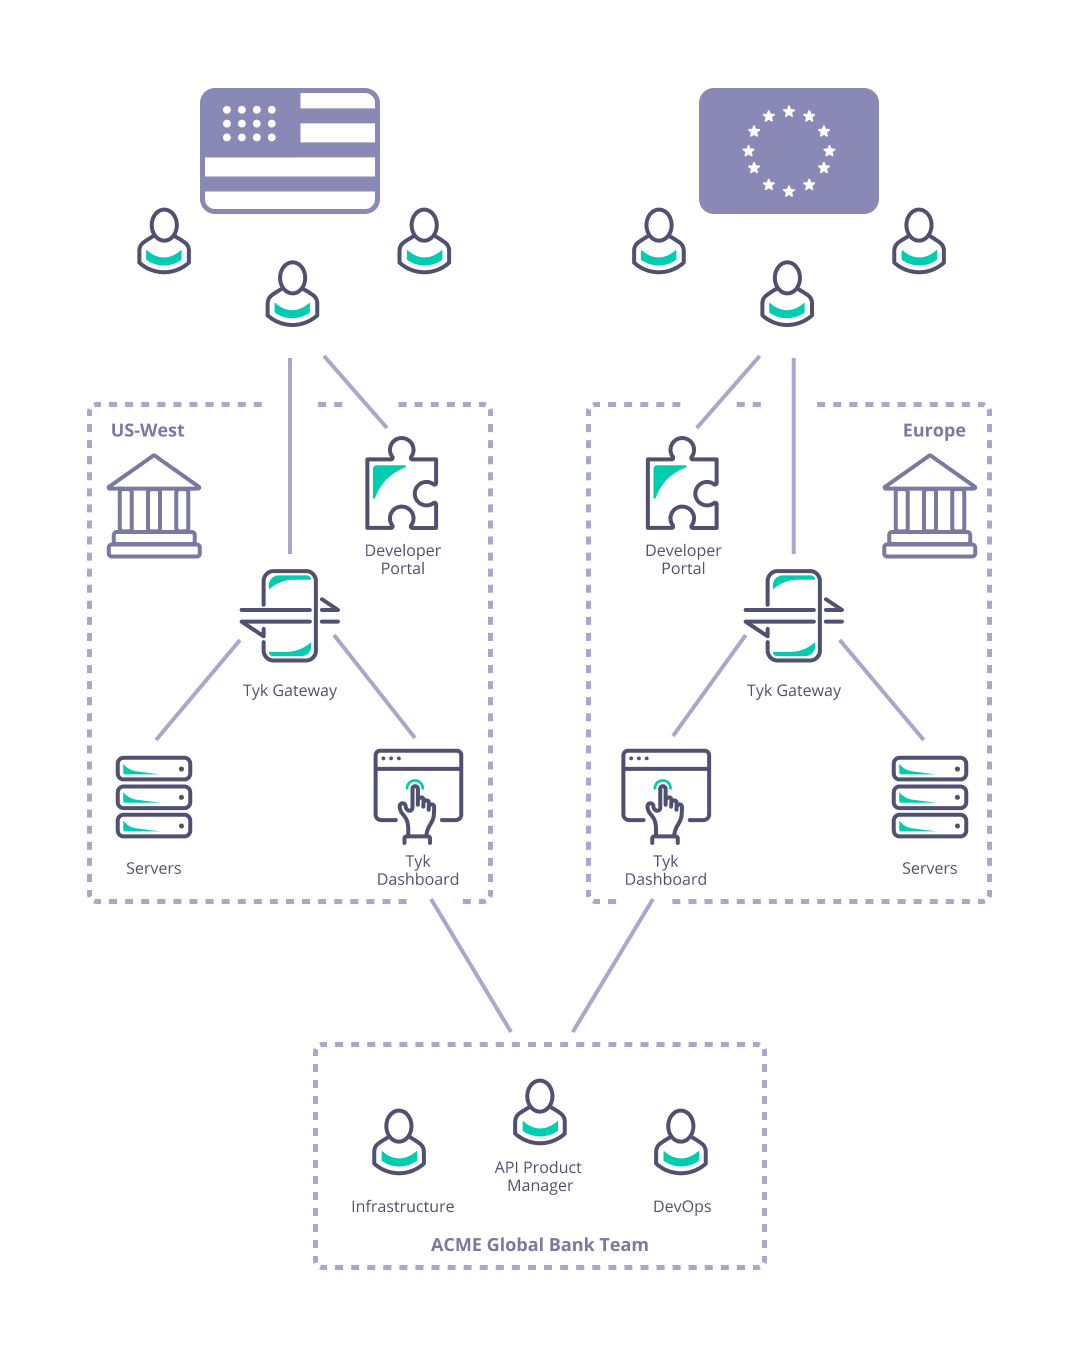
Managing a complex deployment of services with internal and externally facing APIs
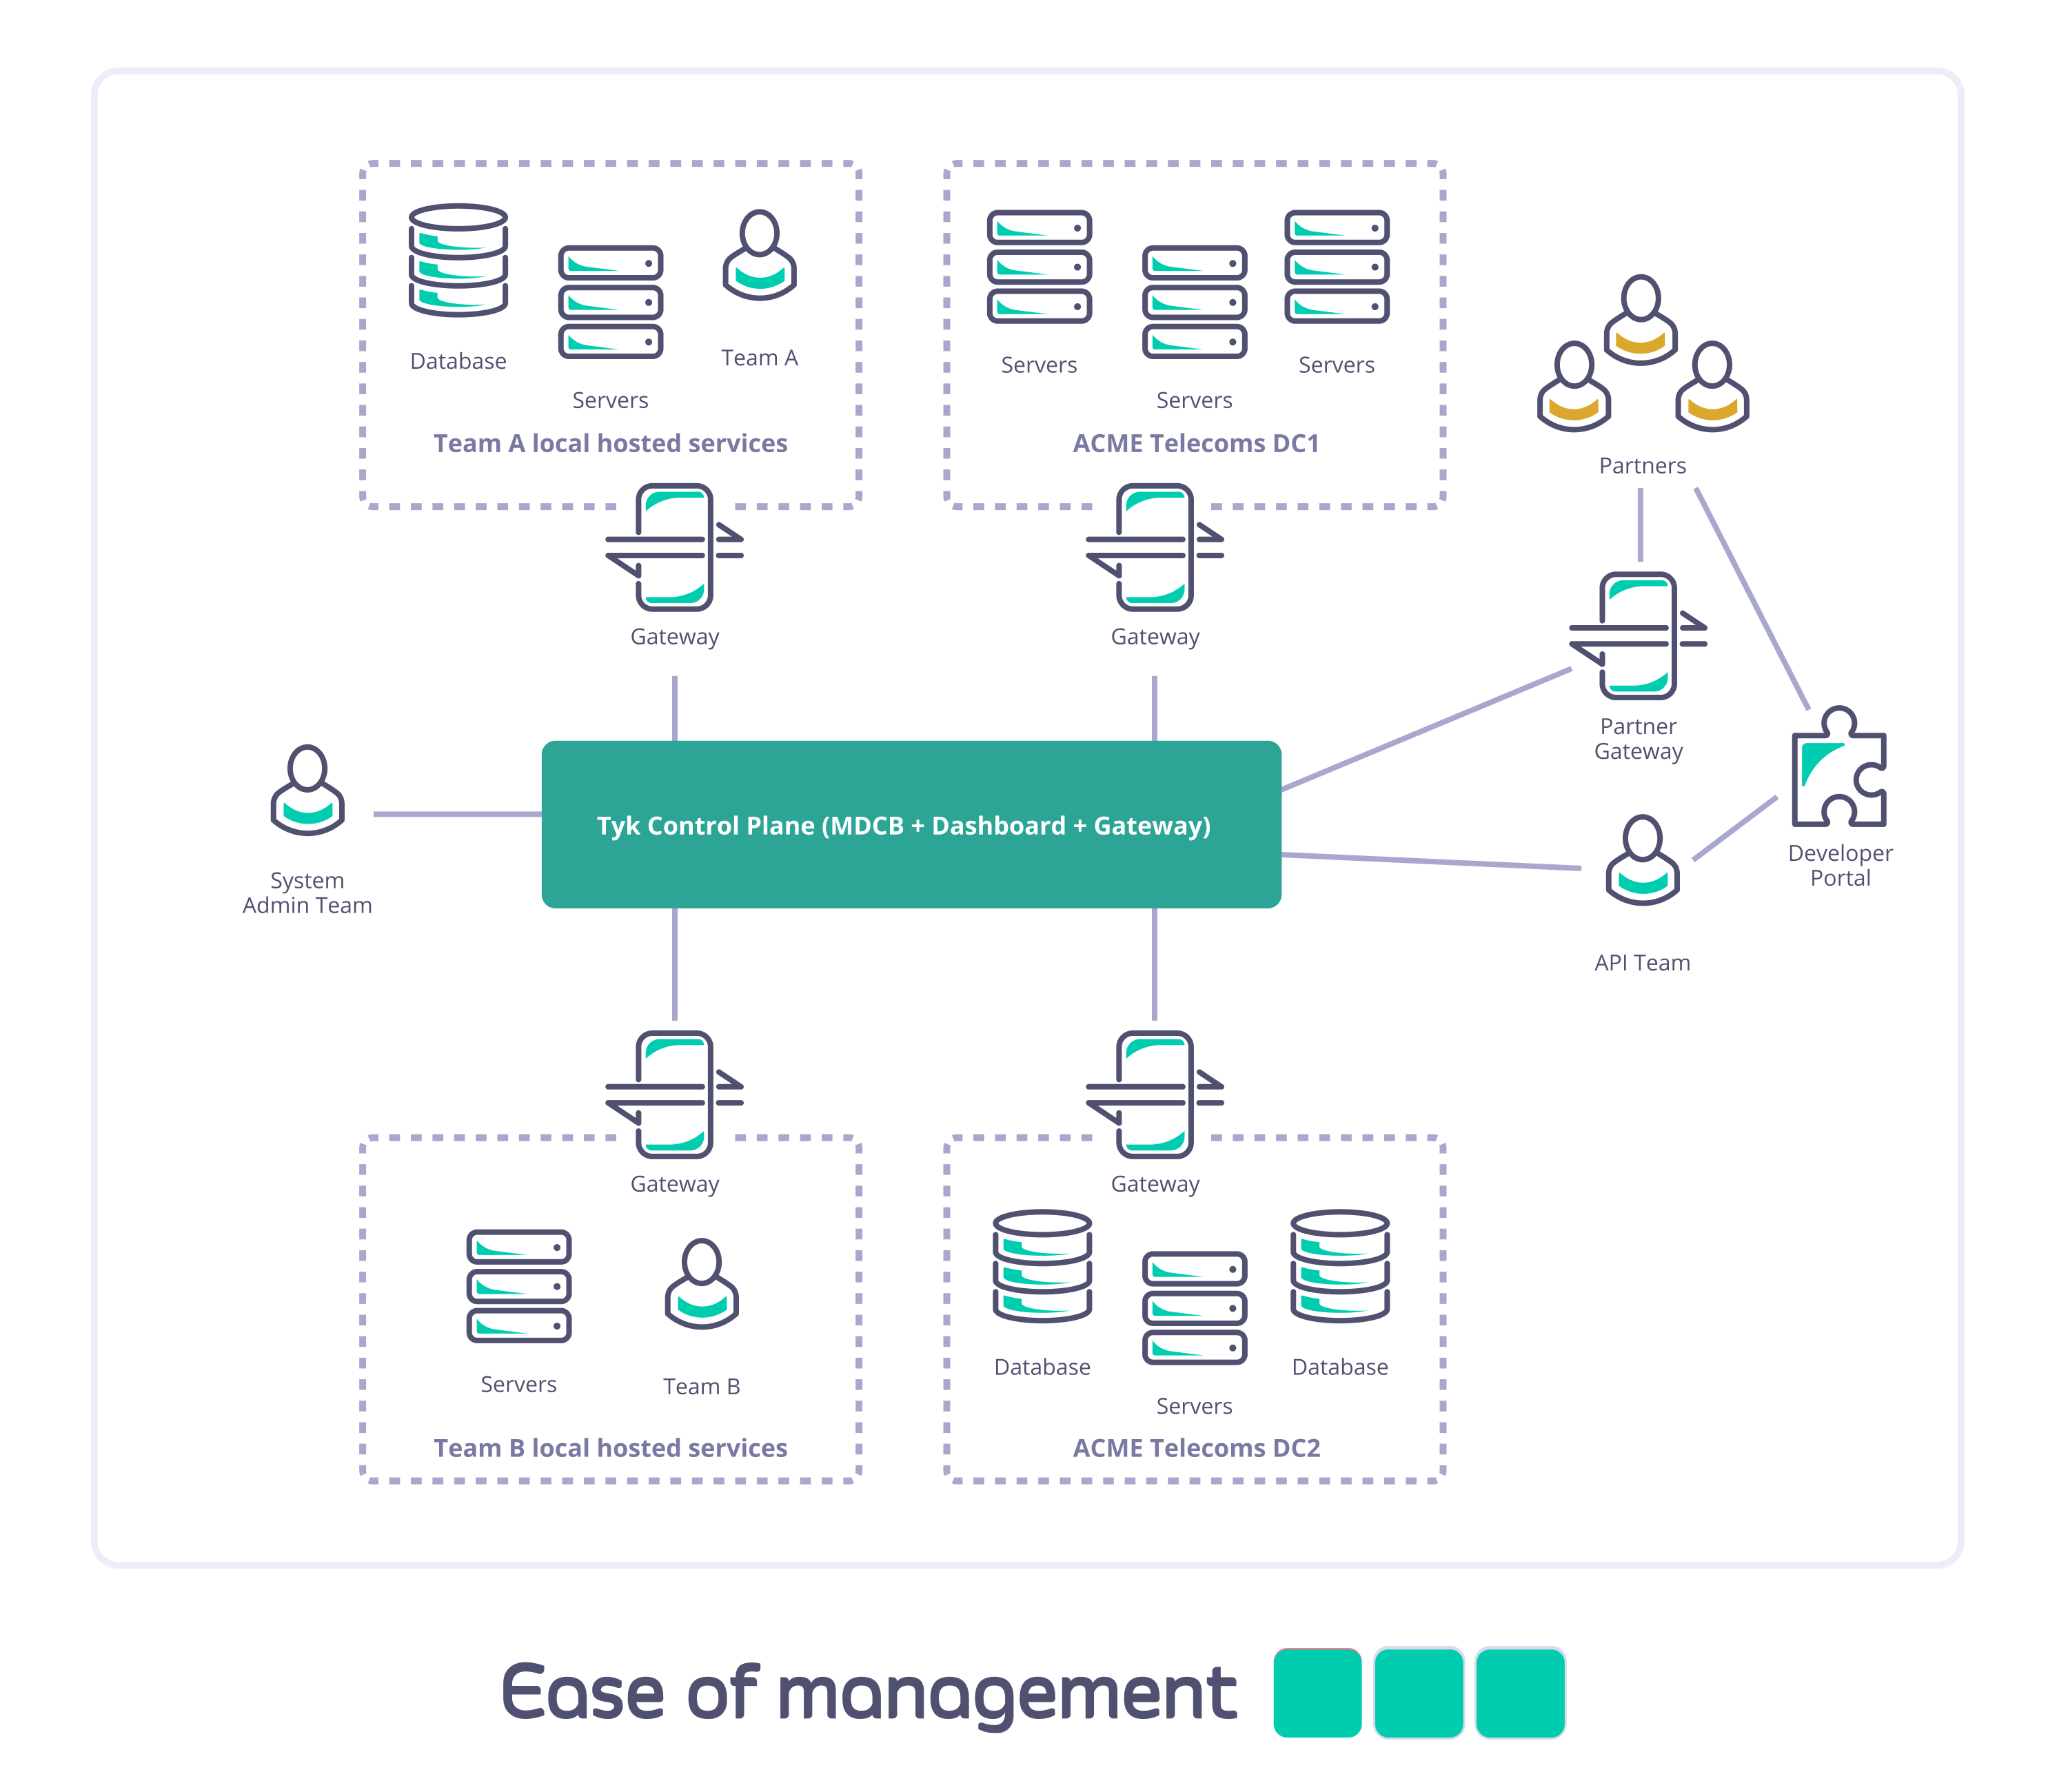
Consider Acme Telecoms: they have a large nationally distributed workforce and complex self-hosted IT systems; are using Tyk API Gateways to deploy internal and external APIs; and have different teams managing and consuming different sets of APIs across multiple sites. They need to ensure data segregation, availability, and access for internal and external users and partners.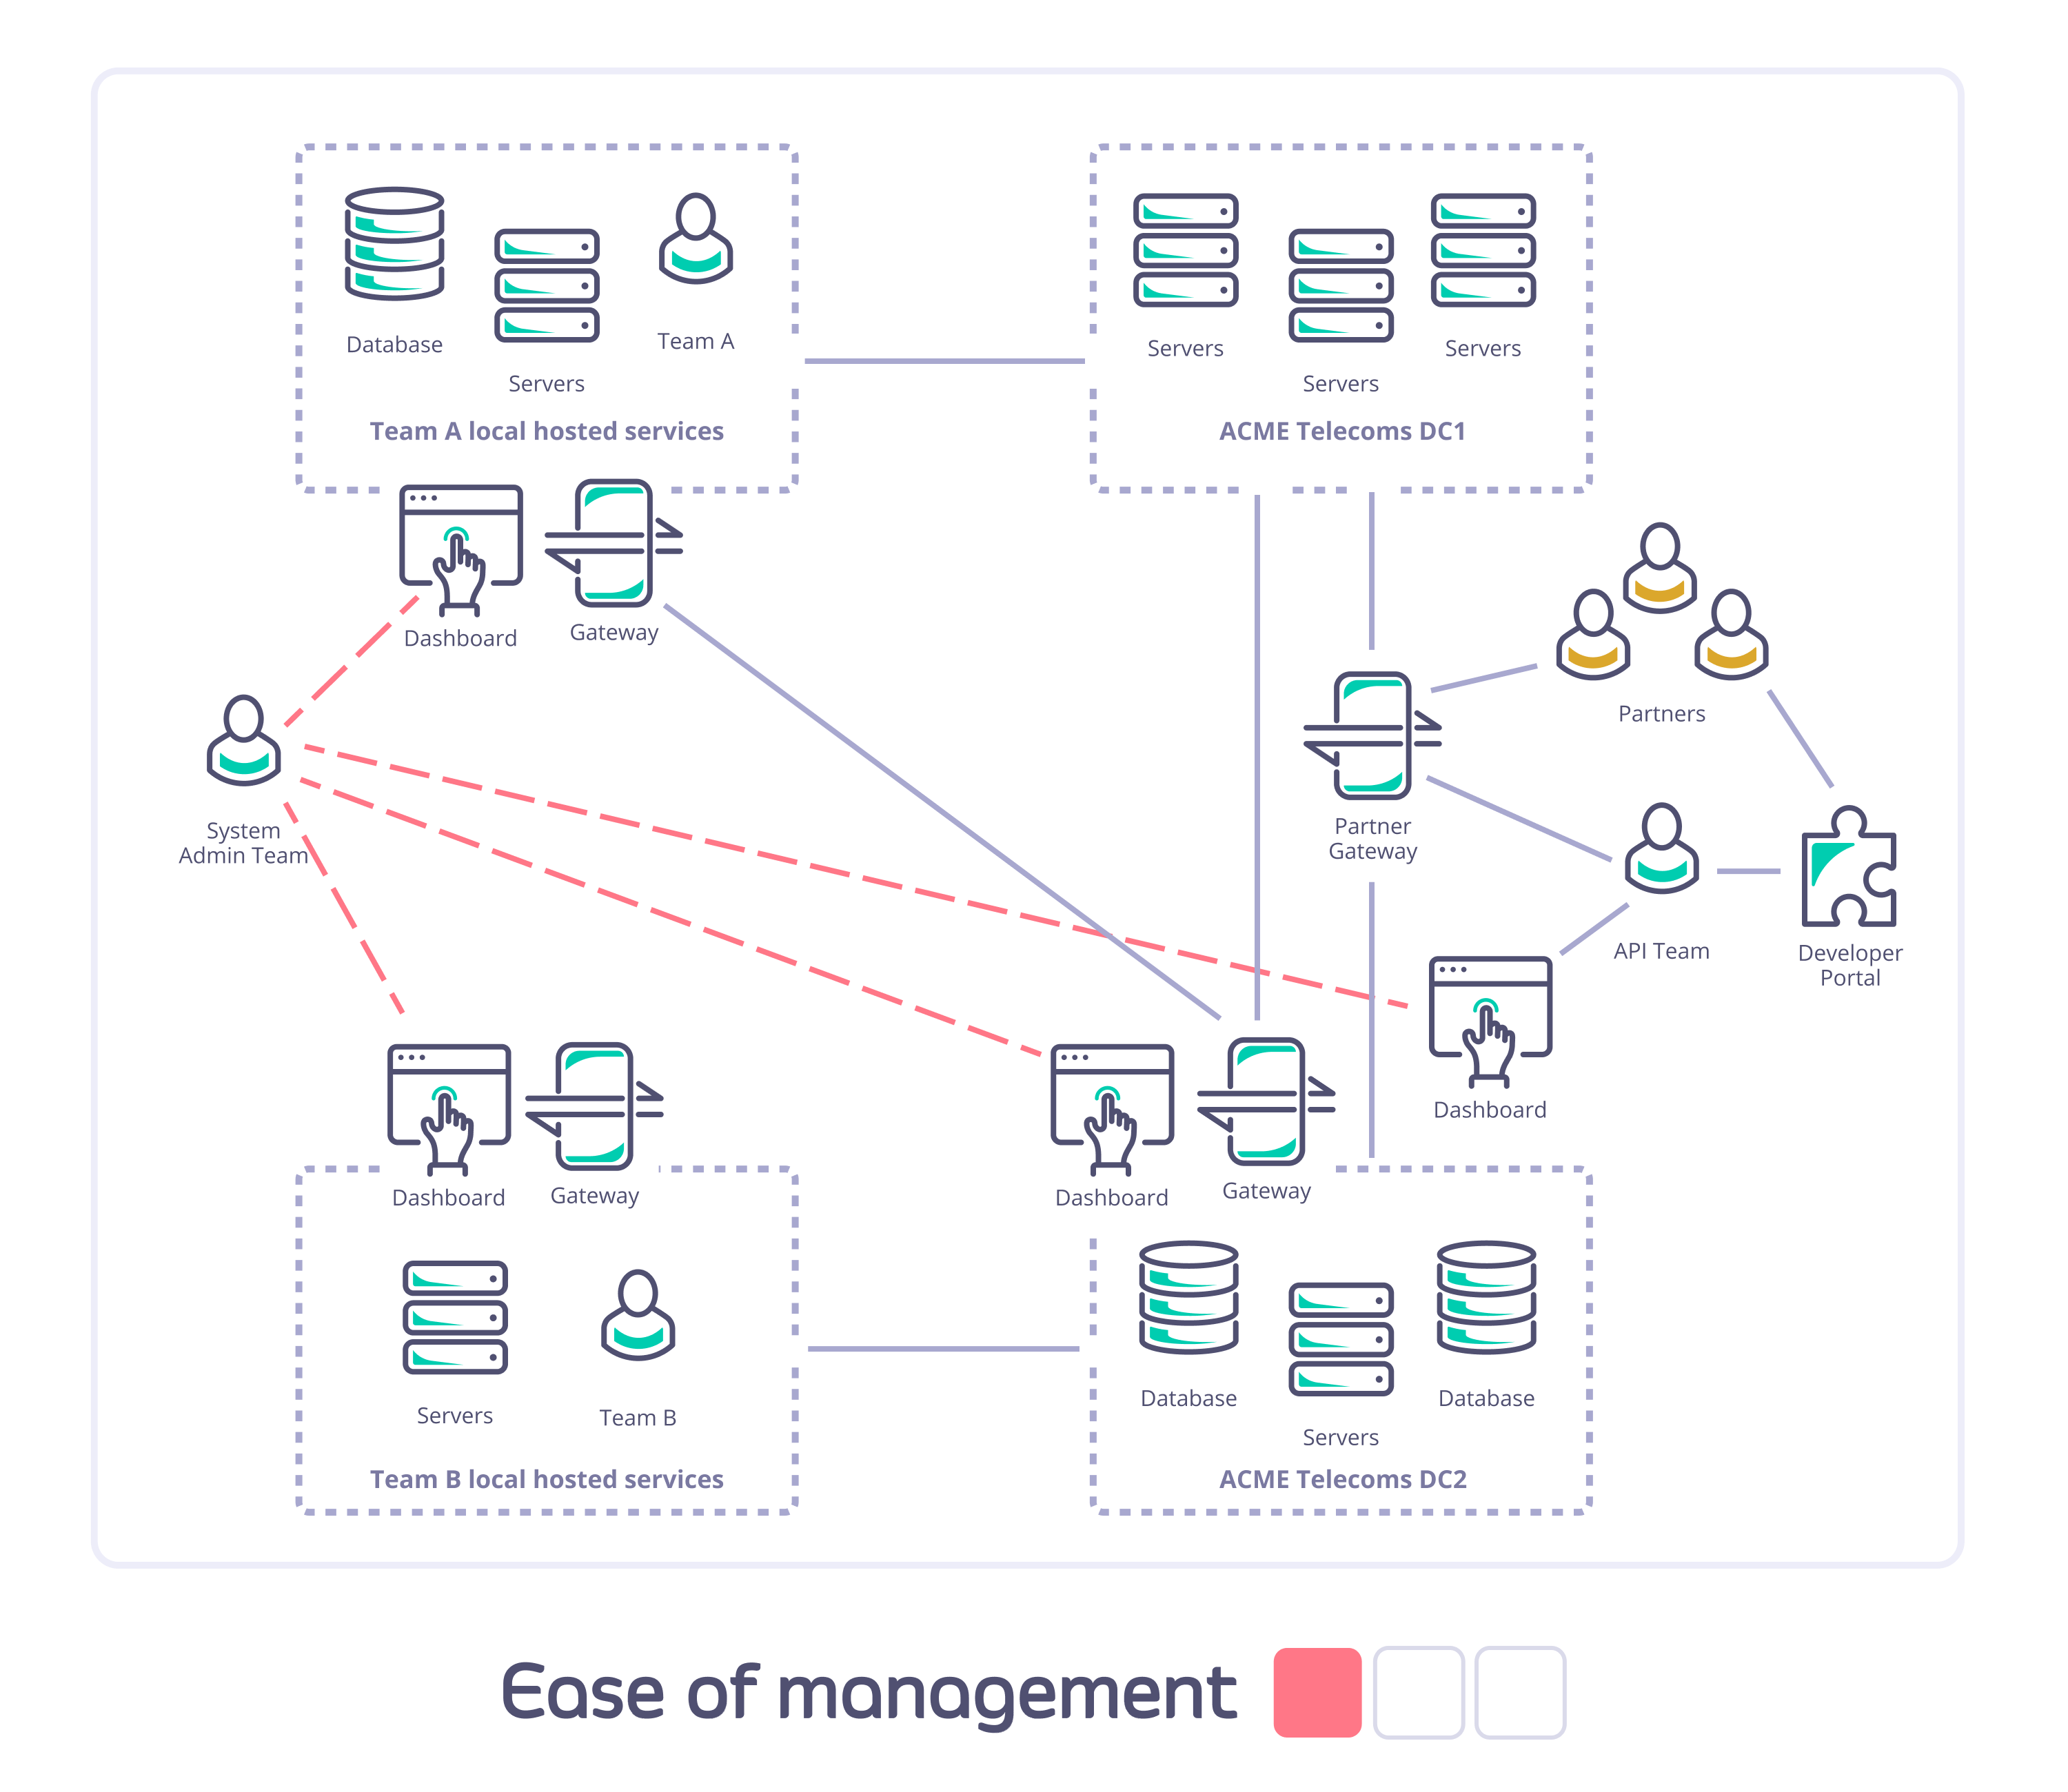
Why Choose MDCB for Your API Infrastructure?
Beyond the two usage scenarios described here, there are many others where MDCB will provide you with the power and flexibility you need to manage your own particular situation. Here are some examples of the benefits that deploying Tyk MDCB can bring:Flexible architecture
- You can control geographic distribution of traffic, restricting traffic to data centers/regions of your choice.
- You can put your Tyk API Gateways close to users, but still have a single management layer.
- You have a single, simple, point of access for configuration of your complex API infrastructure and yet deploy multiple Developer Portals, if required, to provide access to different user groups (e.g. Internal and External).
- You can physically segment teams and environments within a single physical data center, giving each team full control of its own API gateway and server resources without the noisy neighbors you might experience in a standard self-managed deployment.
- You can deploy gateways with whichever mix of cloud vendors you wish.
- You can mix and match cloud and on premises data centers.
Improved resiliency, security and uptime
- Each Data Plane Gateway operates autonomously using a locally stored copy of the API resources it needs.
- The Control Plane (Management) Gateway maintains synchronization of these configurations across your Tyk deployment via the MDCB backbone link.
- If the Management Gateway or MDCB backbone fails, the Data Planes will continue to handle API requests, rejecting only new authorization tokens created on other Gateways. When connectivity is restored, the Data Plane Gateways will hot-reload to fetch any updated configurations (e.g. new authorization tokens) from the Control Plane.
- If a Data Plane Gateway fails, this does not impact the operation of the others: when it comes back online, if it is unable to contact the Control Plane, it will retrieve the “last good” configuration held locally.
- The MDCB backbone runs on a resilient compressed RPC channel that is designed to handle ongoing and unreliable connectivity; all traffic on the backbone is encrypted and so safer to use over the open internet or inter-data center links.
- Improved data security through separation of traffic into completely separate clusters within your network.
Reduced latency
- Deploying Data Plane Gateways close to your geographically distributed API consumers helps reduce their perceived request latency.
- Deploying Data Plane Gateways close to your backend services will minimize round trip time servicing API requests.
- The Data Plane Gateways cache keys and other configuration locally, so all operations can be geographically localised.
- All traffic to and from one Gateway cluster will have rate limiting, authentication and authorization performed within the data center rather than “calling home” to a central control point; this reduces the API request round trip time.
Improved Infrastructure Management
- Due to the shared Control Plane, all Data Plane Gateways report into a single Tyk Dashboard. This provides a simple, consistent place to manage your APIM deployment.
- This allows a shared infra team to offer API management and API Gateways as a service, globally, across multiple clouds and Self-Managed regions, from a single pane of glass.
Next Steps
MDCB Components
Overview
Here we will give an overview of the main elements of a Tyk Multi Data Center (distributed) solution, clarifying the terminology used by Tyk.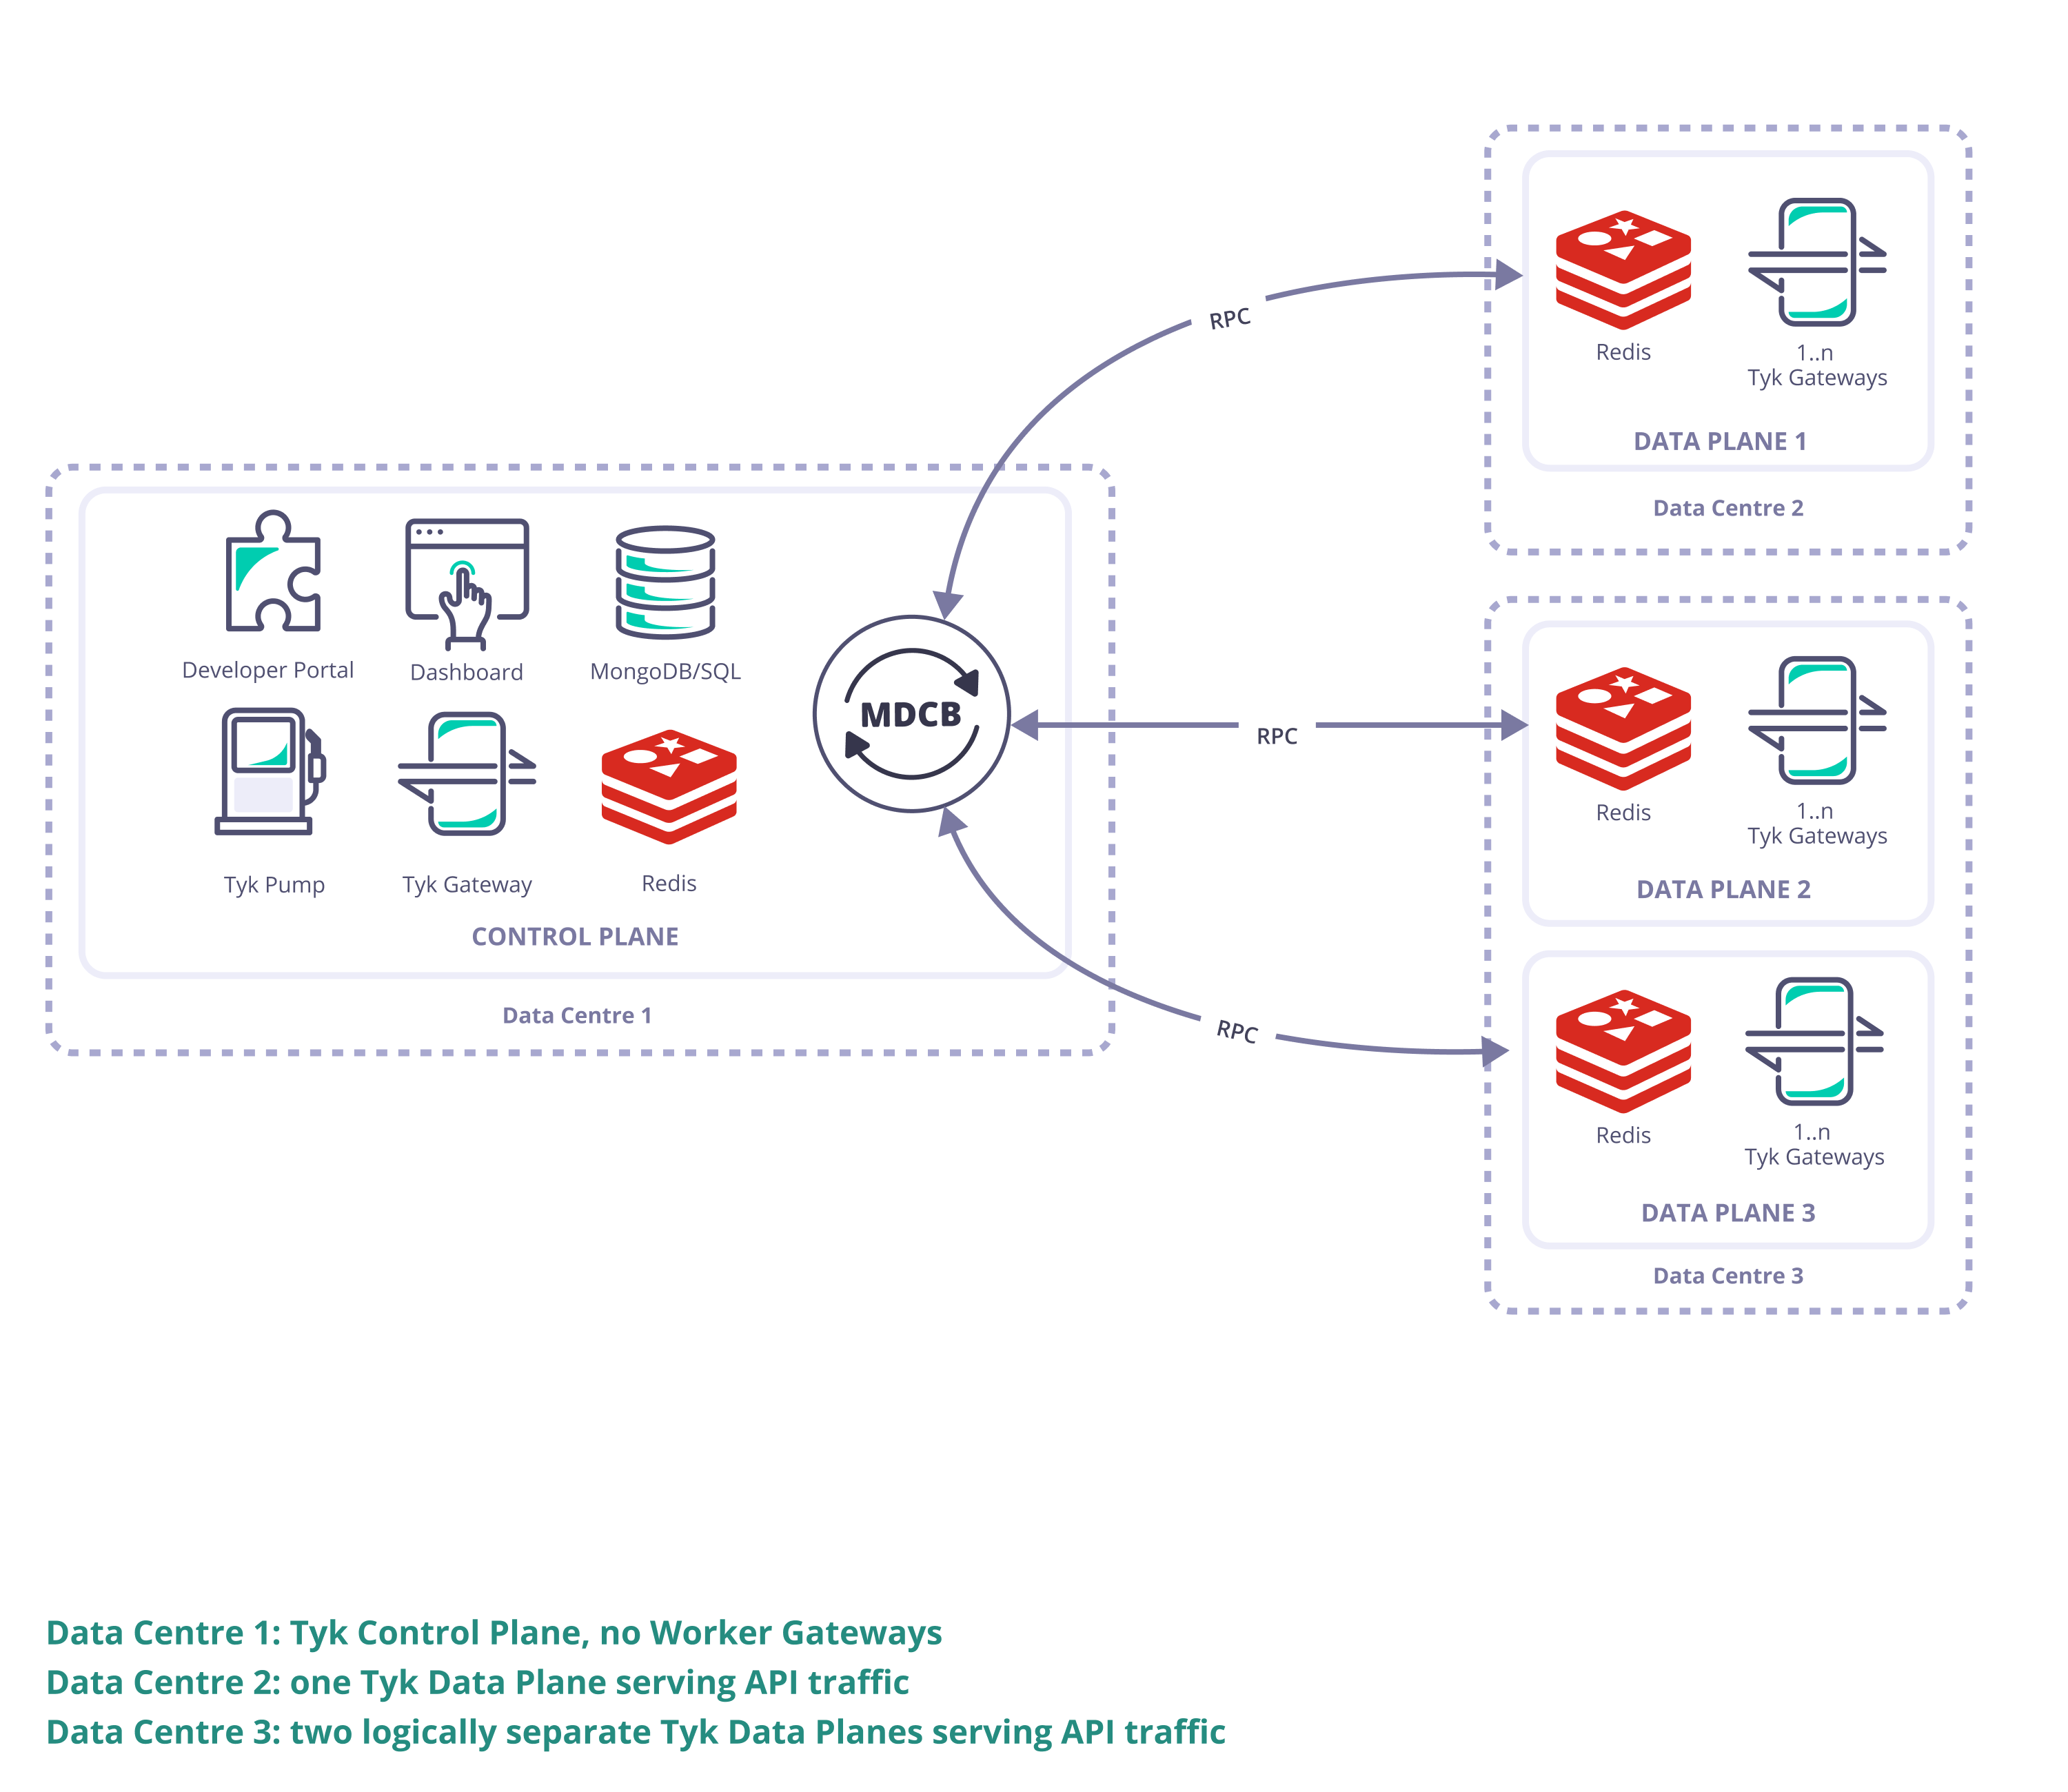
Tyk Gateway
- The workhorse of any deployment, Tyk’s lightweight Open Source API gateway that exposes your APIs for consumption by your users. It is a reverse proxy that secures your APIs, manages session and policies, monitors, caches and manipulates requests/responses when needed before/after it proxies them to and from the upstream.
Tyk Dashboard
- Tyk’s management platform used to control the creation of API configurations, policies and keys in a persistent manner. It provides analytic information on the traffic the Gateways have processed which includes aggregated API usage and detailed information per transaction.
Tyk Multi Data Center Bridge (MDCB)
- The backbone of the distributed Tyk deployment, connecting the distributed Data Plane deployments back to the Control Plane.
Tyk Pump
- Tyk’s open source analytics purger that can be used to export transaction logs from the Tyk deployment to the visualisation tool or other data store of your choice
Tyk Developer Portal
- The access point for your API Consumers where you publish your API catalog(s) and they obtain API keys.
Redis
- An in-memory data store used as a database, cache and message broker. We use it as pub/sub broker for inter-Gateway communication, and as a cache for API configurations, keys, certificates, and temporary store for analytics records.
MongoDB/SQL
- A persistent data store for API configurations, policies, analytics and aggregated analytics, Dashboard organizations, configurations, dashboard users, portal developers and configuration.
Control Plane
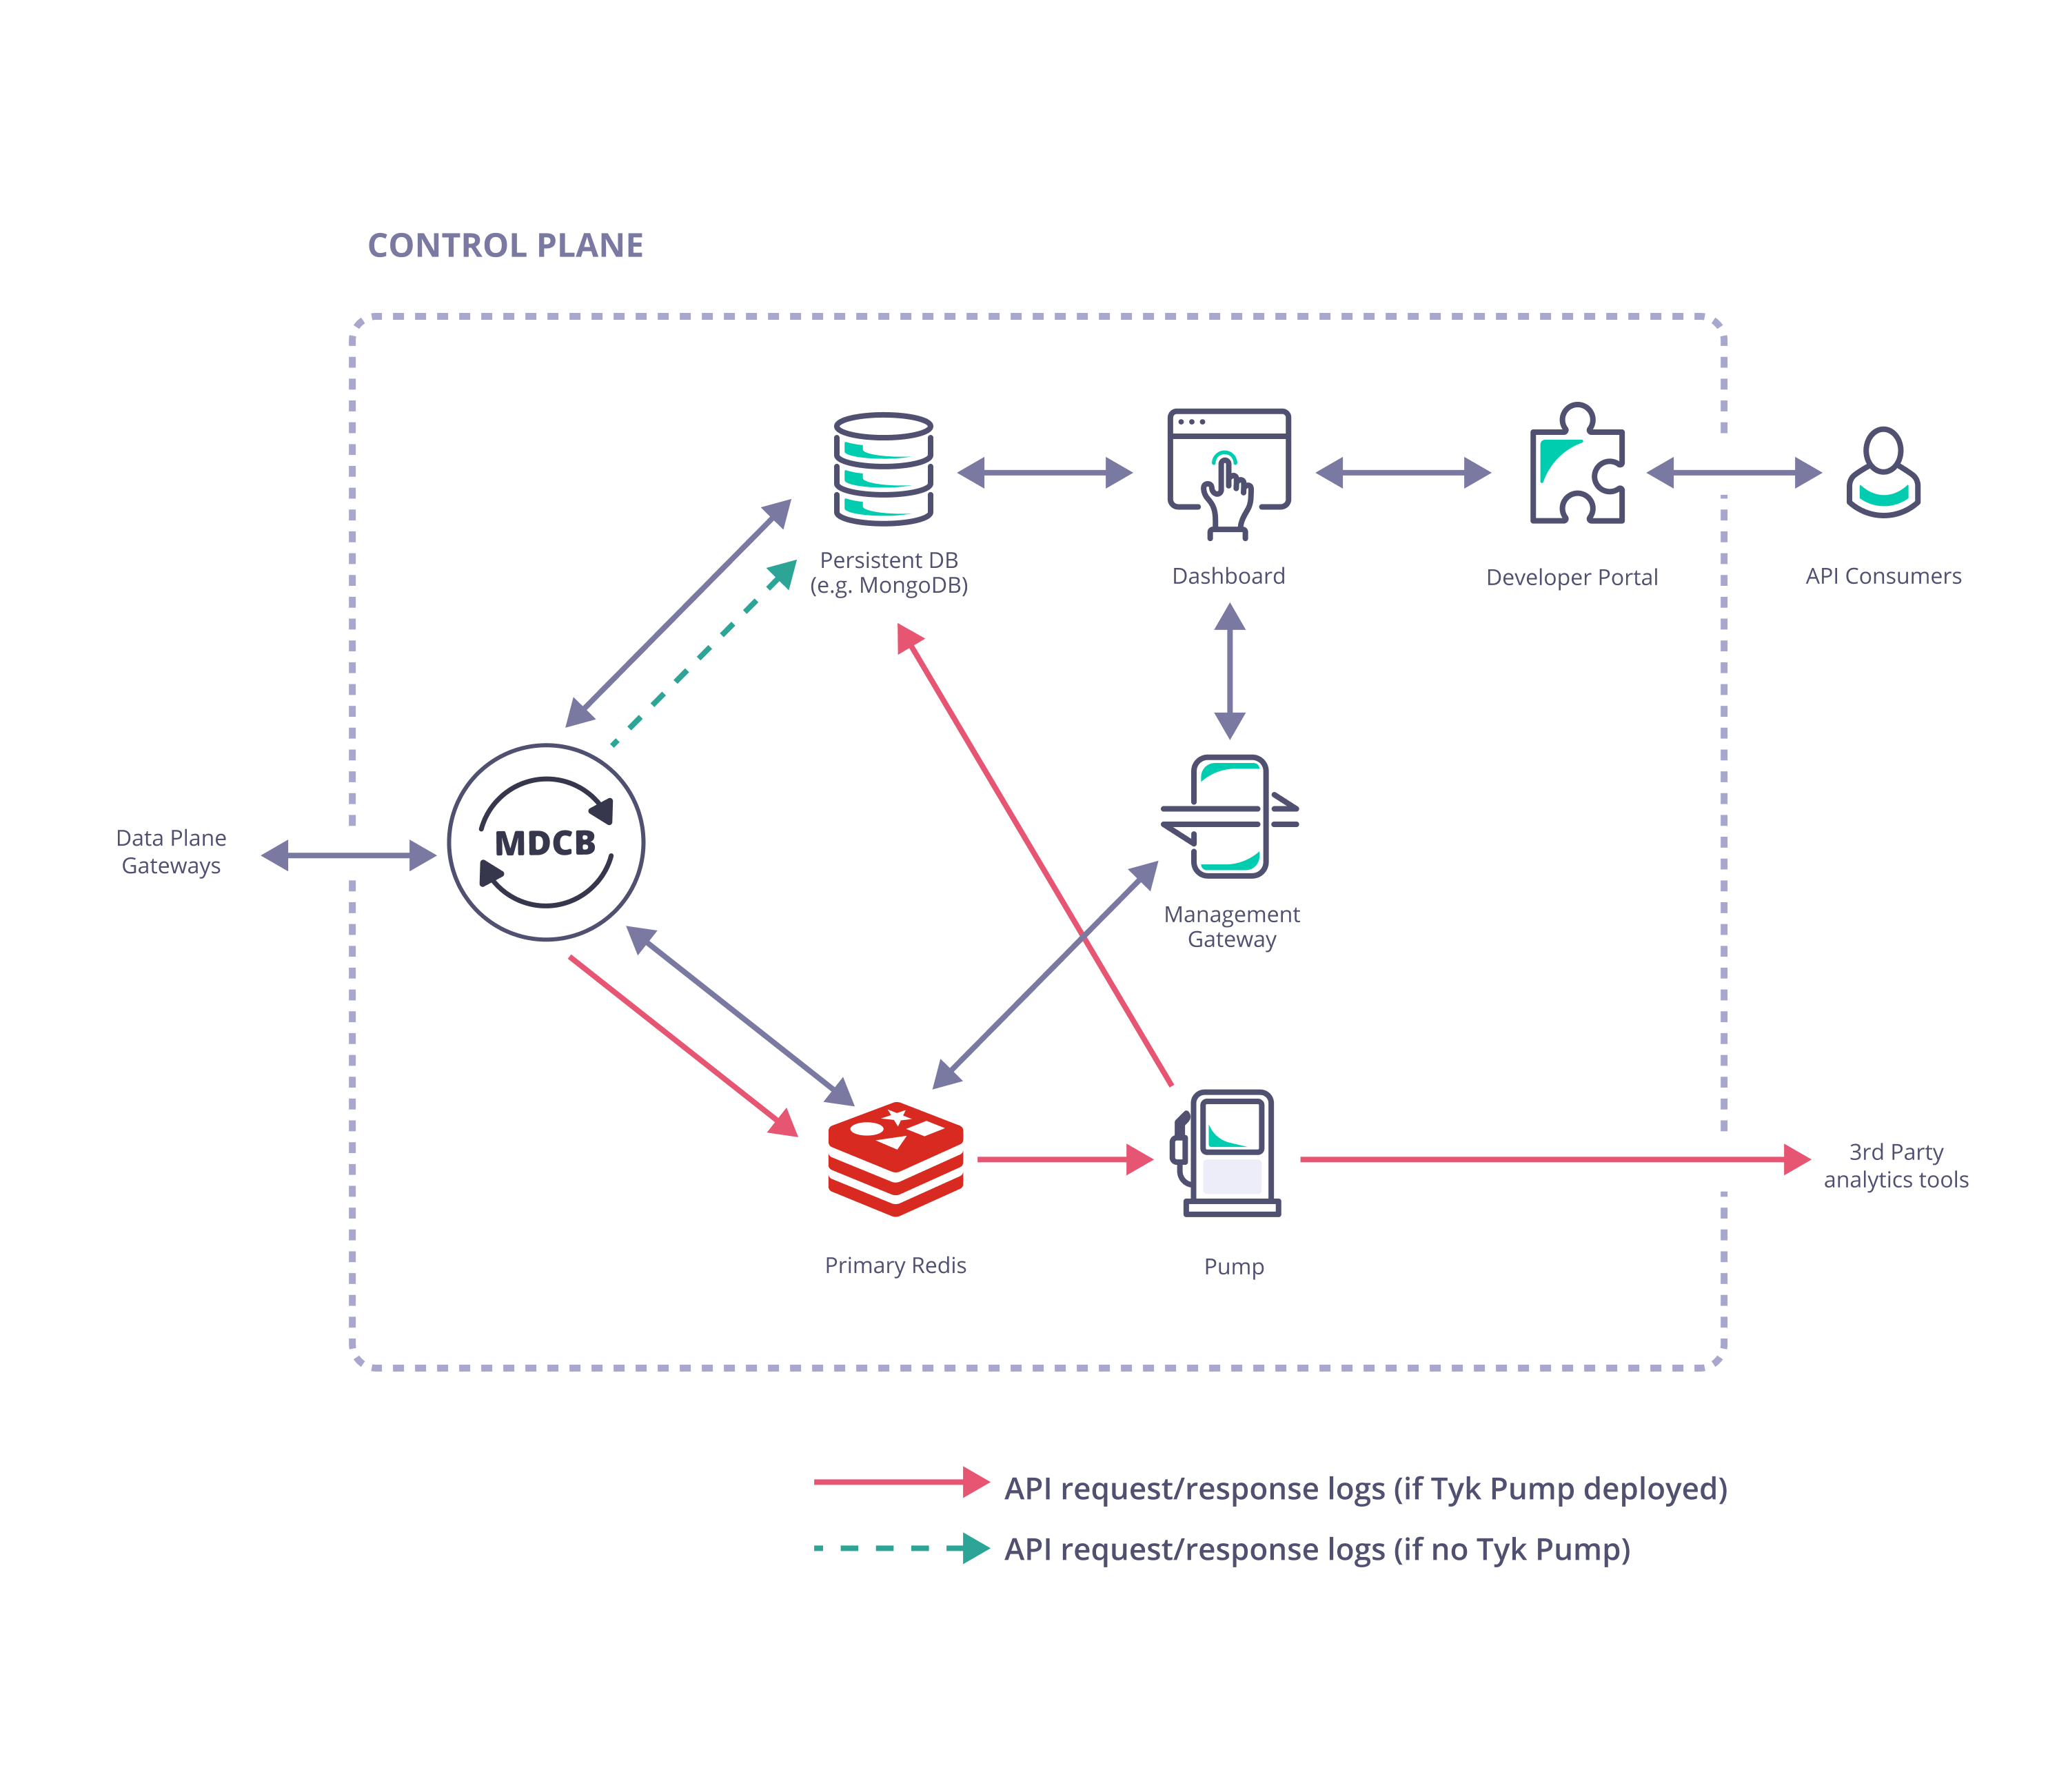
- Tyk Dashboard (used to configure and control the whole Tyk installation)
- Tyk Gateway (used for creation of keys and certificates, this does not service API requests; it is important to ensure there is no public access to it and it must not be sharded (tagged) as it “belongs” to the whole Tyk installation)
- Tyk MDCB
- Redis (high availability Redis data store that should be backed up in case of failure; this document gives recommendation on Redis persistency)
- MongoDB or SQL (a persistent data store that should be deployed and set up for redundancy and high availability)
Optional Components
- One or more Tyk Pumps can be deployed within the Control Plane to export analytics data (request/response logs) to your data sink of choice for further analytics and visualisation.
- A Tyk Developer Portal can be added to enhance the end-user experience when accessing your APIs.
Data Plane
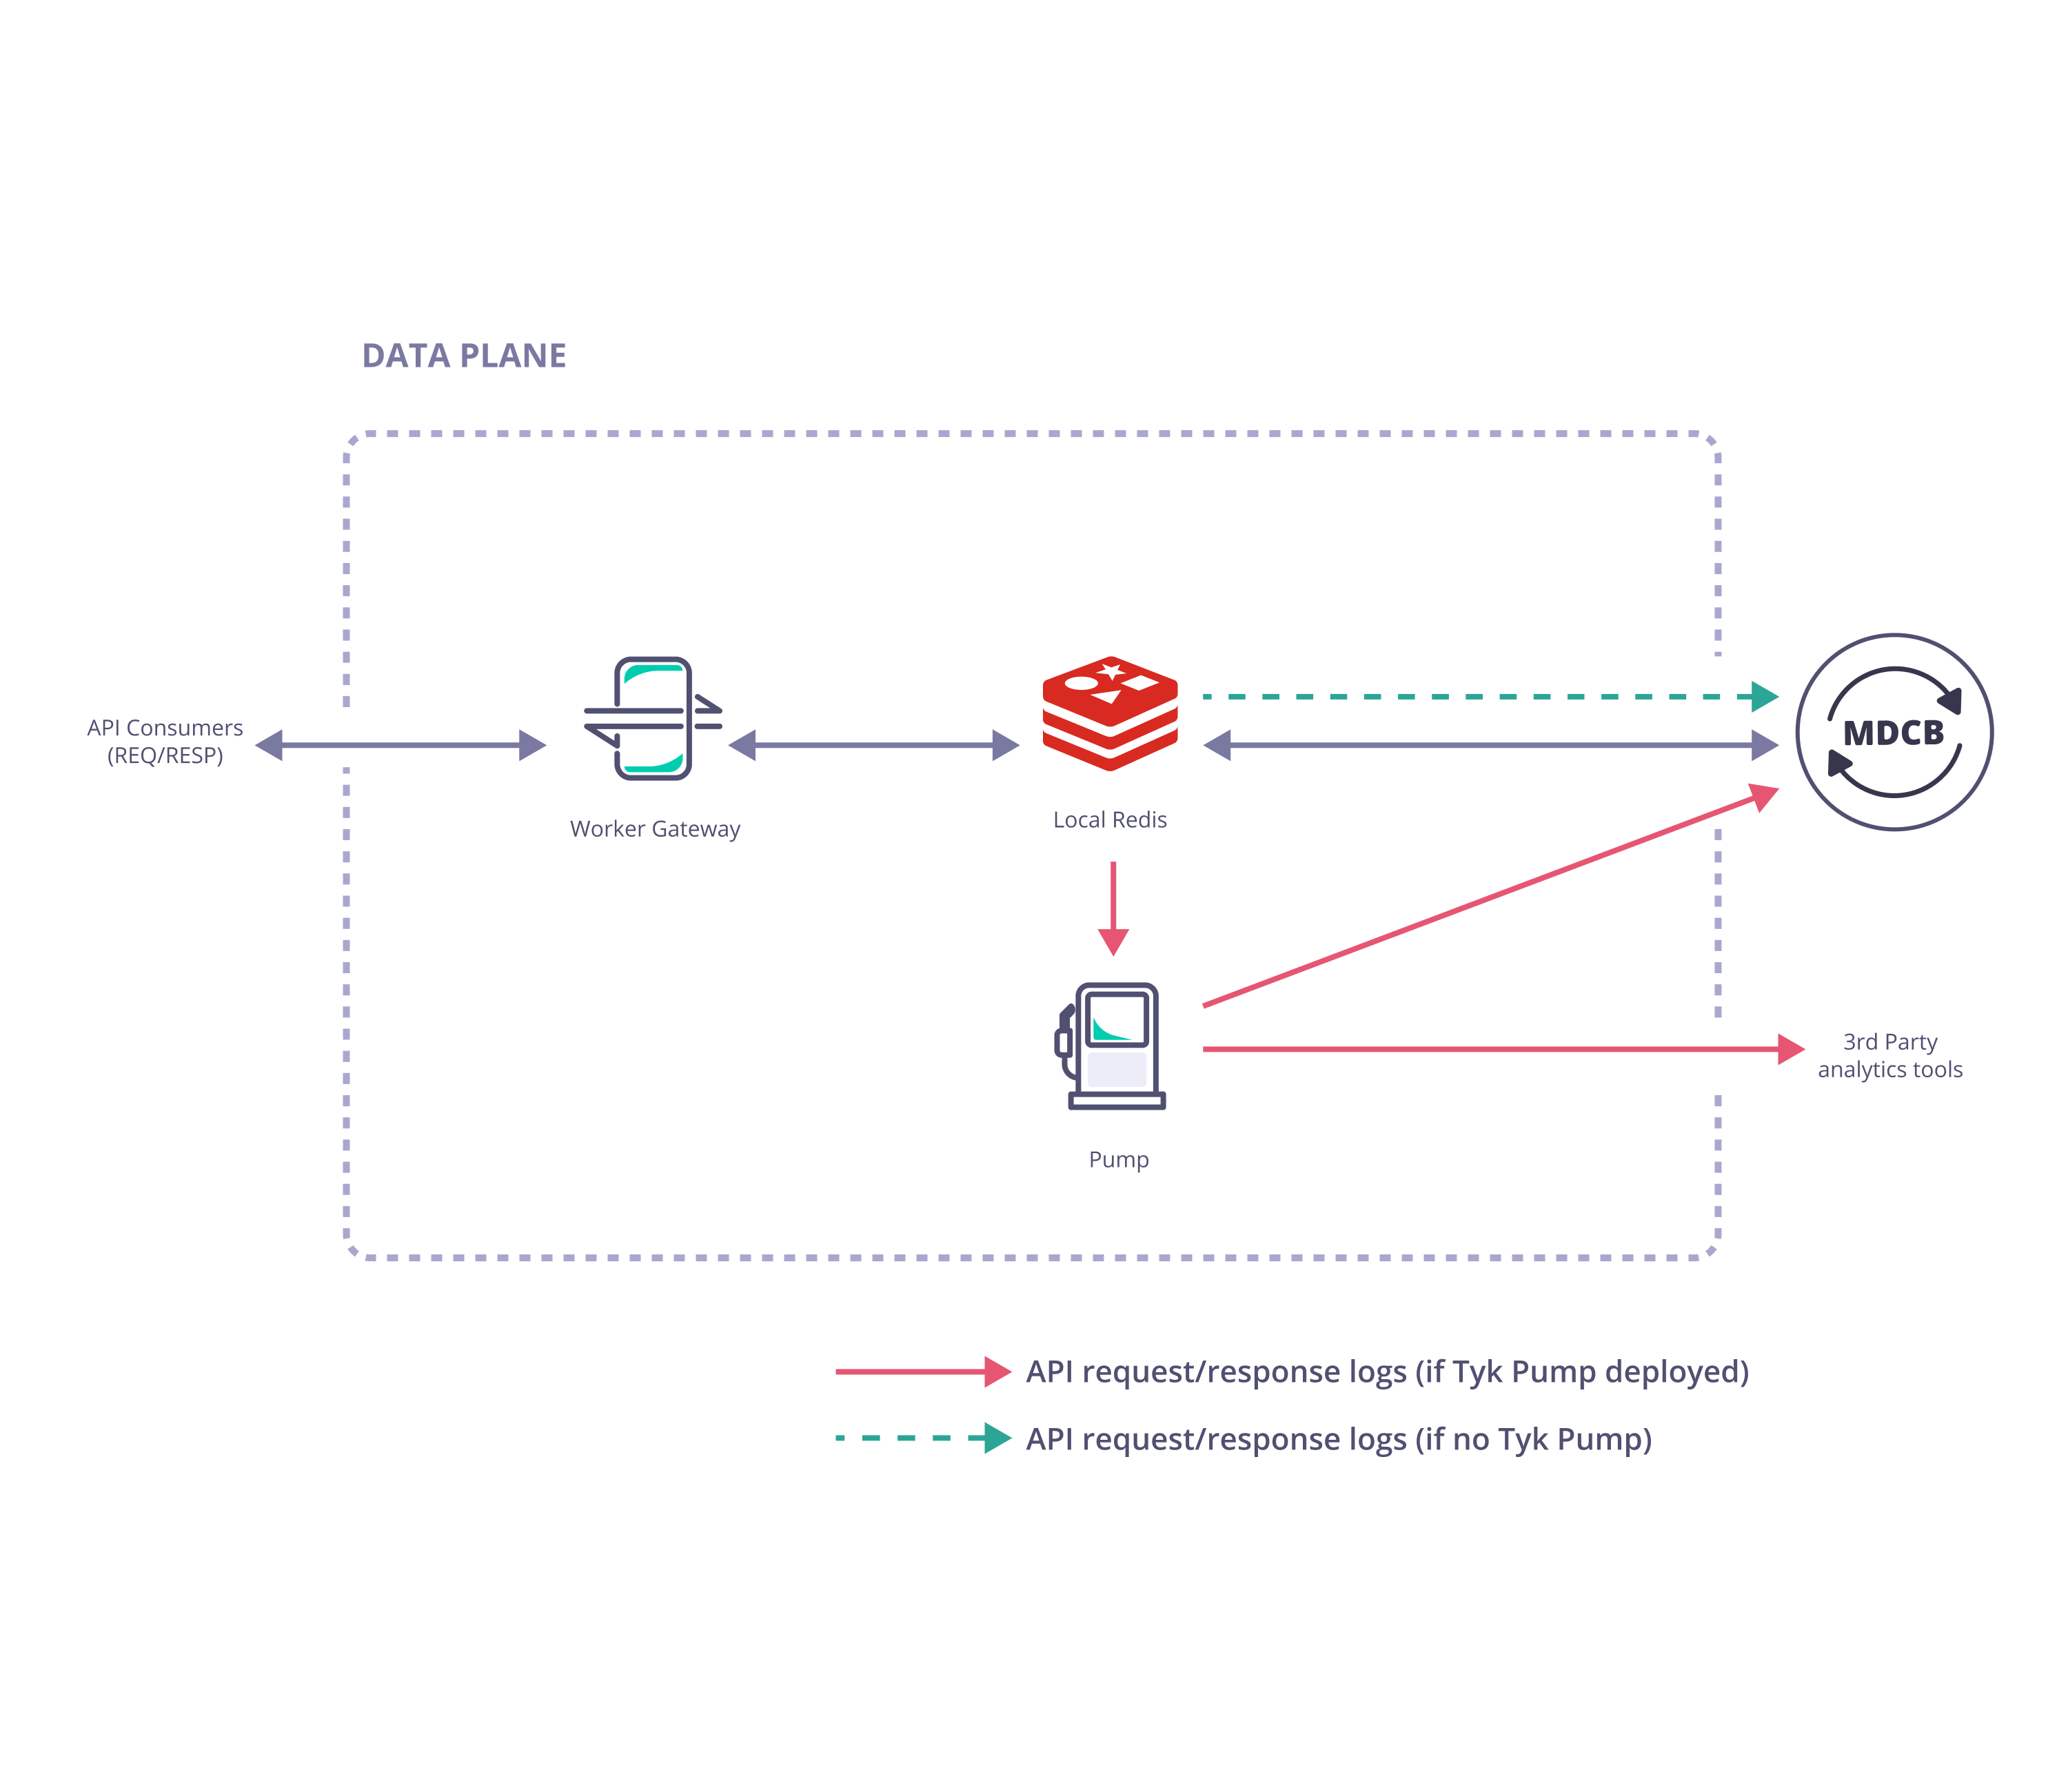
- Tyk Gateway (one or more Gateways specifically configured to operate in the Data Plane)
- Redis (a single Redis data store shared by all Gateways in the cluster)
Optional Components
- A Tyk Pump specifically configured as a Hybrid Pump can be deployed with the Data Plane gateways to export analytics data (request/response logs) to your data sink of choice for further analytics and visualisation.
Setup MDCB Control Plane
The Tyk control plane contains all the standard components of a standard Tyk Self-Managed installation with the addition of the Multi Data Center Bridge (MDCB).Installing MDCB Component On Linux
The MDCB component must be able to connect to Redis and MongoDB/PostgreSQL directly from within the Control Plane deployment. It does not require access to the Tyk Gateway(s) or Dashboard application. The MDCB component will however, by default, expose an RPC service on port 9091, to which the Tyk Data Plane data centers, i.e. the Gateways that serve API traffic, will need connectivity.Prerequisites
We will assume that your account manager has provided you with a valid MDCB and Dashboard License and the command to enable you to download the MDCB package. We will assume that the following components are up and running in your Controller DC:- MongoDB or SQL (check supported versions)
- Redis (check supported versions)
- Tyk Dashboard
- Tyk Gateway / Gateways Cluster
-
Working Tyk-Pro Self-Managed installation
When using SQL rather than MongoDB in a production environment, we only support PostgreSQL.
Installing using RPM and Debian packages
To download the relevant MDCB package from PackageCloud:The repository is setup! You can now install packages.
You will now be able to install MDCB as follows:
Installing in a Kubernetes Cluster with our Helm Chart
The Tyk Control Plane helm chart is pre-configured to install Tyk control plane for multi data center API management from a single Dashboard with the MDCB component. Below is a concise instruction on how to set up an MDCB Control Plane with Redis and PostgreSQL. To access the comprehensive installation instructions and configuration options, please see Tyk Control Plane Helm Chart.Prerequisites
- Kubernetes 1.19+
- Helm 3+
- MDCB and Dashboard license
Quick Start
-
Setup required credentials
First, you need to provide Tyk Dashboard and MDCB license, admin email and password, and API keys. We recommend to store them in secrets.
-
Install Redis (if you don’t already have Redis installed)
If you do not already have Redis installed, you may use these charts provided by Bitnami.
Follow the notes from the installation output to get connection details and password. The DNS name of your Redis as set by Bitnami is
tyk-redis-master.tyk-cp.svc:6379(Tyk needs the name including the port) The Bitnami chart also creates a secrettyk-rediswhich stores the connection password inredis-password. We will make use of this secret in installation later.
Ensure that you are installing Redis versions that are supported by Tyk. Please consult the list of supported versions that are compatible with Tyk.
-
Install PostgreSQL (if you don’t already have PostgreSQL installed)
If you do not already have PostgreSQL installed, you may use these charts provided by Bitnami.
Follow the notes from the installation output to get connection details. We require the PostgreSQL connection string for Tyk installation. This can be stored in a secret and will be used in installation later.
Ensure that you are installing PostgreSQL versions that are supported by Tyk. Please consult the list of supported versions that are compatible with Tyk.
-
Install Tyk Control Plane
-
Done!
Now Tyk Dashboard and Tyk MDCB should be accessible through service
dashboard-svc-tyk-cp-tyk-dashboardat port3000andmdcb-svc-tyk-cp-tyk-mdcbat port9091respectively. You can login to Dashboard using the admin email and password to start managing APIs. You can use the MDCB connection details included in the installation output, to install the MDCB Data Plane.
Configuration
If you install MDCB component with package, modify your/opt/tyk-sink/tyk_sink.conf file as follows:
Configuration Example
From MDCB 2.0+, you can choose between Mongo or SQL databases to setup your This storage will work for fetching your organization data (APIs, Policies, etc) and for analytics.
analytics storage. In order to setup your PostgreSQL storage, you can use the same configuration from your Tyk Dashboard main storage.For example, to set up a postgres storage the analytics configurations would be:Health check
It is possible to perform a health check on the MDCB service. This allows you to determine if the service is running, so is useful when using MDCB with load balancers. Health checks are available via the HTTP port. This is defined byhttp_port configuration setting and defaults to 8181. Do not use the standard MDCB listen port (listen_port) for MDCB health checks.
From MDCB v2.7.0, there are 2 health check services available:
/livenessendpoint returns aHTTP 200 OKresponse when the service is operational./readinessendpoint returns aHTTP 200 OKresponse when MDCB is ready to accept requests. It ensures that dependent components such as Redis and data store are connected, and the gRPC server is ready for connection.
/health via the port defined by the healthcheck_port configuration setting. The default port is 8181. The /health endpoint is also available on v2.7.0 or later for backward compatibility.
To use the health check service, call the /health endpoint i.e. http://my-mdcb-host:8181/health. This will return a HTTP 200 OK response if the service is running.
Please note that an HTTP 200 OK response from the /health endpoint merely indicates that the MDCB service is operational. However, it is important to note that the service may not yet be ready for use if it is unable to establish a connection with its dependent components (such as Redis and Data store) or if they are offline. Upgrade to v2.7.0 and later to have more accurate health checking.
Troubleshooting
Check that the MDCB service is running
Check that MDCB is listening on port 9091
Check the logs for MDCB
-f flag to follow the log. The command should return output similar to this:
Check MDCB configurations
From MDCB v2.7.0, a secured HTTP endpoint/config can be enabled that allows you to query configuration of MDCB.
To enable the secured HTTP endpoint, make sure you have the following in your /opt/tyk-sink/tyk_sink.conf config file.
/config endpoint to return a json representation of your MDCB config:
/env endpoint to return your MDCB config in the form of environment variables settings:
Enabling MDCB on Organization Object on Tyk Dashboard
Before a Data Plane Gateway can connect to MDCB, it is important to enable the organization that owns all the APIs to be distributed to be allowed to utilize Tyk MDCB. To do this, the organization record needs to be modified with two flags using the Tyk Dashboard Admin API. To make things easier, we will first set a few environment variables:export DASH_ADMIN_SECRET=<YOUR_ADMIN_SECRET>
<YOUR_ADMIN_SECRET> in tyk_analytics.conf file under admin_secret field or TYK_DB_ADMINSECRET environment variable.
export DASH_URL=<YOUR_DASH_URL>
export ORG_ID=<YOUR_ORG_ID>
- Send a GET request to the Dashboard API to
/admin/organisations/$ORG_IDto retrieve the organization object. In the example below, we are redirecting the output json to a filemyorg.jsonfor easy editing.
- Open
myorg.jsonin your favorite text editor and add the following fields as follows. New fields are between the....
hybrid_enabled and event_options configuration fields have been added:
-
hybrid_enabled:Allows a Data Plane Gateway to login as an Organisation member into MDCB. -
event_options:Theevent_optionsobject is optional. By default the update and removal of Redis keys (hashed and unhashed), API Definitions and policies are propagated to various instance zones. Theevent_optionsobject contains akey_eventobject that allows configuration of the following additional features:- event notification mechanism for all Redis key (hashed and unhashed) events. Events can be notified via webhook by setting the
webhookproperty to the value of the webhook URL. Similarly, events can be notified via email by setting theemailproperty to the value of the target email address. - enable propagation of events for when an OAuth token is revoked from Dashboard by setting the
redisproperty totrue.
event_optionsin the example above enables the following functionality:- events are propagated when OAuth tokens are revoked from Dashboard since
redisistrue - events associated with Redis keys (hashed and unhashed) and revoking OAuth tokens via Dashboard are sent to webhook
https://example.com/webhookand email addressuser@example.com
- event notification mechanism for all Redis key (hashed and unhashed) events. Events can be notified via webhook by setting the
- Update your organization with a PUT request to the same endpoint, but this time, passing in your modified
myorg.jsonfile.
Setup MDCB Data Plane
You may configure an unlimited number of Tyk Data Planes containing Gateways for ultimate High Availablity (HA). We recommend that you deploy your Data Plane Gateways as close to your upstream services as possible in order to reduce latency. It is a requirement that all the Gateways in a Data Plane data center share the same Redis DB in order to take advantage of Tyk’s DRL and quota features. Your Data Plane can be in the same physical data center as the Control Plane with just a logical network separation. If you have many Tyk Data Planes, they can be deployed in a private-cloud, public-cloud, or even on bare-metal.Installing in a Kubernetes Cluster with our Helm Chart
The Tyk Data Plane helm chart is pre-configured to install Tyk Gateway and Tyk Pump that connects to MDCB or Tyk Cloud, our SaaS MDCB Control Plane. After setting up Tyk Control Plane with Helm Chart, obtain the required connection details from installation output and configure data plane chart as below. For Tyk Cloud users, following Tyk Cloud instructions to deploy your hybrid gateways.Prerequisites
- Kubernetes 1.19+
- Helm 3+
- Connection details to remote control plane from the tyk-control-plane installation output.
- Redis for key storage
- Tyk Pump to send analytics to Tyk Control Plane and Prometheus
gateway-svc-tyk-dp-tyk-gateway at port 8080. Pump is also configured with Hybrid Pump which sends aggregated analytics to MDCB, and Prometheus Pump which expose metrics locally at :9090/metrics.
-
Set connection details
Set the below environment variables and replace values with connection details to your MDCB control plane. See Tyk Data Plane documentation on how to get the connection details.
-
Then use Helm to install Redis and Tyk
-
Done!
Now Tyk Gateway should be accessible through service
gateway-svc-tyk-dp-tyk-gatewayat port8080. Pump is also configured with Hybrid Pump which sends aggregated analytics to MDCB, and Prometheus Pump which expose metrics locally at:9090/metrics. For the complete installation guide and configuration options, please see Tyk Data Plane Chart.
Configuring an existing Tyk Gateway
If you have Redis and a working Tyk Gateway deployed, follow below steps to configure your gateways to work in RPC mode.If you have deployed Gateway with
tyk-data-plane Chart, you don’t need to go through following steps to configure Tyk Gateway. The necessary configurations has been set in tyk-data-plane chart templates.Prerequisites
- Redis
- A working headless/open source Tyk Gateway deployed
Data Plane Gateway Configuration
Modify the Tyk Gateway configuration (tyk.conf) as follows:
"use_db_app_configs": false,
Next, we need to ensure that the policy loader and analytics pump use the RPC driver:
if you set
analytics_config.type to rpc - make sure you don’t have your Tyk Pump configured to send analytics via the hybrid Pump type.key_space_sync_interval to set the period’s length in which the gateway will check for changes in the key space, if this value is not set then by default it will be 10 seconds.
The most important elements here are:
| Field | Description |
|---|---|
api_key | This the API key of a user used to authenticate and authorize the Gateway’s access through MDCB. The user should be a standard Dashboard user with minimal privileges so as to reduce risk if compromised. The suggested security settings are read for Real-time notifications and the remaining options set to deny. |
group_id | This is the “zone” that this instance inhabits, e.g. the cluster/data center the gateway lives in. The group ID must be the same across all the gateways of a data center/cluster which are also sharing the same Redis instance. This id should also be unique per cluster (otherwise another gateway’s cluster can pick up your keyspace events and your cluster will get zero updates). |
connection_string | The MDCB instance or load balancer. |
bind_to_slugs | For all Tyk installations this should be set to false. |
Minimizing latency with MDCB
Overview
As described previously, Acme Global Bank has operations and customers in both the EU and USA. To decrease the latency in response from their systems and to ensure that data remains in the same legal jurisdiction as the customers (data residency), they have deployed backend (or, from the perspective of the API gateway, “upstream”) services in two data centers: one in the US, the other in the EU. Without a dedicated solution for this multi-region use case, Acme Global Bank would deploy a Tyk Gateway cluster in each data center and then have the operational inconvenience of maintaining two separate instances of Tyk Dashboard to configure, secure and publish the APIs. By using Tyk’s Multi-Data Center Bridge (MDCB), however, they are able to centralise the management of their API Gateways and gain resilience against failure of different elements of the deployment - data or control plane - improving the availability of their public APIs. In this example we will show you how to create the Acme Global Bank deployment using our example Helm charts.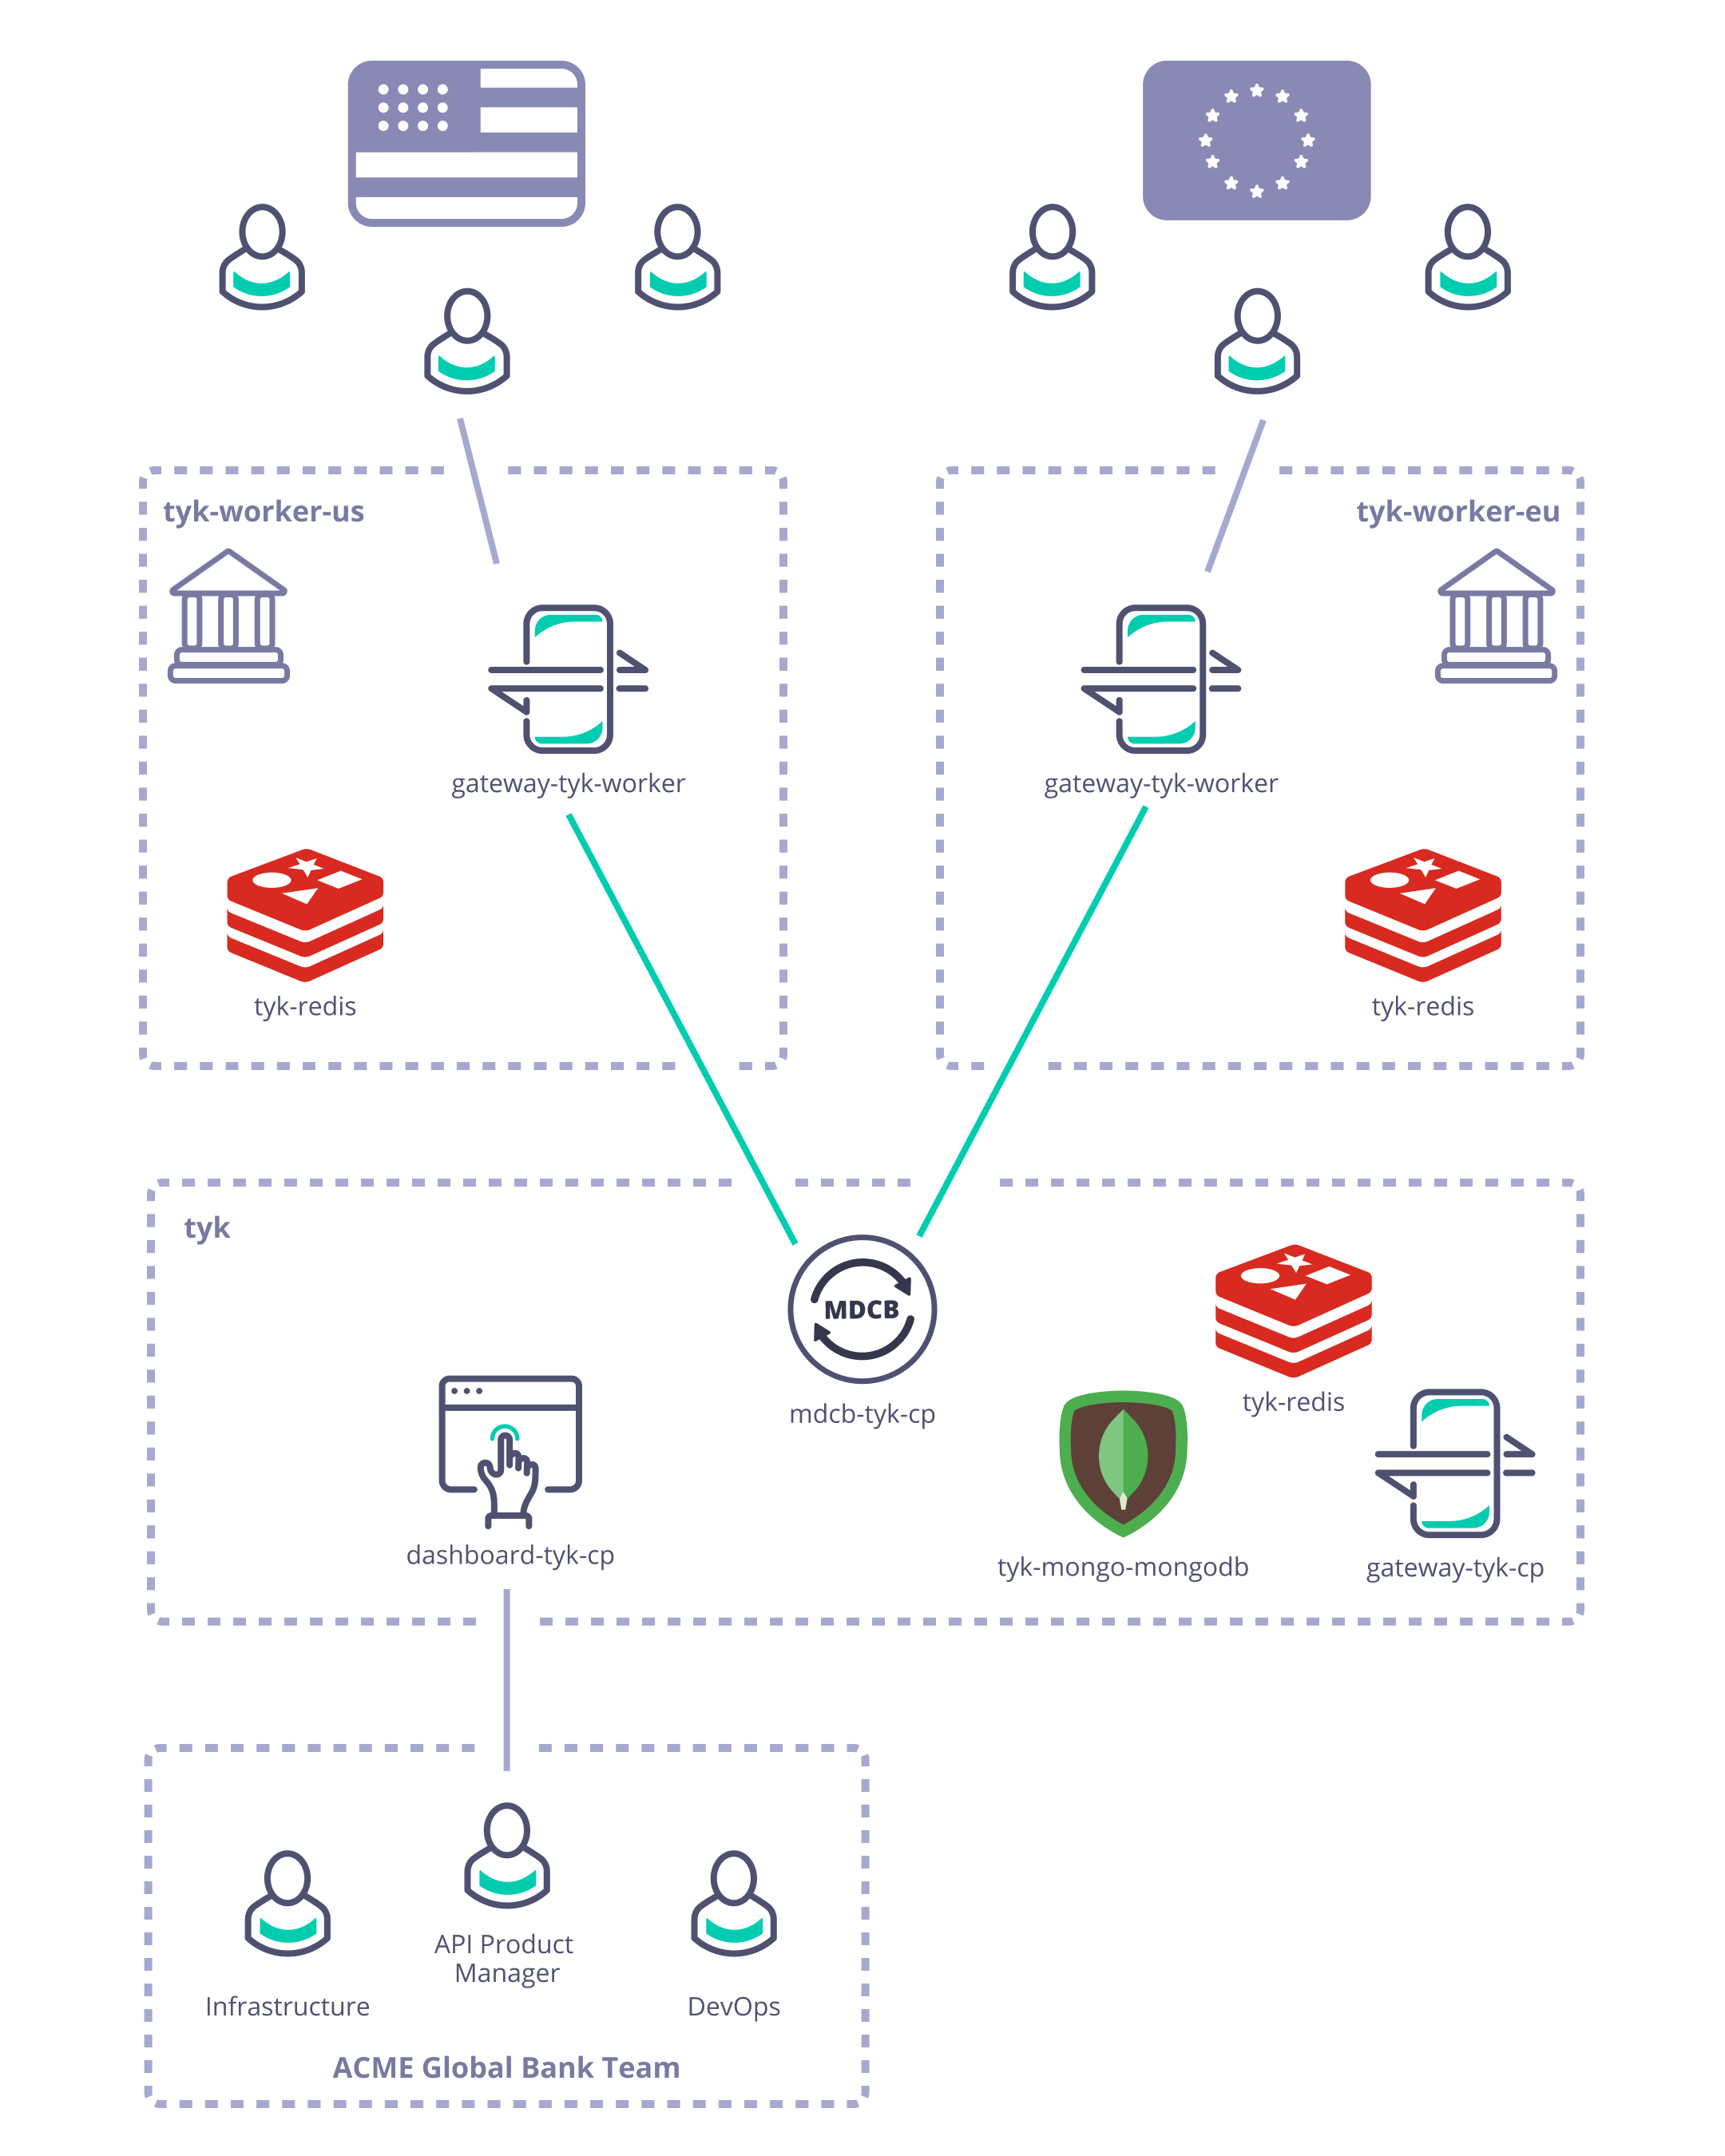
Pre-requisites and configuration
-
What you need to install/set-up
- Tyk Pro license (Dashboard and MDCB keys - obtained from Tyk)
- Access to a cloud account of your choice, e.g. GCP
- You need to grab this Tyk Demo repository: GitHub - TykTechnologies/tyk-k8s-demo
- You need to install
helm,jq,kubectlandwatch
-
To configure GCP
- Create a GCP cluster
- Install the Google Cloud SDK
- install
gcloud ./google-cloud-sdk/install.sh
- install
- Configure the Google Cloud SDK to access your cluster
gcloud auth logingcloud components install gke-gcloud-auth-plugingcloud container clusters get-credentials <<gcp_cluster_name>> —zone <<zone_from_gcp_cluster>>—project <<gcp_project_name>>
- Verify that everything is connected using
kubectlkubectl get nodes
-
You need to configure the Tyk build
- Create a
.envfile within tyk-k8s-demo based on the provided.env.examplefile - Add the Tyk license keys to your
.env:LICENSE=<dashboard_license>MDCB_LICENSE=<mdcb_license>
- Create a
Deploy Tyk Stack to create the Control and Data Planes
- Create the Tyk Control Plane
./up.sh -r redis-cluster -e load-balancer tyk-cp
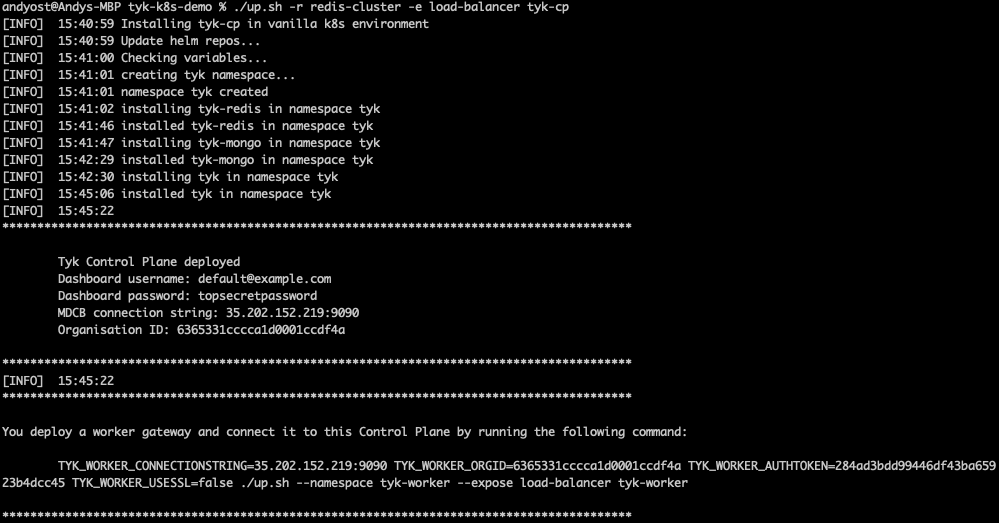
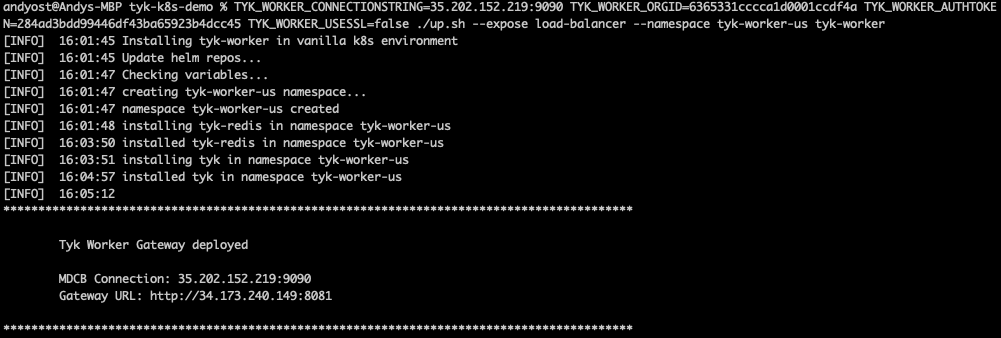
- Create two logically-separate Tyk Data Planes to represent Acme Global Bank’s US and EU operations using the command provided in the output from the
./up.shscript:TYK_WORKER_CONNECTIONSTRING=<MDCB-exposure-address:port> TYK_WORKER_ORGID=<org_id> TYK_WORKER_AUTHTOKEN=<mdcb_auth_token> TYK_WORKER_USESSL=false ./up.sh --namespace <worker-namespace> tyk-worker
<worker-namespace> to tyk-worker-us, the other to tyk-worker-eu (or namespaces of your choice)
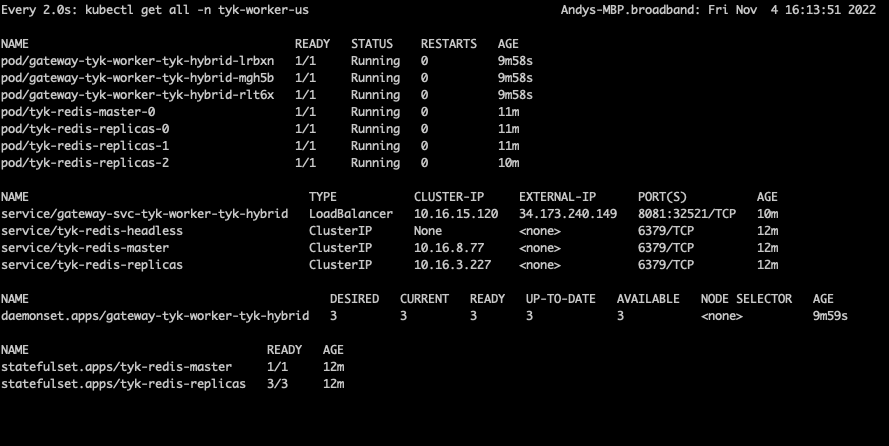
Deploying the tyk-worker-us namespace (Data Plane #1)

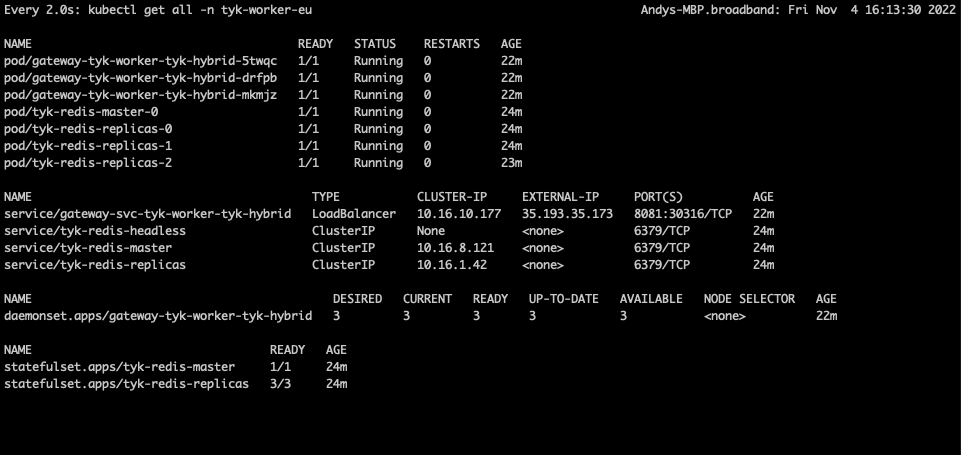
tyk-worker-eu namespace (Data Plane #2)
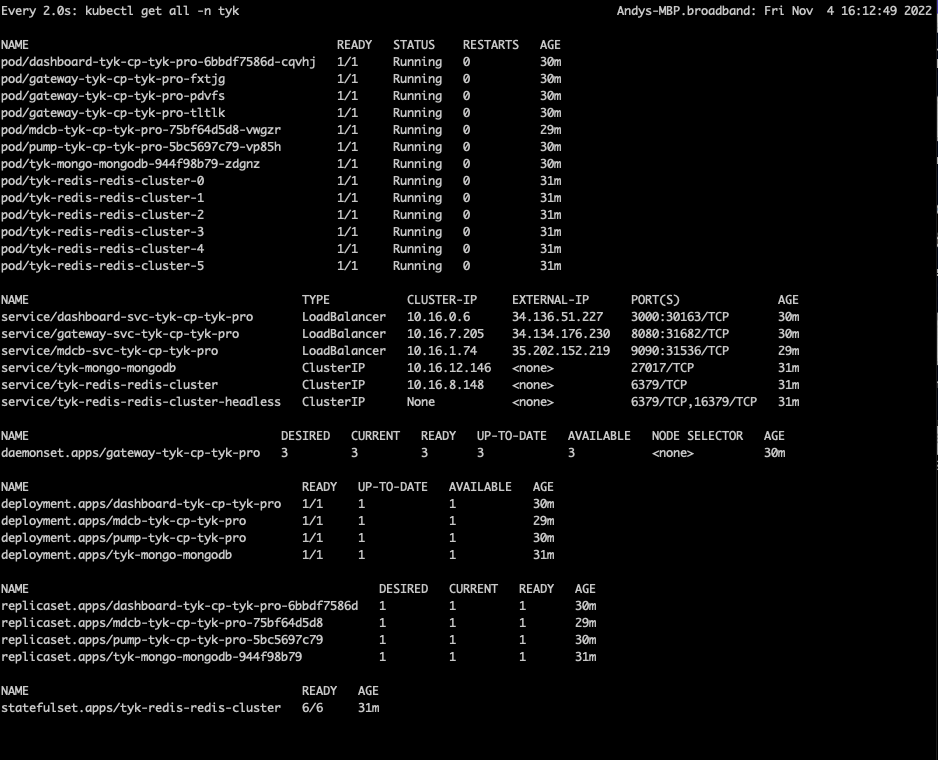
- Verify and observe the Tyk Control and Data Planes
- Use
curlto verify that the gateways are alive by calling their/helloendpoints
- Use
- You can use
watchto observe each of the Kubernetes namespaces
tyk-cp (Control Plane)
tyk-worker-us (Data Plane #1)
tyk-worker-eu (Data Plane #2)

Testing the deployment to prove the concept
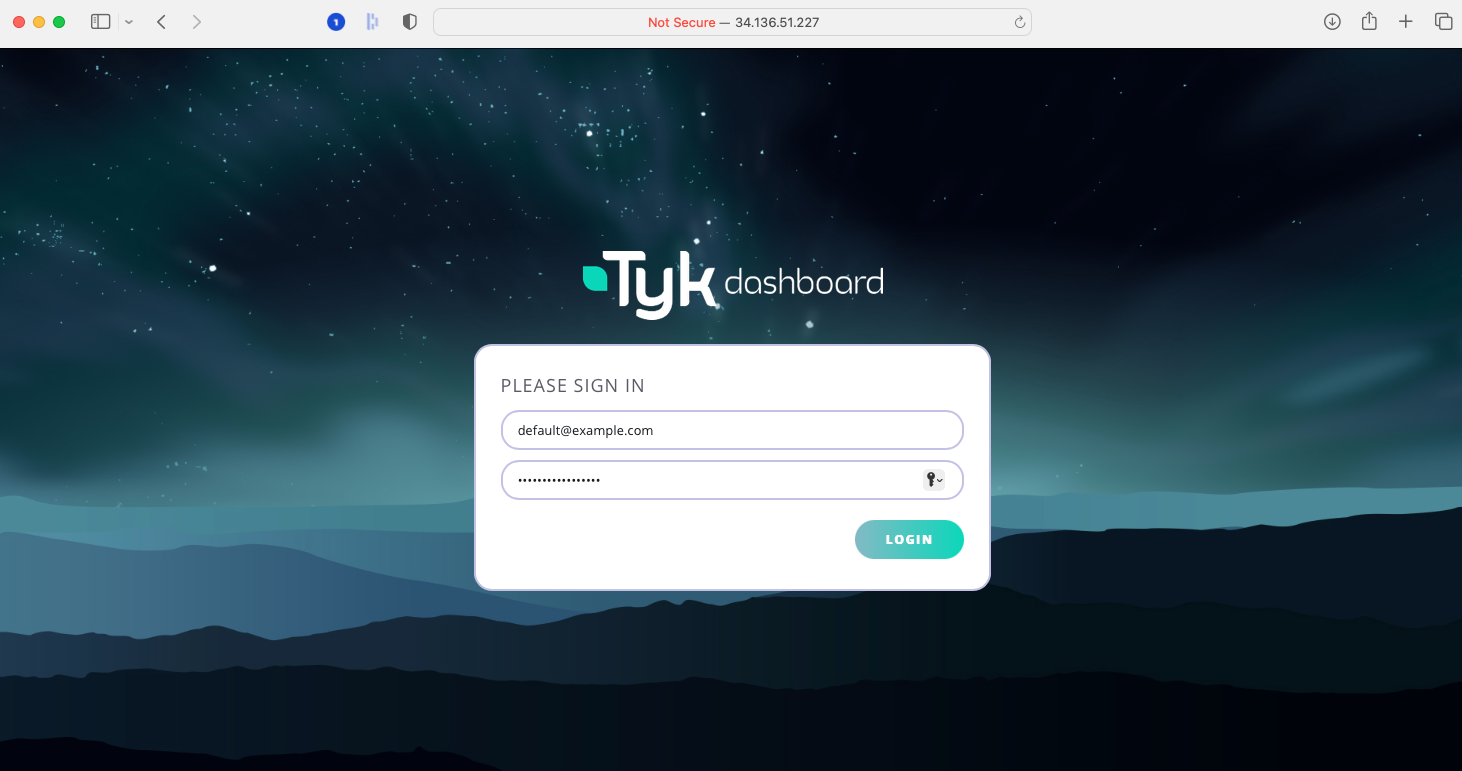
As you know, the Tyk Multi Data Center Bridge provides a link from the Control Plane to the Data Plane Gateways, so that we can control all the remote gateways from a single dashboard.- Access Tyk Dashboard
- You can log into the dashboard at the external IP address reported in the watch window for the Control Plane - in this example it was at
34.136.51.227:3000, so just enter this in your browser - The user name and password are provided in the
./up.shoutput:- username:
default@example.com - password:
topsecretpassword(or whatever you’ve configured in the.envfile)
- username:
- You can log into the dashboard at the external IP address reported in the watch window for the Control Plane - in this example it was at
- Create an API in the dashboard, but don’t secure it (set it to
Open - keyless); for simplicity we suggest a simple pass-through proxy tohttbin.org. - MDCB will propagate this API through to the Data Plane Gateways - so try hitting that endpoint on the two Data Plane gateways (their addresses are given in the watch windows: for example
34.173.240.149:8081for mytyk-worker-usgateway above). - Now secure the API from the dashboard using the Authentication Token option. You’ll need to set a policy for the API and create a key.
- If you try to hit the API again from the Data Plane Gateways, you’ll find that the request is now rejected because MDCB has propagated out the change in authentication rules. Go ahead and add the Authentication key to the request header… and now you reach
httpbin.orgagain. You can see in the Dashboard’s API Usage Data section that there will have been success and error requests to the API. - OK, so that’s pretty basic stuff, let’s show what MDCB is actually doing for you… reset the API authentication to be
Open - keylessand confirm that you can hit the endpoint without the Authentication key from both Data Planes. - Next we’re going to experience an MDCB outage - by deleting its deployment in Kubernetes:
kubectl delete deployment.apps/mdcb-tyk-cp-tyk-pro -n tyk - Now there’s no connection from the data placne to the control plane, but try hitting the API endpoint on either Data Plane Gateway and you’ll see that they continue serving your users’ requests regardless of their isolation from the Control Plane.
- Back on the Tyk Dashboard make some changes - for example, re-enable Authentication on your API, add a second API. Verify that these changes do not propagate through to the Data Plane Gateways.
- Now we’ll bring MDCB back online with this command:
./up.sh -r redis-cluster -e load-balancer tyk-cp - Now try hitting the original API endpoint from the Data Planes - you’ll find that you need the Authorization key again because MDCB has updated the Data Planes with the new config from the Control Plane.
- Now try hitting the new API endpoint - this will also have automatically been propagated out to the Data Planes when MDCB came back up and so is now available for your users to consume.
Closing everything down
We’ve provided a simple script to tear down the demo as follows:./down.sh -n tyk-worker-us./down.sh -n tyk-worker-eu./down.sh
MDCB Synchroniser
Overview
Data Plane Gateways need resources such as API keys, certificates, and OAuth clients to process API requests. To ensure high availability and resilience, these resources need to be synchronized from the Control Plane to the Data Planes. The MDCB Synchroniser is a feature that proactively pushes these resources to the Data Planes when they start up. This improves resilience if the MDCB link or the Control Plane is unavailable, as the Data Planes can continue to operate independently using the resources stored locally in their Redis instances. It also offers a performance improvement, as Gateways do not have to retrieve resources on demand when an API is first called.A note on spellingThroughout this documentation, we use specific spelling conventions to help distinguish between product features and general concepts:
- Synchroniser (with an ‘s’) refers specifically to a core functionality of Tyk MDCB
- synchronize (with a ‘z’) and its derivatives refer to the general concept of synchronization
How Resources are Synchronized
There are two models for synchronizing resources from the Control Plane to the Data Planes: on-demand retrieval and proactive synchronization using the Synchroniser.Without the Synchroniser (On-demand)
If the Synchroniser is not in use, the Data Plane Gateways pull resources on demand. When a Gateway requires a resource (for example, a TLS certificate to serve a request), it first checks its local Redis cache. If the resource doesn’t exist locally, it requests it from the Control Plane via the MDCB. Once retrieved, the resource is cached locally in Redis for future use. This model introduces a potential single point of failure. If the MDCB or Control Plane is down, a Data Plane Gateway cannot retrieve a resource it has not previously cached, which could impact API availability.
With the Synchroniser (Proactive)
When the Synchroniser is enabled, API keys, certificates, and OAuth clients are synchronized and stored in the Data Plane’s Redis in advance. When one of these resources is created, modified, or deleted on the Control Plane, a signal is emitted, and the Data Planes update their local stores accordingly. This ensures that all required resources are already in place when the Gateway needs to handle traffic.NoteBy default, the Synchroniser will synchronize all certificates to every Data Plane. In Tyk 5.12.0, we added the option to configure a more granular, selective synchronization for TLS certificates. This is particularly useful in environments with a large number of certificates where different Data Planes serve different domains.This selective approach reduces both the memory footprint of each Data Plane’s Redis instance and unnecessary network traffic between the Control and Data Planes.
- Redis Storage: Proactively synchronizing all resources will increase the storage requirements for each Data Plane’s local Redis instance. Using the selective certificate sync feature from Tyk 5.12.0 can help mitigate this for certificates.
- Data Residency: The synchronization of keys and OAuth clients is an all-or-nothing process. All keys and OAuth clients will be propagated to all Data Planes. If you have strict data residency requirements, be aware that there is no mechanism to restrict these resources to specific Gateway groups.

Configuring the Synchroniser for Tyk Self Managed
The Synchroniser is disabled by default. To enable it, please configure both the Data Plane Gateways and MDCB accordingly.Data Plane configuration
The Synchroniser behaviour is configured inslave_options object in the Data Plane Gateway’s tyk.conf file or equivalent environment variables, in addition to the standard Data Plane Gateway settings:
| Property | Description |
|---|---|
synchroniser_enabled | Set to true to use the Synchroniser |
sync_used_certs_only | Synchronize only the TLS certificates used by APIs loaded to the Gateway |
NoteThe
sync_used_certs_only option was added in Tyk 5.12.0 to prevent the Data Plane from loading irrelevant TLS certificates (which could generate noise in the Gateway application logs if expired). With this option set to true only certificates required for APIs loaded by the Gateway will be synchronised to the Data Plane.In Tyk 5.12.0, there is a small limitation. When this option is enabled, certificates registered for APIs secured with Certificate Authentication are retrieved on demand rather than during the initial sync.Control Plane configuration
The Synchroniser behaviour is configured in thesync_worker_config object in the MDCB’s tyk_sink.conf file or equivalent environment variables, in addition to the standard MDCB settings:
| Property | Description |
|---|---|
enabled | Set to true to use the Synchroniser |
hash_keys | Set to true if key hashing is also enabled in your Tyk Dashboard and Gateway configurations. This ensures that the Synchroniser correctly handles hashed API keys. |
max_batch_size | The maximum number of keys that the Synchroniser will fetch from Redis in a single batch. The default value is 1000. |
time_between_batches | The cooldown period in seconds between fetching batches of keys. The default is 0, which means there is no delay. |
max_workers | The maximum number of Gateway groups (clusters) that can be synchronized concurrently. The default value is 10000. |
warmup_time | The time in seconds that MDCB will wait before starting the synchronization process. This allows the worker nodes to load APIs and policies from their local Redis before synchronising other resources. The default value is 2 seconds. |
group_key_ttl | The Time To Live (TTL) in seconds for the group synchronization key in Redis. This key (syncworker-{groupID}-{orgID}) prevents multiple Gateways in the same group from triggering a sync simultaneously. The default value is 180 seconds. |
Configuring the Synchroniser for Tyk Cloud
Please submit a support ticket to us if you want to enable Synchroniser for your Tyk Cloud deployment.Frequently Asked Questions
How do I know if synchronization happened?
How do I know if synchronization happened?
You could check the MDCB log message to know when synchronization started and finished:
Can I trigger a re-synchronization?
Can I trigger a re-synchronization?
Synchronization will be triggered when the Time To Live (TTL) of a Data Plane Gateway expires. The default expiry duration is 3 minutes. The Time To Live (TTL) value can be set in the MDCB config using
sync_worker_config.group_key_ttl.