Introduction
Rich plugins make it possible to write powerful middleware for Tyk. Tyk supports: gRPC provides the ability to write plugins using many languages including C++, Java, Ruby and C#. The dynamically built Tyk binaries can expose and call Foreign Function Interfaces in guest languages that extend the functionality of a gateway process. The plugins are able to directly call some Tyk API functions from within their guest language. They can also be configured so that they hook into various points along the standard middleware chain.When using Python plugins, the middleware function names are set globally. So, if you include two or more plugins that implement the same function, the last declared plugin implementation of the function will be returned. We plan to add namespaces in the future.
How do rich plugins work ?
ID Extractor & Auth Plugins
The ID Extractor is a caching mechanism that’s used in combination with Tyk Plugins. It can be used specifically with plugins that implement custom authentication mechanisms. The ID Extractor works for all rich plugins: gRPC-based plugins, Python and Lua. See ID Extractor for more details.Interoperability
This feature implements an in-process message passing mechanism, based on Protocol Buffers, any supported languages should provide a function to receive, unmarshal and process this kind of messages. The main interoperability task is achieved by using cgo as a bridge between a supported language -like Python- and the Go codebase. Your C bridge function must accept and return aCoProcessMessage data structure like the one described in api.h, where p_data is a pointer to the serialised data and length indicates the length of it.
CoProcessObject data structure.
HookType- the hook type (see below)Request- the HTTP requestSession- the client’s Session.Metadata- the metadata from the session data above (key/value string map).Spec- the API specification data. Currently organization ID, API ID and config_data.
Coprocess Dispatcher
Coprocess.Dispatcher describes a very simple interface for implementing the dispatcher logic, the required methods are: Dispatch, DispatchEvent and Reload.
Dispatch accepts a pointer to a struct CoProcessObject (as described above) and must return an object of the same type. This method is called for every configured hook on every request.
Typically, it performs a single function call in the target language (such as Python_DispatchHook in coprocess_python), where the corresponding logic is handled—mainly because different languages have different ways of loading, referencing, or calling middleware.
DispatchEvent provides a way of dispatching Tyk events to a target language. This method doesn’t return any variables but does receive a JSON-encoded object containing the event data. For extensibility purposes, this method doesn’t use Protocol Buffers, the input is a []byte, the target language will take this (as a char) and perform the JSON decoding operation.
Reload is called when triggering a hot reload, this method could be useful for reloading scripts or modules in the target language.
Coprocess Dispatcher - Hooks
This component is in charge of dispatching your HTTP requests to the custom middleware. The list, from top to bottom, shows the order of execution. The dispatcher follows the standard middleware chain logic and provides a simple mechanism for “hooking” your custom middleware behavior, the supported hooks are:- Pre: gets executed before the request is sent to your upstream target and before any authentication information is extracted from the header or parameter list of the request. When enabled, this applies to both keyless and protected APIs.
- AuthCheck: gets executed as a custom authentication middleware, instead of the standard ones provided by Tyk. Use this to provide your own authentication mechanism.
- PostKeyAuth: gets executed right after the authentication process.
- Post: gets executed after the authentication, validation, throttling, and quota-limiting middleware has been executed, just before the request is proxied upstream. Use this to post-process a request before sending it to your upstream API. This is only called when using protected APIs. If you want to call a hook after the authentication but before the validation, throttling and other middleware, see PostKeyAuth.
-
Response: gets executed after the upstream API replies. The arguments passed to this hook include both the request and response data. Use this to modify the HTTP response before it’s sent to the client. This hook also receives the request object, the session object, the metadata and API definition associated with the request.
Response hooks are not available for native Go plugins. Python and gRPC plugins are supported.
Coprocess Gateway API
coprocess_api.go provides a bridge between the Gateway API and C. Any function that needs to be exported should have the export keyword:
api.h, like this:
Basic usage
The intended way of using a Coprocess middleware is to specify it as part of an API Definition:All hook types support chaining except the custom auth check (
auth_check).Rich Plugins Data Structures
This section describes the data structures used by the Tyk rich plugins. The coprocess object is a message dispatched by Tyk to the gRPC server handling the custom plugins. The Tyk Protocol Buffer definitions are intended for users to generate their own bindings using the appropriate gRPC tools for the required target language. The remainder of this document illustrates a class diagram and explins the attributes of the protobuf messages.Coprocess Object
TheCoprocess.Object data structure wraps a Coprocess.MiniRequestObject and Coprocess.ResponseObject It contains additional fields that are useful for users that implement their own request dispatchers, like the middleware hook type and name.
It also includes the session state object (SessionState), which holds information about the current key/user that’s used for authentication.

Field Descriptions
hook_type
Contains the middleware hook type: pre, post, custom auth.
hook_name
Contains the hook name.
request
Contains the request object, see MiniRequestObject for more details.
session
Contains the session object, see SessionState for more details.
metadata
Contains the metadata. This is a dynamic field.
spec
Contains information about API definition, including APIID, OrgID and config_data.
response
Contains information populated from the upstream HTTP response data, for response hooks. See ResponseObject for more details. All the field contents can be modified.
MiniRequestObject
TheCoprocess.MiniRequestObject is the main request data structure used by rich plugins. It’s used for middleware calls and contains important fields like headers, parameters, body and URL. A MiniRequestObject is part of a Coprocess.Object.
Field Descriptions
headers
A read-only field for reading headers injected by previous middleware. Modifying this field won’t alter the request headers See set_headers and delete_headers for this.
set_headers
This field appends the given headers (keys and values) to the request.
delete_headers
This field contains an array of header names to be removed from the request.
body
Contains the request body. See ReturnOverrides for response body modifications.
raw_body
Contains the raw request body (bytes).
url
The request URL.
params
A read-only field that contains the request params. Modifying this value won’t affect the request params.
add_params
Add paramaters to the request.
delete_params
This field contains an array of parameter keys to be removed from the request.
return_overrides
See ReturnOverrides for more information.
method
The request method, e.g. GET, POST, etc.
request_uri
Raw unprocessed URL which includes query string and fragments.
scheme
Contains the URL scheme, e.g. http, https.
ResponseObject
TheResponseObject exists within an object for response hooks. The fields are populated with the upstream HTTP response data. All the field contents can be modified.
Field Descriptions
status_code
This field indicates the HTTP status code that was sent by the upstream.
raw_body
This field contains the HTTP response body (bytes). It’s always populated.
body
This field contains the HTTP response body in string format. It’s not populated if the raw_body contains invalid UTF-8 characters.
headers
A map that contains the headers sent by the upstream.
multivalue_headers
A list of headers, each header in this list is a structure that consists of two parts: a key and its corresponding values.
The key is a string that denotes the name of the header, the values are a list of strings that hold the content of the header, this is useful when the header has multiple associated values.
This field is available for Go, Python and Ruby since tyk v5.0.4 and 5.1.1+.
ReturnOverrides
TheReturnOverrides object, when returned as part of a Coprocess.Object, overrides the response of a given HTTP request. It also stops the request flow and the HTTP request isn’t passed upstream. The fields specified in the ReturnOverrides object are used as the HTTP response.
A sample usage for ReturnOverrides is when a rich plugin needs to return a custom error to the user.
Field Descriptions
response_code
This field overrides the HTTP response code and can be used for error codes (403, 500, etc.) or for overriding the response.
response_error
This field overrides the HTTP response body.
headers
This field overrides response HTTP headers.
override_error
This setting provides enhanced customization for returning custom errors. It should be utilized alongside response_body for optimal effect.
response_body
This field serves as an alias for response_error and holds the HTTP response body.
SessionState
ASessionState data structure is created for every authenticated request and stored in Redis. It’s used to track the activity of a given key in different ways, mainly by the built-in Tyk middleware like the quota middleware or the rate limiter.
A rich plugin can create a SessionState object and store it in the same way built-in authentication mechanisms do. This is what a custom authentication middleware does. This is also part of a Coprocess.Object.
Returning a null session object from a custom authentication middleware is considered a failed authentication and the appropriate HTTP 403 error is returned by the gateway (this is the default behavior) and can be overridden by using ReturnOverrides.
Field Descriptions
last_check
No longer used.
allowance
No longer in use, should be the same as rate.
rate
The number of requests that are allowed in the specified rate limiting window.
per
The number of seconds that the rate window should encompass.
expires
An epoch that defines when the key should expire.
quota_max
The maximum number of requests allowed during the quota period.
quota_renews
An epoch that defines when the quota renews.
quota_remaining
Indicates the remaining number of requests within the user’s quota, which is independent of the rate limit.
quota_renewal_rate
The time in seconds during which the quota is valid. So for 1000 requests per hour, this value would be 3600 while quota_max and quota_remaining would be 1000.
access_rights
Defined as a map<string, APIDefinition> instance, that maps the session’s API ID to an AccessDefinition. The AccessDefinition defines the access rights for the API in terms of allowed: versions and URLs(endpoints). Each URL (endpoint) has a list of allowed methods. For further details consult the tutorials for how to create a security policy for Tyk Cloud, Tyk Self Managed and Tyk OSS platforms.
org_id
The organization this user belongs to. This can be used in conjunction with the org_id setting in the API Definition object to have tokens “owned” by organizations.
oauth_client_id
This is set by Tyk if the token is generated by an OAuth client during an OAuth authorization flow.
basic_auth_data
This section contains a hashed representation of the basic auth password and the hashing method used.
For further details see BasicAuthData.
jwt_data
Added to sessions where a Tyk key (embedding a shared secret) is used as the public key for signing the JWT. The JWT token’s KID header value references the ID of a Tyk key. See JWTData for an example.
hmac_enabled
When set to true this indicates generation of a HMAC signature using the secret provided in hmac_secret. If the generated signature matches the signature provided in the Authorization header then authentication of the request has passed.
hmac_secret
The value of the HMAC shared secret.
is_inactive
Set this value to true to deny access.
apply_policy_id
The policy ID that is bound to this token.
Although
apply_policy_id is still supported, it is now deprecated. apply_policies is now used to list your policy IDs as an array. See here for more details.data_expires
A value, in seconds, that defines when data generated by this token expires in the analytics DB (must be using Pro edition and MongoDB).
monitor
Defines a quota monitor containing a list of percentage threshold limits in descending order. These limits determine when webhook notifications are triggered for API users or an organization. Each threshold represents a percentage of the quota that, when reached, triggers a notification. See Monitor for further details and an example.
enable_detailed_recording
Set this value to true to have Tyk store the inbound request and outbound response data in HTTP Wire format as part of the analytics data.
metadata
Metadata to be included as part of the session. This is a key/value string map that can be used in other middleware such as transforms and header injection to embed user-specific data into a request, or alternatively to query the providence of a key.
tags
Tags are embedded into analytics data when the request completes. If a policy has tags, those tags will supersede the ones carried by the token (they will be overwritten).
alias
As of v2.1, an Alias offers a way to identify a token in a more human-readable manner, add an Alias to a token in order to have the data transferred into Analytics later on so you can track both hashed and un-hashed tokens to a meaningful identifier that doesn’t expose the security of the underlying token.
last_updated
A UNIX timestamp that represents the time the session was last updated. Applicable to Post, PostAuth and Response plugins. When developing CustomAuth plugins developers should add this to the SessionState instance.
id_extractor_deadline
This is a UNIX timestamp that signifies when a cached key or ID will expire. This relates to custom authentication, where authenticated keys can be cached to save repeated requests to the gRPC server. See id_extractor and Auth Plugins for additional information.
session_lifetime
UNIX timestamp that denotes when the key will automatically expire. Any·subsequent API request made using the key will be rejected. Overrides the global session lifetime. See Key Expiry and Deletion for more information.
key_id
This is the unique identifier for the access token used to authenticate the request, introduced in v5.9.0.
AccessDefinition
Field Descriptions
api_name
The name of the API that the session request relates to.
api_id
The ID of the API that the session request relates to.
versions
List of allowed API versions, e.g. "versions": [ "Default" ].
allowed_urls List of AccessSpec instances. Each instance defines a URL (endpoint) with an associated allowed list of methods. If all URLs (endpoints) are allowed then the attribute is not set.
AccessSpec
Defines an API’s URL (endpoint) and associated list of allowed methodsField Descriptions
url
A URL (endpoint) belonging to the API associated with the request session.
methods
List of allowed methods for the URL (endpoint), e.g. "methods": [ "GET". "POST", "PUT", "PATCH" ].
BasicAuthData
TheBasicAuthData contains a hashed password and the name of the hashing algorithm used. This is represented by the basic_auth_data attribute in SessionState message.
Field Descriptions
password
A hashed password.
hash
Name of the hashing algorithm used to hash the password.
JWTData
Added to sessions where a Tyk key (embedding a shared secret) is used as the public key for signing the JWT. This message contains the shared secret.Field Descriptions
secret
The shared secret.
Monitor
Added to a session when monitor quota thresholds are defined within the Tyk key. This message contains the quota percentage threshold limits, defined in descending order, that trigger webhook notification.Field Descriptions
trigger_limits
List of trigger limits defined in descending order. Each limit represents the percentage of the quota that must be reached in order for the webhook notification to be triggered.
Using Python
Overview
Requirements
Since v2.9, Tyk supports any currently stable Python 3.x version. The main requirement is to have the Python shared libraries installed. These are available aslibpython3.x in most Linux distributions.
- Python3-dev
- Protobuf: provides Protocol Buffers support
- gRPC: provides gRPC support
Important Note Regarding Performance
Python plugins are embedded within the Tyk Gateway process. Tyk Gateway integrates with Python custom plugins via a cgo bridge.Tyk Gateway <-> CGO <-> Python Custom Plugin
In order to integrate with Python custom plugins, the libpython3.x.so shared object library is used to embed a Python interpreter directly in the Tyk Gateway. Further details can be found here
This allows combining the strengths of both Python and Go in a single application. However, it’s essential to be aware of the potential complexities and performance implications of mixing languages, as well as the need for careful memory management when working with Python objects from Go.
The Tyk Gateway process initialises the Python interpreter using Py_initialize. The Python Global Interpreter Lock (GIL) allows only one thread to execute Python bytecode at a time, ensuring thread safety and simplifying memory management. While the GIL simplifies these aspects, it can limit the scalability of multi-threaded applications, particularly those with CPU-bound tasks, as it restricts parallel execution of Python code.
In the context of custom Python plugins, API calls are queued and the Python interpreter handles requests sequentially, processing them one at a time. Subsequently, this would consume large amounts of memory, and network sockets would remain open and blocked until the API request is processed.
Install the Python development packages
- Docker
- Ubuntu/Debian
- Red Hat or CentOS
Starting from Tyk Gateway version
Whilst Python plugins are still supported by Tyk Gateway, if you want to use them you must extend the image to add support for Python. For further details, please refer to the release notes for Tyk Gateway
v5.3.0, Python is no longer bundled with the official Tyk Gateway Docker image by default, to address security vulnerabilities in the Python libraries highlighted by Docker Scout.Whilst Python plugins are still supported by Tyk Gateway, if you want to use them you must extend the image to add support for Python. For further details, please refer to the release notes for Tyk Gateway
v5.3.0.docker build with this Dockerfile, providing the Tyk Gateway image that you would like to extend as build argument BASE_IMAGE.
As an example, this command will extend Tyk Gateway v5.3.0 to support Python plugins, generating the image tyk-gateway-python:v5.3.0:Python versions
Newer Tyk versions provide more flexibility when using Python plugins, allowing the users to set which Python version to use. By default, Tyk will try to use the latest version available. To see the Python initialisation log, run the Tyk gateway in debug mode. To use a specific Python version, set thepython_version flag under coprocess_options in the Tyk Gateway configuration file (tyk.conf).
Tyk doesn’t support Python 2.x.
Troubleshooting
To verify that the required Python Protocol Buffers module is available:How do I write Python Plugins?
We have created a demo Python plugin repository. The project implements a simple middleware for header injection, using a Pre hook (see Tyk custom middleware hooks. A single Python script contains the code for it, see middleware.py.Custom Authentication Plugin Tutorial
Introduction
This tutorial will guide you through the creation of a custom authentication plugin, written in Python. A custom authentication plugin allows you to implement your own authentication logic and override the default Tyk authentication mechanism. The sample code implements a very simple key check; currently it supports a single, hard-coded key. It could serve as a starting point for your own authentication logic. We have tested this plugin with Ubuntu 14. The code used in this tutorial is also available in this GitHub repository.Requirements
- Tyk API Gateway: This can be installed using standard package management tools like Yum or APT, or from source code. See here for more installation options.
Dependencies
- The Tyk CLI utility, which is bundled with our RPM and DEB packages, and can be installed separately from https://github.com/TykTechnologies/tyk-cli
- In Tyk 2.8 the Tyk CLI is part of the gateway binary, you can find more information by running “tyk help bundle”.
- Python 3.4
Create the Plugin
The first step is to create a new directory for your plugin file:manifest.json and needs to contain the following content:
-
The
file_listblock contains the list of files to be included in the bundle, the CLI tool expects to find these files in the current working directory. -
The
custom_middlewareblock contains the middleware settings like the plugin driver we want to use (driver) and the hooks that our plugin will expose. You use theauth_checkfor this tutorial. For other hooks see here. -
The
namefield references the name of the function that you implement in your plugin code:MyAuthMiddleware. -
You add an additional file called
middleware.py, this will contain the main implementation of our middleware.Your bundle should always contain a file namedmiddleware.pyas this is the entry point file.
Contents of middleware.py
You import decorators from the Tyk module as this gives you theHook decorator, and you import Tyk Python API helpers
You implement a middleware function and register it as a hook, the input includes the request object, the session object, the API meta data and its specification:
manifest.json to add as many files as you want. Files that aren’t listed in the manifest.json file will be ignored when building the plugin bundle.
Building the Plugin
A plugin bundle is a packaged version of the plugin, it may also contain a cryptographic signature of its contents. The-y flag tells the Tyk CLI tool to skip the signing process in order to simplify the flow of this tutorial. For more information on the Tyk CLI tool, see here.
You will use the Dockerised version of the Tyk CLI tool to bundle our package.
First, export your Tyk Gateway version to a variable.
bundle.zip in your current directory:
bundle.zip file in the plugin directory.
Publishing the Plugin
To allow Tyk access to the plugin bundle, you need to serve this file using a web server. For this tutorial we’ll use the Python built-in HTTP server (check the official docs for additional information). This server listens on port 8000 by default. To start it use:python3 -m http.server
When the server is started our current working directory is used as the web root path, this means that our bundle.zip file should be accessible from the following URL:
http://<IP Address>:8000/bundle.zip
The Tyk Gateway fetches and loads a plugin bundle during startup time and subsequent reloads. For updating plugins using the hot reload feature, you should use different plugin bundle names as you expect them to be used for versioning purposes, e.g. bundle-1, bundle-2, etc.
If a bundle already exists, Tyk will skip the download process and load the version that’s already present.
Configure Tyk
You will need to modify the Tyk global configuration file (tyk.conf) to use Python plugins. The following block should be present in this file:
Options
enable_coprocess: This enables the pluginpython_path_prefix: Sets the path to built-in Tyk modules, this will be part of the Python module lookup path. The value used here is the default one for most installations.enable_bundle_downloader: This enables the bundle downloaderbundle_base_url: This is a base URL that will be used to download the bundle. You should replace thebundle_base_urlwith the appropriate URL of the web server that’s serving your plugin bundles. For now HTTP and HTTPS are supported but we plan to add more options in the future (like pulling directly from S3 buckets). You use the URL that’s exposed by the test HTTP server in the previous step.public_key_path: Modifypublic_key_pathin case you want to enforce the cryptographic check of the plugin bundle signatures. If thepublic_key_pathisn’t set, the verification process will be skipped and unsigned plugin bundles will be loaded normally.
Configure an API Definition
There are two important parameters that you need to add or modify in the API definition. The first one iscustom_middleware_bundle which must match the name of the plugin bundle file. If we keep this with the default name that the Tyk CLI tool uses, it will be bundle.zip.
"custom_middleware_bundle": "bundle.zip"
The second parameter is specific to this tutorial, and should be used in combination with use_keyless to allow an API to authenticate against our plugin:
"use_keyless": false
"enable_coprocess_auth": true
"enable_coprocess_auth" will instruct the Tyk gateway to authenticate this API using the associated custom authentication function that’s implemented by the plugin.
Configuration via the Tyk Dashboard
To attach the plugin to an API, From the Advanced Options tab in the API Designer enter bundle.zip in the Plugin Bundle ID field.

Testing the Plugin
Now you can simply make an API call against the API for which we’ve loaded the Python plugin.If Running Tyk Gateway from Source
At this point you have your test HTTP server ready to serve the plugin bundle and the configuration with all the required parameters. The final step is to start or restart the Tyk Gateway (this may vary depending on how you setup Tyk). A separate service is used to load the Tyk version that supports Python (tyk-gateway-python), so we need to stop the standard one first (tyk-gateway):
What’s Next?
In this tutorial you learned how Tyk plugins work. For a production-level setup we suggest the following steps:- Configure Tyk to use your own key so that you can enforce cryptographic signature checks when loading plugin bundles, and sign your plugin bundles!
- Configure an appropriate web server and path to serve your plugin bundles.
Add Python Plugin To Your Gateway
API settings
To add a Python plugin to your API, you must specify the bundle name using thecustom_middleware_bundle field:
Global settings
To enable Python plugins you need to add the following block totyk.conf:
enable_coprocess: enables the rich plugins feature.
python_path_prefix: Sets the path to built-in Tyk modules, this will be part of the Python module lookup path. The value used here is the default one for most installations.
enable_bundle_downloader: enables the bundle downloader.
bundle_base_url: is a base URL that will be used to download the bundle, in this example we have test-bundle specified in the API settings, Tyk will fetch the URL for your specified bundle server (in the above example): dummy-bundle-server.com/bundles/test-bundle. You need to create and then specify your own bundle server URL.
public_key_path: sets a public key, this is used for verifying signed bundles, you may omit this if unsigned bundles are used.
Tyk Python API methods
Python plugins may call these Tyk API methods:store_data(key, value, ttl)
store_data sets a Redis key with the specified value and ttl.
get_data(key)
get_data retrieves a Redis key.
trigger_event(event_name, payload)
trigger_event triggers an internal Tyk event, the payload must be a JSON object.
log(msg, level)
log will log a message (msg) using the specified level.
log_error(*args)
log_error is a shortcut for log, it uses the error log level.
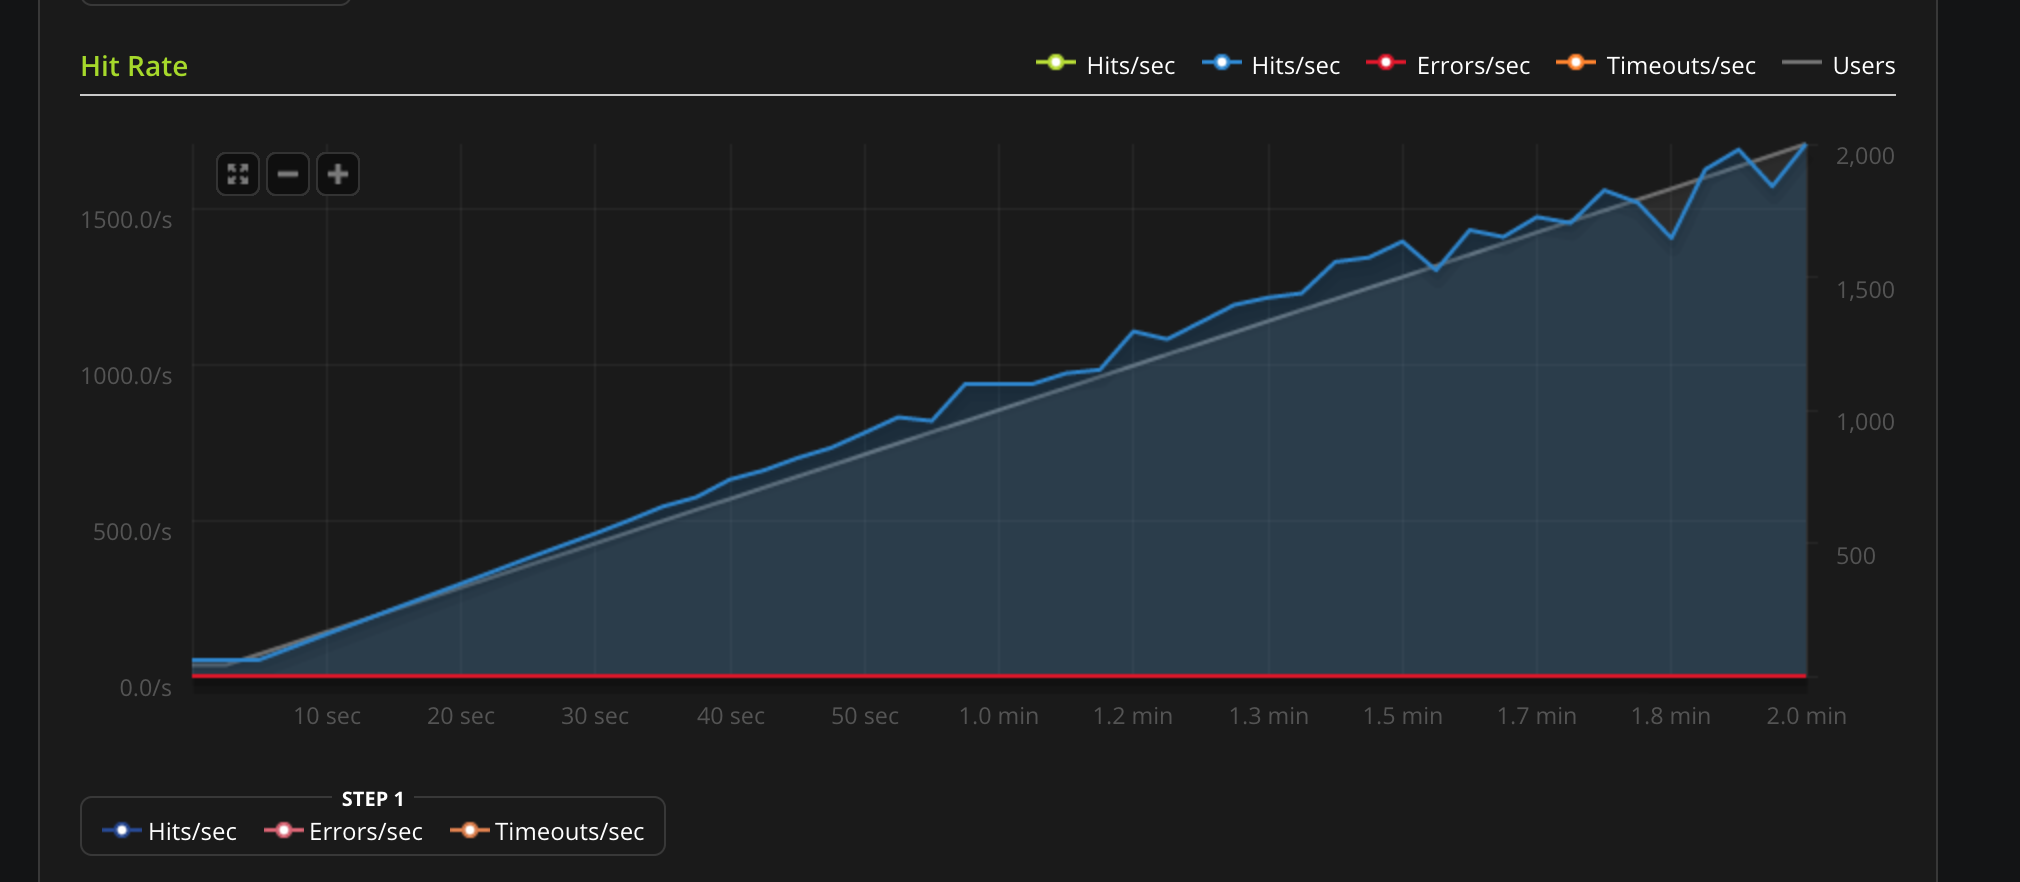
Python Performance
These are some benchmarks performed on Python plugins. Python plugins run in a standard Python interpreter, embedded inside Tyk.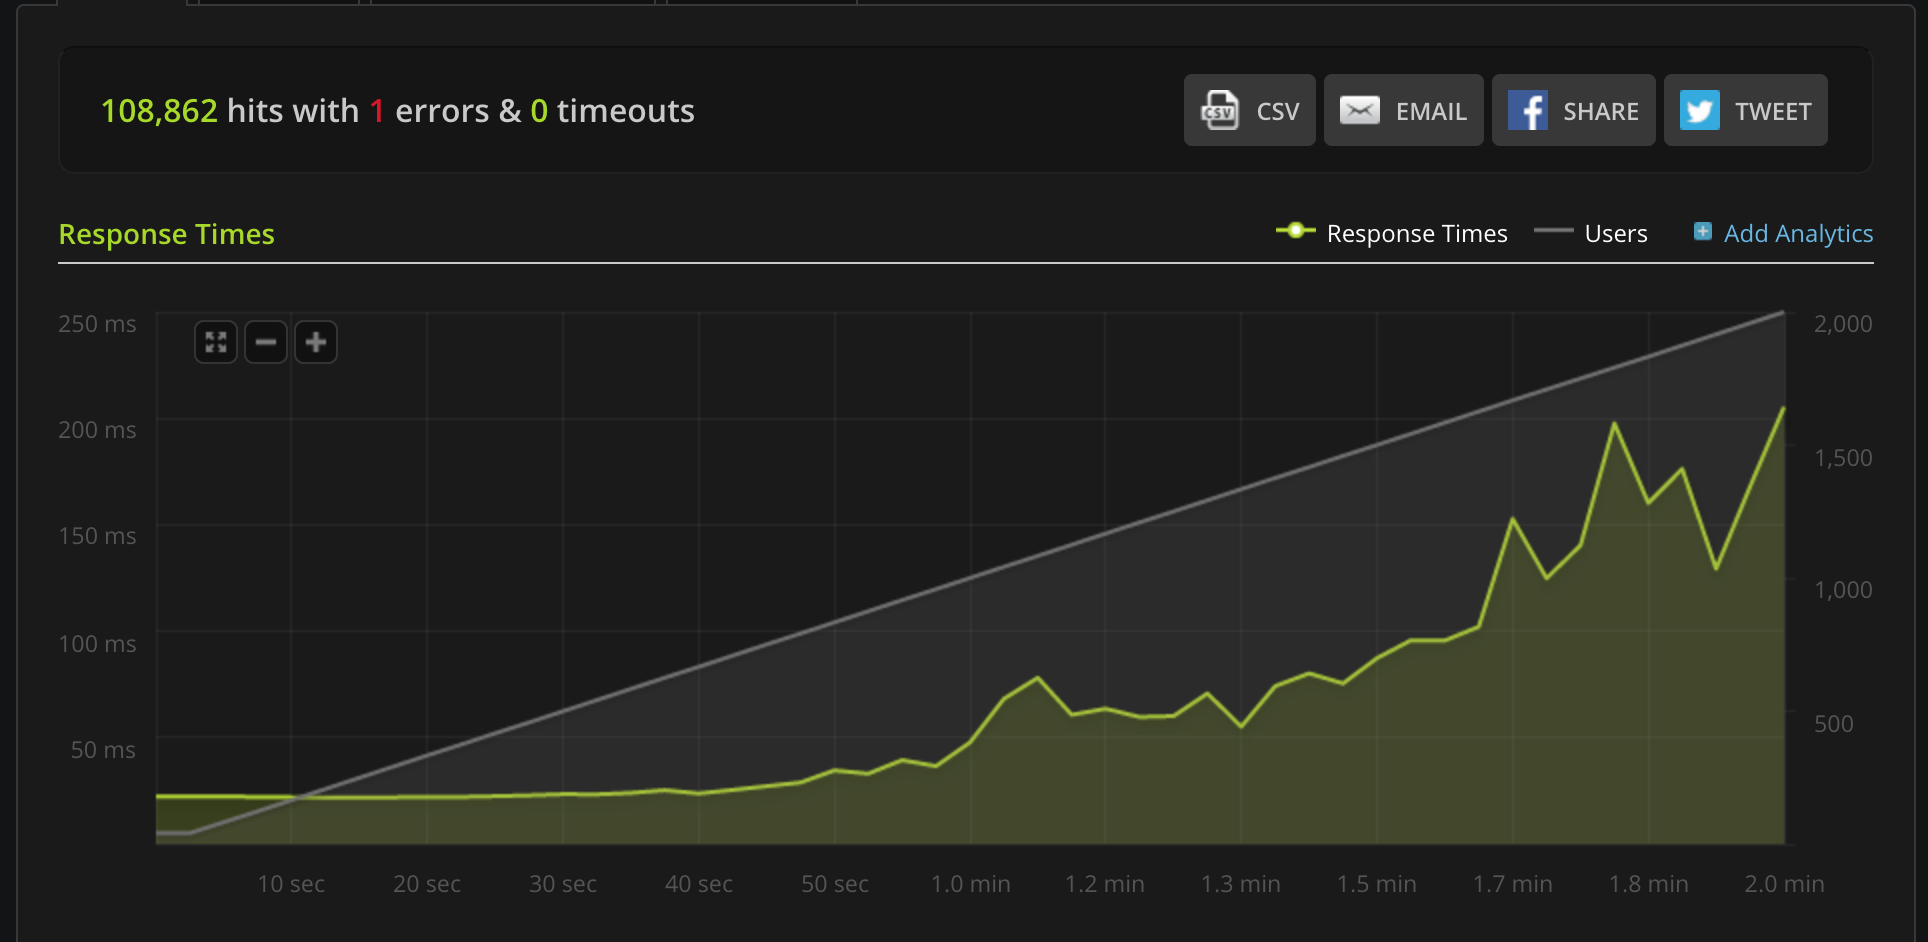
Using gRPC
Overview
gRPC is a very powerful framework for RPC communication across different languages. It was created by Google and makes heavy use of HTTP2 capabilities and the Protocol Buffers serialisation mechanism to dispatch and exchange requests between Tyk and your gRPC plugins. When it comes to built-in plugins, we have been able to integrate several languages like Python, Javascript & Lua in a native way: this means the middleware you write using any of these languages runs in the same process. At the time of writing, the following languages are supported: C++, Java, Objective-C, Python, Ruby, Go, C# and Node.JS. For supporting additional languages we have decided to integrate gRPC connections and perform the middleware operations within a gRPC server that is external to the Tyk process. Please contact us to learn more:Tyk has built-in support for gRPC backends, enabling you to build rich plugins using any of the gRPC supported languages. See gRPC by language for further details.
Use Cases
Deploying an external gRPC server to handle plugins provides numerous technical advantages:- Allows for independent scalability of the service from the Tyk Gateway.
- Utilizes a custom-designed server tailored to address specific security concerns, effectively mitigating various security risks associated with native plugins.
gRPC Plugin Architectural Overview
An example architecture is illustrated below.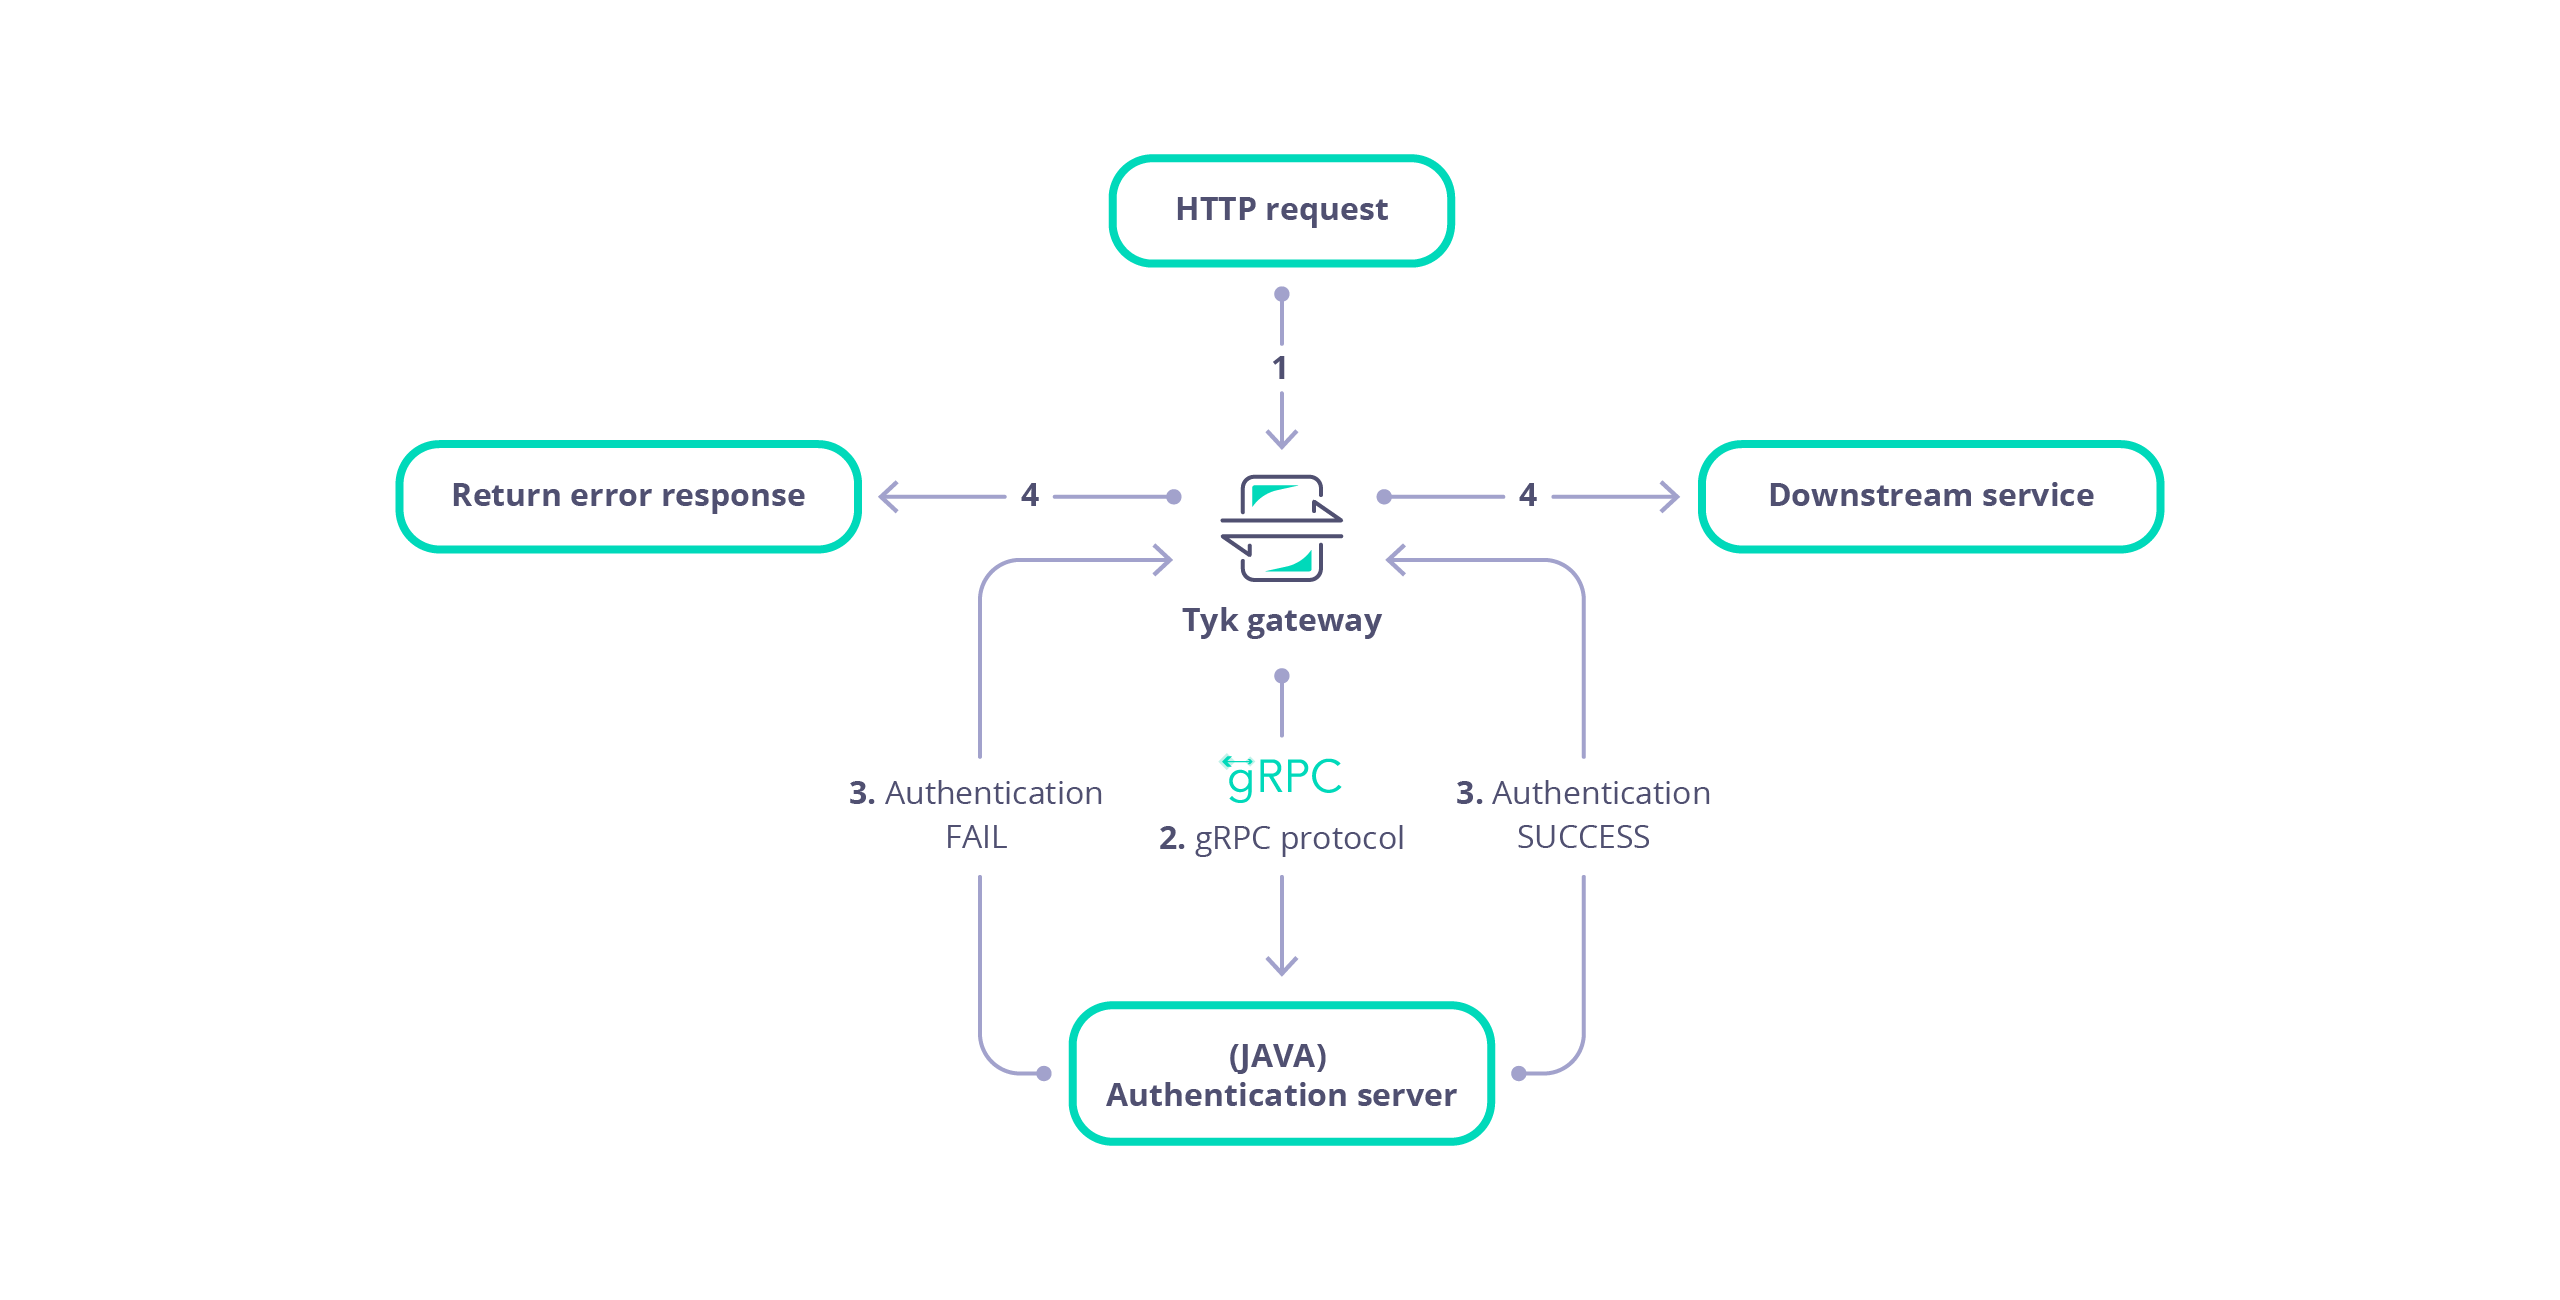
- Tyk receives a HTTP request.
- Tyk serialises the request and session into a protobuf message that is dispatched to your gRPC server.
- The gRPC server performs custom middleware operations (for example, any modification of the request object). Each plugin (Pre, PostAuthKey, Post, Response etc.) is handled as separate gRPC request.
- The gRPC server sends the request back to Tyk.
- Tyk proxies the request to your upstream API.
Limitations of gRPC plugins
At the time of writing the following features are currently unsupported and unavailable in the serialised request:- Client certificiates
- OAuth keys
- For graphQL APIs details concerning the max_query_depth is unavailable
- A request query parameter cannot be associated with multiple values
gRPC Developer Resources
The Protocol Buffers and bindings provided by Tyk should be used in order for successful ommunication between Tyk Gateway and your gRPC plugin server. Documentation for the protobuf messages is available in the Rich Plugins Data Structures page. You can generate supporting HTML documentation using the docs task in the Taskfile file of the Tyk repository. This documentation explains the protobuf messages and services that allow gRPC plugins to handle a request made to the Gateway. Please refer to the README file within the proto folder of the tyk repository for further details. You may re-use the bindings that were generated for our samples or generate the bindings youself for Go, Python and Ruby, as implemented by the generate task in the Taskfile file of the Tyk repository. If you wish to generate bindings for another target language you may generate the bindings yourself. The Protocol Buffers and gRPC documentation provide specific requirements and instructions for each language.Load Balancing Between gRPC Servers
Since Tyk 5.8.3 Tyk Gateway has had the ability to load balance between multiple gRPC servers. To implement this you must first specify the address of the load balanced service using thedns:/// (note: triple slash) protocol in Tyk Gateway’s gRPC server address configuration (TYK_GW_COPROCESSOPTIONS_COPROCESSGRPCSERVER). Tyk will retrieve the list of addresses for each gRPC server from that service.
You can control whether Tyk will implement load balancing using the gRPC round robin load balancing) config (TYK_GW_COPROCESSOPTIONS_GRPCROUNDROBINLOADBALANCING):
- If set to
true, Tyk will balance load between the server addresses retrieved using a round robin approach. - If set to
false, Tyk will implement a sticky session approach without load balancing.
tcp:// address of the gRPC server in Tyk Gateway’s gRPC server address configuration (TYK_GW_COPROCESSOPTIONS_COPROCESSGRPCSERVER) and set gRPC round robin load balancing (TYK_GW_COPROCESSOPTIONS_GRPCROUNDROBINLOADBALANCING) to false.
Getting Started: Key Concepts
This document serves as a developer’s guide for understanding the key concepts and practical steps for writing and configuring gRPC plugins for Tyk Gateway. It provides technical insights and practical guidance to seamlessly integrate Tyk plugins into your infrastructure through gRPC. The goal is to equip developers with the knowledge and tools needed to effectively utilize gRPC for enhancing Tyk Gateway functionalities. This comprehensive guide covers essential tasks, including:- Developing a gRPC Server: Learn how to develop a gRPC server using Tyk protocol buffers. The gRPC server facilitates the execution of Tyk plugins, which offer custom middleware for various phases of the API request lifecycle. By integrating these plugins, developers can enable Tyk Gateway with enhanced control and flexibility in managing API requests, allowing for fine-grained customization and tailored processing at each stage of the request lifecycle.
- Configuring Tyk Gateway: Set up Tyk Gateway to communicate with your gRPC Server and, optionally, an external secured web server hosting the gRPC plugin bundle for API configurations. Configure Tyk Gateway to fetch the bundle configured for an API from the web server, enabling seamless integration with gRPC plugins. Specify connection settings for streamlined integration.
- API Configuration: Customize API settings within Tyk Gateway to configure gRPC plugin utilization. Define plugin hooks directly within the API Definition or remotely via an external web server for seamless request orchestration. Tyk plugins provide custom middleware for different phases of the API request lifecycle, enhancing control and flexibility.
- API Testing: Test that Tyk Gateway integrates with your gRPC server for the plugins configured for your API.
Develop gRPC server
Develop your gRPC server, using your preferred language, to handle requests from Tyk Gateway for each of the required plugin hooks. These hooks allow Tyk Gateway to communicate with your gRPC server to execute custom middleware at various stages of the API request lifecycle.Prerequisites
The following prerequisites are necessary for developing a gRPC server that integrates with Tyk Gateway. ####### Tyk gRPC Protocol Buffers A collection of Protocol Buffer messages are available in the Tyk Gateway repository to allow Tyk Gateway to integrate with your gRPC server, requesting execution of plugin code. These messages establish a standard set of data structures that are serialised between Tyk Gateway and your gRPC Server. Developers should consult the Rich Plugins Data Structures page for further details. ####### Protocol Buffer Compiler The protocol buffer compiler,protoc, should be installed to generate the service and data structures in your preferred language(s) from the Tyk gRPC Protocol Buffer files. Developers should consult the installation documentation at grpc.io for an explanation of how to install protoc.
Generate Bindings
Generate the bindings (service and data structures) for your target language using theprotoc compiler. Tutorials are available at protobuf.dev for your target language.
Implement service
Your gRPC server should implement the Dispatcher service to enable Tyk Gateway to integrate with your gRPC server. The Protocol Buffer definition for the Dispatcher service is listed below:Developer resources
Consult the Tyk protocol buffers for the definition of the service and data structures that enable integration of Tyk gateway with your gRPC server. Tyk provides pre-generated bindings for C++, Java, Python and Ruby. Example tutorials are available that explain how to generate the protobuf bindings and implement a server for Java, .NET and NodeJS. Tyk Github repositories are also available with examples for Ruby and C#/.NETConfigure Tyk Gateway
Configure Tyk Gateway to issue requests to your gRPC server and optionally, specify the URL of the web server that will serve plugin bundles.Configure gRPC server
Modify the root of yourtyk.conf file to include the coprocess_options section, similar to that listed below:
coprocess_options section as follows:
enable_coprocess: Enables the rich plugins feature.coprocess_grpc_server: Specifies the gRPC server URL, in this example we’re using TCP. Tyk will attempt a connection on startup and keep reconnecting in case of failure.grpc_recv_max_size: Specifies the message size supported by the gateway gRPC client, for receiving gRPC responses.grpc_send_max_size: Specifies the message size supported by the gateway gRPC client for sending gRPC requests.grpc_authority: Theauthorityheader value, defaults tolocalhostif omitted. Allows configuration according to RFC 7540.
Configure Web server (optional)
Tyk Gateway can be configured to download the gRPC plugin configuration for an API from a web server. For further details related to the concept of bundling plugins please refer to plugin bundles.enable_bundle_downloader: Enables the bundle downloader to download bundles from a webserver.bundle_base_url: Base URL from which to serve bundled plugins.public_key_path: Public key for bundle verification (optional)
public_key_path value is used for verifying signed bundles, you may omit this if unsigned bundles are used.
Configure API
Plugin hooks for your APIs in Tyk can be configured either by directly specifying them in a configuration file on the Gateway server or by hosting the configuration externally on a web server. This section explains how to configure gRPC plugins for your API endpoints on the local Gateway or remotely from an external secured web server.Local
This section provides examples for how to configure gRPC plugin hooks, locally within an API Definition. Examples are provided for Tyk Gateway and Tyk Operator.Tyk Gateway
For configurations directly embedded within the Tyk Gateway, plugin hooks can be defined within your API Definition. An example snippet from a Tyk Classic API Definition is provided below:MyPostMiddleware. Before the request is sent upstream Tyk Gateway will serialize the request into a Object protobuf message with the hook_name property set to MyPostMiddleware and the hook_type property set to Post. This message will then then be dispatched to the gRPC server for processing before the request is sent upstream.
Ensure the plugin driver is configured as type grpc. Tyk will issue a request to your gRPC server for each plugin hook that you have configured.
Tyk Operator
The examples below illustrate how to configure plugin hooks for an API Definition within Tyk Operator. Setting thedriver configuring parameter to gRPC instructs Tyk Gateway to issue a request to your gRPC server for each plugin hook that you have configured.
Pre plugin hook example
In this example we can see that a custom_middleware configuration block has been used to configure a gRPC Pre request plugin hook with name HelloFromPre. Before any middleware is executed Tyk Gateway will serialize the request into a Object protobuf message with the hook_name property set to HelloFromPre and the hook_type property set to Pre. This message will then then be dispatched to the gRPC server.
custom_middleware configuration block has been used to configure a gRPC Post plugin with name HelloFromPost.
Before the request is sent upstream Tyk Gateway will serialize the request and session details into a Object protobuf message with the hook_name property set to HelloFromPost and the hook_type property set to Post. This message will then then be dispatched to the gRPC server for processing before the request is sent upstream.
Remote
It is possible to configure your API so that it downloads a bundled configuration of your plugins from an external webserver. The bundled plugin configuration is contained within a zip file. A gRPC plugin bundle is similar to the standard bundling mechanism. The standard bundling mechanism zips the configuration and plugin source code, which will be executed by Tyk. Conversely, a gRPC plugin bundle contains only the configuration (manifest.json), with plugin code execution being handled independently by the gRPC server.
Bundling a gRPC plugin requires the following steps:
- Create a
manifest.jsonthat contains the configuration of your plugins - Build a zip file that bundles your plugin
- Upload the zip file to an external secured webserver
- Configure your API to download your plugin bundle
Create the manifest file
Themanifest.json file specifies the configuration for your gRPC plugins. An example manifest.json is listed below:
The source code files, file_list, are empty for gRPC plugins. Your gRPC server contains the source code for handling plugins.
Build plugin bundle
A plugin bundle can be built using the Tyk Gateway binary and should only contain themanifest.json file:
mybundle.zip. The zip file is signed with key mykey.pem.
The resulting bundle file should then be uploaded to the webserver that hosts your plugin bundles.
Configure API
####### Tyk Gateway To add a gRPC plugin to your API definition, you must specify the bundle file name within thecustom_middleware_bundle field:
custom_middleware_bundle field will be used in combination with the gateway settings to construct a bundle URL. For example, if Tyk Gateway is configured with a webserver base URL of https://my-bundle-server.com/bundles/ then an attempt would be made to download the bundle from https://my-bundle-server.com/bundles/mybundle.zip.
####### Tyk Operator
Currently this feature is not yet documented with a Tyk Operator example for configuring an API to use plugin bundles. For further details please reach out and contact us on the community support forum.
Test your API Endpoint
It is crucial to ensure the security and reliability of your gRPC server. As the developer, it is your responsibility to verify that your gRPC server is secured and thoroughly tested with appropriate test coverage. Consider implementing unit tests, integration tests and other testing methodologies to ensure the robustness of your server’s functionality and security measures. This step ensures that the Tyk Gateway properly communicates with your gRPC server and executes the custom logic defined by the plugin hooks. Test the API endpoint using tools like Curl or Postman. Ensure that your gRPC server is running and the gRPC plugin(s) are functioning. An example using Curl is listed below:https://www.your-gateway-server.com:8080/api/path with the actual endpoint of your API.
Summary
This guide has explained the key concepts and processes for writing gRPC plugins that integrate with Tyk Gateway. The following explanations have been given:- Prerequisites for developing a gRPC server for your target language.
- The Dispatcher service interface.
- How to configure Tyk Gateway to integrate with your gRPC server.
- How to configure Tyk Gateway with an optional external web server for fetching plugin configuration.
- How to configure gRPC plugins for your APIs.
- How to test your API integration with your gRPC server using curl.
What’s Next?
- Consult the Protocol Buffer messages that Tyk Gateway uses when making a request to a gRPC server.
- Visit tutorial guides that explain how to implement a Java, .NET and NodeJS gRPC server.
- Visit our plugins hub to explore further gRPC development examples and resources.
Getting Started: Creating A Python gRPC Server
In the realm of API integration, establishing seamless connections between services is paramount. Understanding the fundamentals of gRPC server implementation is crucial, especially when integrating with a Gateway solution like Tyk. This guide aims to provide practical insights into this process, starting with the basic principles of how to implement a Python gRPC server that integrates with Tyk Gateway.Objectives
By the end of this guide, you will be able to implement a gRPC server that will integrate with Tyk Gateway, setting the stage for further exploration in subsequent parts:- Establishing the necessary tools, Python libraries and gRPC service definition for implementing a gRPC server that integrates with Tyk Gateway.
- Developing a basic gRPC server that echoes the request payload to the console, showcasing the core principles of integration.
- Configuring Tyk Gateway to interact with our gRPC server, enabling seamless communication between the two services.
Tyk Dispatcher Service
The Dispatcher service, defined in the coprocess_object.proto file, contains the Dispatch RPC method, invoked by Tyk Gateway to request remote execution of gRPC plugins. Tyk Gateway dispatches accompanying data relating to the original client request and session. The service definition is listed below:Prerequisites
Firstly, we need to download the Tyk Protocol Buffers and install the Python protoc compiler. We are going to use the protoc compiler to generate the supporting classes and data structures to implement the Dispatcher service.Tyk Protocol Buffers
Issue the following command to download and extract the Tyk Protocol Buffers from the Tyk GitHub repository:Install Dependencies
We are going to setup a Python virtual environment and install some supporting dependencies. Assuming that you have Python virtualenv already installed, then issue the following commands to setup a Python virtual environment containing the grpcio and grpcio-tools libraries:Install grpcurl
Follow the installation instructions to install grpcurl. We will use grpcurl to send test requests to our gRPC server.Generate Python Bindings
We are now able to generate the Python classes and data structures to allow us to implement our gRPC server. To accomplish this we will use the Python protoc command as listed below:Implement Dispatcher Service
We will now develop the Dispatcher service, adding implementations of the Dispatch and DispatchEvent methods, to allow our gRPC server to integrate with Tyk Gateway. Before we continue, create a file, async_server.py, within the same folder as the generated Protocol Buffer (.proto) files.Dispatch
Our implementation of the Dispatch RPC method will deserialize the request payload and output to the console as JSON format. This serves as a useful development and debugging aid, allowing inspection of the request and session state dispatched by Tyk Gateway to our gRPC server. Copy and paste the following source code into the async_server.py file. Notice that we have used type hinting to aid readability. The type hints are located within the type hint files (.pyi) we generated with the protoc compiler.- The MessageToJson function is used to deserialize the request payload as JSON.
- In the context of custom plugins we access the hook_type and hook_name attributes of the Object message to determine which plugin to execute.
- The ID of the API associated with the request is accessible from the spec dictionary, object.spec.get(‘APIID’).
DispatchEvent
Our implementation of the DispatchEvent RPC method will deserialize and output the event payload as JSON. Append the following source code to the async_server.py file:- The event data is accessible from the payload attribute of the event parameter.
- An implementation of the DispatchEvent RPC method must return an instance of coprocess_object_pb2.EventReply.
Create gRPC Server
Finally, we will implement an AsyncIO gRPC server to handle requests from Tyk Gateway to the Dispatcher service. We will add functions to start and stop our gRPC server. Finally, we will use grpcurl to issue a test payload to our gRPC server to test that it is working.Develop gRPC Server
Append the following source code from the listing below to the async_server.py file:noteA descriptor is a data structure that describes the structure of the messages, services, enums and other elements defined in a .proto file. The purpose of the descriptor is primarily metadata: it provides information about the types and services defined in the protocol buffer definition. The coprocess_object_pb2.py file that we generated using protoc contains a DESCRIPTOR field that we can use to retrieve this metadata. For further details consult the documentation for the Google’s protobuf FileDescriptor class.
- An instance of a gRPC server is created using grpc.aio.server().
- A service implementation should be registered with the gRPC server. We register our PythonDispatcher class via coprocess_object_pb2_grpc.add_DispatcherServicer_to_server(PythonDispatcher(), server).
- Reflection can be enabled to allow clients to dynamically discover the services available at a gRPC server. We enabled our Dispatcher service to be discovered via reflection.enable_server_reflection(SERVICE_NAMES, server). SERVICE_NAMES is a tuple containing the full names of two gRPC services: the Dispatcher service obtained by using the DESCRIPTOR field within the coprocess_object_pb2 module and the other being the standard reflection service.
- The server instance should be started via invoking and awaiting the start and wait_for_termination methods of the server instance.
- A port may be configured for the server. In this example we configured an insecure port of 50051 on the server instance via the add_insecure_port function. It is also possible to add a secure port via the add_secure_port method of the server instance, which accepts the port number in addition to an SSL certificate and key to enable TLS encryption.
- The server instance can be stopped via its stop method.
Start gRPC Server
Issue the following command to start the gRPC server:Test gRPC Server
To test our gRPC server is working, issue test requests to the Dispatch and DispatchEvent methods, using grpcurl. ####### Send Dispatch Request Use the grpcurl command to send a test dispatch request to our gRPC server:Configure Test Environment
Now that we have implemented and started a gRPC server, Tyk Gateway needs to be configured to integrate with it. To achieve this we will enable the coprocess feature and configure the URL of the gRPC server. We will also create an API so that we can test that Tyk Gateway integrates with our gRPC server.Configure Tyk Gateway
Within the root of the tyk.conf file, add the following configuration, replacing host and port with values appropriate for your environment:Configure API
Before testing our gRPC server we will create and configure an API with 2 plugins:- Pre Request: Named MyPreRequestPlugin.
- Response: Named MyResponsePlugin and configured so that Tyk Gateway dispatches the session state with the request.
Test API
We have implemented and configured a gRPC server to integrate with Tyk Gateway. Furthermore, we have created an API that has been configured with two gRPC plugins: a Pre Request and Response plugin. When we issue a request to our API and observe the console output of our gRPC server we should see a JSON representation of the request headers etc. echoed in the terminal. Issue a request for your API in the terminal window. For example:Summary
In this guide, we’ve delved into the integration of a Python gRPC server with Tyk Gateway. We have explained how to implement a Python gRPC server and equipped developers with the necessary tools, knowledge and capabilities to effectively utilize Tyk Gateway through gRPC services. The following essential groundwork has been covered:- Setting up tools, libraries and service definitions for the integration.
- Developing a basic gRPC server with functionality to echo the request payload, received from Tyk Gateway, in JSON format.
- Configuring Tyk Gateway for seamless communication with our gRPC server.
Create a Request Transformation Plugin with Java
This tutorial will guide you through the creation of a gRPC-based Java plugin for Tyk. Our plugin will inject a header into the request before it gets proxied upstream. For additional information about gRPC, check the official documentation here. The sample code that we’ll use implements a request transformation plugin using Java and uses the proper gRPC bindings generated from our Protocol Buffers definition files.Requirements
- Tyk Gateway: This can be installed using standard package management tools like Yum or APT, or from source code. See here for more installation options.
- The Tyk CLI utility, which is bundled with our RPM and DEB packages, and can be installed separately from https://github.com/TykTechnologies/tyk-cli.
- In Tyk 2.8 the Tyk CLI is part of the gateway binary, you can find more information by running “tyk help bundle”.
- Gradle Build Tool: https://gradle.org/install/.
- gRPC tools: https://grpc.io/docs/quickstart/csharp.html#generate-grpc-code
- Java JDK 7 or higher.
Create the Plugin
Setting up the Java Project
We will use the Gradle build tool to generate the initial files for our project:tyk-plugin directory containing the basic skeleton of our application.
Add the following to build.gradle
Create the Directory for the Server Class
Install the gRPC Tools
We need to download the Tyk Protocol Buffers definition files, these files contains the data structures used by Tyk. See Data Structures for more information:Generate the Bindings
To generate the Protocol Buffers bindings we use the Gradle build task:build.gradle file.
Implement Server
We need to implement two classes: one class will contain the request dispatcher logic and the actual middleware implementation. The other one will implement the gRPC server using our own dispatcher. From the~/tyk-plugin/src/main/java/com/testorg/testplugin directory, create a file named PluginDispatcher.java with the following code:
PluginServer.java with the following code. This is the server implementation:
Server.java). In the next steps we’ll setup the plugin bundle and modify Tyk to connect to our gRPC server.
Bundle the Plugin
We need to create a manifest file within thetyk-plugin directory. This file contains information about our plugin and how we expect it to interact with the API that will load it. This file should be named manifest.json and needs to contain the following:
- The
custom_middlewareblock contains the middleware settings like the plugin driver we want to use (driver) and the hooks that our plugin will expose. We use theprehook for this tutorial. For other hooks see here. - The
namefield references the name of the function that we implemented in our plugin code -MyPreMiddleware. This will be handled by our dispatcher gRPC method inPluginServer.java.
tyk-plugin directory. Check your tyk-cli install path first:
-y flag tells the Tyk CLI tool to skip the signing process in order to simplify the flow of this tutorial.
For more information on the Tyk CLI tool, see here.
You should now have a bundle.zip file in the tyk-plugin directory.
Publish the Plugin
To publish the plugin, copy or uploadbundle.zip to a local web server like Nginx, or Apache or storage like Amazon S3. For this tutorial we’ll assume you have a web server listening on localhost and accessible through http://localhost.
Configure Tyk
You will need to modify the Tyk global configuration file tyk.conf to use gRPC plugins. The following block should be present in this file:
enable_coprocess: This enables the plugin.coprocess_grpc_server: This is the URL of our gRPC server.enable_bundle_downloader: This enables the bundle downloader.bundle_base_url: This is a base URL that will be used to download the bundle. You should replace the bundle_base_url with the appropriate URL of the web server that’s serving your plugin bundles. For now HTTP and HTTPS are supported but we plan to add more options in the future (like pulling directly from S3 buckets).public_key_path: Modifypublic_key_pathin case you want to enforce the cryptographic check of the plugin bundle signatures. If thepublic_key_pathisn’t set, the verification process will be skipped and unsigned plugin bundles will be loaded normally.
custom_middleware_bundle which must match the name of the plugin bundle file. If we keep this with the default name that the Tyk CLI tool uses, it will be bundle.zip:
bundle_base_url is http://localhost/bundles/, Tyk will use the following URL to download our file:
http://localhost/bundles/bundle.zip
The second parameter is specific to this tutorial, and should be used in combination with use_keyless to allow an API to authenticate against our plugin:
enable_coprocess_auth will instruct the Tyk gateway to authenticate this API using the associated custom authentication function that’s implemented by our plugin.
Configuration via the Tyk Dashboard
To attach the plugin to an API, from the Advanced Options tab in the API Designer enter bundle.zip in the Plugin Bundle ID field.
Server.cs):
What’s Next?
In this tutorial we learned how Tyk gRPC plugins work. For a production-level setup we suggest the following:- Configure an appropriate web server and path to serve your plugin bundles.
Create Custom Authentication Plugin with .NET
This tutorial will guide you through the creation of a custom authentication plugin for Tyk with a gRPC based plugin with .NET and C#. For additional information check the official gRPC documentation. The sample code that we’ll use implements a very simple authentication layer using .NET and the proper gRPC bindings generated from our Protocol Buffers definition files.Requirements
- Tyk Gateway: This can be installed using standard package management tools like Yum or APT, or from source code. See here for more installation options.
- The Tyk CLI utility, which is bundled with our RPM and DEB packages, and can be installed separately from https://github.com/TykTechnologies/tyk-cli
- In Tyk 2.8 the Tyk CLI is part of the gateway binary, you can find more information by running “tyk help bundle”.
- .NET Core for your OS: https://www.microsoft.com/net/core
- gRPC tools: https://grpc.io/docs/quickstart/csharp.html#generate-grpc-code
Create the Plugin
Create .NET Project
We use the .NET CLI tool to generate the initial files for our project:tyk-plugin directory containing the basic skeleton of a .NET application.
From the tyk-plugin directory we need to install a few packages that the gRPC server requires:
- The
Grpcpackage provides base code for our server implementation. - The
ThreadPoolpackage is used byGrpc. - The
Protobufpackage will be used by our gRPC bindings.
Install the gRPC Tools
We need to install the gRPC tools to generate the bindings. We recommended you follow the official guide here: https://grpc.io/docs/quickstart/csharp.html#generate-grpc-code. Run the following Commands (both MacOS and Linux):GRPC_TOOLS environment variable will point to the appropriate GrpcTools path that matches our operating system and architecture. The last step is to export a variable for the protoc program; this is the main program used to generate bindings:
protoc, we can download the Tyk Protocol Buffers definition files. These files contain the data structures used by Tyk. See Data Structures for more information:
Generate the bindings
To generate the bindings, we create an empty directory and run theprotoc tool using the environment variable that was set before:
Implement Server
Create a file calledServer.cs.
Add the following code to Server.cs.
Program.cs to instantiate our dispatcher implementation and start a gRPC server.
Add the following code to Program.cs.
Program.cs). In the next steps we’ll setup the plugin bundle and modify Tyk to connect to our gRPC server.
Bundle the Plugin
We need to create a manifest file within thetyk-plugin directory. This file contains information about our plugin and how we expect it to interact with the API that will load it. This file should be named manifest.json and needs to contain the following:
- The
custom_middlewareblock contains the middleware settings like the plugin driver we want to use (driver) and the hooks that our plugin will expose. We use theauth_checkhook for this tutorial. For other hooks see here. - The
namefield references the name of the function that we implement in our plugin code -MyAuthMiddleware. This will be handled by our dispatcher gRPC method (implemented inServer.cs). - The
pathfield is the path to the middleware component. - The
raw_body_onlyfield - The
require_sessionfield, if set totruegives you access to the session object. It will be supplied as a session variable to your middleware processor function
tyk-plugin directory. Check your tyk-cli install path first:
-y flag tells the Tyk CLI tool to skip the signing process in order to simplify the flow of this tutorial.
For more information on the Tyk CLI tool, see here.
You should now have a bundle.zip file in the tyk-plugin directory.
Publish the Plugin
To publish the plugin, copy or uploadbundle.zip to a local web server like Nginx, or Apache or storage like Amazon S3. For this tutorial we’ll assume you have a web server listening on localhost and accessible through http://localhost.
Configure Tyk
You will need to modify the Tyk global configuration file tyk.conf to use gRPC plugins. The following block should be present in this file:
enable_coprocess: This enables the plugin.coprocess_grpc_server: This is the URL of our gRPC server.enable_bundle_downloader: This enables the bundle downloader.bundle_base_url: This is a base URL that will be used to download the bundle. You should replace the bundle_base_url with the appropriate URL of the web server that’s serving your plugin bundles. For now HTTP and HTTPS are supported but we plan to add more options in the future (like pulling directly from S3 buckets).public_key_path: Modifypublic_key_pathin case you want to enforce the cryptographic check of the plugin bundle signatures. If thepublic_key_pathisn’t set, the verification process will be skipped and unsigned plugin bundles will be loaded normally.
custom_middleware_bundle which must match the name of the plugin bundle file. If we keep this with the default name that the Tyk CLI tool uses, it will be bundle.zip:
bundle_base_url is http://localhost/bundles/, Tyk will use the following URL to download our file:
http://localhost/bundles/bundle.zip
The second parameter is specific to this tutorial, and should be used in combination with use_keyless to allow an API to authenticate against our plugin:
enable_coprocess_auth will instruct the Tyk gateway to authenticate this API using the associated custom authentication function that’s implemented by our plugin.
Configuration via the Tyk Dashboard
To attach the plugin to an API, from the Advanced Options tab in the API Designer enter bundle.zip in the Plugin Bundle ID field.
Server.cs):
What’s Next?
In this tutorial we learned how Tyk gRPC plugins work. For a production-level setup we suggest the following:- Configure an appropriate web server and path to serve your plugin bundles.
- See the following GitHub repo for a gRPC based .NET plugin that incorporates authentication based on Microsoft SQL Server.
Create Custom Authentication Plugin with NodeJS
This tutorial will guide you through the creation of a custom authentication plugin for Tyk with a gRPC based plugin written in NodeJS. For additional information about gRPC, check the official documentation here. The sample code that we’ll use implements a very simple authentication layer using NodeJS and the proper gRPC bindings generated from our Protocol Buffers definition files.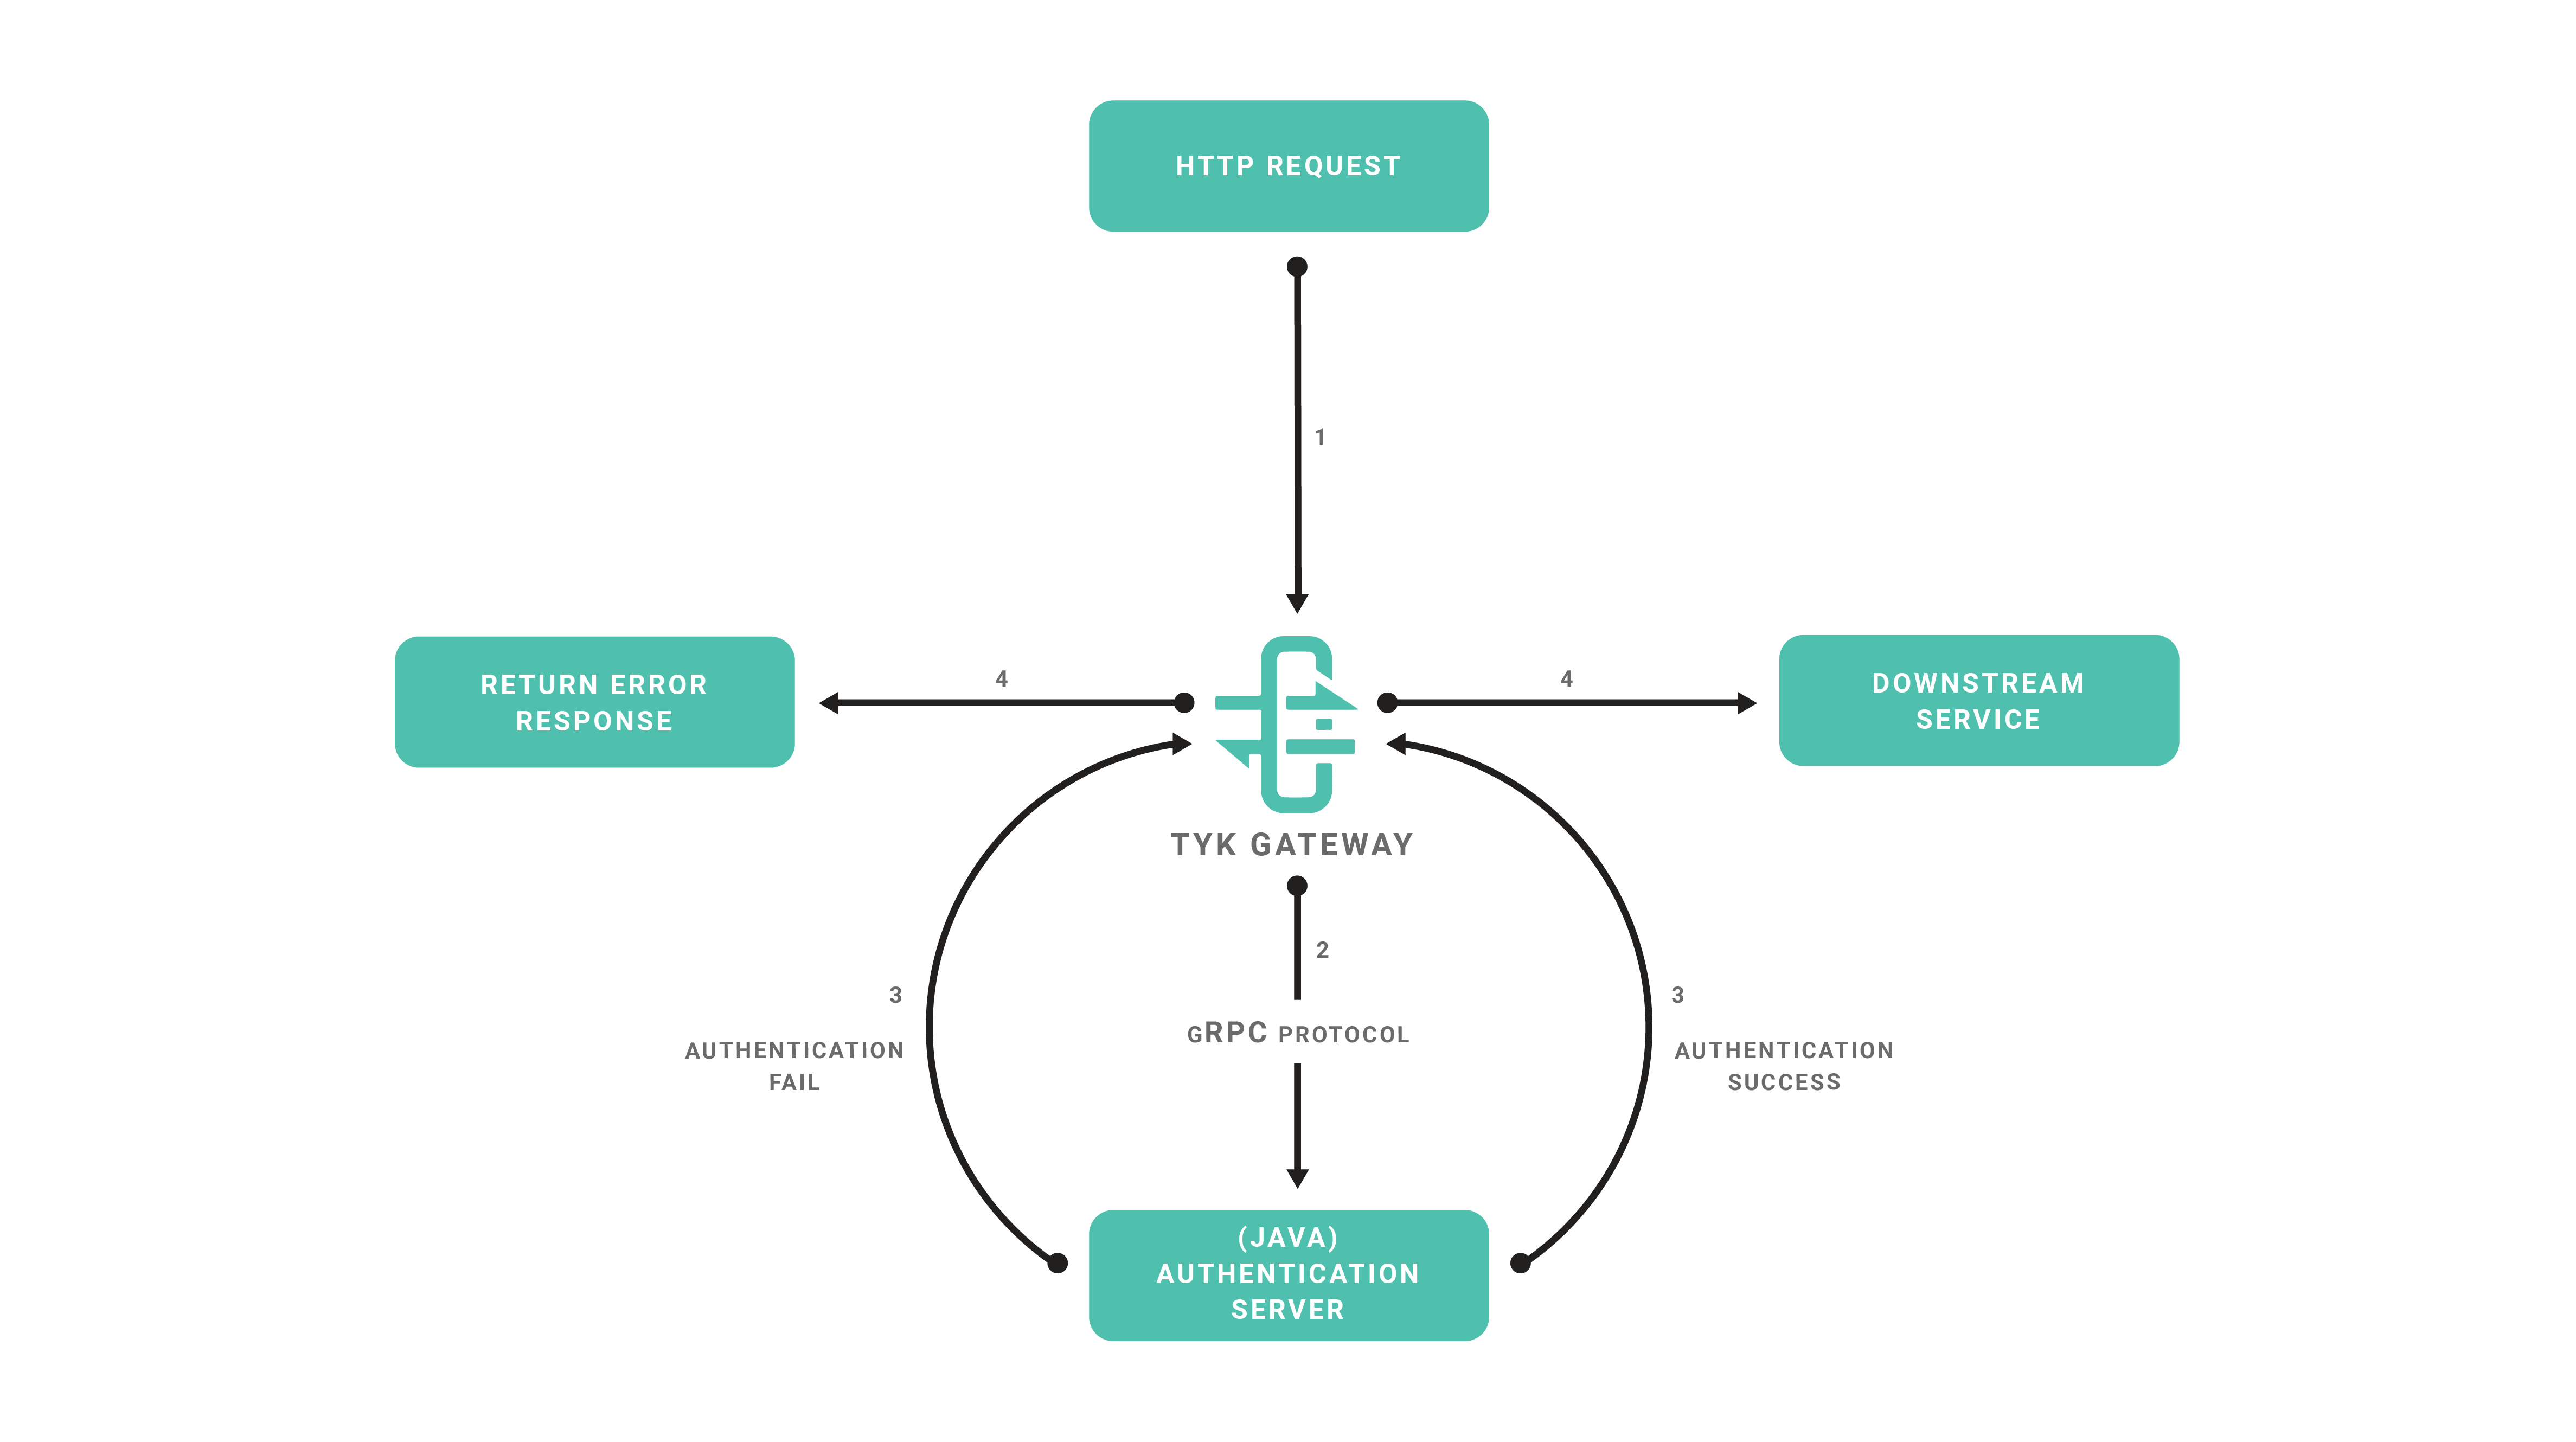
Requirements
- Tyk Gateway: This can be installed using standard package management tools like Yum or APT, or from source code. See here for more installation options.
- The Tyk CLI utility, which is bundled with our RPM and DEB packages, and can be installed separately from https://github.com/TykTechnologies/tyk-cli
- In Tyk 2.8 and upwards the Tyk CLI is part of the gateway binary, you can find more information by running “tyk help bundle”.
- NodeJS v6.x.x https://nodejs.org/en/download/
Create the Plugin
Create NodeJS Project
We will use the NPM tool to initialize our project, follow the steps provided by theinit command:
Install gRPC Tools
Typically to use gRPC and Protocol Buffers you need to use a code generator and generate bindings for the target language that you’re using. For this tutorial we’ll skip this step and use the dynamic loader that’s provided by the NodeJS gRPC library. This mechanism allows a program to load Protocol Buffers definitions directly from.proto files. See this section in the gRPC documentation for more details.
To fetch the required .proto files, you may use an official repository where we keep the Tyk Protocol Buffers definition files:
Implement Server
Now we’re ready to implement our gRPC server, create a file calledmain.js in the project’s directory
Add the following code to main.js.
5555 (see the listenAddr constant). In the next steps we’ll setup the plugin bundle and modify Tyk to connect to our gRPC server.
Bundle the Plugin
We need to create a manifest file within thetyk-plugin directory. This file contains information about our plugin and how we expect it to interact with the API that will load it. This file should be named manifest.json and needs to contain the following:
- The
custom_middlewareblock contains the middleware settings like the plugin driver we want to use (driver) and the hooks that our plugin will expose. We use theauth_checkhook for this tutorial. For other hooks see here. - The
namefield references the name of the function that we implement in our plugin code -MyAuthMiddleware. The implemented dispatcher uses a switch statement to handle this hook, and calls theauthMiddlewarefunction inmain.js. - The
pathfield is the path to the middleware component. - The
raw_body_onlyfield - The
require_sessionfield, if set totruegives you access to the session object. It will be supplied as a session variable to your middleware processor function
tyk-plugin directory. Check your tyk-cli install path first:
-y flag tells the Tyk CLI tool to skip the signing process in order to simplify the flow of this tutorial.
For more information on the Tyk CLI tool, see here.
You should now have a bundle.zip file in the tyk-plugin directory.
Publish the Plugin
To publish the plugin, copy or uploadbundle.zip to a local web server like Nginx, Apache or storage like Amazon S3. For this tutorial we’ll assume you have a web server listening on localhost and accessible through http://localhost.
Configure Tyk
You will need to modify the Tyk global configuration file tyk.conf to use gRPC plugins. The following block should be present in this file:
enable_coprocess: This enables the plugin.coprocess_grpc_server: This is the URL of our gRPC server.enable_bundle_downloader: This enables the bundle downloader.bundle_base_url: This is a base URL that will be used to download the bundle. You should replace the bundle_base_url with the appropriate URL of the web server that’s serving your plugin bundles. For now HTTP and HTTPS are supported but we plan to add more options in the future (like pulling directly from S3 buckets).public_key_path: Modifypublic_key_pathin case you want to enforce the cryptographic check of the plugin bundle signatures. If thepublic_key_pathisn’t set, the verification process will be skipped and unsigned plugin bundles will be loaded normally.
custom_middleware_bundle which must match the name of the plugin bundle file. If we keep this with the default name that the Tyk CLI tool uses, it will be bundle.zip:
bundle_base_url is http://localhost/bundles/, Tyk will use the following URL to download our file:
http://localhost/bundles/bundle.zip
The second parameter is specific to this tutorial, and should be used in combination with use_keyless to allow an API to authenticate against our plugin:
enable_coprocess_auth will instruct the Tyk gateway to authenticate this API using the associated custom authentication function that’s implemented by our plugin.
Configuration via the Tyk Dashboard
To attach the plugin to an API, from the Advanced Options tab in the API Designer enter bundle.zip in the Plugin Bundle ID field.
Server.cs):
What’s Next?
In this tutorial we learned how Tyk gRPC plugins work. For a production-level setup we suggest the following:- Configure an appropriate web server and path to serve your plugin bundles.
Create Custom Authentication Plugin With Python
In the realm of API security, HMAC-signed authentication serves as a foundational concept. In this developer-focused blog post, we’ll use HMAC-signed authentication as the basis for learning how to write gRPC custom authentication plugins with Tyk Gateway. Why learn how to write Custom Authentication Plugins?- Foundational knowledge: Writing custom authentication plugins provides foundational knowledge of Tyk’s extensibility and customization capabilities.
- Practical experience: Gain hands-on experience in implementing custom authentication logic tailored to specific use cases, starting with HMAC-signed authentication.
- Enhanced control: Exercise greater control over authentication flows and response handling, empowering developers to implement advanced authentication mechanisms beyond built-in features.
- Read and completed our getting started guide that explains how to implement a basic Python gRPC server to echo the request payload received from Tyk Gateway. This tutorial extends the source code of the tyk_async_server.py file to implement a custom authentication plugin for a HMAC signed authentication key.
- Read our HMAC signatures documentation for an explanation of HMAC signed authentication with Tyk Gateway. A brief summary is given in the HMAC Signed Authentication section below.
HMAC Signed Authentication
Before diving in further, we will give a brief overview of HMAC signed authentication using our custom authentication plugin.- Client request: The journey begins with a client requesting access to a protected resource on the Tyk API.
- HMAC signing: Before dispatching the request, the client computes an HMAC signature using a secret key and request date, ensuring the payload’s integrity.
- Authorization header: The HMAC signature, along with essential metadata such as the API key and HMAC algorithm, is embedded within the Authorization header.
- Tyk Gateway verification: Upon receipt, Tyk Gateway forwards the request to our gRPC server to execute the custom authentication plugin. This will validate the HMAC signature, ensuring the request’s authenticity before proceeding with further processing.
- The Date header contains a date string formatted as follows: Fri, 03 May 2024 11:06:00 GMT.
-
The Authorization header is formatted as
Signature keyId="<keyId>", algorithm="<hmac-algorithm>", signature="<hmac signature>"where:- keyId is a Tyk authentication key.
- algorithm is the HMAC algorithm used to sign the signature, hmac-sha512 or hmac-sha256.
- signature is the HAMC signature calculated with the date string from the Date header, signed with a base64 encoded secret value, using the specified HMAC algorithm. The HMAC signature is then encoded as base64.
Prerequisites
Firstly, we need to create the following:- An API configured to use a custom authentication plugin.
- A HMAC enabled key with a configured secret for signing.
Create API
We will create an API served by Tyk Gateway, that will forward requests upstream to https://httpbin.org/. The API will have the following parameters configured:- Listen path: Tyk Gateway will listen to API requests on /grpc-custom-auth/ and will strip the listen path for upstream requests.
- Target URL: The target URL will be configured to send requests to http://httpbin/.
- Authentication Mode: The authentication mode will be configured for custom authentication. This is used to trigger CoProcess (gRPC), Python or JSVM plugins to handle custom authentication.
- Update the location to use the protocol scheme, host and port suitable for your environment.
- Replace the value in the x-tyk-authorization header with the secret value in your tyk.conf file.
- Replace the org_id with the ID of your organization.
Create HMAC Key
We will create an key configured to use HMAC signing, with a secret of secret. The key will configured to have access to our test API. You can use the following configuration below, replacing the value of the org_id with the ID of your organization.- Update the location to use the protocol scheme, host and port suitable for your environment.
- Replace the value in the x-tyk-authorization header with the secret value in your tyk.conf file.
Make a note of the key ID given in the response, since we will need this to test our API.
Implement Plugin
Our custom authentication plugin will perform the following tasks:- Extract the Authorization and Date headers from the request object.
- Parse the Authorization header to extract the keyId, algorithm and signature attributes.
- Compute the HMAC signature using the specific algorithm and date included in the header.
- Verify that the computed HMAC signature matches the signature included in the Authorization header. A 401 error response will be returned if verification fails. Our plugin will only verify the key against an expected value. In a production environment it will be necessary to verify the key against Redis storage.
- Verify that the keyId matches an expected value (VALID_TOKEN). A 401 error response will be returned to Tyk Gateway if verification fails.
- If verification of the signature and key passes then update the session with HMAC enabled and set the HMAC secret. Furthermore, add the key to the Object metadata.
Import Python Modules
Ensure that the following Python modules are imported at the top of your tyk_async_server.py file:Add Constants
Add the following constants to the top of the tyk_async_server.py file, after the import statements:- SECRET is a base64 representation of the secret used for HMAC signing.
- VALID_TOKEN is the key ID that we will authenticate against.
Extract headers
Add the following function to your tyk_async_server.py file to extract a dictionary of the key value pairs from the Authorization header. We will use a regular expression to extract the key value pairs.Compute HMAC Signature
Add the following function to your tyk_async_server.py to compute the HMAC signature.- algorithm is the HMAC algorithm to use for signing. We will use HMAC SHA256 or HMAC SHA512 in our custom authentication plugin
- date_string is the date extracted from the date header in the request sent by Tyk Gateway.
- secret_key is the value of the secret used for signing.
- hmac Python module to compute the HMAC signature.
- base64 Python module to encode the result.
Verify HMAC Signature
Add the following function to your tyk_async_server.py file to verify the HMAC signature provided by the client:- algorithm is the HMAC algorithm to use for signing. We will use hmac-sha256 or hmac-sha512 in our custom authentication plugin.
- signature is the signature string extracted from the Authorization header.
- source_string is the date extracted from the date header in the request sent by Tyk Gateway.
- secret_key is the value of the secret used for signing.
Set Error Response
Add the following helper function to tyk_async_server.py to allow us to set the response status and error message if authentication fails.- object is an instance of the Object message representing the payload sent by Tyk Gateway to the Dispatcher service in our gRPC server. For further details of the payload structure dispatched by Tyk Gateway to a gRPC server please consult our gRPC documentation.
- code is the HTTP status code to return in the response.
- message is the response message.
Authenticate
Add the following to your tyk_async_server.py file to implement the main custom authentication function. This parses the headers to extract the signature and date from the request, in addition to verifying the HMAC signature and key:- If authentication fails then we set the error message and status code for the response accordingly, using our set_response_error function.
- If authentication passes then we update the session attribute in the Object payload to indicate that HMAC verification was performed and provide the secret used for signing. We also add the verified key to the meta data of the request payload.
- Extracts the Date and Authorization headers from the request and verifies that the Authorization header is structured correctly, using our parse_auth_header function. We store the extracted Authorization header fields in the parse_dict dictionary. If the structure is invalid then a 400 bad request response is returned to Tyk Gateway, using our set_response_error function.
- We use our verify_hmac_signature function to compute and verify the HMAC signature. A 400 bad request error is returned to the Gateway if HMAC signature verification fails, due to an unrecognized HMAC algorithm.
-
A 401 unauthorized error response is returned to the Gateway under the following conditions:
- The client HMAC signature and the computed HMAC signature do not match.
- The extracted key ID does not match the expected key value in VALID_TOKEN.
- If HMAC signature verification passed and the key included in the Authorization header is valid then we update the SessionState instance to indicate that HMAC signature verification is enabled, i.e. hmac_enabled is set to true. We also specify the HMAC secret used for signing in the hmac_secret field and include the valid token in the metadata dictionary.
Integrate Plugin
Update the Dispatch method of the PythonDispatcher class in your tyk_async_server.py file so that our authenticate function is called when the a request is made by Tyk Gateway to execute a custom authentication (HookType.CustomKeyCheck) plugin.Test Plugin
Create the following bash script, hmac.sh, to issue a test request to an API served by Tyk Gateway. The script computes a HMAC signature and constructs the Authorization and Date headers for a specified API. The Authorization header contains the HMAC signature and key for authentication. Replace the following constant values with values suitable for your environment:- KEY represents the key ID for the HMAC signed key that you created at the beginning of this guide.
- HMAC_SECRET represents the base64 encoded value of the secret for your HMAC key that you created at the beginning of this guide.
- BASE_URL represents the base URL, containing the protocol scheme, host and port number that Tyk Gateway listens to for API requests.
- ENDPOINT represents the path of your API that uses HMAC signed authentication.
Summary
In this guide, we’ve explained how to write a Python gRPC custom authentication plugin for Tyk Gateway, using HMAC-signed authentication as a practical example. Through clear instructions and code examples, we’ve provided developers with insights into the process of creating custom authentication logic tailored to their specific API authentication needs. While Tyk Gateway already supports HMAC-signed authentication out of the box, this guide goes beyond basic implementation by demonstrating how to extend its capabilities through custom plugins. By focusing on HMAC-signed authentication, developers have gained valuable experience in crafting custom authentication mechanisms that can be adapted and expanded to meet diverse authentication requirements. It’s important to note that the authentication mechanism implemented in this guide solely verifies the HMAC signature’s validity and does not include access control checks against specific API resources. Developers should enhance this implementation by integrating access control logic to ensure authenticated requests have appropriate access permissions. By mastering the techniques outlined in this guide, developers are better equipped to address complex authentication challenges and build robust API security architectures using Tyk Gateway’s extensibility features. This guide serves as a foundation for further exploration and experimentation with custom authentication plugins, empowering developers to innovate and customize API authentication solutions according to their unique requirements.Performance
These are some benchmarks performed on gRPC plugins. gRPC plugins may use different transports, we’ve tested TCP and Unix Sockets.TCP
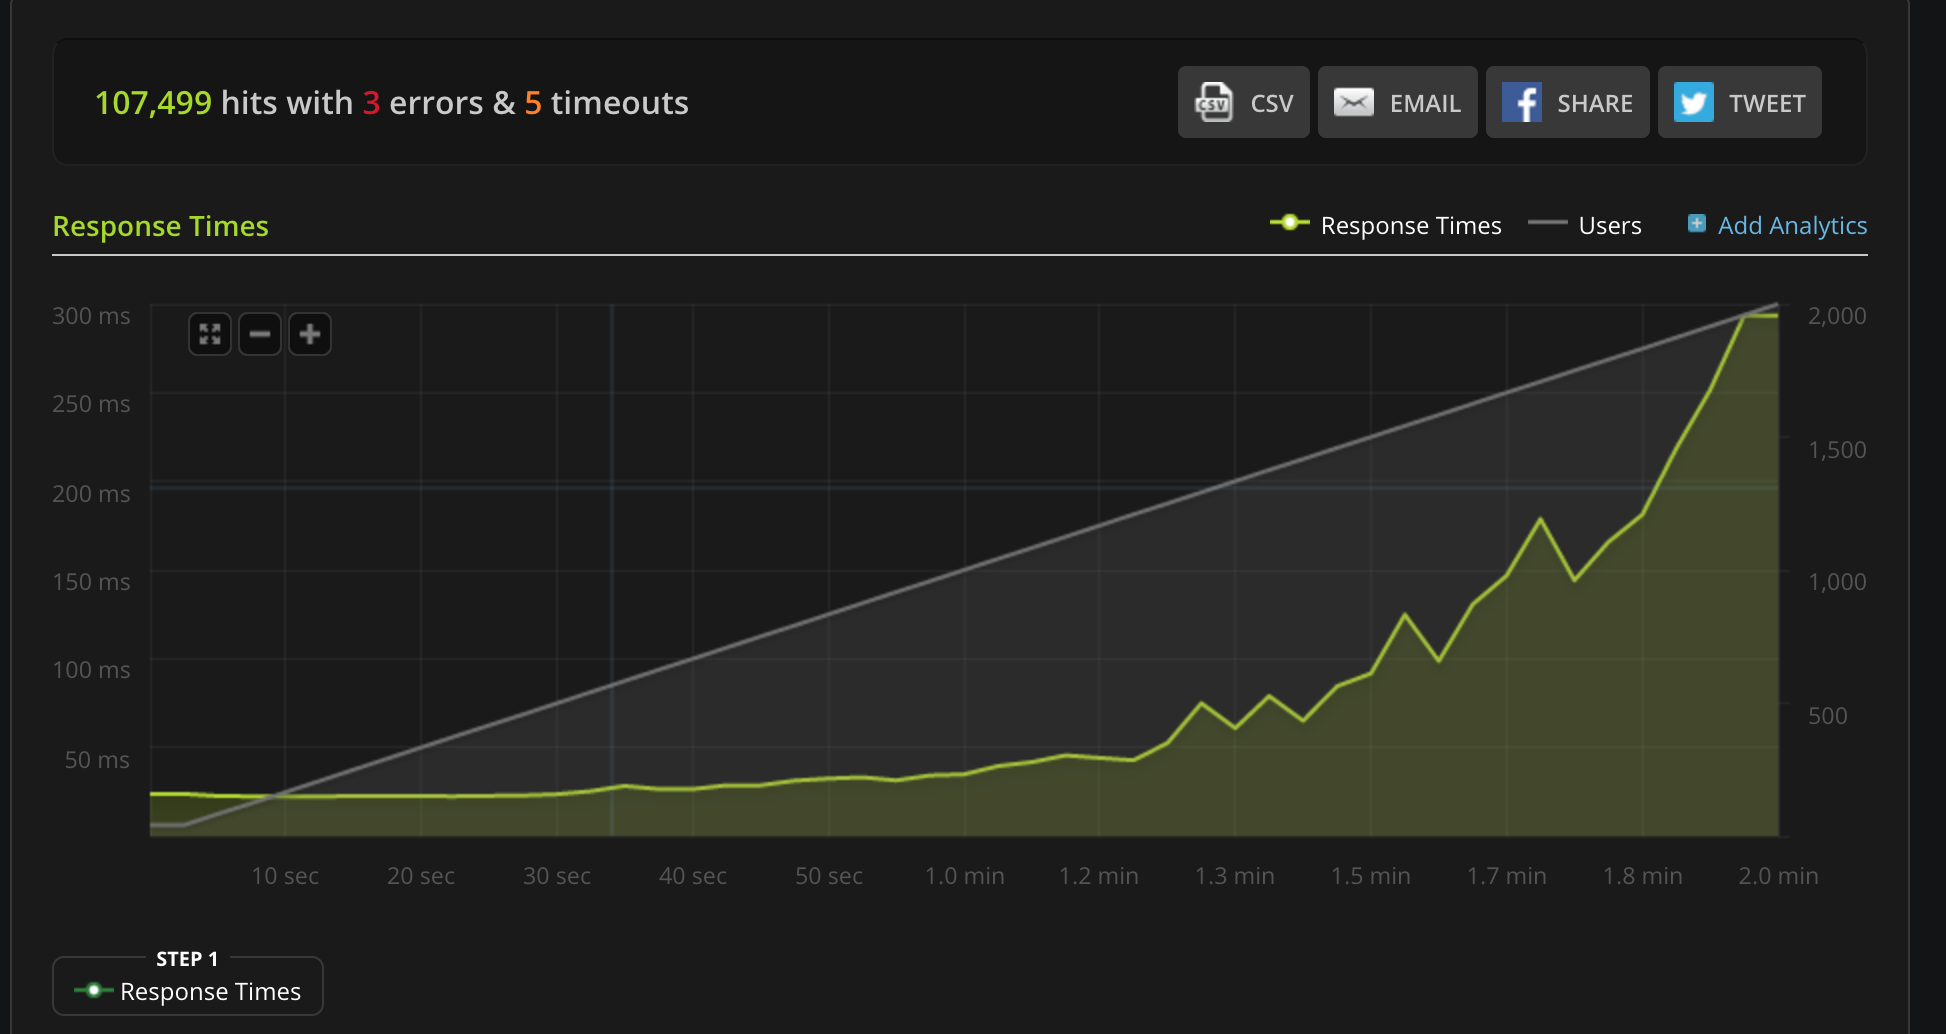
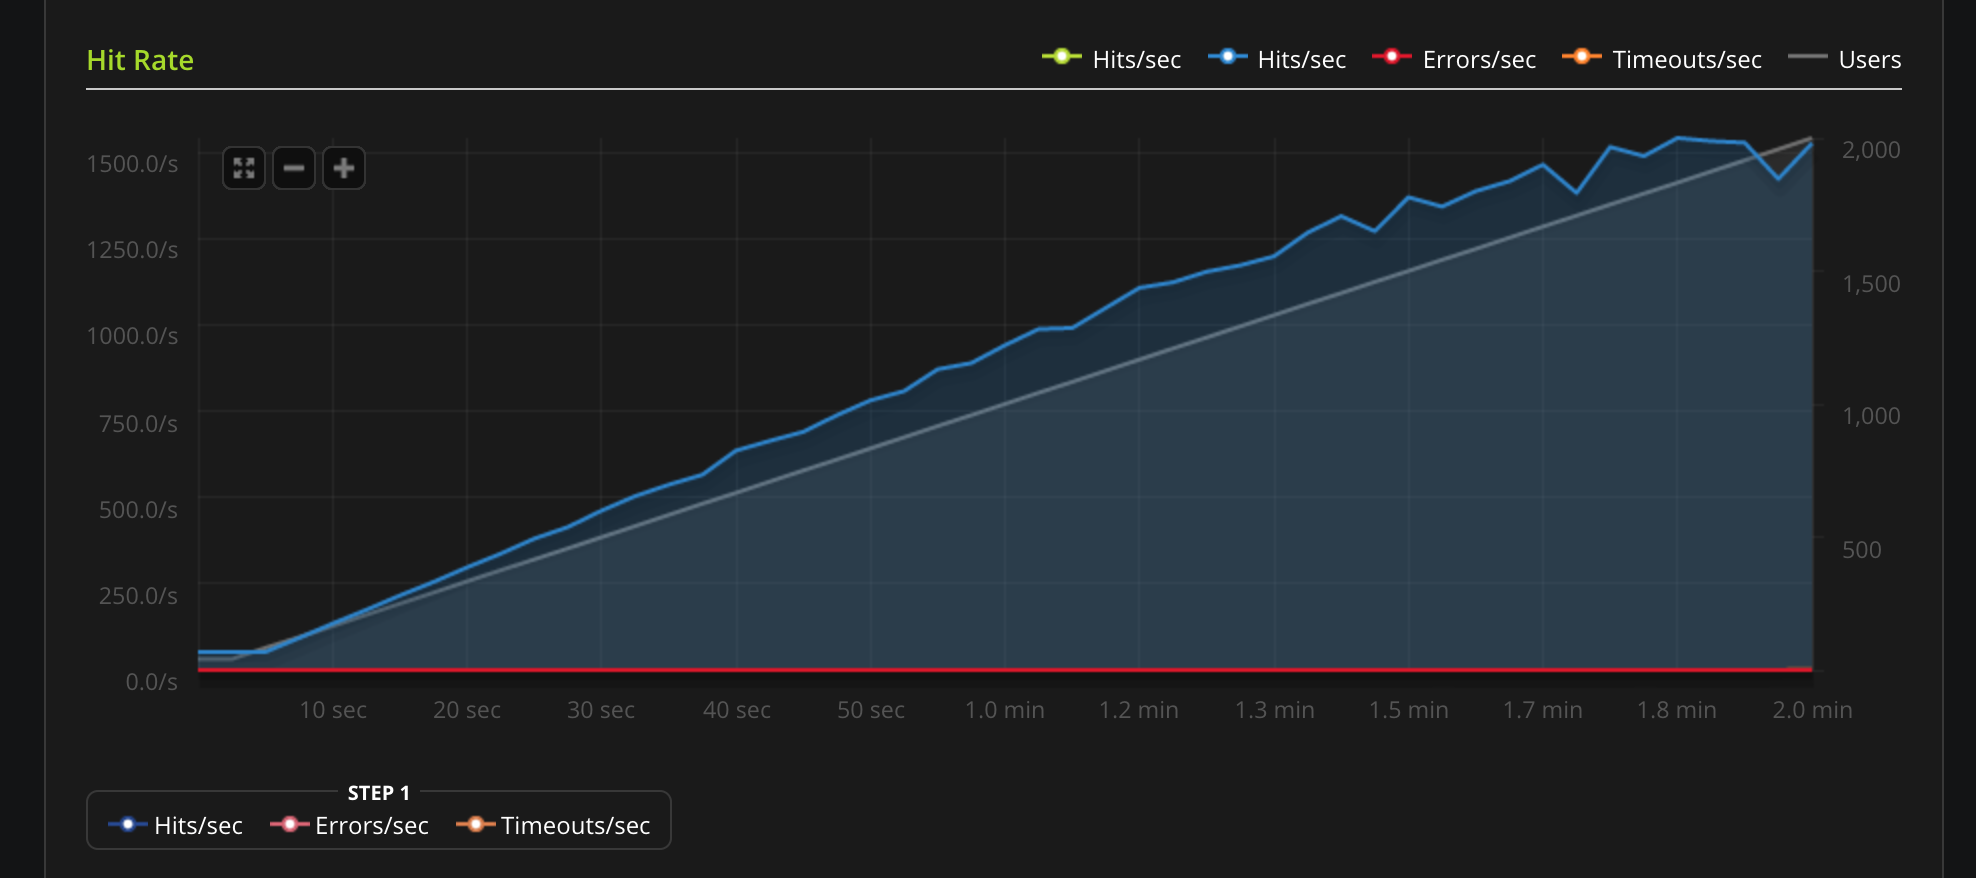
Unix Socket
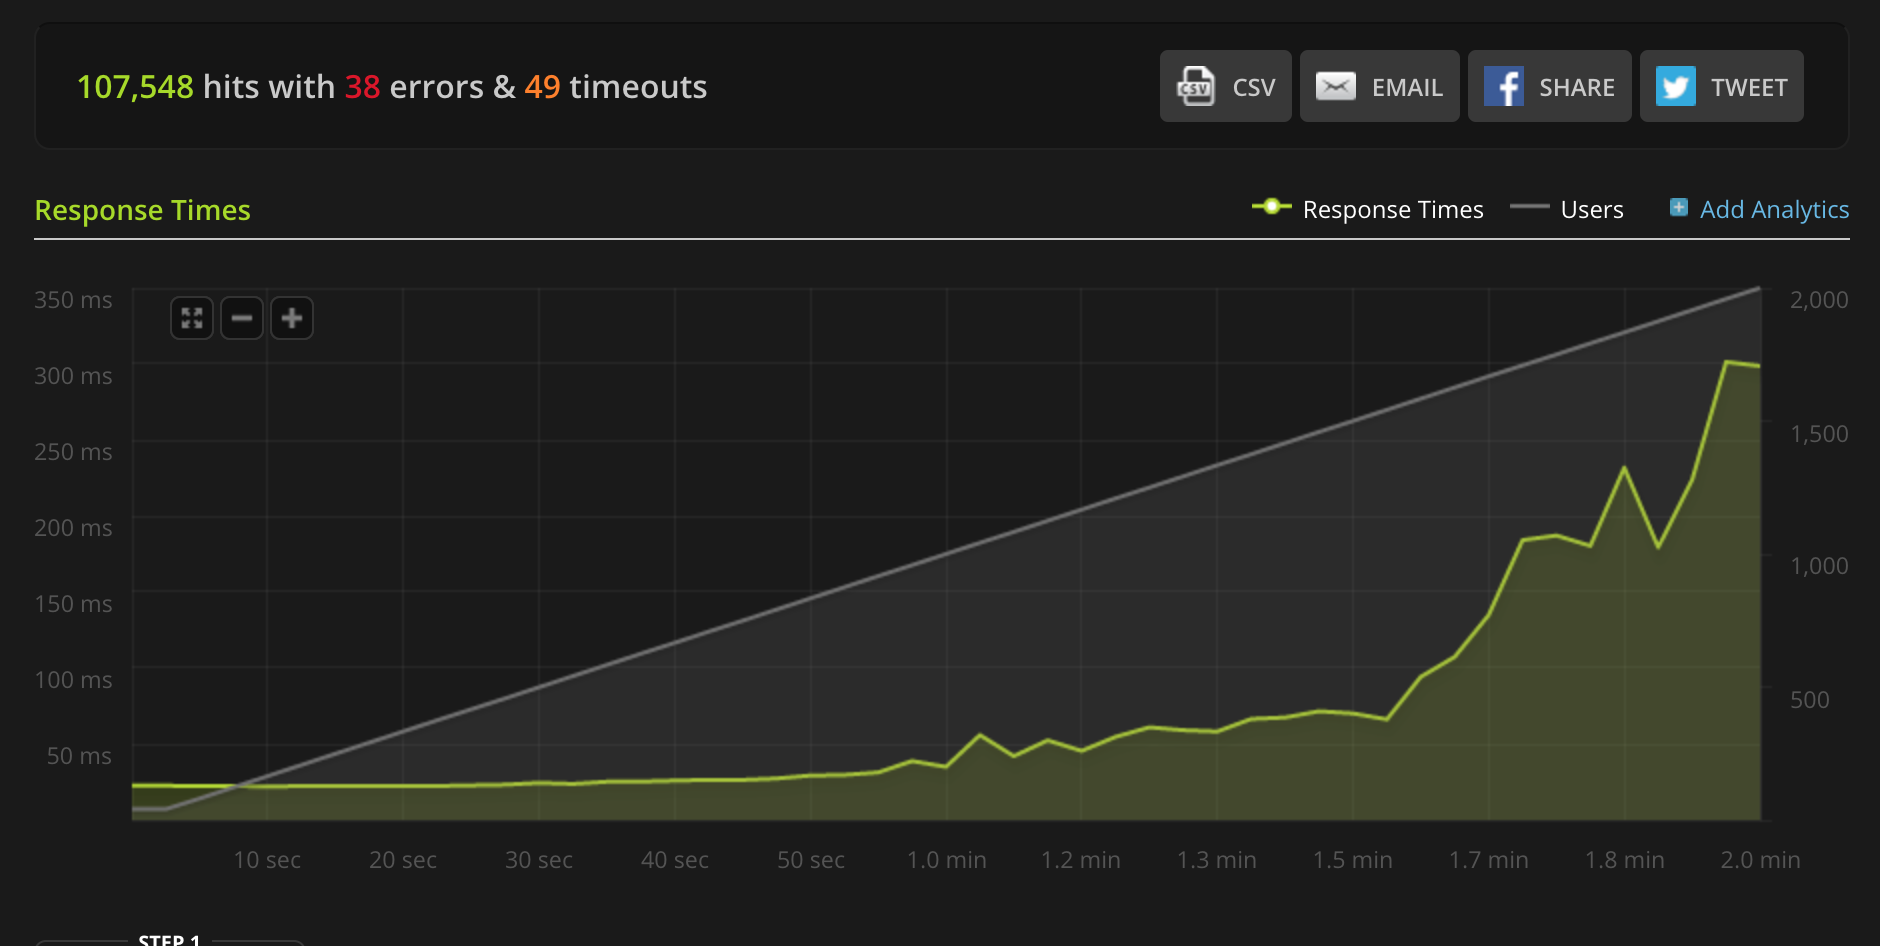
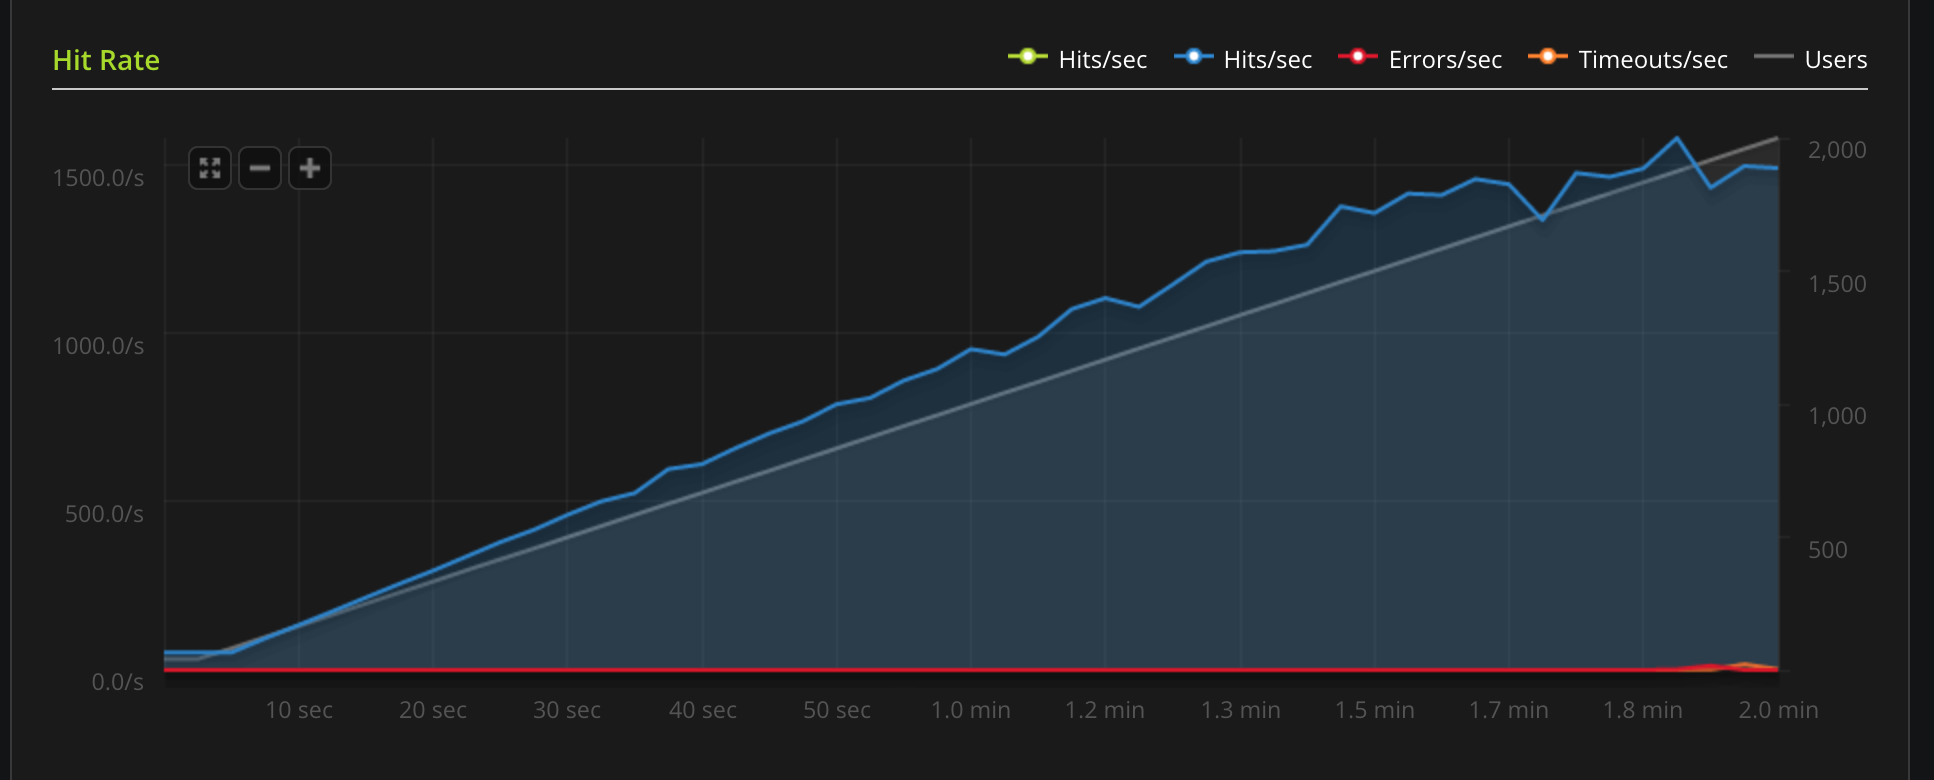
Using Lua
Overview
Requirements
Tyk uses LuaJIT. The main requirement is the LuaJIT shared library, you may find this aslibluajit-x in most distros.
For Ubuntu 14.04 you may use:
$ apt-get install libluajit-5.1-2 $ apt-get install luarocks
The LuaJIT required modules are as follows:
- lua-cjson: in case you have
luarocks, run:$ luarocks install lua-cjson
How to write LuaJIT Plugins
We have a demo plugin hosted in the repo tyk-plugin-demo-lua. The project implements a simple middleware for header injection, using a Pre hook (see Tyk custom middleware hooks) and mymiddleware.lua.Lua Performance
Lua support is currently in beta stage. We are planning performance optimizations for future releases.Tyk Lua API Methods
Tyk Lua API methods aren’t currently supported.Lua Plugin Tutorial
Settings in the API Definition
To add a Lua plugin to your API, you must specify the bundle name using thecustom_middleware_bundle field:
Global settings
To enable Lua plugins you need to add the following block totyk.conf:
enable_coprocess enables the rich plugins feature.
enable_bundle_downloader enables the bundle downloader.
bundle_base_url is a base URL that will be used to download the bundle, in this example we have “test-bundle” specified in the API settings, Tyk will fetch the following URL: http://my-bundle-server.com/bundles/test-bundle.
public_key_path sets a public key, this is used for verifying signed bundles, you may omit this if unsigned bundles are used.