OAuth 2.0 without an external Authorization Server
Tyk can act as an OAuth 2.0 authorization server, performing token generation and management for clients accessing APIs deployed on Tyk. There are many great resources on the Internet that will help you to understand the OAuth 2.0 Authorization Framework, which we won’t attempt to duplicate here. We will provide a basic introduction to the concepts and terminology before we dive into the details of using Tyk as your auth server. Tyk offers some great features when used as the authorization server including:- Fine-Grained Access Control: Manage access using Tyk’s built-in access controls, including versioning and named API IDs
- Usage Analytics: Leverage Tyk’s analytics capabilities to monitor OAuth 2.0 usage effectively, grouping data by Client Id
- Multi-API Access: Enable access to multiple APIs using a single OAuth token; configure one API for OAuth 2.0 token issuance and the other APIs with the Auth Token method, linking them through a common policy
- Authorization Code Grant: the client is redirected to an identity server where the user must approve access before an access token will be issued
- Client Credentials Grant: used for machine-to-machine access, authentication is performed using only the client Id and client secret
-
Resource Owner Password Grant (a.k.a. Password Grant): only for use where the client is highly trusted, as the client must provide the Resource Owner’s own credentials during authentication
Tyk does not recommend the use of Resource Owner Password Grant. This method is considered unsafe and is prohibited in the OAuth 2.0 Security Best Practice but is supported for use with legacy clients.
- understand how to integrate your client (and, for Authorization Code grant, your identity server) according to the OAuth grant type
- register a client app for each client that needs to access the API
- configure your API proxy to use the Tyk OAuth 2.0 authentication method
OAuth 2.0 Core Concepts
OAuth 2.0 (Open Authorization 2.0) is a widely adopted authorization protocol that allows third-party applications to access user resources securely, without needing to expose sensitive credentials such as user passwords. It is an industry-standard framework that enables a delegated approach to securing access to APIs and services. The IETF OAuth 2.0 specification outlines the standard for OAuth 2.0.“The OAuth 2.0 authorization framework enables a third-party application to obtain limited access to an HTTP service, either on behalf of a resource owner by orchestrating an approval interaction between the resource owner and the HTTP service, or by allowing the third-party application to obtain access on its own behalf.” — RFC 6749OAuth 2.0 provides a mechanism for client applications to request limited access to resources hosted by a resource server, on behalf of a resource owner (typically a user), without exposing the resource owner’s credentials. This allows secure sharing of data between applications—for example, allowing a calendar app to access a user’s contacts to automatically find available time slots for meetings. OAuth 2.0 has many variations and flows suited for different use cases, this section will provide an overview of the core principles, terminology, and key concepts, specifically focusing on how you can implement OAuth 2.0 with Tyk.
Terminology
- Protected Resource: The service or data that is protected by OAuth (e.g. an API endpoint) and requires authorization to access.
- Resource Owner: The user or system that owns the Protected Resource and has the ability to grant or deny access to it.
- Client: The application or system that seeks access to the Protected Resource. It acts on behalf of the Resource Owner.
- Access Token: A short-lived piece of data that grants the Client access to the Protected Resource. The token proves that the Client has been authorized by the Resource Owner.
- Authorization Server: The server that issues Access Tokens to the Client after validating the Client’s identity and obtaining consent from the Resource Owner.
- Client Application: The application that requests authorization from the Authorization Server. This application must first be registered with the Authorization Server to obtain credentials (Client Id and Client Secret).
- Resource Server: The server that hosts the Protected Resource. It receives access requests from Clients, which must include a valid Access Token.
- Identity Server: A server that authenticates the Resource Owner, offering the facility to log in and authorize Client access to Protected Resources.
- Scope: Defines the specific permissions or access levels being requested by the Client (e.g. read, write, delete).
- Grant Type: The method by which the Client obtains an Access Token, based on the OAuth flow being used (e.g. Authorization Code, Client Credentials, Resource Owner Password Credentials).
Access Tokens
In OAuth 2.0, access tokens are used to represent the authorization granted to the client by the resource owner. These tokens are typically small, opaque data objects that are passed along with each API request to authenticate the client. While the OAuth 2.0 specification does not mandate a specific format, JSON Web Tokens (JWTs) are commonly used as they can encode metadata, such as the user’s identity, permissions, and token expiry time. Tokens usually come with an expiration date to limit the time they are valid and minimize the risk of abuse. Access tokens can often be refreshed via a refresh token if they expire, allowing for long-lived access without requiring the user (resource owner) to reauthorize the application (client).Client Application
For a client to request an Access Token from the Authorization Server, it must first authenticate itself. This ensures that the Resource Owner can confidently delegate access to the requested resources. To do this, the client is registered with the Authorization Server as a Client Application, which requires the following elements:- Client Id: A unique, public identifier for the client application (e.g., a username or application name).
- Client Secret: A confidential string (like a password) that is shared between the client and the Authorization Server. The client secret is never exposed to the Resource Owner.
- Redirect URI: The URL to which the client will be redirected after the authorization process is complete (either granted or denied).
Manage Client Access Policies
The access tokens issued to clients by Tyk Authorization Server are lookup keys to Sessions and are usually associated with Policies at the point of creation. These allow the application of quotas, rate limits and access rights in the normal manner. Policies can be assigned to client apps and will be applied to all access tokens issued for that client app.Client App Registration
For all grant types, the first common step is the registration of the client with Tyk Dashboard by creation of a Client App. This will allocate a client Id and client secret that must be provided in future authentication requests by the client.Using the Tyk Dashboard UI
- Client apps are registered per-API, so the first step is to configure Tyk OAuth 2.0 as the security method to be used for the API. With this done, you can navigate to the OAuth Client management screen for the API from the Actions menu on the Created APIs screen:
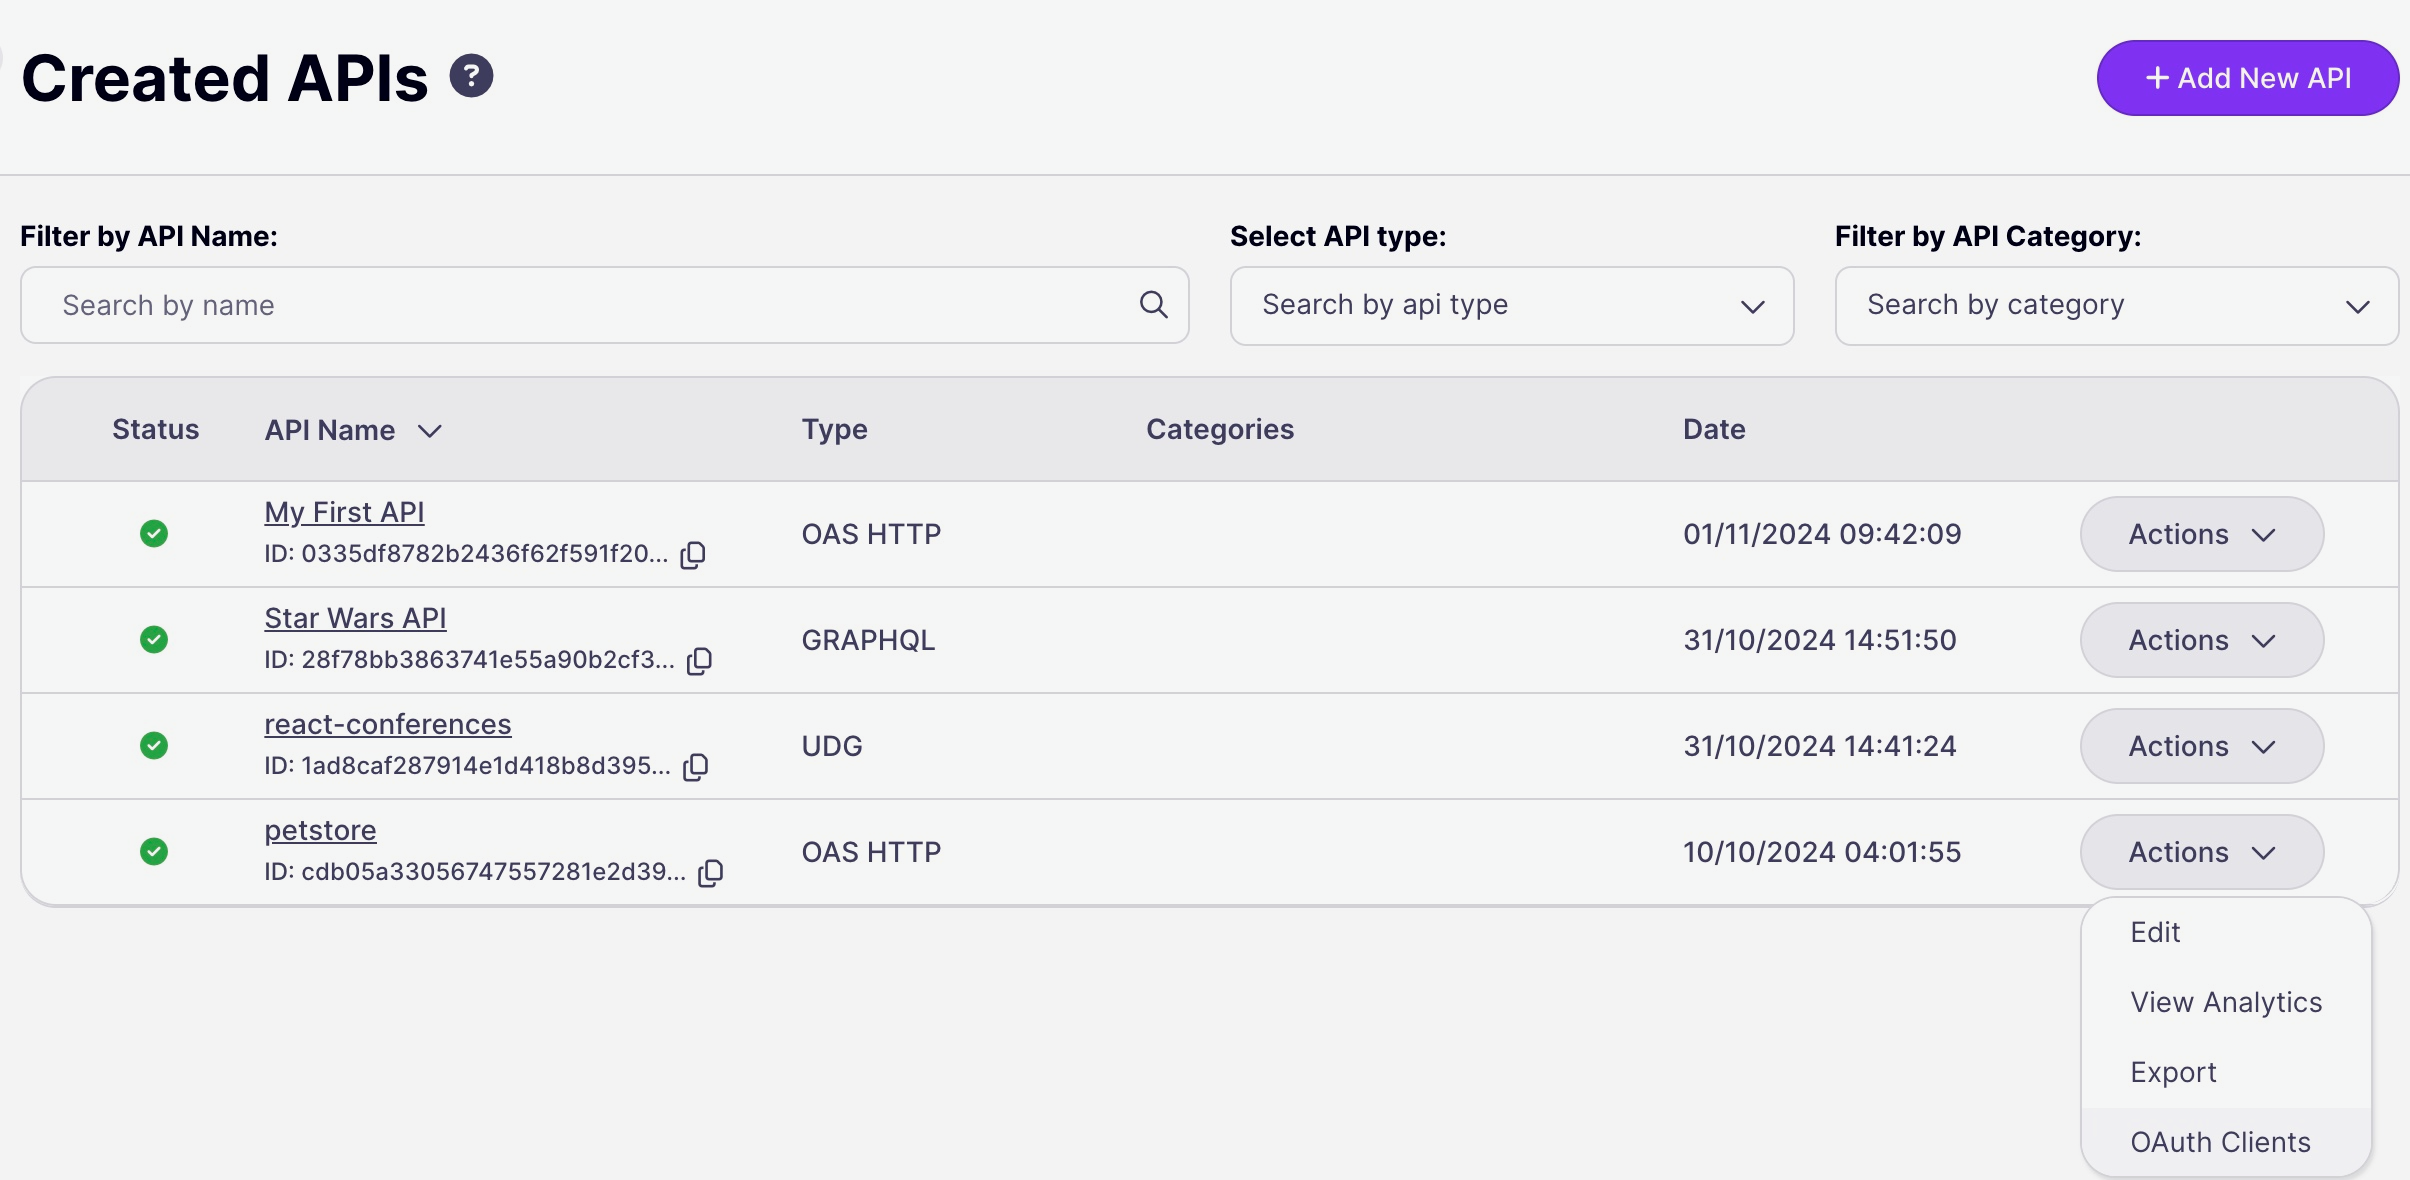
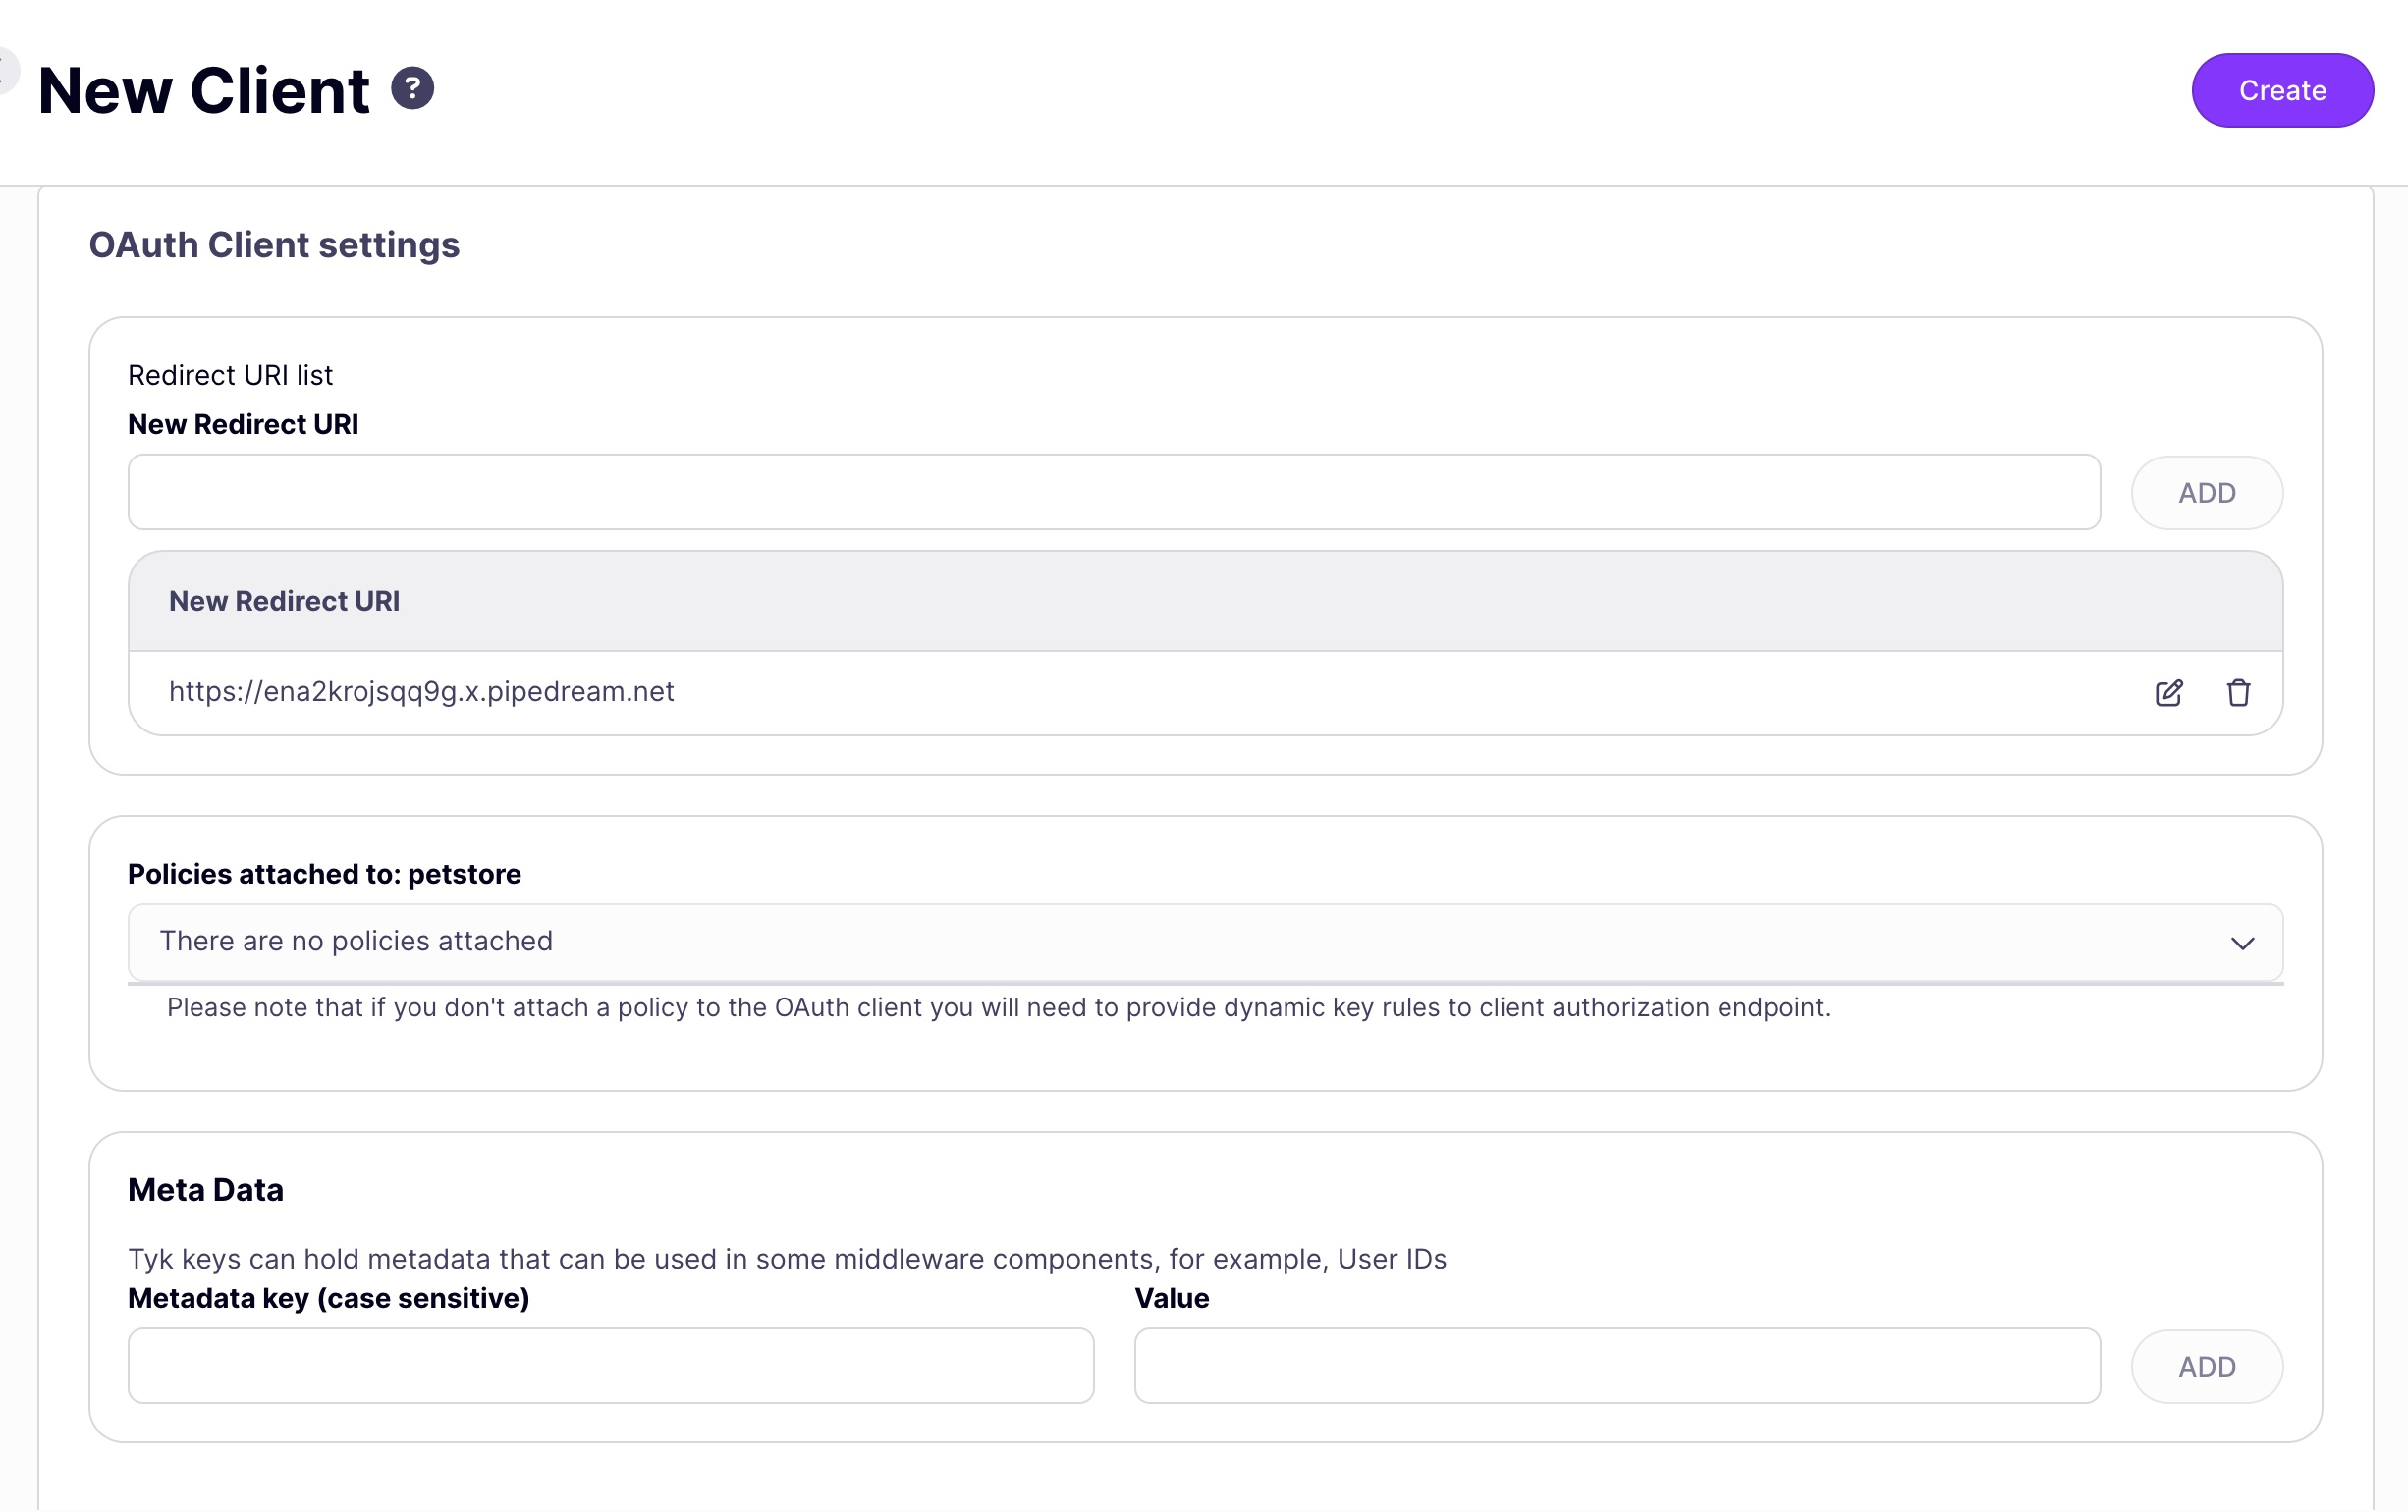
- You will now be prompted to register a client app that will be granted access to the API configuring:
- redirect URI
- [optional] security policies to be applied to access tokens generated for the client
- [optional] metadata to be added to the access tokens
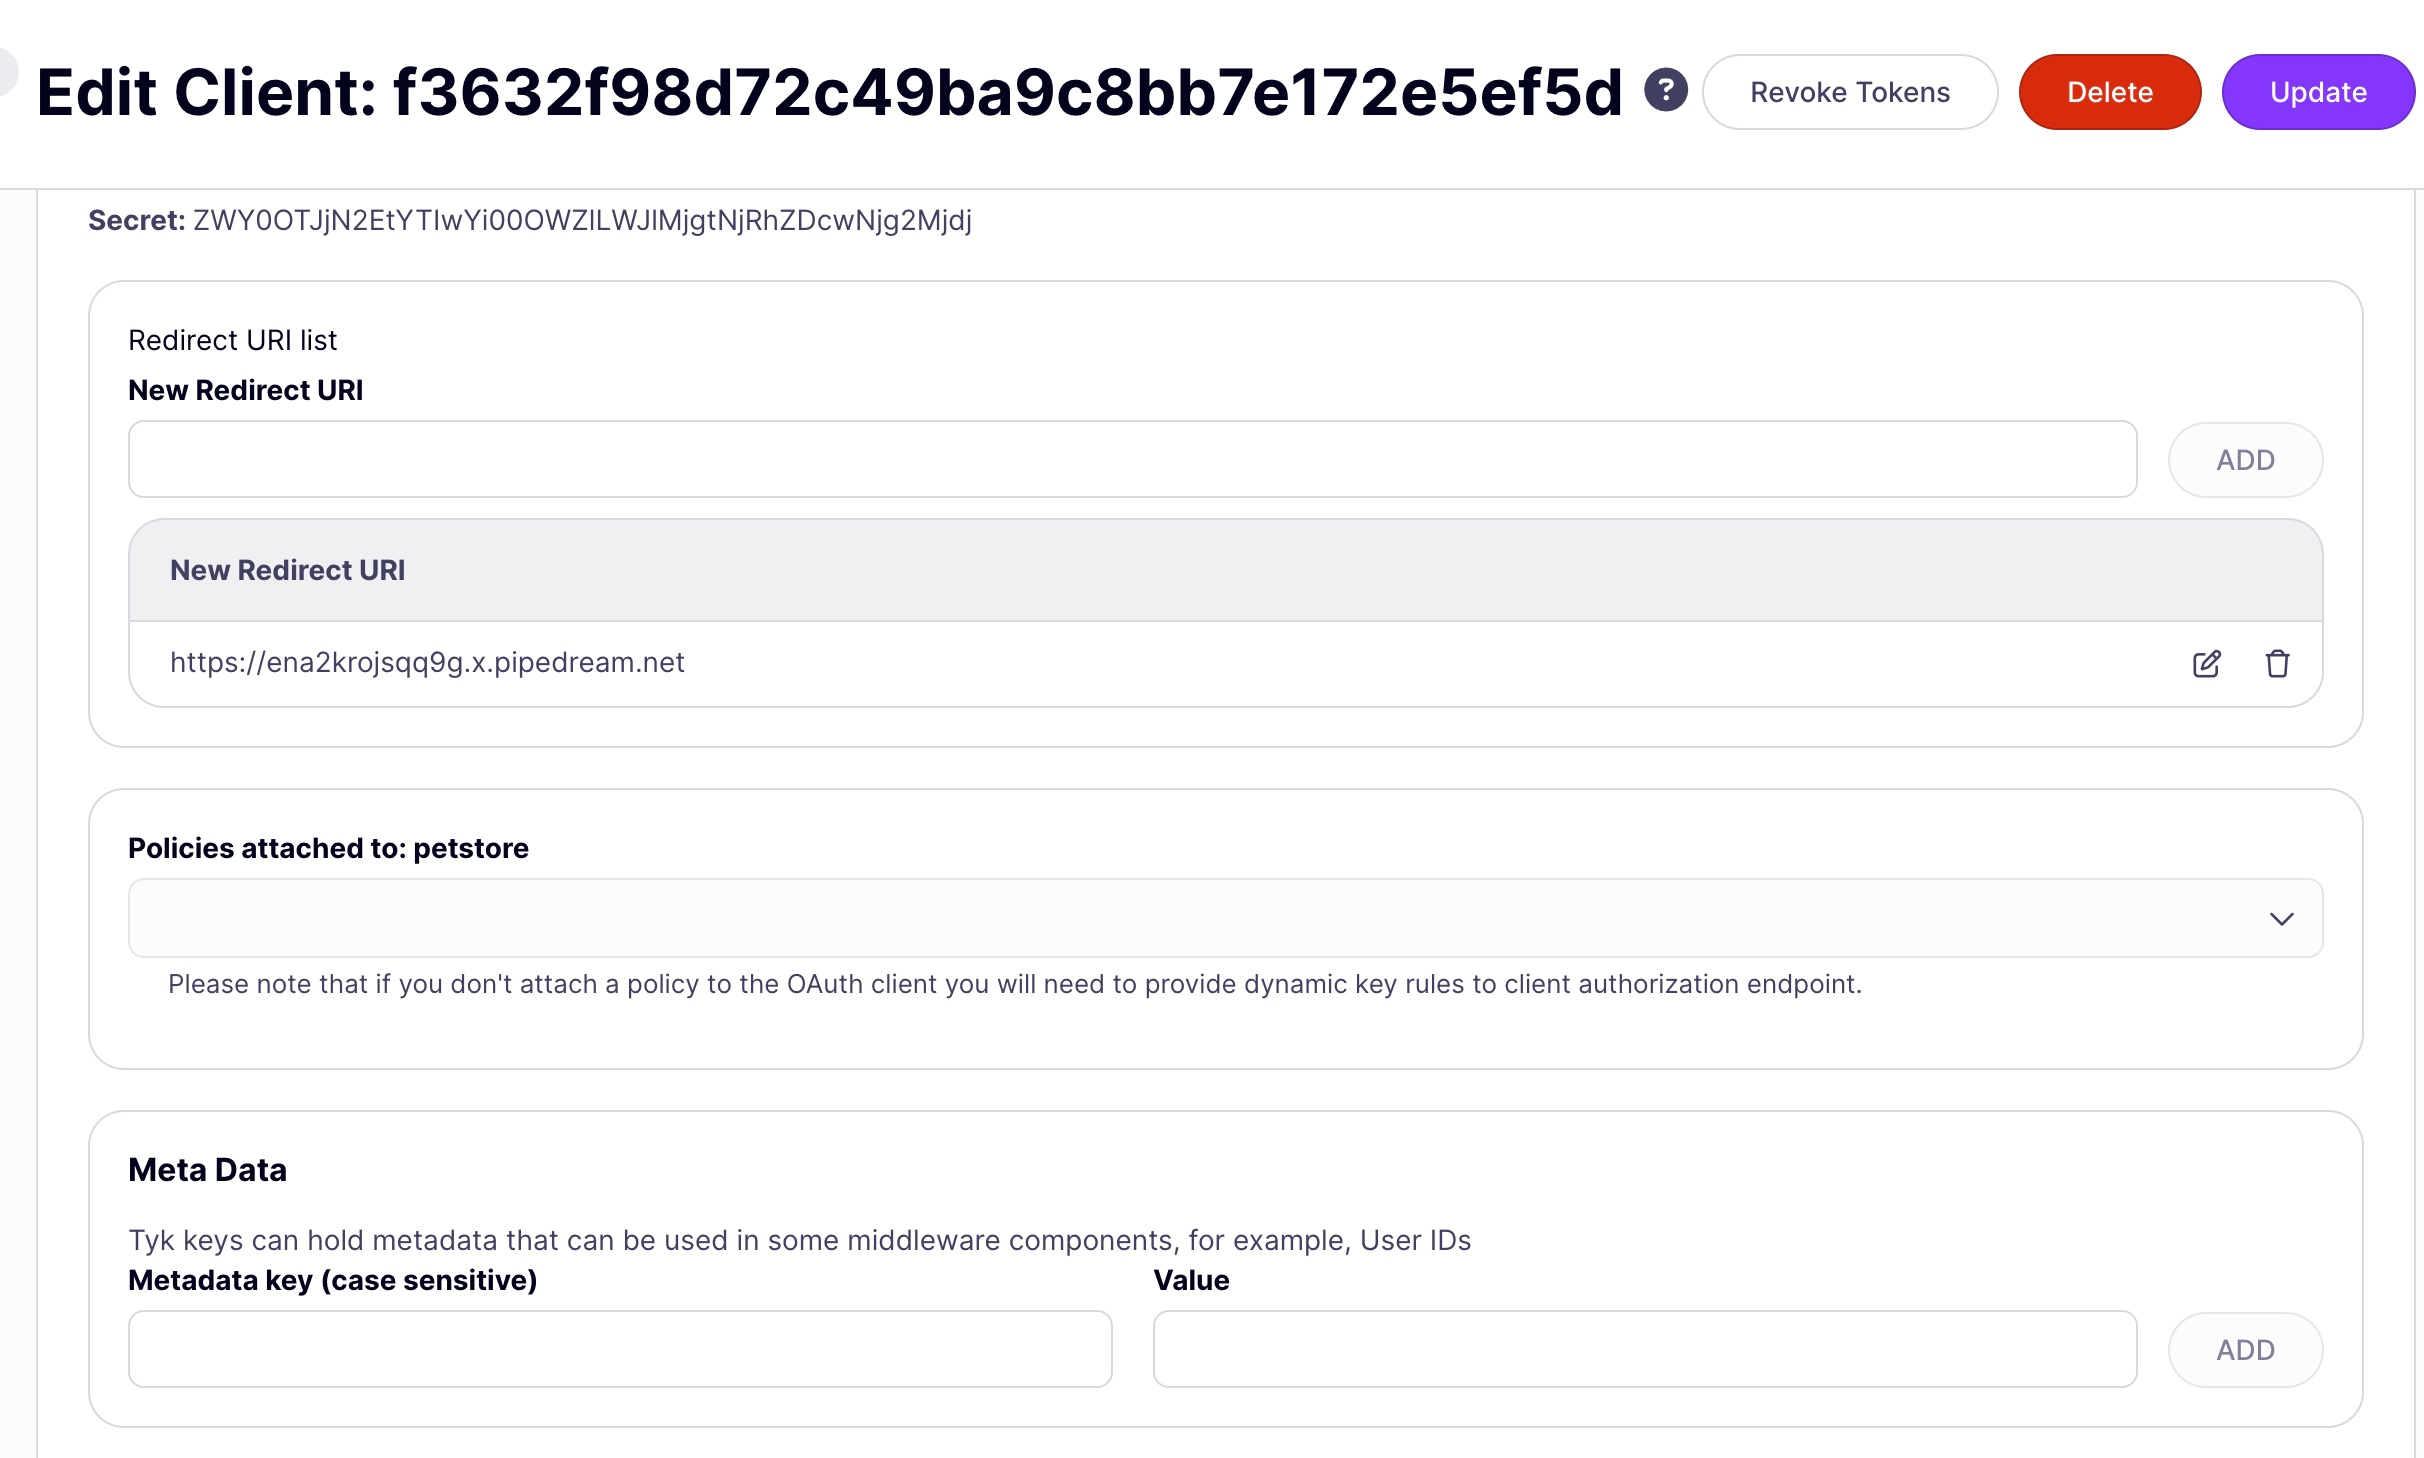
- In the OAuth Client management screen, you will see a list of client apps registered with the API (as identified by their client Id). By clicking on the list item, or from the Actions menu’s Edit option you will be taken to the Edit Client app screen, where you can see the client secret and make any modifications you need. There is also the option to revoke tokens that have been issued for this client app.
Using the Tyk Dashboard API
The Tyk Dashboard API contains several endpoints that are provided to manage client apps. Client apps are registered per-API, so each takes as an input the API Id for the API:Using the Authorization Code Grant
When using Tyk as the Authorization Server with the Authorization Code grant, the following steps are followed after registering the Client App: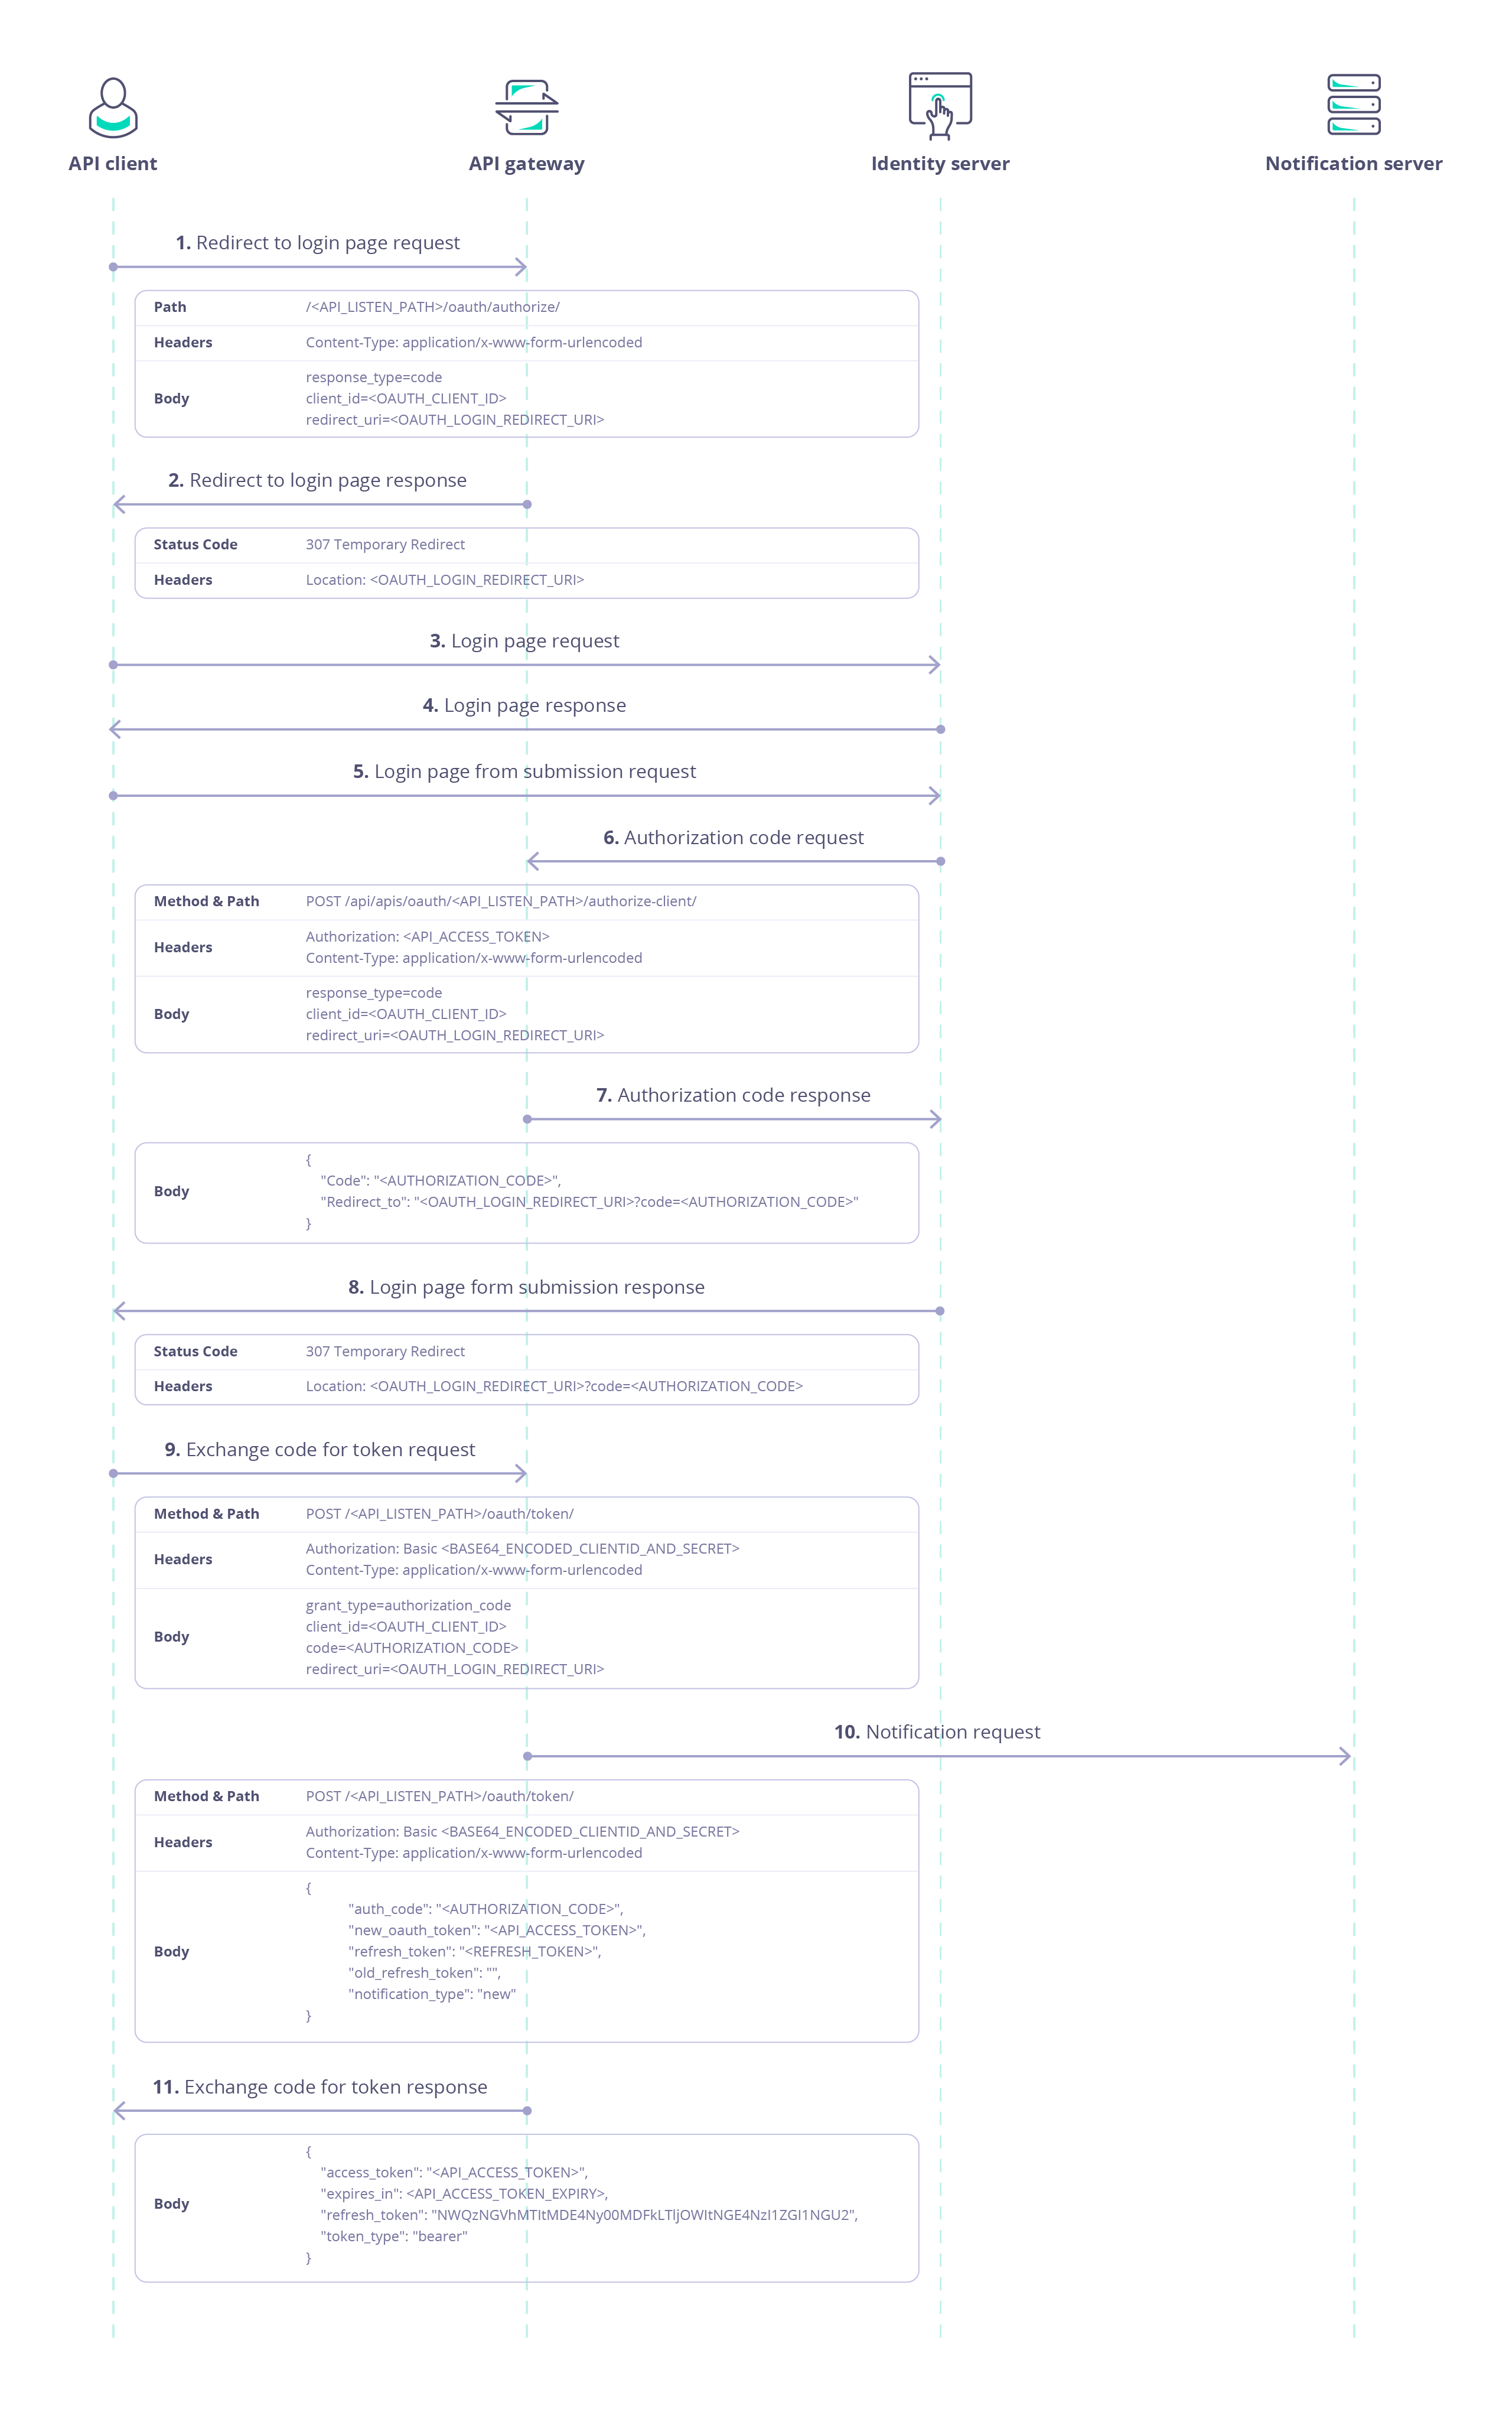
HTTP 307 Temporary Redirect, redirecting the user to an Identity Server
(5) the user must log in on the Identity Server and authorize the client
(6) when the user successfully authenticates and authorizes the request, the Identity Server must request an Authorization Code from the Auth Server
(8) The Identity Server provides the Authorization Code to the client
(9) The client exchanges the Authorization Code for an Access Token from the Auth Server
(10) The client uses the Access Token to authenticate with the protected API using the Auth Token method
Integration with Identity Server
Whilst Tyk can provide the authorization server functionality, issuing and managing access and authorization tokens, the identity server functions (authenticating users (resource owners) and allowing them to authorize client access) must be performed by a separate Identity Provider (IdP). The identity server will need access to the Tyk Dashboard API to obtain an Authorization Code. Tyk Identity Broker (TIB) can fulfill this role, authenticating users against an external IdP and handling the authorization code exchange with Tyk Dashboard on their behalf. See Issue API Access Tokens via TIB for details.Authorization Request
The authorization endpoint for an API proxy on Tyk is a special endpoint automatically added to the proxy definition, accessible fromPOST /<listen-path>/oauth/authorize
The following parameters are required in a request to this endpoint:
For example:
/my-api proxy deployed on a Tyk Gateway at https://tyk.cloud.tyk.io.
If the client Id (my-client-id) is valid, the response will be HTTP 307 Temporary Redirect with the redirect URI (http://identityserver.com/client-redirect-uri) in the location header.
Authorization Code Request
The Identity Server requests an Authorization Code from the Authentication Server. Tyk’s authorization code endpoint is hosted in the Tyk Dashboard API, accessible fromPOST /api/apis/{api_id}/authorize-client. The same redirect_uri as provided in the original request must be provided alongside the client_id as a security feature to verify the client identity.
This endpoint is protected using the Dashboard API secret assigned to the Identity Server, which must be provided in the Authorization header.
The following parameters are required in a POST request to this endpoint:
For example:
https://admin.cloud.tyk.io to access the proxy with API Id my-api-id.
If the client Id (my-client-id) is valid and redirect_uri matches the one provided in the initial request, an authorization code will be provided in the response payload, for example:
Exchange the Authorization Code for an Access Token
Once the client has the authorization code, it can exchange this for an access token, which is used to access the protected API. The token exchange endpoint for an API proxy on Tyk is a special endpoint automatically added to the proxy definition, accessible fromPOST /<listen-path>/oauth/token.
This endpoint is protected using Basic Authentication where the username is the client Id and the password is the client secret.
The following parameters are required in the request:
For example:
/my-api proxy deployed on a Tyk Gateway at https://tyk.cloud.tyk.io. The basic auth key is the base64 encoded representation of my-client-id:my-client-secret The client_id and redirect_uri match those provided in the initial authorization request. The code is the authorization code provided to the identity server in the authorization code request.
The response payload contains:
access_token: the token which can be used by the client to access the protected APIexpires_in: the expiration date/time of the access tokentoken_type: set tobearerindicating that the access token should be provided in an Auth Token request to the protected APIrefresh_token: [optional] a special token that can be used in the Refresh Token flow
Using the Client Credentials Grant
When using Tyk as the authorization server with the Client Credentials grant, the client accesses resources on behalf of itself rather than on behalf of a user, so there is no user login/authorization step (as seen with Authorization Code grant). This flow is ideal for server-to-server interactions. After registering the Client App, the client simply requests an access token directly from the authorization server:
Access Token Request
The client obtains an access token for an API proxy on Tyk from a special endpoint automatically added to the proxy definition, accessible fromPOST /<listen-path>/oauth/token.
This endpoint is protected using Basic Authentication where the username is the client Id and the password is the client secret.
The following parameters are required in the request:
For example:
/my-api proxy deployed on a Tyk Gateway at https://tyk.cloud.tyk.io. The basic auth key is the base64 encoded representation of my-client-id:my-client-secret The client_id and client_secret match those allocated by Tyk (the auth server) for the client app.
The response payload contains:
access_token: the token which can be used by the client to access the protected APIexpires_in: the expiration date/time of the access tokentoken_type: set tobearerindicating that the access token should be provided in an Auth Token request to the protected API
Note that Client Credentials grant does not produce a refresh token.
Using the Resource Owner Password Grant
When using Tyk as the authorization server with the Resource Owner Password grant, the client provides the user’s credentials when requesting an access token. There is no user login/authorization step (as seen with Authorization Code grant). This flow is not recommended and is provided only for integration with legacy clients. After registering the Client App, the client simply requests an access token directly from the authorization server: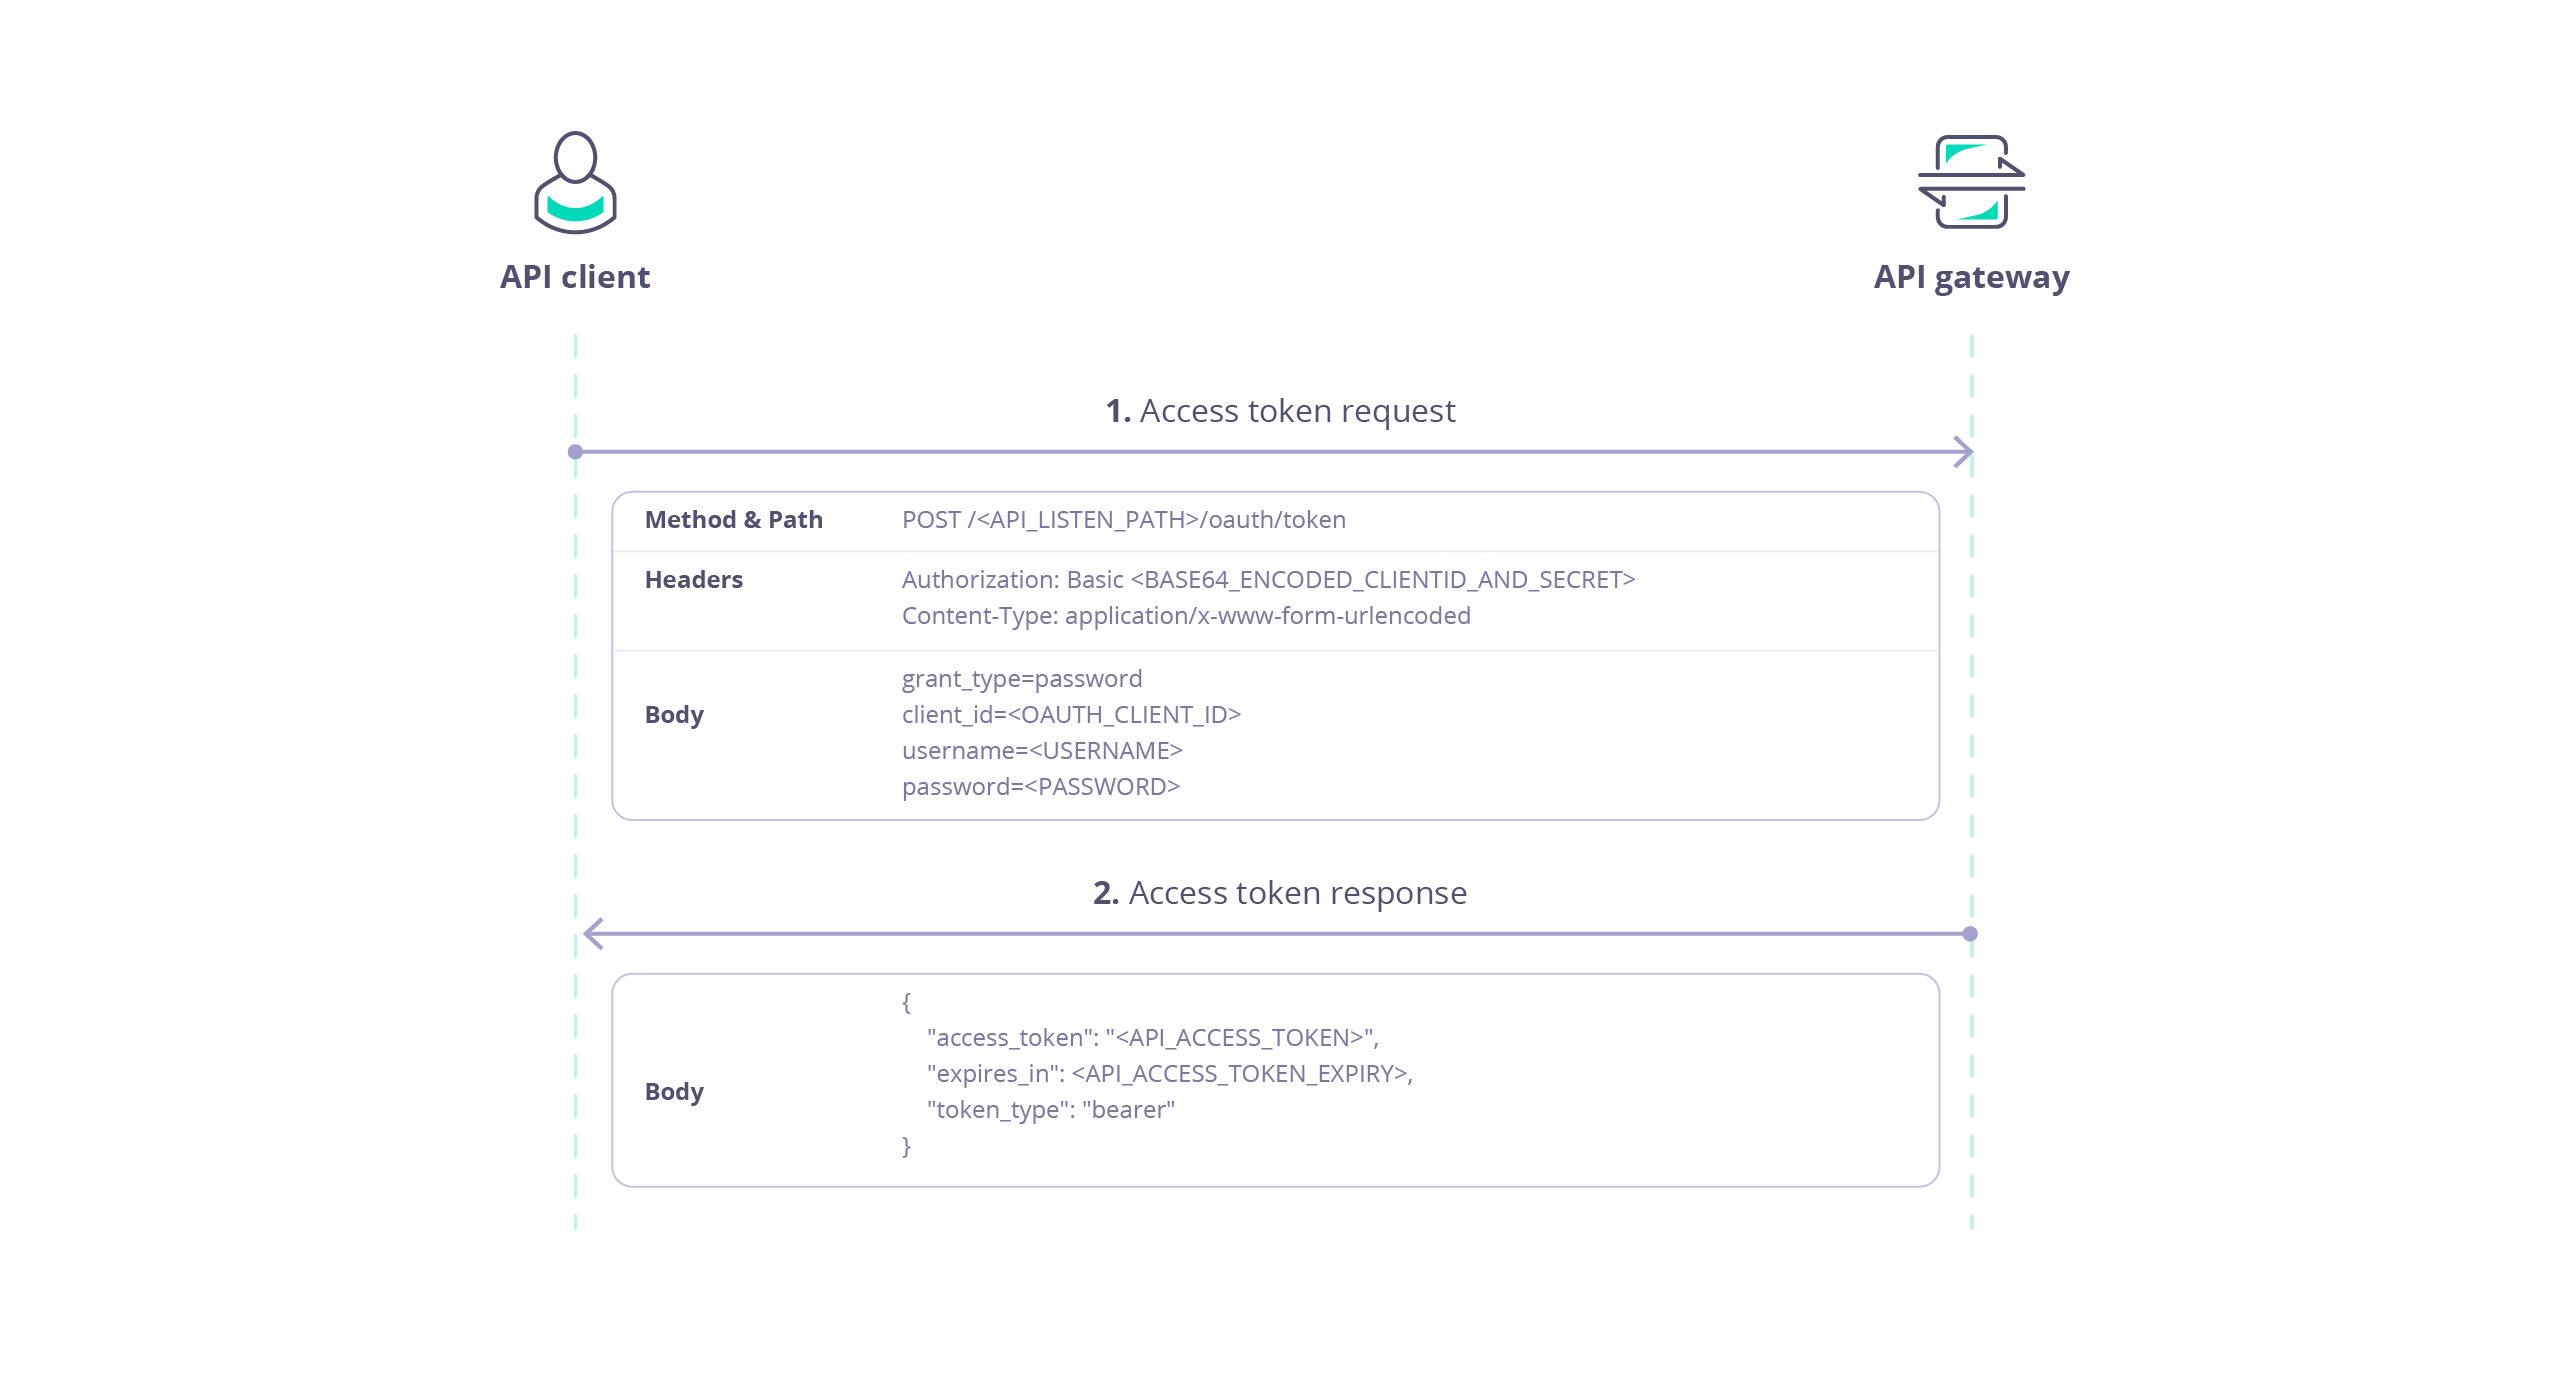
Access Token Request
The client obtains an access token for an API proxy on Tyk from a special endpoint automatically added to the proxy definition, accessible fromPOST /<listen-path>/oauth/token.
This endpoint is protected using Basic Authentication where the username is the client Id and the password is the client secret.
The following parameters are required in the request:
For example:
/my-api proxy deployed on a Tyk Gateway at https://tyk.cloud.tyk.io. The basic auth key is the base64 encoded representation of my-client-id:my-client-secret The client_id and client_secret match those allocated by Tyk (the auth server) for the client app.
The response payload contains:
access_token: the token which can be used by the client to access the protected APIexpires_in: the expiration date/time of the access tokentoken_type: set tobearerindicating that the access token should be provided in an Auth Token request to the protected APIrefresh_token: [optional] a special token that can be used in the Refresh Token flow
Configuring your API Proxy
As explained previously, the AuthN/Z methods to be used to secure an API proxy are configured in the API definition. This permits granular application of the most appropriate method to each API deployed on Tyk Gateway. When using Tyk as the Authorization Server, the API configuration can be applied using the Tyk Dashboard’s API Designer UI, or by direct modification of the API definition. We will provide examples here when using Tyk OAS APIs. If you are using Tyk Classic APIs, the process is very similar, though there are differences in the location and specific labelling of options.Using the Tyk API Designer
- Client Authentication is configured on the Settings screen within the API Designer, within the Server section. Ensure that you are in Edit mode, click on the button to Enable Authentication and then select Tyk OAuth 2.0 from the drop down options:
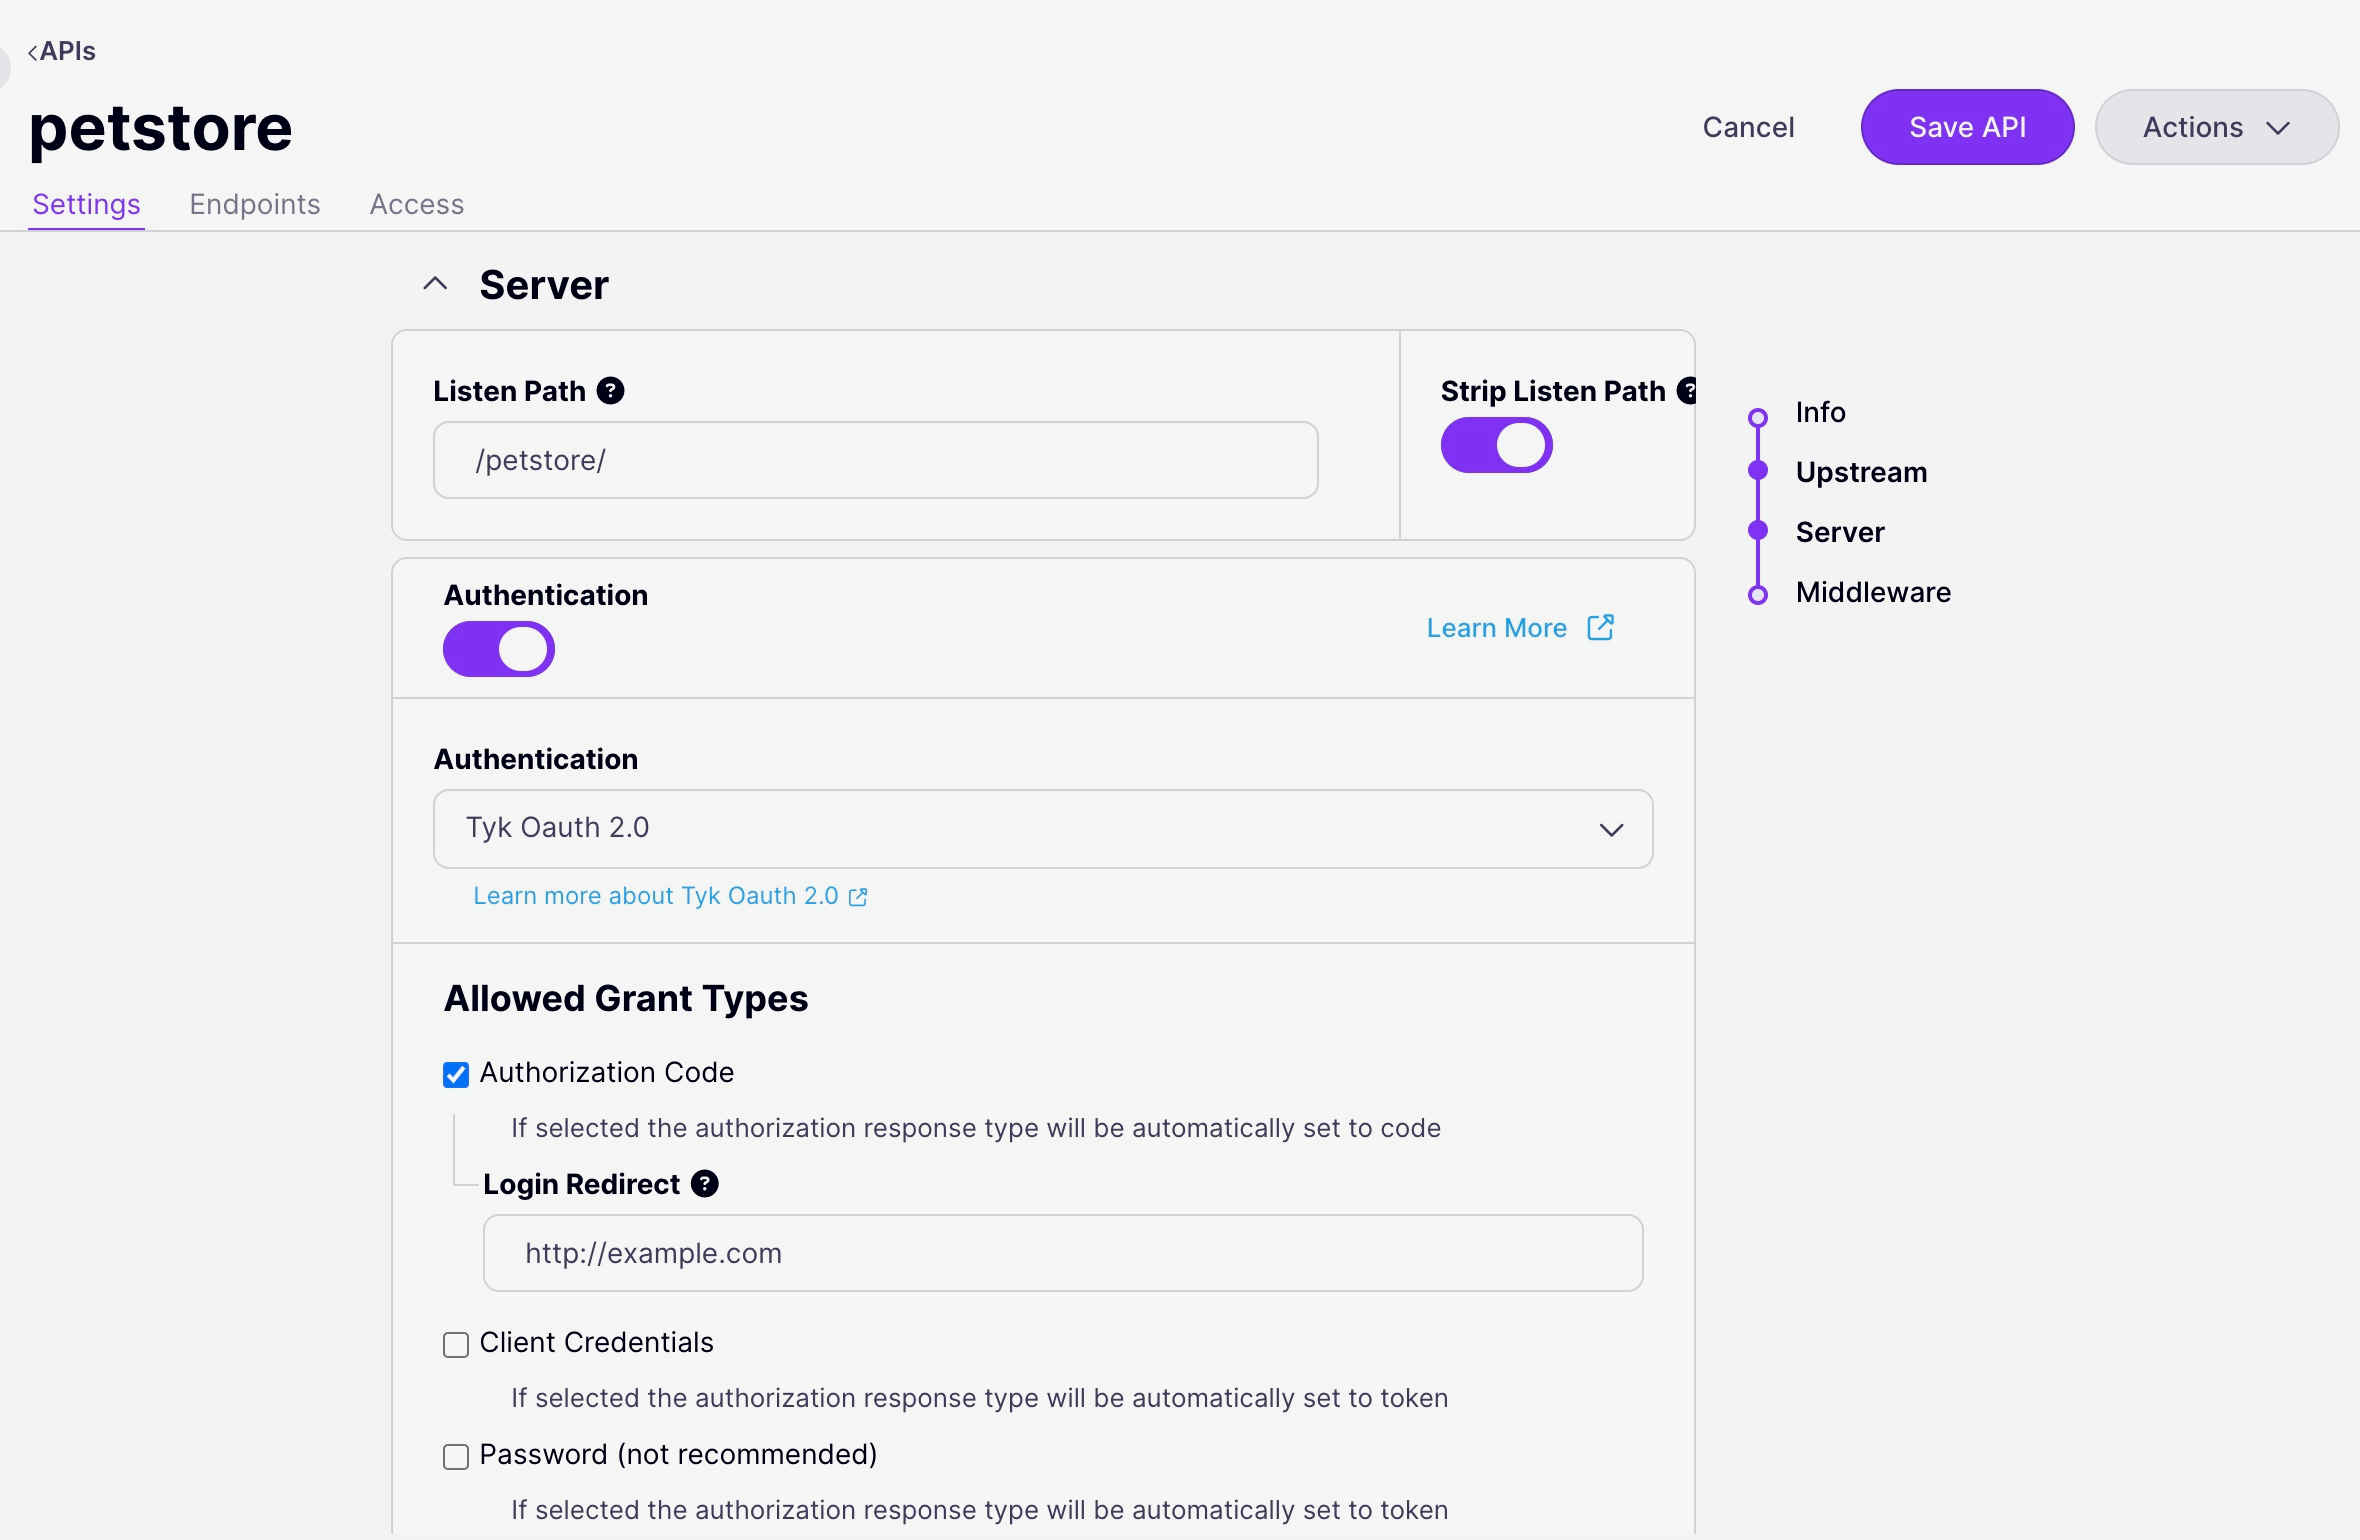
- Select the OAuth Grant Type that you wish to use for the API, if appropriate you can also select the Refresh Token grant so that the Auth Server (Tyk) will generate both access and refresh tokens.
-
Provide the requested configuration options depending on the selected Grant Type. Note that for Authorization Code Grant, Redirect URL should be the login page for your Identity Server and must be matched by the
redirect_uriprovided in the client app (and in the client’s authentication request). The Notifications configuration can be provided for Authorization Code and Password grants. - Select Save API to apply the new settings.
Using the API Definition
The OpenAPI Specification indicates the use of OAuth 2.0 authentication in thecomponents.securitySchemes object using the type: oauth2. Tyk supports the authorizationCode, clientCredentials and password flows and implements Relative Endpoint URLs for the authorizationUrl, tokenUrl and refreshUrl.
Authorization header, but Tyk is configurable, via the Tyk Vendor Extension, to support custom header keys and credential passing via query parameter or cooke.
authentication.stripAuthorizationData field (Tyk Classic: strip_auth_data).
With the OAuth method selected, you’ll need to configure Tyk to handle the specific configuration of OAuth grants that you will support. All of the OAuth specific configuration is performed within the authentication.securitySchemes.oauth object in the Tyk Vendor Extension.
For example:
- Client authentication has been enabled (line 44)
- The OpenAPI description declares the
oauthsecurity scheme that expects Authorization Code flow. Note that theauthorization URLandtoken URLare declared relative to the API proxy listen path - Authorization requests (made to
POST /my-oauth-api/oauth/authorize) will be redirected tohttp://<identity-server>/client-redirect-uriwhere the Resource Owner should be prompted to authorize the request - Notifications of token issuance will be sent to
http://notifyme.comwith theX-Tyk-Shared-Secretheader set tooauth-shared-secret
Authorization header of the request.
The configuration above is a complete and valid Tyk OAS API Definition that you can import into Tyk and, with correctly configured and integrated identity server can be used to try out OAuth Client Authentication using Tyk as the Authorization Server.
Using Tyk Classic APIs
As noted in the Tyk Classic API documentation, you can select the Tyk as OAuth Server method using theuse_oauth2 option.
Managing OAuth Tokens
Using Refresh Tokens
The Refresh Token flow is used to obtain a new access token when the current token has expired or is about to expire. This allows clients to maintain a valid access token without requiring the user to go through the authentication and authorization process again. Refresh tokens are single use and, when used, automatically invalidate the access token with which they were issued. This prevents accidental duplication of access tokens granting authorized access to a resource (API). A refresh token can be issued by the auth server alongside the access token at the last stage of the OAuth flow for:- Authentication Code grant
- Resource Owner Password grant
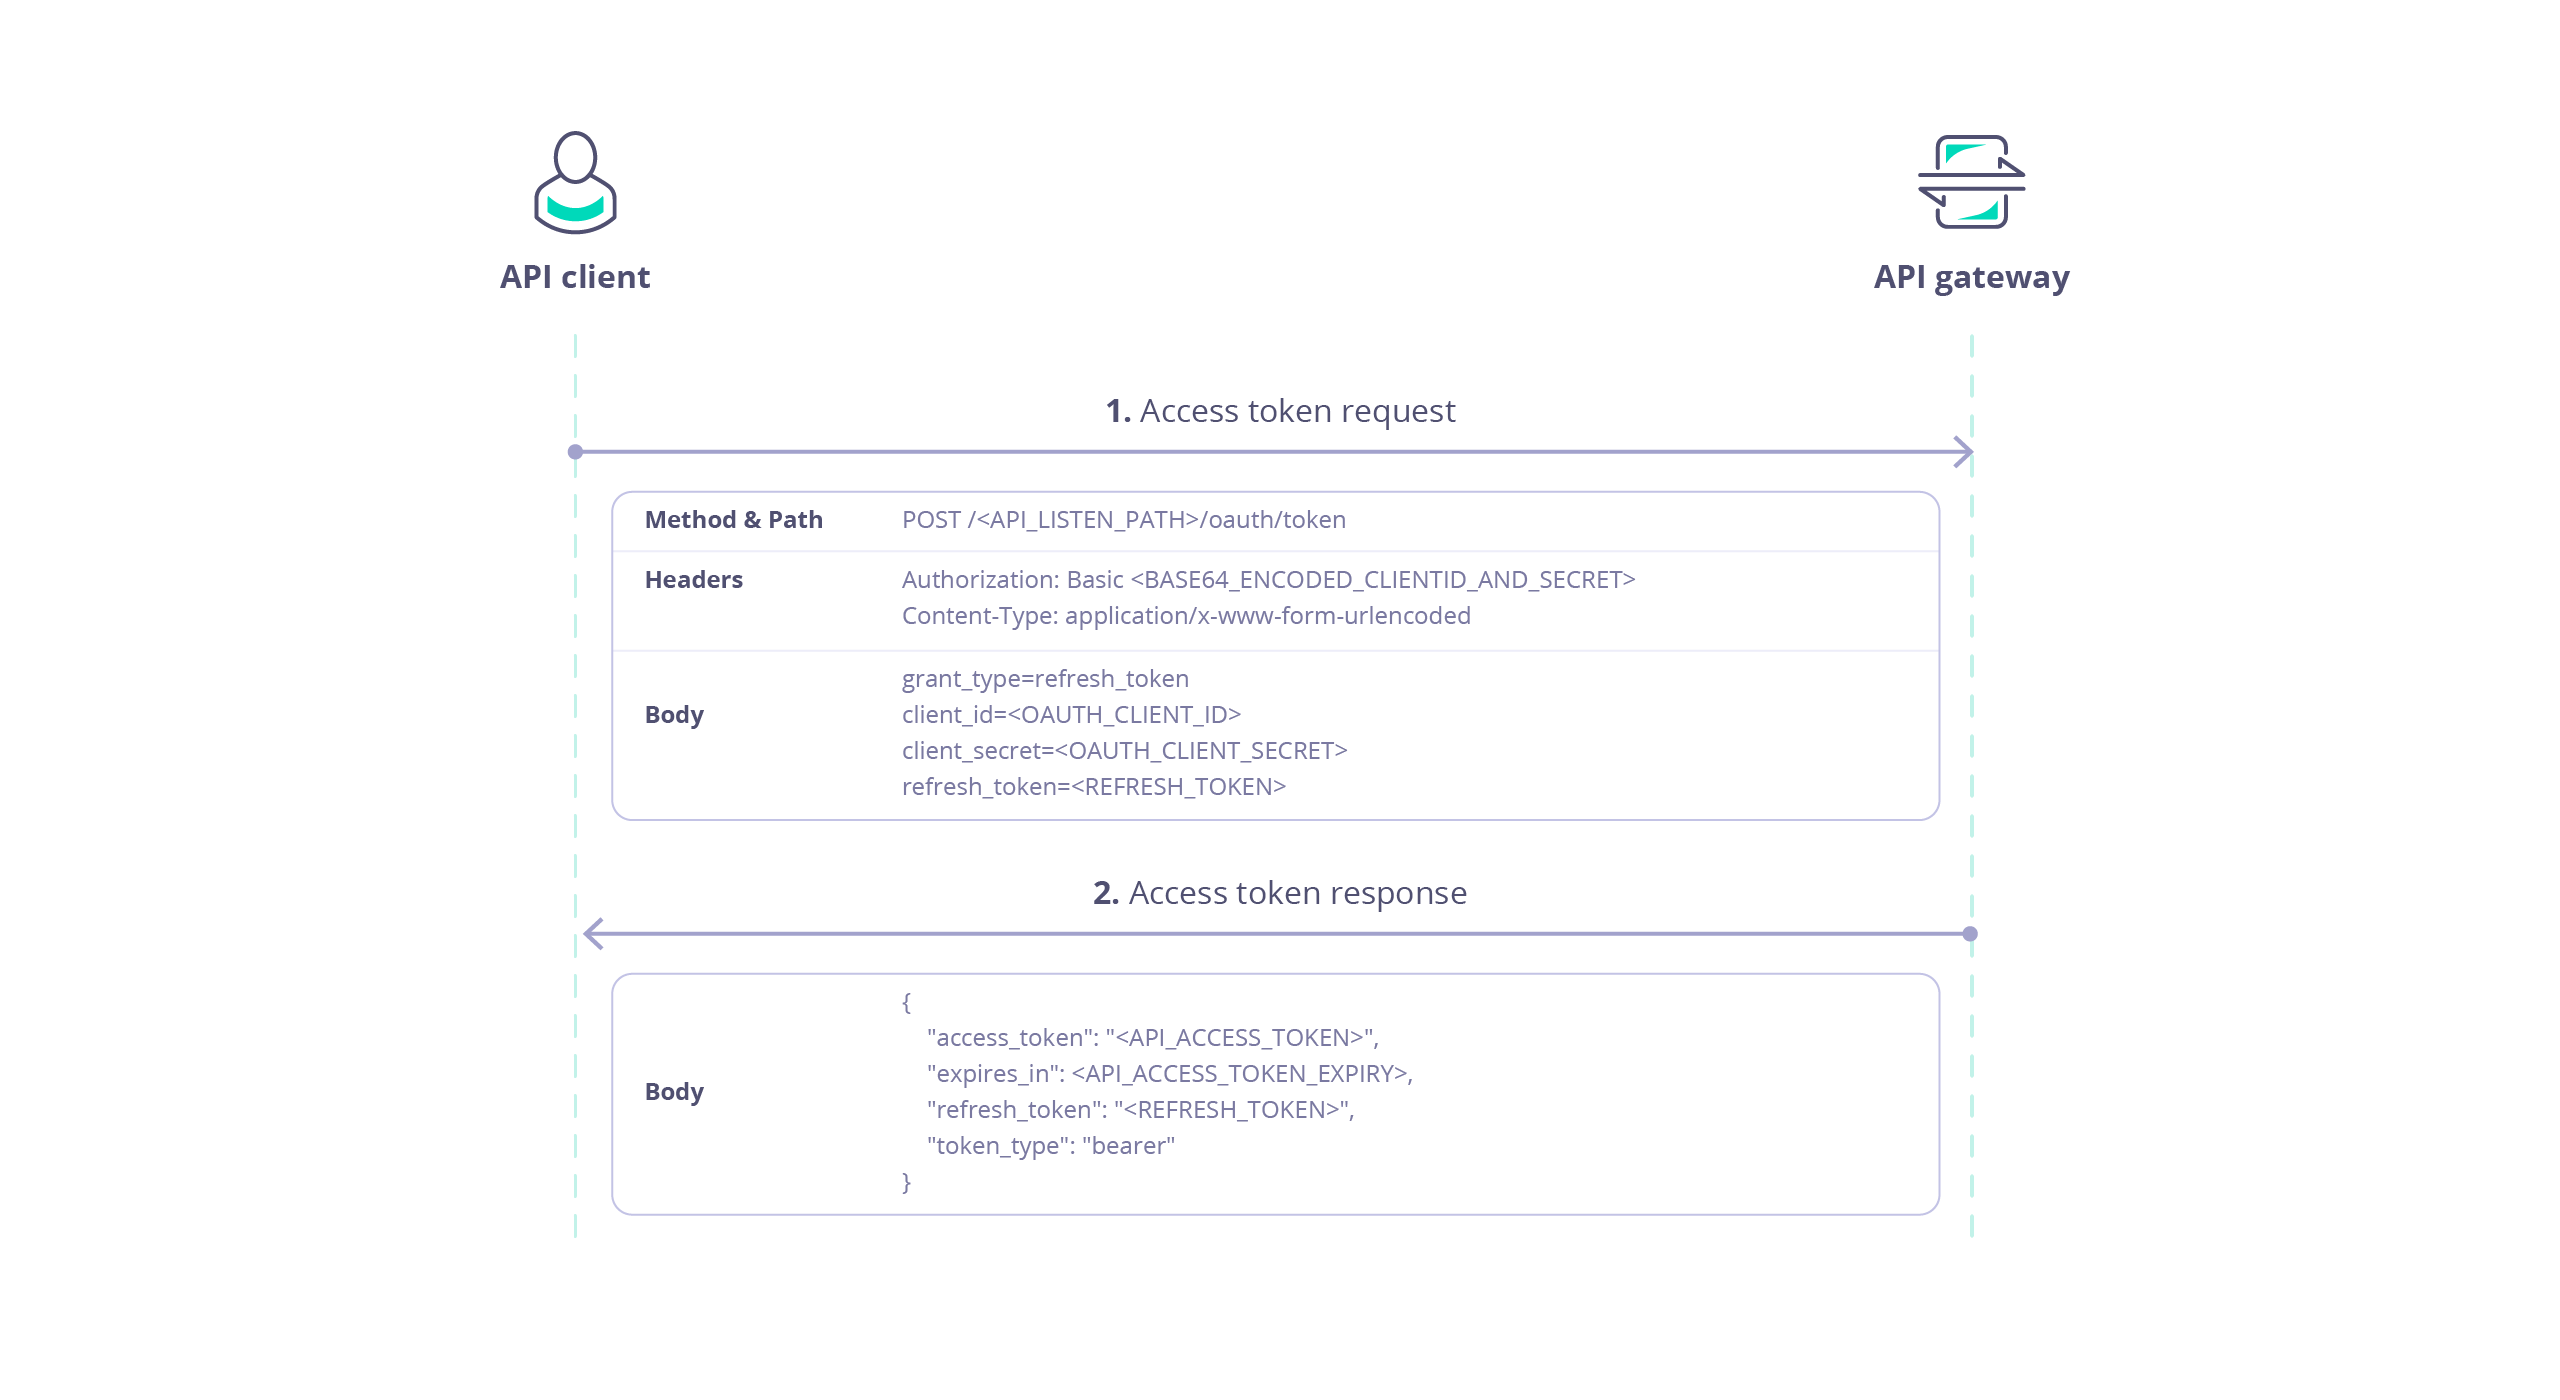
Refreshing an Access Token
If you have correctly configured your API, then Tyk will provide a refresh token with the access token. The client can subsequently exchange the refresh token for a new access token without having to re-authenticate, with another call to thePOST /<listen-path>/oauth/token endpoint as follows:
For example:
/my-api proxy deployed on a Tyk Gateway at https://tyk.cloud.tyk.io. The basic auth key is the base64 encoded representation of my-client-id:my-client-secret The client_id and client_secret match those allocated by Tyk (the auth server) for the client app. The refresh_token is a valid refresh token previously issued to the client.
The response payload contains:
access_token: a new access token which can be used by the client to access the protected APIexpires_in: the expiration date/time of the access tokentoken_type: set tobearerindicating that the access token should be provided in an Auth Token request to the protected APIrefresh_token: a new refresh token that can be used later to refresh the new access token
Revoking Access Tokens
OAuth access tokens have built in expiry, but if you need to revoke a client’s access to the API before this time, then you can use the option on the OAuth Client management screen screen in Tyk Dashboard UI or the Tyk Dashboard API to do so. Using the Tyk Dashboard API you can revoke specific tokens (both access and refresh) or all tokens issued for a specific client app as follows:- retrieve a list of all tokens for a client app
- revoke a single token
- revoke all tokens for a client app
Authorization header.
In this example, we issue a request to the /revoke endpoint of the auth server via the Tyk Dashboard API to invalidate a specific access token:
token_type_hint must be set to access_token or refresh_token to match the type of token to be revoked.
Token Expiration and Retention
Tyk provides several global Gateway configuration options (intyk.conf) that control the expiration and retention of OAuth 2.0 tokens:
oauth_token_expire: Overrides the default expiration time (in seconds) for newly generated access tokens. This value sets the logicalexpirestimestamp in the access token’s Session.oauth_refresh_token_expire: Overrides the default expiration time (in seconds) for newly generated refresh tokens. If not set, it defaults to 14 days (1,209,600 seconds). When this TTL expires, the refresh token is physically deleted from Redis.oauth_token_expired_retain_period: Controls a background cleanup job that removes expired tokens from an internal tracking list (a Redis sorted set used to track all tokens issued to a specific OAuth Client). It does not control the Redis TTL or the retention of the actual Session data.
Interaction with Session Lifecycle Controls
Because OAuth access tokens are stored as standard Session objects, their physical retention in Redis is governed by Tyk’s standard session lifecycle controls, not by theoauth_token_expired_retain_period.
The oauth_token_expire setting defines the initial expires timestamp for the Session relating to the access token. Once that timestamp is reached, the session lifecycle controls determine how long the expired session data is retained in Redis.
Refresh tokens, however, are not Session objects. They do not use the session lifecycle controls and are physically deleted from Redis exactly when their oauth_refresh_token_expire TTL is reached.
For more details on how to control the physical retention of access token session data, see the Session Lifecycle documentation.
OAuth Token Notifications
When operating as an OAuth authorization server, Tyk can generate an event whenever it issues an access token. You can configure a dedicated webhook that will be triggered to notify the Resource Owner service of the occurrence of the event. OAuth token notifications can only be configured when using Authorization Code or Resource Owner Password Credentials grants, not when using Client Credentials grant because this flow is primarily used for server-to-server communication, where the client acts on its own behalf without user-specific authorization changes. You can configure the URL that the webhook will issue aPOST request and a “shared secret” value that will be provided in a header (X-Tyk-Shared-Secret) used to secure the communication to the target application. The OAuth token notification webhook does not support any other authentication method.
The body of the webhook request will have this content:
auth_codeis the Authorization Code that has been issuednew_oauth_tokenis the Access Token that has been issuedrefresh_tokenis the Refresh Token that has been issuedold_refresh_tokenis the Refresh Token that has been consumed when refreshing an access tokennotification_typewill indicate the cause of the event:new: a new access token has been issuedrefresh: a token has been refreshed and a new refresh token has been issued
Configuring Notifications in the Tyk API Designer
Client Authentication is configured on the Settings screen within the Tyk OAS API Designer, within the Server section. Ensuring that you are in Edit mode, go to the Authentication section where you should have selected Tyk OAuth 2.0 from the drop down options. Here you will see the Notifications section where you can configure:- Notifications URL
- Notifications Shared Secret