I really enjoy working with our enterprise clients on a daily basis, not least because it gives me huge insight into their requirements and pain points which I can feed back into our product development lifecycle. By doing this I’m able to better understand which Tyk features need most clarification, gain insight into what kind of obstacles you’re facing, and, of course, get pestered about your most-wanted features.
Single-Sign-On, (SSO), is certainly one that comes up a lot, and actually applies to all three categories above: almost every company asks about it, finds it challenging and puts it as a prerequisite on a tender.
Locking-in has never been on Tyk’s agenda; instead, we focus on integration with best of breed solutions. So we’ve recently announced our plans to integrate with providers that support standardised OIDC flow, such as Okta, who we recently partnered with.
My aim in this blog is to demonstrate how quick and easy it is to setup Okta and Tyk to achieve SSO with Tyk’s Dashboard, our web-based API management user interface. That way, you can benefit from Tyk’s API Management Platform coupled with Okta’s User Access Management.
But first of all: what is SSO?
SSO gives users the ability to log in to multiple applications or systems without the need to enter their username and password more than once. Using OpenID-Connect (OIDC), enables an application to verify the identity of users from an organisation without the need to self-store and manage them, and without doing the identification process or exposing their passwords to that application.
Instead, the organisation’s lists of users and passwords are kept in centralised single and safe location, with the Identity Provider (IdP) that the organisation has chosen to use (Okta for instance). The Authorisation Server of the IdP then identifies the users for a pre-registered and approved application (or the ‘client’ in OAuth and OIDC terminology).
As a user of Tyk or other API gateways, you’re probably aware of two main authentication requirements. The first is to protect your APIs using OIDC flow through an API gateway. The second would be to SSO your gateway’s management UI (e.g. a management dashboard for API owners, and a developer portal for API consumers) with an external IdP.
Where does Tyk come in?
Tyk’s API platform already provides a user interface to manage your API gateways, and a Developer Portal to self-cater the users/developers of your APIs.
With systems like this, you usually require an administrator to create users (on Tyk’s Dashboard) or have users register themselves (on the Developer Portal). Organisations would also potentially need to on-board all their users, emails and passwords to Tyk and manage them separately in Tyk.
Many organisations today are already using an external IdP, which takes care of users’ identity management. They’d rather not use another system, expose their users’ passwords, nor have to manage them on every separate product they buy.
To aid this, Tyk has a dedicated service-level component that addresses this particular issue, enabling enterprises to easily utilise SSO for their users on the Tyk Dashboard and Developer Portal. We named this service Tyk Identity Broker (TIB).
TIB is an open-source project which is used to integrate Tyk authentication with 3rd party IdPs. It’s been designed as a glue-code solution, so it can integrate with almost any IdP, including social network providers.
How do I SSO Tyk using Okta as my Identity Provider?
Let’s get started. For this introduction I’ve aimed to give you the key information, with some handy screengrabs to help illustrate what you should see, and when.
If you need more information, you can also refer to our step-by-step guide to SSO Tyk-Dashboard UI using my company’s Okta user.
Step 0 – Just before we begin
As usual, I think that most of the time you spend on getting SSO to Tyk’s Dashboard working is likely to be on preparing and setting up your environment. Though the following list is quite trivial, you’ll need to have all these boxes ticked before you can get started with Tyk and Okta.
- Ensure Tyk’s Platform is up and running
In order to demonstrate SSO to Tyk Dashboard UI, please have Tyk platform up and running (i.e. Tyk-Dashboard, Tyk-Gateway/s, Redis, MongoDB and Tyk-Pump).
If you don’t have an environment and are just getting started with Tyk please check our very useful and most wonderful quick-and-dirty-all-in-one-not-for-benchmarks-demo repository, which uses docker-compose. This conveniently manages for you all the required components in containers. NB: please use this repo just to try out Tyk and not for load testing, since this all-in-one-machine-set-up is not our recommendation for real testing and production environments. Find out more about best practices for deploying Tyk to production. - Have a licensed Tyk Dashboard
Tyk’s Dashboard is a licensed product. If you are not sure you have a licence, try to login in to Tyk Dashboard. If you see the “please enter your licence key” message it means you haven’t entered a licence key yet. You can get a free licence for non-commercial use or use your paid one. - Authorisation key to Tyk Dashboard Rest API endpoints
Make sure you have authorised access to Tyk’s Dashboard REST APIs by logging in to the Tyk Dashboard and clicking on “Edit Profile” on the upper left corner of the screen. The API key is under the title “Tyk Dashboard API Access Credentials”. If you need further help, here are further explanations and some screenshots. - Okta account
Please register with the Okta Developer site or, if you have already registered, make sure you can login. You should get a domain such as https://dev-XXXXX.oktapreview.com/app/UserHome for a dev account.
Step 1 – Start up Tyk Identity Broker (TIB)
TIB is an open source product. There are two ways to get it:
- As a docker image in hub.docker.com
yaara@Tyk>docker run --name my-tib -itd --rm --network tykprodockerdemo_tyk -p 127.0.0.1:3010:3010 tykio/tyk-identity-brokerThere are two config files that TIB will be using – tib.conf and profiles.json. Since you would probably want to update them you can create confs directory and mount it as follows:
yaara@Tyk> docker run --name my-tib -itd --rm --network tykprodockerdemo_tyk -p 127.0.0.1:3010:3010 -v $(pwd)/confs:/opt/tyk-identity-broker/confs tykio/tyk-identity-broker /opt/tyk-identity-broker/tyk-identity-broker -c /opt/tyk-identity-broker/confs/tib.conf -p /opt/tyk-identity-broker/confs/profiles.json - The zipped binary from github: clone this repo for master version or get specific releases
If you want to run your own version locally, download TIB’s latest version (currently it’s v0.4.0) and from command line run the following:
tar -xvzf tyk-identity-broker-0.4.0.tar.gz
cd tyk-identity-broker-0.4.0
go build
./tyk-identity-broker-0.4.0 -c tib.conf -s profiles.json
For simplicity, we are running TIB on port 3010 but you are able to configure it as you wish in the tib.conf configuration file.
Step 2 – Set-up on Okta’s side
This is a dead-simple-but-dry flow to set up Okta IdP side. Using your Okta user, login to Okta’s developer site and create Web Application as follows:
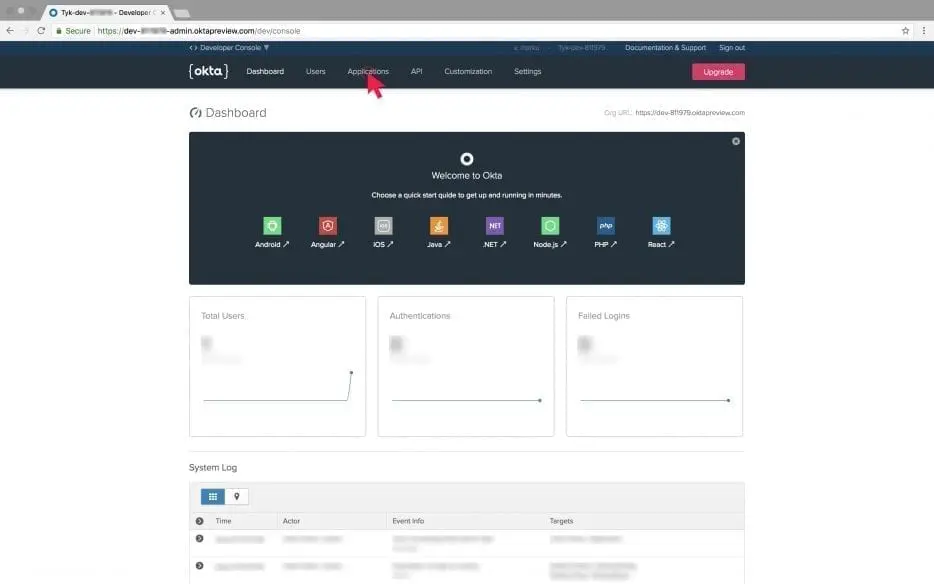
Click on Applications, in the website’s main navigation area.
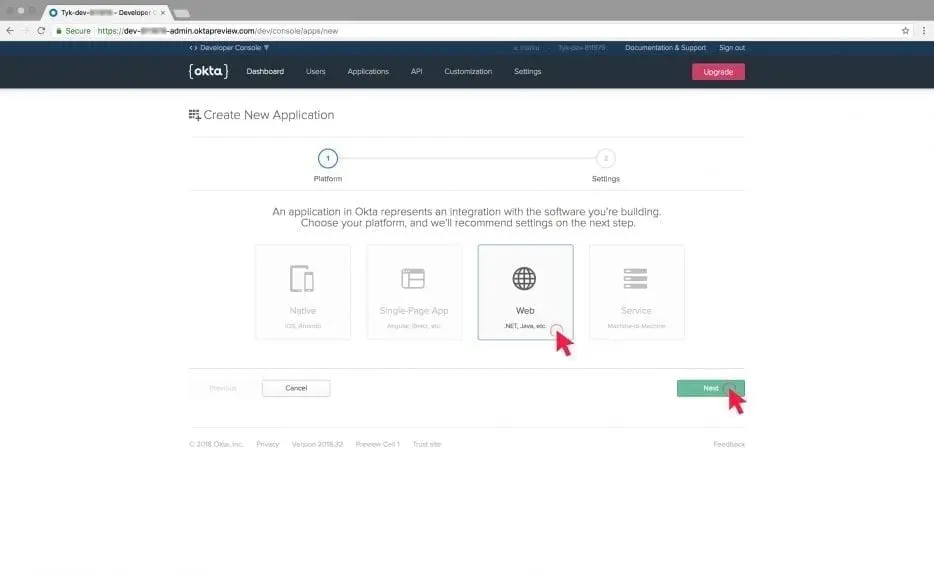
Click on “Add Application”, choose “Web” and click “Next”
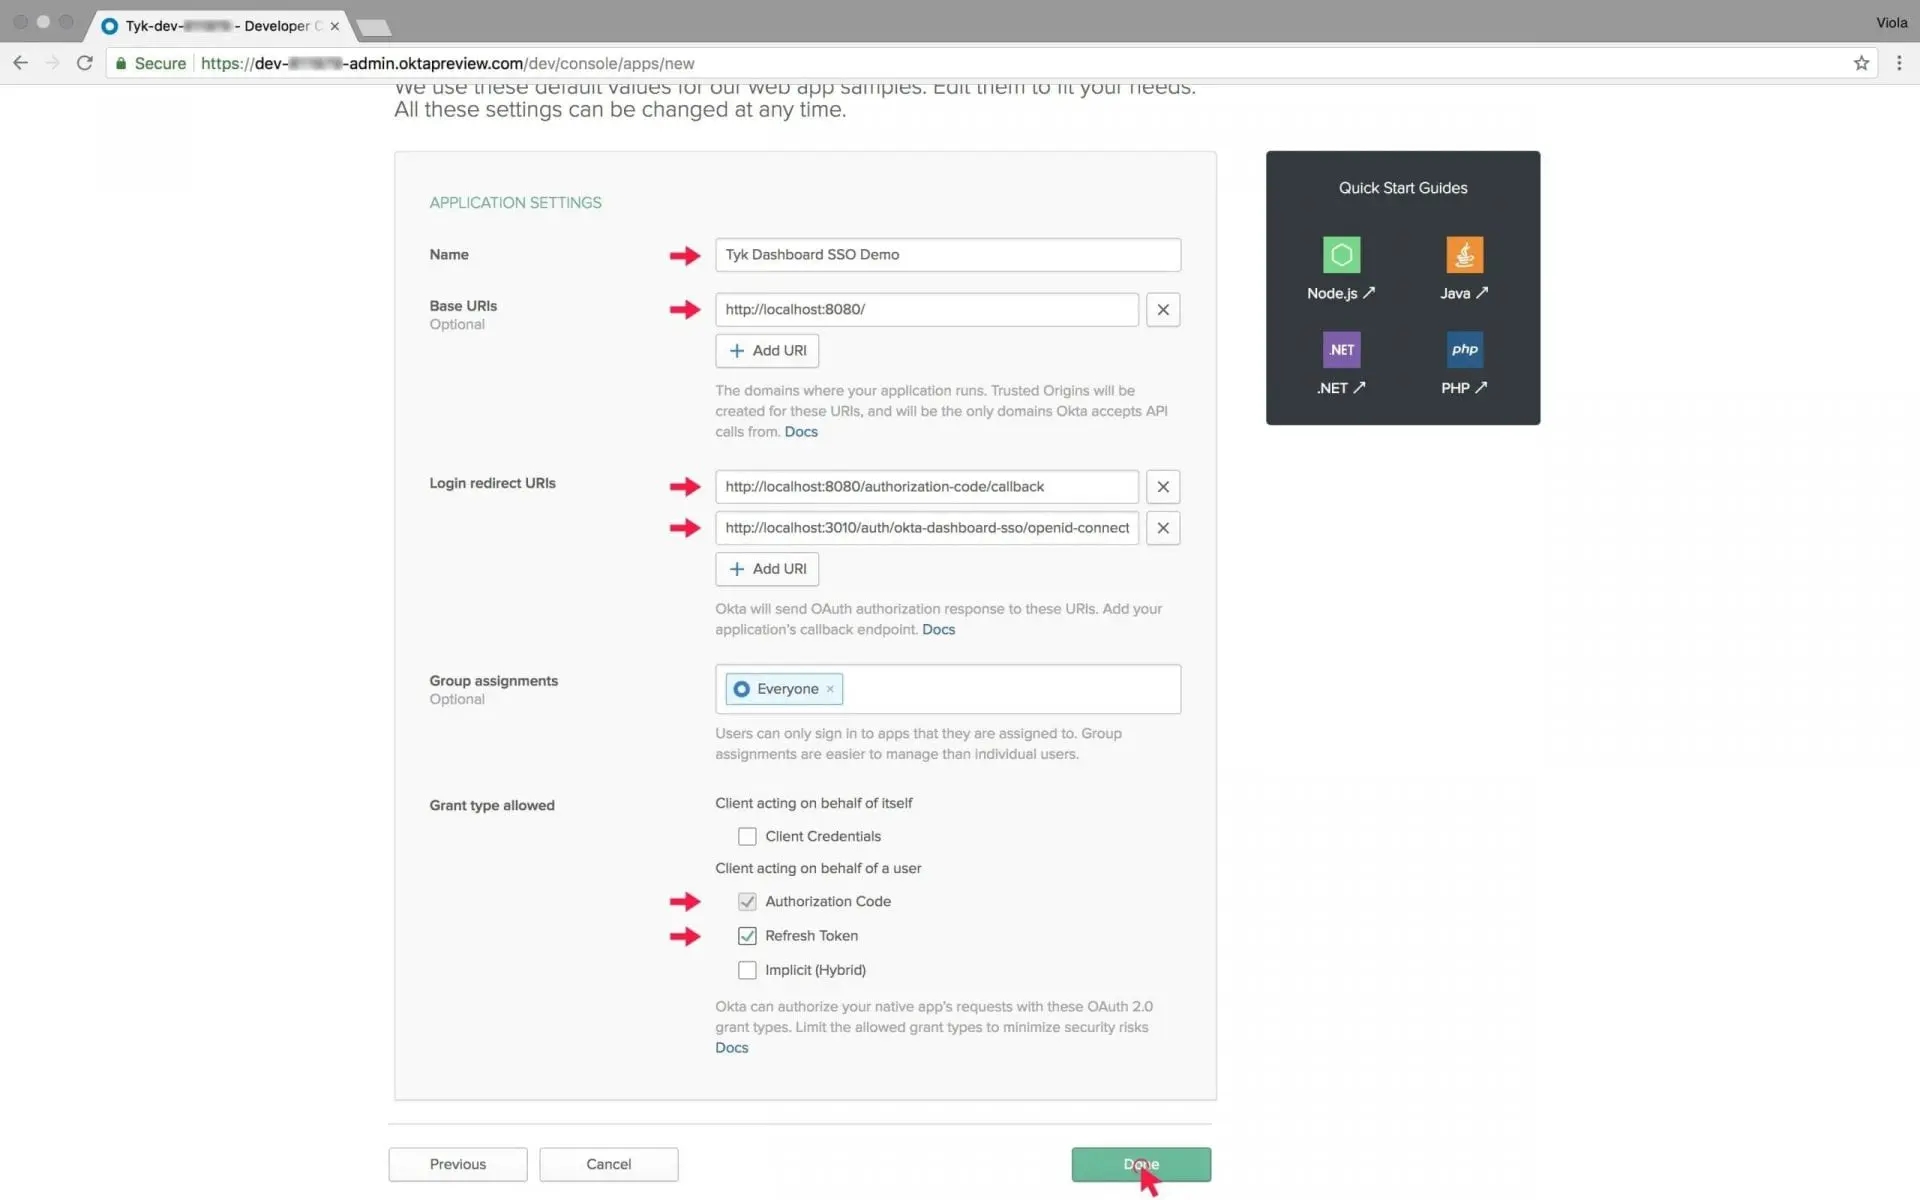
In the new screen update three fields:
-
- The application Name –
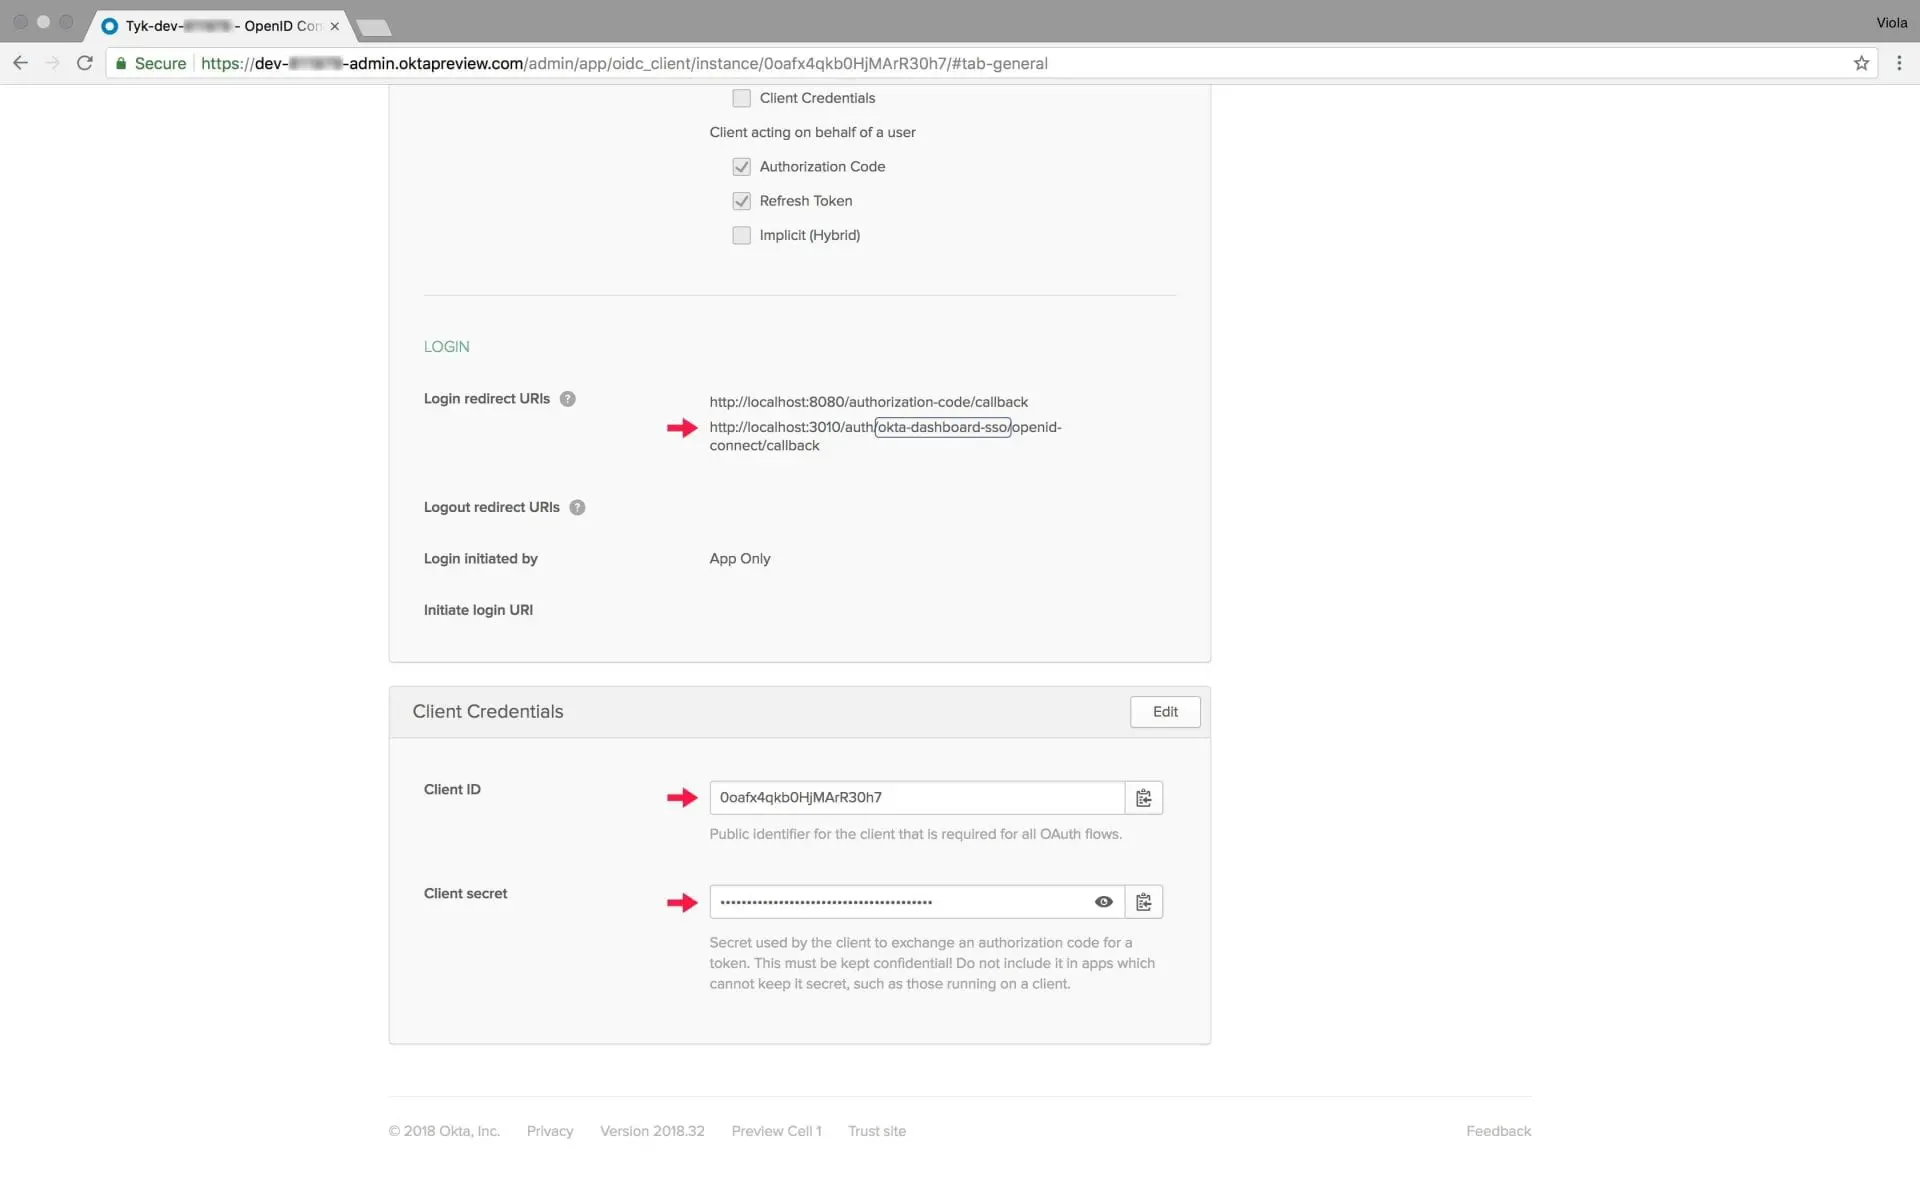
Change the default name of the app. I chose the name “Tyk Dashboard SSO Demo”. - The response URI – this is one of the most important bits. This URI must have a perfect match to TIB’s URI + profile which we will create inside TIB in the next step. Okta will use this URI during the authorisation stage and send an API callback to TIB in that specific path: https://{TIB-HOSTNAME:PORT}/auth/{PROFILE-NAME-IN-TIB}/openid-connect/callback. As you can clearly see, only the profile name needs to be added on top of TIB’s hostname. It can be any string that makes sense to you, as long as you use the same one for the profile in TIB.
- Tick “Authorization Code” and “Refresh Token”.
- Click Done. Okta will generate for you a client_id and secret. You will need these later on, so please copy them to a notepad.
- The application Name –
 Tick “Authorization Code” and “Refresh Token”.
 Step 4: Click Done. Okta will generate for you client_id and and secret. Please copy them to a notepad.
For permissions to login via Okta: Under Assignments tab, make sure group assignments is set to everyone (for now – you will change this later!)
Step 3 – TIB’s part of the deal
We will now create a profile for SSO to Tyk’s Dashboard in Okta.
This is an example of a profiles.json:
{
  "ActionType": "GenerateOrLoginUserProfile",
  "ID": "{PROFILE-NAME-IN-TIB}",
  "OrgID": "5a54a74550200d0001975584",
  "IdentityHandlerConfig": {"DashboardCredential": "{DASHBOARD-SECRET}"},
  "ProviderConfig": {
      "CallbackBaseURL": "https://{TIB-DOMAIN}:{TIB-PORT}",
      "FailureRedirect": "https://{DASHBOARD-DOMAIN}:{DASHBOARD-PORT}/?fail=true",
      "UseProviders": [{
          "Key": "{Okta-App-Client-ID}",
          "Secret": "{Okta-App-Client-SECRET}",
          "DiscoverURL": "https://{IdP-DOMAIN}.oktapreview.com/oauth2/default/.well-known/openid-configuration",
          "Name": "openid-connect"
      }]
  },
  "ProviderName": "SocialProvider",
  "ReturnURL": "https://{DASHBOARD-DOMAIN}:{DASHBOARD-PORT}/tap",
  "Type": "redirect"
}
As you can see, you would need to create a separate profile for every combination of
ActionType-ReturnURL-OrgId
Set the profile in profile.json as follows:
- ActionType – login to dashboard or developer profile
- OrgId – The org id of the organisation you belong to
- ID – Profile’s name, i.e. “ID”: “{PROFILE-NAME-IN-TIB}”,
- IdentityHandlerConfig.DashboardCredential – the credentials TIB uses to access the Tyk Dashboard API
- Under ProviderConfig:
- CallbackBaseURL – TIB’s URL, will be used to create the endpoint for the callback from Okta, i.e. https://{TIB-HOSTNAME:PORT}/auth/{PROFILE-NAME-IN-TIB}/openid-connect/callback
- FailureRedirect – in case of failure of Auth.
- UseProviders.[1].Key – the client_id from Okta (saved on your notepad)
- UseProviders.[1].Secret – the client_id’s secret from Okta
- UseProviders.[1].DiscoveryURL – That’s Okta’s well-known discovery URL “https://dev-XXXXX.oktapreview.com/oauth2/default/.well-known/openid-configuration”
- ProviderConfig.UseProviders.[1].Name – that’s the authentication type in TIB and for Okta it must be “openid-connect”
Now you can restart TIB by running the binary or docker with profiles.json in the same directory or via docker with the mounted config files.
Step 4 – Verify that you can SSO to the Dashboard
Fear no more – we are almost there! Now, from the browser, call TIB’s endpoint with the profile you have added in profiles.json: https://localhost:3010/auth/{PROFILE-NAME-IN-TIB}/openid-connect
If it’s working you’ll be redirected to Okta’s web page and will be asked to enter your Okta user’s credentials After successful authentication in Okta you’ll be redirected to the dashboard and login without going through the login page. Job done!
If you need to update your profile after TIB is already running then you can use TIB’s REST API with the key from tib.conf:
curl https://{TIB-DOMAIN}:{TIB-PORT}/api/profiles/{PROFILE-NAME-IN-TIB} -H “Authorization: {MY-SECRET}” -H “Content-type: application/json” -X PUT –data “@./my-new-dashboard-profile.json”
- POST and DELETE calls apply as normal
- You can post a few profiles to TIB
- Please refer to the full doc for TIB REST APIs
What’s the magic? The flow behind the scenes:
- The initial call to the endpoint on TIB was redirected to Okta and has Okta authenticate the user.
- Okta redirected the call back to TIB endpoint according to the callback you set up earlier in Okta and in tib.conf.
- TIB, via REST API call to the dashboard, created a nonce and a special session attached to it.
- TIB redirected the call to the dashboard to a special endpoint /tap (defined on the profile under ReturnURL) with the nonce that was created.
- The Dashboard on the /tap endpoint finds the session that is attached to the nonce, logs the user in, and redirects it to the dashboard first page.
Setting login page and MFA Enhancements
Once it’s working you can also add two more enhancements – SSO and Multi-Factor Authentication (MFA).
SSO login into the dashboard via a login page
You will need to set up a web server with a login page and update tyk_analytics.conf to redirect logins to that url. Explicit details can be found in steps 6-7 of our LDAP guide.
Multi-Factor-Authentication (MFA) Support
MFA is a method for confirming user identity for authorisation purposes (i.e. granting access to resources). It requires the user to prove their identity to the authentication mechanism, in two or more ways (i.e. factors).
One factor is knowledge-based; i.e something you and only you could know, like a password. The second factor is possession-based, something you and only you could have, such as a code that is sent to your pre-defined mobile number. A third factor could be inherence-based; i.e. something that only you could possibly have, like your unique fingerprint or iris.
One of the most important reasons for using MFA is to protect your organisation against attackers that are trying to steal credentials through social engineering and phishing. Okta Adaptive MFA provides the additional security to protect organisations from data breaches while offering administrators and end users the simplicity to stay productive. Okta Adaptive MFA also integrates with the applications and infrastructure such as Tyk to make deployment that much easier.
Okta’s MFA works out-of-the-box in Tyk. All you need to do is to add it to the configuration of the account holder.
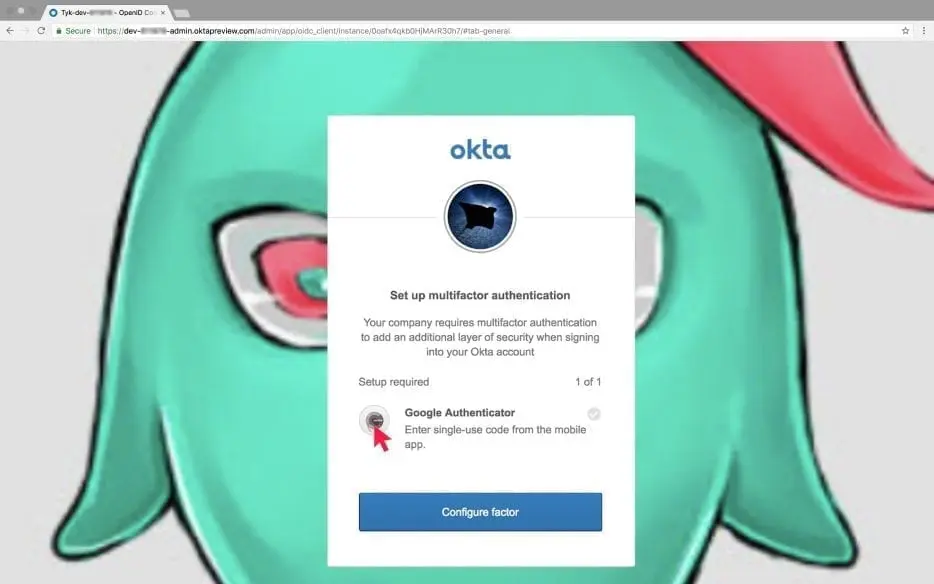
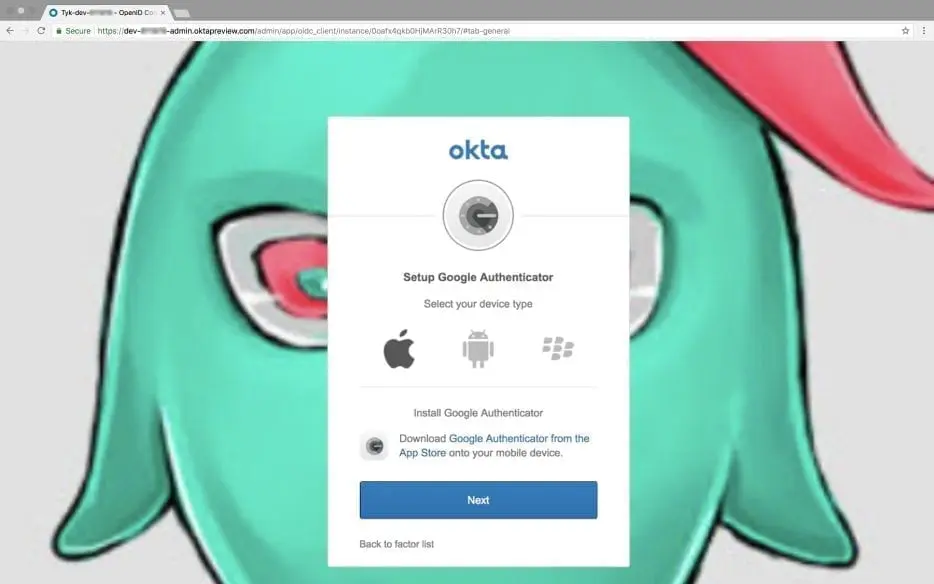
Under Security → Multi Factor → Factor types you can choose the types you want. For instance I chose Google Authenticator. In the following screenshots you can see that while I’m trying to login to the dashboard, Okta enforced the MFA and asked me to get the Google Authenticator:
I had to download the Google Authenticator and identify with the generated code:
Then, after I successfully authenticated with Google Authenticator, I could login to our Dashboard.
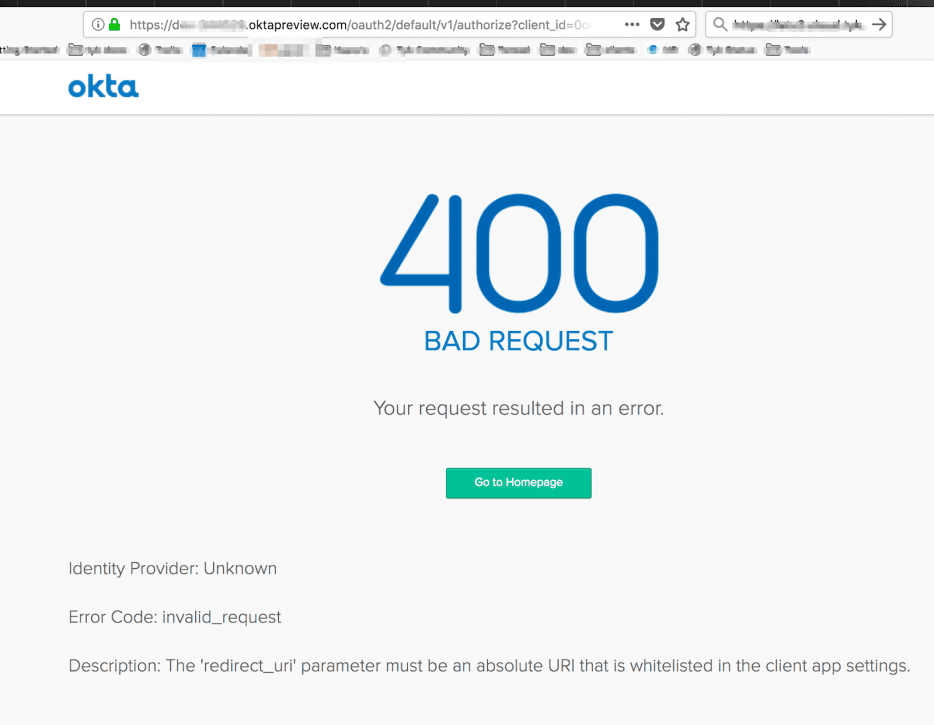
Common pitfalls you may come across
If you get 400 Bad Request it probably means the profile name in the login endpoint is not identical to the profile name in the callback that you set up on Okta’s app:
- On Okta’s app – Login redirect URIs: https://localhost:3010/auth/{PROFILE-NAME-IN-TIB}/openid-connect/callback.
- The endpoint to test – https://localhost:3010/auth/{PROFILE-NAME-IN-TIB}/openid-connect
Before you’re off to the next task on your plate
I hope this guide helped you learning how to set up SSO to Tyk-Dashboard.
A small home-task, to verify your understanding, could be to set up SSO to the Tyk developer portal (hint: use “<portal-url>/sso” in your “ReturnURL”).
My own next task is to write another blog guiding you through the setup of an API using Tyk’s gateway and securing it using Okta IdP – make sure you keep an eye out for it!