I’m often asked which is the better style of API: REST, GraphQL, or gRPC. My answer is always: “I’m not sure. What does your API model say?” At this point, I’m often met with blank stares or given an answer about some database. What I’m really asking is: “What problems does your API solve and why?” Once we understand the needs better through modelling our API, we can then determine what API interaction style(s) are the best fit for your API.
I’m often asked which is the better style of API: REST, GraphQL, or gRPC. My answer is always: “I’m not sure. What does your API model say?” At this point, I’m often met with blank stares or given an answer about some database (that, in itself, is a whole other topic of discussion). What I’m really asking is: “What problems does your API solve and why?” Once we understand the needs better through modelling our API, we can then determine what API interaction style(s) are the best fit for it.
API modelling introduction
Let’s start at the beginning: what is API modelling? In brief, API modelling defines what you need your API to deliver from a multitude of different perspectives. Modelling is an iterative process that considers those involved with your API, what it is they need to do with the API and the steps involved in them doing so.
Different types of API modelling
Naturally, you will need to suit your API modelling to the unique context of your business. REST API resource modelling will look different to GraphQL API modelling, for example. However, the steps that you follow during the modelling process (which we’ve outlined below) will remain the same.
Note that when we talk about API modelling here, it’s not the same as using APIs to help with other modelling work. A financial modelling API is a product that helps with financial modelling, for example, while a topic modelling API is one that supports topic modelling (for example using chat or call transcripts). Where we talk about modelling a REST API, on the other hand, we’re referring to the process of defining what the API itself needs to deliver.
Why API modelling before you design?
Beginning API design from the database will often lead to poor quality APIs that fail to meet the needs of everyone involved. Instead, we must consider who will use our API, what capabilities our API needs to support, and how they plan to use it.
To better understand the difficulties of bottom-up API design, let’s take a project management example:
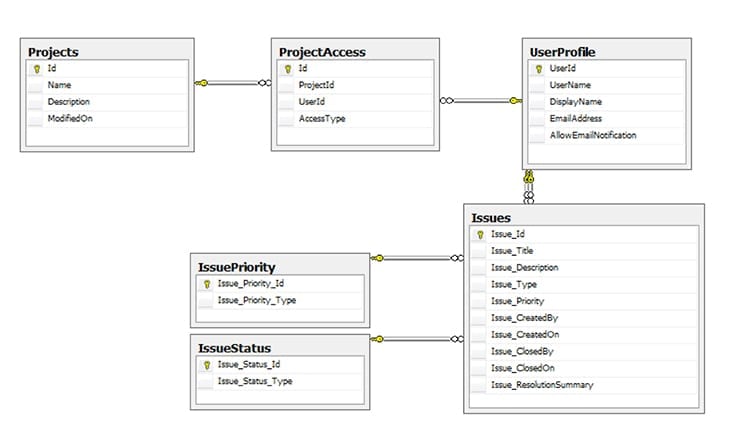
While the database may store all the important data for your app, it doesn’t tell us what the users want to do. Rather, it tells us how some developers decided to store the associated data. If we simply start with the database design, we might end up with a CRUD-style HTTP API that looks like this:
- Create Project
- Read Project
- Update Project
- Delete Project
- Search Projects
- Create UserProfile
- Read UserProfiles
- …
While this might not be a bad start, it focuses too much on the database tables and not enough on the user’s needs. Our table names might be understood internally but may be foreign to those outside our team when they become the names of our API resources. Naming is primarily about communication.
API modelling helps us to establish better communication practices before we design our API. And since APIs are forever, we need to carefully consider the names we select for our resources. It also helps to draw out common understanding, sometimes called a ubiquitous language in domain-driven design, that can be used as a shared dictionary between your developers and product manager.
In addition, API modelling answers the question of why your API exists and what it plans to solve before you decide how to design and build it.
“Weeks of programming can save you hours of planning.” – unknown
The process of modelling your API isn’t difficult and shouldn’t take too much time. I’ve consolidated the process into five steps, which I’ll overview for you below.
Step 1: Determine who needs your API
The first step in API modelling is determining who will use your API. They may be called participants, actors or users. Unlike a user interface, APIs might be used both directly by developers and indirectly by end users. It is important to understand the needs of both parties. You also need to consider the kinds of applications and devices that may interact with your API in different ways.
When identifying participants involved in using the API, you may want to be a little more specific. Rather than just calling out developers as a participant, you may want to differentiate between internal developers, operations engineers and external developers. The same could be said for differentiating end users: standard users, account administrators and system administrators each have different methods and desired outcomes when consuming your API.
For our project management app, we might identify the following participants as a starting point:
- Project managers – create and oversee a project
- Project collaborators – participate in a project
- Project viewer – observe and report on a project
- Project management office admin – oversee the status of all projects and manage accounts
No matter how general or specific your list may be, identifying who will use your API is an important first step. As a bonus, this list of participants will drive your API documentation efforts in the future, ensuring that they address the needs of the various developers and end users who will consume your API.
Step 2: Identify the desired outcomes
Your end users don’t care about your fancy databases or the elegant way you built your code; they care about the outcomes your API enables. For our project management API, this might include:
- Managing a project from start to completion
- Add collaborators to a project
- Subdivide a project into issues
- Track issue progress
- View incomplete issues
- View active projects
Notice that these outcomes will likely require one or more steps to accomplish the activity. For our next step, let’s decompose these outcomes into the steps that make it a reality.
Step 3: Map the steps required to achieve these outcomes
Outcomes are composed of steps, with each step being accomplished by a participant. Each step will be powered by one or more endpoints from your API. Decomposing outcomes into individual steps requires a deeper understanding of how your API will solve real-world problems. This insight is generally left to a subject matter expert (“SME”), so be sure to involve them in your API modeling process.
Revisiting our project management API, we can identify some of the steps required to support our desired outcomes:
- Managing a project -> Create a new project
- Add collaborators to a project -> Create a new user account; Find a user account by email; Add selected user to a project as a project member
- Subdivide a project into issues -> Add a project to an issue
- Track issue progress -> Mark an issue as started; Mark an issue as complete
- View incomplete issues -> Lookup a project; List incomplete issues for a project
- View active projects -> List active projects
While this isn’t a comprehensive list, it does demonstrate how our outcomes may map to a single step, or require multiple steps.
Step 4: Define your API model
Once all of the steps have been identified, you will begin to see an API start to emerge. This API will be composed of resources and actions. We can group these together to start to identify the resources and actions that we will need later, as we move into API design. Just remember that the goal of this step is to simply capture the APIs and methods to validate your API requirements – before moving into the more detailed process of API design.
Using our project management API, we might find the following resources and actions:
Projects
- Create a project
- Lookup a project
- List active projects
User accounts
Synonyms: Users
- Create a new user account
- Find a user account by email
Project members
Synonyms: Collaborators
- Add selected user to a project as a project member
Project issues
Synonyms: Tasks
- Add a project to an issue
- Mark an issue as started
- Mark an issue as complete
- List incomplete issues for a project
Notice how our outcomes and steps start to help us identify the resources associated with our API. They also help us to see how the API will be used, providing a hint to what our eventual API design may look like. Just keep in mind that these are candidate resources – we may not need them all, or we may need some that we haven’t identified yet. That’s the purpose of API modelling – to create a rough sketch of our API before we do the harder work of mapping it to HTTP and building it.
Step 5: Validate your API model
The final step in modelling your API is to validate it against known requirements. Like a good quality assurance (QA) team, your job is to ensure that your API will meet the requirements of everyone using it. Use wireframes, user stories, test cases, and other requirements to verify that your API model can meet the needs currently identified.
As you validate your APIs, look for participants, outcomes, and steps that are missing. You may also want to make notes about APIs that have dependencies on other APIs or that may experience heavy usage. While not necessary, this may guide some of your decisions as you move into the design and development phases.
Best practices for API modelling
As you begin your API modelling, these tips and best practices should help keep you on track.
Define the API’s purpose and requirements
Take the time to clearly identify who will be using your API. As this is crucial to successful modelling, it’s important to put plenty of thought into it and not to rush. Doing so will ensure your eventual design will take your users’ requirements into account.
Use standard data formats and protocols
Presumably, you want to make your API easy to consume, regardless of who your users will be. As such, adopting OpenAPI Specification (OAS) standards, OpenTelemetry and the like makes a lot of sense. Doing so can enable consumers to adopt and integrate your API more rapidly, so bear this in mind during the modelling phase.
Keep communication in mind when naming resources
API modelling can position communication to be at the heart of your design process. Keep this in mind when naming your resources, for the benefit of all those who will be using your API.
Get your subject matter expert on board early
You’ll likely need the help of a subject matter expert when mapping the steps required for your API to achieve the outcomes you need. Bringing your SME into the modelling process at an early stage means tapping into their expertise from the outset, which can help the modelling process flow more smoothly.
Don’t rush through validation
While the validation stage is the final step in modelling your API, don’t be tempted to rush through it and start ploughing ahead with your design and development. Validation is crucial. It is at this stage that you should spot whether your API will or won’t meet the needs of its intended users. If not, you’ll need to make some changes to your model. Just bear in mind that a small delay while you do so is far better than rushing ahead with a fundamentally flawed design.
Wrap-up: preparing for API design
At this point, you know a little more about what outcomes your API needs to support, the steps to get there, and what it may look like. Now, you can start to determine what style of API design is best for your API:
- REST
- GraphQL
- gRPC
- A combination of two or more of the above
For our project management example, we may decide to use a resource-based approach and apply REST constraints. In this case, we may map some of our steps to the following endpoints:
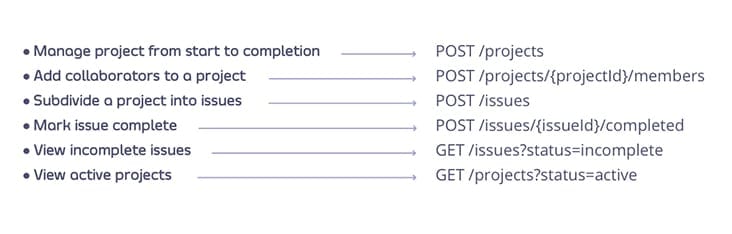
Of course, moving from modelling to design doesn’t happen automatically. The API design process starts with the model we created and applies the principles of HTTP and our chosen API style(s) to create an API design that we code against.