Deploying and managing your applications in a hybrid cloud environment can deliver plenty of benefits. Flexibility, engineering efficiency, optimised costs, reduced latency, ease of use and digital innovation are just a few of the rewards you can look forward to reaping. Here’s how to achieve all of this and more with Tyk Cloud Hybrid.
Tyk Cloud Hybrid provides a hybrid cloud environment for your business to deploy and manage its applications. A cloud computing architecture that combines elements of public and private clouds, hybrid cloud systems provide you with the benefits of both types.
In practical terms, Tyk Cloud Hybrid means you use the Tyk Cloud Control Panel for your public cloud while deploying from your private cloud or on-premises servers.
With the traditional Tyk Cloud setup, your organisation can deploy and manage its APIs in a fully cloud-based environment using the Tyk API Gateway. This configuration means that Tyk hosts and manages all aspects of the API infrastructure, including the API gateway, underlying servers and data stores.
The Tyk Hybrid Cloud deployment offers more flexibility and control over deployment and management options setup, while still providing many of the same benefits surrounding API management and security. Read on to learn how to get started quickly with Tyk Cloud Hybrid.
Get started with Tyk Cloud Hybrid
For this tutorial, we’ll start by setting up Tyk Cloud. Then, we’ll perform some simple functions, such as installing worker gateways and performing basic API management.
As a prerequisite, ensure you have Docker installed on your machine, plus any text editor of your choice. This article uses Visual Studio Code.
Setting up Tyk Cloud
First, visit the Tyk Cloud signup page, fill out the required fields and click the CREATE NEW ACCOUNT button. You will be redirected to the Set Up Organisation page. There, enter your organisation name and the home region for your workload deployment.

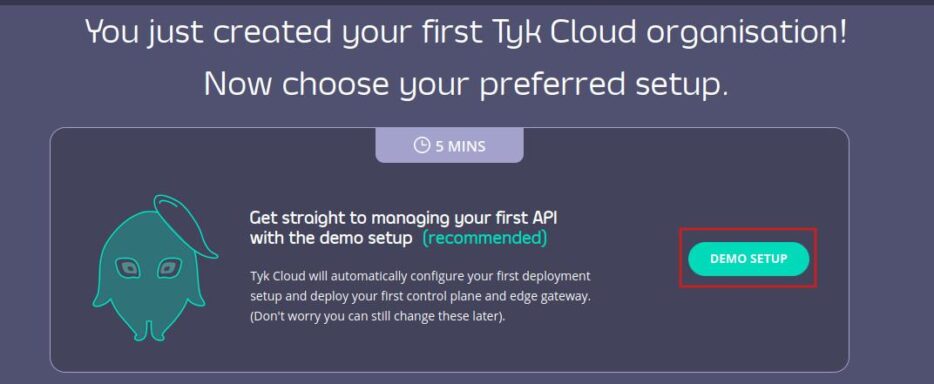
Tyk has two options for setting up your deployments: Demo Setup and Manual Setup. Let’s start with the Demo Setup process, then we’ll explore the manual alternative.
Option 1: Demo Setup
The Demo Setup enables you to automatically configure your organisation, deployments, teams, control plane and edge gateways. Note that you should not use this environment for production.
To begin, click DEMO SETUP to set up your deployment in the shortest time.
This will start up your deployment as shown:

Once your configuration is complete, select Overview from the left-hand menu pane to see the various components created.
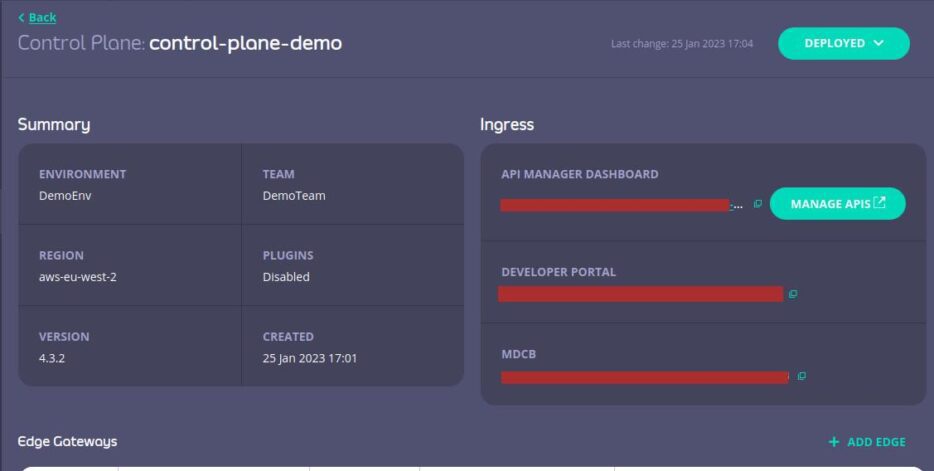
Here, you can see the created environment, team and control plane. And it only took about five minutes. Nice.
Now, let’s explore the manual setup option.
Option 2: Manual setup
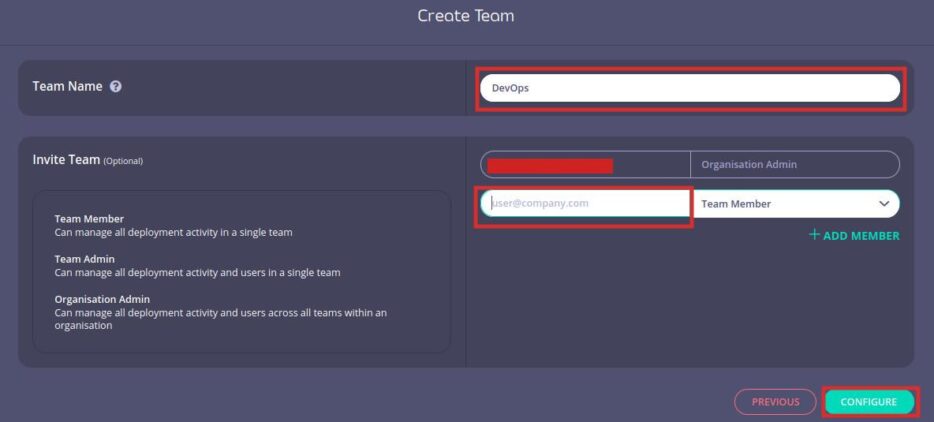
Click MANUAL SETUP to configure your deployment.

You will be redirected to a page to create your team, with an option to invite team members via email.
With Tyk Cloud, you can assign a role to each team member in an organisation. Your options are:
- Organisation admin: This role has privileges for managing your account’s organisational tasks, like creating or deleting teams and viewing, editing and deploying environments.
- Team admin: This role is responsible for inviting, deleting and editing team members of their assigned team. Furthermore, this user can create, edit and delete deployments, environments and plugins.
- Team members: Team members can view environments and deployments, plus create and delete control planes. Their role allows them to deploy, un-deploy, redeploy and manage Single Sign On (SSO).
- Billing Admin: As the name suggests, the billing administrator role handles billing management for the Tyk Cloud account. Individuals in this role help create and manage new accounts, organisations and other billing admins.
With these roles in mind, fill in your desired information and click the CONFIGURE button.
The last stage is to configure your environment. Enter your environment and control plane names, then click DEPLOY.
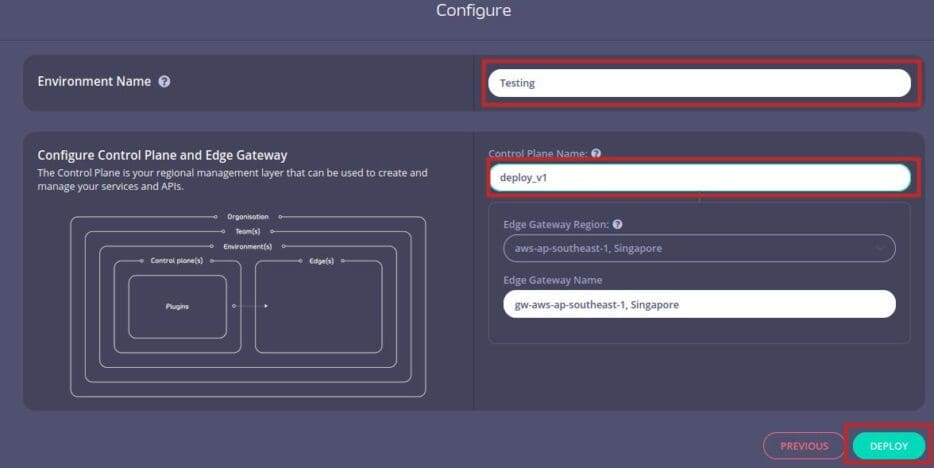
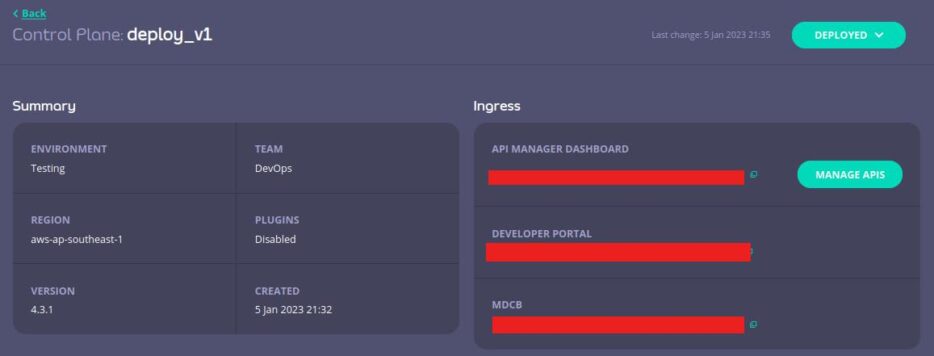
Your edge gateway name will generate automatically according to the region you chose during setup. Once your deployment is complete, it will look like this:
Installation of worker gateway
Now that setup is complete, you’re ready to install the worker gateway using Docker. First, clone the Tyk Gateway Docker repository onto your machine. Open your terminal and navigate to your preferred directory. Then, clone the repository using the following command:
git clone https://github.com/TykTechnologies/tyk-gateway-docker.git
Now, check into the cloned repository and open it using your favourite text editor (use code . to open it with Visual Studio Code).
Before going any further, you’ll need to modify a few attributes in the tyk.hybrid.conf file.
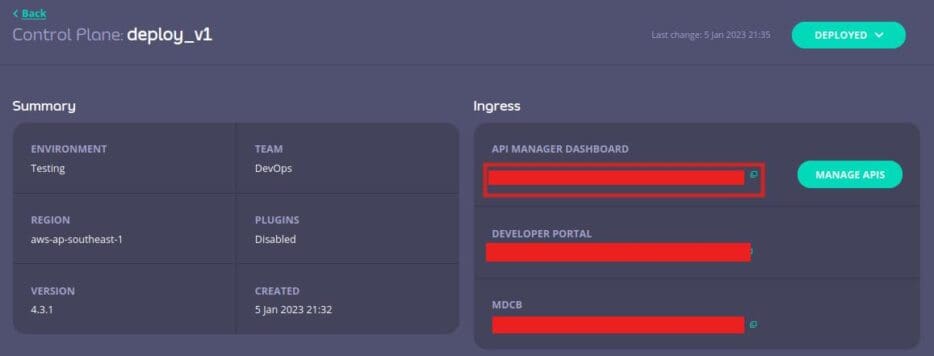
To get the rpc_key and api_key, navigate to the deployment dashboard and click API MANAGER DASHBOARD.
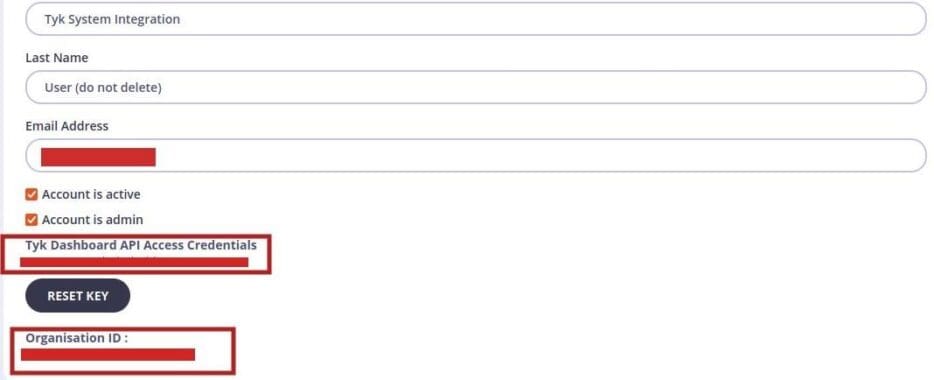
This will redirect you to a page similar to the image below. In the left panel, under the System Management section, select Users.
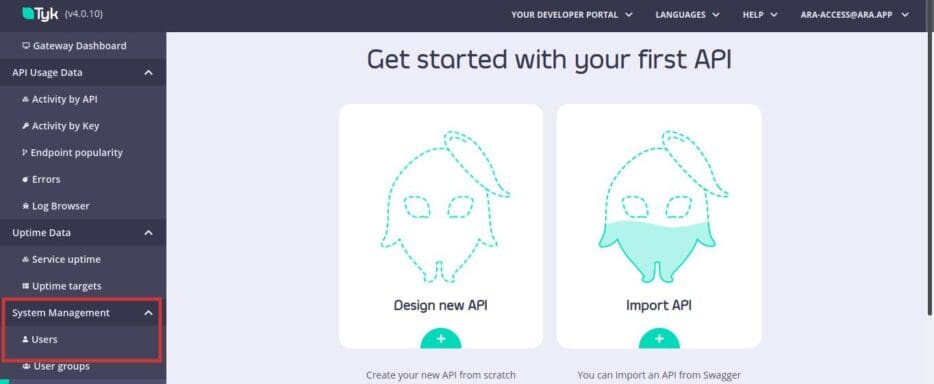
Now, click the name under FIRST NAME to be directed to your account details.
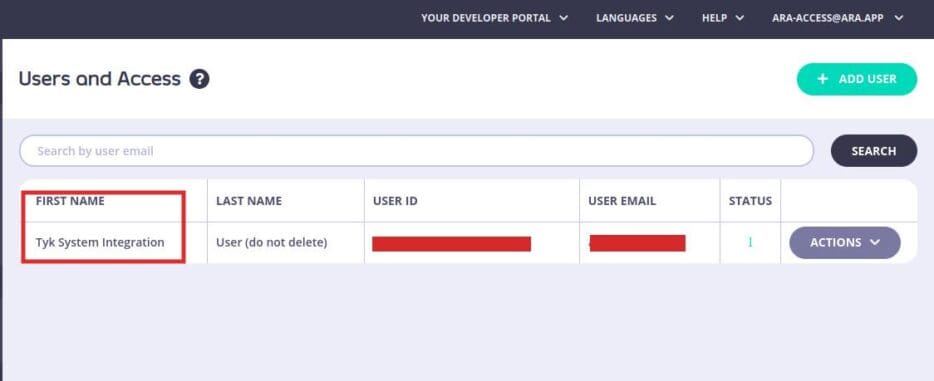
The Tyk Dashboard API Access Credentials is your api_key, and Organisation ID is your rpc_key.
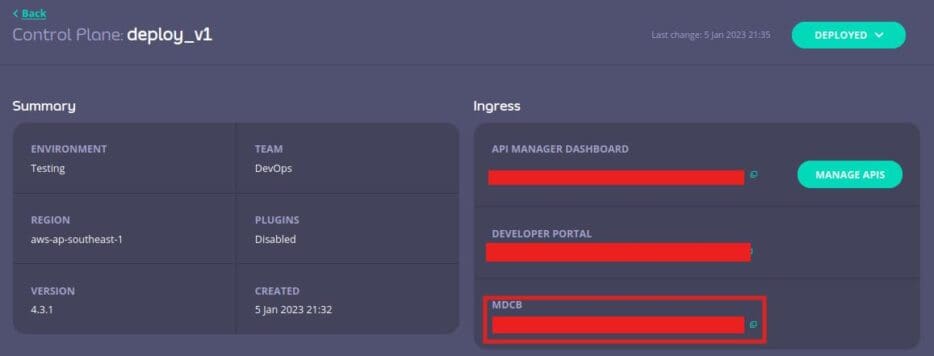
Finally, find the connection_string in your deployment dashboard under MDCB.
Now that you’ve retrieved the rpc_key, api_key, and connection_string, return to your code editor, open the repository you cloned, locate the tyk.hybrid.conf file, and enter the values for these attributes in the following snippet:
...

"slave_options": {

     "use_rpc": true,

     "rpc_key": "<ORG_ID>",

     "api_key": "<API-KEY>",

     "connection_string": "<MDCB-INGRESS>:443",

     "enable_rpc_cache": true,

     "bind_to_slugs": false,

     "group_id": "ny",

     "use_ssl": true,

     "ssl_insecure_skip_verify": true

 },

...
Note: The ellipses [...] indicate additional code on either side of the above snippet.
Next, locate the following section in the docker-compose.yml file under volumes service:
 volumes:

   - ./tyk.hybrid.conf:/opt/tyk-gateway/tyk.conf

   - ./apps:/opt/tyk-gateway/apps

   - ./middleware:/opt/tyk-gateway/middleware

   - ./certs:/opt/tyk-gateway/certs
Finally, change standalone to hybrid.
You’ve now completed your setup and can use Docker to install the gateway.
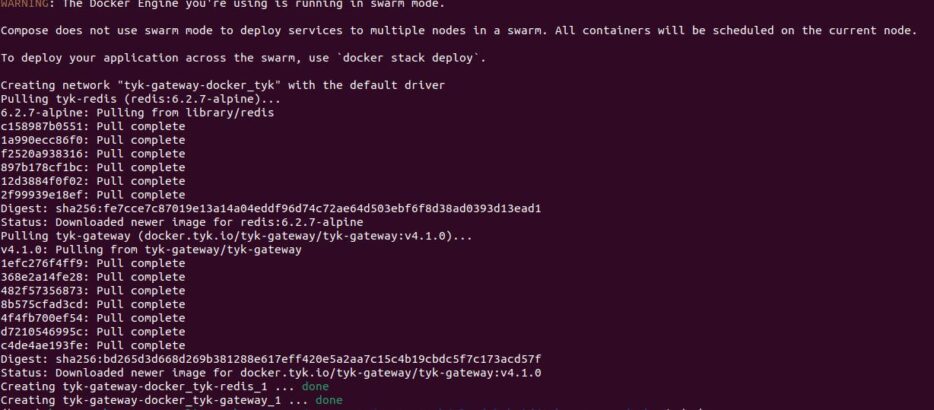
Return to your terminal and, in the cloned repository directory, enter docker-compose up -d to initiate the installation.
Note: If this command doesn’t work, try docker compose up -d.
You should now see the following processes occur:
Additionally, you can check the status of your containers using docker ps. Your output will look similar to the one below:

Next, run curl https://localhost:8080/hello -i to check whether your connection was successful. The output of this command is as shown:
HTTP/1.1 200 OK

Content-Type: application/json

Date: Fri, 23 Dec 2022 18:43:14 GMT

Content-Length: 234

{"status":"pass","version":"4.1.0","description":"Tyk GW","details":{"redis":{"status":"pass","componentType":"datastore","time":"2022-12-23T18:43:09Z"},"rpc":{"status":"pass","componentType":"system","time":"2022-12-23T18:43:09Z"}}}
If the connection is successful, you can create an API from your Tyk Cloud control panel and test the connection.
Creating an API
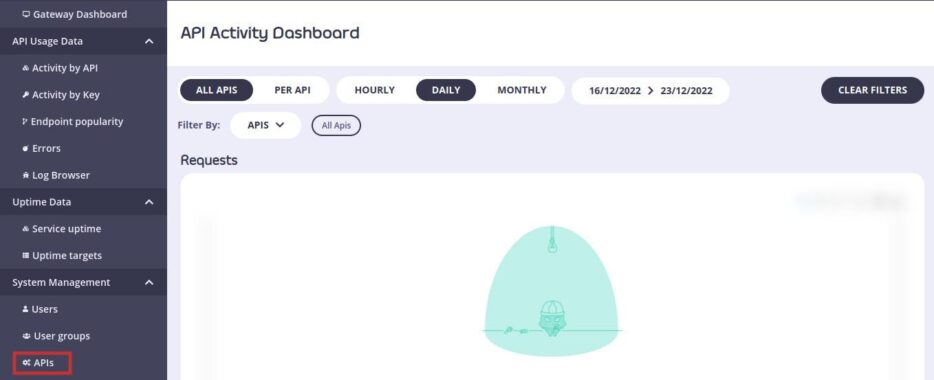
Back in your deployment dashboard, click the API MANAGER DASHBOARD once more to get to the API Gateway page. Then, under the System Management submenu, choose APIs.
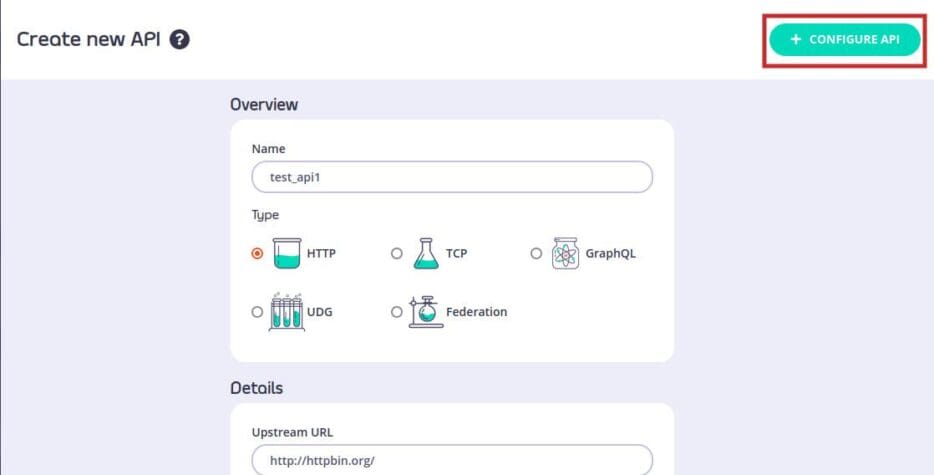
You should now have two options: Design new API and Import API. Select the Design new API card. Then, input the name of your API, leaving the API type set to HTTP, and click + CONFIGURE API.
The next step is configuring the gateway through which you’ll proxy your API. For this tutorial, select I’ll connect my own gateway later and click Confirm.

Next, scroll down to Authentication in the API Core Settings page and select Open (Keyless) under Authentication mode. Then, click SAVE.

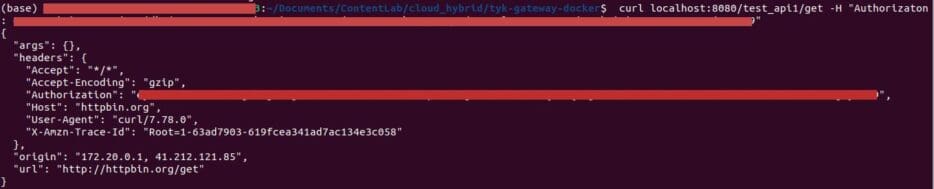
Now, if you return to your terminal and use the curl localhost:8080/test_api1/get command, you should see the following output as a response from Tyk Cloud:

This indicates a successful connection between Tyk Cloud and your local machine. You can also connect with your on-premises data centres instead of a local machine.
API management
Securing the API
So far, the API you created is not secure, and anyone with the URL can access it. You need to secure it using authentication that blocks access from all other users.
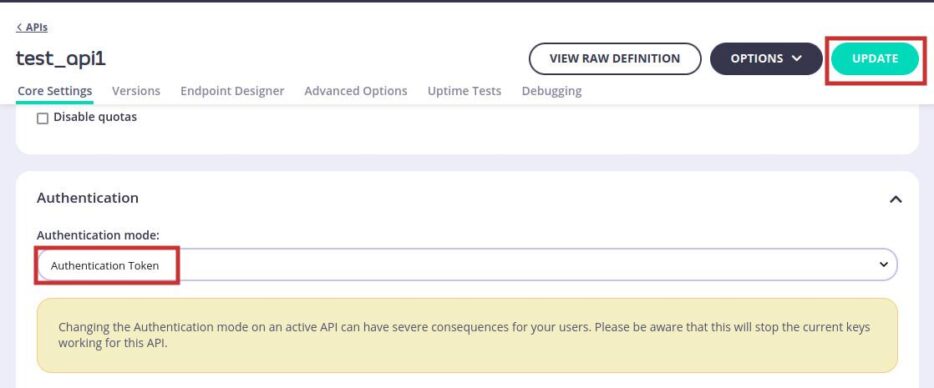
First, view the API you created, and select Authentication Token under the Authentication mode dropdown. Then, click UPDATE.
Now, if you re-run the command earlier command from your terminal, you receive this error:
{

 "error": "Authorization field missing"

}
This is because it can’t find the API key. To fix this, you need to create rules of engagement for your API. Return to your Gateway Dashboard, select Policies under System Management in the left-hand menu, then click ADD POLICY.

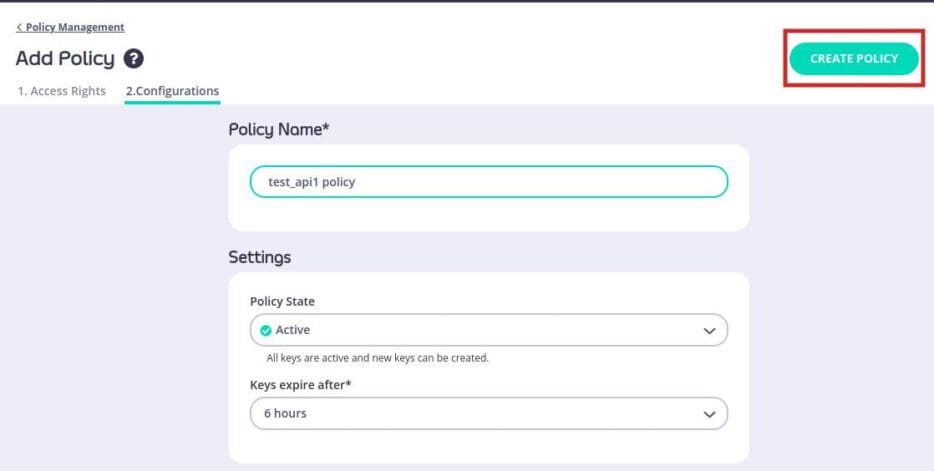
In the Add Policy panel, select the API for which you’ll create the policy. Leave the default values in the Access Rights section. In the Configurations section, input the name of your policy and select the duration after which your key should expire. For this example, you’ll use 6 hours. Click CREATE POLICY.
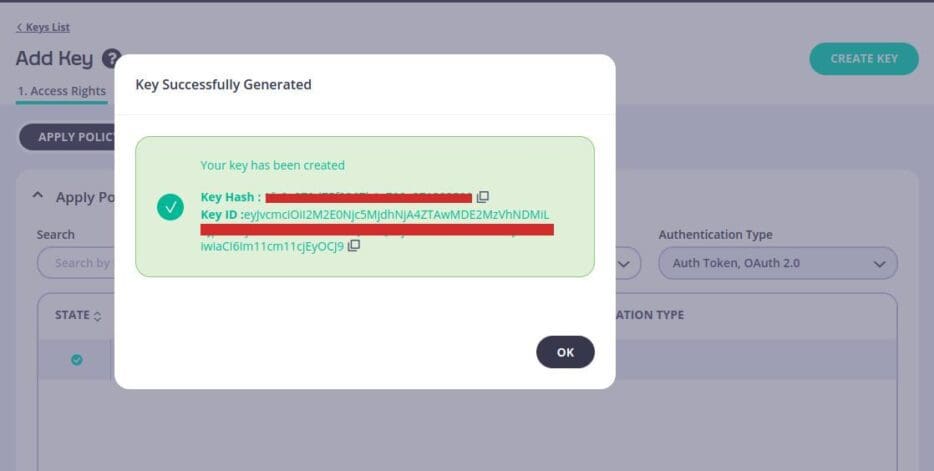
Next, head over to Keys to create an API key using the policy you’ve just created. In the same way you created the policy, select this policy from the Add Key panel and click CREATE KEY. Your key will be created as shown:
Now, return to the terminal and use this command:
curl localhost:8080/test_api1/get -H "Authorization: <Your Key ID>"
You’ll be able to access your API as shown:
With this key, your users can now interact securely with your API.
Rate limiting an API
Rate limiting means setting the maximum number of calls you can make to a particular API in a given time. This enables you to effectively monitor the network traffic to your API and track its operations. To rate limit your API in Tyk Cloud, navigate to Policies and select your target API. In your policy dashboard, expand the Global Limits and Quota section to see the Rate Limiting options.
Modify the Rate and Per (seconds) fields as shown below and click the UPDATE button.
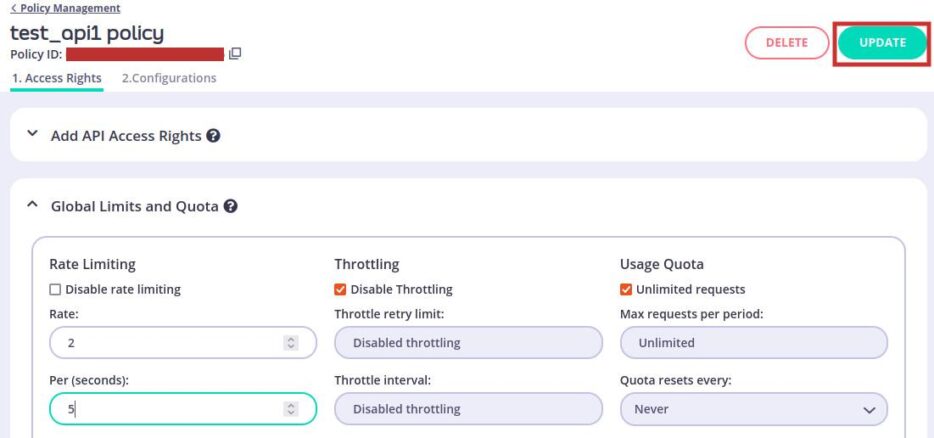
In this example, you’ve specified a maximum of 2 API calls in 5 seconds. Head to the terminal and see how this works.
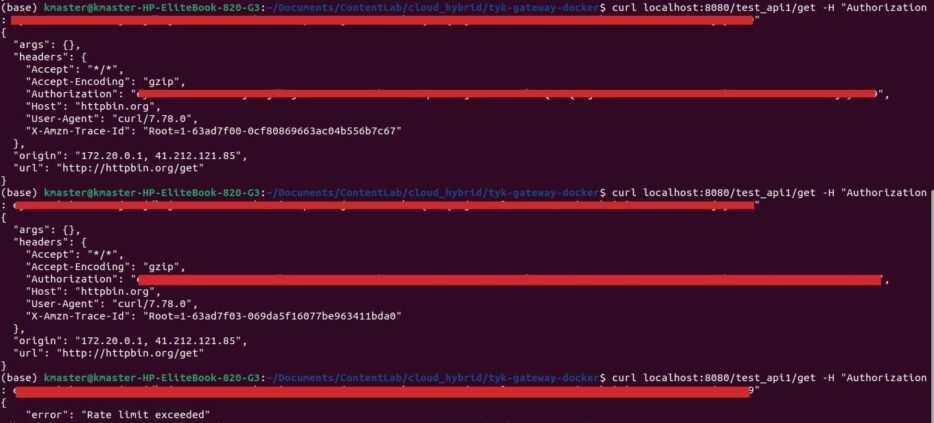
For the selected duration of 5 seconds, you can only perform 2 API calls. If you exceed that number, an error is shown.
Versioning and publishing an API
Versioning helps when you want to roll out new updates without interfering with the main application. In Tyk Cloud, you can version your API by first heading to your Gateway Dashboard. From the left-hand panel, under System Management, select APIs and click the Versions tab.

Under Version Setting, uncheck Do not use versioning.
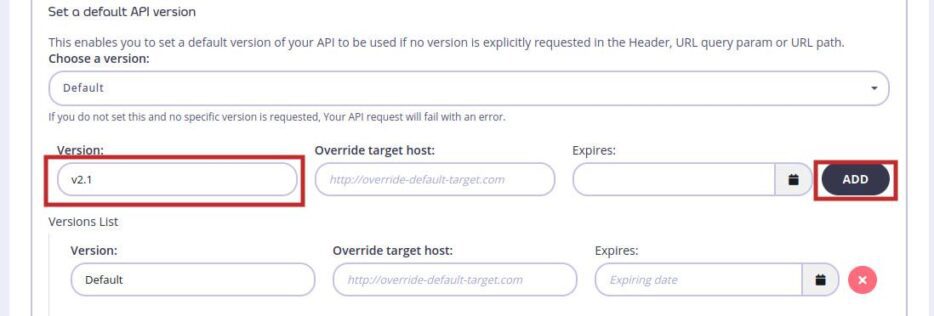
For this example, name the API version v2.1. Click ADD to save.
You then need to test out the version of your API with a response. Select the Endpoint Designer tab. Then, from the Edit Version dropdown, choose the API version you created. Next, click + ADD ENDPOINT.
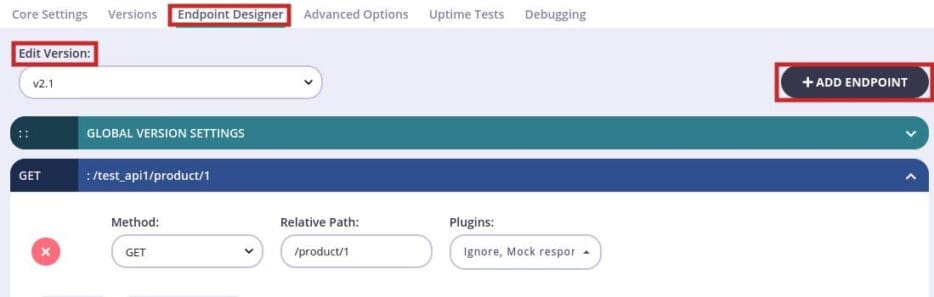
In the Relative Path, input /product/1 and, for the plugins, select Mock Response and Ignore. These plugins will enable you to test the API responses to see if they are working as they should.
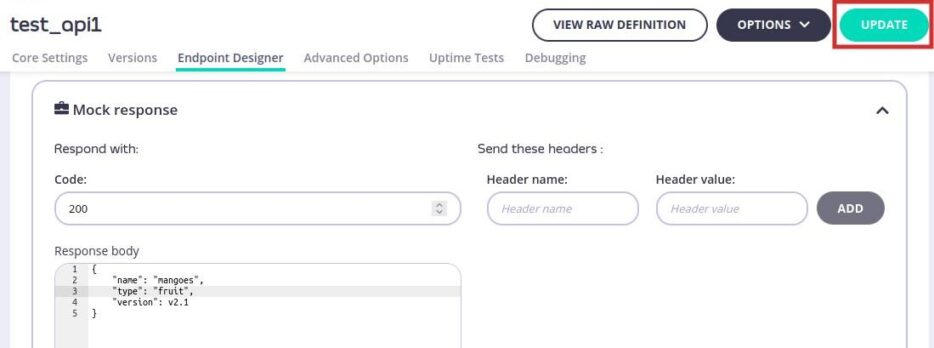
Now, expand the Mock Response. In the Response body section, input the following:
{

 "name": "mangoes",

 "type": "fruit",

 "version": v2.1

}
Finally, click UPDATE.
To demonstrate your new version via the terminal, change the default API version under the Versions tab to the one you just created. Click UPDATE.
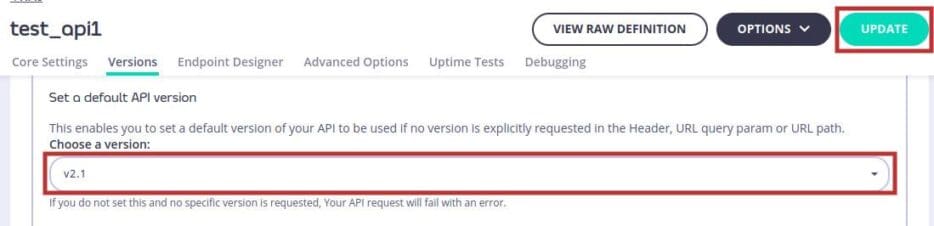
In the terminal, run curl localhost:8080/test_api1/product/1/get -H "Authorization: <KEY ID>". The output should mirror the response text you entered above.

Publishing an API
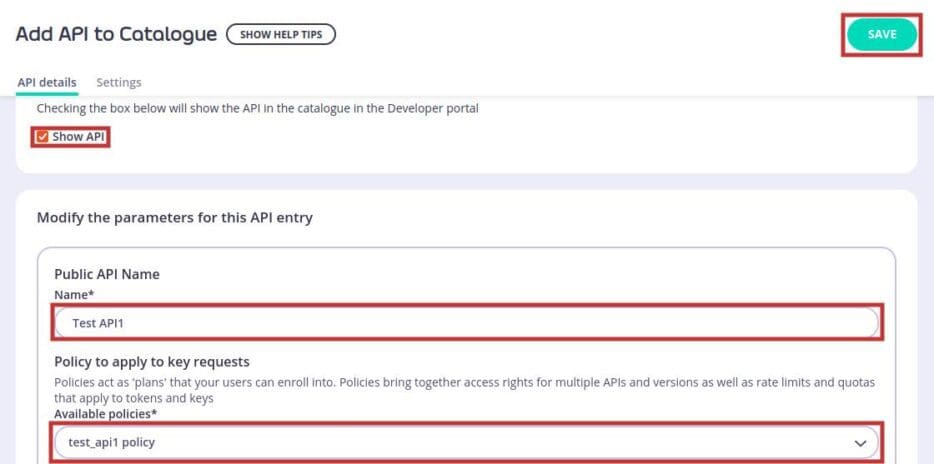
Once the API is versioned, you can publish it for other developers to access and use. In the Gateway Dashboard, under Portal Management, select Catalogue. Then, in the Portal API Catalogue, click ADD NEW API to edit your API details. Add the name of your public API and choose the policy for which you have the API keys. Additionally, ensure you leave the Show API box ticked.
Then, click SAVE.
Finally, return to YOUR DEVELOPER PORTAL and select OPEN YOUR PORTAL to get to your portal homepage. Select the API Catalogue and you will see your API entry. A developer can now request an API key to use the API.
And that’s it!
Conclusion
As we’ve shown above, getting started with Tyk Cloud is fast and easy. As soon as you’ve set up your account, you can connect, secure, limit, version and publish your APIs.
Tyk Cloud Hybrid gives you the function and performance of Tyk while keeping your on-premises infrastructure secure and ready for deployments. Plus, the Tyk Cloud dashboard makes it easy to navigate and manage your environments and deployments – so you can start enjoying all the benefits of flexible, secure API management.
Visit Tyk Cloud today and see how quickly and easily you can manage your API ecosystem.