Let’s chat about Kubernetes. Here at Tyk, we’ve seen a huge shift recently, with businesses moving towards automation, redundancy and continuous delivery. Modern times call for modern deployments, and when it comes to scalable, portable and extensible deployments, little can compete with Kubernetes (K8s).
Tyk and Kubernetes make a beautiful pairing, with Tyk Operator bringing GitOps practices to API management processes. With Tyk, you can describe the entire API management system declaratively. You can also customise the Tyk Gateway and augment its functionality with a range of custom plugins
Today, we’ll look at one of those plugins – a custom Python plugin – that you can use with Tyk and Kubernetes as you pivot from imperative to declarative configurations. We’ll show you how to deploy the plugin into a Tyk installation running on a Kubernetes cluster.
Tyk, Python and K8s
Whether an object-oriented or functional programmer, we support your methods and functions through Tyk’s extensible plugin options. Out of the box, Tyk provides support for GoLang, Lua, JavaScript, Python development and all gRPC – supported languages. We’re here to make your life easier, not force you to do things a certain way!
In Figure 1, you can see the request chain lifecycle outlining the stages where you can inject custom logic or plugins. The Python plugin will execute at the Custom pre-middleware stage and inject a sample header into the request.
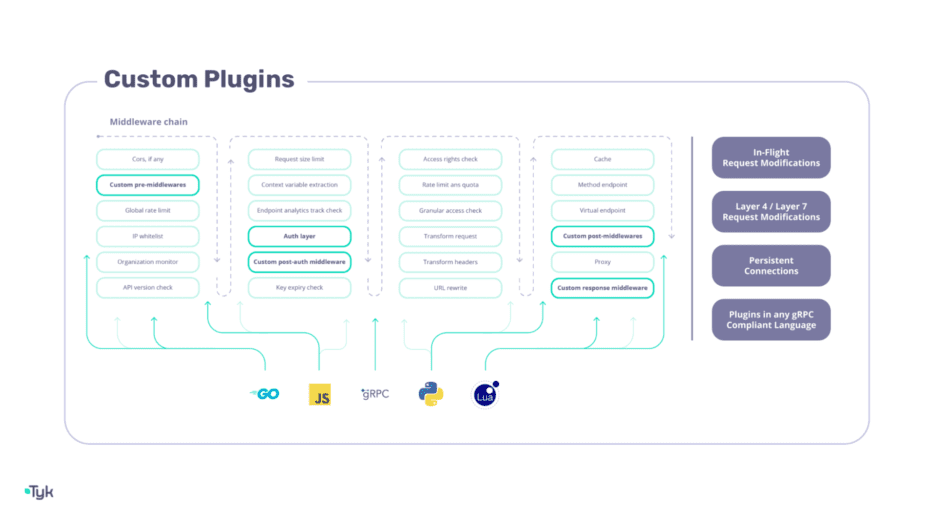
Figure 1: Middleware chain depicting where custom logic can be injected throughout the request lifecycle.
Methodology and Code
Estimated time:
- ~10-20 minutes based on hardware
System prerequisites:
- Minikube, Helm CLI, Python, Postman (or curl)
——————————————————————————————————————–
Suppose you were interested in injecting a header into a request. You need to create a directory housing two files. The first is a manifest.json indicating what powers the plugin, at what stage the plugin executes, and the path to which the plugin should be applied.
In our code snippet Reference 1 below, we are defining a Python plugin to run on the pre-stage, on the /get path, invoking the function SetHeader.
{

  “file_list”: [

    “middleware.py”

  ],

  “custom_middleware”: {

    “driver”: “python”,

        “pre”: [

            {

                “name”: “SetHeader”,

                “path”: “/get”,

                “require_session”: false,

                “raw_body_only”: false

            }

        ]

  }

}
Reference 1: A manifest.json file illustrating what plugin is being executed, where it’s executed and when it’s executed.
The second file you need is the Python file itself. Reference 2 illustrates a Python script which injects a header testheader into a request with the value testvalue.
from tyk.decorators import *

from gateway import TykGateway as tyk

@Hook

def SetHeader(request, session, spec):

    tyk.log(“PreHook is called”, “info”)

    request.add_header(“testheader”, “testvalue”)

    return request, session
Reference 2: A middleware.py file containing Python logic.
Now for some example code:
mkdir example_python_plugin

cd example_python_plugin

touch middleware.py manifest.json
Populate the two created files with the examples from Reference 1 and Reference 2. In order to compile the files and load them onto the Tyk Gateway, you first need to bundle them together.
This can be achieved using the following snippet:
IMAGETAG=v3.2.1

docker run

  –rm -w “/tmp” -v $(pwd):/tmp

  –entrypoint “/bin/sh” -it

  tykio/tyk-gateway:$IMAGETAG

  -c ‘/opt/tyk-gateway/tyk bundle build -y’
We are setting the shell variable IMAGETAG to be the version of the gateway we intend to load the Python bundle onto. In this case, we are loading the plugin onto a Tyk Gateway v3.2.1. When completed, you should see a bundle.zip in your example_python_plugin directory.
Now, you need to serve the bundle. The easiest way to do so is through a local server using the following command:
python3 -m http.server
Your bundle should now be accessible locally through the URL https://localhost:8000/bundle.zip, or through https://host.minikube.internal:8000/bundle.zip from within minikube.
Python development is now complete.
Loading the Python plugin onto the Tyk Gateway
Now, it’s time to spin up a Kubernetes cluster locally using minikube and deploy the Tyk Gateway onto it. Supposing minikube and helm are installed on your system, you can simply start the cluster using:
minikube startNOTE: If minikube and helm are not installed, please use these links for minikube and helm to install them.
Now, you can follow up with some post-install commands. These commands are taken from our documentation on installing with helm.
# Add tyk helm charts

helm repo add tyk-helm https://helm.tyk.io/public/helm/charts/

helm repo update

# Export values of helm to a local values.yaml

helm show values tyk-helm/tyk-pro > values.yaml

# Under the section dash: license:, ensure your license key is filled out

# Create the Tyk Namespace

kubectl create namespace tyk


# Add dependencies


helm install redis tyk-helm/simple-redis -n tyk

helm install mongo tyk-helm/simple-mongodb -n tyk
At this point, you should have a values.yaml file on your local filesystem. Under the section dash: license:, ensure your license key is filled out. Please feel free to specify a password for the admin user in the .yaml file as well.
In the values.yaml, underneath the section gateway: extraEnvs:, please add the following environment variables:
extraEnvs: [

    {

      “name”: “TYK_GW_ENABLEBUNDLEDOWNLOADER”,

      “value”: “true”

    },

    {

      “name”: “TYK_GW_BUNDLEBASEURL”,

      “value”: “https://host.minikube.internal:8000/”

    },

    {

      “name”: “TYK_GW_BUNDLEINSECURESKIPVERIFY”,

      “value”: “true”

    },

    {

      “name”: “TYK_GW_COPROCESSOPTIONS_ENABLECOPROCESS”,

      “value”: “true”

    },

    {

      “name”: “TYK_GW_COPROCESSOPTIONS_PYTHONPATHPREFIX”,

      “value”: “/opt/tyk-gateway”

    }

  ]
Depending on where you served the bundle, your value for TYK_GW_BUNDLEBASEURL may change. In this tutorial, the bundle is being served locally on the host machine, so we are accessing the host network through minikube’s hostname entry.
You may now bring up the Tyk installation with:
helm install tyk-pro tyk-helm/tyk-pro -f ./values.yaml -n tyk –debug –wait
Once the install is complete, you can install Tyk Operator. Tyk Operator allows you to manage resources on your Kubernetes cluster through custom resource definitions (CRDs). These are extensions of the Kubernetes API. They allow you to manage extra, non-native Kubernetes resources. To install Tyk Operator, follow these instructions:
# Install Cert-Manager

kubectl apply -f https://github.com/jetstack/cert-manager/releases/download/v1.8.0/cert-manager.yaml

# Install Tyk-Operator

helm install tyk-operator tyk-helm/tyk-operator -n tyk
At this point, both Tyk and Tyk Operator should be loaded onto your minikube cluster. Now it’s time to create an API and load the Python plugin onto that API. You can download a sample CRD named httpbin.yaml with the content depicted in Reference 3.
apiVersion: tyk.tyk.io/v1alpha1

kind: ApiDefinition

metadata:

  name: httpbin

spec:

  name: httpbin

  use_keyless: true

  protocol: http

  active: true

  proxy:

    target_url: https://httpbin.org

    listen_path: /httpbin

    strip_listen_path: true

  custom_middleware_bundle: “bundle.zip”
Reference 3: A httpbin.yaml CRD containing the information to load our custom plugin.
In order to create this resource using Tyk Operator, simply run the following:
kubectl apply -f httpbin.yaml -n tyk
Congratulations! You have now loaded a custom Python plugin onto your Tyk Gateway running within minikube. In order to test it out, you can enable a tunnel into the Tyk Dashboard and gateway services:
minikube service dashboard-svc-tyk-pro -n tyk –url

minikube service gateway-svc-tyk-pro -n tyk –url
Figure 3 illustrates where the tunnel URL for our internal gateway service can be found.
You can access the gateway running within minikube using this URL.

Figure 3: Obtaining the tunnel URL into the Tyk gateway service.
Using these URLs provided into the local minikube cluster, you may now use Postman to hit the /get endpoint of our deployed httpbin service.
As depicted in Figure 4, the header has been injected into the request, and echoed back to us.
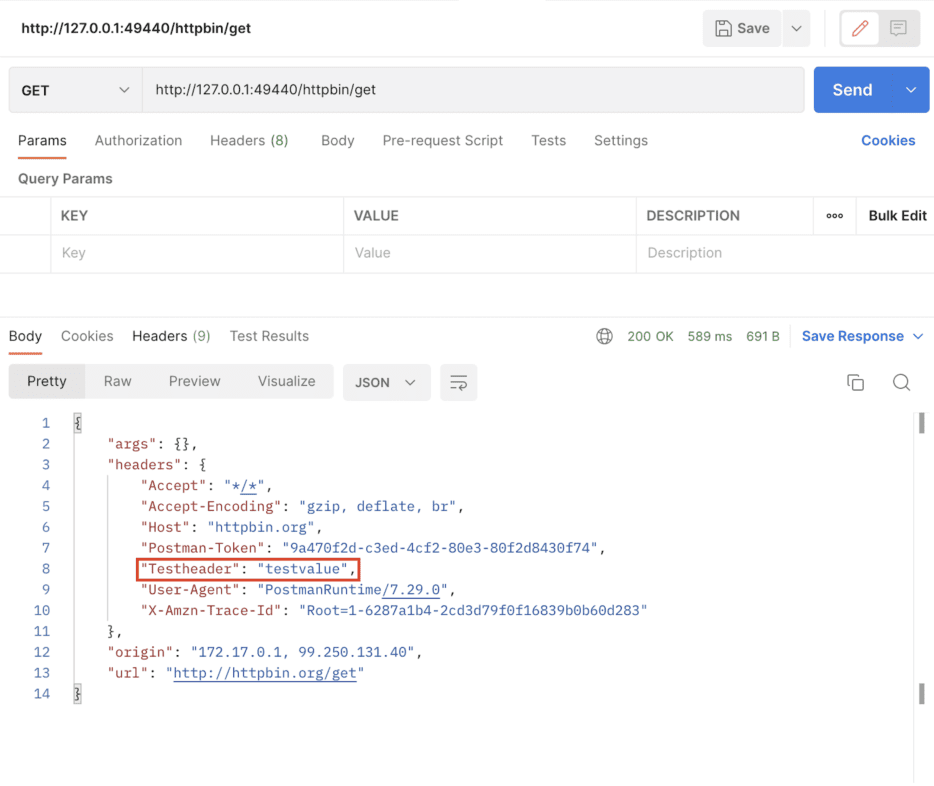
Figure 4: Response from the Tyk managed httpbin microservice. The headers are injected into the request and echoed back in the response.
And that’s it! Everything you need to start deploying Python plugins in Tyk running K8s. Time to enjoy the benefits of your new, declarative configurations!
A version of Tyk Operator is available within the open-source repository, but it has been archived and will be unmaintained. The latest release of Tyk Operator will be available exclusively to paying customers.