An application programming interface (API) is a set of rules and protocols that allows one application to communicate with another. But here’s the thing, there are several different types of APIs. In this article, we’ll be focusing on internal APIs, which are specifically designed for use within an organization. Most organizations have a number of internal APIs. And managing all these APIs gets complicated.
But what if you could manage all your APIs from a centralized place? The good news is you can with an internal API portal. This portal serves as a centralized hub for storing all the APIs within an organization. It’s like a central repository facilitating an organization’s discovery, consumption, and management of internal APIs, and it’s only accessible to employees within the organization.
By providing a single place to discover, understand, and access API functionalities, internal API portals help increase developer efficiency and productivity. With everything in one central location, developers save time and can communicate seamlessly. An internal portal also promotes consistency, streamlines maintenance, and is the main source for important metrics, such as the number of successful or failed requests and API logs.
The only problem is, building an API portal is a lot of work. And it involves more than just developing the portal itself. You need to handle security, scalability, and effective management of multiple APIs. Setting up user management systems, integrating monitoring tools, and creating a user-friendly UI are also essential. It’s a massive undertaking that requires significant time, energy, and a dedicated team. And that’s where Tyk comes in.
Tyk is an open source API gateway and management platform that helps organizations set up their API portals without having to build them from scratch. In this article, you’ll learn how easy it is to get started with Tyk and how to use some of its core features to manage and document APIs, secure your portal, and do more!
How to build an internal developer portal with Tyk
To quickly get started with this tutorial, you need to clone this GitHub repo. It’s a basic CRUD API built using Node.js and Express, and its purpose is to mimic an internal employee database. It uses a local JSON file to store the employee data, and with it, you can create, read, update, or delete an employee.
After cloning the repository, navigate to the Tyk.io website to create an account.
Create a Tyk account
In this article, you’ll be utilizing Tyk Cloud. Tyk Cloud is a hosted solution that saves you from deploying your own instance of the Tyk Gateway and reduces the time it takes to get started with your API portal. It’s easy to set up and has a free five-week trial.
Follow the prompts to create a new account. If you don’t want to use a hosted solution and get full control over the deployment, you can also use their self-hosted option.
Once you’ve created your account, Tyk asks you to set up your organization. Provide a name and region, and select CREATE ORGANISATION:
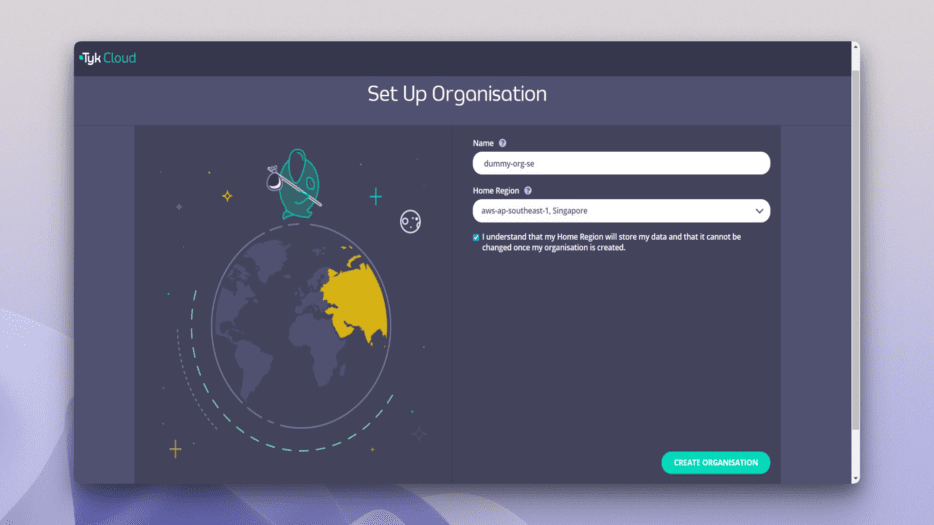
CREATE ORGANISATION
You are navigated to a new screen that shows you two options for getting started. The first option provides a dummy setup, and the second option offers more flexibility to set up a dashboard from scratch. Choose the second MANUAL SETUP option:
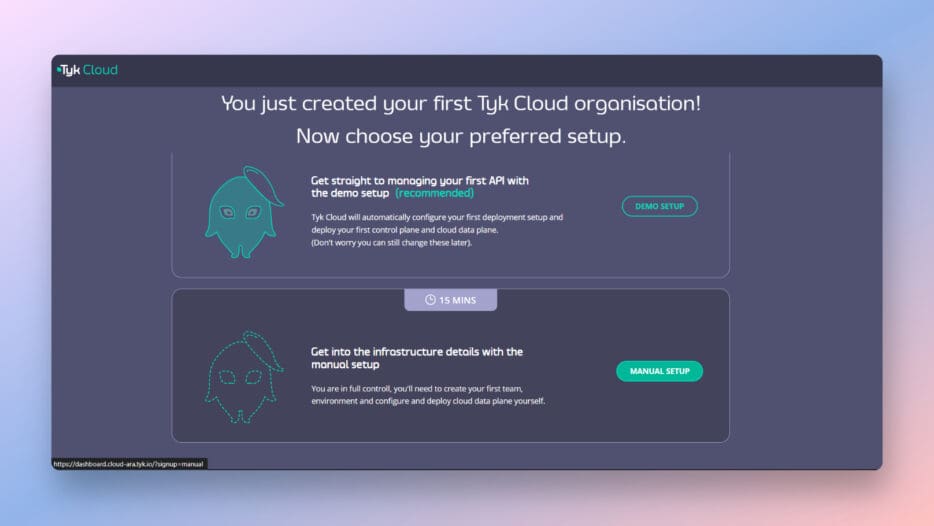
Manual setup for Tyk
On the next page, create a team by providing a team name, and if you would like, you can invite additional team members. When finished, select CONFIGURE:
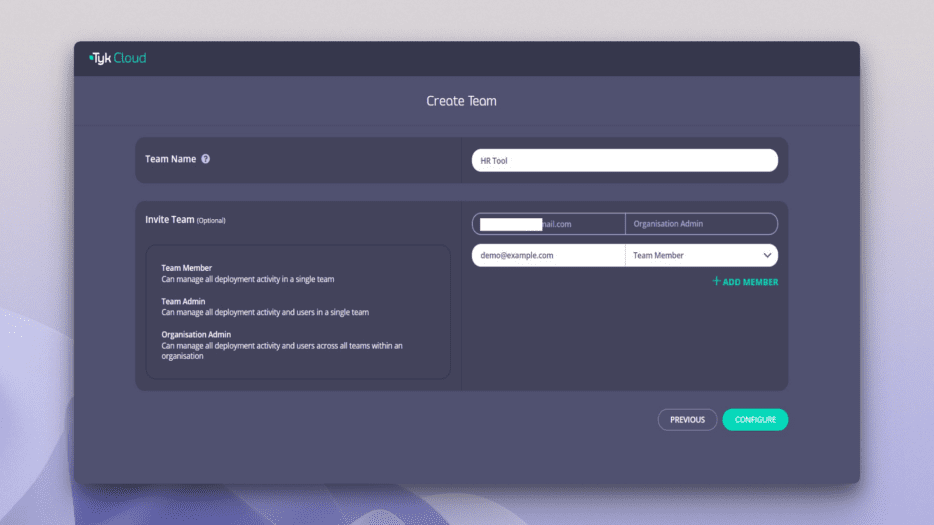
Create a team name and add members
Once you click on CONFIGURE, you are given the option to set up an environment. An environment allows you to create different configurations for your development, staging, or production setups. Name your environment, the control plane, and the cloud data plane. Update it according to your preference and click DEPLOY:
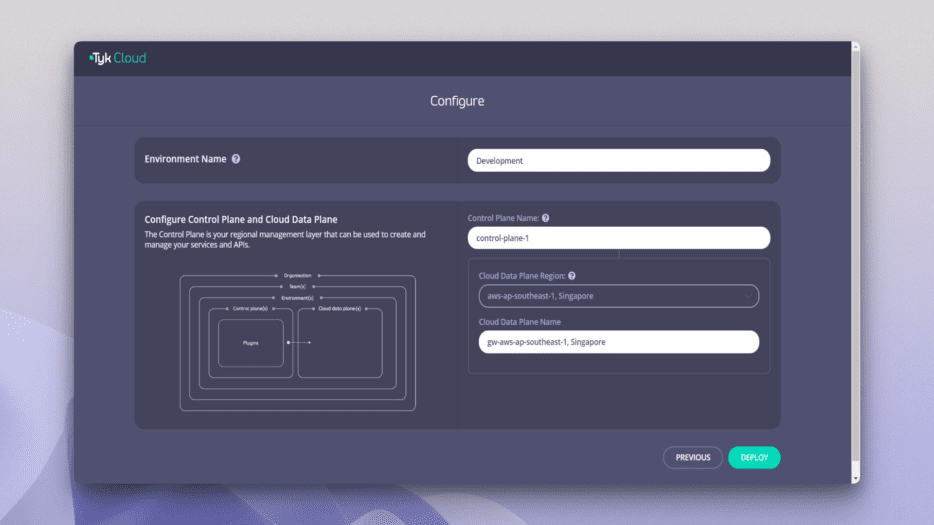
Deploy your environment
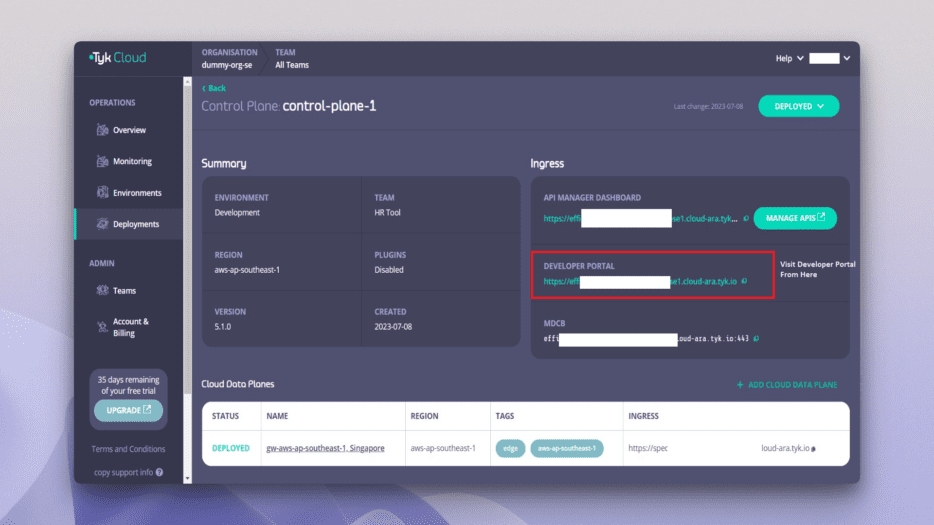
The deployment takes about two minutes to complete. Once complete, you are redirected to a dashboard containing the API Manager Dashboard URL, Developer Portal URL, and other information.
Under the Ingress list of the dashboard (on the right side of your dashboard), find the API MANAGER DASHBOARD section that lists all the ingress URLs. Click on MANAGE APIS to open the API dashboard:
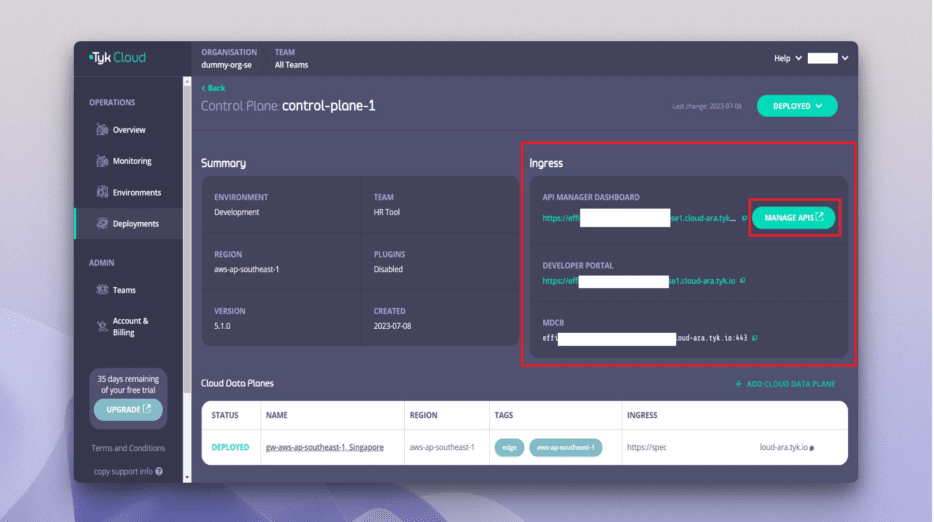
Click on MANAGE APIS
In the API dashboard, you can design a new API from scratch or import an API using an OpenAPI Specification (OAS) 3 file or a Tyk definition file.
An `openapi.json` file that you can use for importing the API specifications has been provided in the GitHub repo to simplify this tutorial. The API address is also provided under the servers section in the OpenAPI or OAS 3 specification.
Next, you import an API to your portal.
Import an API into Tyk
To import an API to the Tyk dashboard, click the Import API button on your dashboard:
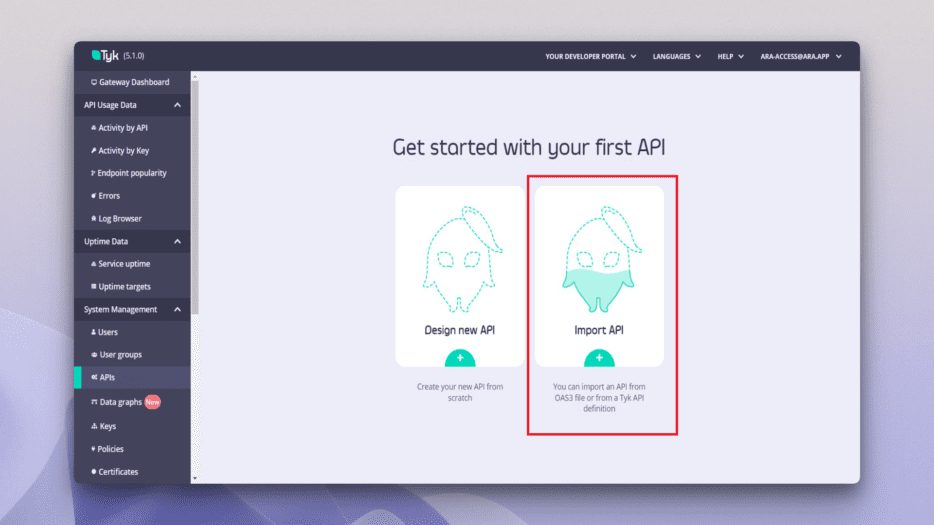
Import API option in Tyk gateway
This opens a form with multiple options. In the Source format section, select openAPI and paste the OpenAPI definition in the text field. Don’t edit anything else, and select IMPORT API from the menu at the top:

IMPORT API
Once the import is complete, on the next screen, you can see that Tyk took the first URL it found in the servers list and used it as the Target URL:
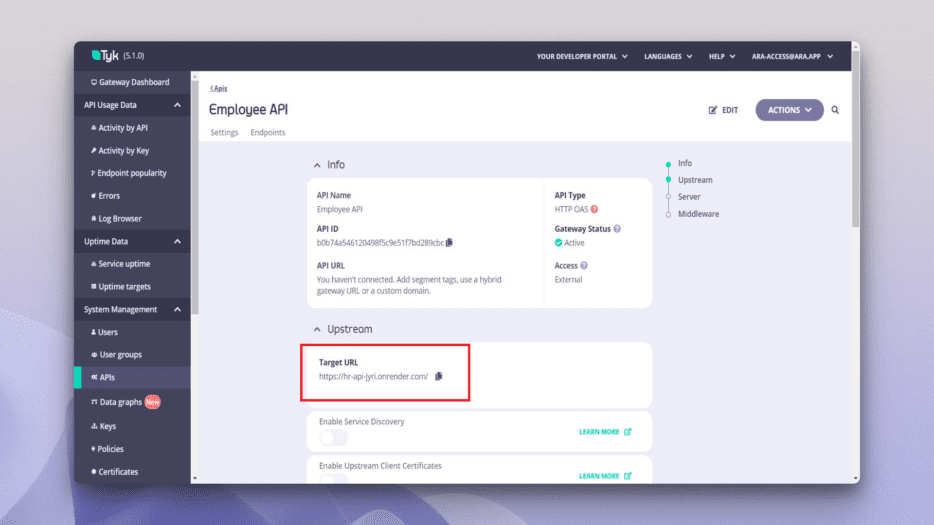
API details
To access the API using Tyk, you need to change a particular configuration and enable segment tags from the menu. Select EDIT on the API details page, then scroll down to find the Enable Segment Tags option and toggle the button to enable it. Select Gateways, select edge, and save the API:
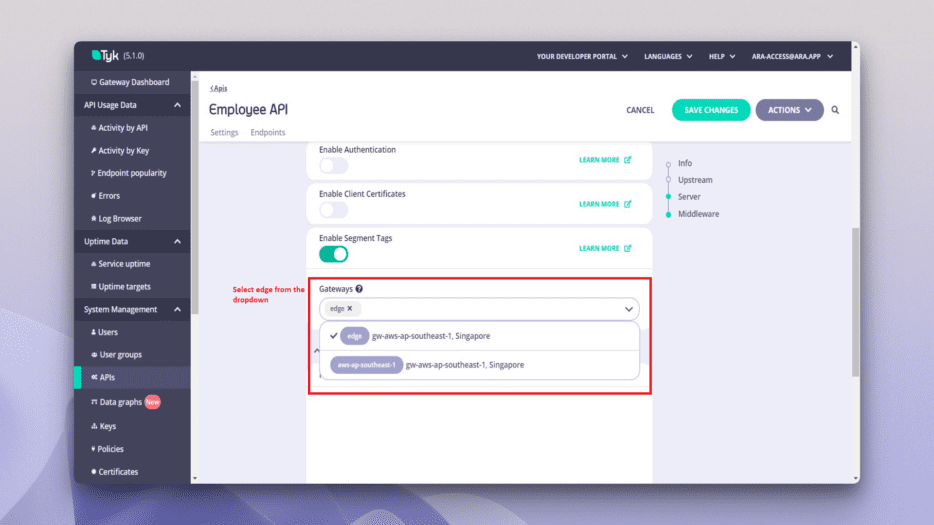
Enable segment tags
From this API configuration screen, you can configure your API or enable CORS or caching, which is beyond the scope of this tutorial.
After enabling the segment tag and selecting the gateway, click on SAVE CHANGES.
Once you’ve saved your changes, Tyk provides a new API URL that uses a Tyk Gateway to access the API endpoint. Whenever you hit the endpoint, Tyk updates the API data accordingly.
You can test to make sure your API URL is working by replacing the base endpoint with the given URL. For instance, the API provided in this article has a base URL of `https://hr-api-jyri.onrender.com/`, and Tyk’s API URL is `https://specific-guitarist-gw.aws-apse1.cloud-ara.tyk.io/`. This means instead of calling `https://hr-api-jyri.onrender.com/employees`, you can directly call `https://specific-guitarist-gw.aws-apse1.cloud-ara.tyk.io/employees` through the Tyk Gateway. The API request should be visible in the control plane API Usage Data section:
API usage
Host pages for the API
To host pages in the Developer Portal, you can write the pages in Markdown syntax or use one of the Tyk prebuilt themes.
Start by creating a home page using a prebuilt template. In the sidebar of your gateway portal, click on Portal Management > Pages. Then select ADD PAGE in the upper right-hand corner:

Host a page using a prebuilt template
The next screen asks you for the title, slug, and page type. Give the page a title, and input the page’s path into the slug option. Check the Make Homepage box and make sure the Page Type is set to Default Home Page Template:
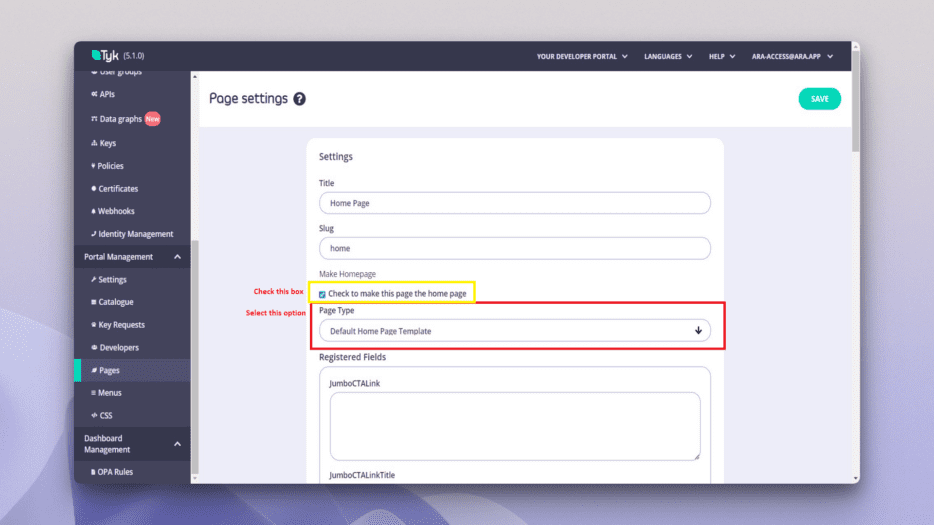
Select the default template for your home page
As you can see, there are several fields for the default home page. Also notice that there’s no styling available at this point because you’re using a prestyled theme with Bootstrap. Bootstrap provides prebuilt components. If you want to, you can customize the style of your home page at a later time.
Fill in a few fields, including JumboCTALink, JumboCTALinkTitle, and JumboCTATitle, which display the title and links in the hero section of your Developer Portal, and save your changes:

Customize your home page
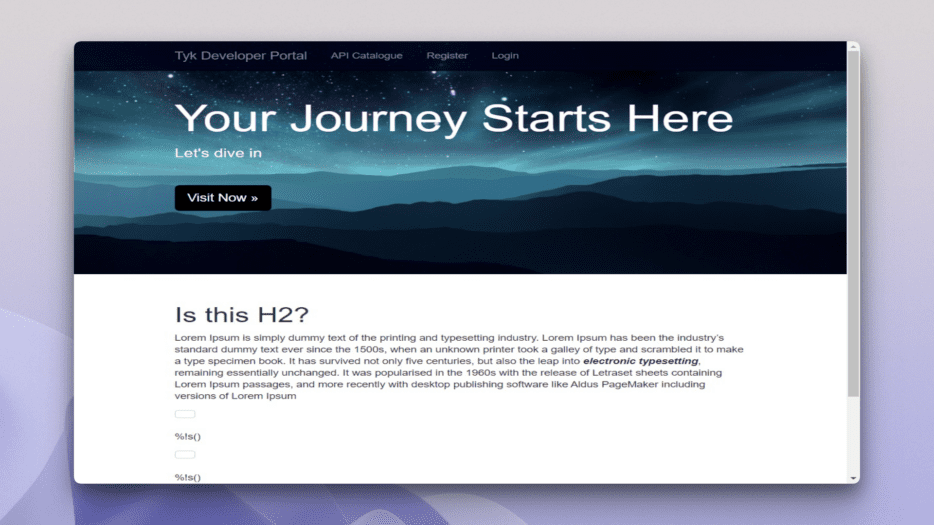
You can also use Markdown syntax for styling your content and adding elements such as lists, links, or headings. Once you’ve saved your changes, locate the URL for the Developer Portal under the Ingress section of your Tyk account and visit the URL to view the changes:
Locate the Developer Portal URL
As you can see, using a prebuilt template is easy. Now, create another page with Markdown-only content.
Go back to the Pages section and click on the Add Page button again to add a new page. Provide a name for the page, add a slug similar to the title, and select the Default Page Template. Add some content to the MainBody section (it only accepts Markdown syntax) and hit SAVE:
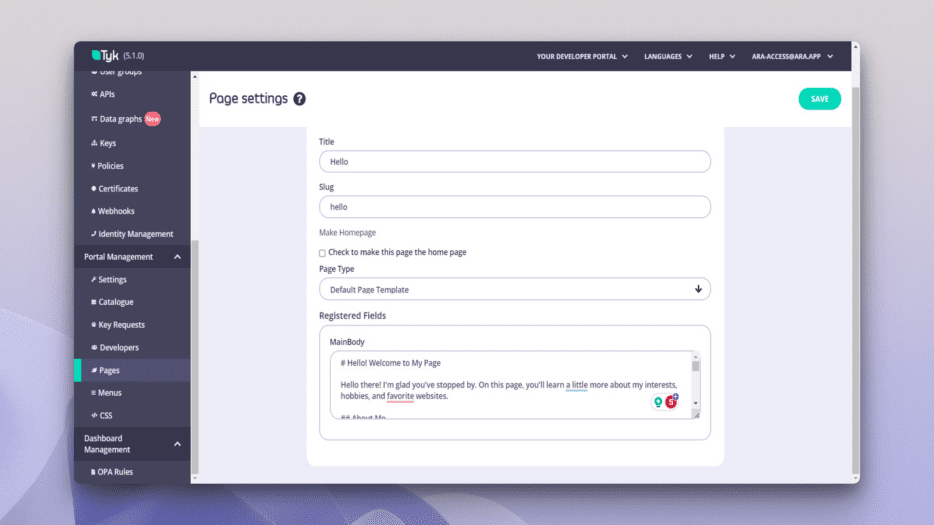
Creating a Markdown-only template
If you visit the URL of your Developer Portal, followed by the slug (ie `/hello`), you’ll be taken to the page you just created:
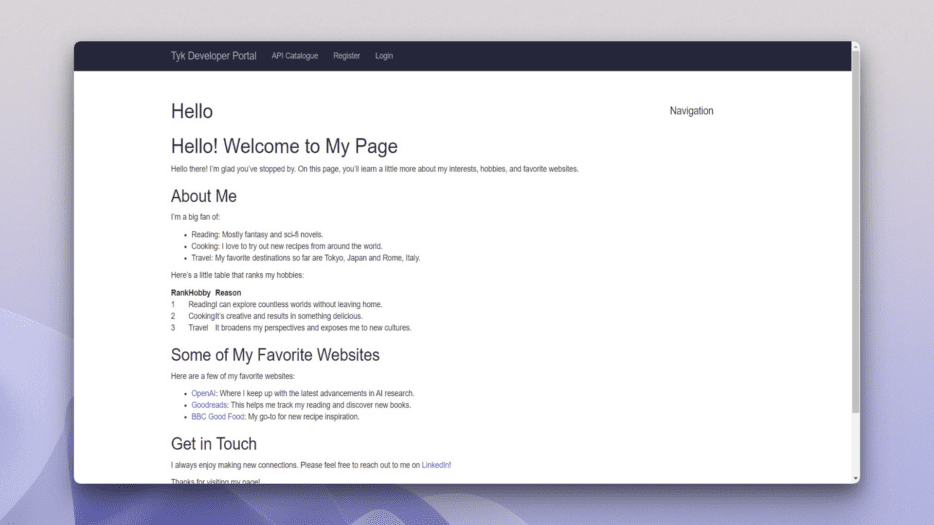
New Hello page
You always have the option to create your own template if you don’t want to use a prebuilt one. You can also change the CSS of the portal by changing the portal CSS from the CSS option:

Add custom CSS
Tyk uses Bootstrap classes for styling the Developer Portal. For example, if you inspect the button in the hero section of your Developer Portal, you’ll find that it uses classes such as `btn-lg` and `btn-primary`:
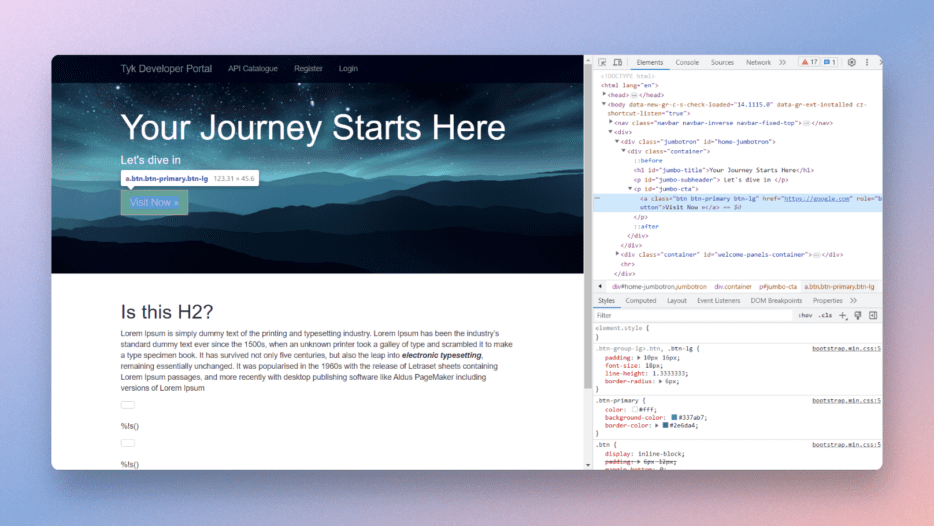
Tyk using Bootstrap classes
In the CSS customization option, you can target these classes for customizing the portal. Say you want to change the color of this button to black; in the CSS field, paste the following code:
```css

.btn-primary {

  background-color: #000;

  border: 0;

}

```
Click on the UPDATE button on the CSS customization page and visit your Developer Portal to see the changes:
Custom button style
Now that you know how to import your APIs and host pages, make sure your APIs are secure.
Secure your portal
API policies allow you to set up access rules, rate limits, and usage quotas to help you secure your APIs.
To secure the API, you need to add a policy to the employee API. In the left sidebar, select the Policies option. Once the page opens, select ADD POLICY:
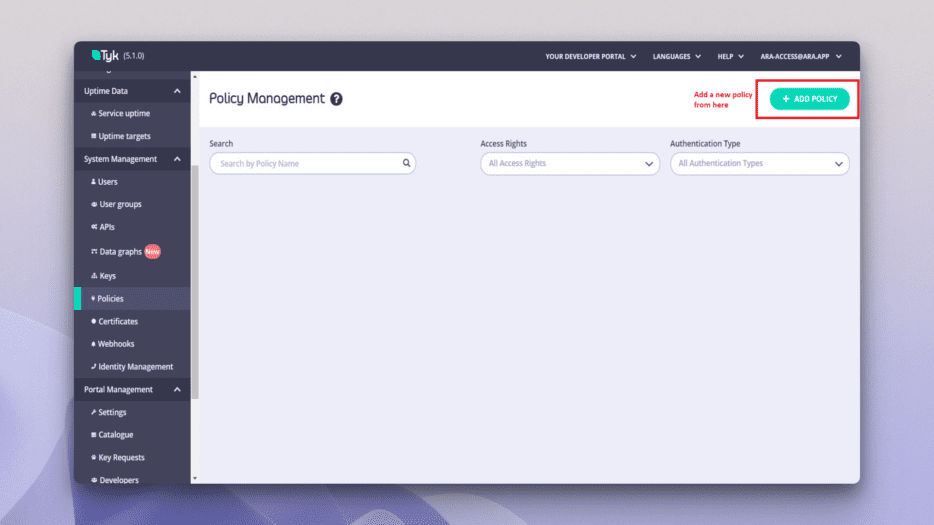
Add a policy
Clicking on ADD POLICY takes you to a new page where you are asked to select an API for applying the policy. At this point, you should only have the keyless Employee API as an option, meaning no access key is required to access the API. Select Employee API and click on Configurations at the top:
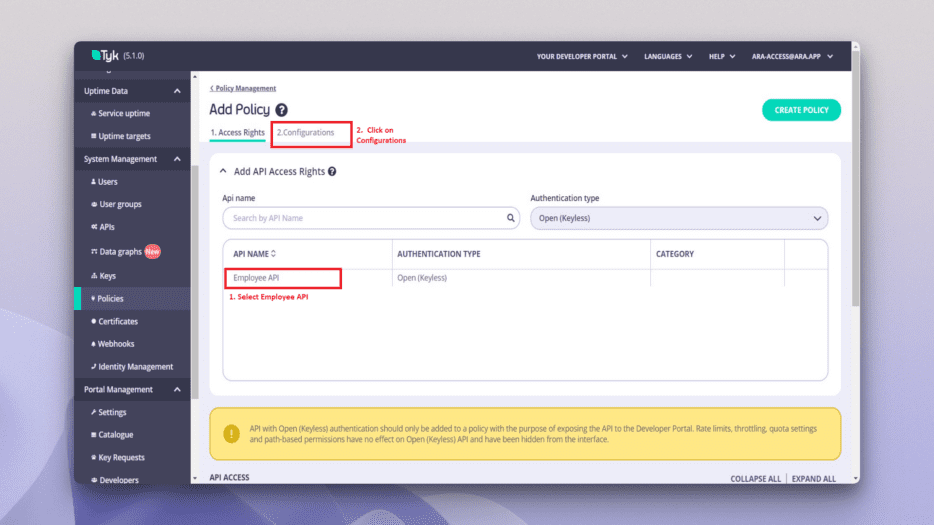
Adding an API to the policy
In the Configurations section, give your policy a name and change the Keys expire after option to Key never expire. You can also provide metadata or tags for the policy to organize them if you have multiple APIs and multiple policies. When finished, click on CREATE POLICY:

Create a security policy
When you use an API without any authentication type, the Policies section does not show the options for rate limiting, throttling, quota settings, and so on. But if your API has an authentication method, these options are visible.
This “Secure an API” page from the Tyk official documentation shows you how to secure your API using policies.
Now that you’ve successfully created a policy, add an API to the catalogue.
Add an API to the portal API catalogue
To add an API to the Portal API Catalogue, click on Catalogue in the sidebar and select ADD NEW API:
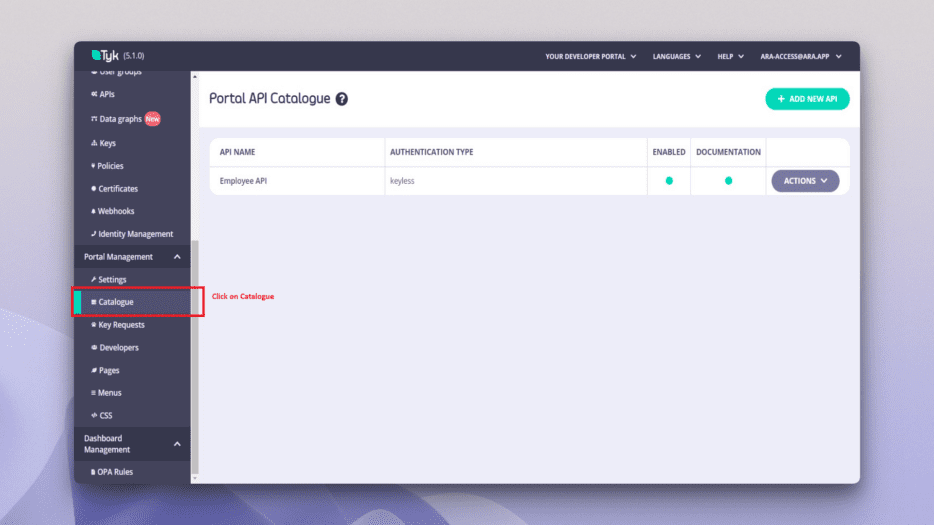
Open Catalogue from menu
From here, you can define the name of the public API and choose the policies that affect the API. Because the API is already set up in the policy, you just need to give your API a public name and apply the changes. The public name of the API is visible in the Developer Portal.
You can also provide a brief description of the API to provide your developers with more information about the API. Additionally, if you scroll to the bottom of the page, you’ll see that you can attach the documentation using a JSON Swagger doc, a Swagger URL, or a JSON Apiary Blueprint. Use the same OpenAPI doc you used previously:
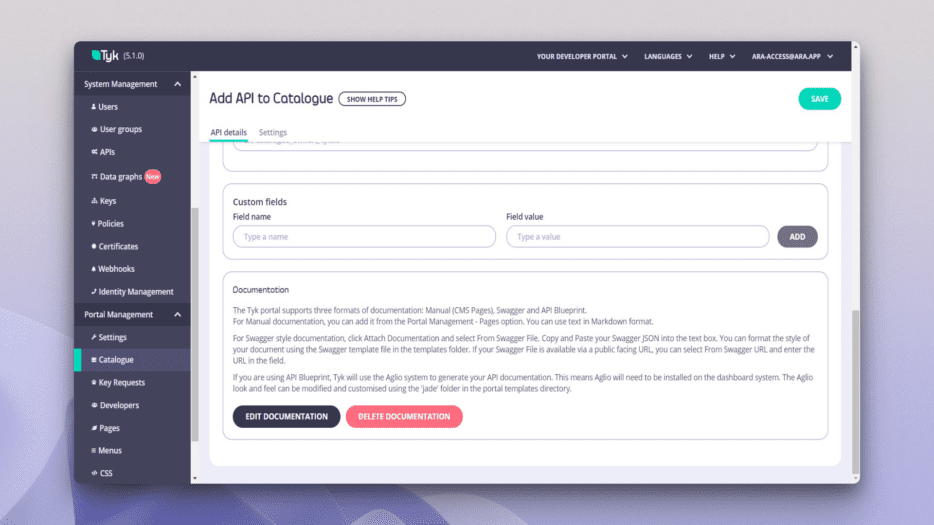
Add API to catalogue
When you’ve finished filling out the details, click SAVE in the upper right-hand corner. Now, if you visit the Developer Portal and click on the Catalogue section, you’ll find your API listed there, along with the OpenAPI documentation:
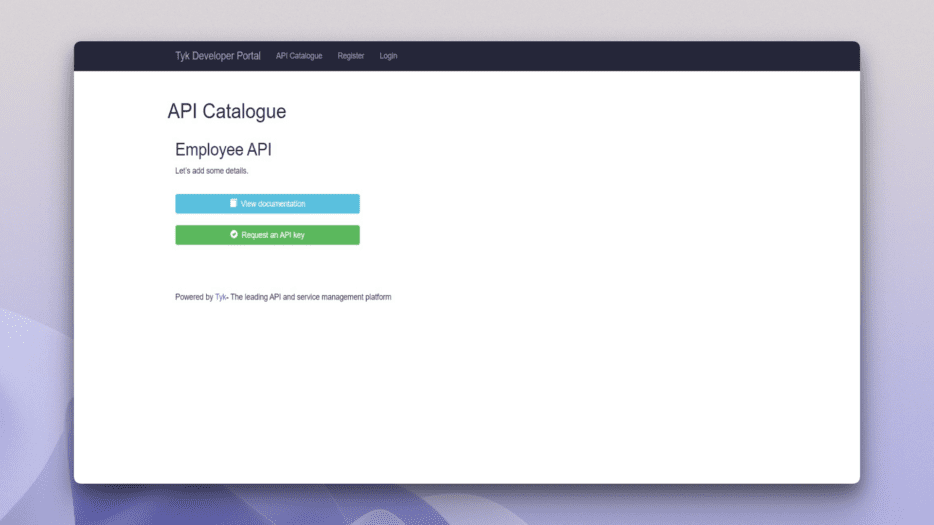
Employee API with OpenAPI documentation
Add developers to your portal
In your sidebar, the Portal Management section contains all the settings you need to control your Developer Portal. If you click on Settings, you’ll find the options available to control the sign-ups or login of developers. You can also restrict access to your API Catalogue from this menu:
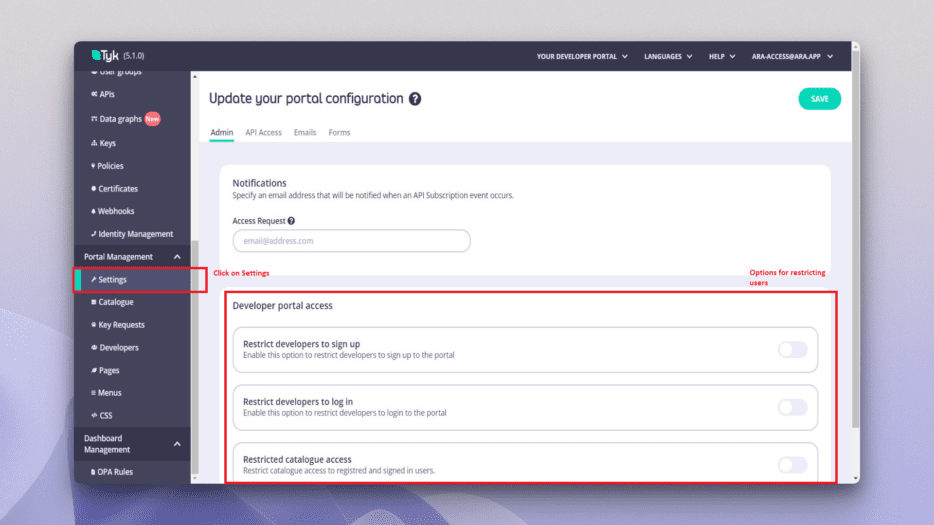
Restrict developers
Under Portal Management > Developers, you also have the option to manually add developers to your portal. You just need to click on Developers and add a new developer using the ADD DEVELOPER button:
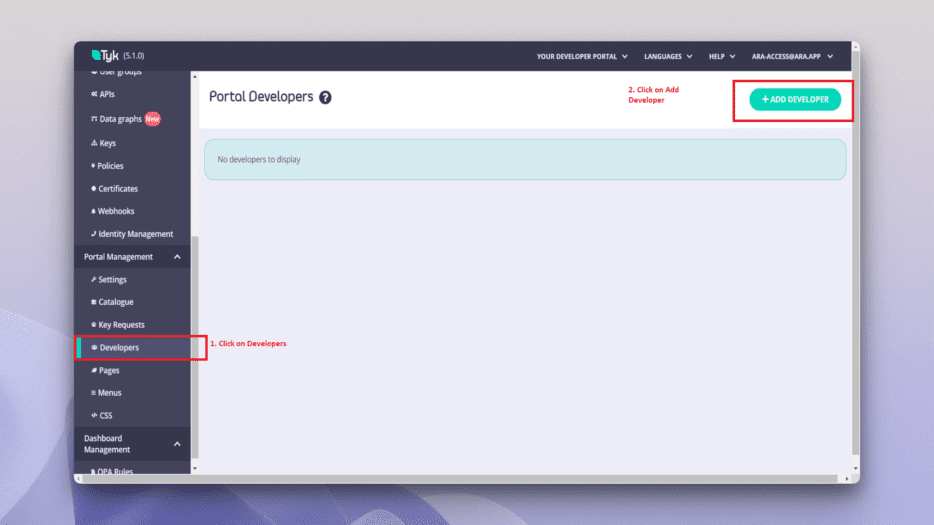
Adding developers to your portal
Once you’ve provided the necessary credentials, click SAVE, and you’ll have successfully added a new developer.
How to monitor your API with Tyk
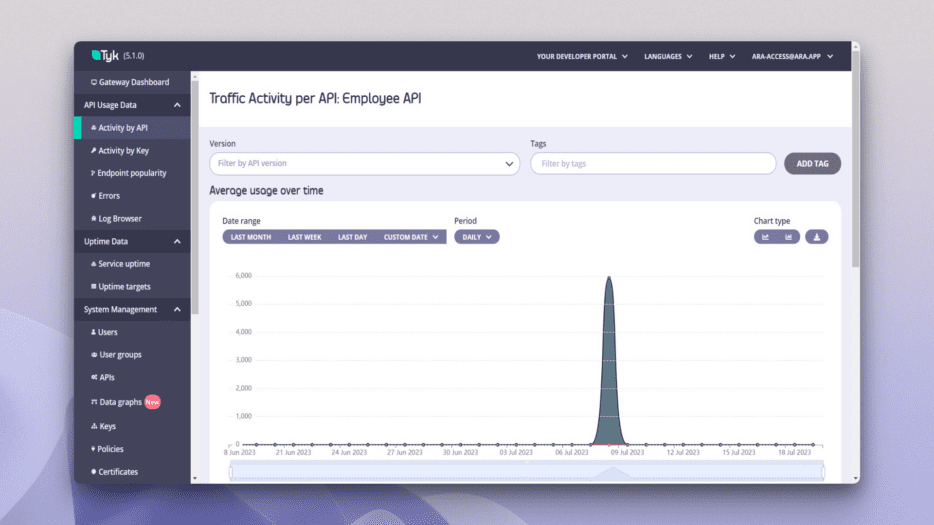
One of the main benefits of the Tyk Gateway is that it provides detailed analytics regarding API usage, errors, and logs. All you need to do is click on the Activity by API option from the sidebar:

Track API usage
Say you want to view the logs of the API calls made on a certain date. With Tyk, you don’t have to check the actual API logs. You just need to view the logs on the gateway itself by selecting the Log Browser option from the menu:
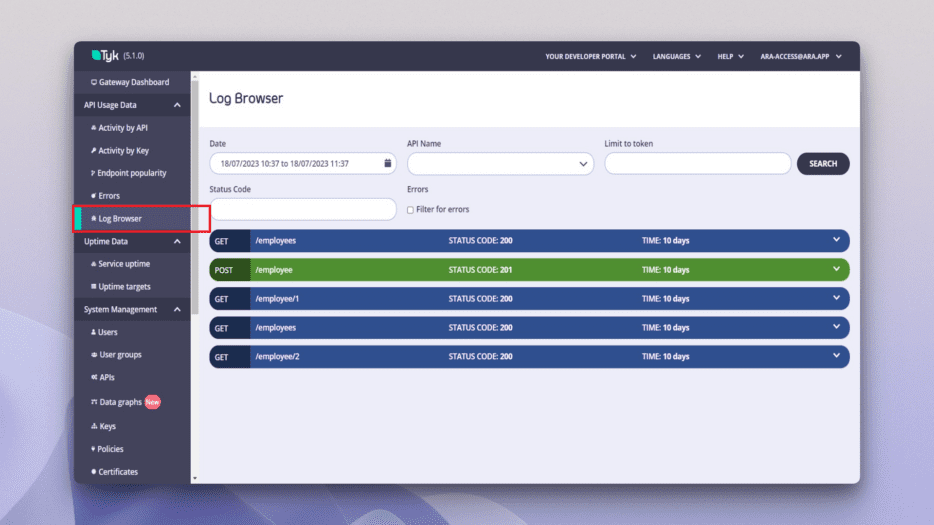
Viewing logs of API calls
The Log Browser logs all the calls made using your API. All the necessary details, including status code, timestamp, and latency, are logged here. You can also filter your logs using various filters, such as the date, name of the API, and status code:
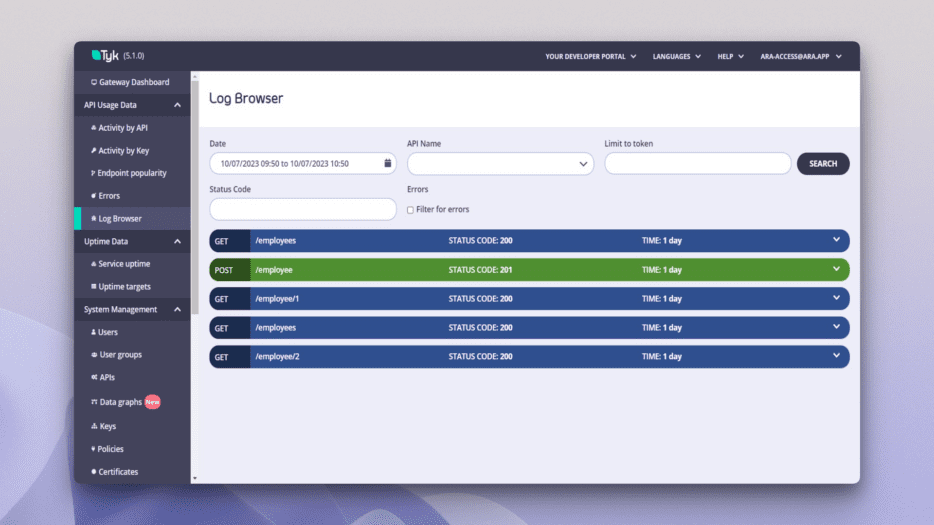
Log browser
Similarly, you can also check the success, error details, and popularity of an API from the Tyk Gateway.
The Tyk enterprise developer portal
If you want more features, such as monetizing your APIs without writing any extra code, the Tyk Enterprise Developer Portal is a great solution. It provides you with a CMS-like experience for serving APIs to your users. You can personalize the portal according to your preference and give your users a native feel in your brand colors, create custom layouts for your portal, and specify your own email workflow.
The Tyk Enterprise Developer Portal also provides an efficient way of managing multiple APIs by combining them into API products. For instance, you can share OpenAPI specification documentation and tutorials along with your API products to help your users get started quickly.
Additionally, the Tyk Enterprise Developer Portal allows you to create separate organizations and teams to help better organize developers according to their roles and needs. This gives the developers a clutter-free experience and reduces confusion. For example, if you have two separate developer teams, one for an employee data application and another one for a student data application, you can provide them different access so that the members from the groups only have access to the APIs that they need.
Within the Enterprise Developer Portal, you can also create multiple catalogues to cater to distinct audiences and ensure that your API products reach the right people. This targeted approach not only enhances user experience but also optimizes the use and management of your APIs.
Conclusion
An internal portal is a great way to build a centralized access point for all your internal APIs and increase the productivity of your developers.
If you’re considering building an internal portal, Tyk is a great tool for catering to your unique needs. Its advanced features, such as the ability to customize the admin panel with custom CSS and the flexibility to implement rate-limiting and caching, make it a great choice.
If you are planning on building an internal developer portal and don’t want to devote a lot of time and money to building it from scratch, you should consider Tyk. With its five-week trial period, you have all the time you need to explore its extensive features.