Caching
Overview
Tyk supports various ways of caching requests. At its simplest level, Tyk can cache all safe requests, however you can also manually set exactly which endpoint patterns to cache, and if that doesn’t suffice, or you require more granular control, then you can enable upstream control and have your application tell Tyk whether to cache a request or not and for how long.
Note
Invalidate Cache functionality is not currently supported in MDCB Gateways.
Global
Enabling Caching via an API Definition
To enable caching in your API, within your API definition you will need to set the cache_options flags in the main body of the definition:
"cache_options": {
  "cache_timeout": 10,
  "enable_cache": true,
  "cache_all_safe_requests": false,
  "enable_upstream_cache_control": false,
  "cache_by_headers": [],
  "cache_response_codes": [200]
}
Note
If you set cache_all_safe_requests to true, then the cache will be global and all inbound requests will be evaluated by the caching middleware. This is great for simple APIs, but for most a finer-grained control is required.
Enabling Caching via the Dashboard
Follow these steps to enable caching via the Dashboard.
Step 1: Go to the Advanced Options
From the API Designer, select the Advanced Options tab:

Step 2: Set the Cache Options for the Global Cache
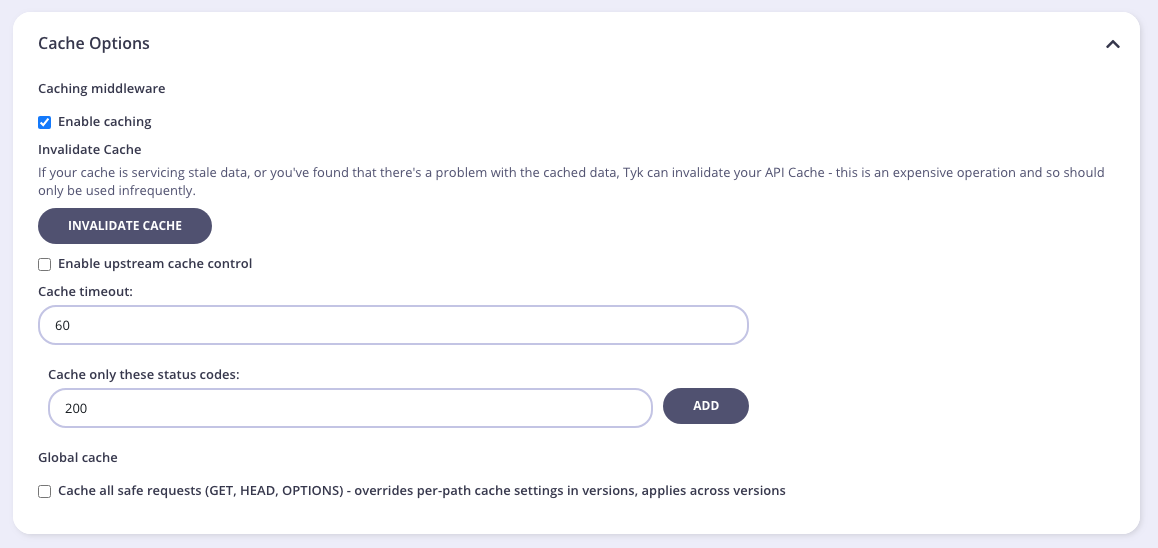
Here you must set:
- Enable caching: To enable the cache middleware.
- Cache timeout: To set the timeout (in seconds) for cached requests.
- Cache only these status codes: To set which response codes to cache (remember to click Add after entering a response code).
- Global cache: Enable the global cache.
Dynamic caching based on headers or body content
By default Tyk maintains a cache of an API key (if auth is enabled), request method and request path. But you can have a dynamic cache for keys as well, and maintain a differnt cache based on the header or body content values.
For HTTP headers you can set thecache_option.cache_by_headers option. For example:
"cache_options": {
   "cache_by_headers": ["Unique-user-Id"]
   ....
}
For request body based caching, it should be defined on a per endpoint level. Add the following config under the API definition extended_paths section:
"extended_paths": {
  "advance_cache_config": [
    {
      "method":"POST",
      "path":"addBooks",
      "cache_key_regex": "pattern"
    }
  ]
  ...
}
Both header and body dynamic caching is not exposed in the Dashboard UI, and needs to be enabled though either the raw API editor or via the Dashboard API.
Per-Path
To cache only specific endpoints, within the version data under the extended_paths section, you will need to define the paths to cache in the cache list:
extended_paths: {
  ignored: [],
  white_list: [],
  black_list: [],
  cache: [
      "widget",
      "badger",
      "fish"
  ],
  transform: [],
  transform_headers: []
}
Now Tyk will only cache the /widget, /badger, and /fish endpoints. Tyk will only cache safe requests, so currently GET and HEAD requests are the only supported HTTP methods. For many this will suffice with regards to caching requests; however in some cases you may wish to have full control over when to cache and be reactive about the time to live of the cached response.
You will still need to set the timeout and the response codes to validate in the cache configuration section.
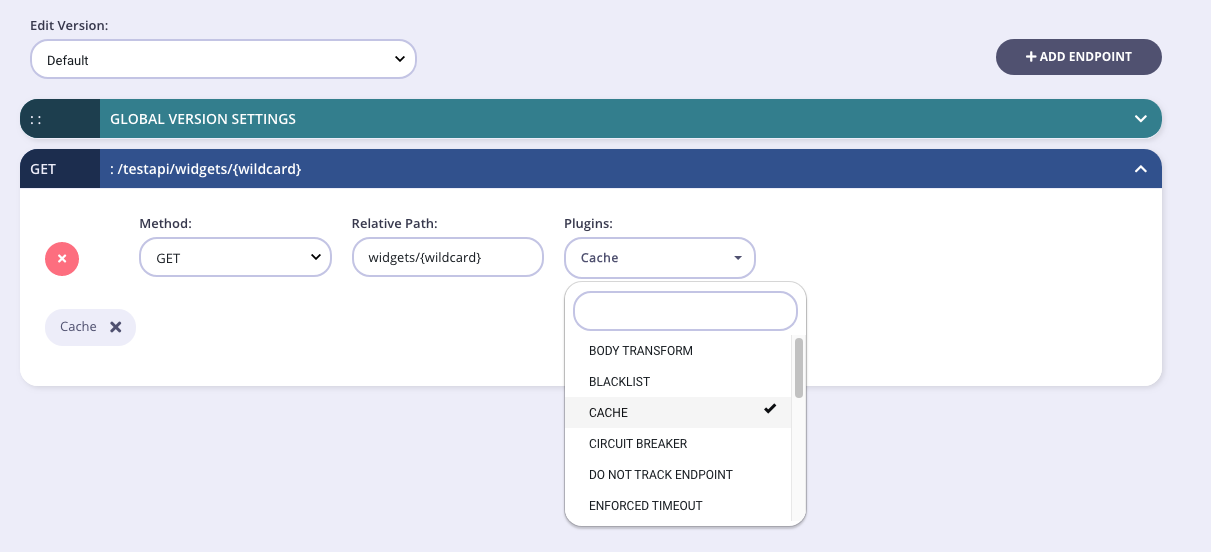
Setting Up a Per-Path Cache in the Dashboard
Step 1: Disable Global Cache
Ensure that the global cache is disabled (Cache all safe requests is not selected).
You need to set:
- Caching middleware: To enable the cache middleware.
- Cache timeout: To set the timeout (in seconds) for cached requests.
- Cache only these status codes: To set which status codes to cache (click Add after entering a code).
Step 2: Select the Cache Plugin
Go to the Endpoint Designer tab. From the path you want to cache, select the Cache plugin option from the drop-down list.
Upstream Control
Upstream cache control enables you to set whether a response should be cached, and for how long. To enable this, you will need to set the following:
Step 1. In the API definition:
enable_cache: trueenable_upstream_cache_control: true- Set which paths to act upon. Add these paths as shown in the screengrab above or manually add these paths to the
cachelist in theextended_pathssection of your API version as below:
"extended_paths": {
            "cache": [
              "ip"
            ]
          }
Step 2. Use the upstream’s response headers: Tyk will evaluate the response headers sent from your application for these paths and based on the data in the response, activate and set the cache values. The two response headers that Tyk looks for are:
x-tyk-cache-action-set: If Tyk finds this header set to1, the request will be cached, even if it’s not a safe request since the upstream control overwrites Tyk’s cache setting. Ifthe header’s value is0or no such header, even if it’s a safe request it will not be cached, again, upstream control overwrites Tyk’s.x-tyk-cache-action-set-ttl: If Tyk finds this header, it will override the TTL of the cached response, otherwise it will default tocache_options.cache_timeout. You can also change this header to a header of your choice by setting the fieldscache_options.cache_control_ttl_header.
Utilising this approach gives the most control as it will also only cache responses based on the request method. So if you only want OPTIONS requests to be cached, and return cache control headers only for this method, then only that method/URL combination will be cached, ignoring other methods for the same path.
Configuration via the Dashboard UI
Under the Advanced settings, ensure that Enable upstream cache control is selected and Global cache is not selected, then follow the steps for per-path caching.
A Separate Redis Cache
For high-traffic systems that make heavy use of caching as well as rate limiting, it makes sense to separate out the Redis cache server from the Redis configuration server that supplies auth tokens and handles rate limiting configuration.
To enable a separate cache server, update your tyk.conf with the following section:
"enable_separate_cache_store": true,
"cache_storage": {
  "type": "redis",
  "host": "",
  "port": 0,
  "addrs": [
      "localhost:6379"
  ],
  "username": "",
  "password": "",
  "database": 0,
  "optimisation_max_idle": 3000,
  "optimisation_max_active": 5000,
  "enable_cluster": false
},
Note
addrs is new in v2.9.3, and replaces hosts which is now deprecated.
If you set enable_cluster to false, you only need to set one entry in addrs:
The configuration is the same (and uses the same underlying driver) as the regular configuration, so Redis Cluster is fully supported.