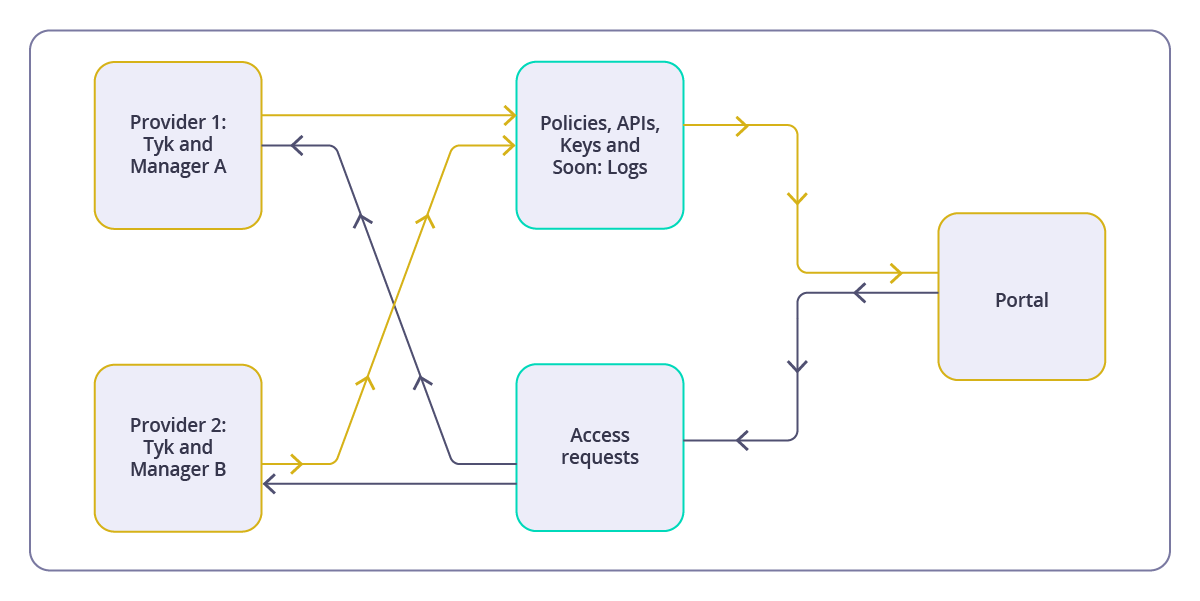
API Providers

Last updated:

Tyk Enterprise Developer Portal

If you are interested in getting access contact us at [email protected]

How to Manage API Access?

The Tyk Enterprise Developer portal provides a special container for access credentials - an application. Applications hold developer credentials that can be used to access APIs published on the portal with a specific plan. A sample relationship between applications, credentials, API Products, and plans is demonstrated in the diagram below.

Sample application setup

Credentials are generated by the Tyk Dashboard when an admin user approves a provisioning request or when provisioning requests are configured to be approved automatically. The provisioning flow is demonstrated in the diagram below.

Portal provisioning flow

This section describes how admin users can manage applications and configure the settings of provisioning requests.

Provisioning Request

Approve or Reject Provisioning Request

When an external developer is looking to access a specific API(s) as a part of an API Product, they will request access via the public facing portal.

Prerequisites

  • A Tyk Enterprise portal installation
  • A portal admin app login
  • Log in to a provisioning request sent by an external API consumer

Step by step instructions

  1. Log in to the portal admin app
  2. Navigate to Provisioning Requests
  3. Select which request you want to approve
  4. Click the more symbol and select either approve or reject

Approve or reject an API provisioning request

Configure Auto Approval

You can auto approve provisioning requests. From the Plans section of the admin app, edit a plan and select Auto-approve provisioning request from the Plan Settings. By default this setting is not selected, requiring manual approval of each request. Click Save Changes to enable this setting.

Auto Approve API provisioning requests

Manage Apps and Credentials

Prerequisites

  • A Tyk Enterprise portal installation
  • A portal admin app login
  • A login to the already created app by an external API consumer

To view existing apps

  1. In the portal admin app, go to Apps. If there are some apps already created by external API-consumers, you’ll see them in the overview list.

    List of applications

  2. Click on an app from the overview page.

  3. On the right hand slideout, you will see the information about the created app.

Revoke app credentials

  1. In the portal admin app, go to Apps and open the app.
  2. Click credentials. This means the developer will no longer be able to access the API Product via the selected plan. These actions will have an immediate effect.

Manage Catalogs

Catalogs are a way for you to tailor the audience for API products and Plans. You can, for example create a Partner Catalog, with a specific API product tailored to them and a preferential plan not available in your public portal.

In this section, you will learn about how catalogs work and how to create a new catalog to expose your API products and plans.

Prerequisites

Create a New Catalog

  1. Navigate to the Catalog section section

    Catalogue menu

  2. Click Create a new catalog

    Create a new catalogue

  3. Enter Name and Path URL

    Name the new catalogue

  4. Set the access required for the catalog e.g. Public, Private or Custom

  • Public: External developers can access the catalog
  • Private: The catalog is only visible to developers that are logged in
  • Custom: Only selected teams can access this catalog
  1. [If creating a custom catalog] Under Audience, select one or multiple teams that you want to have access to this catalog.

Note

For this audience to apply, the visibility needs to be set to custom.

  1. Select the catalog content in terms of which API Products and plans this catalog should contain.

Configure Rate Limits

Different business models may require applying rate limits and quotas not only by credentials but also by other entities, e.g. per application, per developer, per organization etc. For example, if an API Product is sold to a B2B customer, the quota of API calls is usually applied to all developers and their respective applications combined, in addition to a specific credential.

To enable this, Tyk introduced support for custom rate limit keys in Tyk 5.3.0. This guide explains how to configure custom rate limit keys.

Prerequisites

This capability works with Tyk 5.3.0 or higher.

Configuring custom rate limit keys for policies in Tyk Dashboard

Note

If you are using Tyk Developer Portal version 1.13.0 or later, you can configure the custom rate limit keys directly from the Developer Portal in the Advanced settings (optional) colapsible section of the Plan’s view (by Credentials metadata).

Add Plan Advanced Settings

Custom rate limit keys are applied at a policy level. When a custom rate limit key is specified, quota, rate limit and throttling will be calculated against the specified value and not against a credential ID.

To specify a custom rate limit key, add to a policy a new metadata field called rate_limit_pattern. In the value field you can specify any value or expression that you want to use as a custom rate limit key for your APIs. The rate_limit_pattern field supports referencing session metadata using $tyk_meta.FIELD_NAME syntax. In addition, it’s possible to concatenate multiple values together using the pipe operator (|).

For instance, if you want to specify a rate limit pattern to calculate the rate limit for a combination of developers and plans, where all credentials of a developer using the same plan share the same rate limit, you can use the following expression. This assumes that the DeveloperID and PlanID metadata fields are available in a session:

$tyk_meta.DeveloperID|$tyk_meta.PlanID

Here’s how it looks like in the Tyk Dashboard UI:

Configuring custom rate limit keys


Updating credential metadata

Please note that the custom rate limit key capability uses only metadata objects, such as credentials metadata available in a session. Therefore, if the rate_limit_pattern relies on credentials metadata, this capability will work only if those values are present. If, after evaluating the rate_limit_pattern, its value is equal to an empty string, the rate limiter behavior defaults to rate limiting by credential IDs.

Using custom rate limit keys with the portal

The Tyk Enterprise Developer Portal facilitates the configuration of various rate limiting options based on a business model for API Products published in the portal.

To achieve this, the portal, by default, populates the following attributes in the credential metadata, which can be used as part of a custom rate limit key:

  • ApplicationID: The ID of the application to which the credential belongs.
  • DeveloperID: The ID of the developer who created the credential.
  • OrganizationID: The ID of the organization to which the developer belongs.

Additionally, it’s possible to attach custom attribute values defined in a developer profile as metadata fields to credentials.

When a credential is provisioned by the portal, all the fields described above are added as metadata values to the credential, making them valid options for configuring the rate limit key:

Credential's metadata

This approach allows the portal to seamlessly apply rate limits based on any combination of the aforementioned fields and other custom metadata objects defined in policies used for plans or products. This is in addition to credentials.


Tyk Enterprise Developer Portal

If you are interested in getting access contact us at [email protected]

Dynamic Client Registration

Why OAuth2.0 is important

OAuth 2.0 is a crucial security mechanism for both public and internal APIs, as it provides a secure and standardized way to authenticate and authorize access to protected resources. It enables granular access control and revocation of access when necessary without exposing sensitive login credentials. In short, OAuth 2.0 offers a secure and flexible approach to managing access to APIs.

Implementing an OAuth2.0 provider can be a complex process that involves several technical and security considerations. As such, many API providers choose to use specialized identity providers instead of implementing OAuth2.0 provider themselves.

By using specialized identity providers, API providers can leverage the provider’s expertise and infrastructure to manage access to APIs and ensure the security of the authentication process. This also allows API providers to focus on their core business logic and reduce the burden of managing user identities themselves.

How does Tyk help

Tyk offers a standard and reliable way to work with identity providers through the Dynamic Client Registration protocol (DCR), which is an Internet Engineering Task Force protocol that establishes standards for dynamically registering clients with authorization servers.

Tyk Enterprise Developer portal allows API providers to set up a connection with identity providers that support DCR so that API Consumers can use the OAuth2.0 credentials issued by the identity provider to access APIs exposed on the portal.


Prerequisites

Before getting starting with configuring the portal, it’s required to configure your Identity provider and the Dashboard beforehand.

Create an initial access token

Before setting up Tyk Enterprise Developer Portal to work with DCR, you need to configure the identity provider. Please refer to the guides for popular providers to create the initial access token for DCR:

Note

Whilst many providers require initial access tokens, they are optional. Please refer to your provider documentation to confirm if required.

Create OAuth2.0 scopes to enforce access control and rate limit

Tyk uses OAuth2.0 scope to enforce access control and rate limit for API Products. Therefore, creating at least two scopes for an API Product and plan is required.

The below example demonstrates how to achieve that with Keycloak and Okta in the tabs below.

  1. Navigate to the Client scopes menu item

    Navigate to the Client scopes menu item

  2. Create a scope for an API Product

    Create a scope for an API Product

  3. Create a scope for a plan

    Create a scope for a plan

Note

When using Keycloak, ensure that you set the type of the scope to be Optional. Default scopes are applied automatically, while optional scopes can be requested by clients on a case-by-case basis to extend the permissions granted by the user. In recent versions of Keycloak this should appear as a dropdown menu option, as shown in the images above. In older releases of Keycloak this may need to be set explicitly in a separate tab, as show on the image below.

Client Scope Assigned Type

  1. Create an auth server or use the Default authorization server

    Go to Security → API, Edit one of the auth servers and navigate to Scopes

    Add or Edit oauth servers in okta

  2. Create a scope for an API Product

    Create a scope for an API Product

  3. Create a scope for a plan

    Create a scope for a plan

Create Tyk policies for an API Product and plan

Note

You can skip this step if you are using Tyk Developer Portal version 1.13.0 or later. Go directly to Configure Tyk Enterprise Developer Portal to work with an identity provider.

Navigate to the Tyk Dashboard and create two policies: one for a plan and one for an API Product. Both policies should include only the APIs with JWT authentication that you want to bundle as an API Product.

  1. Create a policy for an API product.

    Create a policy for a product

  2. Create a policy for a plan.

    Create a policy for a plan

Create the No Operation policy and API

Note

You can skip this step if you are using Tyk Developer Portal version 1.13.0 or later. Go directly to Configure Tyk Enterprise Developer Portal to work with an identity provider.

Tyk requires any API that uses the scope to policy mapping to have a default policy. Access rights and rate limits defined in the default policy take priority over other policies, including policies for the API Product and plan.

To avoid that, you need to create the No Operation API and policy that won’t grant access to the APIs included in the API Product but will satisfy the requirement for a default policy.

  1. Create the No Operation API.

    Navigate to the APIs menu in the Tyk Dashboard:

    Navigate to the API menu in the Tyk Dashboard

    Create a new HTTP API:

    Create the No Operation API

    Save it:

    Save the No Operation API


  1. Create the No Operation policy.

    Navigate to the Policies menu in the Tyk Dashboard:

    Navigate to the policies menu

    Create a new policy and select the No Operation API in the Add API Access Rights section:

    Create the No Operation policy

    Configure the No Operation policy and save it:

    Save the No Operation policy

Configure scope to policy mapping

Note

You can skip this step if you are using Tyk Developer Portal version 1.13.0 or later. Go directly to Configure Tyk Enterprise Developer Portal to work with an identity provider.

To enforce policies for the API Product and plan, you need to configure the scope to policy mapping for each API included in the API Product. To achieve that, perform the following steps for each API included in the API Product.

  1. Navigate to the API.

    Navigate to the API

  2. Select the required JWT signing method. In this example, we use RSA. Leave the Public key and pol fields blank, they will be filled automatically by the Enterprise portal.

    Select signing method for the API

  3. Select the No Operation policy as the default policy for this API.

    Select the default policy for the API

  4. Enable scope to policy mapping and specify the value of the JWT claim used to extract scopes in the Scope name field (the default value is “scope”).

    Enable scope to policy mapping

  5. Add a scope to policy mapping for the product scope. Type the product scope in the Claim field and select the product policy.

    Add scope to policy mapping for the product scope

  6. Add a scope to policy mapping for the plan scope. Type the plan scope in the Claim field and select the plan policy, then save the API.

    Add scope to policy mapping for the plan scope

Configure Tyk Enterprise Developer Portal to work with an identity provider

Set up the portal to work with your IdP.

Configure the App registration settings

In the portal, navigate to the OAuth2.0 Providers menu section. In that section, you need to configure the connection settings to the IdP and define one or more types (configurations) of OAuth 2.0 clients. For instance, you can define two types of OAuth 2.0 clients:

  • A confidential client that supports the Client credential grant type for backend integrations;
  • A web client that supports the Authorization code grant type for integration with web applications that can’t keep the client secret confidential.

Each configuration of OAuth 2.0 client could be associated with one or multiple API Products so that when an API Consumer requests access to an API Product, they can select a client type that is more suitable for their use case.

Specify connection setting to your IdP

To connect the portal to the IdP, you need to specify the following settings:

  • OIDC well-known configuration URL.
  • Initial access token.

First of all, select your IdP from the Identity provider dropdown list. Different IdPs have slightly different approaches to DCR implementation, so the portal will use a driver that is specific to your IdP. If your IdP is not present in the dropdown list, select the Other option. In that case, the portal will use the most standard implementation of the DCR driver, which implements the DCR flow as defined in the RFC.

Then you need to specify the connection settings: the initial access token and the well-known endpoint. If your Identity Provider uses certificates that are not trusted, the portal will not work with it by default. To bypass certificate verification, you can select the SSL secure skip verify checkbox.

The below example demonstrates how to achieve that with Keycloak and Okta in the tabs below.

Specify connection setting to the IdP

Specify connection setting to the IdP

OIDC URL: {your-domain.com}/oauth2/default/.well-known/openid-configuration

Registration Access Token: To obtain token, Go to Okta Admin Console → Security → API → Tokens → Create New Token

Create client configurations

Once the connection settings are specified, you need to create one or multiple types of clients. You might have multiple types of clients that are suitable for different use cases, such as backend integration or web applications.

You need at least one type of client for the DCR flow to work. To add the first client type, scroll down to the Client Types section and click on the Add client type button.

To configure a client type, you need to specify the following settings:

  • Client type display name. This name will be displayed to API consumers when they check out API products. Try to make it descriptive and short, so it’s easier for API consumers to understand.
  • Description. A more verbose description of a client type can be provided in this field. By default, we do not display this on the checkout page, but you can customize the respective template and make the description visible to API consumers. Please refer to the customization section for guidance.
  • Allowed response_types. Response types associated with this type of client as per the OIDC spec.
  • Allowed grant_types. Grant types that this type of client will support as per the OIDC spec.
  • Token endpoint auth methods. The token endpoint that will be used by this type of client as per the OIDC spec.
  • Additionally, there’s an additional field for Okta: Okta application type which defines which type of Okta client should be created. Ignored for all other IdPs.

Please note that your IdP might override some of these settings based on its configuration.

The below example demonstrates how to achieve that with Keycloak and Okta in the tabs below. After configuring a client type, scroll to the top of the page to save it by clicking on the SAVE CHANGES button.

Configure a client type

Configure a client type

For Okta Client Credentials: allowed response types MUST be token only

Configure API Products and plans for the DCR flow

Once the App registration settings are configured, it is time for the final step: to configure the API Products and plans to work with the DCR flow.

Configure API Products for the DCR flow

To configure API Products to work with the DCR flow, you need to:

  • Enable the DCR flow for the products you want to work with the DCR flow.
  • Associate each product with one or multiple types of clients that were created in the previous step.
  • Specify scopes for this API Product. Note the portal uses the scope to policy mapping to enforce access control to API Products, so there should be at least one scope.

For achieving this, navigate to the API Products menu and select the particular API product you want to use for the DCR flow. Next, go to the ‘App registration configs’ section and enable the ‘Enable dynamic client registration’ checkbox.

After that, specify the scope for this API product. You should have at least one scope that was created in the Prerequisites for getting started. If you need to specify more than one scope, you can separate them with spaces.

Finally, select one or multiple types of clients that were created in the Create client configurations section of this guide to associate them with that product.

Configure an API Product to work with the DCR flow

Configure an API Product to work with the DCR flow


Note

From version 1.13.0, you can complete the DCR configuration for a product under the Dynamic Client Registration tab in the product’s view. Scope to policy mapping for the selected API/s will be automatically configured using the scope defined in the Scopes field.

Add DCR settings

Configure plans for the DCR flow

The last step is to configure the plans you want to use with the DCR flow. To do this, go to the portal’s Plans menu section and specify the OAuth2.0 scope to use with each plan. You should have at least one scope that was created in the Prerequisites for getting started. If you need to specify more than one scope, you can separate them with spaces.

Configure a plan to work with the DCR flow


Note

From version 1.13.0, you can complete the DCR configuration for a plan under the Advanced settings (optional) colapsible section in the plan’s view. Scope to policy mapping for the plan will be automatically configured using the scope defined in the Scopes field.

Add Plan Advanced Settings

Test the DCR flow

To test the DCR flow, you need to perform the following actions:

  • Request access to the API product and plan you have selected for the DCR flow as a developer.
  • Approve the access request as an admin.
  • As a developer, copy the access credentials and obtain an access token.
  • As a developer, make an API call to verify the flow’s functionality.

Request access to the API Product

To request access to the DCR enabled API Product:

  • Log in as a developer and navigate to the catalog page.
  • Select the DCR enabled API Product and add it to the shopping cart.
  • Navigate to the checkout page.
  • On the checkout page, select a plan to use with that product, select an existing application, or create a new one. If you plan to build an application that uses the Authorization code grant type, you also need to specify redirect URI of your application in the Redirect URLs field. If you have multiple redirect URI, you can separate them with commas.
  • Select a client type which is more suitable for your use case in the Select a client type section.
  • Finally, select the applicable type of client and click on the Submit request button.

    Request access to the DCR enabled product

Approve the access request

To approve the access request, navigate to the Access requests menu in the portal, select the access request and approve it by clicking on the Approve button.

Approve DCR access request

Obtain an access token

Once the access request is approved, the developer should receive an email informing them of the approval. Please refer to the email customization section if you wish to change the email template.

As a developer, navigate to the My Dashboard section in the developer portal, select the application, and copy the OAuth 2.0 credentials.

Copy the OAuth2.0 credentials

Then use the credentials you have copied to obtain an access token. Make sure to include the scopes that are used to enforce access to the API product and plan. Otherwise, the gateway will not authorize the request. Here’s an example of to achieve that with curl:

curl --location --request POST 'http://localhost:9999/realms/DCR/protocol/openid-connect/token' \
--header 'Authorization: Basic N2M2NGM2ZTQtM2I0Ny00NTMyLWFlMWEtODM1ZTMyMWY2ZjlkOjNwZGlJSXVxd004Ykp0M0toV0tLZHFIRkZMWkN3THQ0' \
--header 'Content-Type: application/x-www-form-urlencoded' \
--data-urlencode 'scope=product_payments free_plan' \
--data-urlencode 'grant_type=client_credentials'

Since in this example we use the client_secret_basic token endpoint authentication method, the credentials must be supplied as a Base64-encoded string: {client_id}:{client_secret}.

As a result, you should receive a JWT access token containing the required scopes:

An example of a JWT

Make an API Call

Finally, use the access token to make an API call and test the flow functionality:

curl --location --request GET 'http://localhost:8080/payment-api/get' \
--header 'Authorization: Bearer eyJhbGciOiJSUzI1NiIsInR5cCIgOiAiSldUIiwia2lkIiA6ICJUR1ZQd25MWlduaWpNc2taU3lHeHFtYnFDNVlIcW9QUUJYZE4xTmJCRDZjIn0.eyJleHAiOjE2Nzg0NDA2ODksImlhdCI6MTY3ODQ0MDM4OSwianRpIjoiMGYwNTdlYjItODQ5My00ZmM2LTllMzQtZTk0OWUzYWQ2MmI2IiwiaXNzIjoiaHR0cDovL2xvY2FsaG9zdDo5OTk5L3JlYWxtcy9EQ1IiLCJzdWIiOiJlNGE3YmFkNy04ZDA4LTQxOTAtODc1Ni1mNTU1ZWQ3Y2JhZjciLCJ0eXAiOiJCZWFyZXIiLCJhenAiOiI3YzY0YzZlNC0zYjQ3LTQ1MzItYWUxYS04MzVlMzIxZjZmOWQiLCJzY29wZSI6ImZyZWVfcGxhbiBwcm9kdWN0X3BheW1lbnRzIiwiY2xpZW50SWQiOiI3YzY0YzZlNC0zYjQ3LTQ1MzItYWUxYS04MzVlMzIxZjZmOWQiLCJjbGllbnRIb3N0IjoiMTcyLjE3LjAuMSIsImNsaWVudEFkZHJlc3MiOiIxNzIuMTcuMC4xIn0.WGp9UIqE7CjFhHdaM64b0G2HGP4adaDg3dgc0YVCV9rTDYmri32Djku7PcLiDKyNLCvlQXUm_O2YmwMCLLUHKPGlRmBMG2y-79-T8z5V-qBATbE6uzwPh38p-SYIIDBUZtlMEhnVp049ZqNolUW-n2uB4CTRb0kDosdRnqhiMUFpe-ORwnZB-4BHGRlwWKyjc5Da6CvVczM1a_c5akqurGMFaX9DC81SS-zMXXpQPDpAkvUJBfLYDHEvXWH8JISqYv7ZQSAbOyE4b-EkVAesyHIMDCQ_pzf5Yp2ivM0dOufN9kdG2w_9ToMqJieVyQILJPowEakmEealbNUFQvc5FA'

You should receive the following response:

{
  "args": {},
  "headers": {
    "Accept": "*/*",
    "Accept-Encoding": "gzip",
    "Authorization": "Bearer eyJhbGciOiJSUzI1NiIsInR5cCIgOiAiSldUIiwia2lkIiA6ICJUR1ZQd25MWlduaWpNc2taU3lHeHFtYnFDNVlIcW9QUUJYZE4xTmJCRDZjIn0.eyJleHAiOjE2Nzg0NDA2ODksImlhdCI6MTY3ODQ0MDM4OSwianRpIjoiMGYwNTdlYjItODQ5My00ZmM2LTllMzQtZTk0OWUzYWQ2MmI2IiwiaXNzIjoiaHR0cDovL2xvY2FsaG9zdDo5OTk5L3JlYWxtcy9EQ1IiLCJzdWIiOiJlNGE3YmFkNy04ZDA4LTQxOTAtODc1Ni1mNTU1ZWQ3Y2JhZjciLCJ0eXAiOiJCZWFyZXIiLCJhenAiOiI3YzY0YzZlNC0zYjQ3LTQ1MzItYWUxYS04MzVlMzIxZjZmOWQiLCJzY29wZSI6ImZyZWVfcGxhbiBwcm9kdWN0X3BheW1lbnRzIiwiY2xpZW50SWQiOiI3YzY0YzZlNC0zYjQ3LTQ1MzItYWUxYS04MzVlMzIxZjZmOWQiLCJjbGllbnRIb3N0IjoiMTcyLjE3LjAuMSIsImNsaWVudEFkZHJlc3MiOiIxNzIuMTcuMC4xIn0.WGp9UIqE7CjFhHdaM64b0G2HGP4adaDg3dgc0YVCV9rTDYmri32Djku7PcLiDKyNLCvlQXUm_O2YmwMCLLUHKPGlRmBMG2y-79-T8z5V-qBATbE6uzwPh38p-SYIIDBUZtlMEhnVp049ZqNolUW-n2uB4CTRb0kDosdRnqhiMUFpe-ORwnZB-4BHGRlwWKyjc5Da6CvVczM1a_c5akqurGMFaX9DC81SS-zMXXpQPDpAkvUJBfLYDHEvXWH8JISqYv7ZQSAbOyE4b-EkVAesyHIMDCQ_pzf5Yp2ivM0dOufN9kdG2w_9ToMqJieVyQILJPowEakmEealbNUFQvc5FA",
    "Host": "httpbin.org",
    "User-Agent": "curl/7.85.0",
  },
  "origin": "XXX.XXX.XXX.XXX, XXX.XXX.XXX.XXX",
  "url": "http://httpbin.org/get"
}

Documentation for your API Products

As an API Provider, you can package APIs into API Products and supply them with documentation to deliver value to your internal and external API Consumers.
API documentation is essential for API Products. Good API documentation goes beyond just Open API Specification. To make your API Products easy to use and engaging, you can add technical and business guides to the documentation of your API Products, for instance:

  • Get started guides explaining how to start with your API Product;
  • Use-cases;
  • Business documentation that explains the business value and helps to convince decision-makers.

Tyk Enterprise Developer portal provides two ways of documenting APIs:

  • Open API Specifications for APIs;
  • The Get started documentation feature enables API Providers to add as many technical and business guides to API Products as needed.

This section explains how to add the Get started documentation to API Products.

Create Get started guides for your API Product

  1. Create and publish an API Product

    To start with, create and publish an API Product. Please refer to the Publish API Products and Plans page for further guidance.

  2. Add API Documentation to API Products

    Note

    If you are using Tyk Developer Portal version 1.13.0 or later, you can add API Documentation under the "Getting Started" guides tab of the API Product’s view.

    Add Product Guides

    To add API Documentation, select an API Product and navigate to the API Documentation section. Click the ‘Add API Documentation’ button to add a new API Documentation page.

    Navigate to the API Documentation section


    Tyk developer portal stores two versions of each API Documentation page: in Markdown and HTML formats. You can edit both versions, but only one version of the page will be displayed. To edit the Markdown version, click on the ‘Change to Markdown’ button.

    Toggle the Markdown editor


    To edit the HTML version, click the ‘Change to HTML’ button.

    Toggle the HTML editor


    To select which version of the documentation to display, check the ‘Display Markdown’ checkbox. When it’s checked, the portal will display the Markdown version of the page. Otherwise, portal will display the HTML version.

    Display the MD version of the page

  3. Add more documentation pages and set the display order

    With the Tyk developer portal, you can add multiple Markdown and HTML pages to your API Products and select their display order to form a table of contents suitable for your use case. Please refer to the previous step to add one more documentation page to the API Product.

    To reorder API Documentation items, scroll down to the API Documentation section and click on the ‘Reorder items’ button.

    Reorder API Docs


    Then click on the ‘Move up’ button to move an API Documentation item one position up, and the ‘Move down’ button to bring it one position down. Click on the ‘Done’ button and then on the ‘Save’ button to save your changes.

    Reorder API Docs


    Once you save the changes, the new order of items will be reflected in the ‘Get started’ tab.

    Reorder API Docs


    All documentation pages are listed in the ‘Product docs’ section. You can access and edit the API docs from that section.

    Product docs section

  4. Add tags to blogs and API Products

    Finally, you can add blog posts to your API Products using the Tags feature. You can specify tags for API Product and blog posts, then the blog posts that match tags with an API Product will be displayed in the ‘Related blog content’ section.

    Tags diagram


    To specify tags for an API Product, select an API Product, scroll down to the ‘Tags’ section, type in a tag, and press the Enter key.

    Specify tags for an API Product


    To specify tags for a blog post, select a blog post, scroll down to the ‘Tags’ section, type in a tag, and press the Enter key.

    Specify tags for a blog post


    The blog posts that match tags with an API Product will be displayed in the ‘Related blog content’ section of the respective API Product page.

    Related blog content