Overview
Single Sign-On (SSO) with OpenID Connect (OIDC) allows Tyk Dashboard or Developer Portal users to authenticate using their existing identity provider credentials, creating a seamless login experience. This integration leverages Tyk Identity Broker (TIB), which acts as a bridge between Tyk and various identity providers such as Auth0, Keycloak, and other OIDC-compatible systems.To activate SSO on the Dashboard or Developer portal, there’s no requirement to install TIB separately; it is integrated into the Dashboard and Developer Portal. You have two configurations for SSO within the dashboard:
- Using Embedded TIB: No need to install it separately.
- Using External TIB: If you are using a previous version of the Dashboard or Portal, you can still use SSO with TIB installed as a separate application.
Basic Implementation Steps
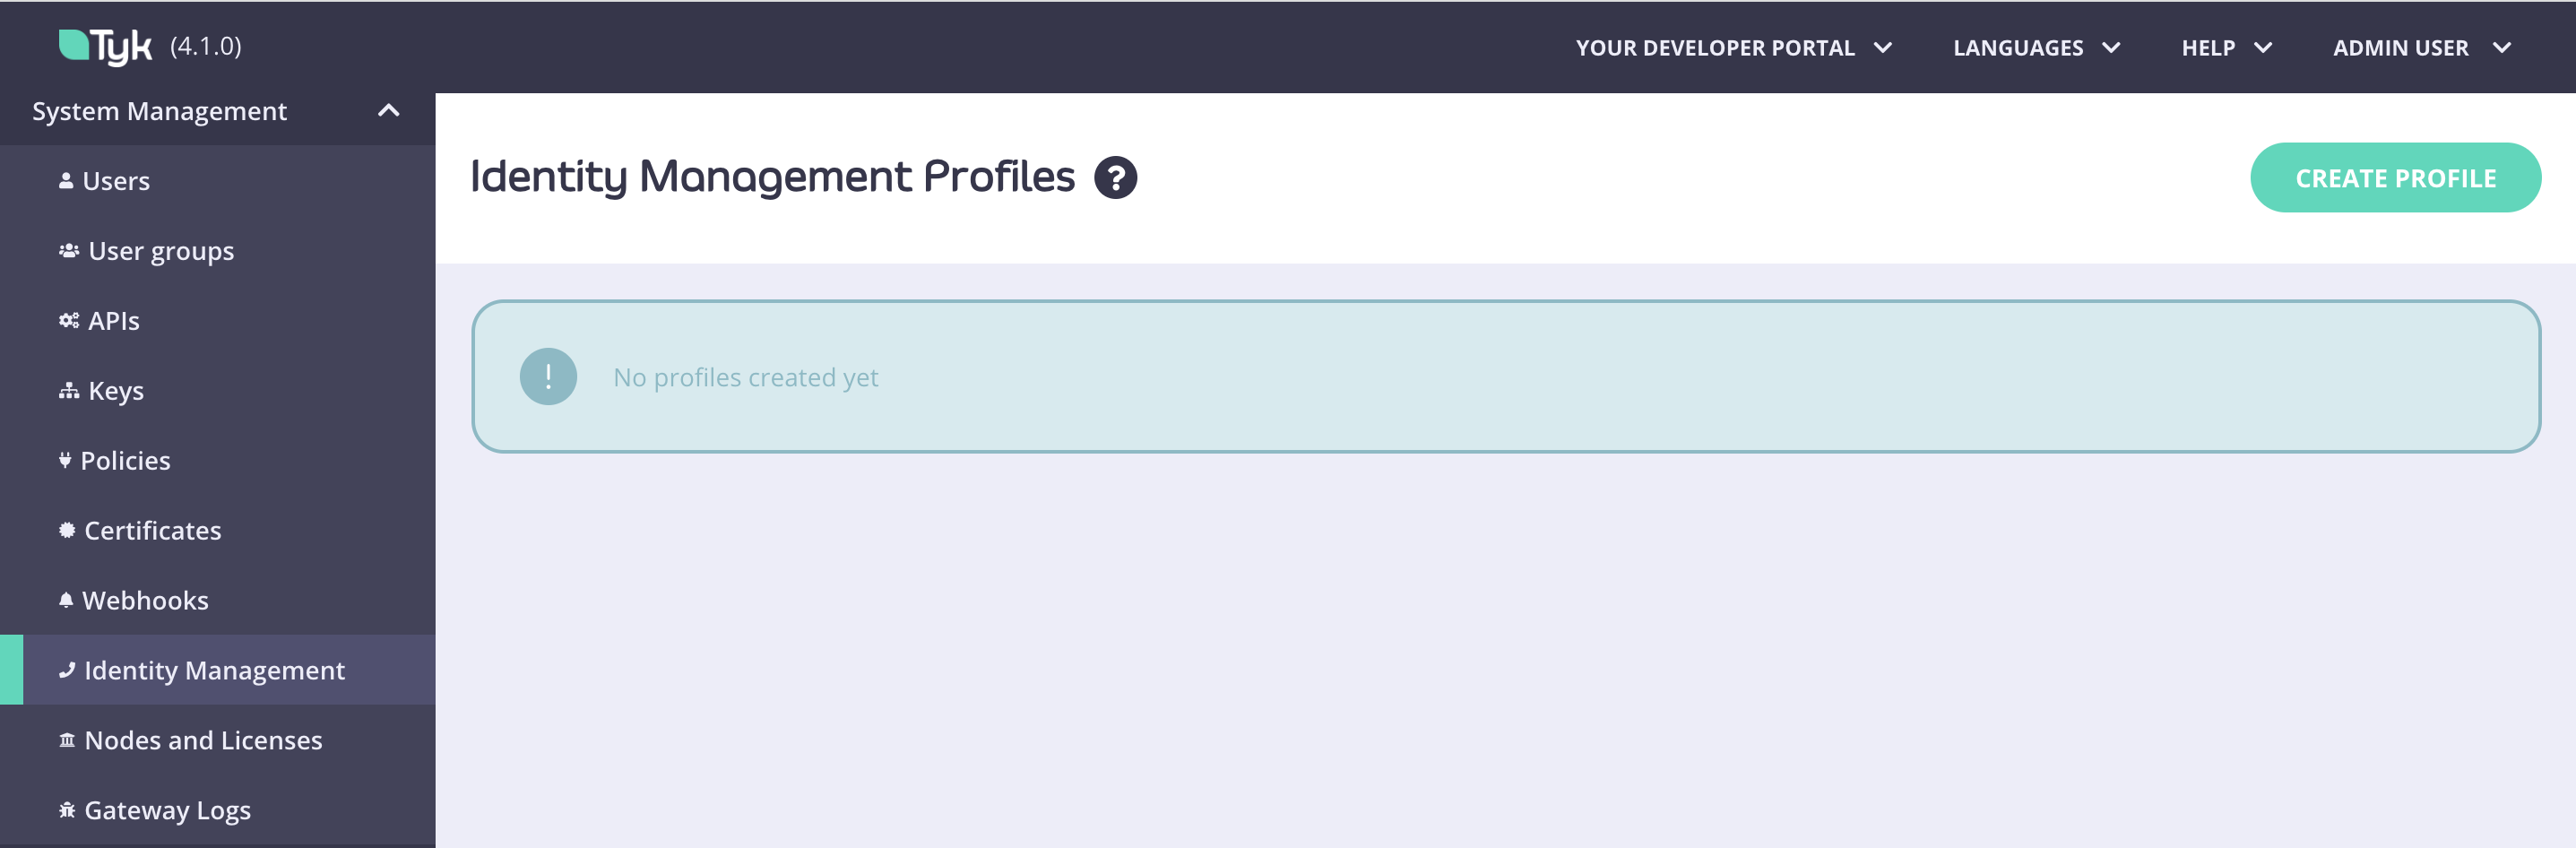
To set up SSO with OIDC in Tyk:- Access the Identity Manager under System Management in the Tyk Dashboard
- Create a profile for your preferred IDP
- Get the
client_id+secretthat are defined on your IDP - Set the
Callback URLgenerated by Tyk on your IDP - Provide your SSO profile in Tyk with the
Discover URL (well known endpoint) - Visit the Login URL after saving your profile to initialize the login
- More Docs for the flow can be found on our GitHub TIB repo README and our 3rd Party integration docs
SSO with Azure Active Directory (AD)
This is an end-to-end worked example of how you can use AzureAD and our Tyk Identity Broker (TIB) to log in to your Dashboard. This guide assumes the following: You already have authorized access to Tyk’s Dashboard. If you haven’t, get the authorization key by following this guide.Configuration at Azure
- Access your Azure Portal and navigate to the Azure Active Directory page.
-
Go to app registrations and create or access an application you want to use for Dashboard access.
- If you are creating an application, give it a name and register it
-
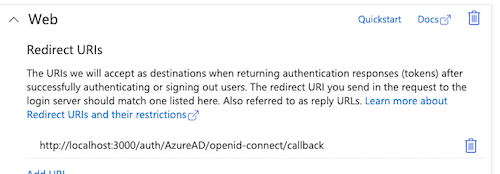
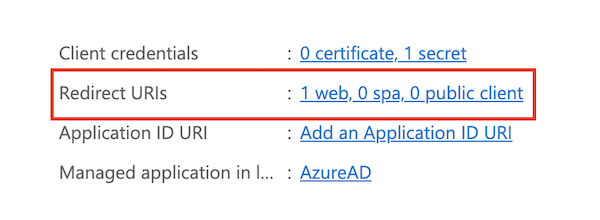
Add a redirect URL to your application as callback to TIB in your Azure application:
- In your app, either via the Authentication menu or the redirect URL shortcut navigate to and add the redirect to TIB in the Web category i.e.
http://localhost:3000/auth/{PROFILE-NAME-IN-TIB}/openid-connect/callback.
- In your app, either via the Authentication menu or the redirect URL shortcut navigate to and add the redirect to TIB in the Web category i.e.
-
Go to Overview and add a secret in Client Credentials. Don’t forget to copy the secret value, not the secretID.

Configuration at Dashbaord
- Log in to your dashboard and select Identity Management, located under System Management
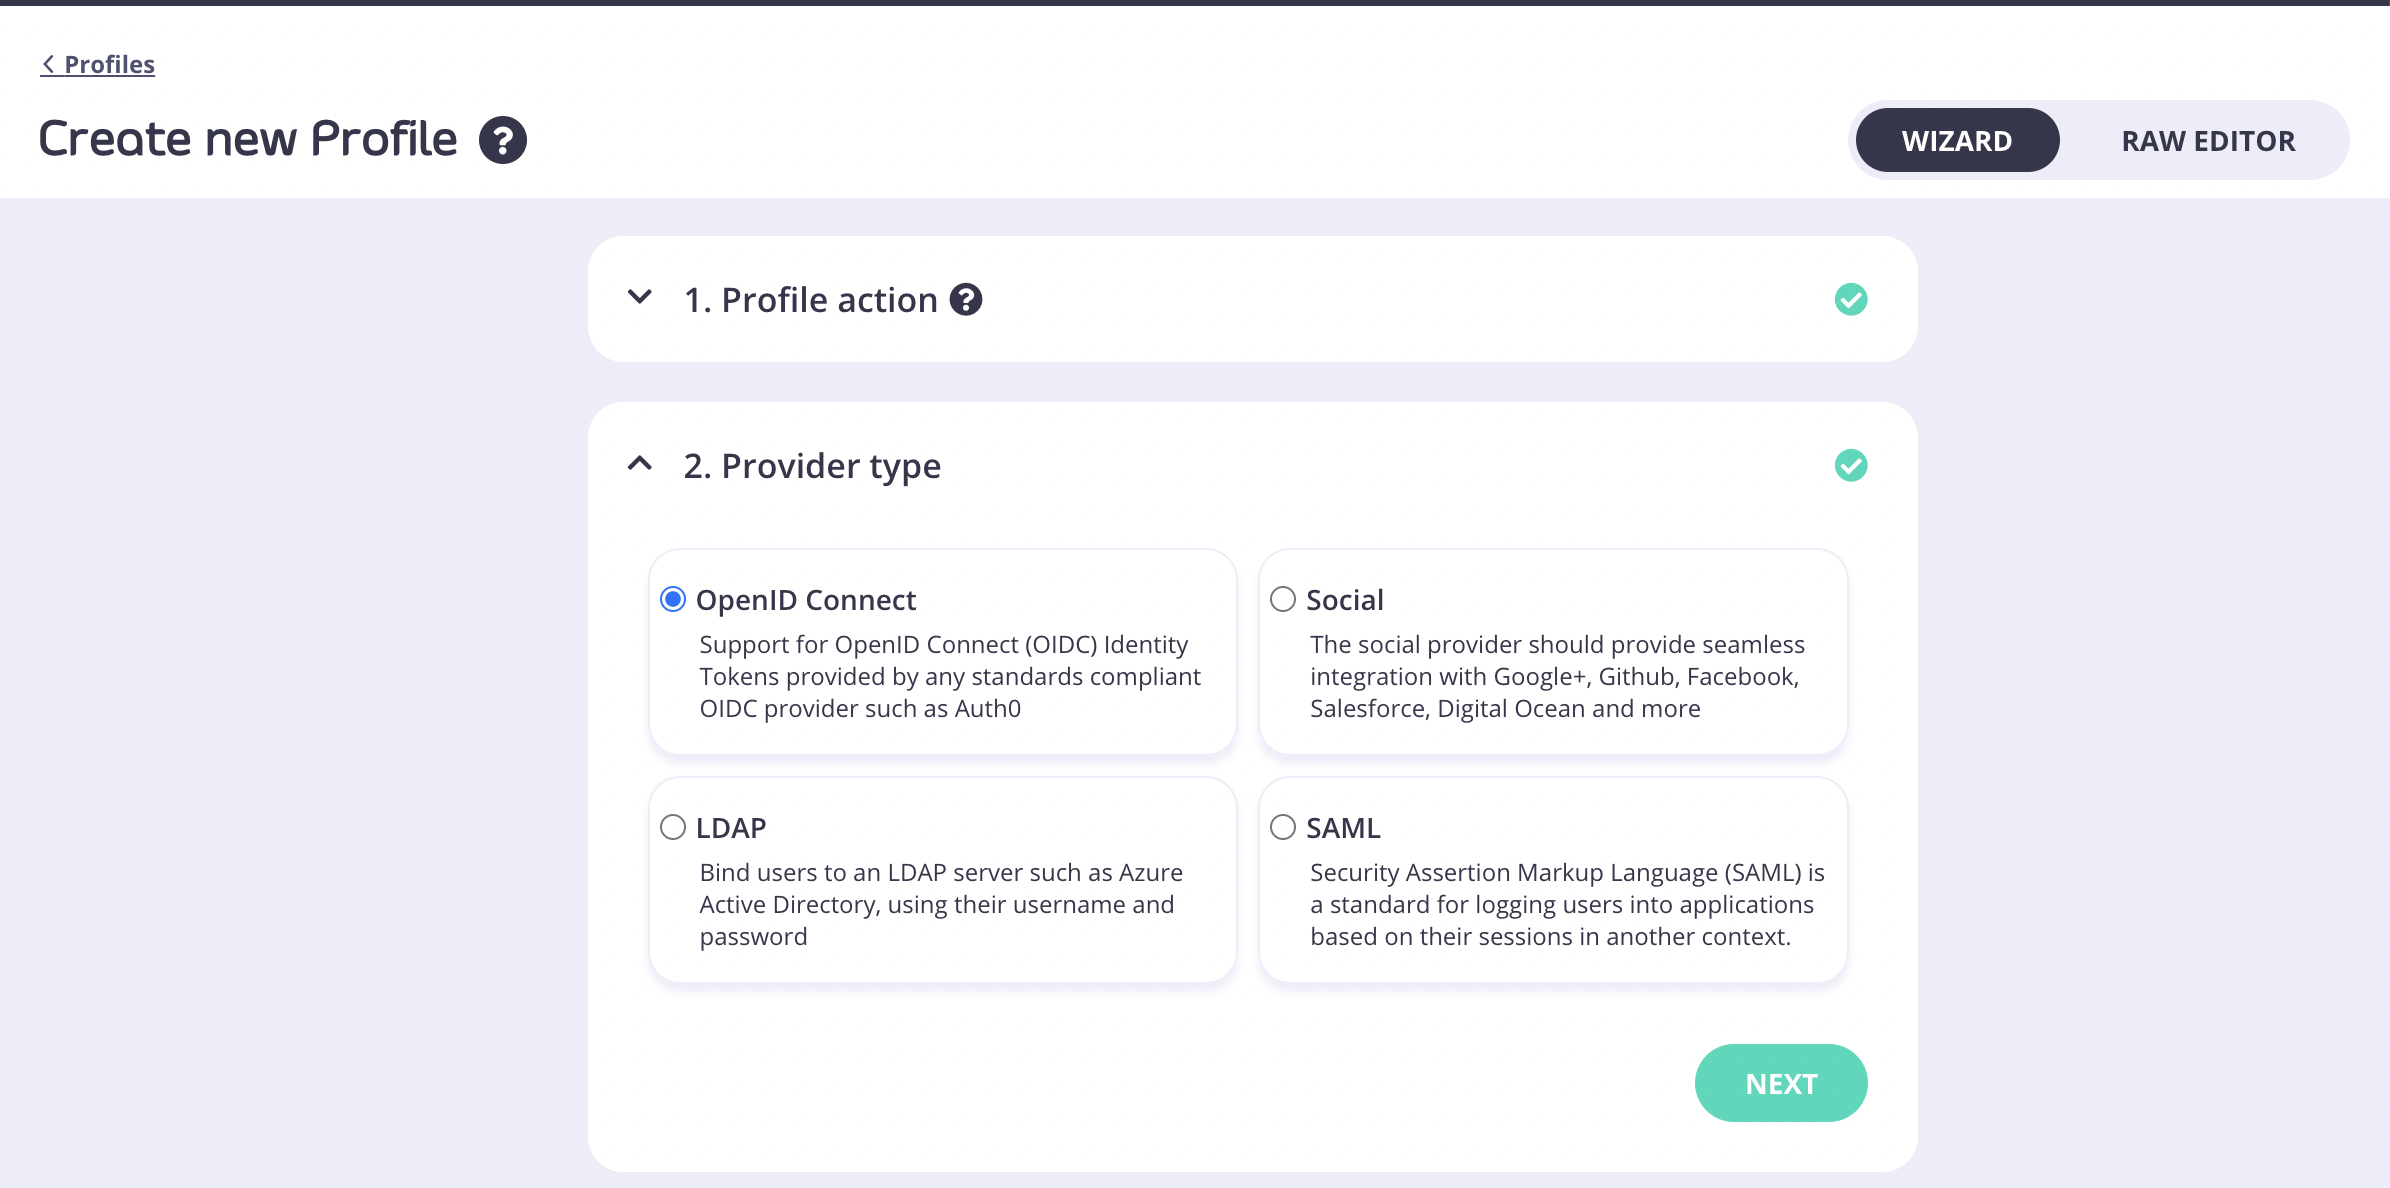
- Create a profile and select OpenID Connect as the provider type
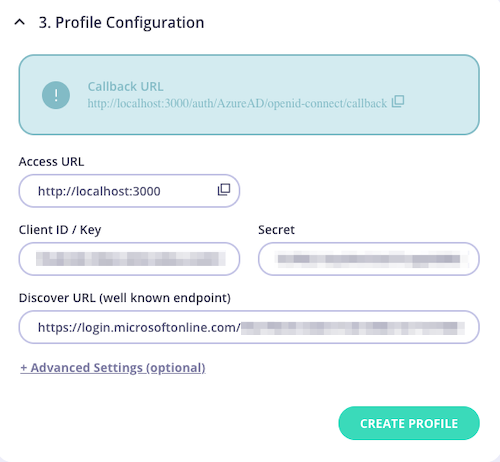
-
Under Profile Configuration, paste the secret value, clientID, and well-known endpoint URL from the Azure site.
- Profile Configuation may look something like this:
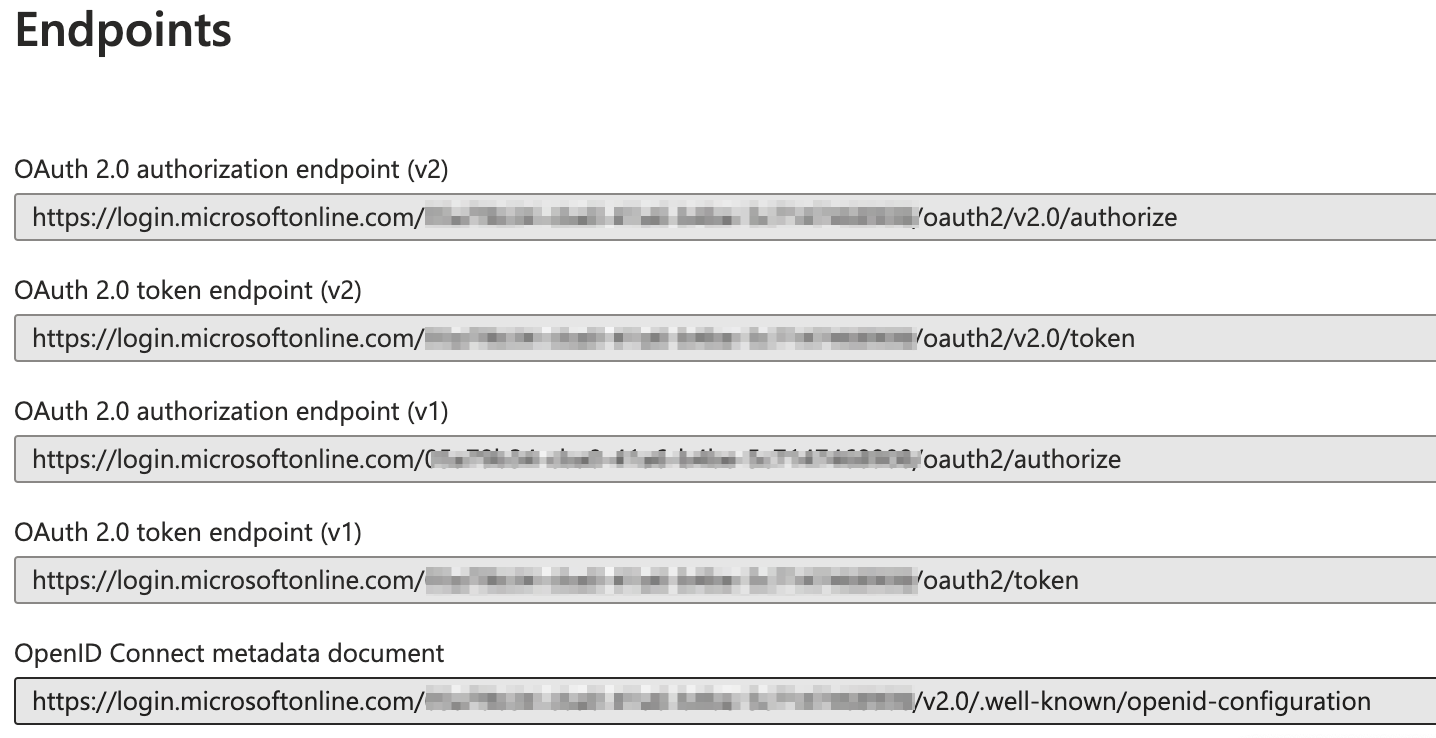
- The well-known endpoint URL is created by Azure and can be located by selecting Endpoints on their site
Test your Azure Login:
From the browser callhttp://localhost:3000/auth/{PROFILE-NAME-IN-TIB}/openid-connect
-
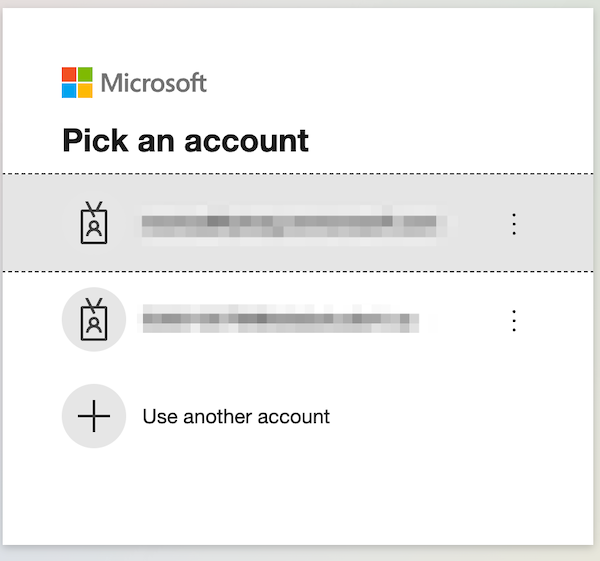
If it’s working you’ll be redirected to Azures’s web page and asked for your username and password.
-
If it’s working you’ll be redirected to Azures’s web page and asked for your username and password.
Enhancements
Once it’s working you can also add more enhancements such as automatic user group mapping from your AzureAD security groups or users groups to Tyk Dashboards groups.User group mapping
Group mapping can be managed from Advanced Settings section of the Profile Configuration screen.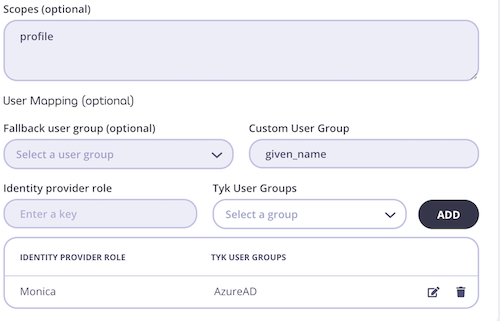
- Identity provider role
- Tyk User Group: This can be created from the User Groups section of the dashboard (reference a link to a page in tyk docs here to show how to create a user group). When creating your User Group, one can also select and adjust the permissions for each group.

OpenID Connect Example
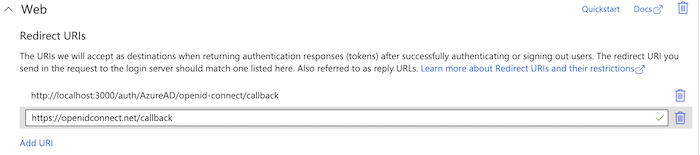
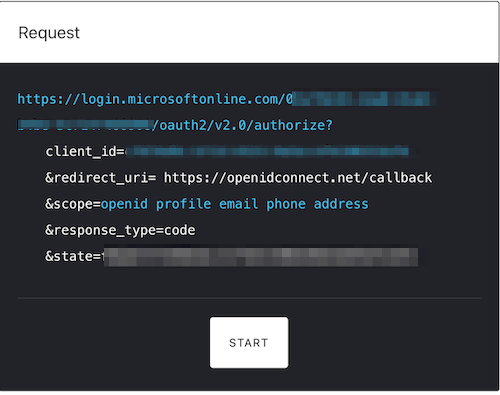
For debugging purposes, you can find an example we created using the OpenID Connect playground.-
Add the redirect url found on the OpenID Connect site to the redirect urls found under the Web section
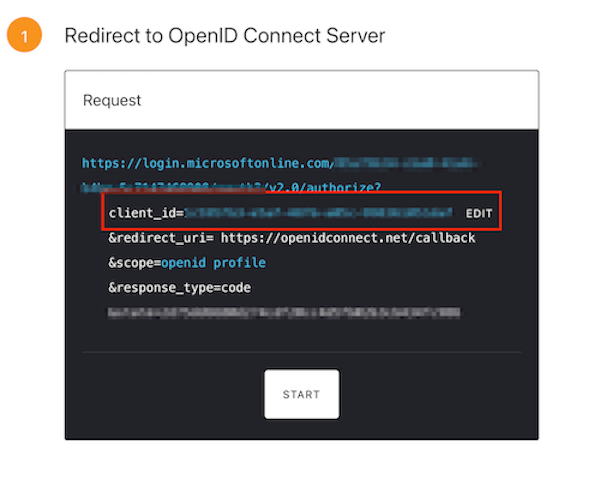
- Copy the OpenID Connect endpoint from the Azure site
-
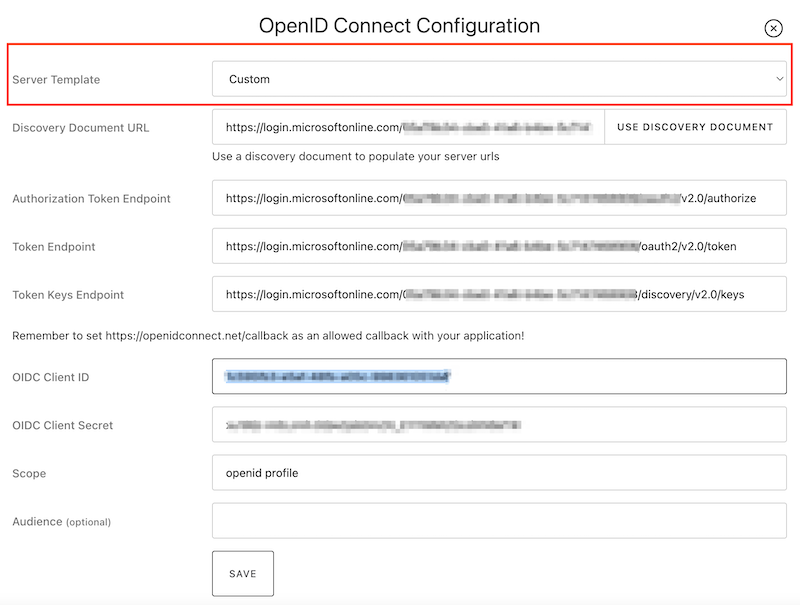
On the OpenID Connect site select Edit. In the Server Template dropdown menu select the Custom option and paste the endpoint in the Discovery Document URL.
-
Press the Use Discovery Document button and this will autofill Authorization Token Endpoint, Token Endpoint, and Token Keys Endpoint
-
Copy and paste the Client ID and Client Secret from the Azure site to your ConnectID. Scope is autofilled for you and save the configuration.

-
Press start at the bottom of the Request window and if done correctly, this should prompt you to sign in to your Azure account.
-
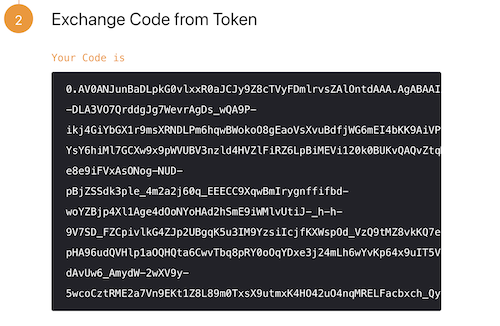
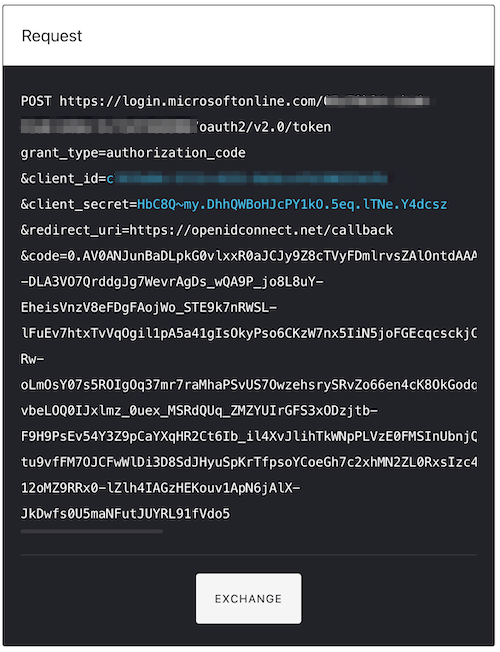
You should then be redirected back to OpenID Connect where you’ll be shown the Exchange Code. This needs to be turned into an access token. Press the exchange button under the request and then press Next.
-
We can then verify this by pressing the verify button. We can also view the information or scope of what is being returned by heading to jwt.io and viewing the payload: data there.
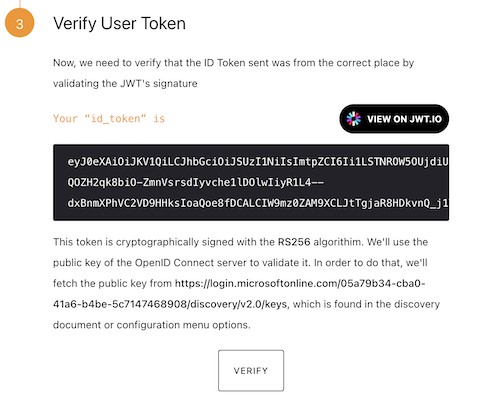
-
We are given an object with key, value pairs and we can pass in the key ie. name to our Custom User Group and the value of to our Identity Provider Role in our Tyk dashboard as shown in the example above.

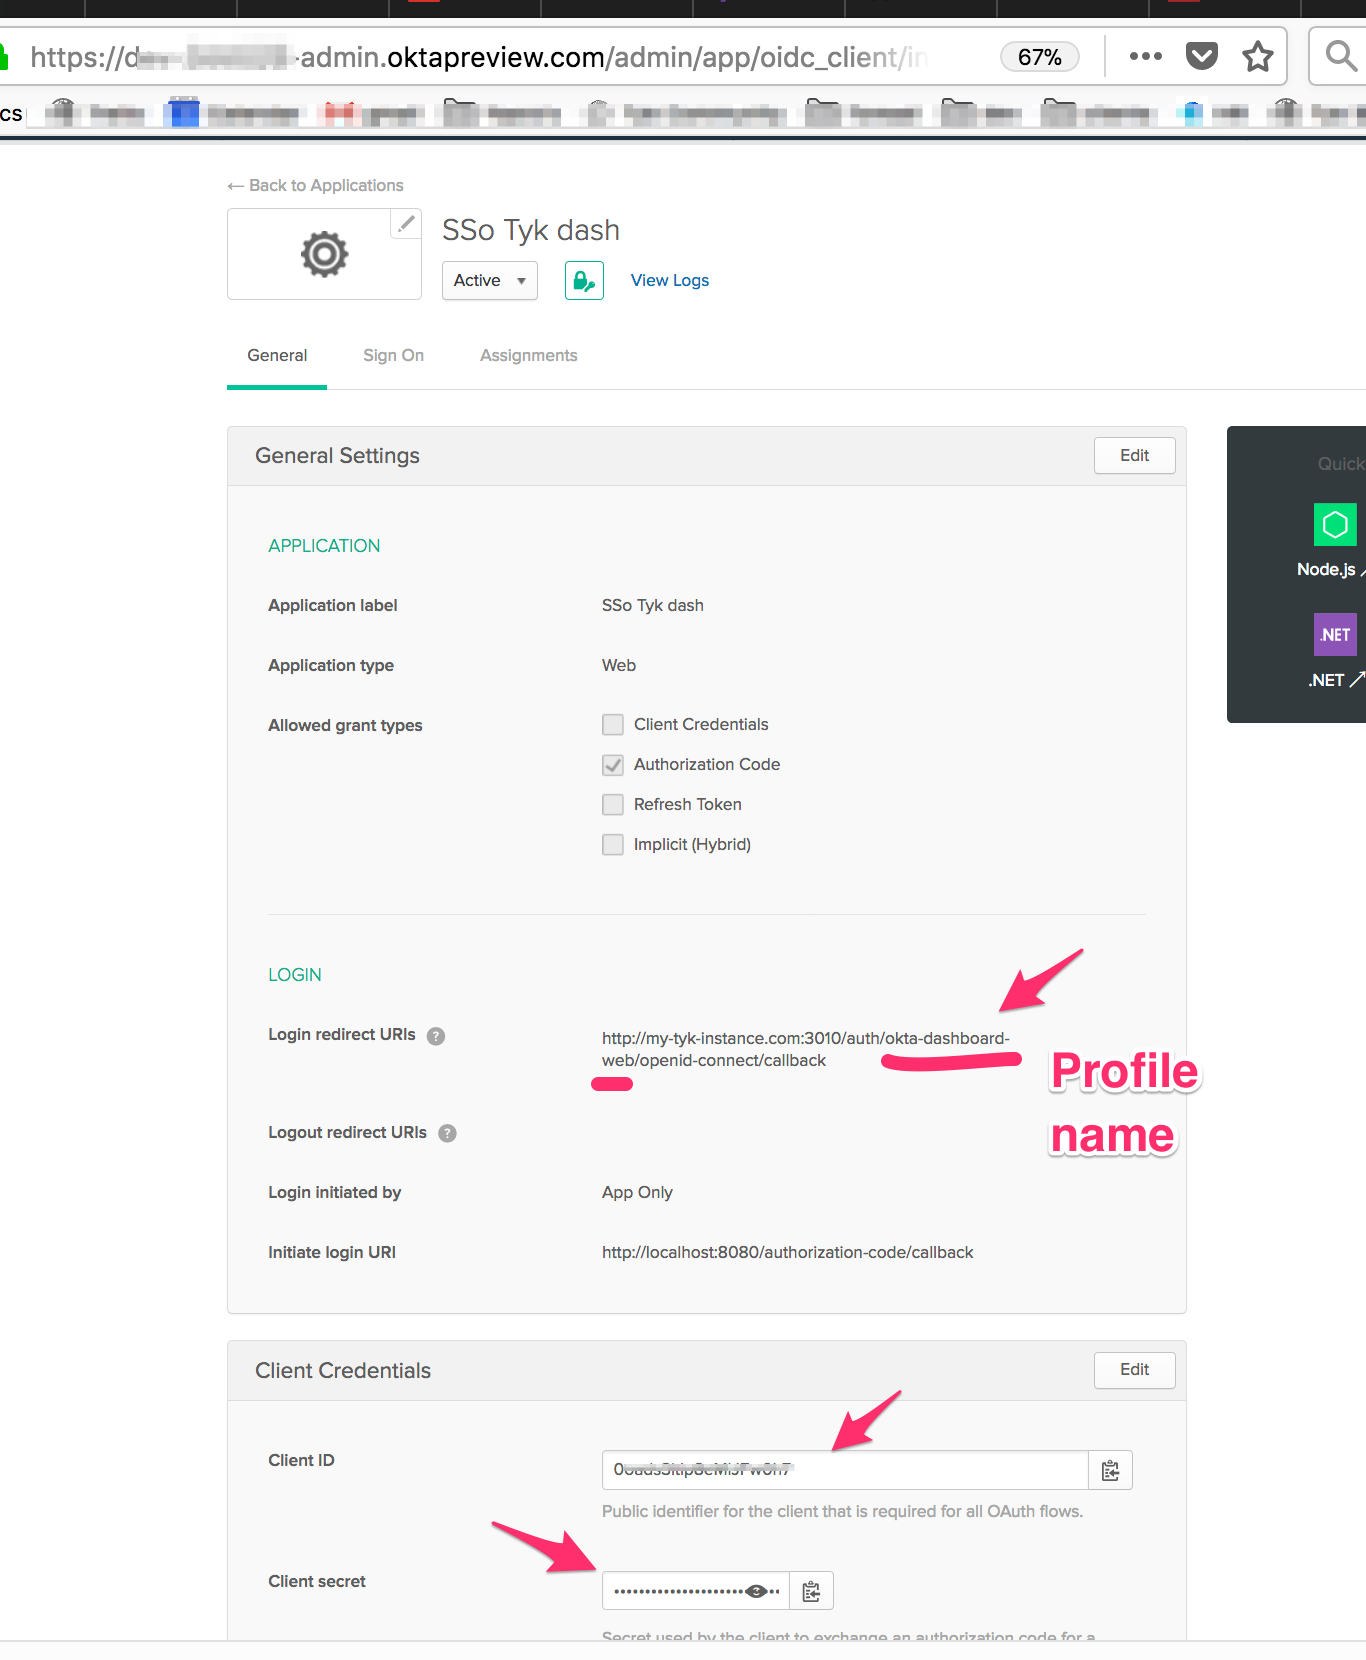
SSO with Okta
This is an end-to-end worked example of how you can use Okta and the Tyk Identity Broker to log into your Dashboard. This guide assumes the following:- You already have authorized access to Tyk’s Dashboard. If you haven’t, get the authorization key by following this doc.
- For simplicity, you are running TIB locally on port 3010
- You are able to edit TIB’s configuration file.
Configuration at Okta
-
Create a developer account on the Okta Developer site.
You’ll get a domain such as
https://<okta-org>.okta.com/.well-known/openid-configuration -
Login and create a Web Application as follows:
- Under
Application, clickAdd Application - Choose
Web - Change the name of the app
- Tick
Authorization Code - Click
Done
Developer Console, for theClassic UIinstructions are slightly different. - Under
-
Add a callback to TIB in your application:
- Under
General, clickEditand update theLogin redirect URIsfield with the endpoint on TIBhttp://localhost:3010/auth/{PROFILE-NAME-IN-TIB}/openid-connect/callback. {PROFILE-NAME-IN-TIB}- this can be any string you choose, as long as you use the same one for the profile in TIB.
- Under
-
Permissions to login via Okta:
Under the
Assignmentstab, make sure group assignments is set to everyone (for now, you will change this later!). - This is how it should look like after step #4
Configuration at TIB
-
Set the profile in
profiles.jsonas follows:- Copy from your Okta client the
cliend IDtoProviderConfig.UseProviders[].key - Copy from your Okta client the
Client secrettoProviderConfig.UseProviders[].secret - Add Okta’s discovery url
"https://<okta-org>.okta.com/.well-known/openid-configuration"toProviderConfig.UseProviders[].DiscoverURL
profiles.jsonfile: - Copy from your Okta client the
- Start TIB by running the binary (
profiles.jsonis in the same CWD) See Install TIB for detailed instructions on how to install TIB - Test that it works:
From the broswer call
http://localhost:3010/auth/{PROFILE-NAME-IN-TIB}/openid-connect- If it’s working you’ll be redirected to Okta’s web page and will be asked to enter your Okta user name and password.
- If you were successfully authenticated by Okta then you’ll be redirected to the Tyk Dashboard and login into it without going through the login page. Job’s done!
- If you need to update your profile then you can use TIB’s REST API as follows:
- POST and DELETE calls apply as normal
- You can post a few profiles to TIB.
- See TIB REST API for more details.
Understanding the flow
- The initial call to the endpoint on TIB was redirected to Okta
- Okta identified the user
- Okta redirected the call back to TIB endpoint (according to the callback you set up on the client earlier in step 3) and from TIB
- TIB, via REST API call to the dashboard, created a nonce and a special session attached to it.
- TIB redirected the call to the dashboard to a special endpoint
/tap( it was defined on the profile underReturnURL) with the nonce that was created. - The Dashboard on the
/tapendpoint finds the session that is attached to thenonce, login the user and redirect to the dashboard first page
Enabling MFA and SSO
Once it’s working you can also add two more enhancements - SSO and MFASSO login into the Dashboard via a login page
You will need to:- set up a web server with a login page and a form for
userandpassword - Update
tyk_analytics.confto redirect logins to that url Explicit details are in steps 6-7
Multi-Factor-Authentication (MFA) Support
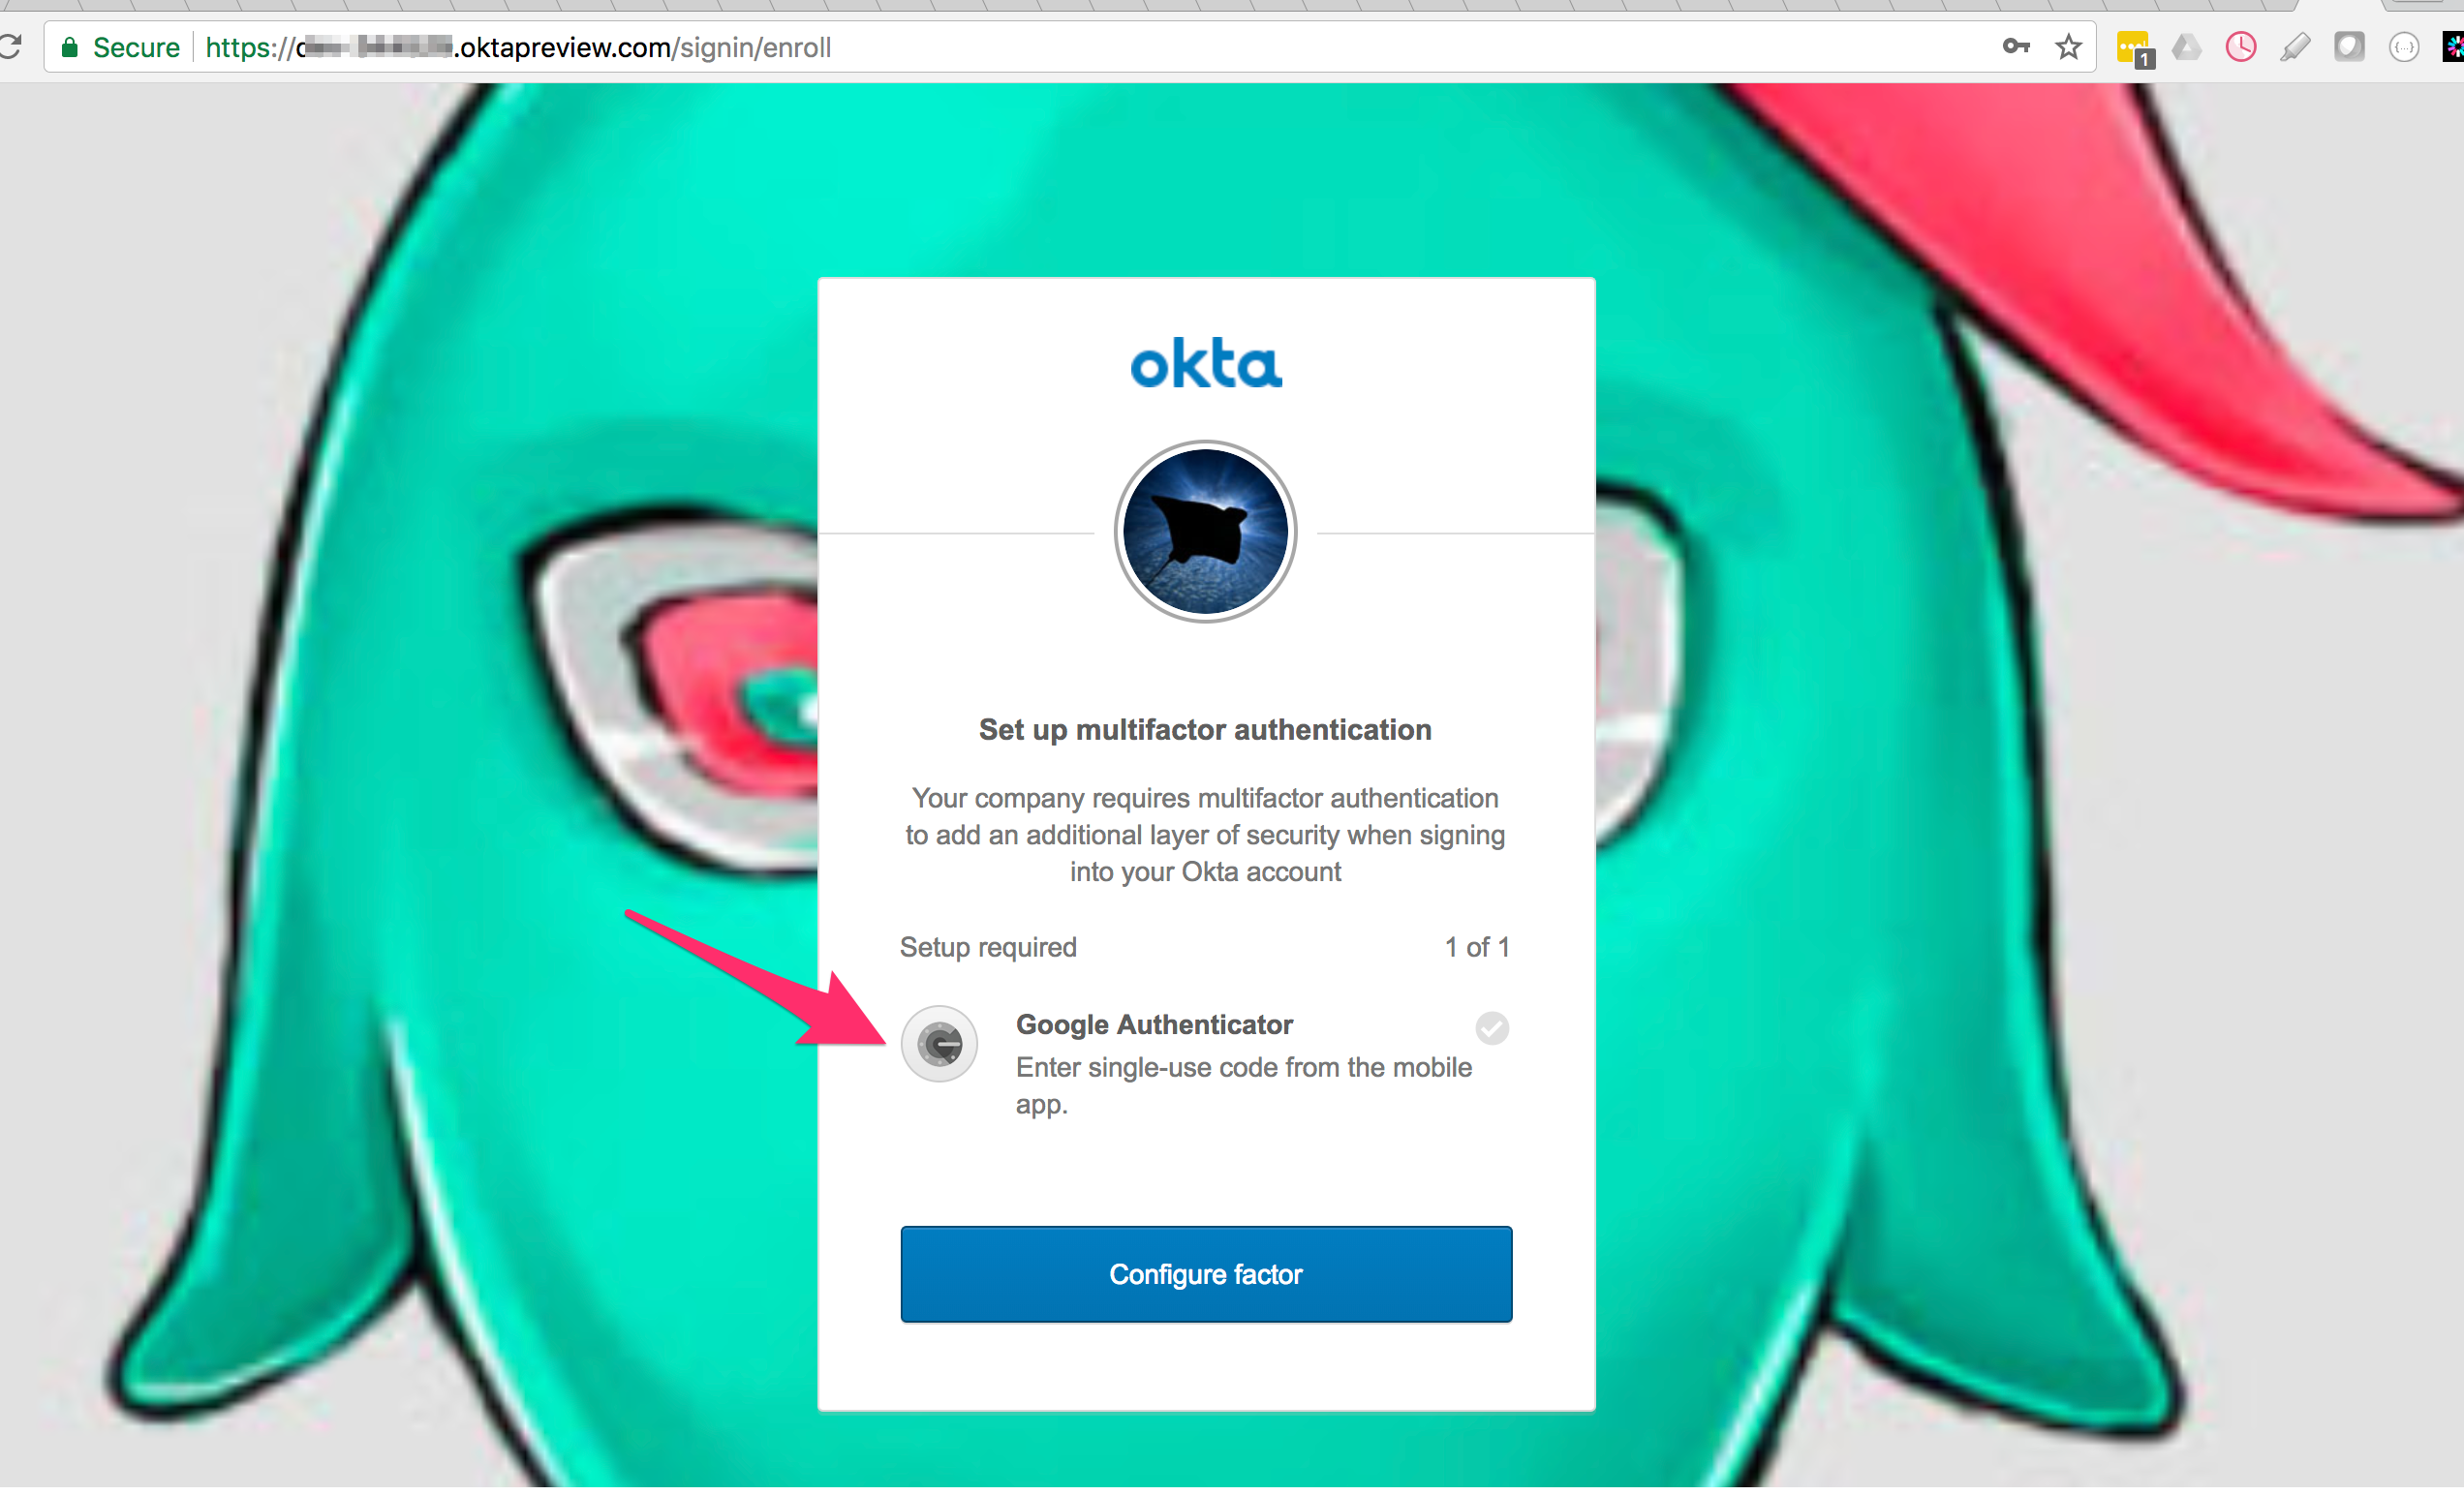
MFA works out-of-the-box in Tyk since luckily Okta supports it. you would need to add it to the configuration of the account holder. UnderSecurity --> Multifactor --> Factor types you can choose the types you want. For instance I chose Google Authenticator.
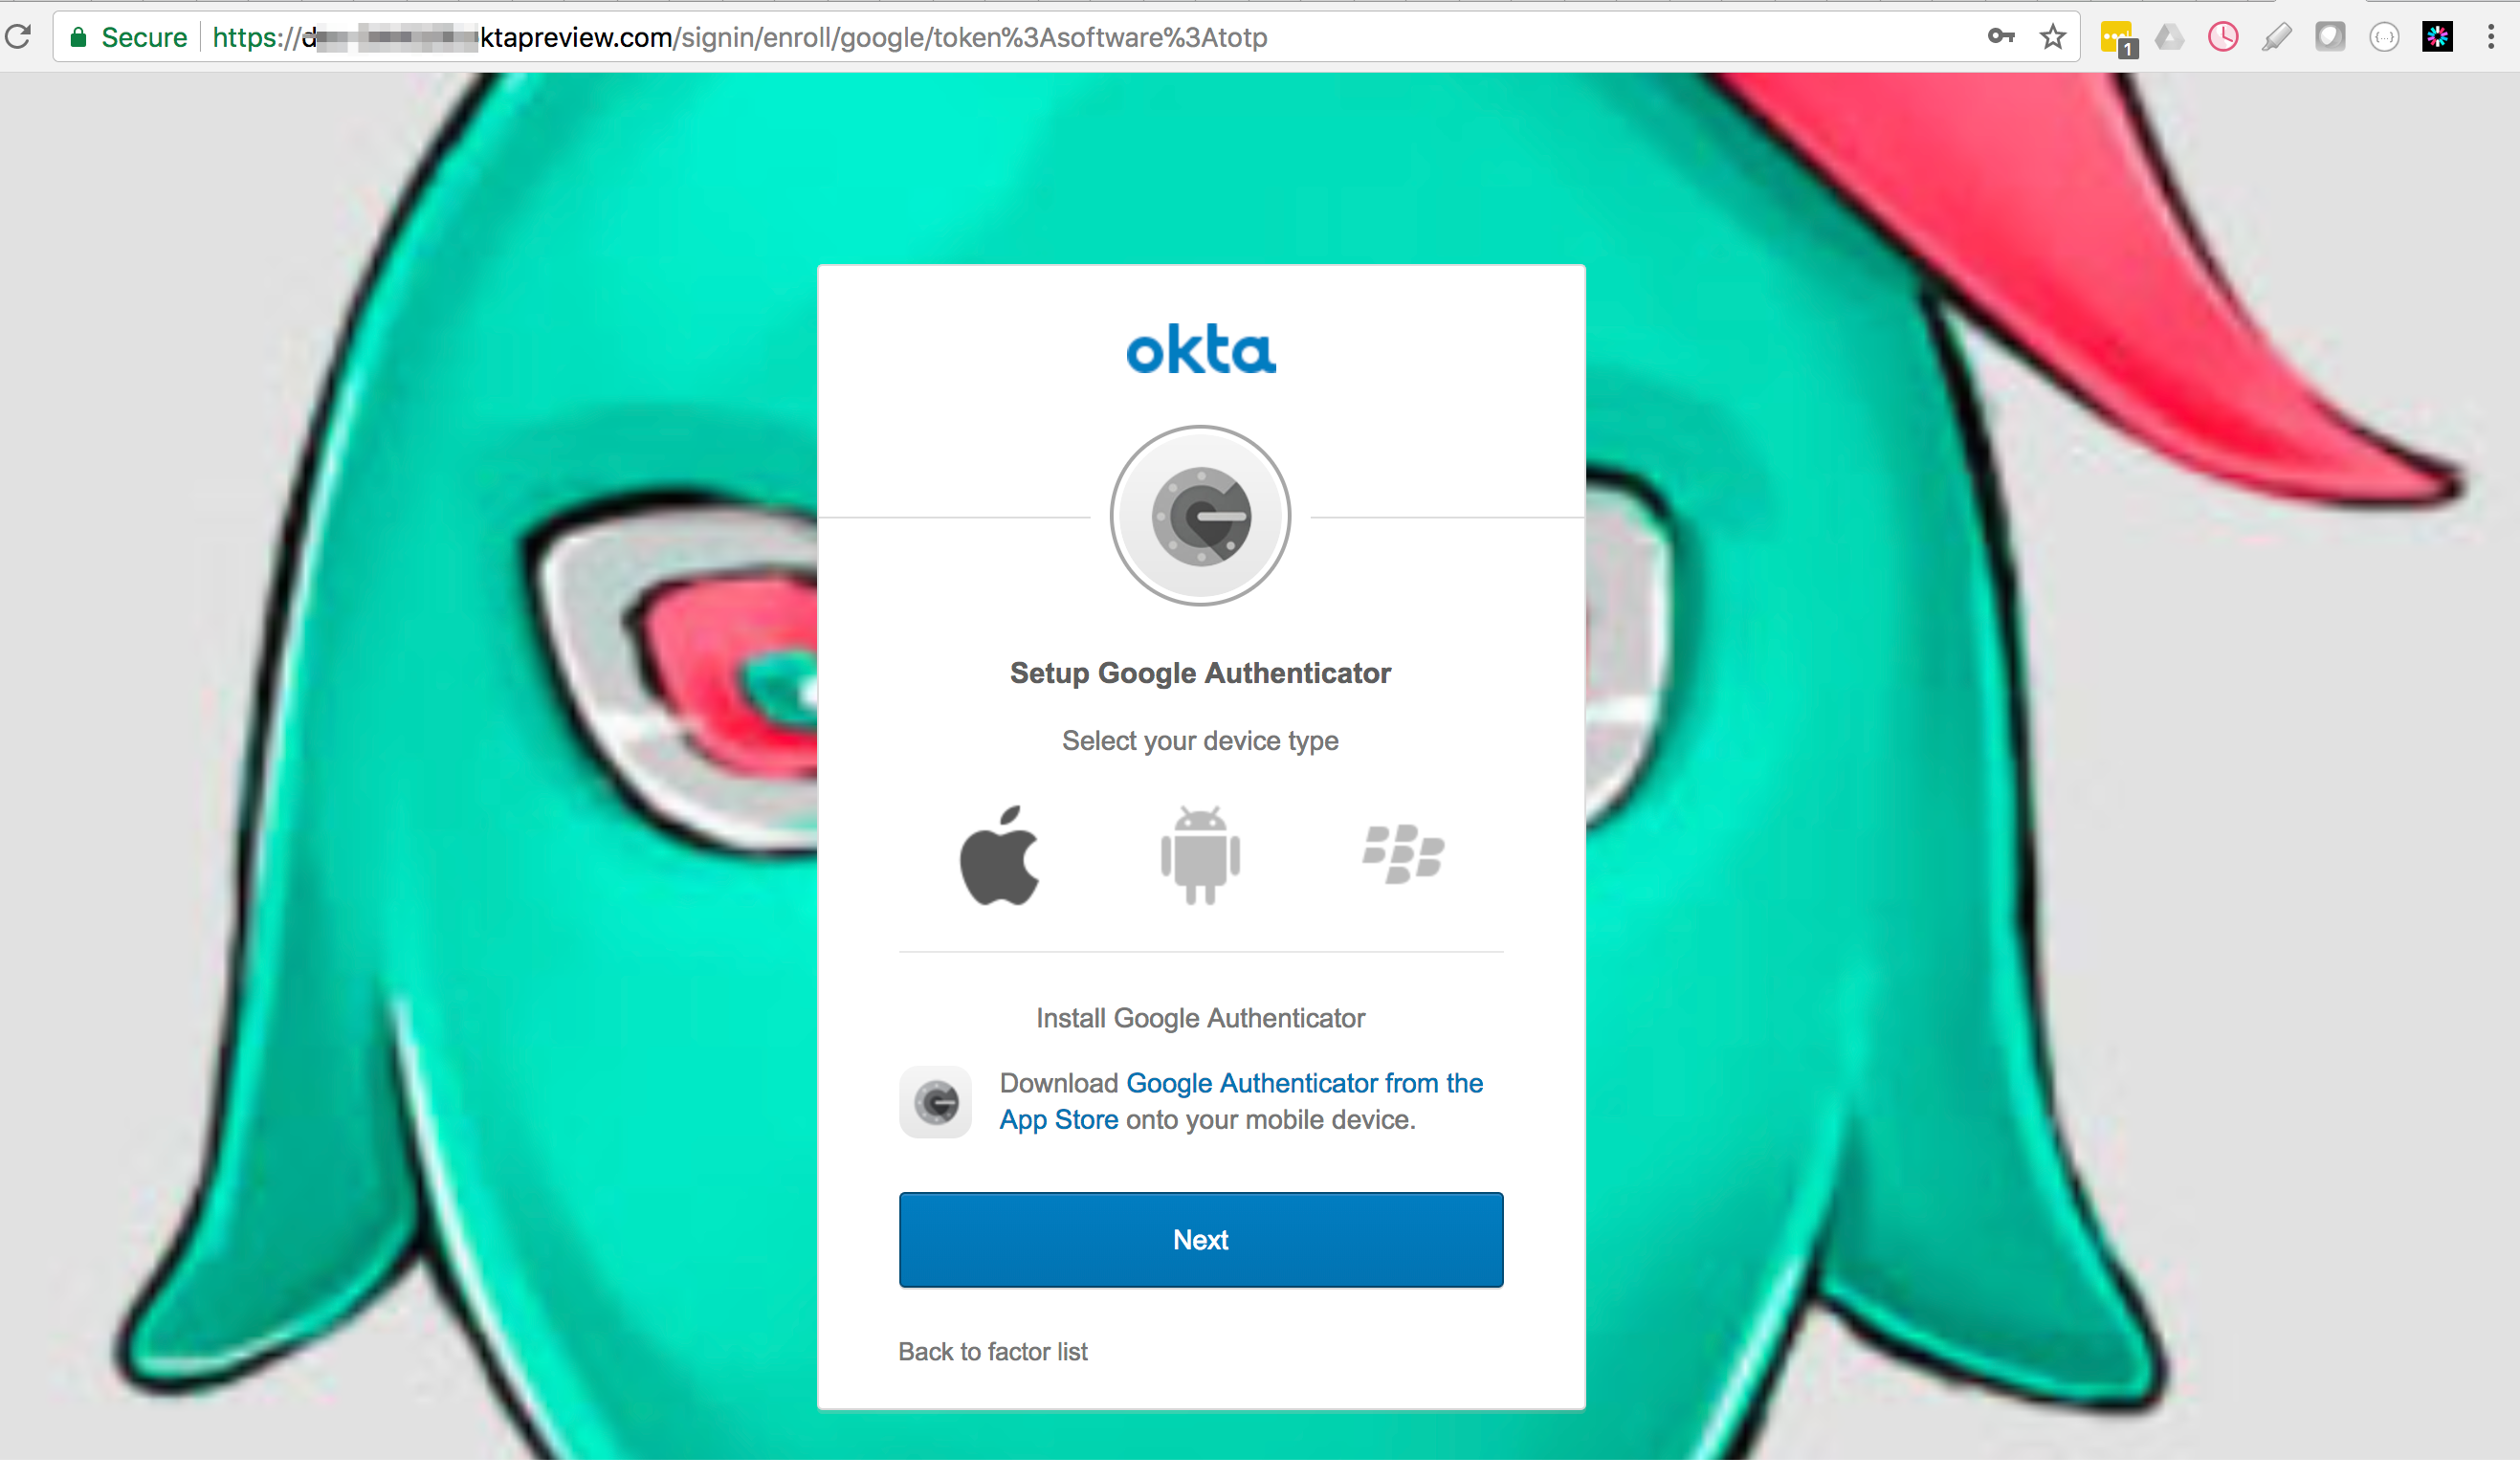
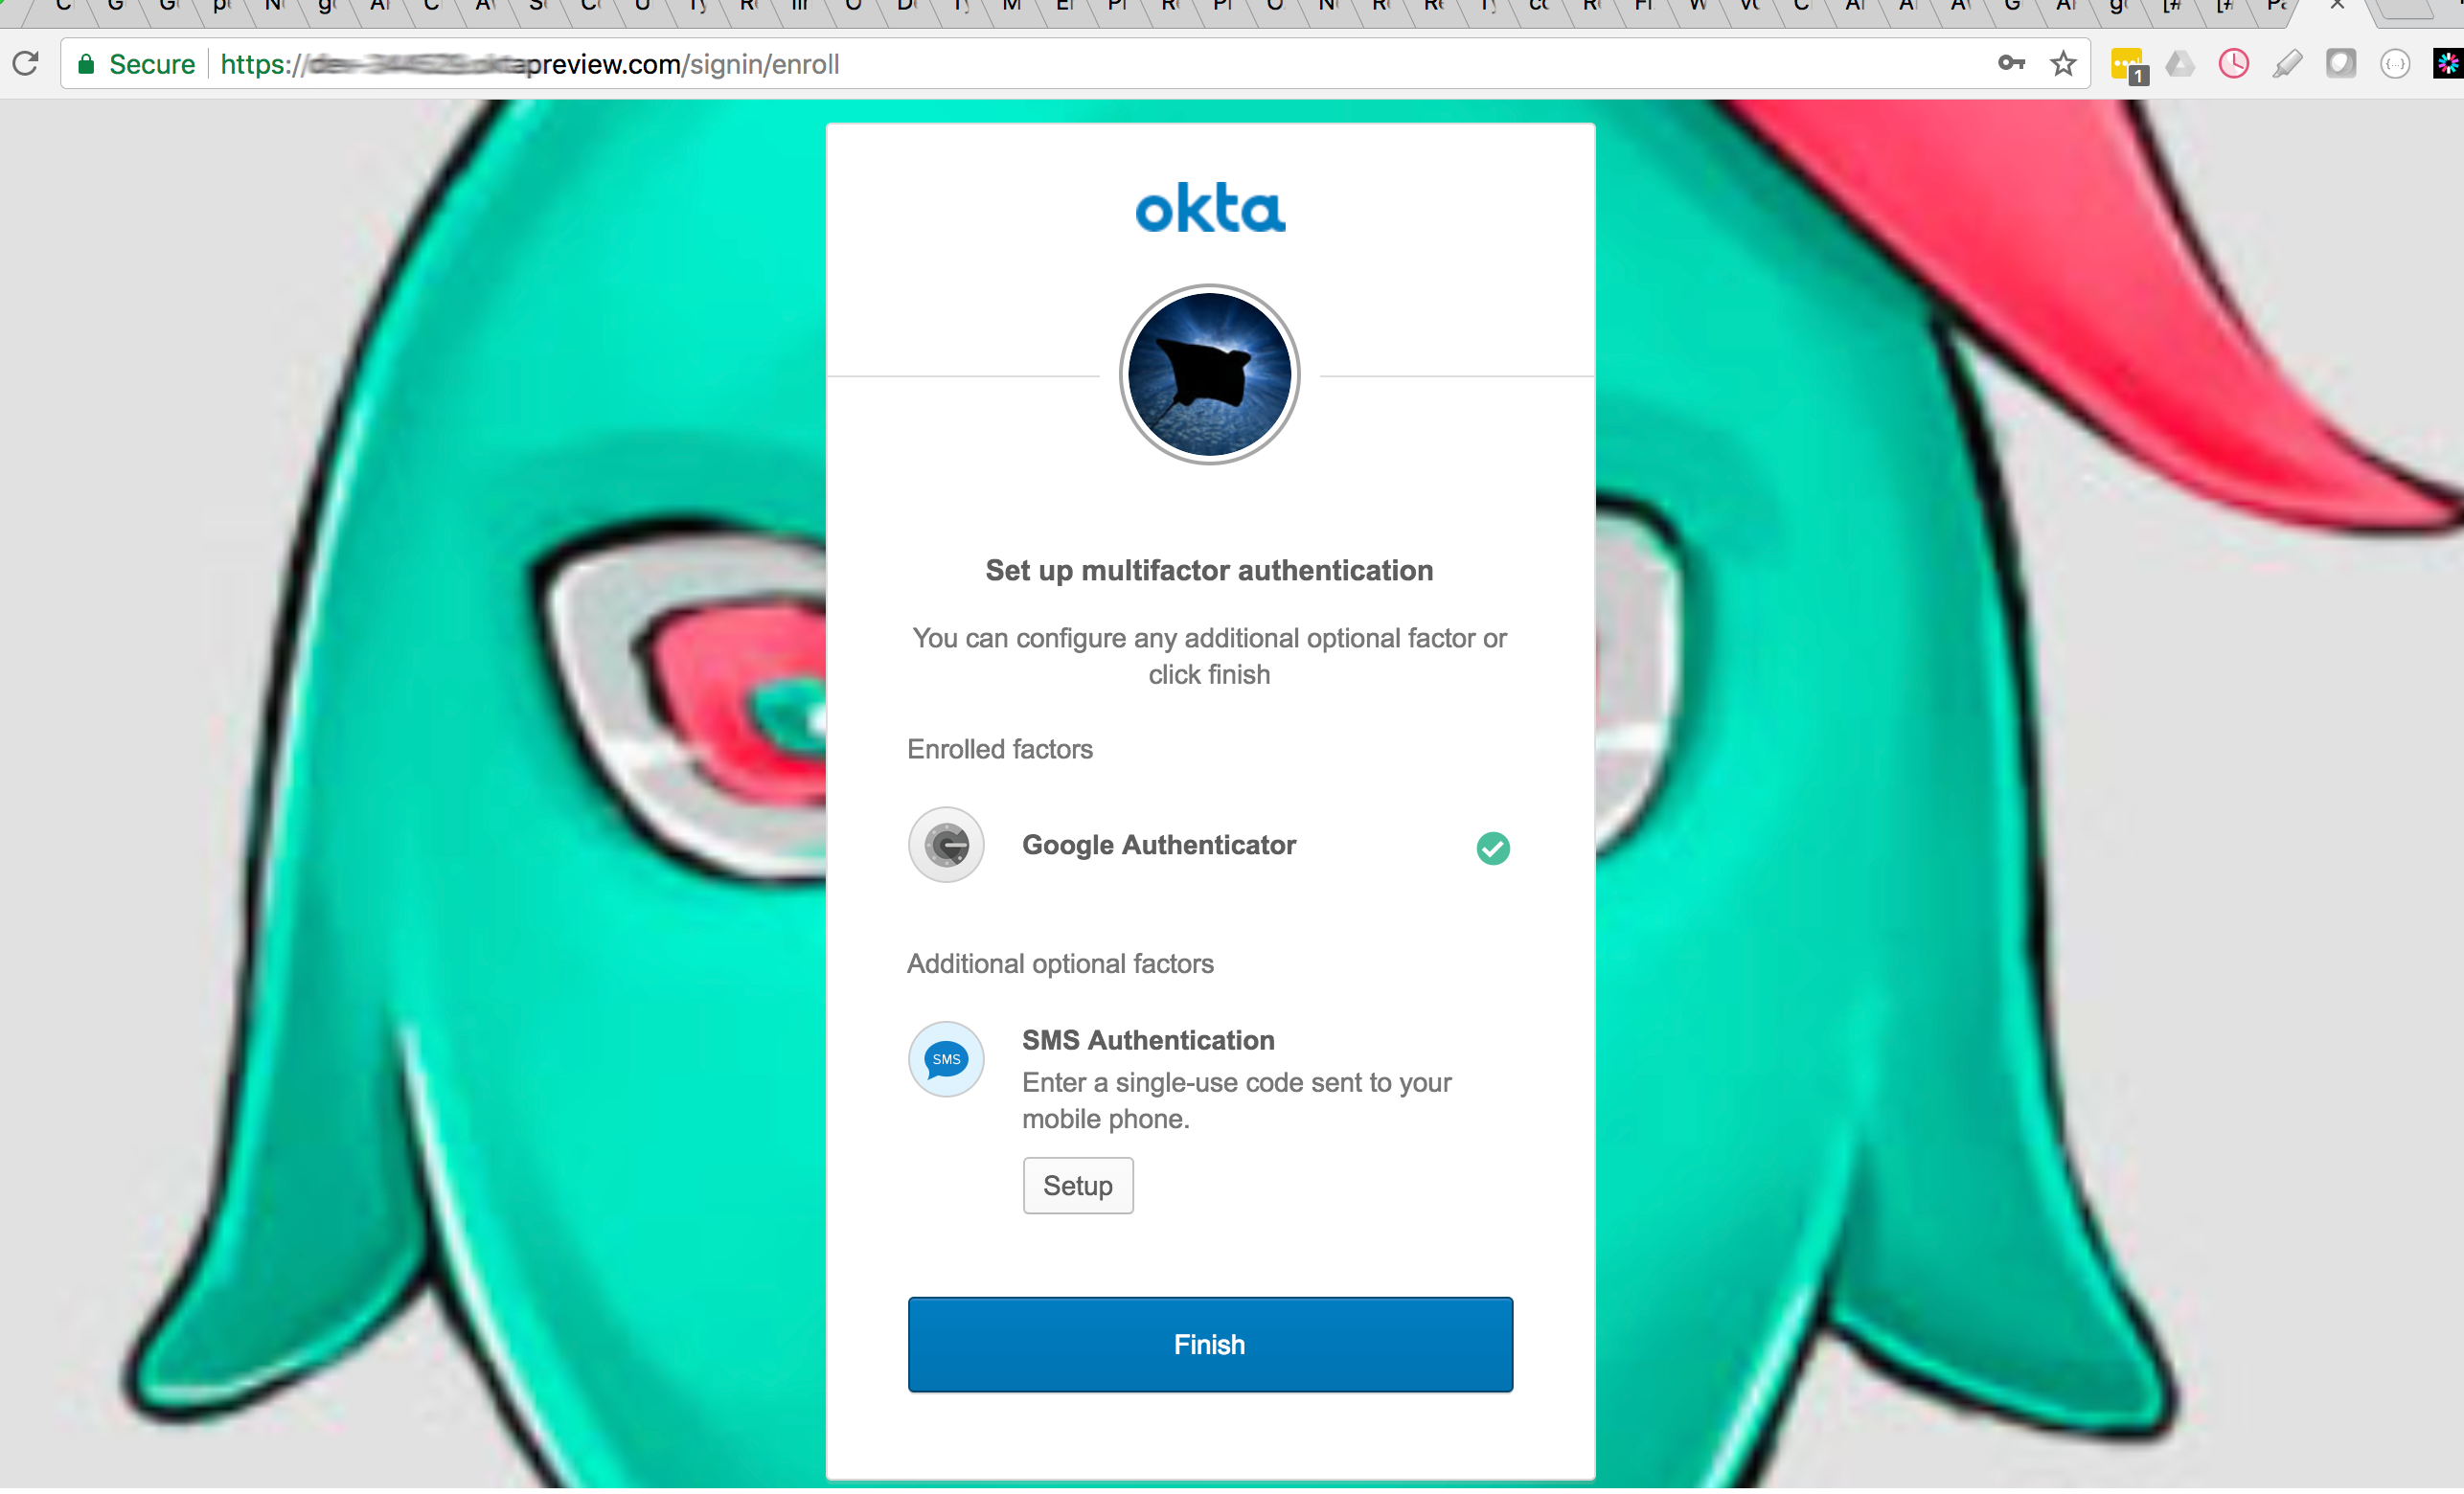
- While trying to login to the Dashboard, Okta enforced the MFA and asked me to use the Google Authenticator:
- I had to download the Google Authenticator and identify with the generated code
- I successfully authenticated with Google Authenticator
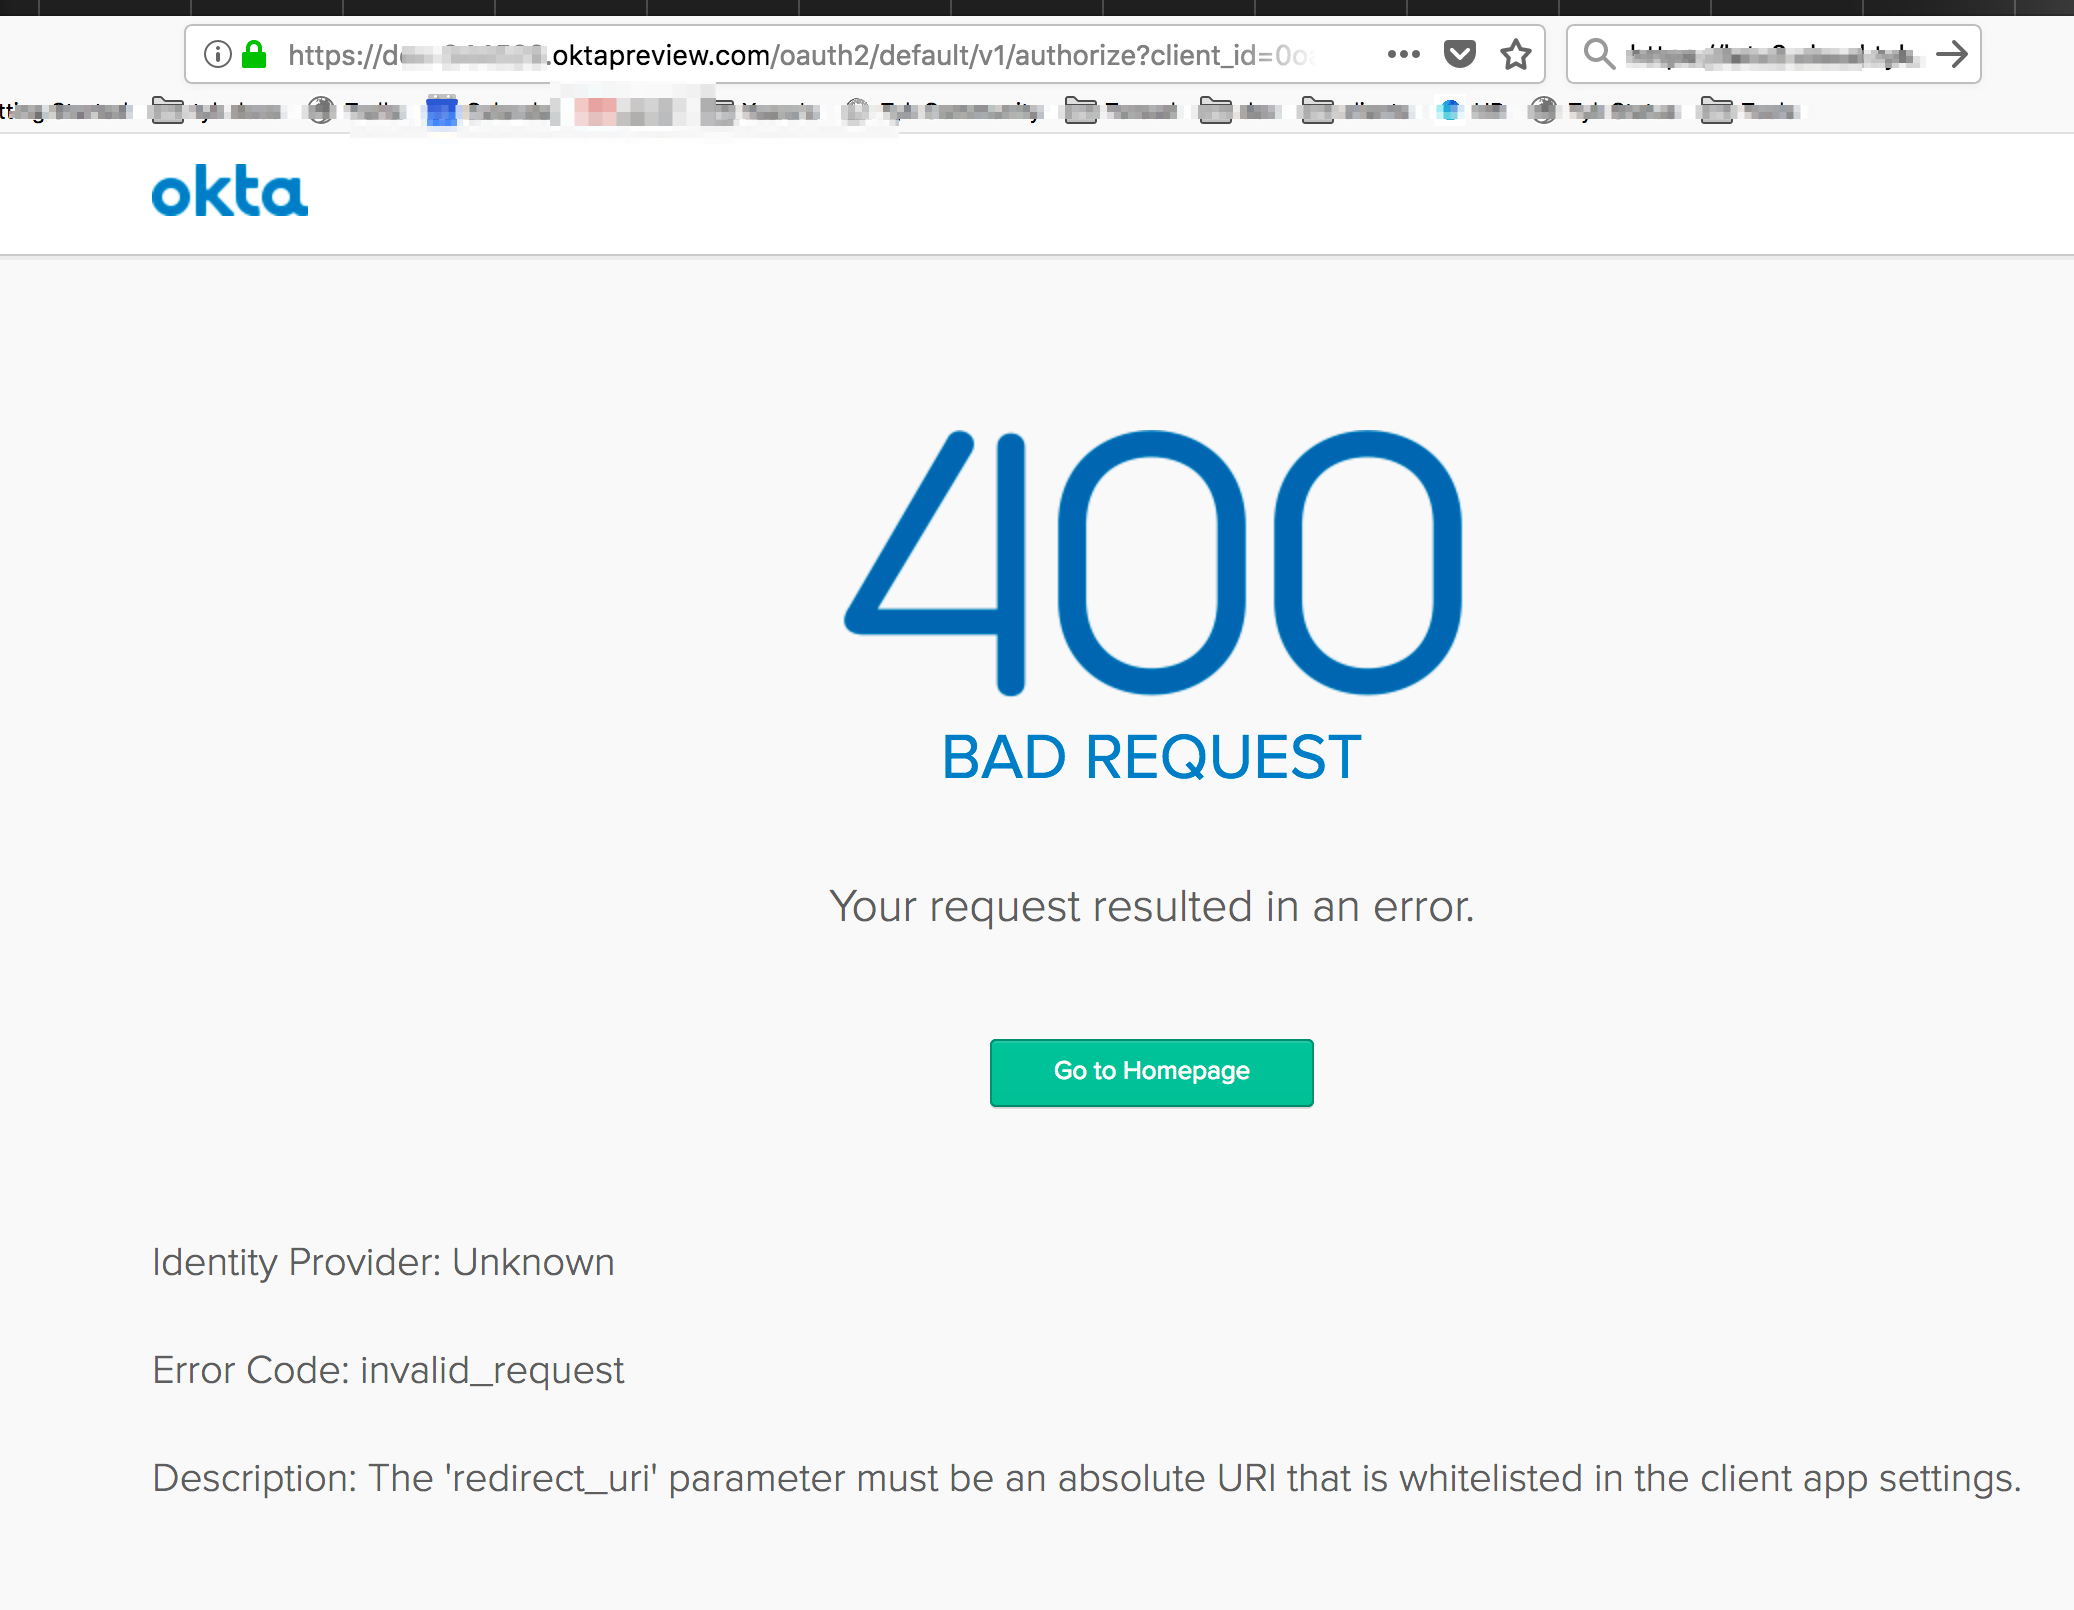
Common Error
If you get a400 Bad Request it means the profile name in the login endpoint is not identical to the profile name in the callback that you set up on Okta’s app:
- On Okta’s app -
Login redirect URIs:http://localhost:3010/auth/{PROFILE-NAME-IN-TIB}/openid-connect/callback. - The endpoint to test -
http://localhost:3010/auth/{PROFILE-NAME-IN-TIB}/openid-connect
SSO with Auth0
This will walk you through securing access to your Tyk Dashboard using OpenID Connect (OIDC) identity tokens with Auth0. We also have the following video that will walk you through the process.
Prerequisites
- A free account with Auth0
- A Tyk Self-Managed or Cloud installation
- Our Tyk Identity Broker (TIB). You can use the internal version included with a Tyk Self-Managed installation and Tyk Cloud, or an external version. See Tyk Identity Broker for more details.
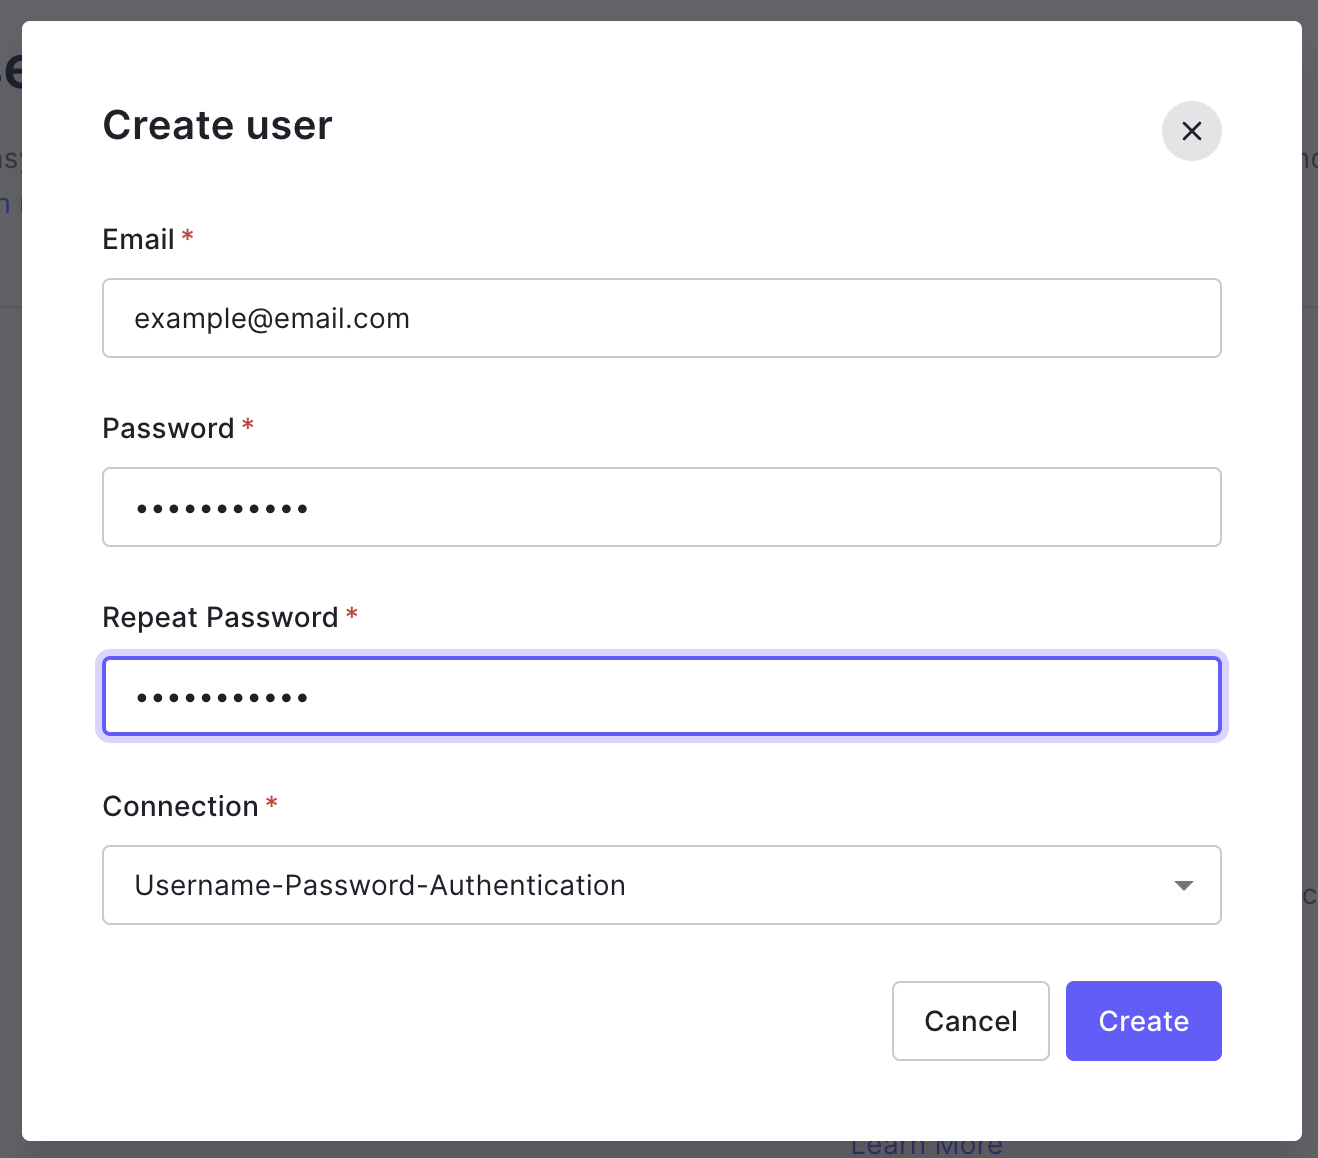
Create a new user in Auth0
- Log in to your Auth0 account.
- Select Users from the User Management menu.

- Click Create User and complete the new user form, using the default Username-Password-Authentication Connection method.
- Click Create to save your new user.
Create an Auth0 application
You will use settings from your Auth0 application within the Tyk Dashboard Identity profile you will create.- Select Applications from the Auth0 menu.

- Click Create Application.
- Give your application a name and select Regular Web Application from the applications types.
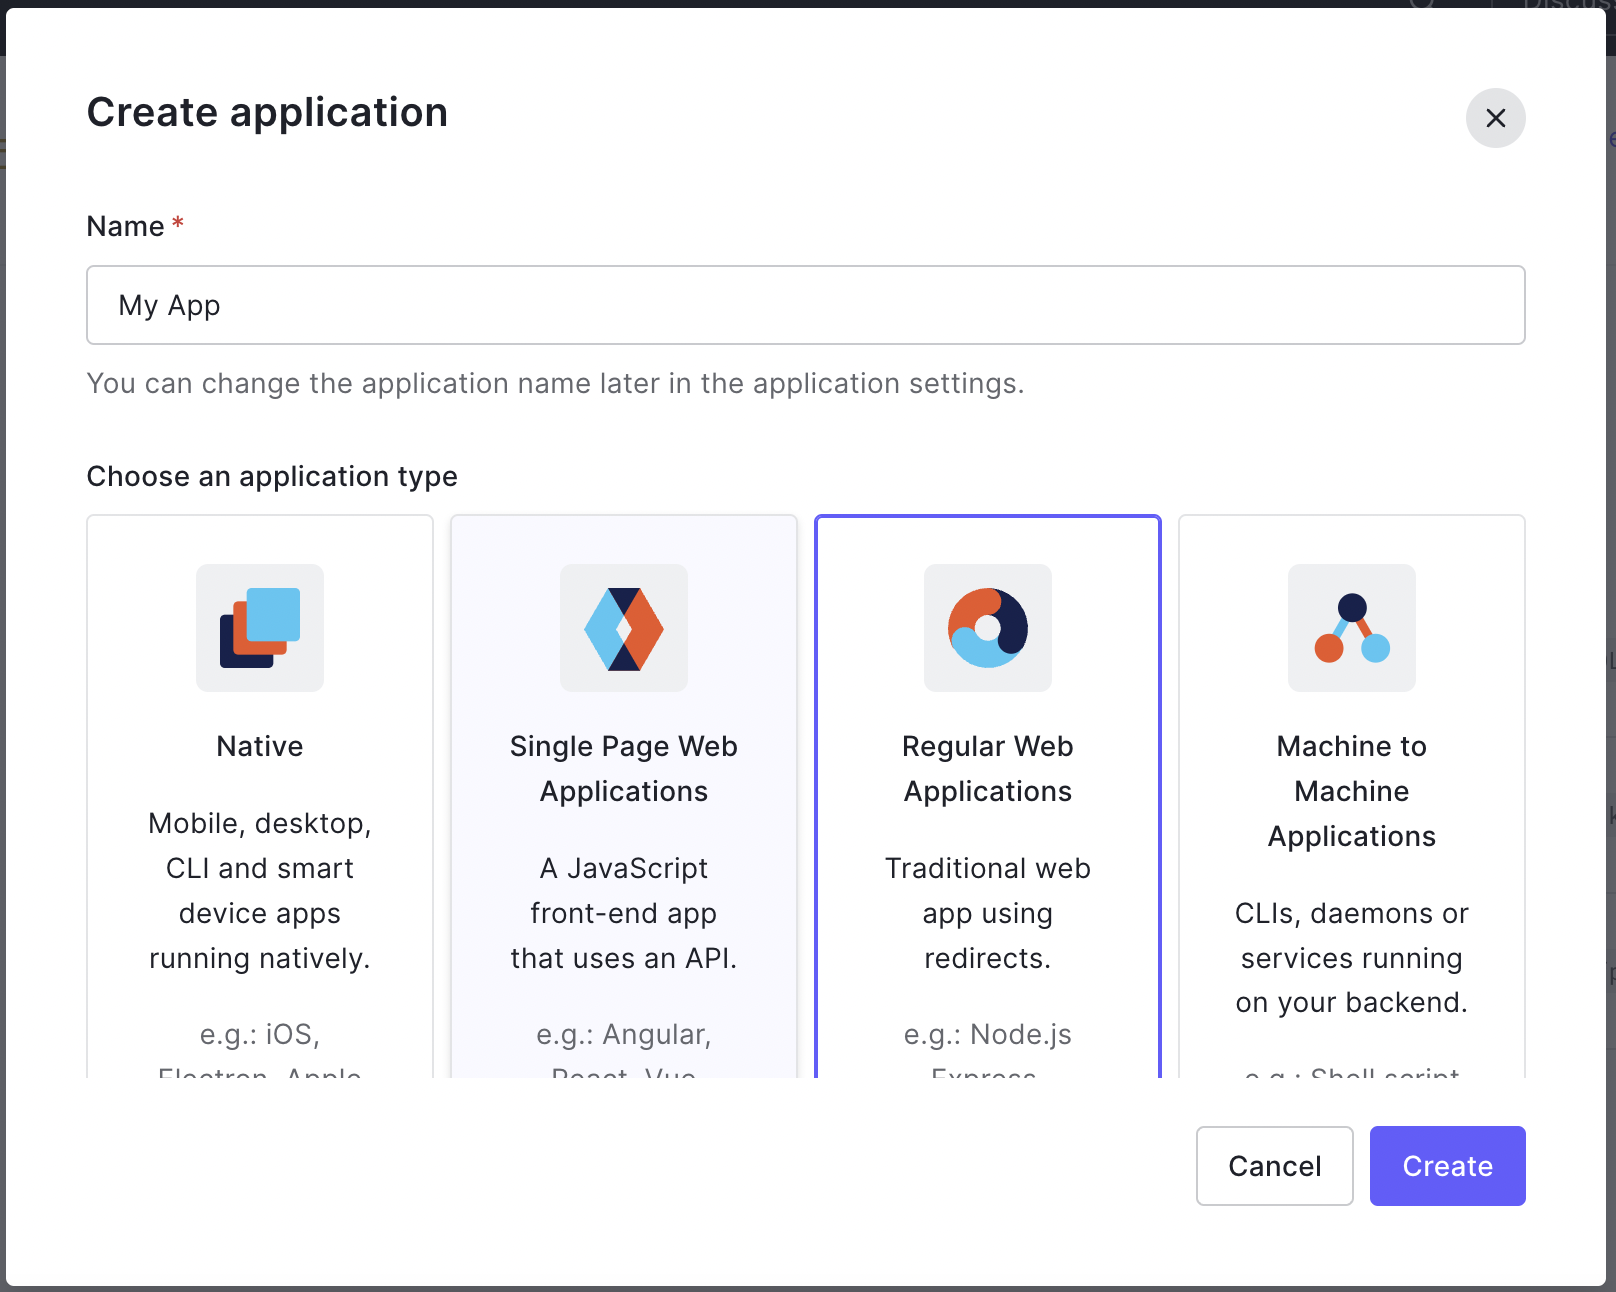
- Click Create.
- After you application has been created select the Basic Information tab.
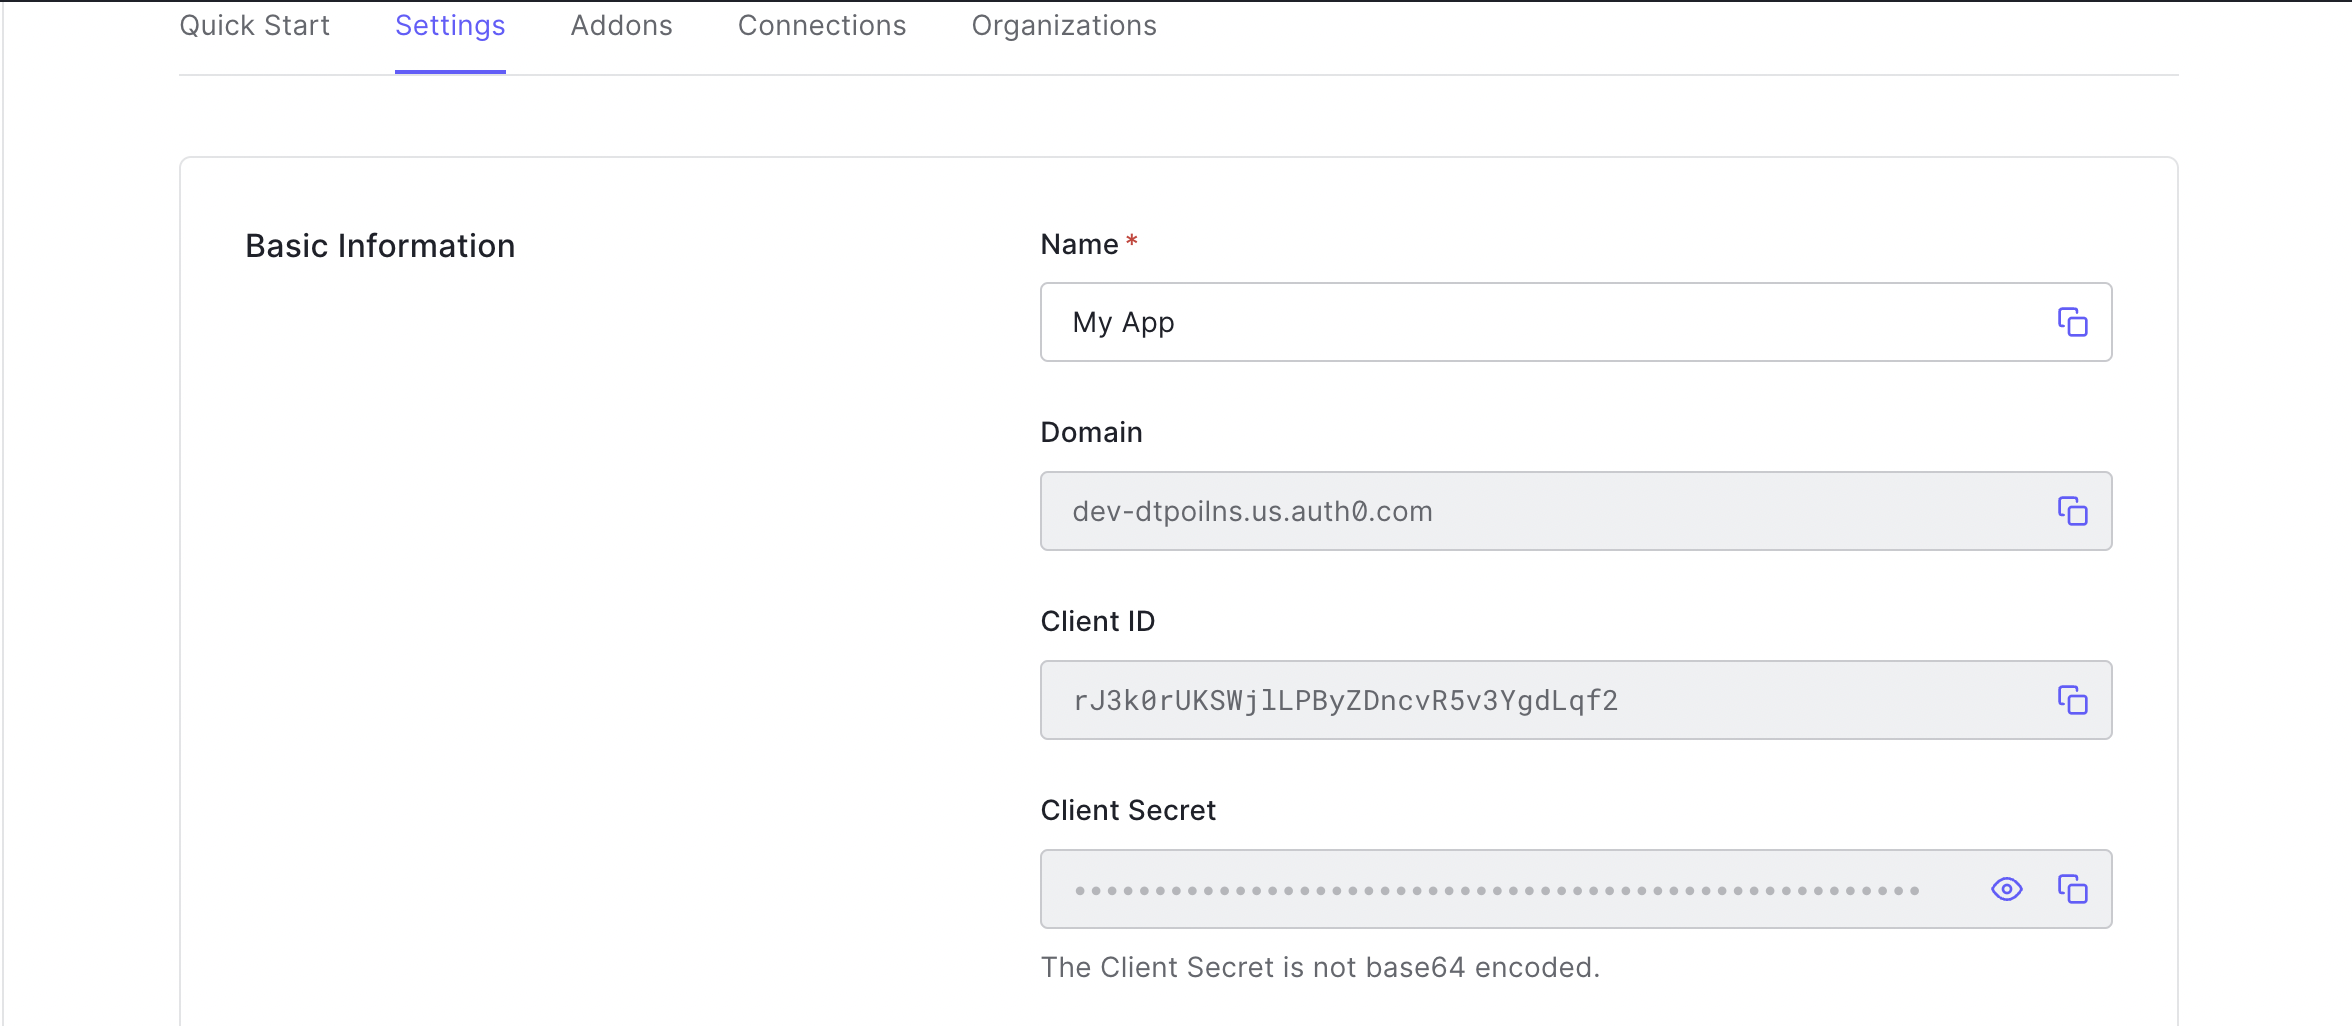
- You will use the Domain, Client Id and Client Secret values in the Identity profile you create next in the Tyk Dashboard.
Create an Identity Management profile in your Dashboard
- Log in to your Tyk Dashboard as an Admin user.
- Select Identity Management from the System Management menu.
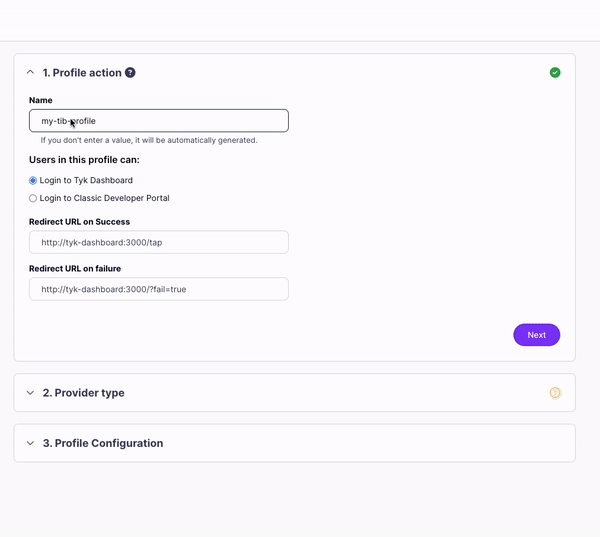
- Click Create Profile.
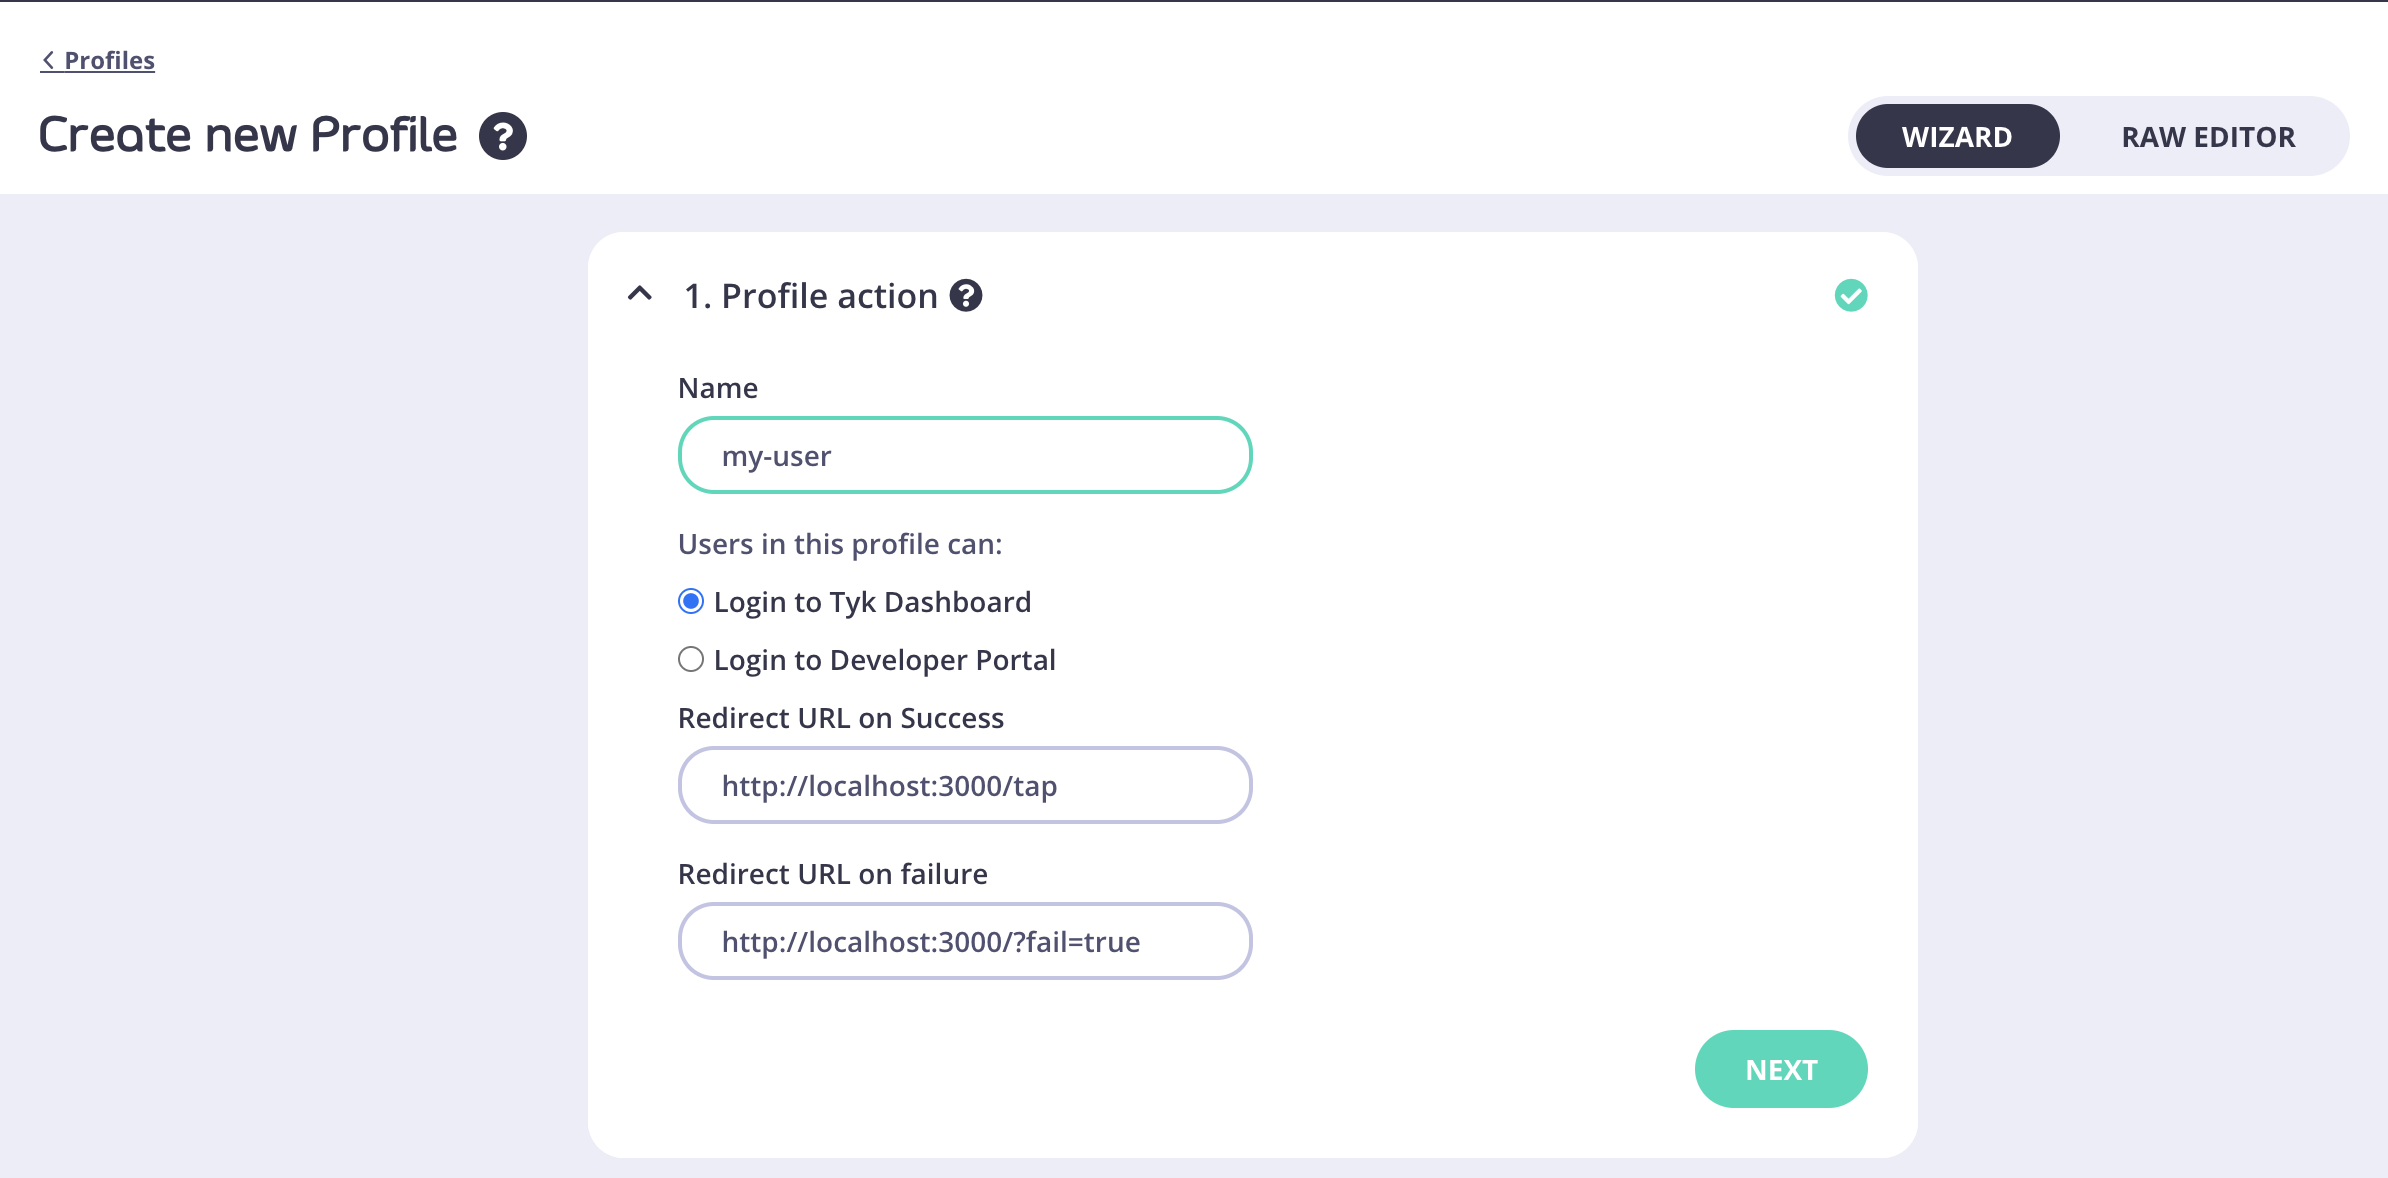
- In the Profile action section enter a name for your profile and make sure the Login to Tyk Dashboard option is selected.
- Click Next. In the Provider type section, select OpenID Connect.
- Click Next. Copy the Client ID value from your Auth0 application > Basic Information and paste it in the Client ID / Key field.
- Copy the Client Secret value from your Auth0 application > Basic Information and paste it in the Secret field.
-
You need to add a Discover URL (well known endpoint). Use the following URL, replacing
<<your-auth0-domain>>with the Domain value from your Auth0 application > Basic Information.https://<<your-auth0-domain>>/.well-known/openid-configuration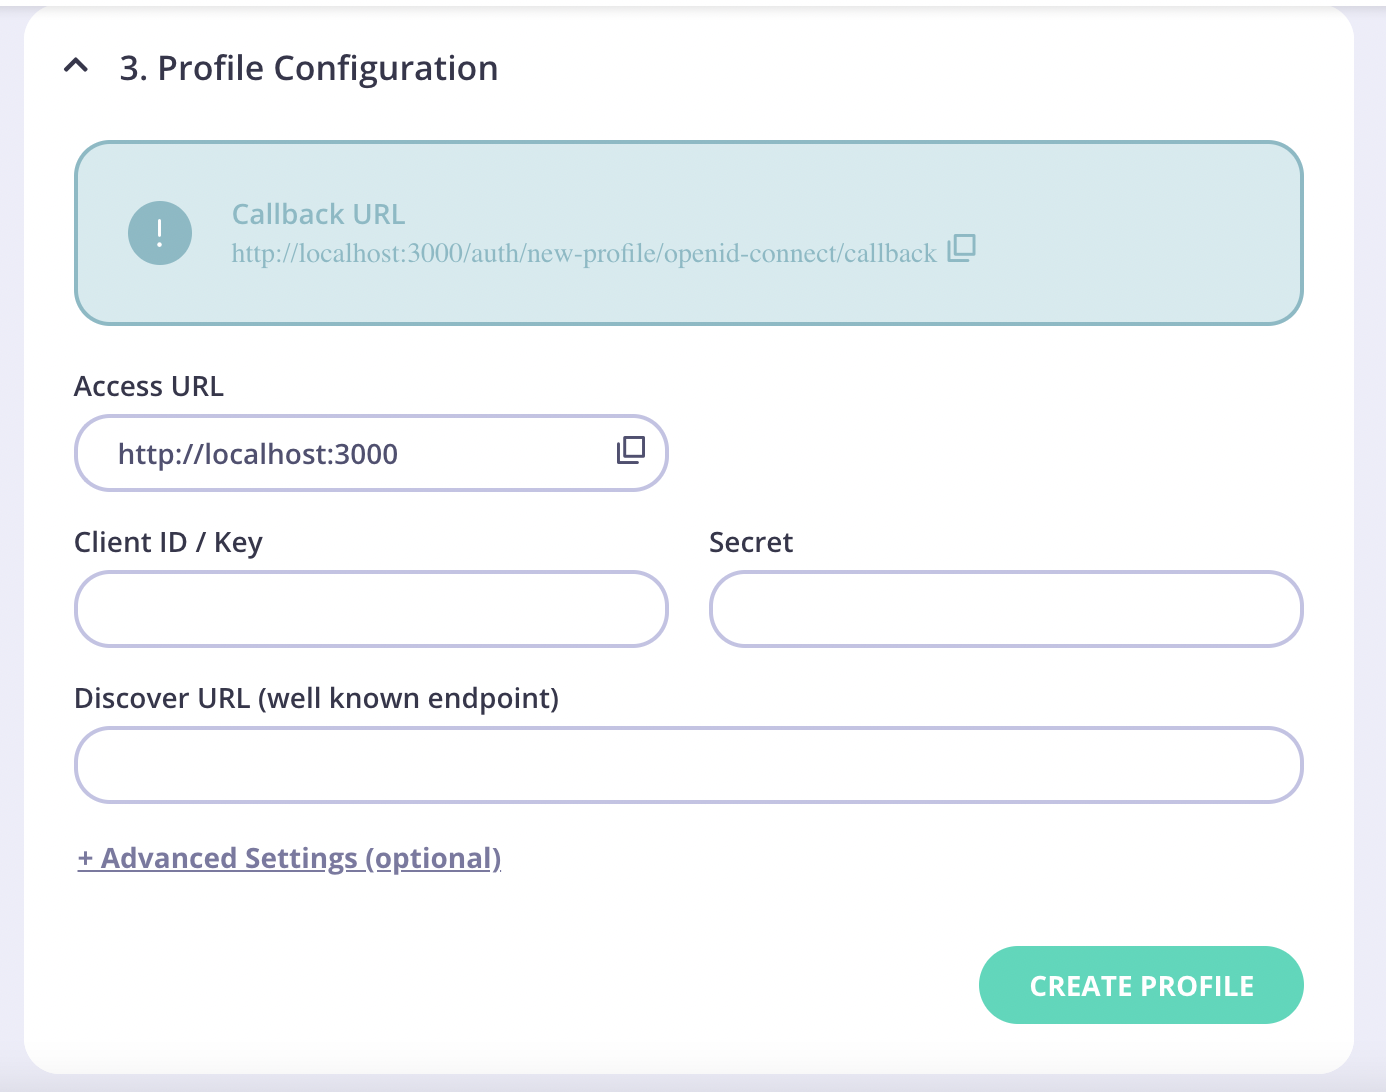
- Copy the Callback URL and paste it into the Allowed Callback URLs field in your Auth0 application > Basic Information.
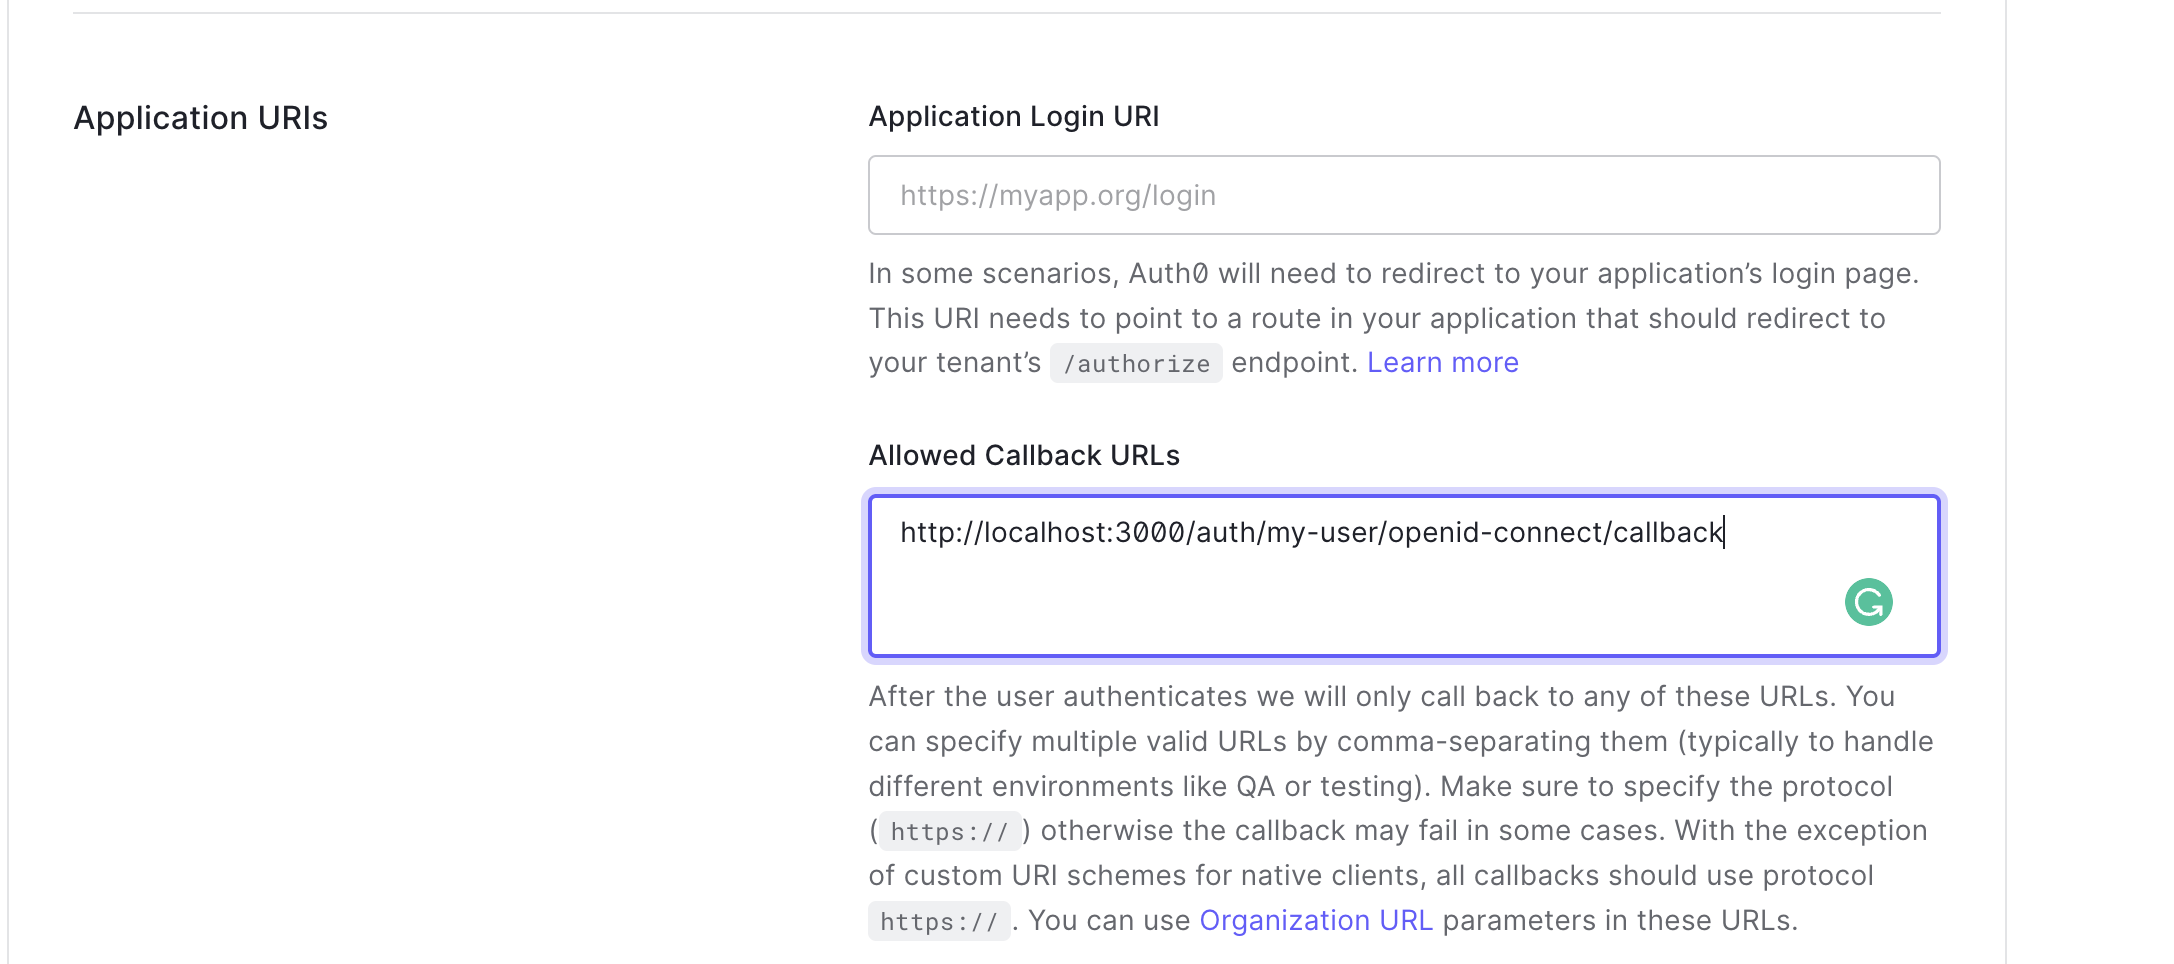
- Click Save Changes to update your Auth0 Application.
- Click Create Profile to save your Identity profile in your Tyk Dashboard.
Test your Auth0 Login
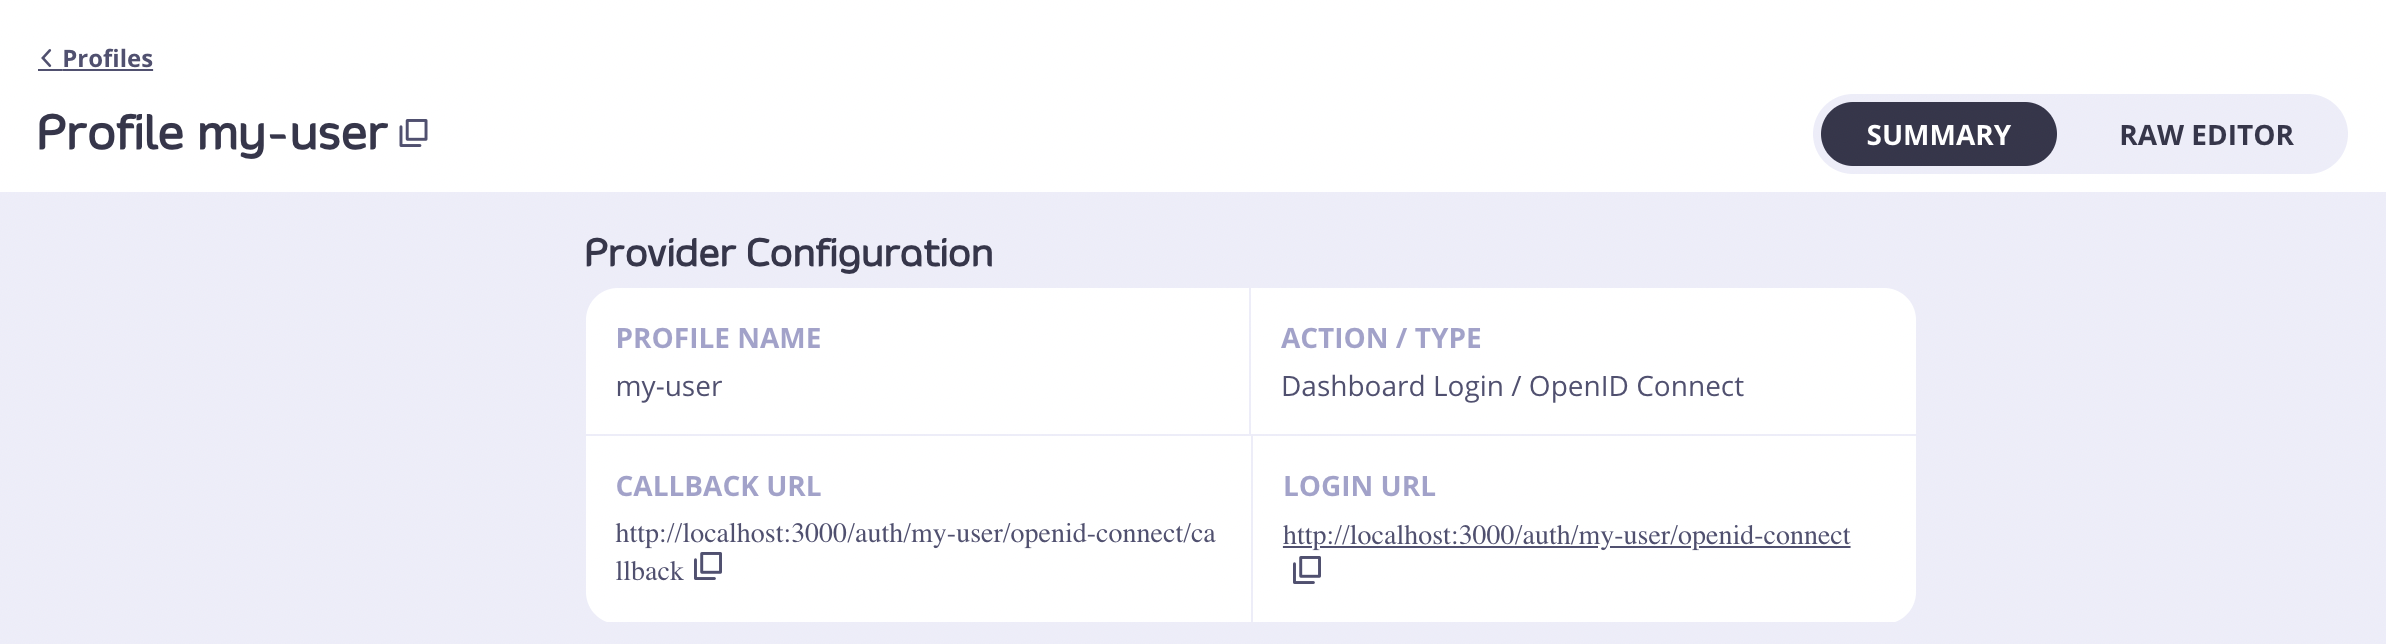
- From your Identity Management Profiles click the profile you created to open it.

- Click the Login URL.
- You will now see the Auth0 login form in a browser tab.
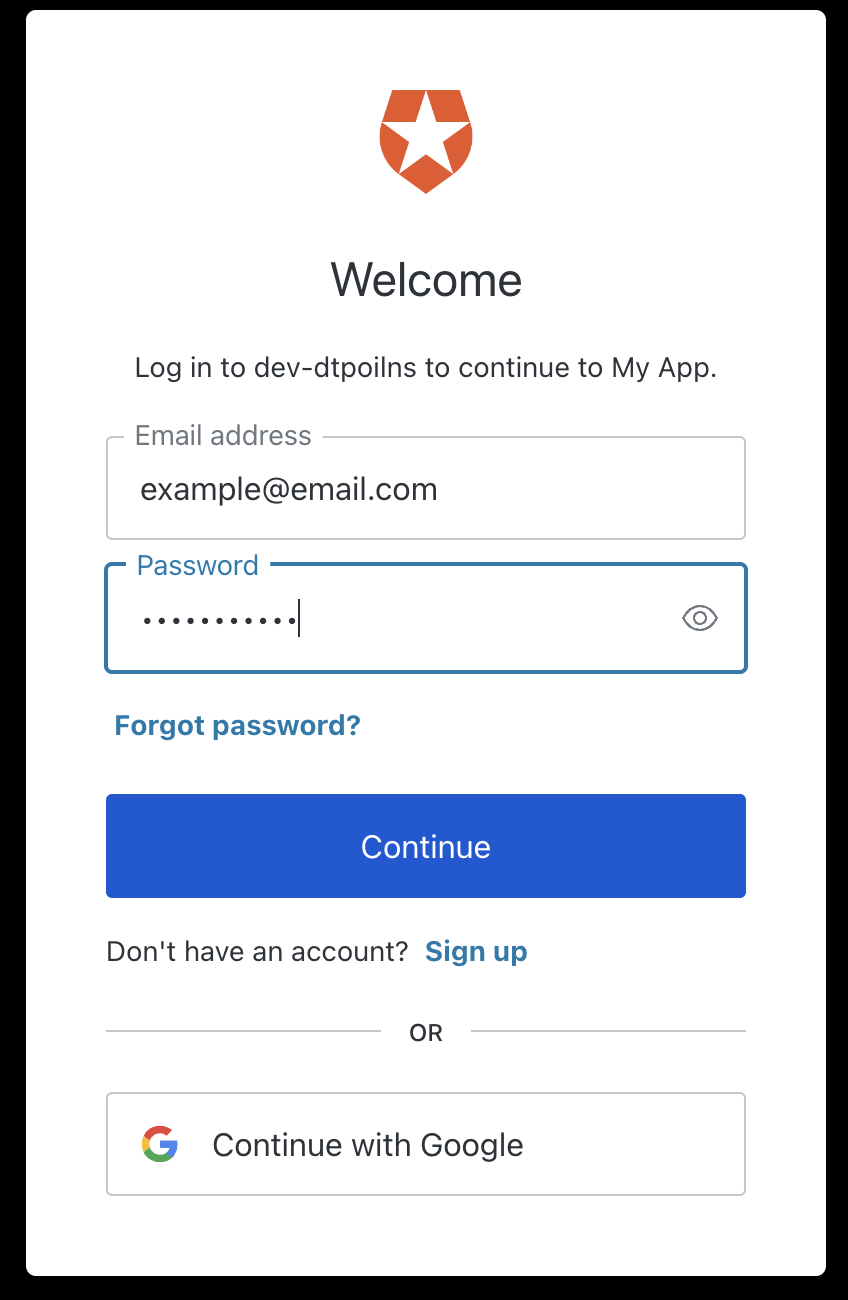
- Enter the email address and password of your Auth0 user.
- You may be asked to authorize your Auth0 application.
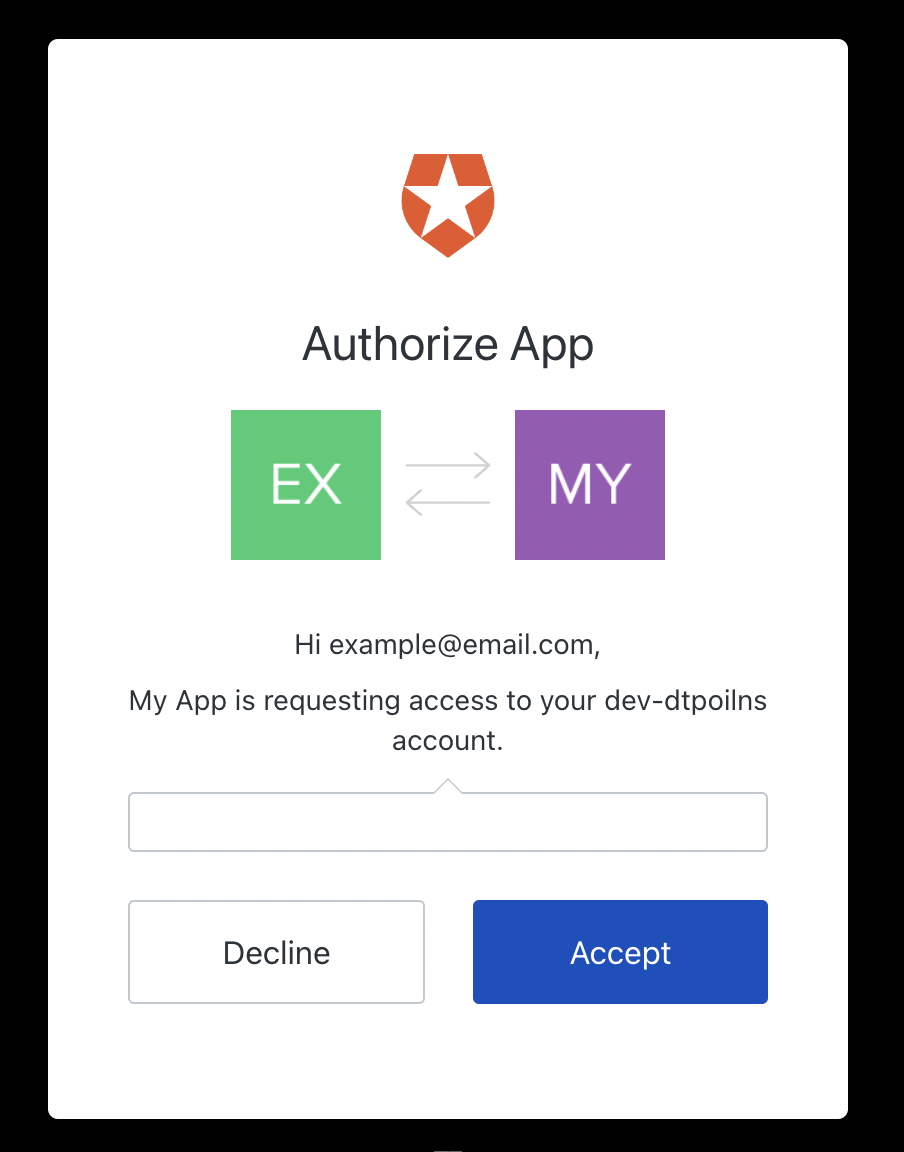
- Click Accept.
- You will now be taken to the Tyk Dashboard.
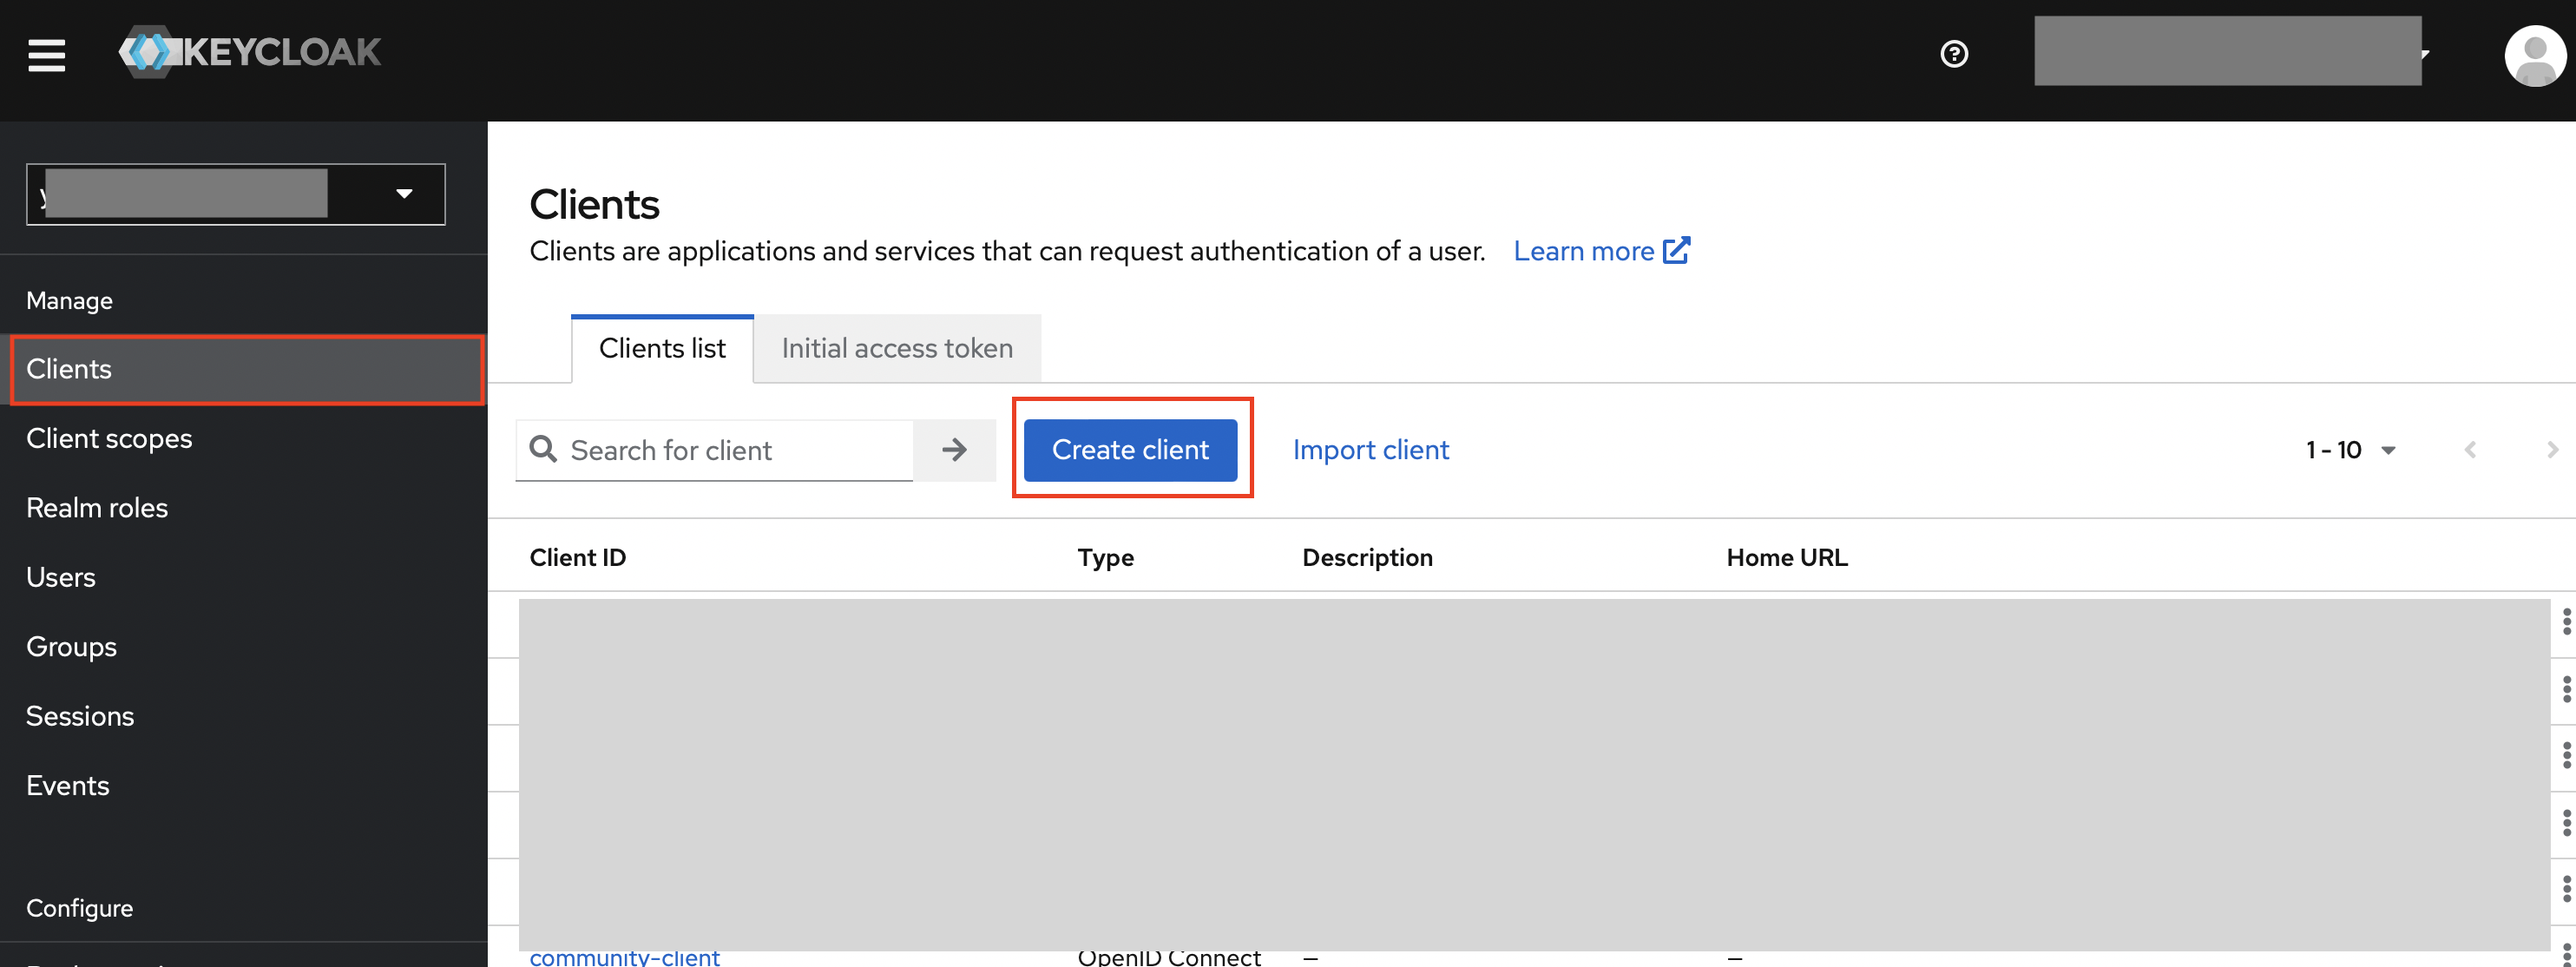
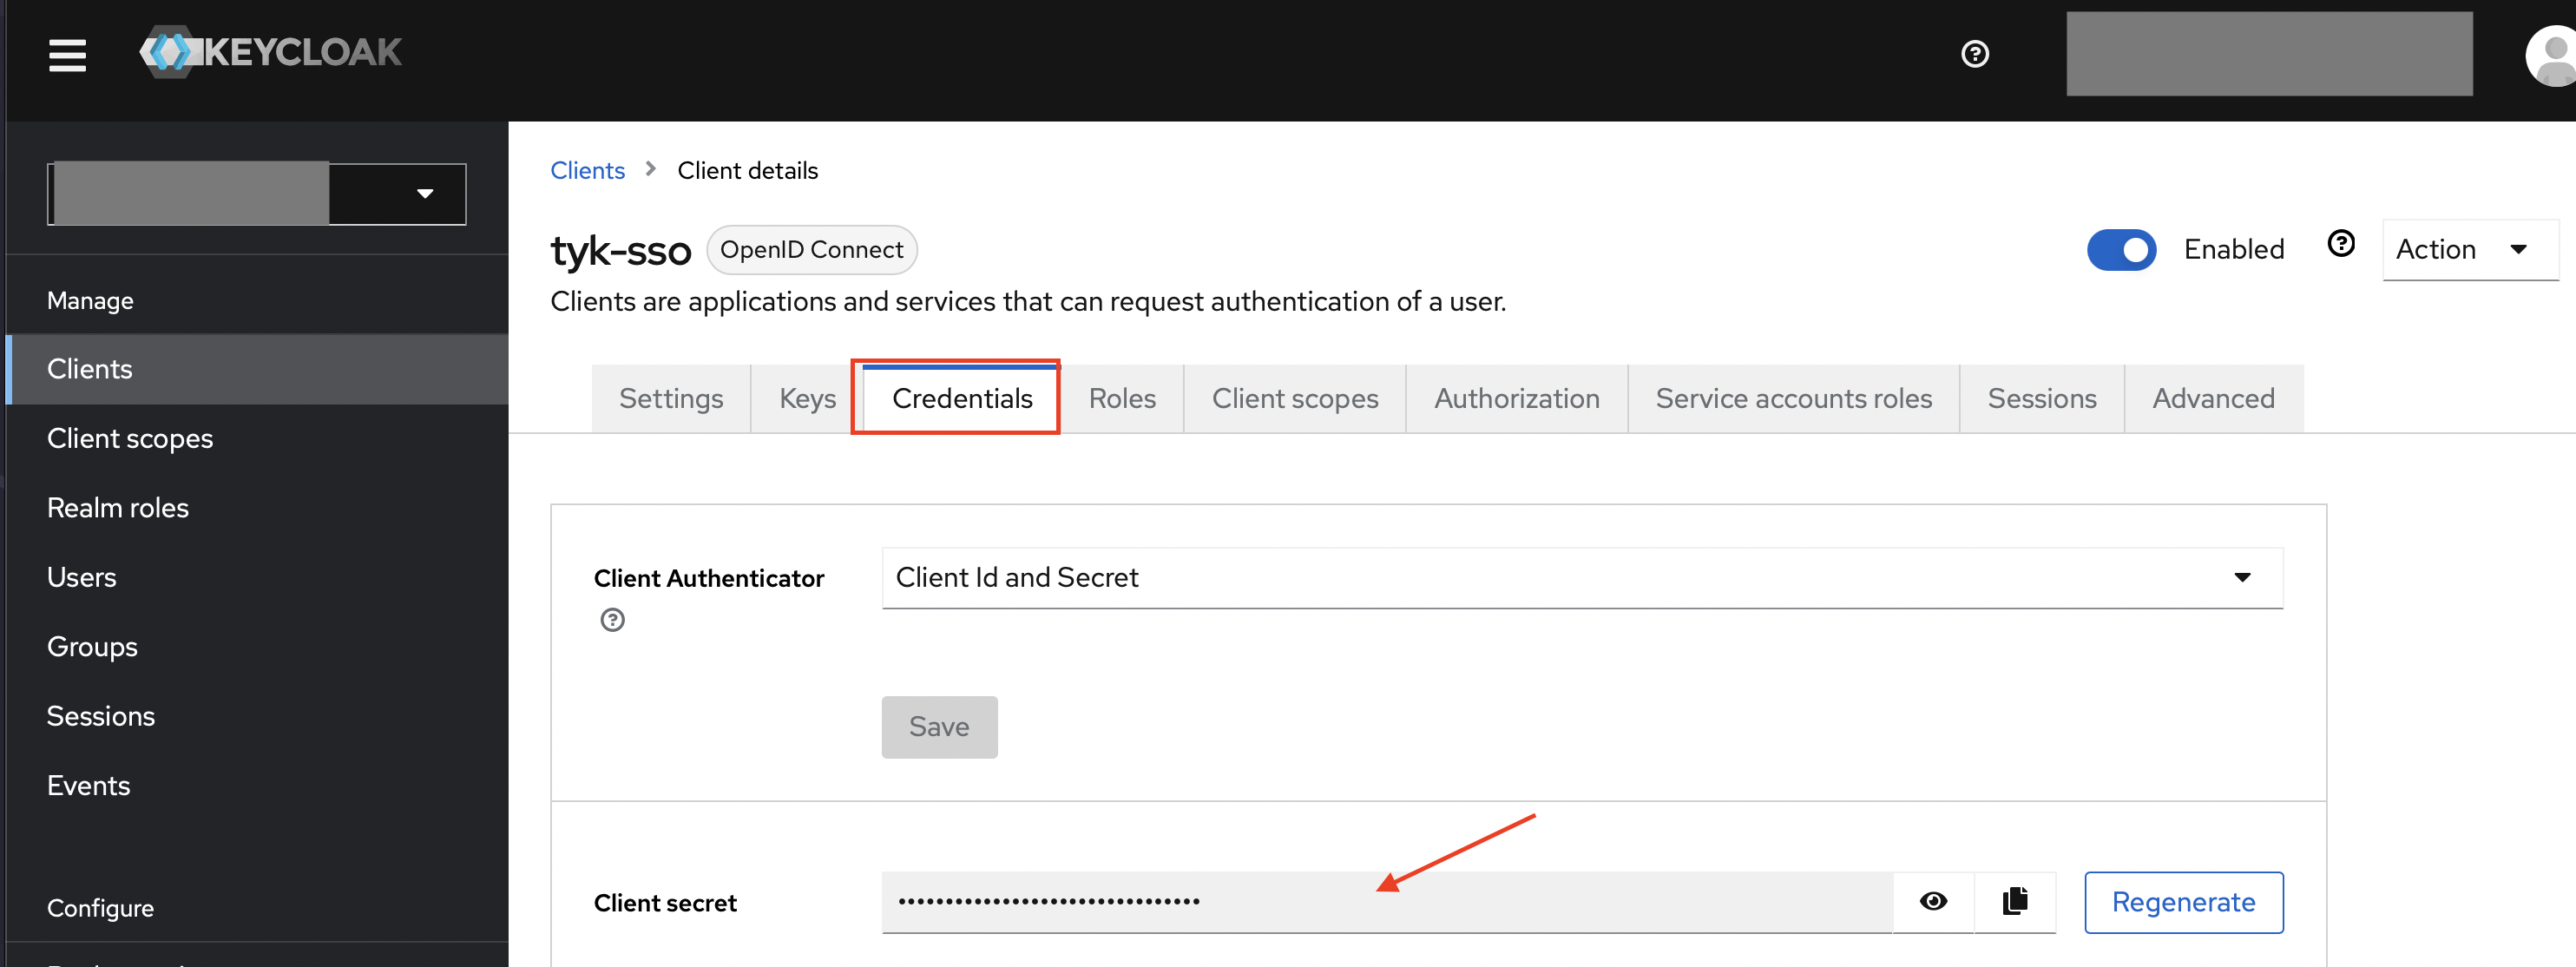
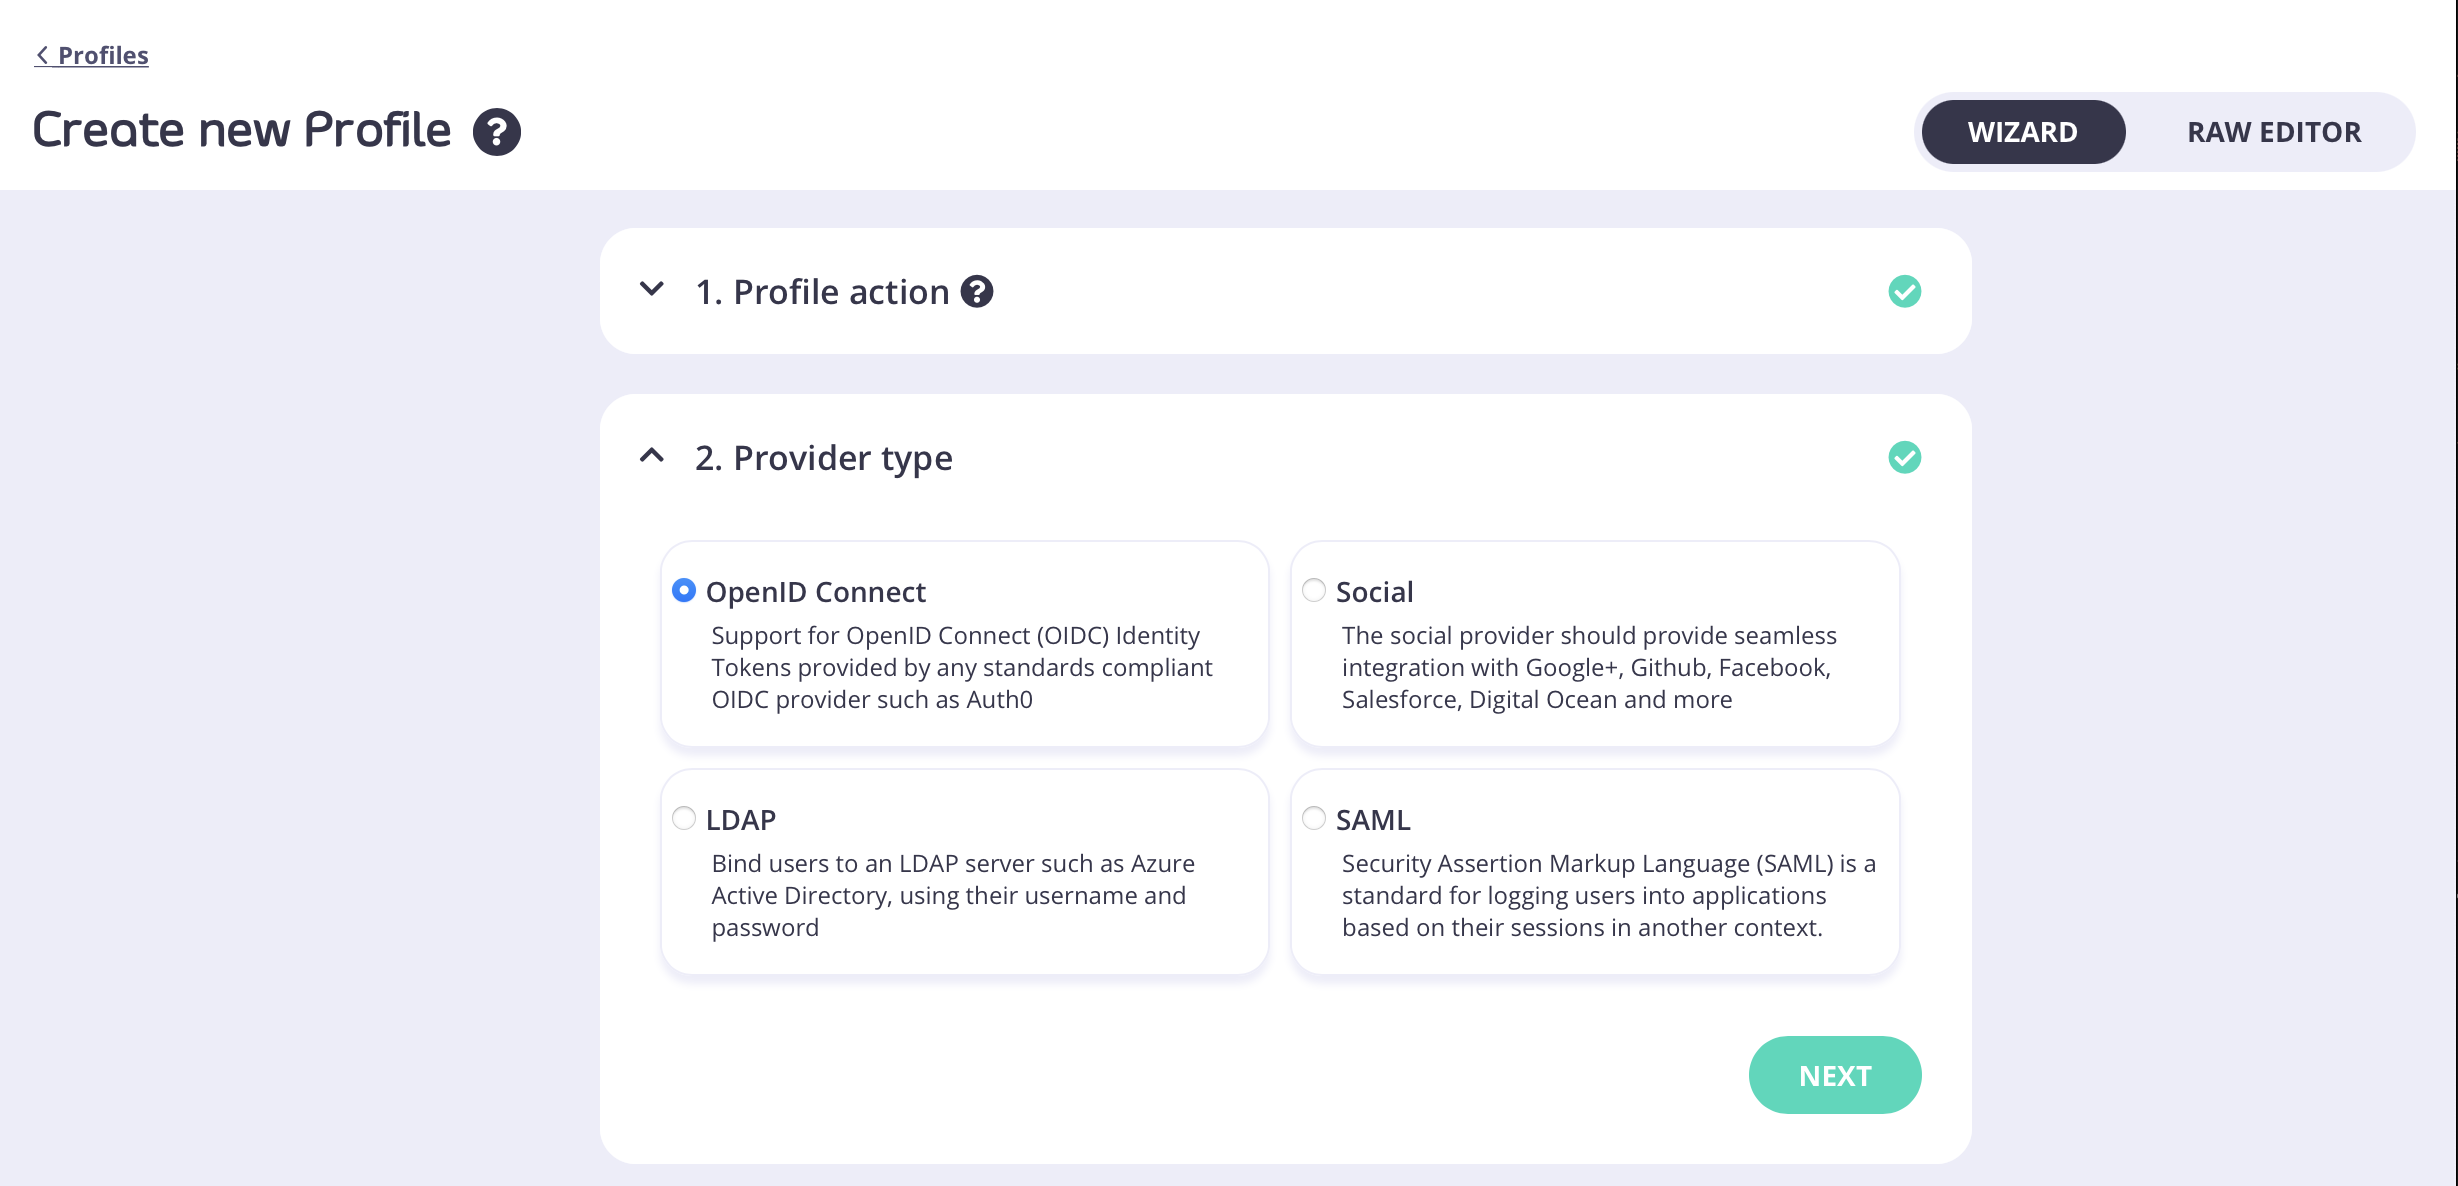
SSO with Keycloak
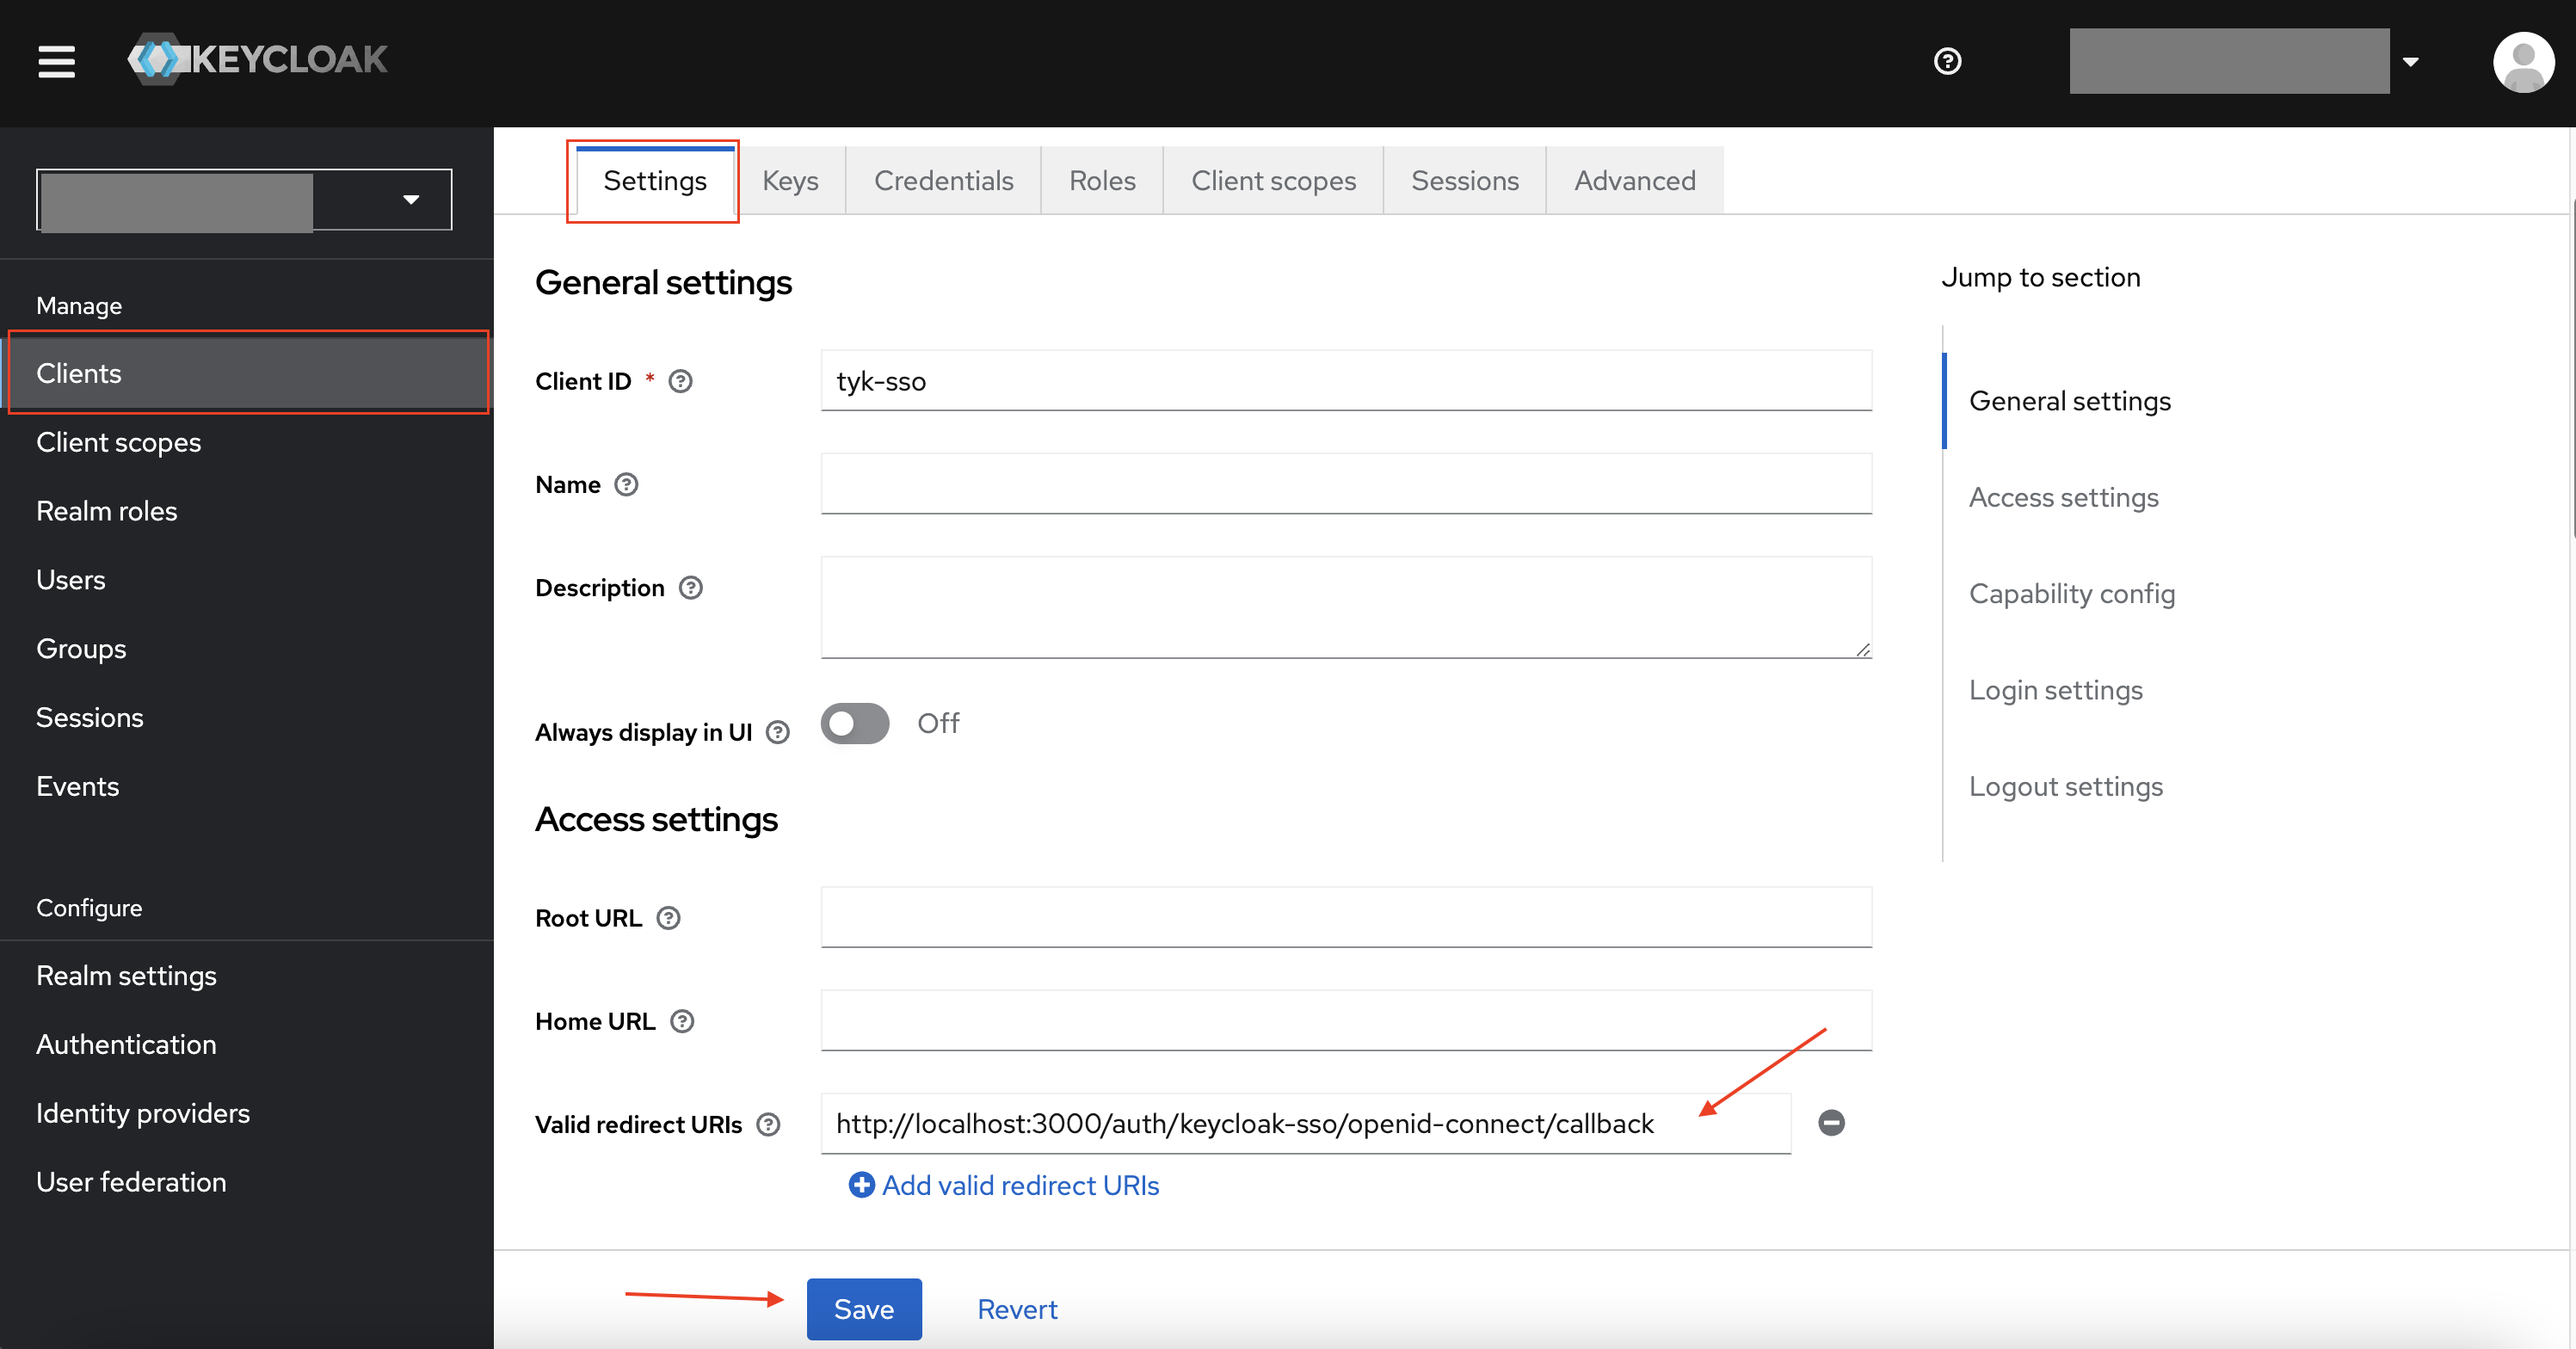
This is a walk-through of how you can use Keycloak and our (internal/embedded) Tyk Identity Broker (TIB) to log in to your Dashboard. This guide assumes you have existing Keycloak and Tyk Pro Environments.Configuration at KeyCloak
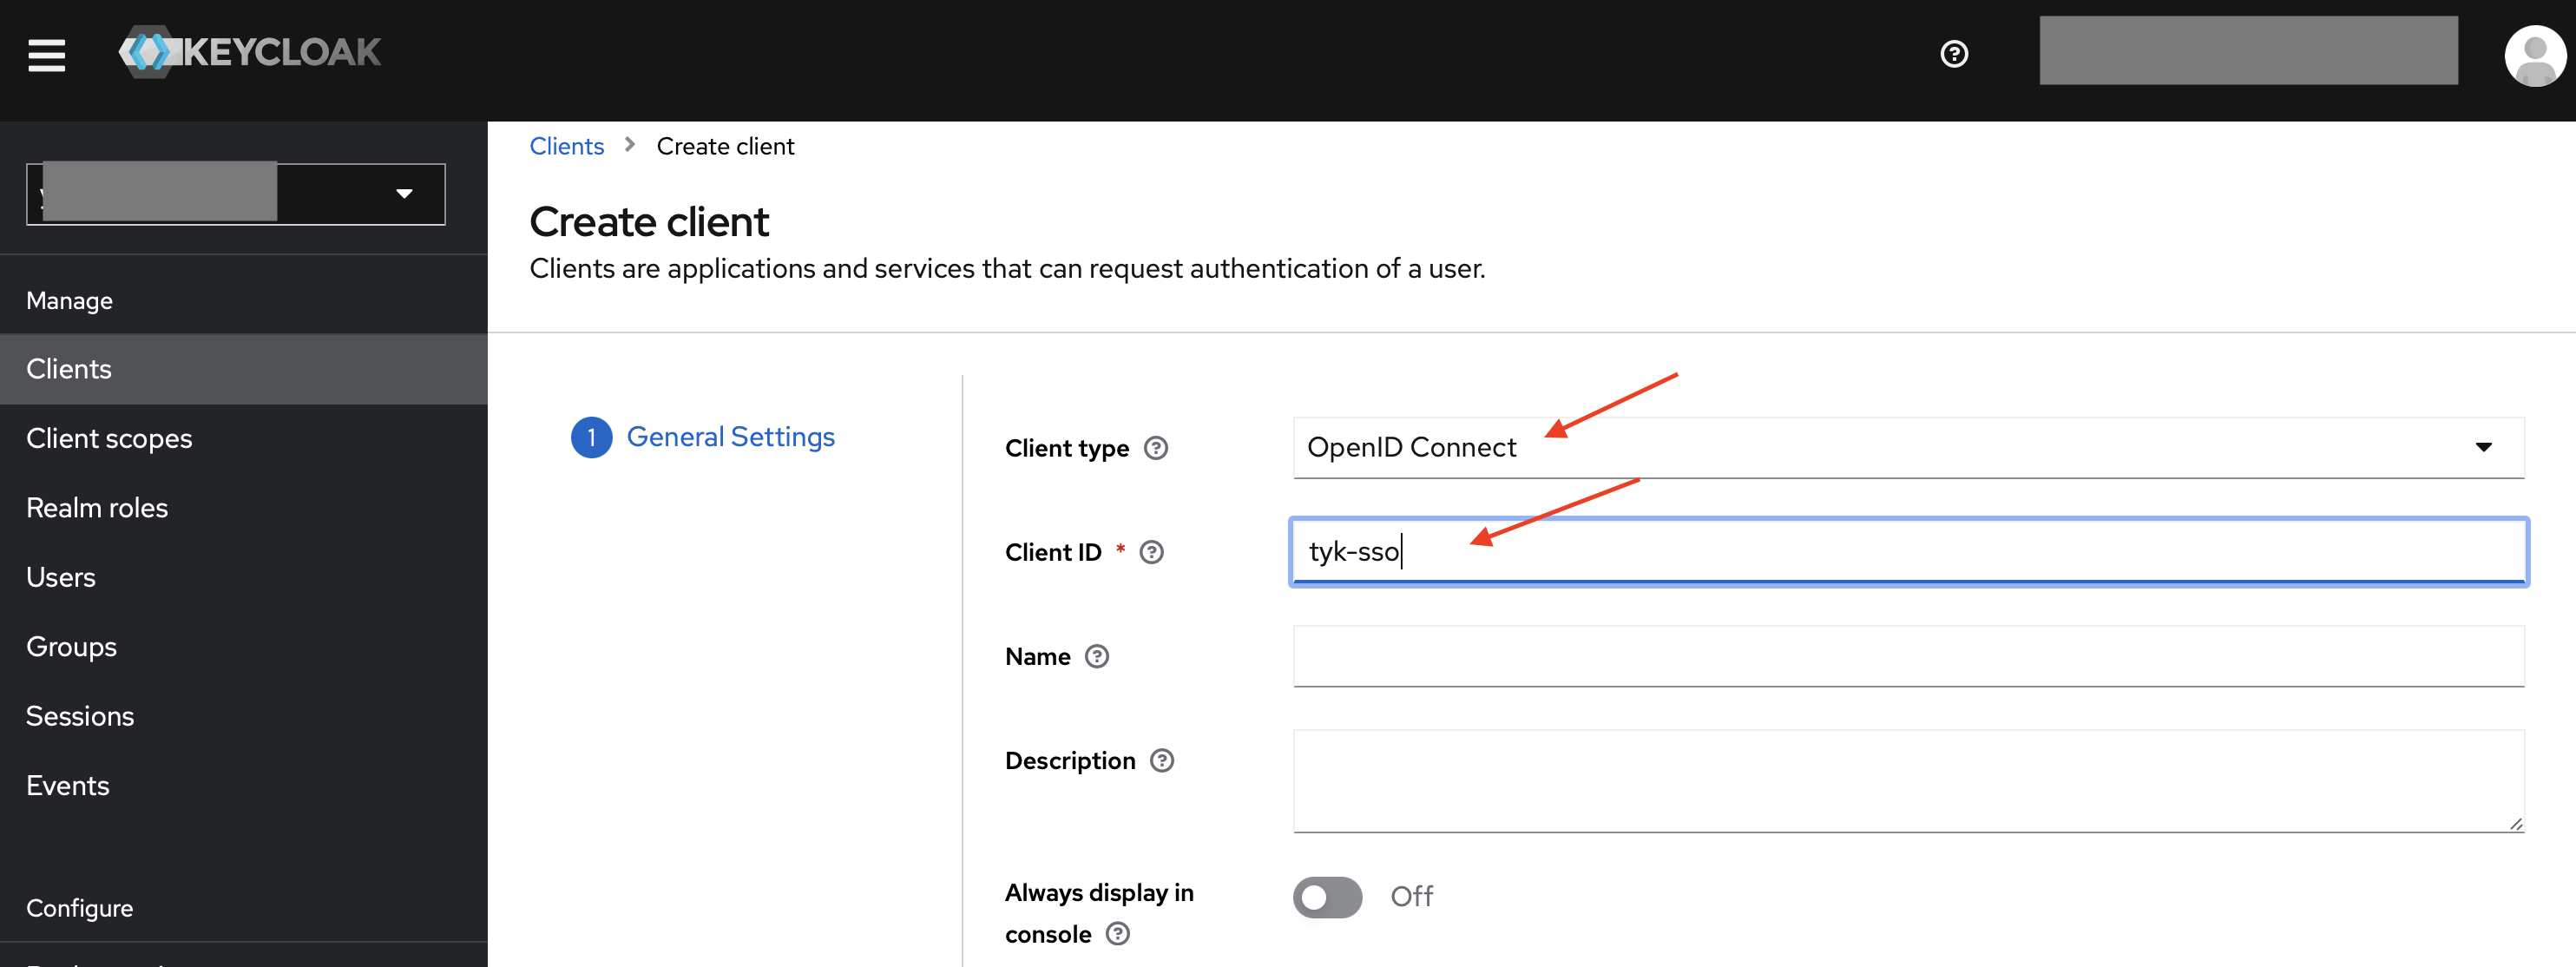
-
In your desired Realm, create a client of OpenID Connect type, and set your desired Client ID.
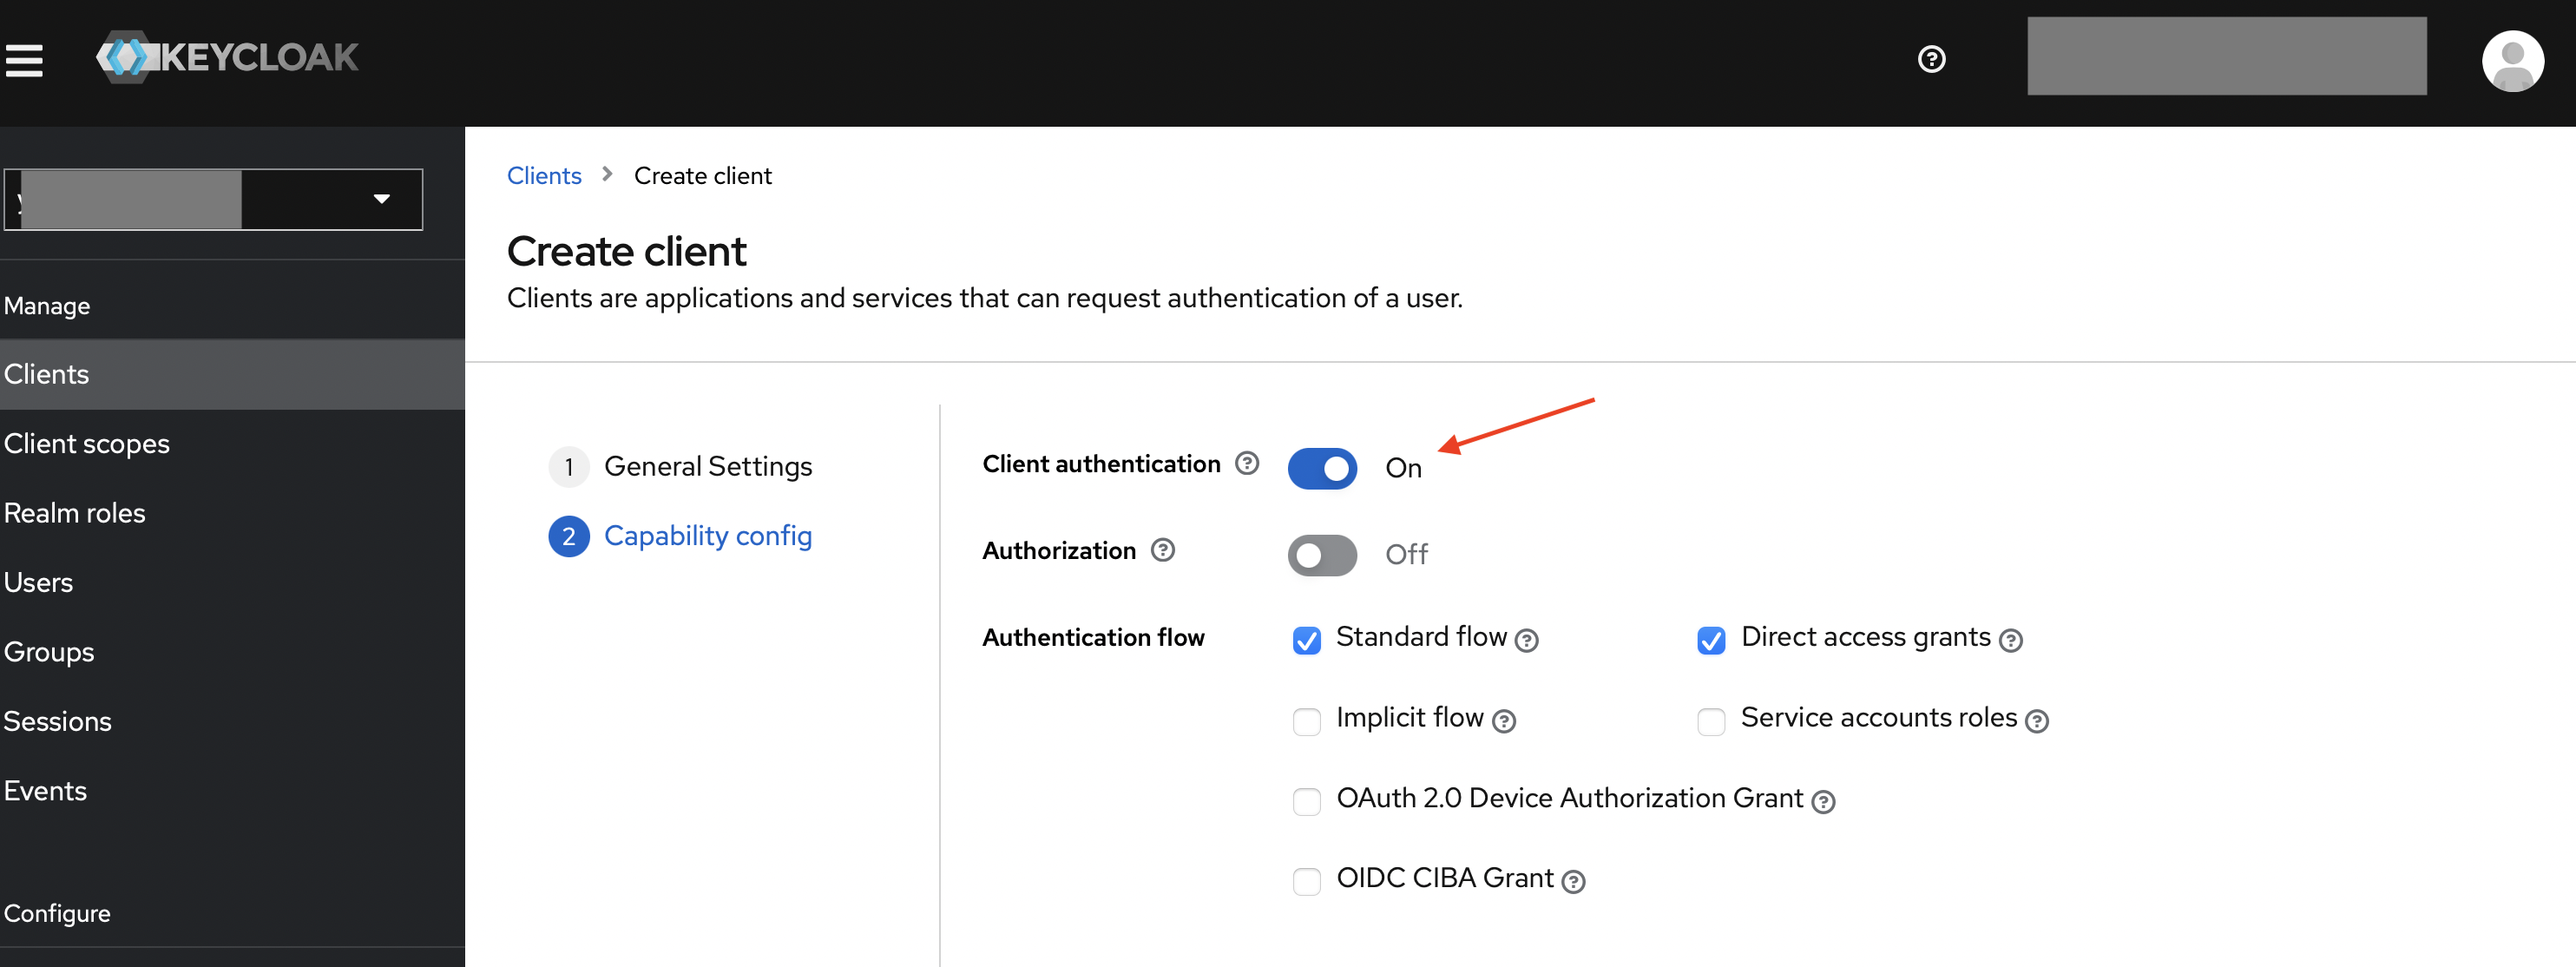
-
Enable client authentication, then save the client.
-
Retrieve the Secret (from the credentials tab) of the Client you just created. You will need the Client ID and Secret in later steps.
-
Retrieve the discovery endpoint of the realm,
https://<your-keycloak-host-and-realm>/.well-known/openid-configuration. This is accessible from “Realm Settings” > “General” Tab > OpenID Endpoint Configuration. You will need it in later steps.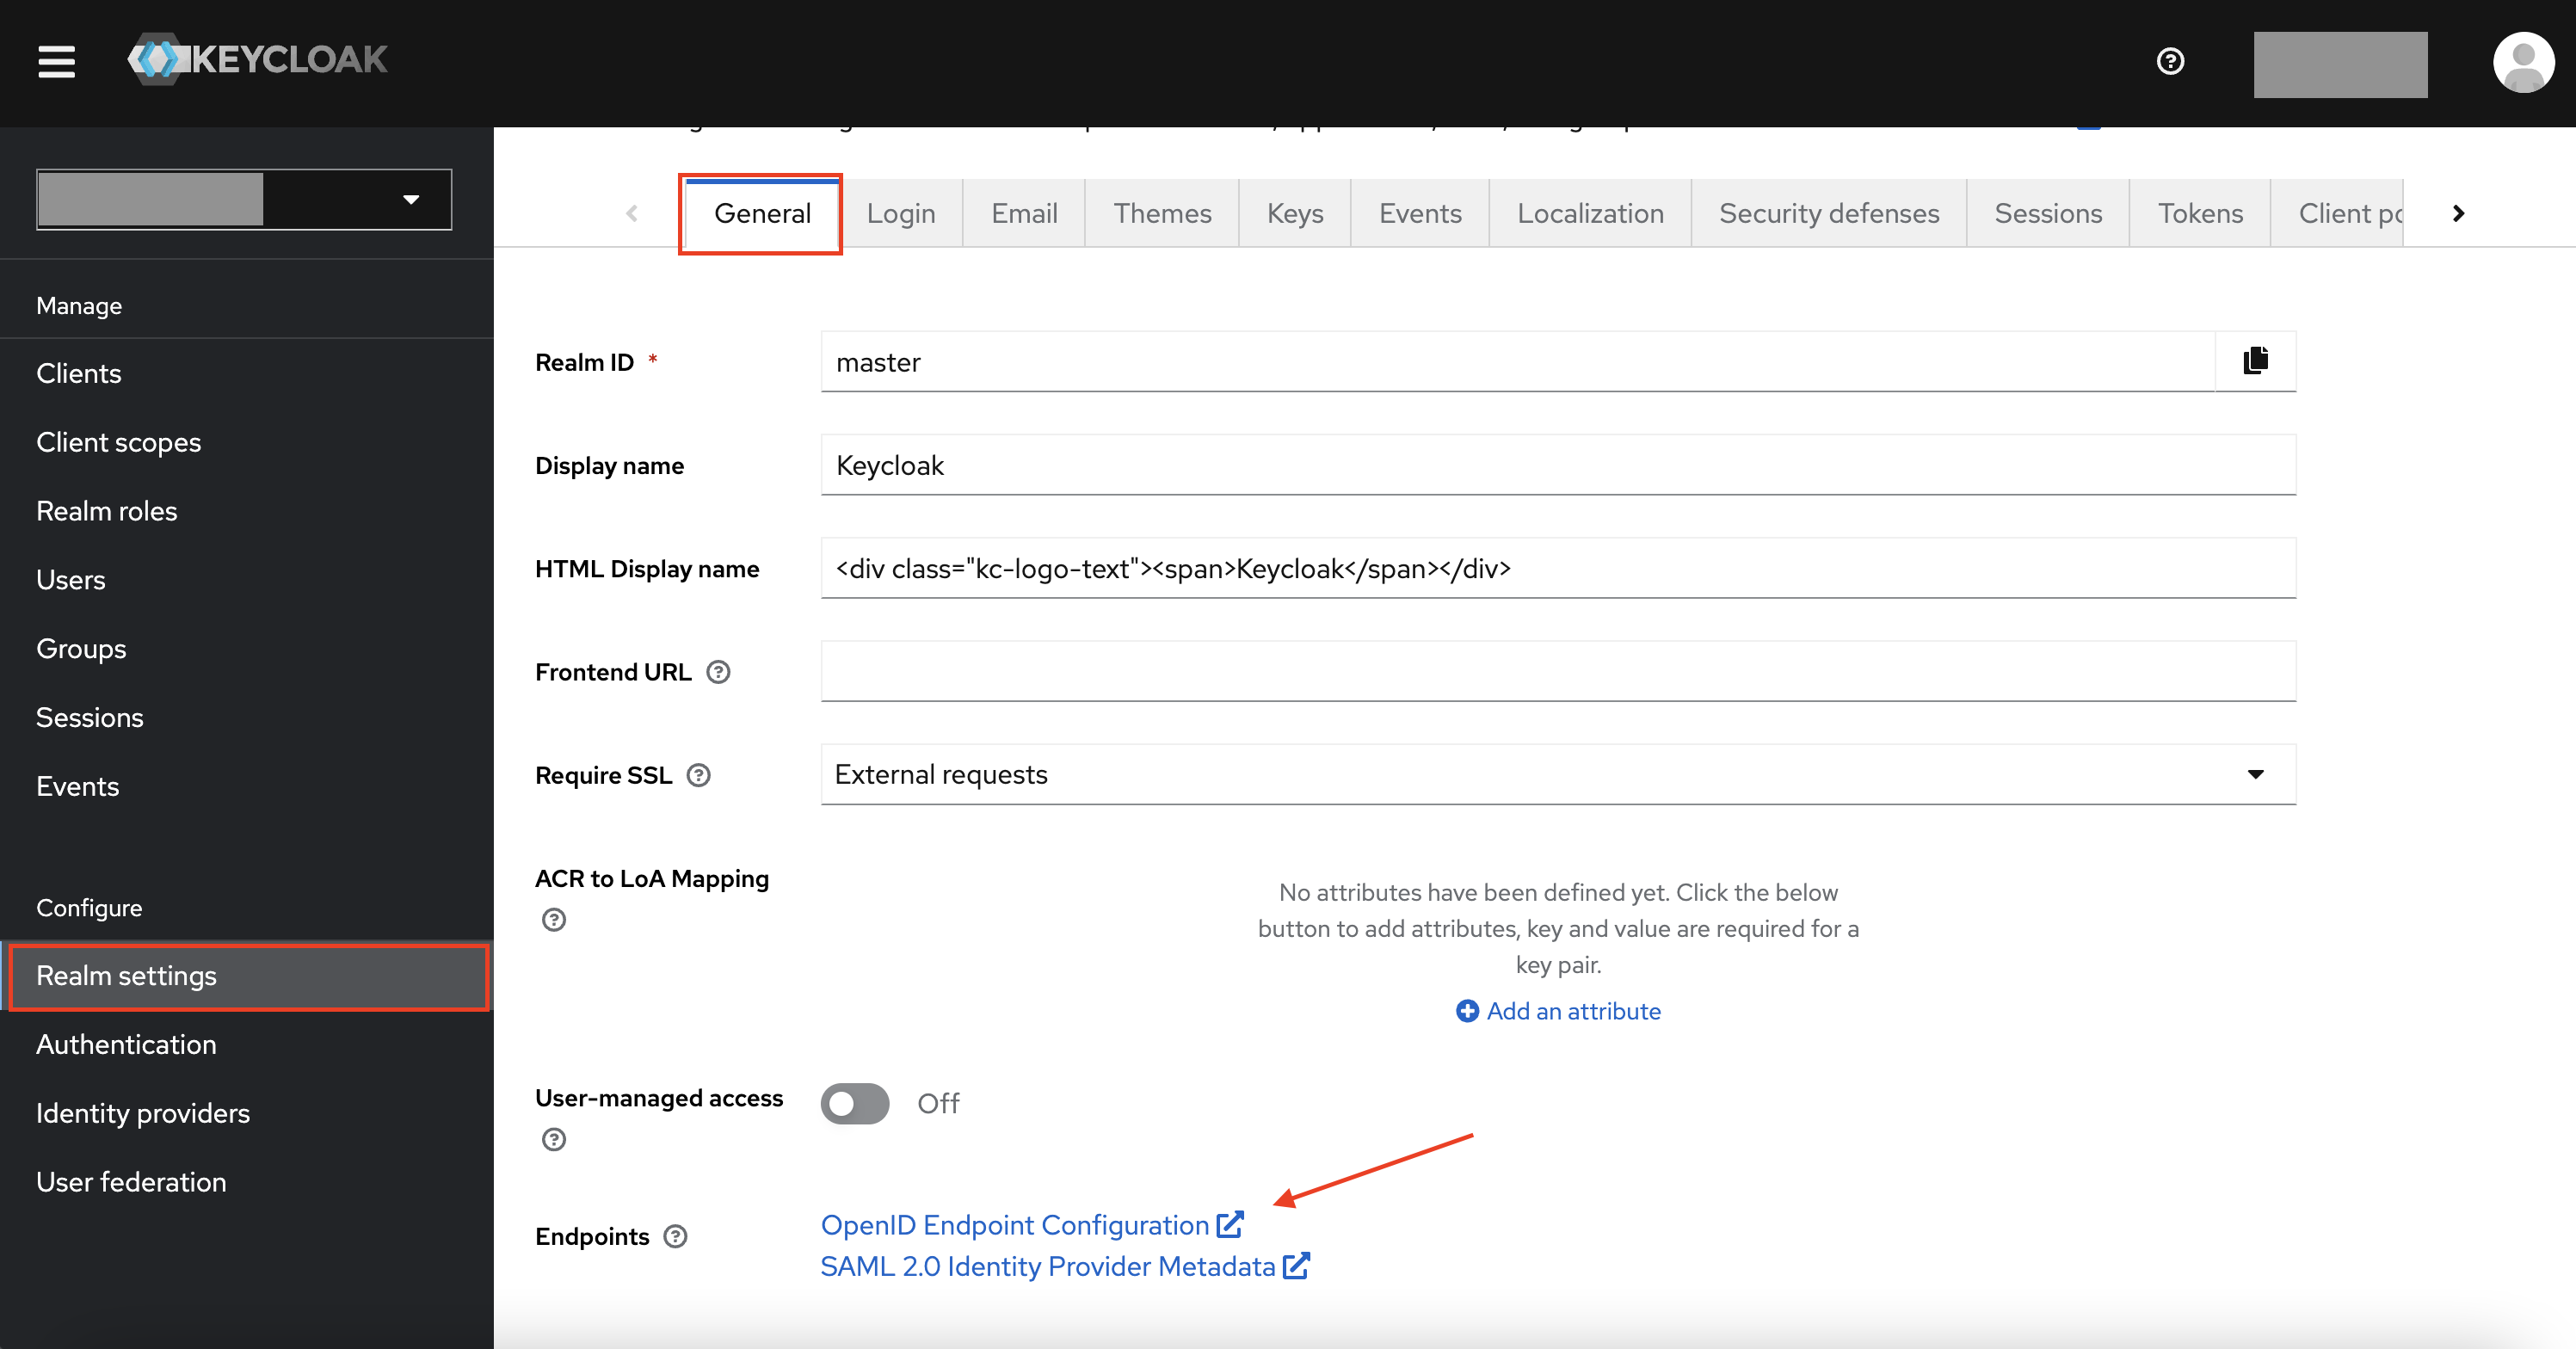
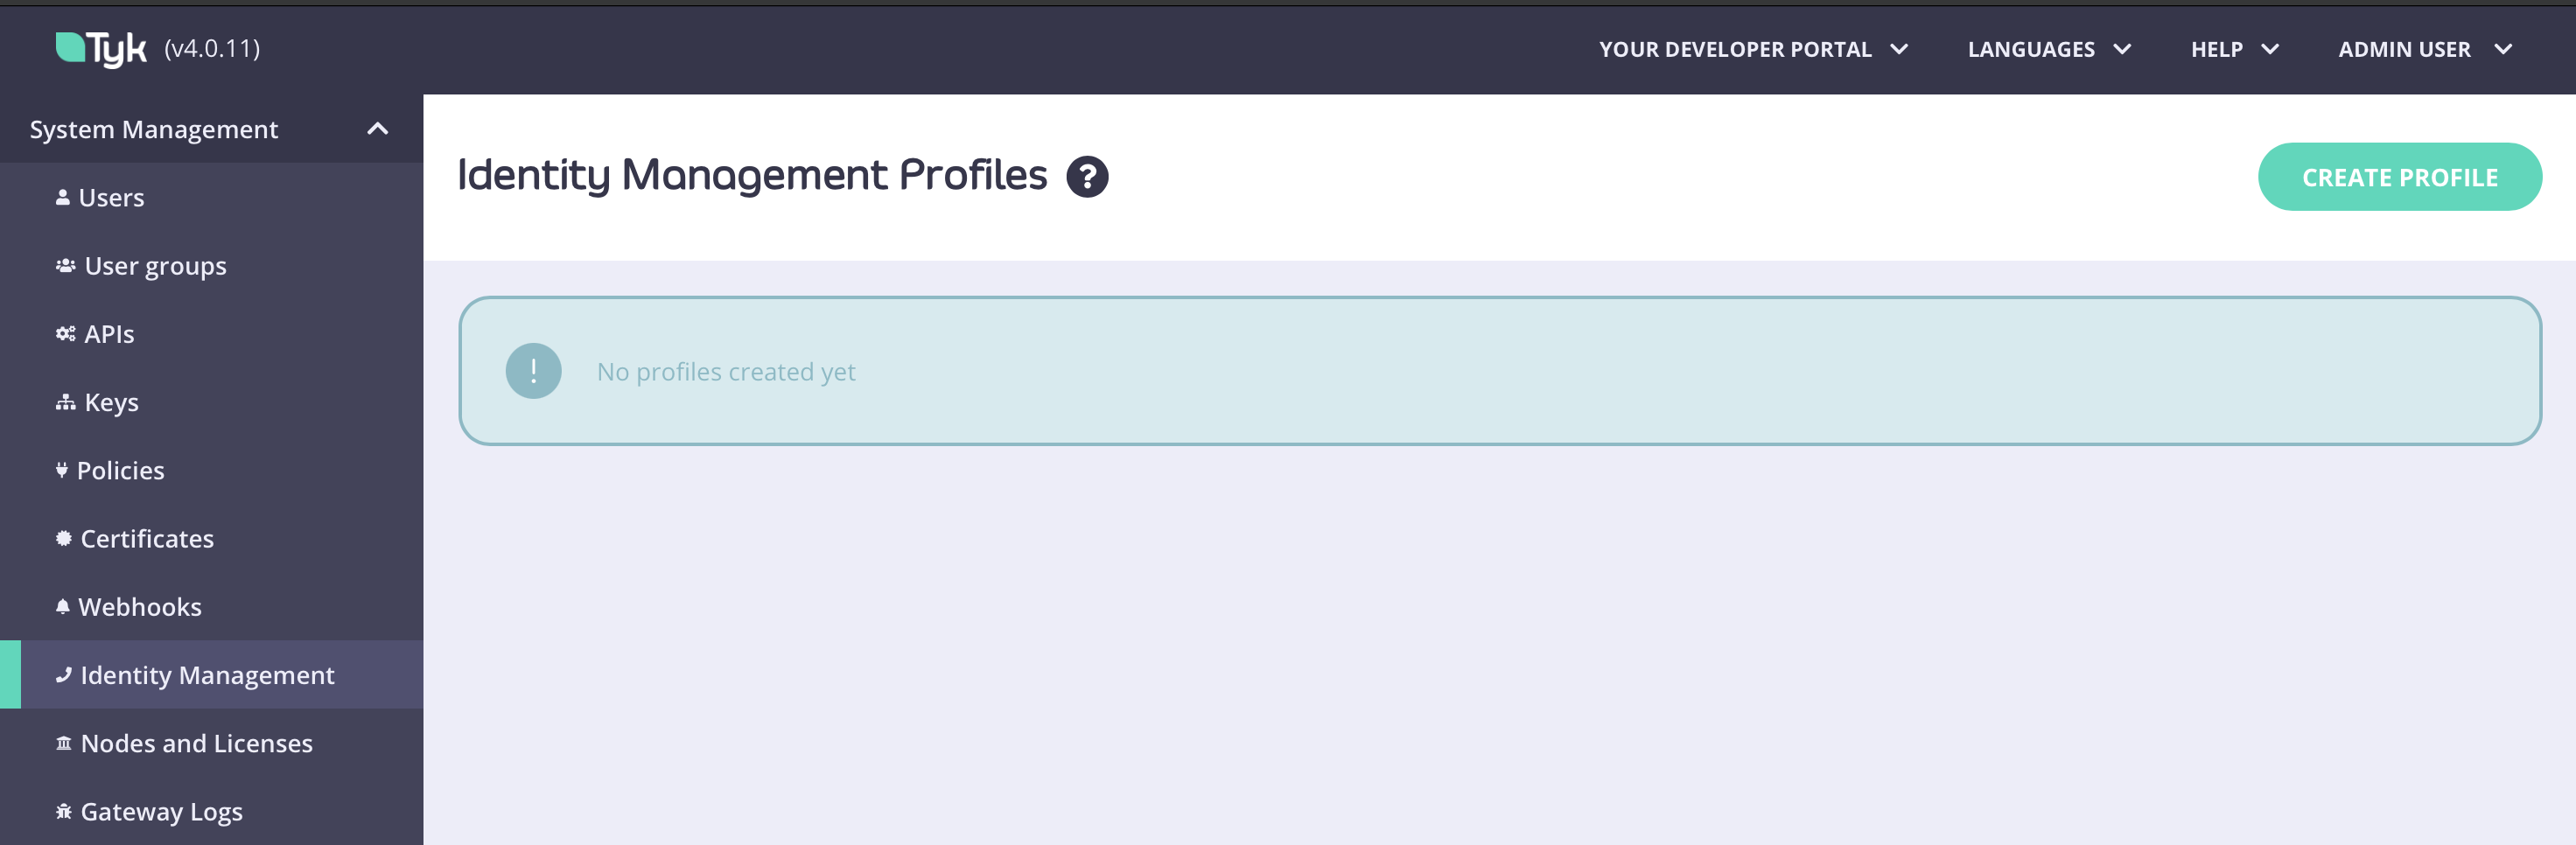
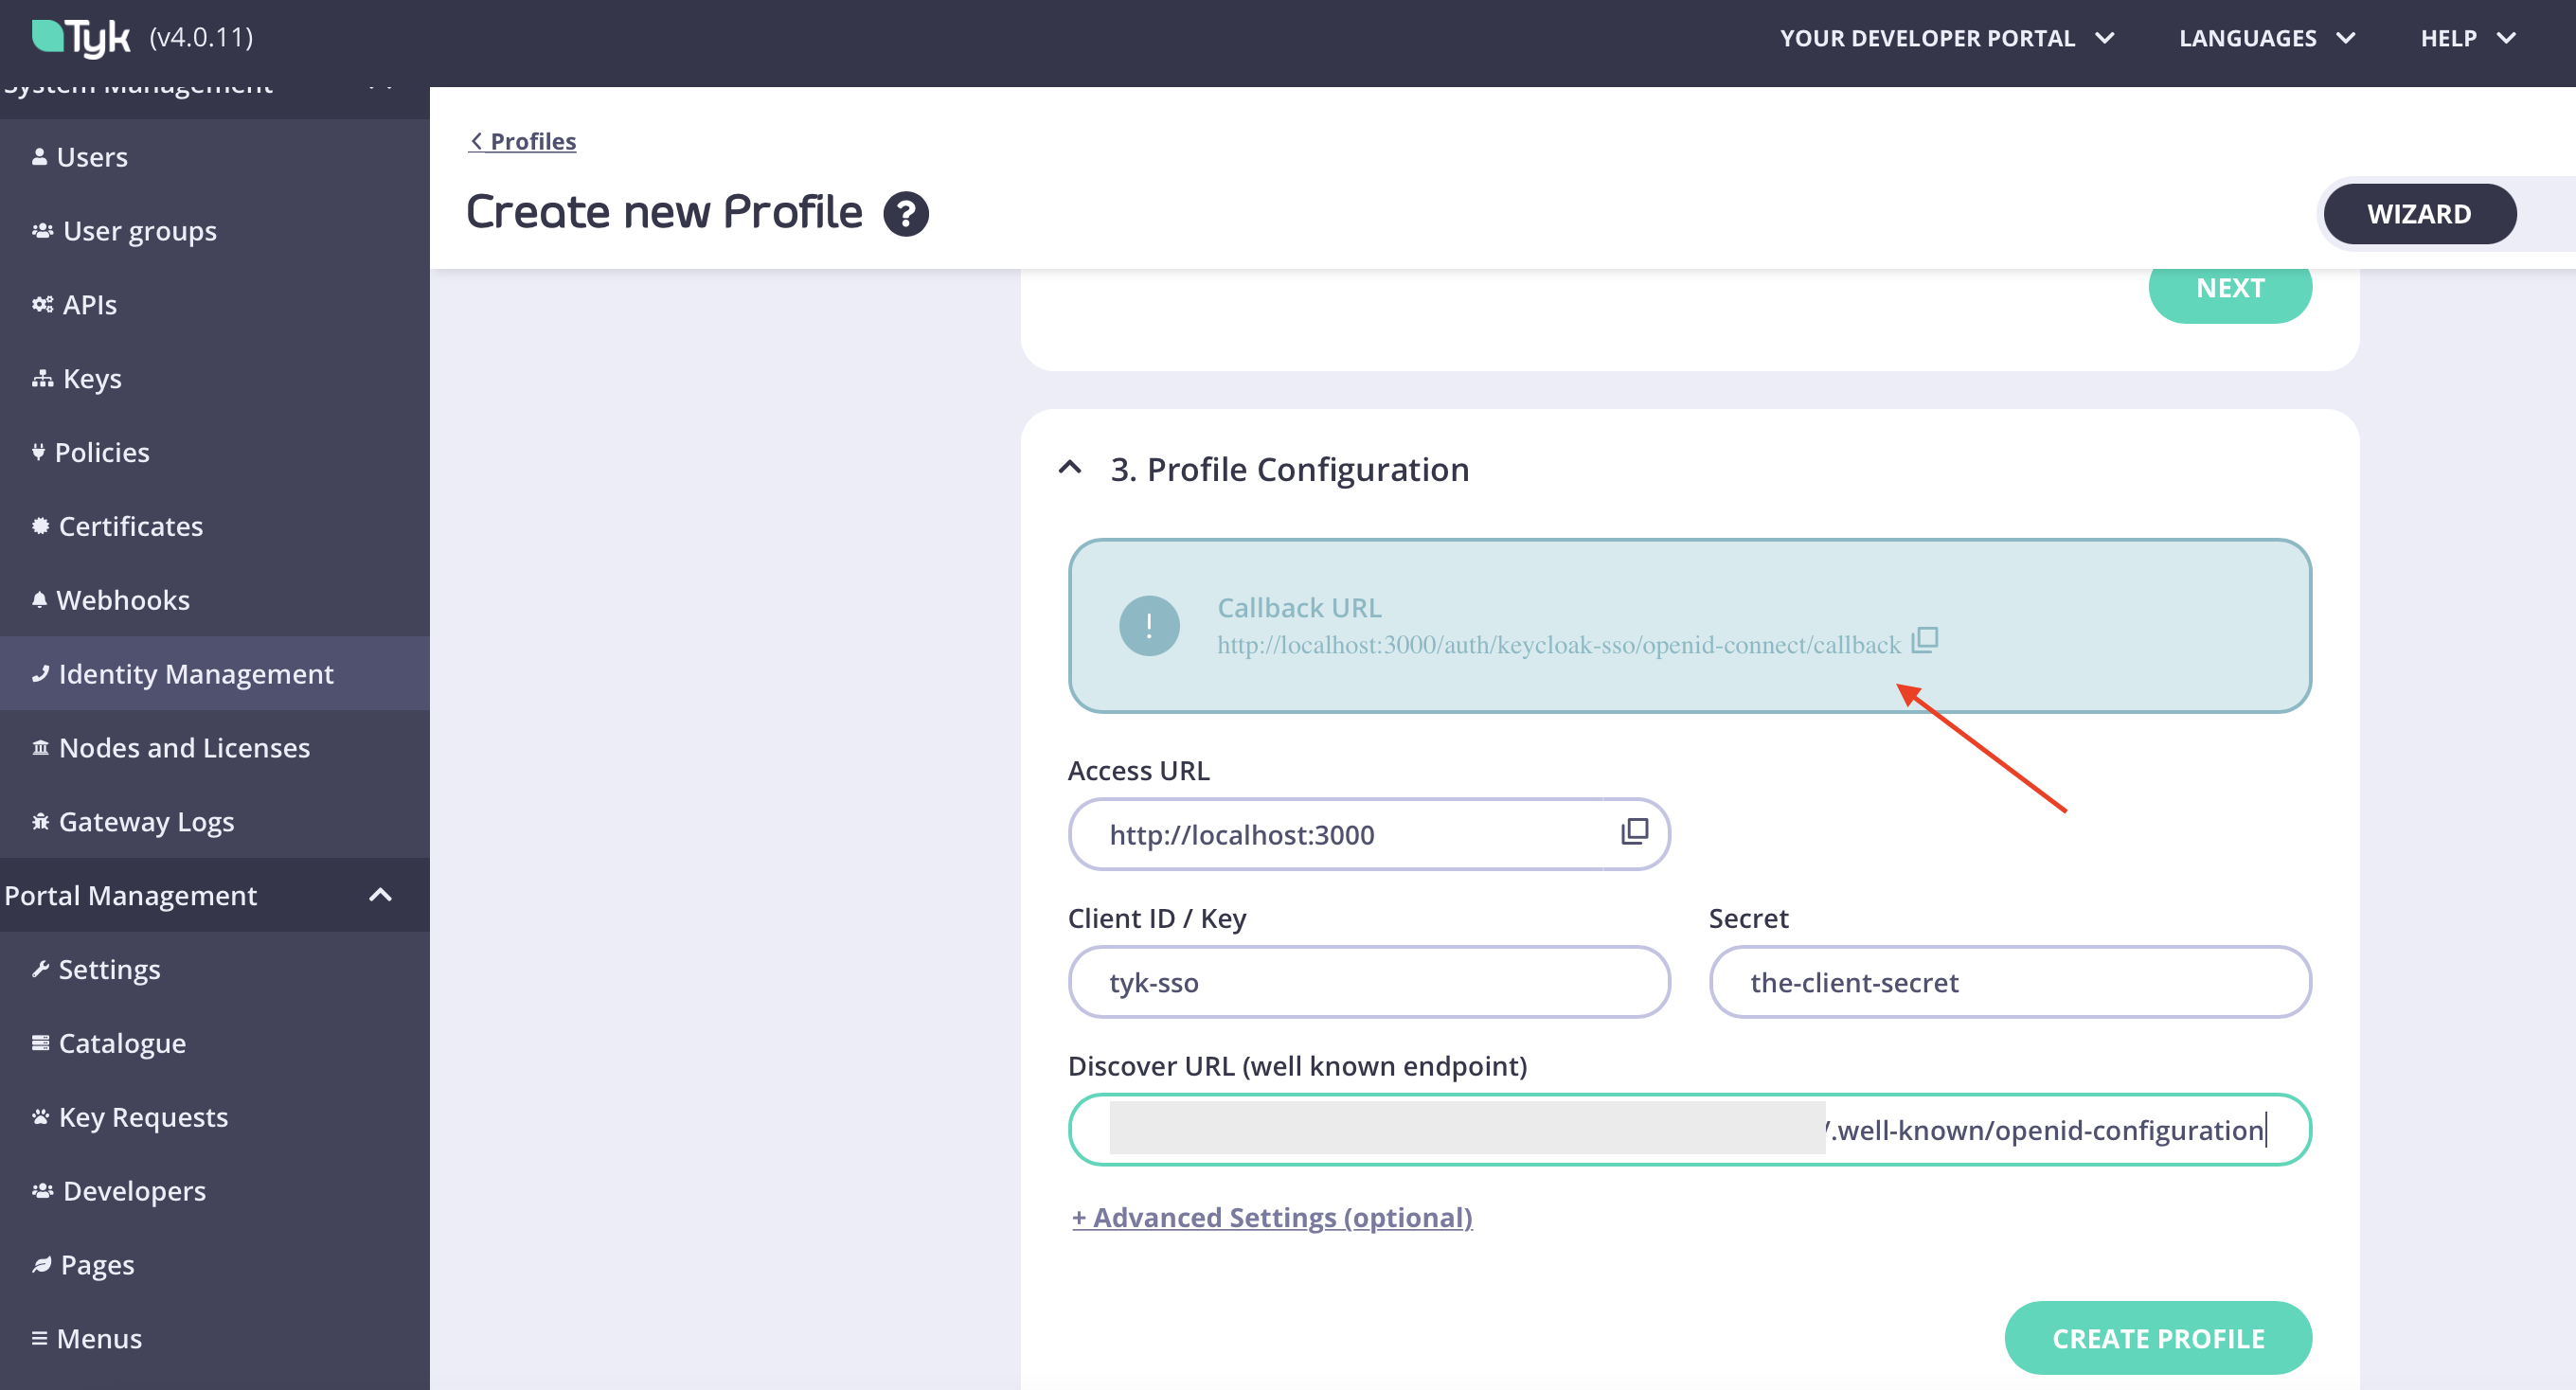
Configuration at Dashboard
-
Log in to your Dashboard and select Identity Management, located under System Management
-
Create a profile, give it a name and select “Login to Tyk Dashboard”
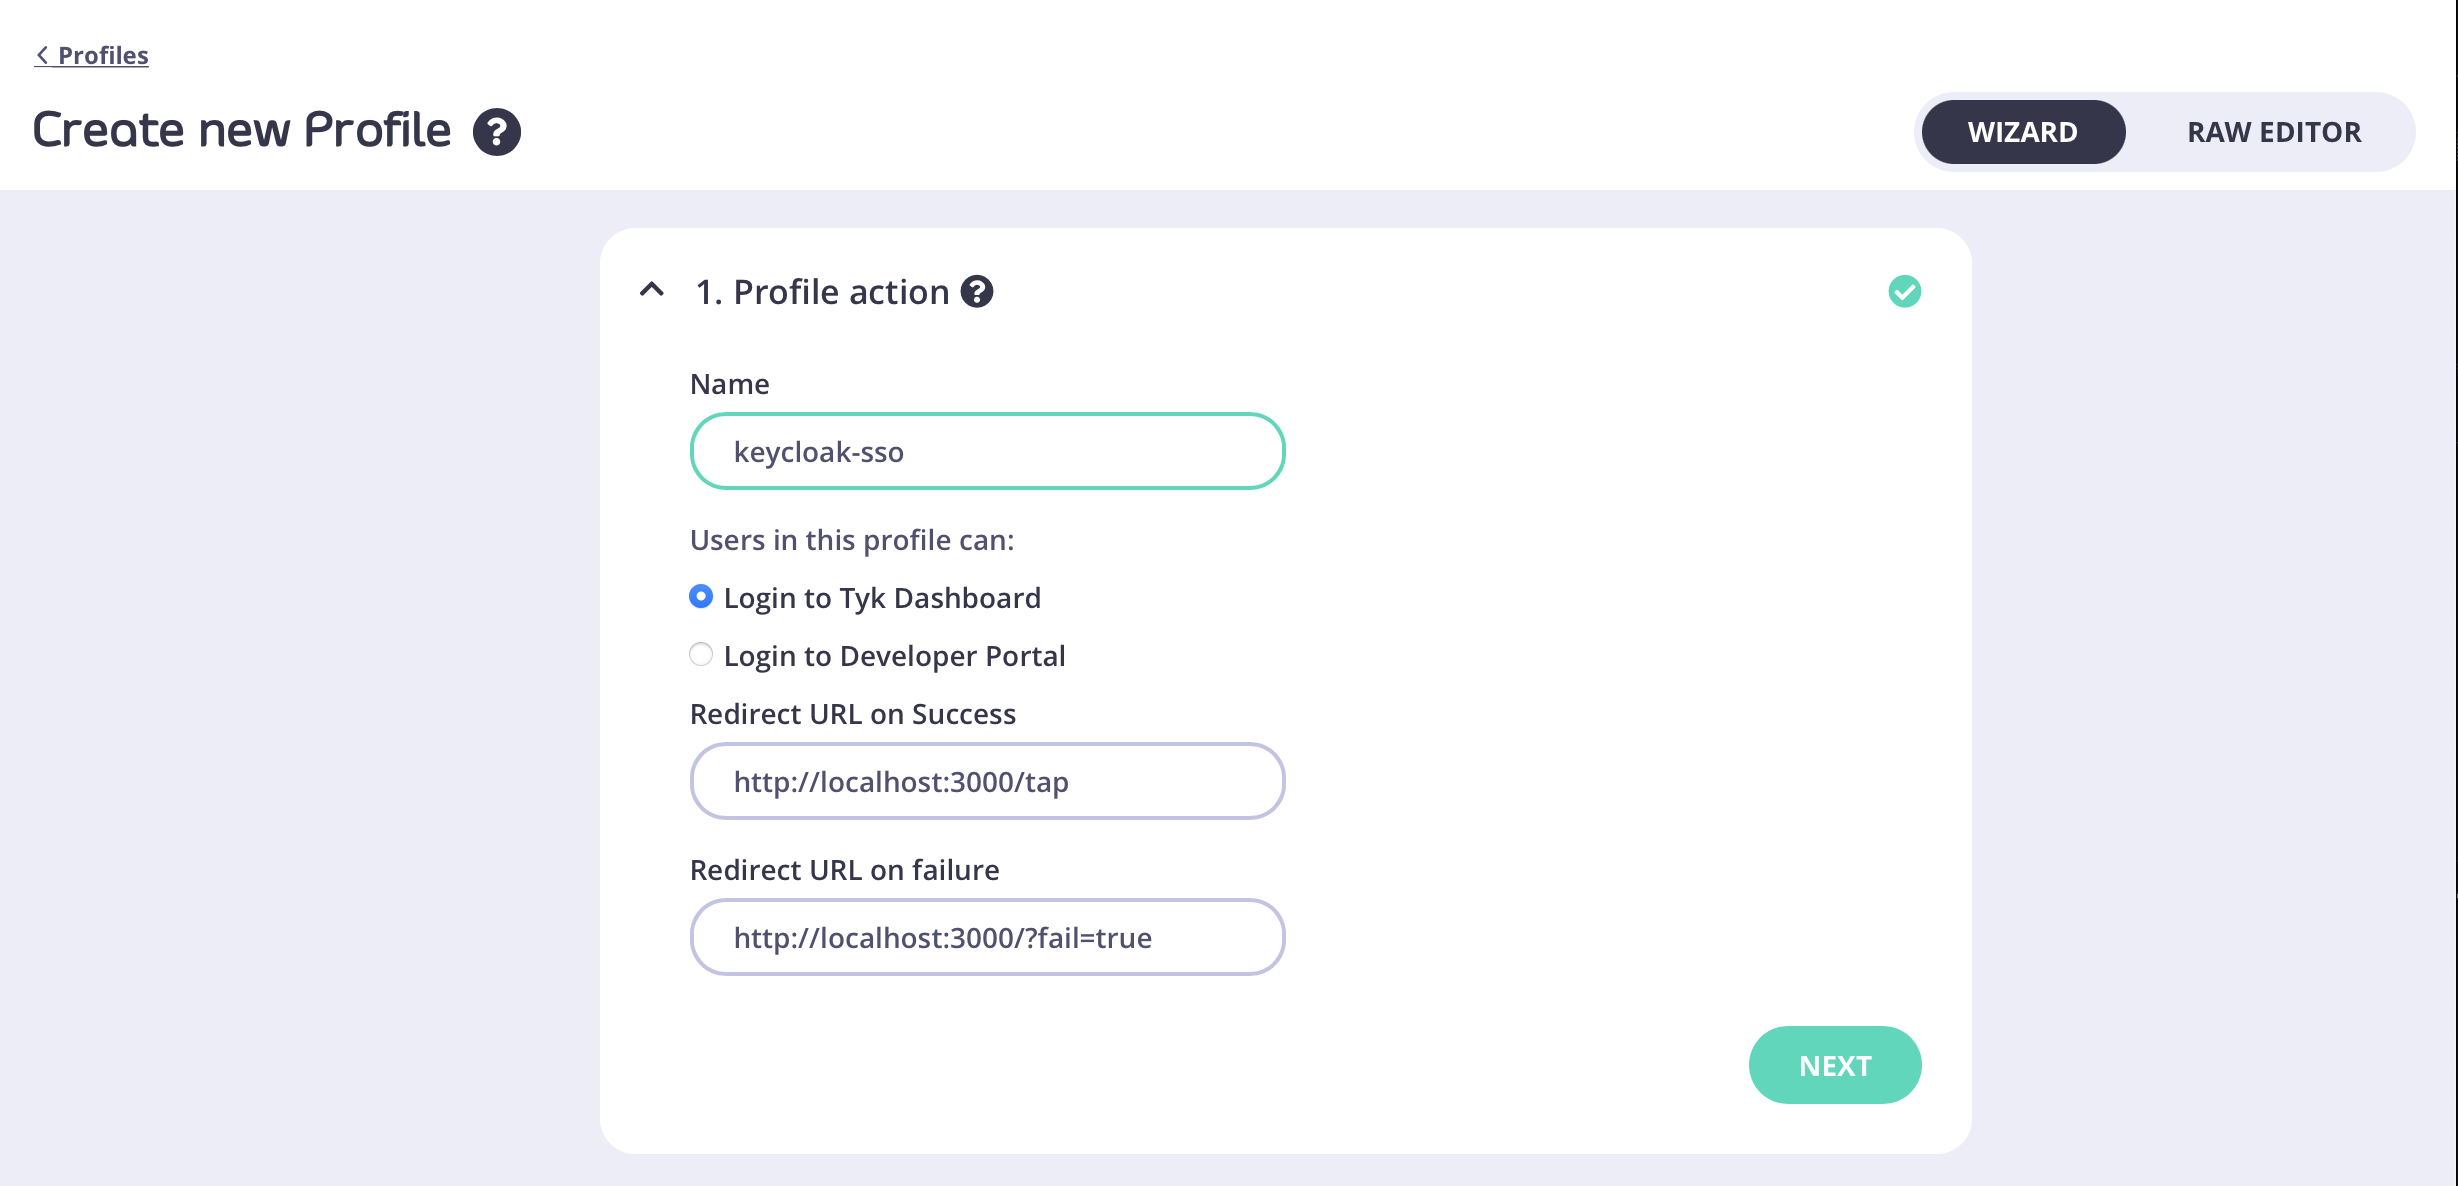
-
Set the provider type as “OpenID Connect”
- Fill in the Client ID, Client Secret and Discovery URL/endpoint from Keycloak (from steps 3 and 4 in Keycloak’s Side)
-
Copy the callback URL from Tyk and then you can click “Create Profile” to save the profile.
-
Go to Keycloak, and paste the callback URL you just copied to “Valid redirect URIs” in the Keycloak Client, and then save the client.
This can be accessed by selecting the “Settings” tab when viewing a Keycloak client.
Test Keycloak Login
- From your Identity Management Profiles click the profile you created to open it.
-
Copy the Login URL and paste it into a browser tab
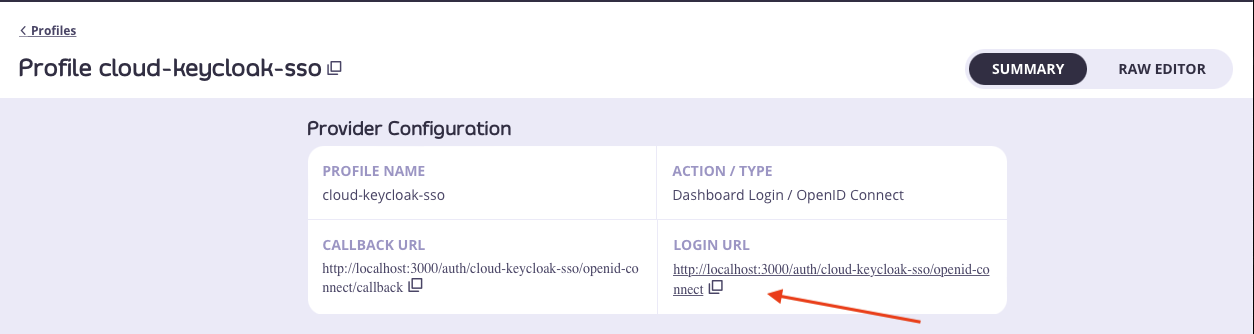
-
You will now see the Keycloak login form.
- Enter the email address and password of your Keycloak user.
-
You should now be redirected to the Tyk Dashboard and logged in
JSON Web Encryption with OIDC
Prerequisites- Tyk Identity Broker v1.6.1+ or Tyk Dashboard v5.7.0+ (JWE feature is available from these versions and in all subsequent releases).
- An Identity Provider (IdP) that supports JSON Web Encryption (JWE)
- A certificate with a private key for Tyk (used to decrypt the ID token)
- A public key file for the IdP (used to encrypt the ID token)
Steps for Configuration
-
Prepare Encryption Keys
-
Load the certificate with the private key into Tyk:
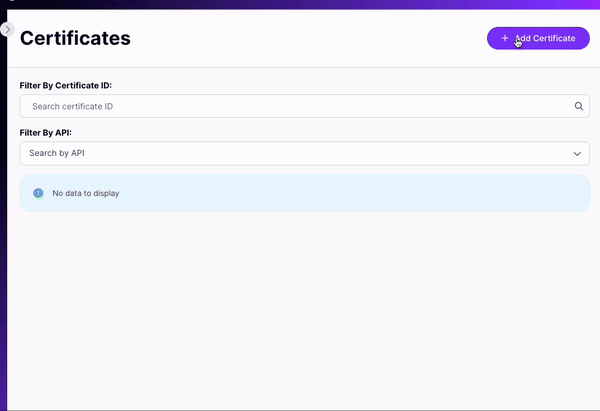
- For embedded TIB in Dashboard: Use Tyk Dashboard’s certificate manager. In the below image you can see the module in dashboard that allows to upload certificates:
- For standalone TIB: Store the certificate as a file accessible to Tyk
- For embedded TIB in Dashboard: Use Tyk Dashboard’s certificate manager. In the below image you can see the module in dashboard that allows to upload certificates:
- Load the public key into your IdP for ID token encryption (process varies by IdP)
-
Load the certificate with the private key into Tyk:
-
Configure the Identity Provider
- Create a new client in your IdP for Tyk Identity Broker
-
Setup OIDC Profile
- Create a new TIB profile:
- Select Social > OIDC as the provider
- Enter the client key and client secret from the IdP
- Copy the callback URL from TIB and add it to the IdP client’s allowed redirect URLs
- Test the basic SSO flow to ensure it’s working correctly
- Create a new TIB profile:
-
Enable JWE
-
Updated the TIB profile via API
- Add the following fields to the
ProviderConfigsection:
- Set
PrivateKeyLocationto either: - The certificate ID from the certificate manager, or
- The file path where the certificate and private key are stored
- Add the following fields to the
-
Update the IdP client configuration
- Enable JWE for the client
- Provide the public key for encryption
-
Updated the TIB profile via API
-
Verification
- Test the complete flow with JWE enabled to ensure proper functionality.
Troubleshooting
While setting up JWE with Tyk Identity Broker, you may encounter some challenges. This section outlines common issues and their solutions to help you navigate the implementation process smoothly.- oauth2: error decoding JWT token: jws: invalid token received, not all parts available it means that JWE is not enabled in the profile and the IDP is already using JWE.
- JWE Private Key not loaded Tyk encountered some issues while loading the certificate with the private key. Ensure that the path or certId are correct.