Overview
The Universal Data Graph (UDG) lets you combine multiple APIs into one universal interface. With the help of GraphQL you’re able to access multiple APIs with a single query. It’s important to note that you don’t even have to build your own GraphQL server. If you have existing REST APIs all you have to do is configure the UDG. With the Universal Data Graph Tyk becomes your central integration point for all your internal as well as external APIs. In addition to this, the UDG benefits from all existing solutions that already come with your Tyk installation. That is, your Data Graph will be secure from the start and there’s a large array of middleware you can build on to power your Graph.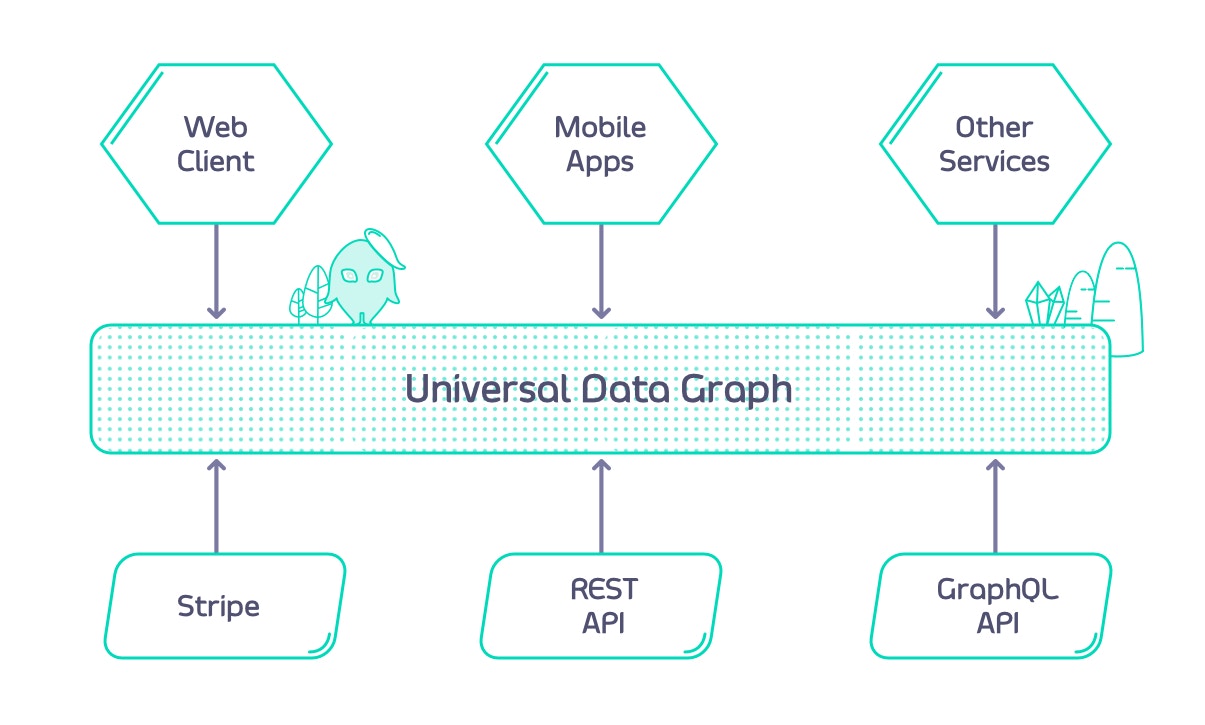
- REST
- GraphQL
- SOAP (through the REST datasource)
-
Kafka
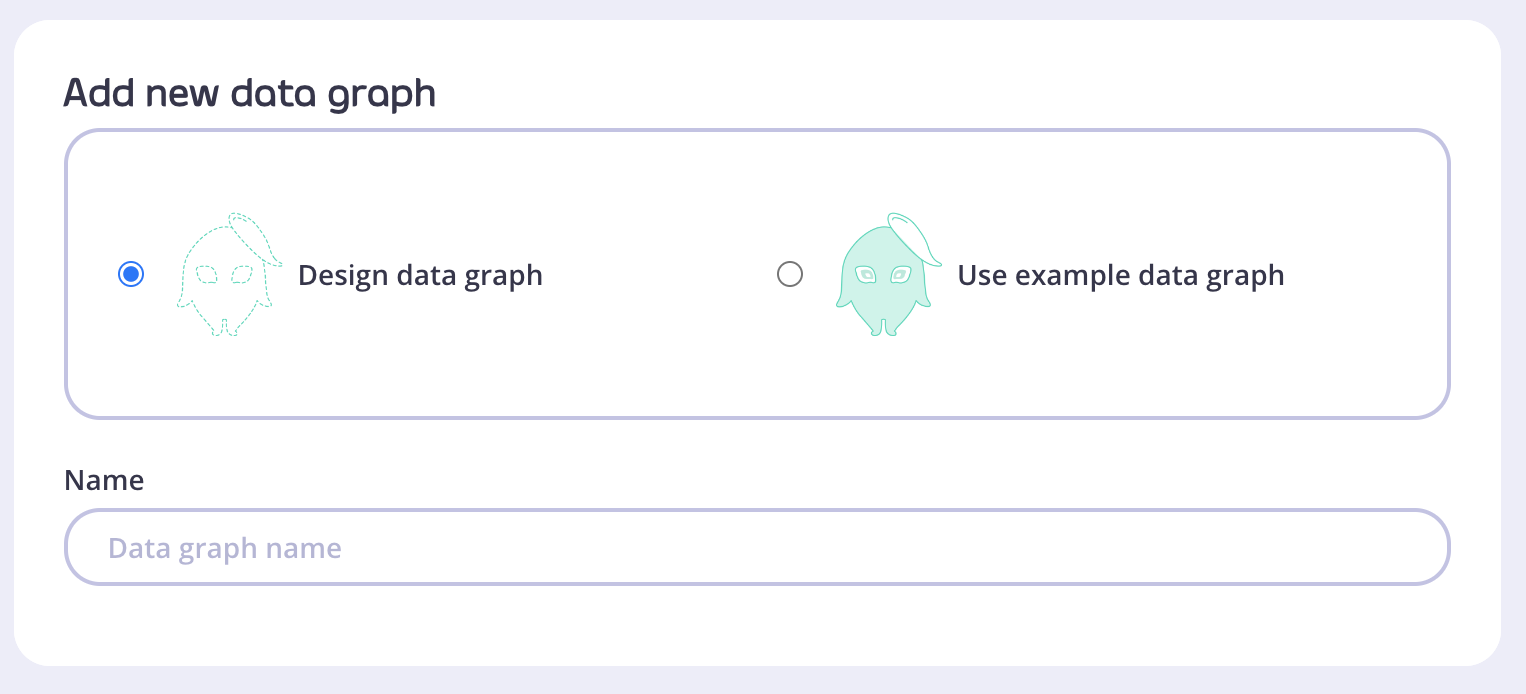
To start creating your first Universal Data Graph in Tyk Dashboard, go to “Data Graphs” section of the menu.
Key Concepts
Universal Data Graph
The Universal Data Graph (UDG) introduces a few concepts you should fully understand in order to make full use of it. UDG comes with a fully spec compliant GraphQL engine that you don’t have to code, you just have to configure it. For that you have to define your “DataSources” and might want to add “Field Mappings” as well as “Arguments” to your configuration. Read on in the sub sections to understand the full picture to use UDG to its full potential. To help you, we have put together the following video.DataSources
In most GraphQL implementations you have the concept of Resolvers. Resolvers are functions that take optional parameters and return (resolve) some data. Each resolver is attached to a specific type and field. DataSources are similar in that they are responsible for loading the data for a certain field and type. The difference is that with DataSources you simply configure how the engine should fetch the data whereas with traditional GraphQL frameworks you have to implement the function on your own. DataSources can be internal as well as external. Internal DataSources are APIs that are already managed by Tyk, such as REST or SOAP services configured through the Dashboard. You can take advantage of Tyk’s rich middleware ecosystem to validate and transform requests and responses for these internal DataSources. External DataSources are APIs that you’re not currently managing through Tyk. For simplicity, you can add them to your data graph without first configuring them as dedicated APIs in Tyk. If you later decide to apply middleware or other policies, you can easily transition an external DataSource into a managed internal API. Head over to the connect data source section to learn about the supported data sources and how to connect them to Tyk.Arguments
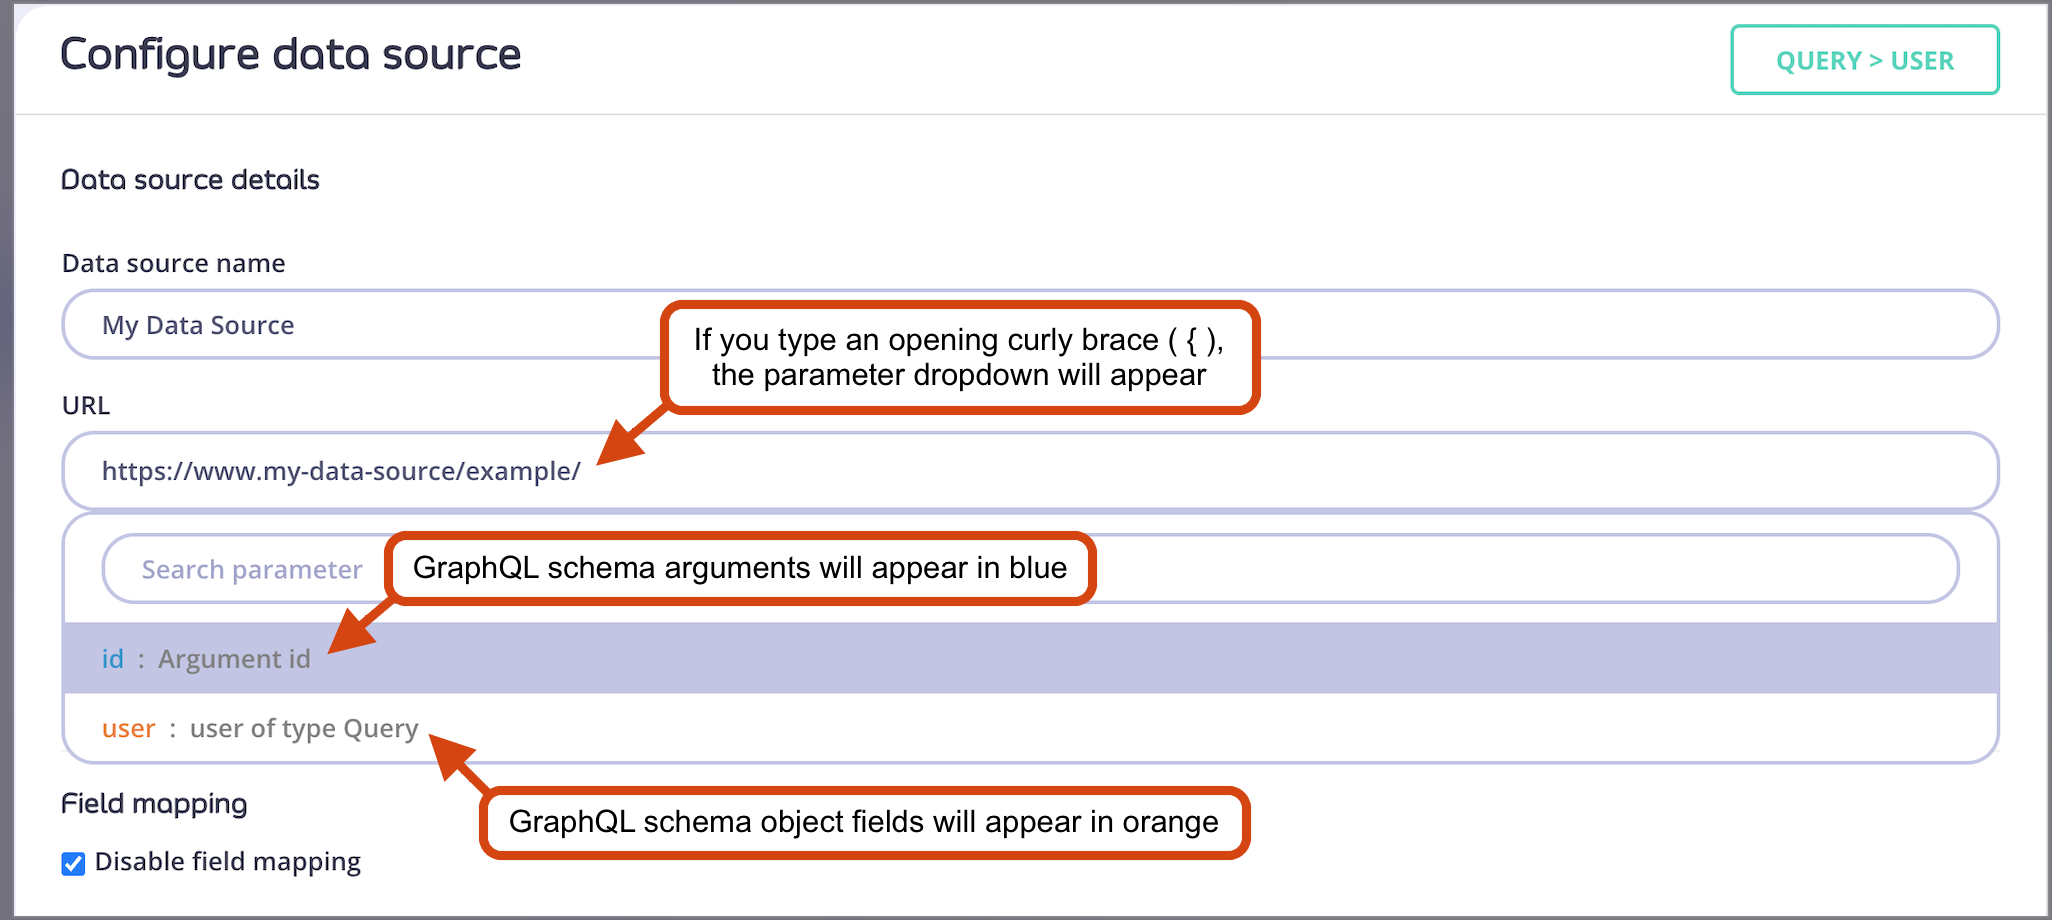
Looking back at the example from the “Field Mappings”, you might wonder how to use the “id” argument from the GraphQL query to make the correct REST API call to the user service. Here’s the schema again:{ ) will produce a dropdown that contains all available fields and arguments.
Field Mappings
Universal Data Graph can automatically resolve where data source information should go in the GraphQL response as long as the GraphQL schema mirrors the data source response structure. Let’s assume you have a REST API with a user resource like this:http://example.com/users/:id
The following is an example response:
user(id: Int!) query, UDG will be able to automatically resolve where id and name values should be in UDG response. In this case no field mapping is necessary.
GraphQL does not support field names with hyphens (e.g.
"user-name"). This can be resolved by using field mappings as described below.[] like this:
id, name and phone-number and fields mapping needs to be used as well. To get the response from inside the brackets the following syntax has to be used in field mapping: [0].
It is also possible to use this syntax for nested paths. For example: [0].user.phone-number
Field mapping in Tyk Dashboard
See below how to configure the field mapping for each individual field.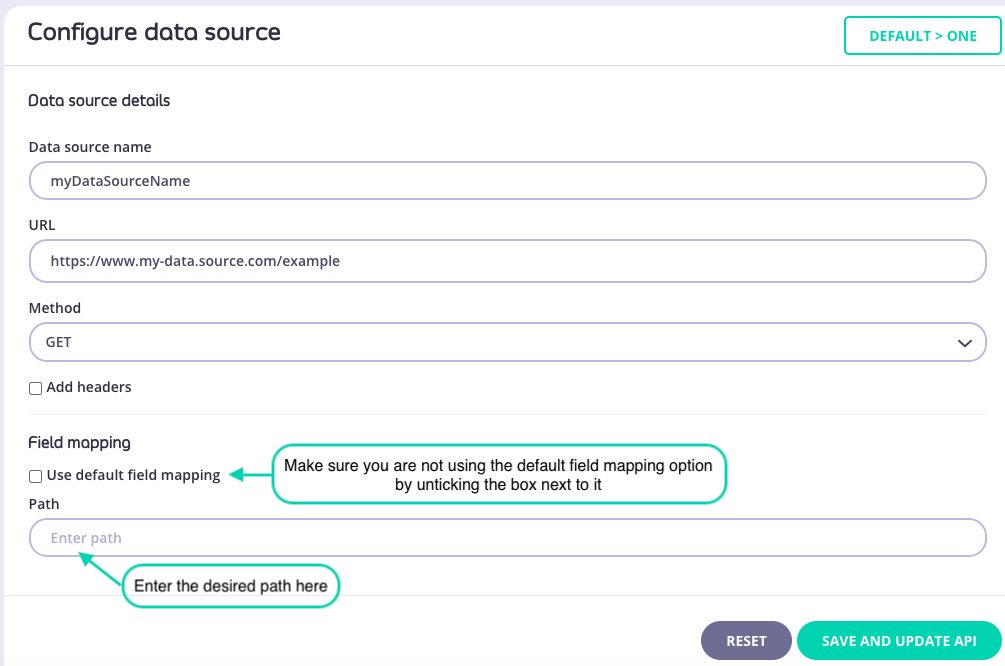
Field mapping in Tyk API definition
If you’re working with raw Tyk API definition the field mapping settings look like this:Reusing response fields
When using the UDG, there may be a situation where you want to access an API with data coming from another API. Consider the following REST APIs:- REST API for people:
https://people-api.dev/people - REST API for a specific person:
https://people-api.dev/people/{person_id} - REST API for driver licenses:
https://driver-license-api.dev/driver-licenses/{driver_license_id}
driverLicenseID from the People API to obtain the driver license data from the Driver License API.
You also want to design the schema so that it represents the relationship between a person and a driver license.
As the person object is referencing a driver license by its ID, it means that we will need to define the driver license inside the person object as a field.
Consequently, a schema representing such a relationship might look like this:
Defining the data source URLs
Now it’s all about defining the data source URLs. For the fieldQuery.people, you can simply use the URL to the API:
Query.person field needs to use its id argument to call the correct API endpoint.
See Concept: Arguments to learn more about it.
driverLicenseID from the Person object. As we defined the driver license data source on the Person object, you can now access all properties from the Person object by using the .object placeholder.
If you want to access data from the object on which the data source is defined, use the
.object placeholder (e.g: .object.id to access the id property from an object).
Result
A query like:Header management
With Tyk v5.2 the possibilities of managing headers for Universal Data Graph and all associated data sources have been extended.Global headers for UDG
Global headers can be configured via Tyk API Definition. The correct place to do that is withingraphql.engine.global_headers section. For example:
Data source headers
Data source headers can be configured via Tyk API Definition and via Tyk Dashboard UI. The correct place to do that is withingraphql.engine.datasources.config.headers section. For example:
Headers priority order
If a header has a value at the data source and global level, then the data source value takes precedence. For example for the below configuration:example-header header name is used globally and there is also a data source level header, with a different value. Value data-source-value will take priority over global-header-value, resulting in the following headers being sent to the data source:
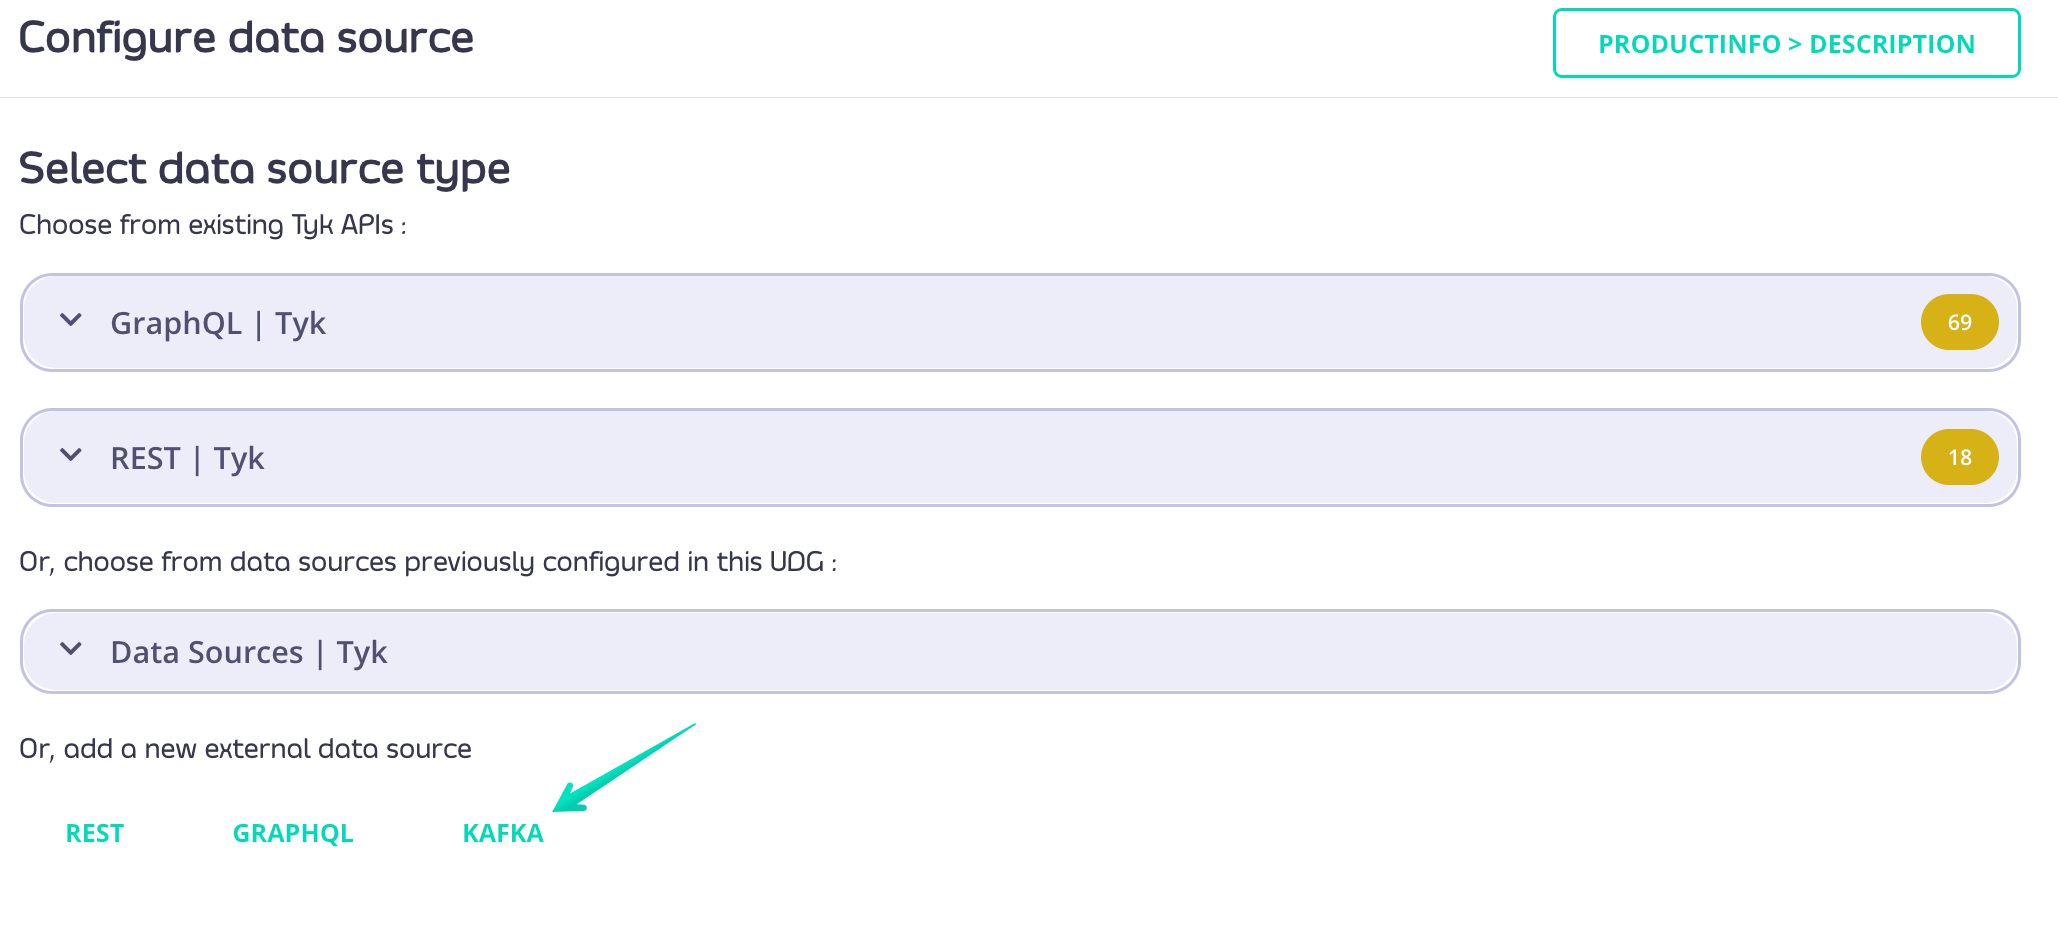
Connect Data Sources
UDG
Datasources are the fuel to power any Unified Data Graph and the designed schema. Datasources can be attached to any field available in the composed UDG schema. They can also be nested within each other. You can add Datasources to your Universal Data Graph without adding them to Tyk as a dedicated API. This is useful for getting started but also limited in capabilities. Datasources that are managed within Tyk offer much more flexibility and allow for a much fuller API Management control. If you want to add quotas, rate limiting, body transformations etc. to a REST Datasource it is recommended to first import the API to Tyk. Supported DataSources:- REST (Query and Mutation only)
- GraphQL (Query, Mutation, and Subscription)
- SOAP (through the REST DataSource, Query and Mutation only)
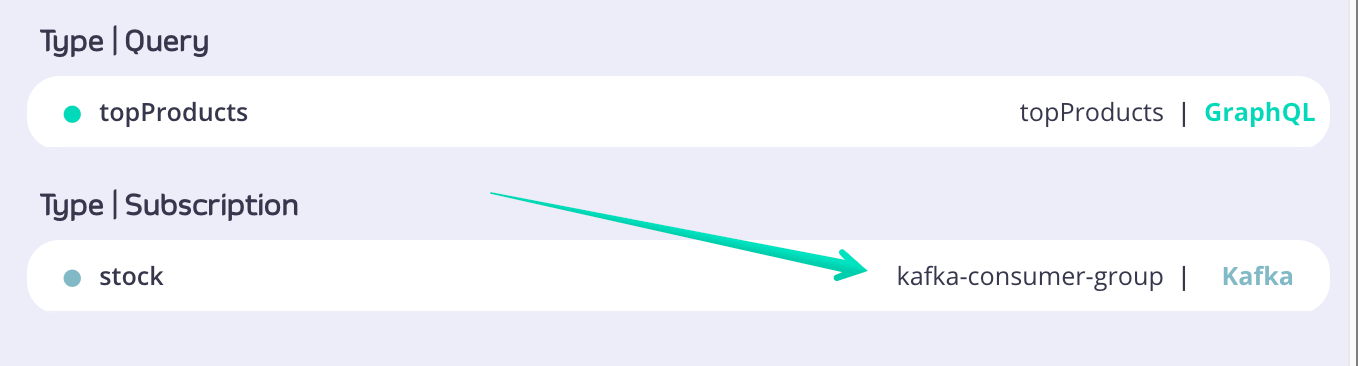
- Kafka (Subscription only)
UDG subscriptions (including SSE) are only supported for data sources of kind GraphQL or Kafka. REST data sources do not support subscriptions. If your upstream service exposes subscriptions via SSE, configure it as a GraphQL data source with the appropriate
subscription_type. See GraphQL Subscriptions for configuration details.GraphQL
The GraphQL Datasource is able to make GraphQL queries to your upstream GraphQL service. In terms of configuration there are no real differences between the GraphQL Datasource and the one for REST with one slight exception.GraphQL data source at operation root level
To illustrate this we’ll have a look at an example graph. Consider the following schema: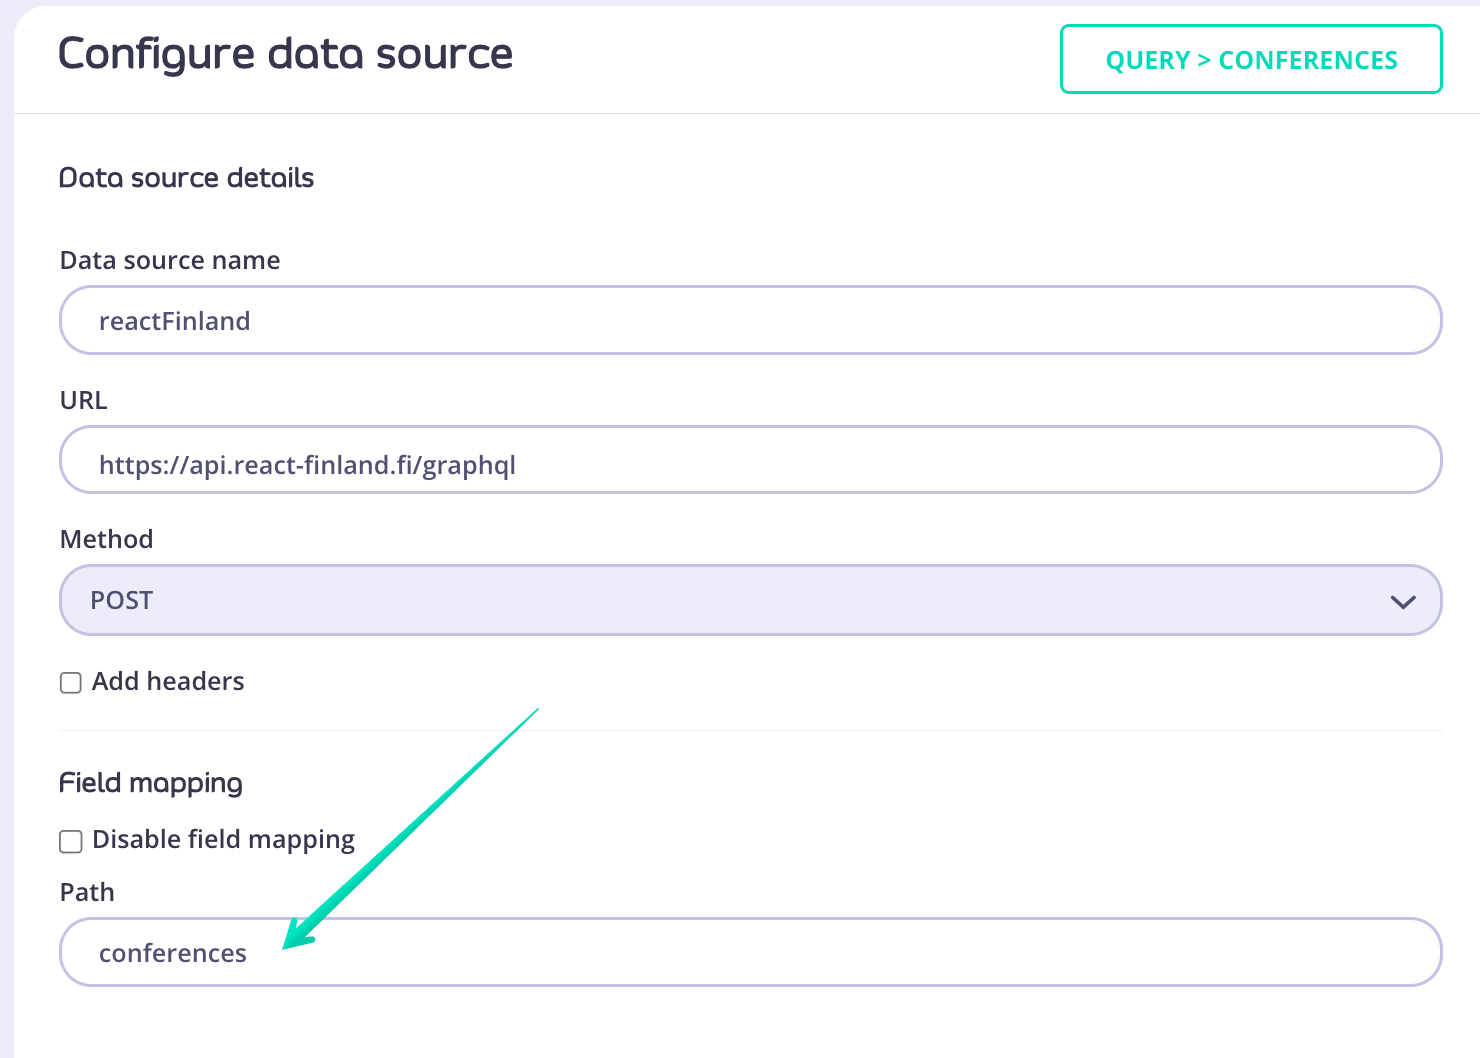
GraphQL data source at type/field level
In case you want to add GraphQL data source at a lower level of your schema - type/field - the configuration steps are as follows:- Navigate to the field you want the GraphQL data source to be connected to and click on it.
- From the right-hand side menu choose GraphQL | Tyk or External GraphQL depending on wheather your data source was previously created in Tyk or if it’s an external service. Provide a data source name and URL.
-
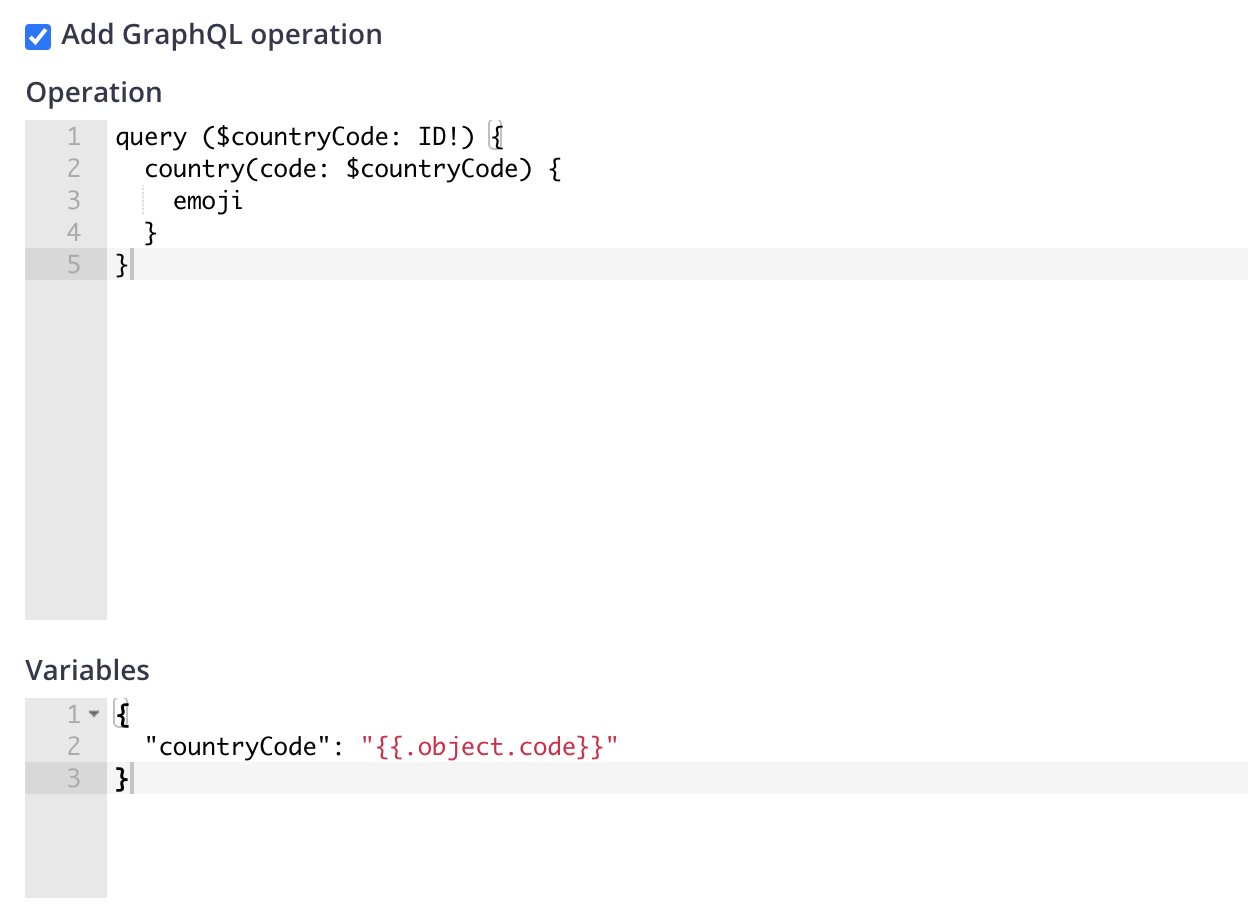
Tick the box next to
Add GraphQL operationto see additional configuration fields. This will allow you to provide a query that will execute against the data source. -
Write the query in the
Operationbox and if you’re using any variables provide those inVariablesbox.You can use objects from your Data Graph schema as variables by referring to them using this syntax:{{.object.code}}
Kafka
The Kafka DataSource is able to subscribe to Kafka topics and query the events with GraphQL. The Kafka DataSource utilizes consumer groups to subscribe to the given topics, and inherits all behavior of the consumer group concept. Consumer groups are made up of multiple cooperating consumers, and the membership of these groups can change over time. Users can easily add a new consumer to the group to scale the processing load. A consumer can also go offline either for planned maintenance or due to an unexpected failure. Kafka maintains the membership of each group and redistributes work when necessary. When multiple consumers are subscribed to a topic and belong to the same consumer group, each consumer in the group will receive messages from a different subset of the partitions in the topic. You should know that if you add more consumers to a single group with a single topic than you have partitions, some consumers will be idle and get no messages.Basic Configuration
You can find the full documentation for Kafka DataSource configuration here. broker_addresses In order to work with the Kafka DataSource, you first need a running Kafka cluster. The configuration takes a list of known broker addresses and discovers the rest of the cluster.group_id field to set the consumer group name.
group_id or you can run multiple subscription queries using the same API. Please keep in mind that the Kafka DataSource inherits all behaviors of the consumer group concept.
client_id
Finally, we need the client_id field to complete the configuration. It is a user-provided string that is sent with every request to the brokers for logging, debugging, and auditing purposes.
Kafka Datasource configuration via Dashboard
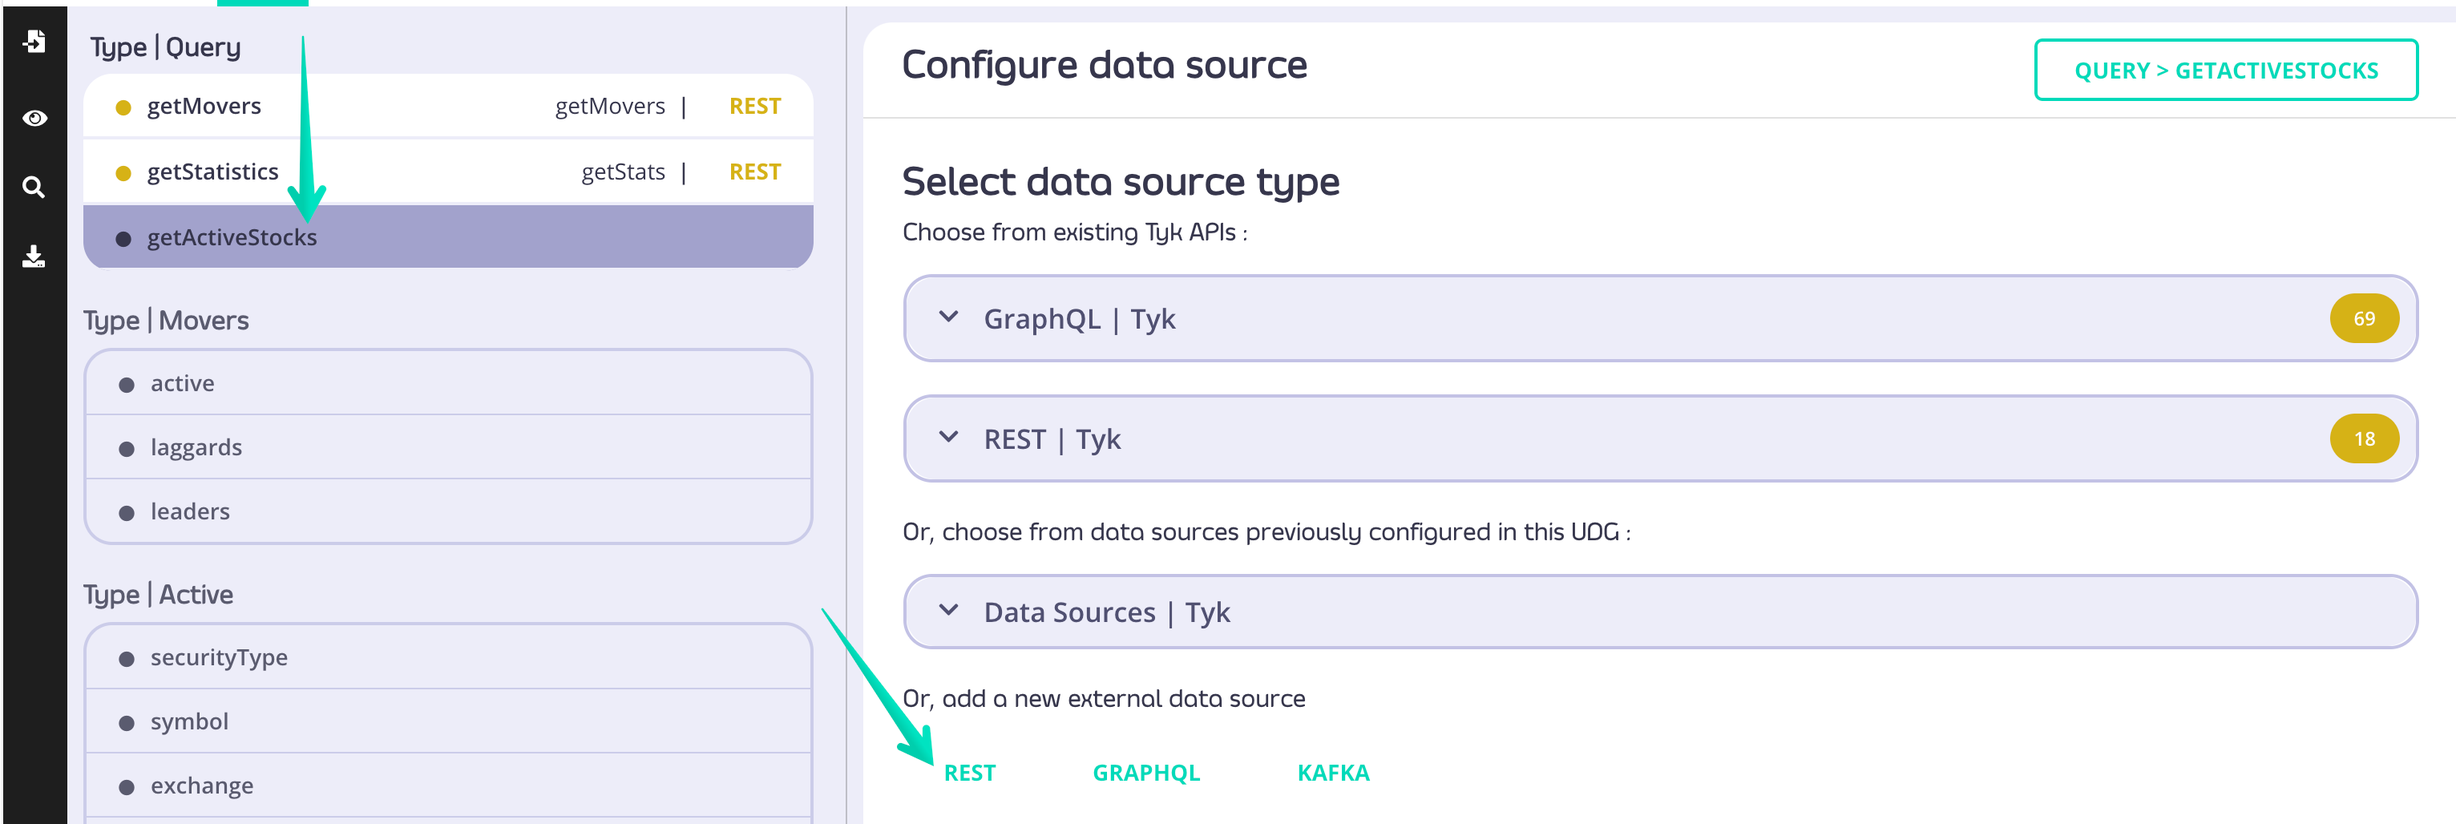
- Click on the field which should have Kafka datasource attached
- From the right-hand side Configure data source panel choose KAFKA at the bottom in the Add a new external data source section
- Provide datasource name, broker address (at least 1), topics (at least 1), groupID, clientID. Optionally you can also choose Kafka version, balance strategy and field mapping options.
- Click SAVE button to persist the configuration.
Subscribing to topics
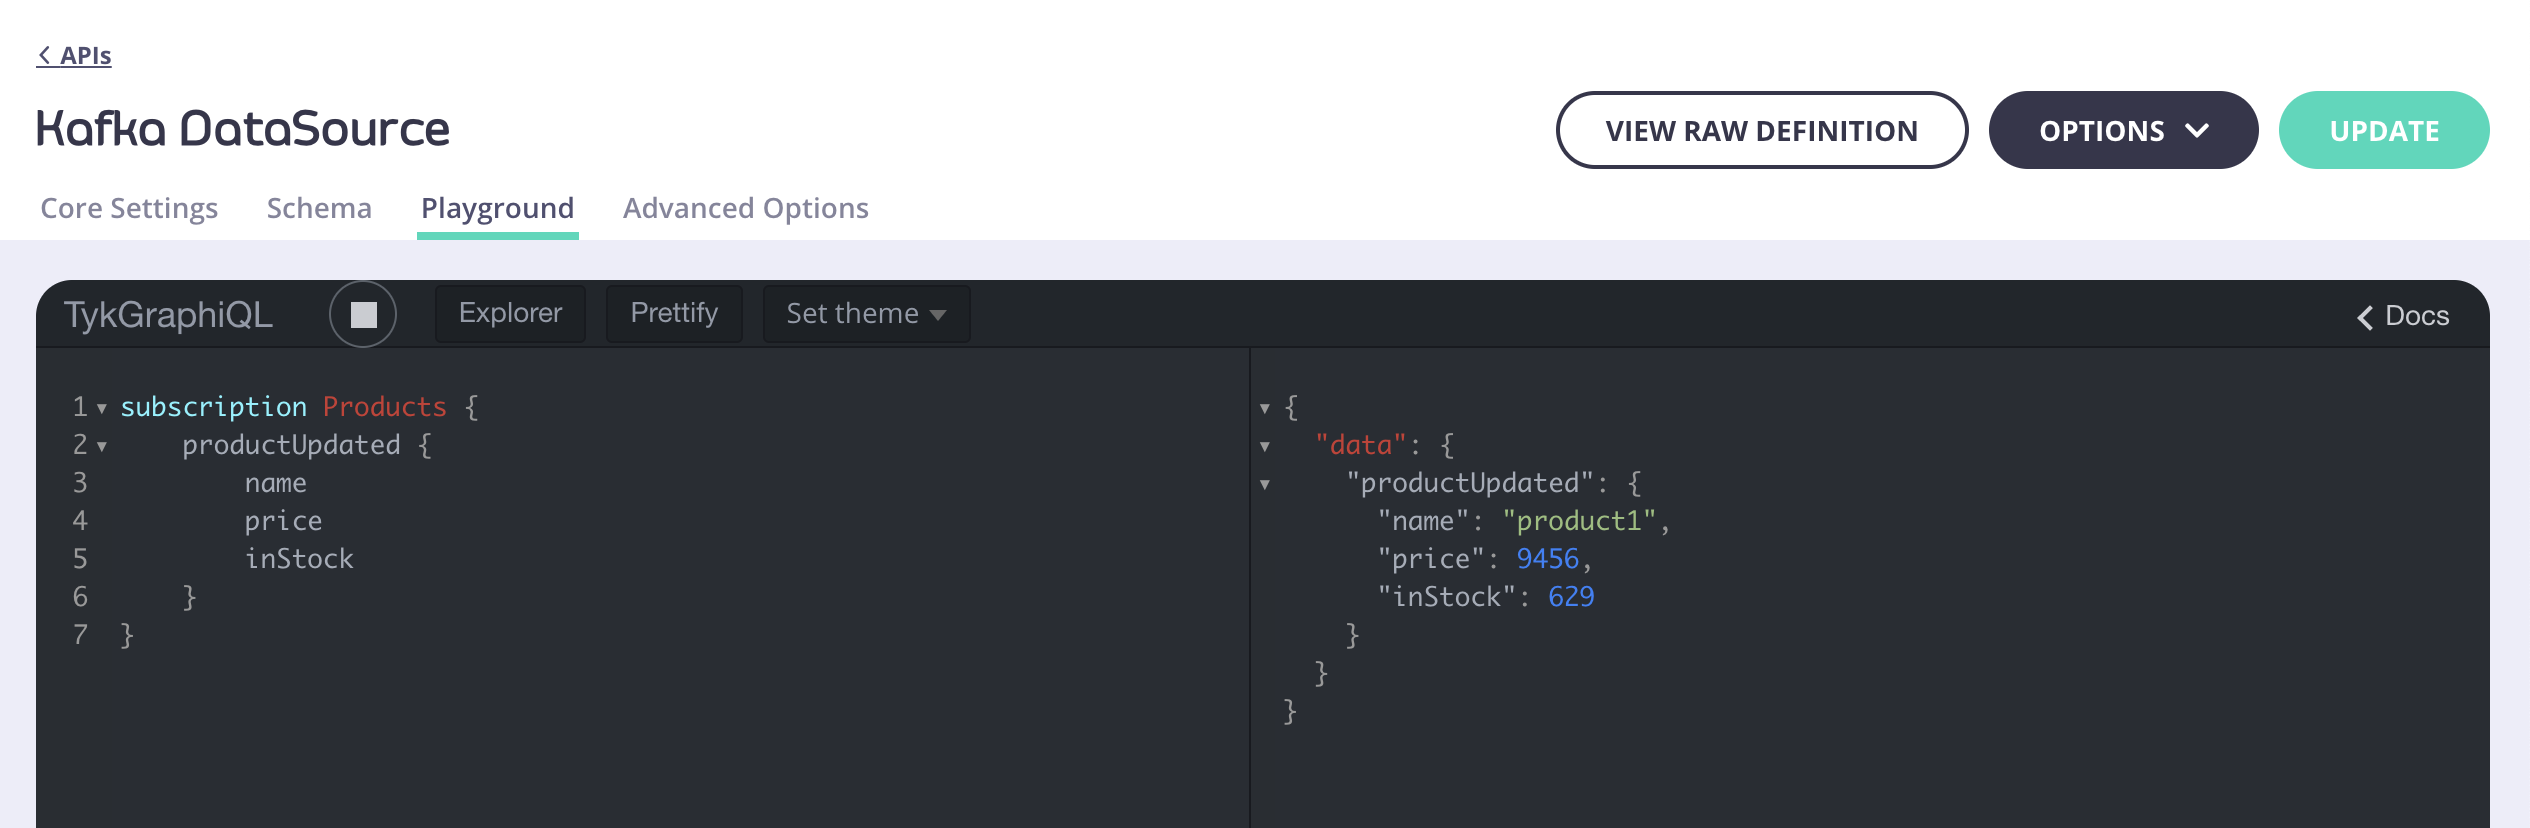
TheSubscription type always defines the top-level fields that consumers can subscribe to. Let’s consider the following definition:
productUpdated field will be updated each time a product is updated. Updating a product means a price or inStock fields of Product are updated and an event is published to a Kafka topic. Consumers can subscribe to the productUpdated field by sending the following query to the server:
Publishing events for testing
In order to test the Kafka DataSource, you can publish the following event toproduct-updates topic:
product-updates.
When you change any of the fields, all subscribers of the productUpdatedkafk field are going to receive the new product info.
The result should be similar to the following:
API Definition for the Kafka DataSource
The Kafka DataSource configuration:REST
The REST Datasource is a base component of UDG to help you add existing REST APIs to your data graph. By attaching a REST datasource to a field the engine will use the REST resource for resolving.REST data sources only support Query and Mutation operations. Subscriptions (including SSE and WebSockets) are not supported for REST kind data sources.To use GraphQL subscriptions with UDG (including SSE), you must use a data source of kind GraphQL or Kafka. See GraphQL Subscriptions for details on configuring SSE subscriptions with a GraphQL data source.
Using external REST API as a Datasource
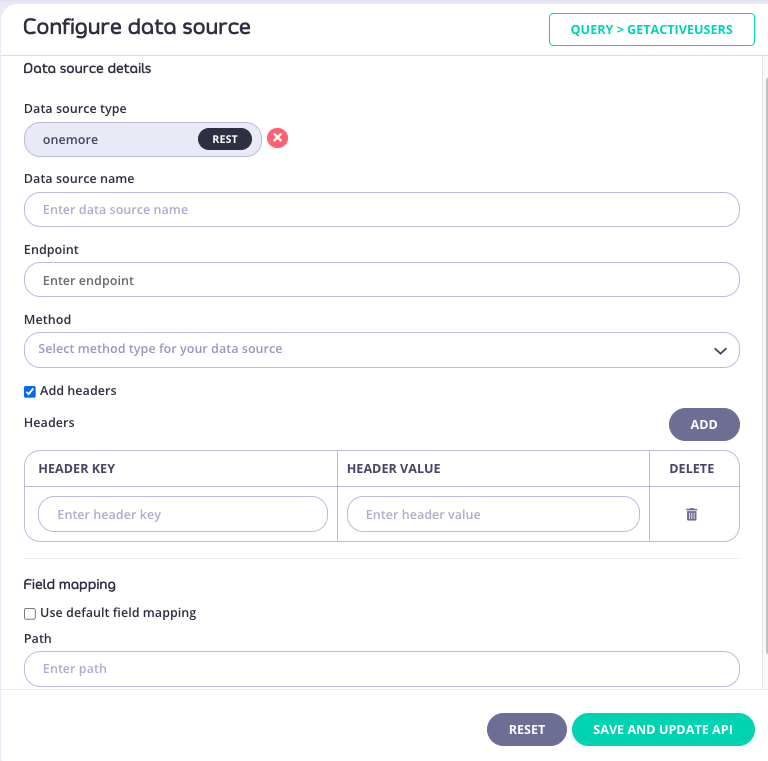
In order to use an external REST API as a Datasource you need to first navigate to the field which that Datasource should be attached to.- Click on the field which should have a datasource attached
- From the right-hand side Configure data source panel choose REST at the bottom in the Add a new external data source section
- Provide data source name, URL, method to be used. Optionally you can add headers information and configure field mapping
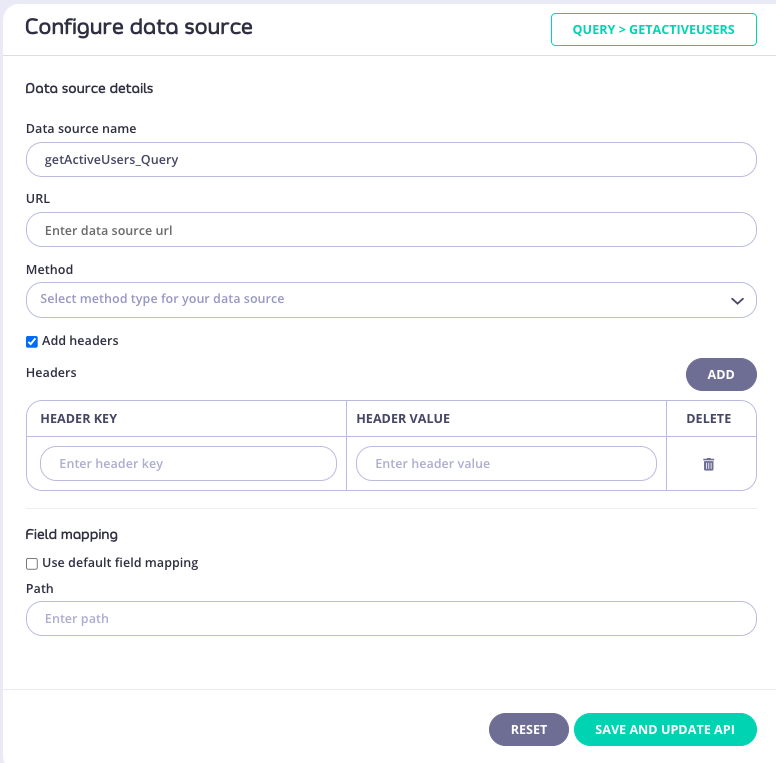
- Click the Save & Update API button to persist the configuration and generate a REST resolver, to resolve this field at runtime.
Using Tyk REST API as a Datasource
- Click on the field which should have a datasource attached
- From the right-hand side Configure data source panel choose REST | Tyk dropdown to see all available APIs
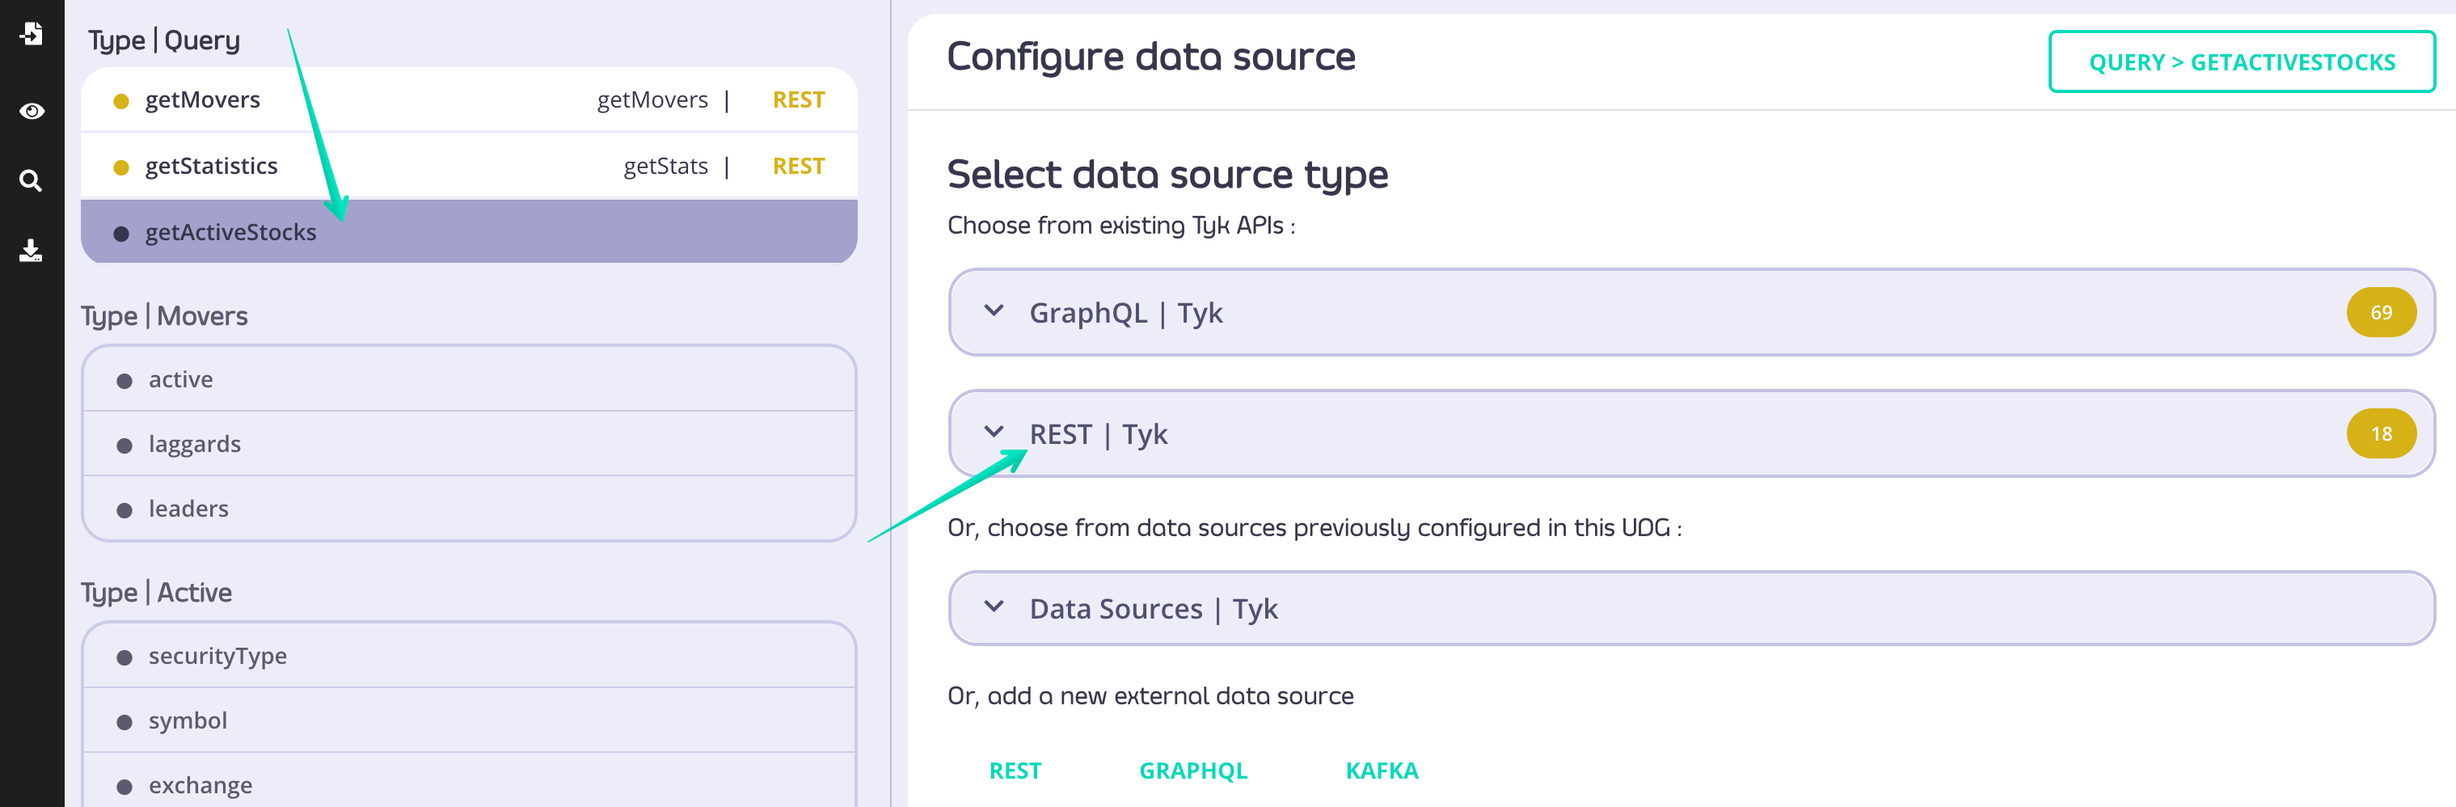
- Choose which Tyk REST API you want to attach
- Provide data source name, endpoint and method to be used. Optionally you can add headers information and configure field mapping
- Click the Save & Update API button to persist the configuration and generate a REST resolver, to resolve this field at runtime.
Automatically creating REST UDG configuration based on OAS specification
Tyk Dashboard users have an option to use Tyk Dashboard API and quickly transform REST API OAS specification into a UDG config and have it published in the Dasboard within seconds. See our Postman collections and forkTyk Dashboard API v5.1.
The endpoint you need to use is:
type is an enum with the following possible values:
- openapi
- asyncapi
openapi.
If you are using Postman and your OAS document is in yaml format you can use a simple pre-request script to transform it into a string.
Tyk
Tyk DataSources are exactly the same as GraphQL or REST DataSources. The only difference is that you can directly choose an endpoint from your existing APIs using a drop-down. This makes it easier to set up and prevents typos compared to typing in the URL etc. From a technical perspective there’s another difference: Tyk DataSources make it possible to call into existing APIs on a Tyk Gateway, even if those are marked as internal. They also add a lot of flexibility as you can add custom middleware, AuthZ as well as AuthN, rate limits, quotas etc. to these. In general, it is advised to first add all APIs you’d wish to add to a data graph as a dedicated API to Tyk. Then in a second step you’d add these to your data graph. Then in a second step you’d add these to your data graph.As of
v3.2.0 internal datasorces (TykRESTDataSource and TykGraphQLDataSource) will be deprecated at the API level. Please use HTTPJSONDataSource or GraphQLDataSource respectively.Getting Started
Overview
In this getting started tutorial we will combine 2 different HTTP services (Users and Reviews) into one single unified UDG API. Instead of querying these two services separately (and probably merging their responses later) we’ll use UDG to get result from both the API’s in one single response.
Prerequisites
- Access to Tyk Dashboard
- Node.JS v.13^ (only to follow this example)
Running example services locally
Clone repo
Now that we have Users service running on port
4000 and Reviews service running on port 4001 let’s see how we can combine these two into one single UDG API in following tutorial.
Creating Schema
- Create API
“Add New API” and UDG. You might want to give your Universal Data Graph an individual name (i.e. User-Reviews-Demo)
- Set Authentication
Keyless(Open). To do this, scroll down to the Authentication section.
The API authentication is set to Keyless for demo purposes, it’s not recommended to use this setting in production, we’ll explore how to secure the UDG later in this guide.
- Configure Schema
gql , graphql and graphqls.
- Save
Now if we try to query our UDG API it should error at this moment as we do not have any data-source attached to it, let’s see how we can do that in next section.
Connect Datasource
Upon navigating to schema tab on API details page you’ll see a split screen view with schema and user interface for available fields to configure the datasource.
You can attach datasource to each individual field and can also re-use the datasource for multiple fields for performance benefits in case it has similar configuration (it needs to use the same upstream URL and method).
We will start with attaching datasource to user query using following approach.
1. Select field to attach datasource.
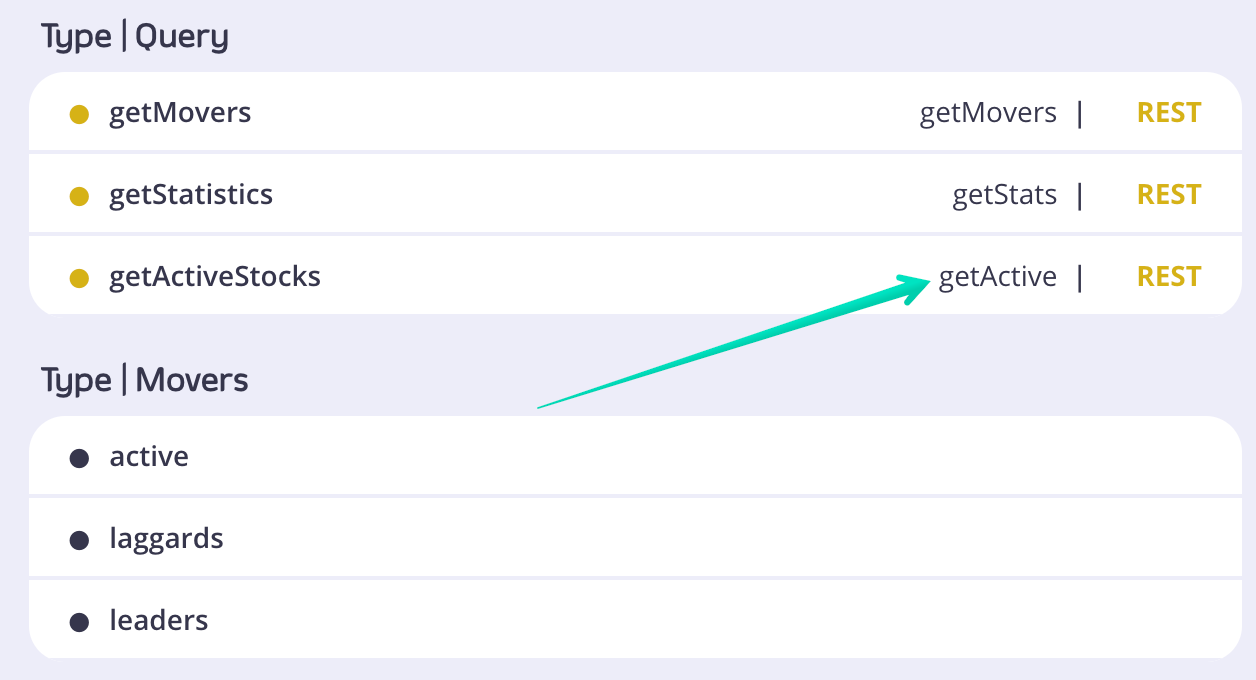
Upon selecting theUsers field on type Query, you’ll see the options to configure that field for following kinds of datasources.
- REST
- GraphQL
- Kafka
2. Select datasource type.
Since our upstream services are REST, we’ll select REST as datasource type but other kind of datasources can be used as well:- Use external data source: Will allow to configure the field to resolve with the external API (outside Tyk environment)
- Using exiting APIs: Which will allow to configure the field with the API that already exists in Tyk environment.
- Re-use already configured data source: If you already have configured a data source for the same API you can re-use the same data-source. If the data source is reused the endpoint will only be called once by Tyk.
3. Configure datasource details.
Configure the data source with the following fields Name Enter a unique datasource name configuration to reuse it in the future. We will name this asgetUserById for the given example.
When configuring a datasource name with Tyk Dashboard, a default name is created automatically by concatenating the field name and the GraphQL type name with an underscore symbol in between. For example, getUserById_Query. This name is editable and can be changed by the user.
URL
We will use the URL for our Users service which returns details of an user for given id i.e http://localhost:4000/users/:id.
To dynamically inject the id for every request made, we can use templating syntax and inject id with user supplied argument or we can also use session object.
To avoid typos in template you can use the UI component to automatically create a template for you. You can select from the available argument and object template options from the list generated by input component which is triggered by entering { in input.
To learn more about arguments click here
To learn more about reusing response fields click here
4. Enter datasource name.
Enter a unique datasource name your configuration to reuse it in the future. We will name this asgetUserById for the given example
5. Select HTTP method for the URL.
You can select the HTTP method for your upstream url. Which should beGET in our case.
6. Add headers (Optional)
If you upstream expects headers, you can supply them using this. You can also use templating syntax here to reuse request headers.7. Select field mapping
Keep the field mapping disabled by default. You can use field mapping to map the API response with your schema. You can learn more about field mapping here8. Save data source
It is important to save the datasource configuration in order to reflect the changes in your API definition. The“Save & Update API”button will persist the full API definition.
9. Update API and Test
Click Update the API. You can now query your UDG API ofuser using the Playground tab in API designer
Challenge
- Try to resolve
reviewsfield on typeUsers - Try to resolve
usersfield on typeReviews
null for reviews.
This happens because we haven’t defined datasource on field level for reviews on type User.
You can find the solution for the challenge in the above video.
Now that we have linked datasources for our queries, let’s see how we can do the same for mutations in the next section.
Mutations
Now that we have attached datasources to our
Query in the schema let’s try to do the same for Mutation.
Steps for Configuration
-
Update Schema
We’ll update the Mutatation type as above where we’ll add two operations
addReview: Which accepts twoarguments(i.etextanduserId) and adds a new review by making aPOSTrequest tohttp://localhost:4001/reviewsendpoint, which expects something like the following in the request payload
deleteReview: Which accepts oneargument(i.ereviewId), that deletes a review by making aDELETErequest tohttp://localhost:4001/reviews/:reviewId
-
Configure datasource.
Follow these steps to configure a data source for the
Mutation.- Navigate to schema tab in the api where you would see the split screen view of schema editor on left and list of configurable fields on right
- Select
addReviewfield fromMutationtype - Select
RESToption - Set a unique datasource name
- Set the URL as
http://localhost:4001/reviews - Select method type as
POST - Set request body to relay the graphql arguments to our upstream payload as follows:
- Update the API
-
Execute mutation operation
We can now test our mutation operation with the playground in API designer using the following operation
That should return us the following response:
Challenge
Configure a datasource to delete a review using review id.You can find the solution for the challenge in the above video.
Now that we have a good idea how we could do CRUD operations with UDG APIs, let’s see how we can secure them using policies
Security
Due to the nature of graphql, clients can craft complex or large queries which can cause your upstream APIs to go down or have performance issues.
Some of the common strategies to mitigate these risks include
- Rate limiting
- Throttling
- Query depth limiting
Query Depth Limit but you can also use common strategies like rate limiting and throttling, which you can read more about here
Steps for Configuration
-
Set authentication mode
In you Api designer core settings tab scroll down to Authentication section and set the authentication mode
Authentication Tokenand update the API. Our API is not open and keyless anymore and would need appropriate Authentication token to execute queries. -
Applying to query depth
Currently if users want they could run queries with unlimited depth as follows
To avoid these kind of scenarios we will set query depth limit on the keys created to access this API. Although we can directly create keys by selecting this API but we’ll use a Policy as it will make it easier to update keys for this API in future. You can read more about Policies here Create Policy
- Navigate to policies page
- Click Add Policy
- Select our API from Access Rights table
- Expand
Global Limits and Quotasection - Unselect
Unlimited Query Depthand set limit to5 - Switch to configuration tab
- Set policy name (eg. user-reviews-policy)
- Set expiration date for the keys that would be created using this policy
- Click on create policy
- Navigate to keys page
- Click Add Key
- Select our newly created policy
- Click create key
- Copy the key ID
Watch the video above to see how you can use these policies to publish your UDG APIs on your portal with documentation and playground.
Field Based Permissions
It is also possible to restrict user’s based on fields using policies. For example you can create two policies
- For read-only access for users to only execute queries.
- For read and write access to run mutations and queries both.
Creating keys with read-only access
Create Policy- Navigate to policies page
- Click Add Policy
- Select our API from Access Rights table
- Expand Api panel under global section
- Toggle Field-Based Permissions and check Mutation
- Switch to configuration tab
- Set policy name (eg. user-reviews-policy-read-only)
- Set expiration date for the keys that would be created using this policy
- Click on create policy
Header Forwarding
Min Version: Tyk v3.2.0 You’re able to configure upstream Headers dynamically, that is, you’re able to inject Headers from the client request into UDG upstream requests. For example, it can be used to access protected upstreams. The syntax for this is straight forward: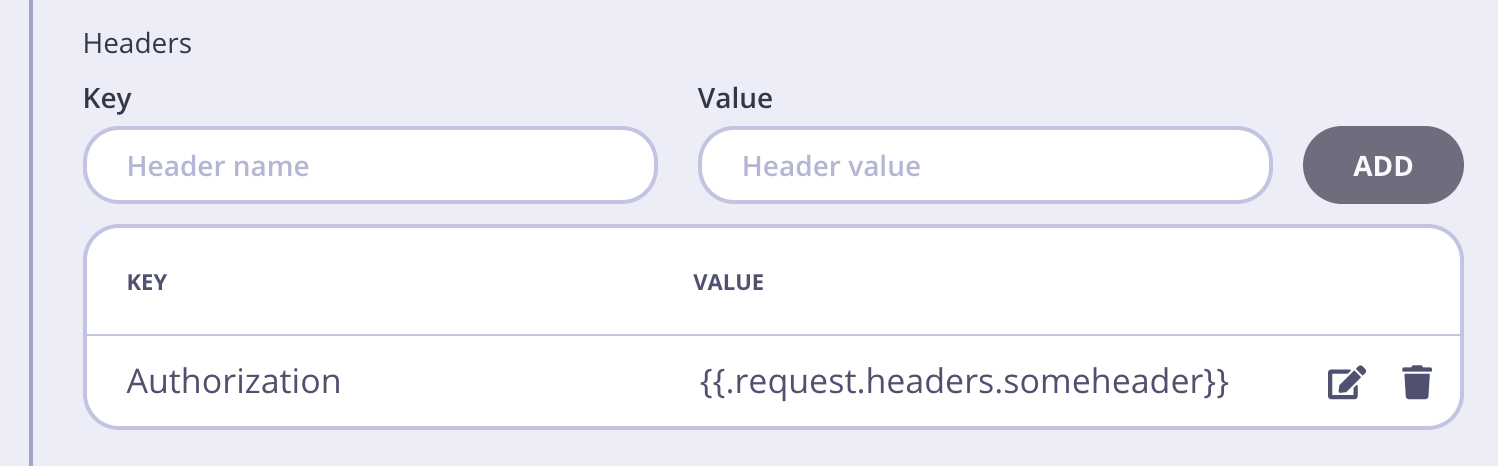
A JSON string has to be escaped before using as a header value. For example:
UDG Examples
It is possible to import various UDG examples from the official Tyk examples repository. We offer 3 ways of importing an example into Tyk:- Using tyk-sync
- Manually import via Dashboard API Import
- Using Tyk Dashboard to browse and import the examples directly
Import via tyk-sync
Please follow the tyk-sync documentation to learn more about this approach.Import via Tyk Dashboard API Import
Navigate to an example inside the examples repository and grab the relevant API definition from there. Then you can move in the Dashboard UI toAPIs -> Import API and select Tyk API as source format.
Paste the API definition inside the text box and hit Import API.
You can find more detailed instructions in the Dashboard API Import documentation section.
Import via Tyk Dashboard UI
Navigate toData Graphs section of the Tyk Dashboard menu. If you haven’t yet created any Universal Data Graphs you will see three options in the screen - one of them Try example data graph - will allow you to browse all examples compatible with your Dashboard version and choose the one you want to import.
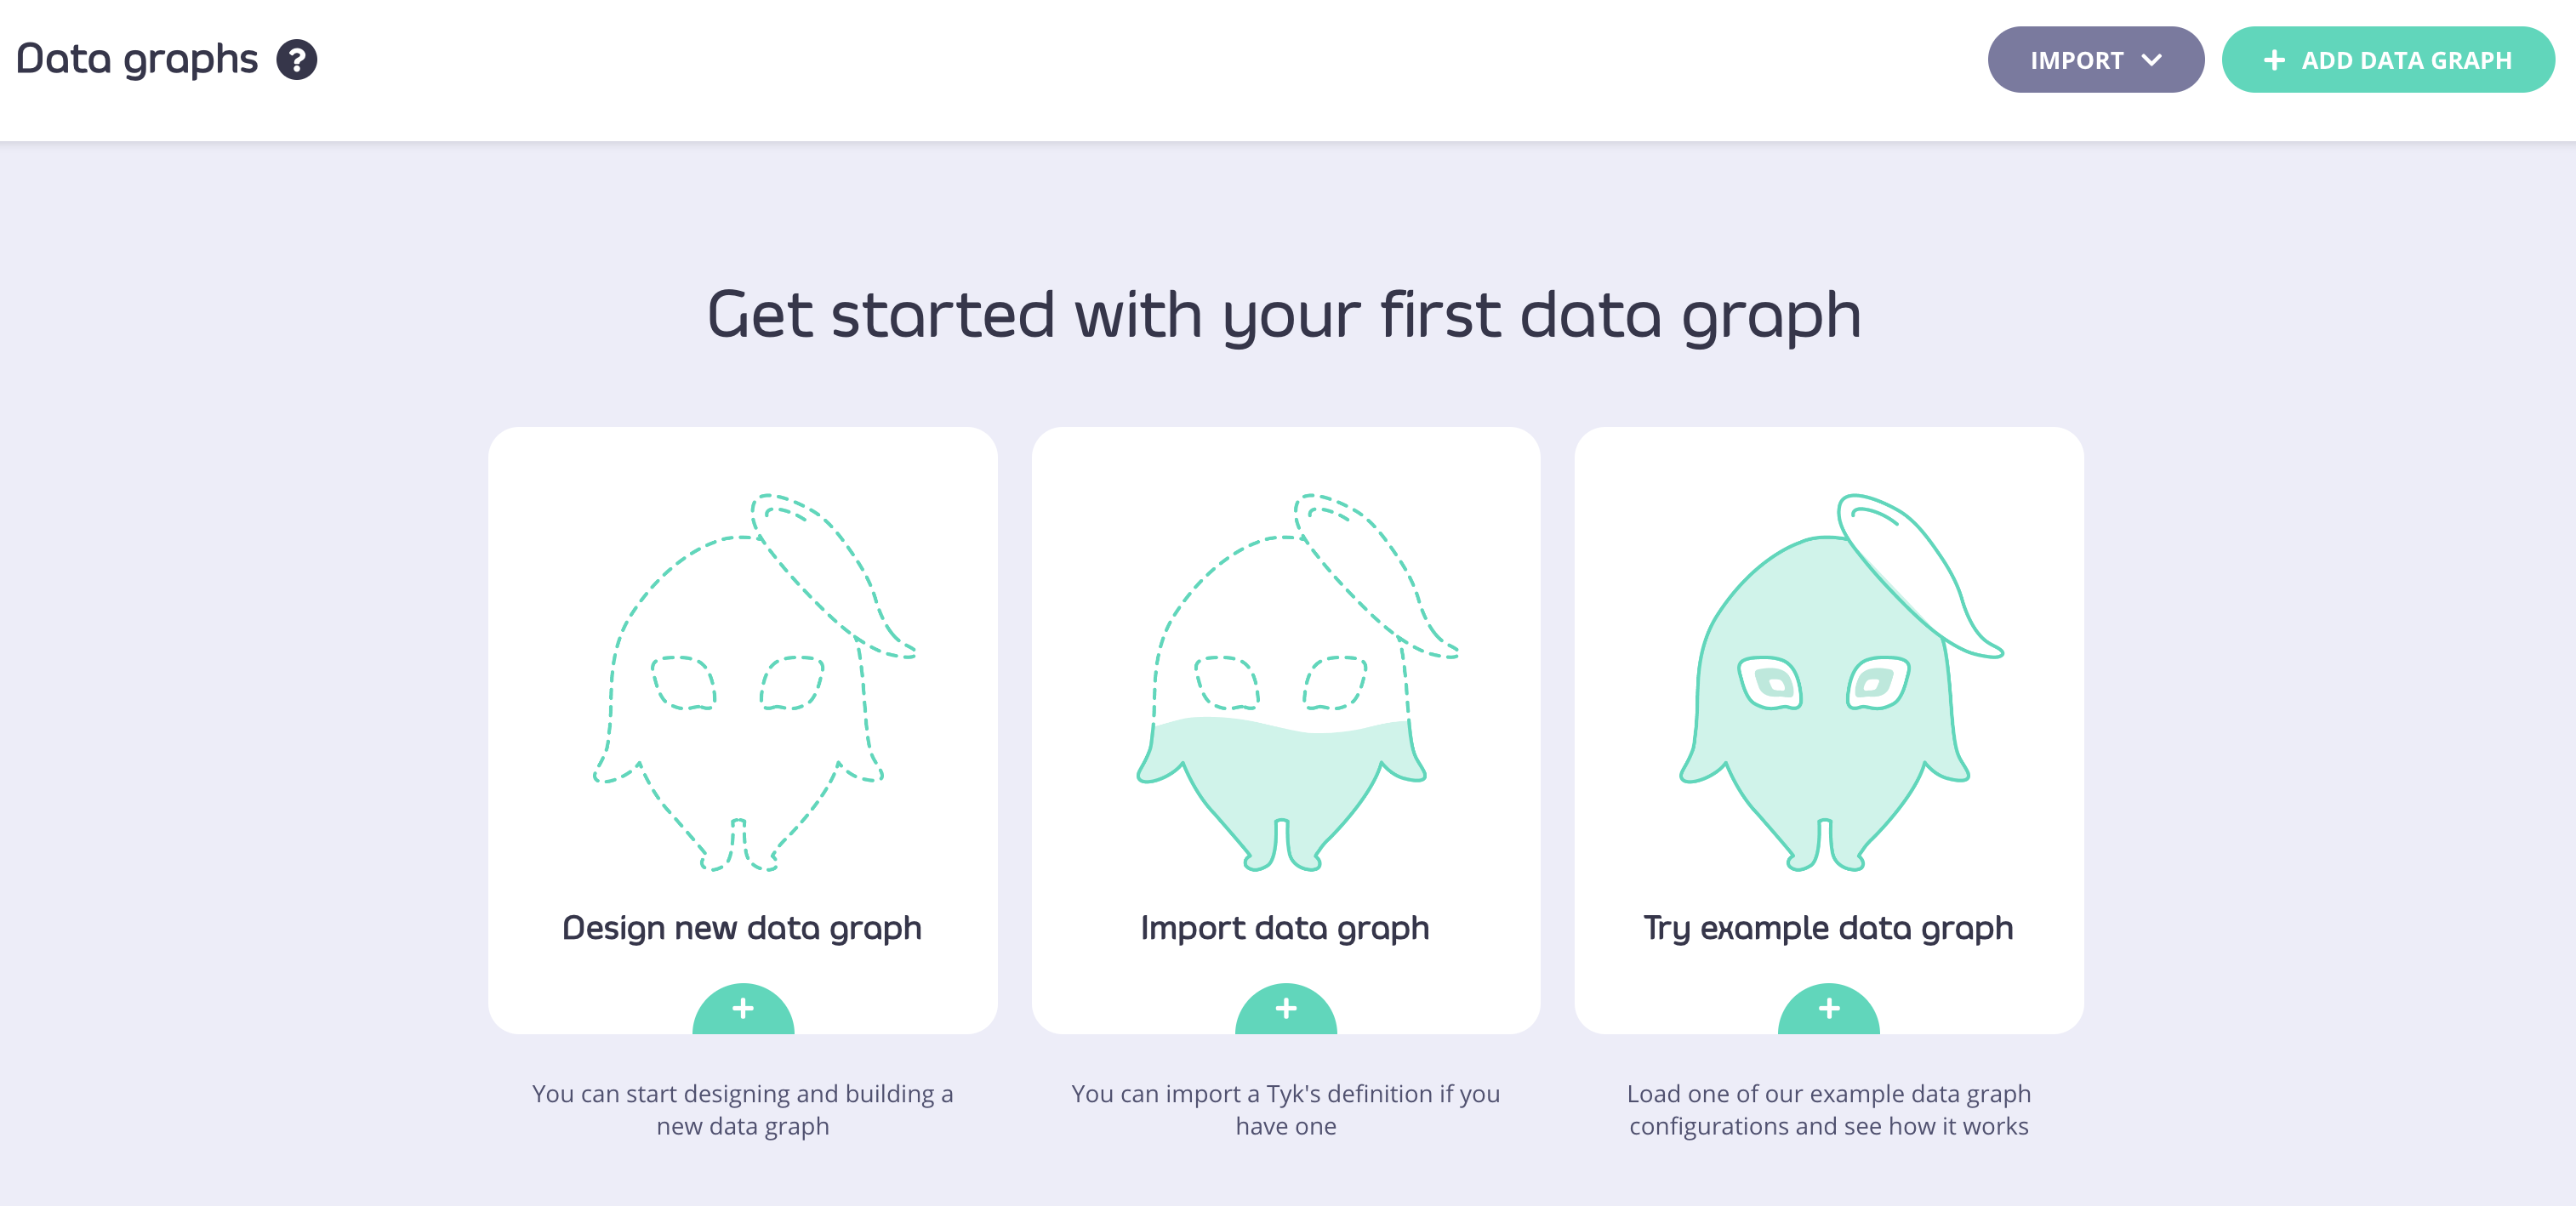
Add Data Graph button and in the next step decide if you want to create one yourself, or use one of the available examples.