Deploy Hybrid Gateways
Tyk Cloud hosts and manages the control planes for you. You can deploy the data planes across multiple locations:
- as Cloud Gateways: deployed and managed in Tyk Cloud, in any of 5 regions available. No need to care about deployment and operational concerns.
- as Hybrid Gateways: deployed locally and managed by you: in your own data centre, public or private cloud or even on your own machine
This page describes the deployment of hybrid data planes and how to connect them to Tyk Cloud, in both Kubernetes and Docker environments.
Pre-requisites
- Tyk Cloud Account, register here if you don’t have one yet:
free trial - A redis instance for each data plane, used as temporay storage for distributed rate limiting, token storage and analytics. You will find instructions for a simple Redis installation in the steps below.
- No incoming firewalls rules are needed, as the connection between Hybrid Gateways and Tyk Cloud is always initiated from the Gateways, not from Tyk Cloud.
Get the connection details to the control plane
The hybrid data plane can connect to control plane in Tyk Cloud by using the Tyk Dashboard API Access Credentials. Follow the guides below to create a user (identity for hybrid data plane) and prepare the connection details:
- Tyk Dashboard API Access Credentials:
api_keysetting in Docker,gateway.rpc.apiKeyin helm - Organisation ID:
rpc_keysetting in Docker,gateway.rpc.rpcKeyin helm - MDCB connection string:
connection_stringsetting in Docker,gateway.rpc.connStringsetting in helm
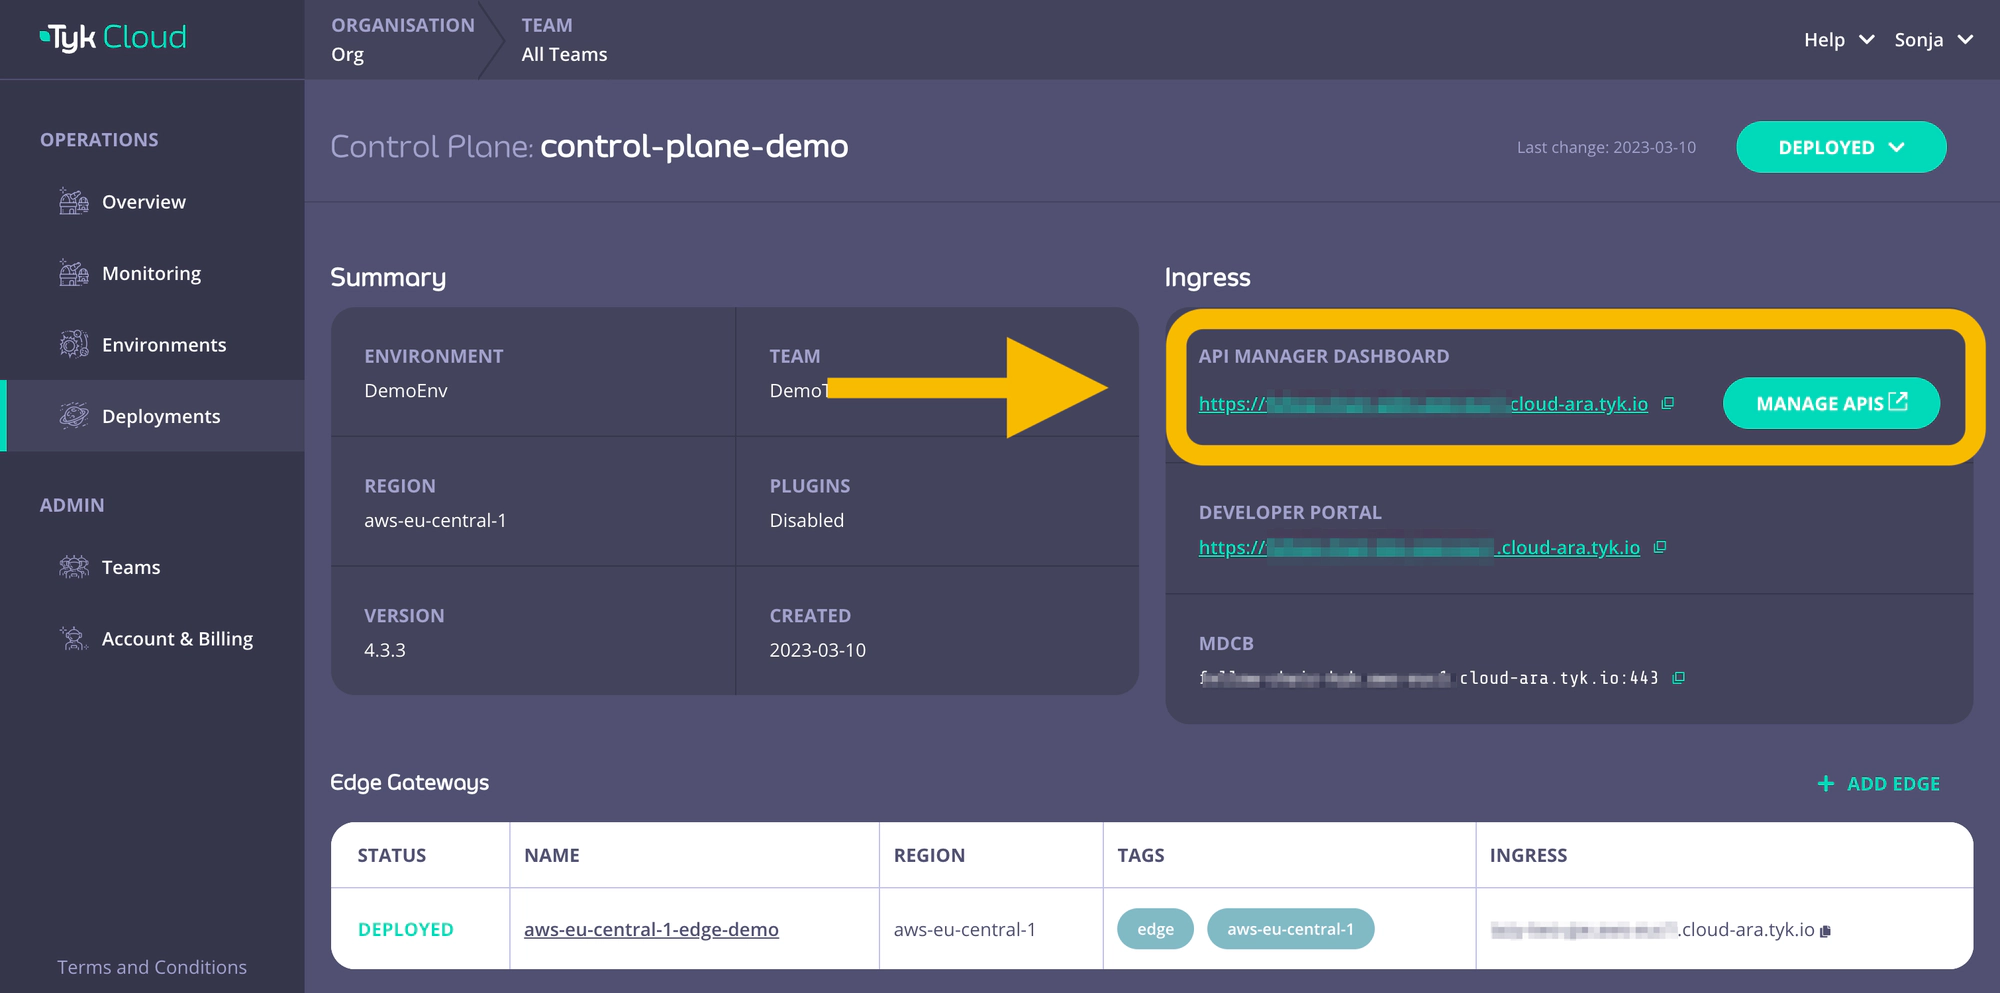
You need first to create a user that will be able to connect to the control plane. Go to the API Manager Dashboard.
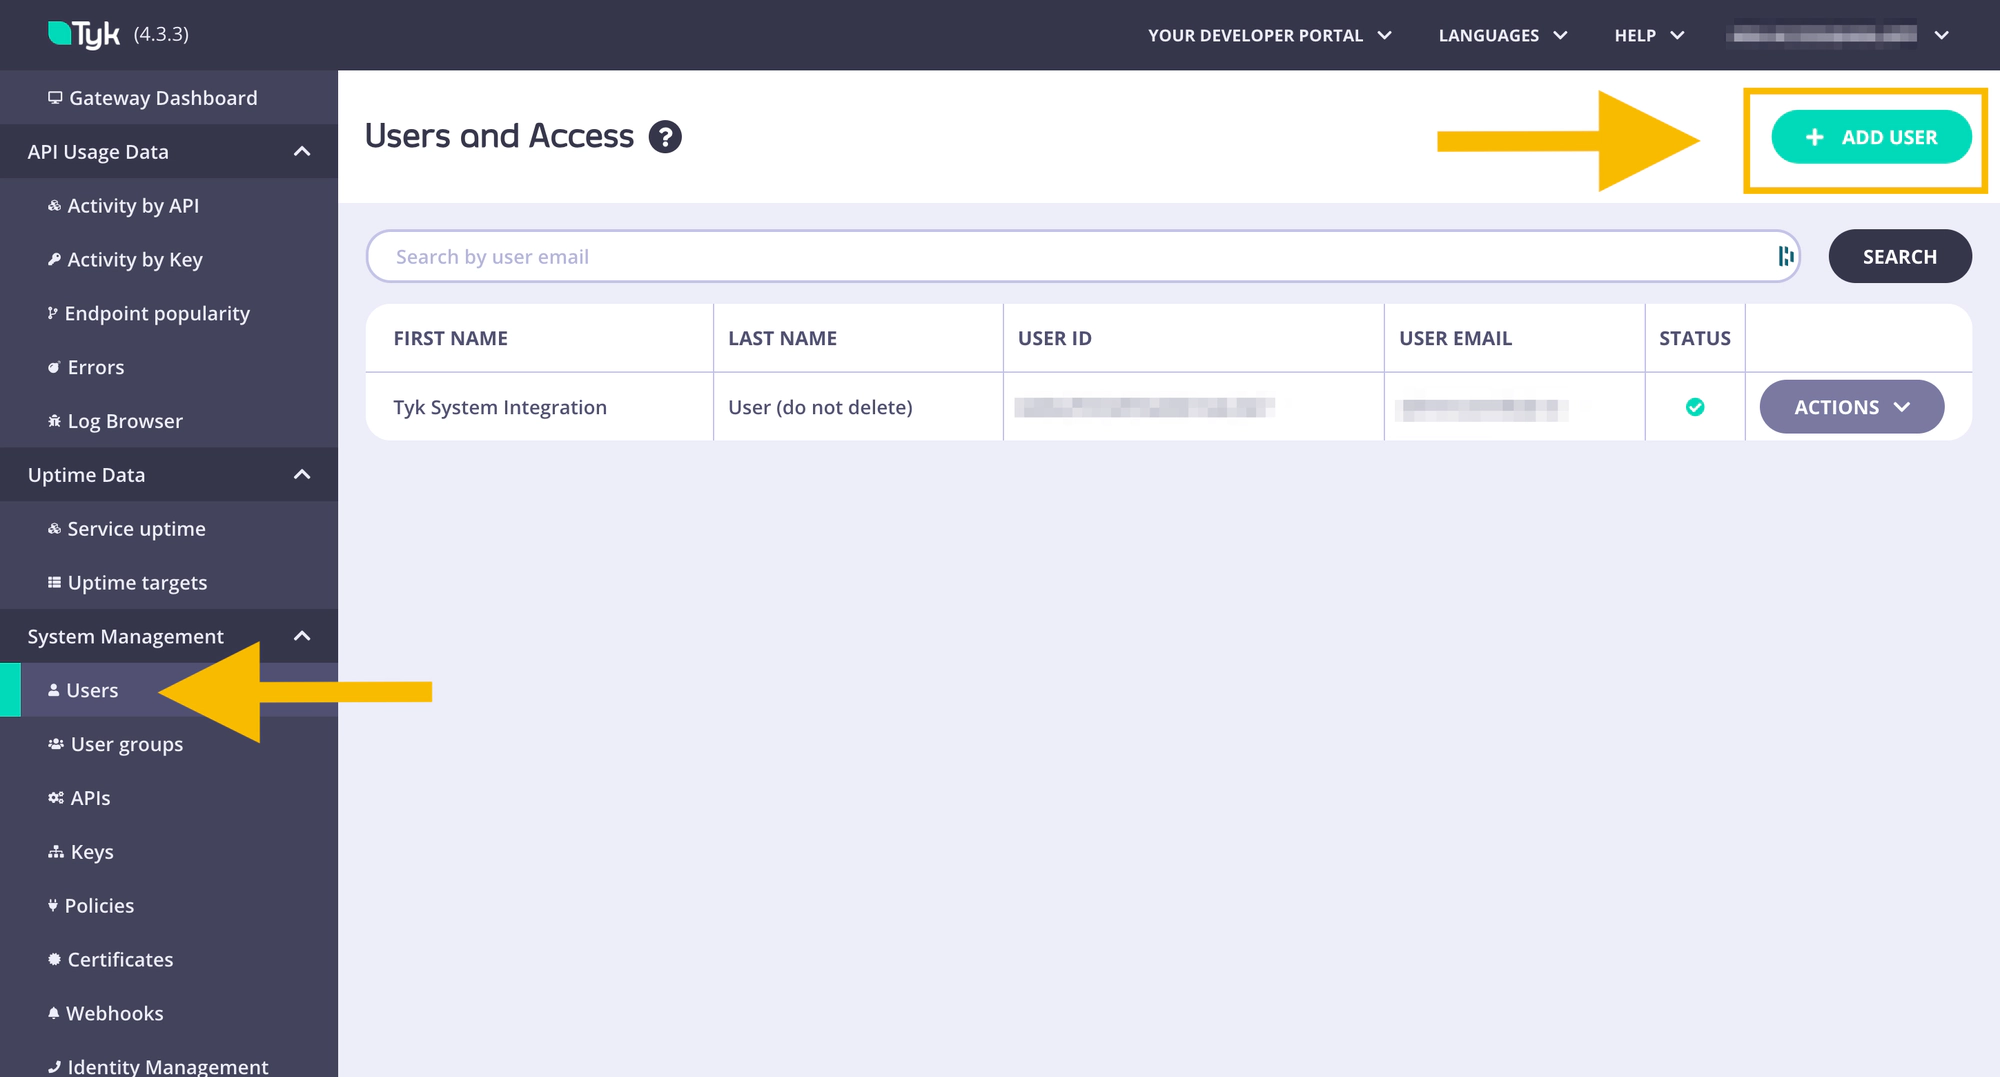
- Within the API Manager Dashboard, select or create a user to be used as the login from your Hybrid gateways with
Real time notificationsas read permission.
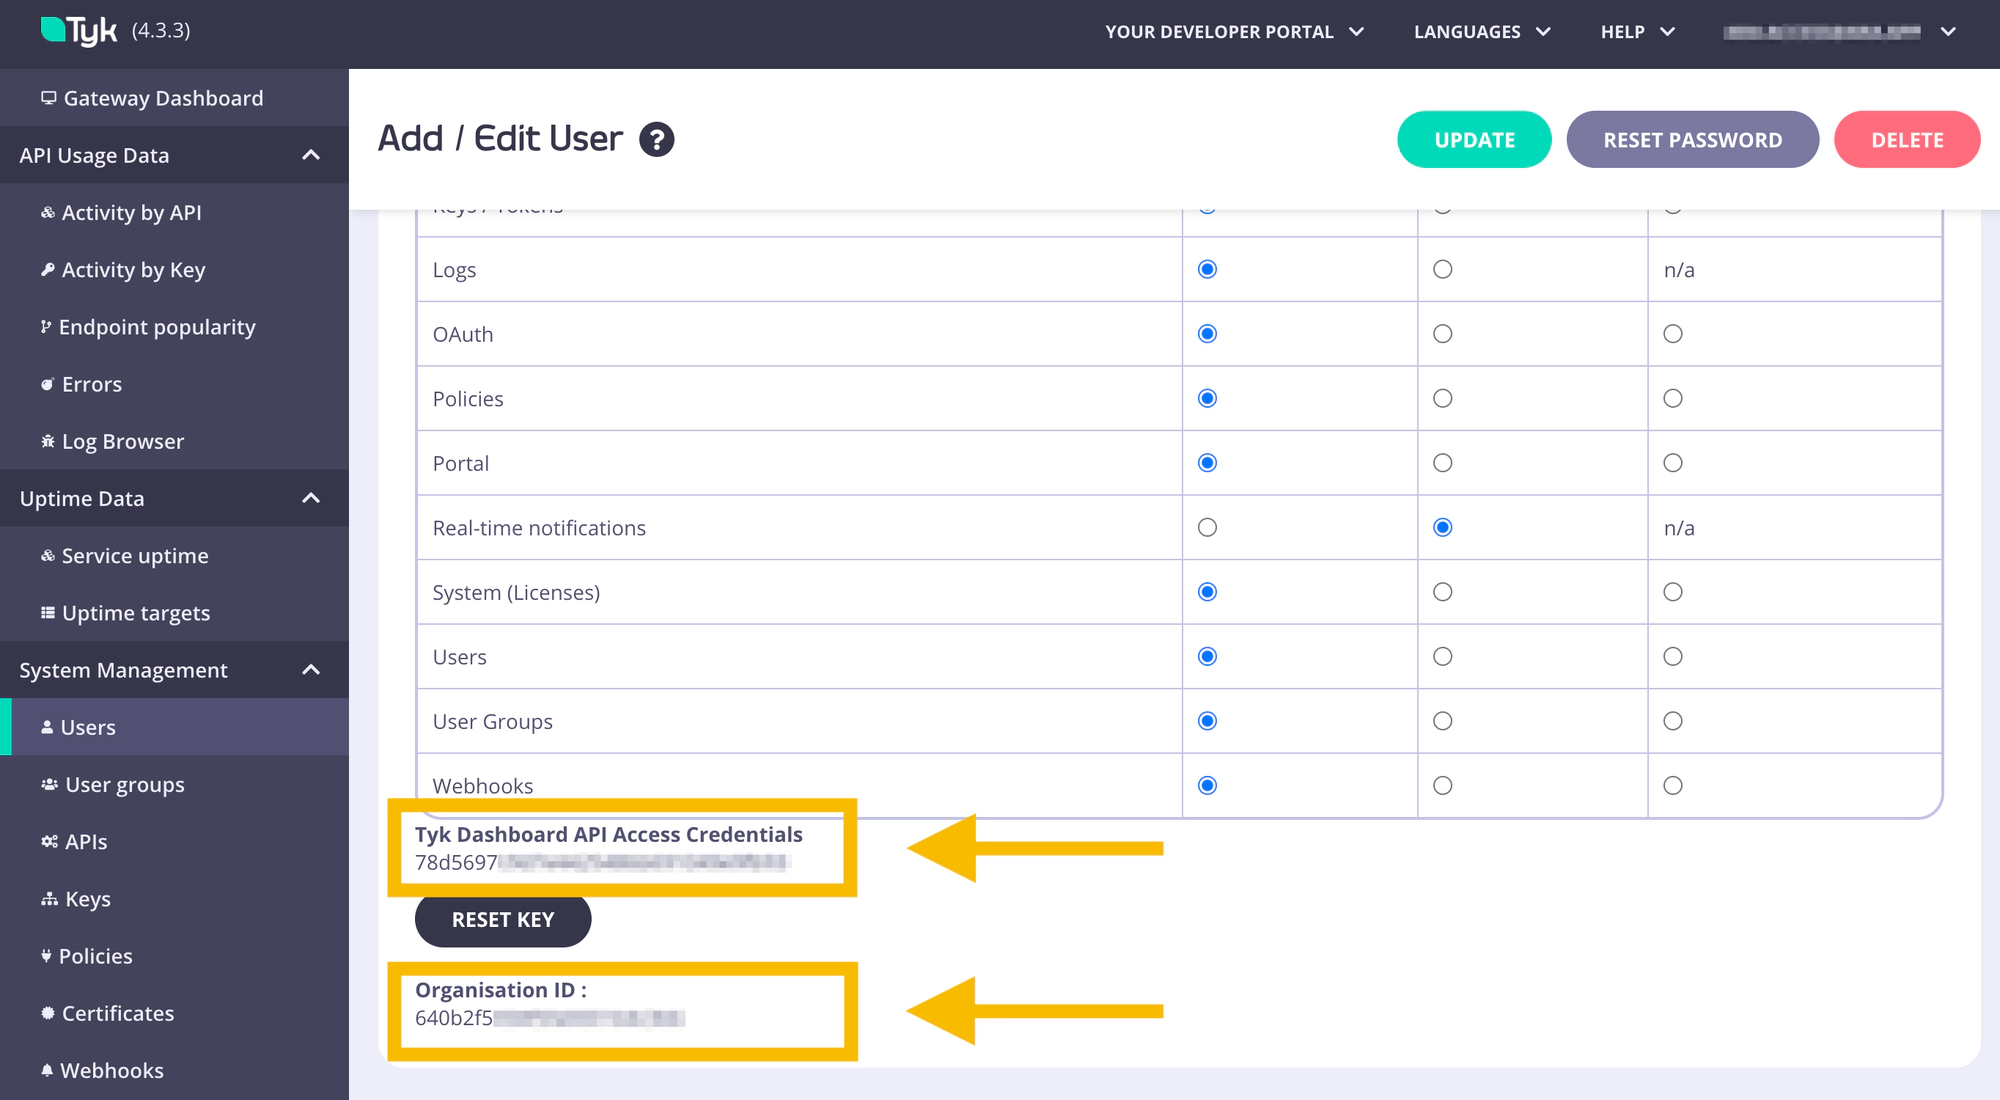
- Copy the Tyk Dashboard API Access Credentials for later use (
api_keysetting in Docker,gateway.rpc.apiKeysetting in helm) - Copy the Organisation ID for later use (
rpc_keysetting in Docker,gateway.rpc.rpcKeysetting in helm)
That’s all you need from the Tyk Manager. Go back to Tyk Cloud Console and retrieve the MDCB connection string for the gateways to connect to your control plane:
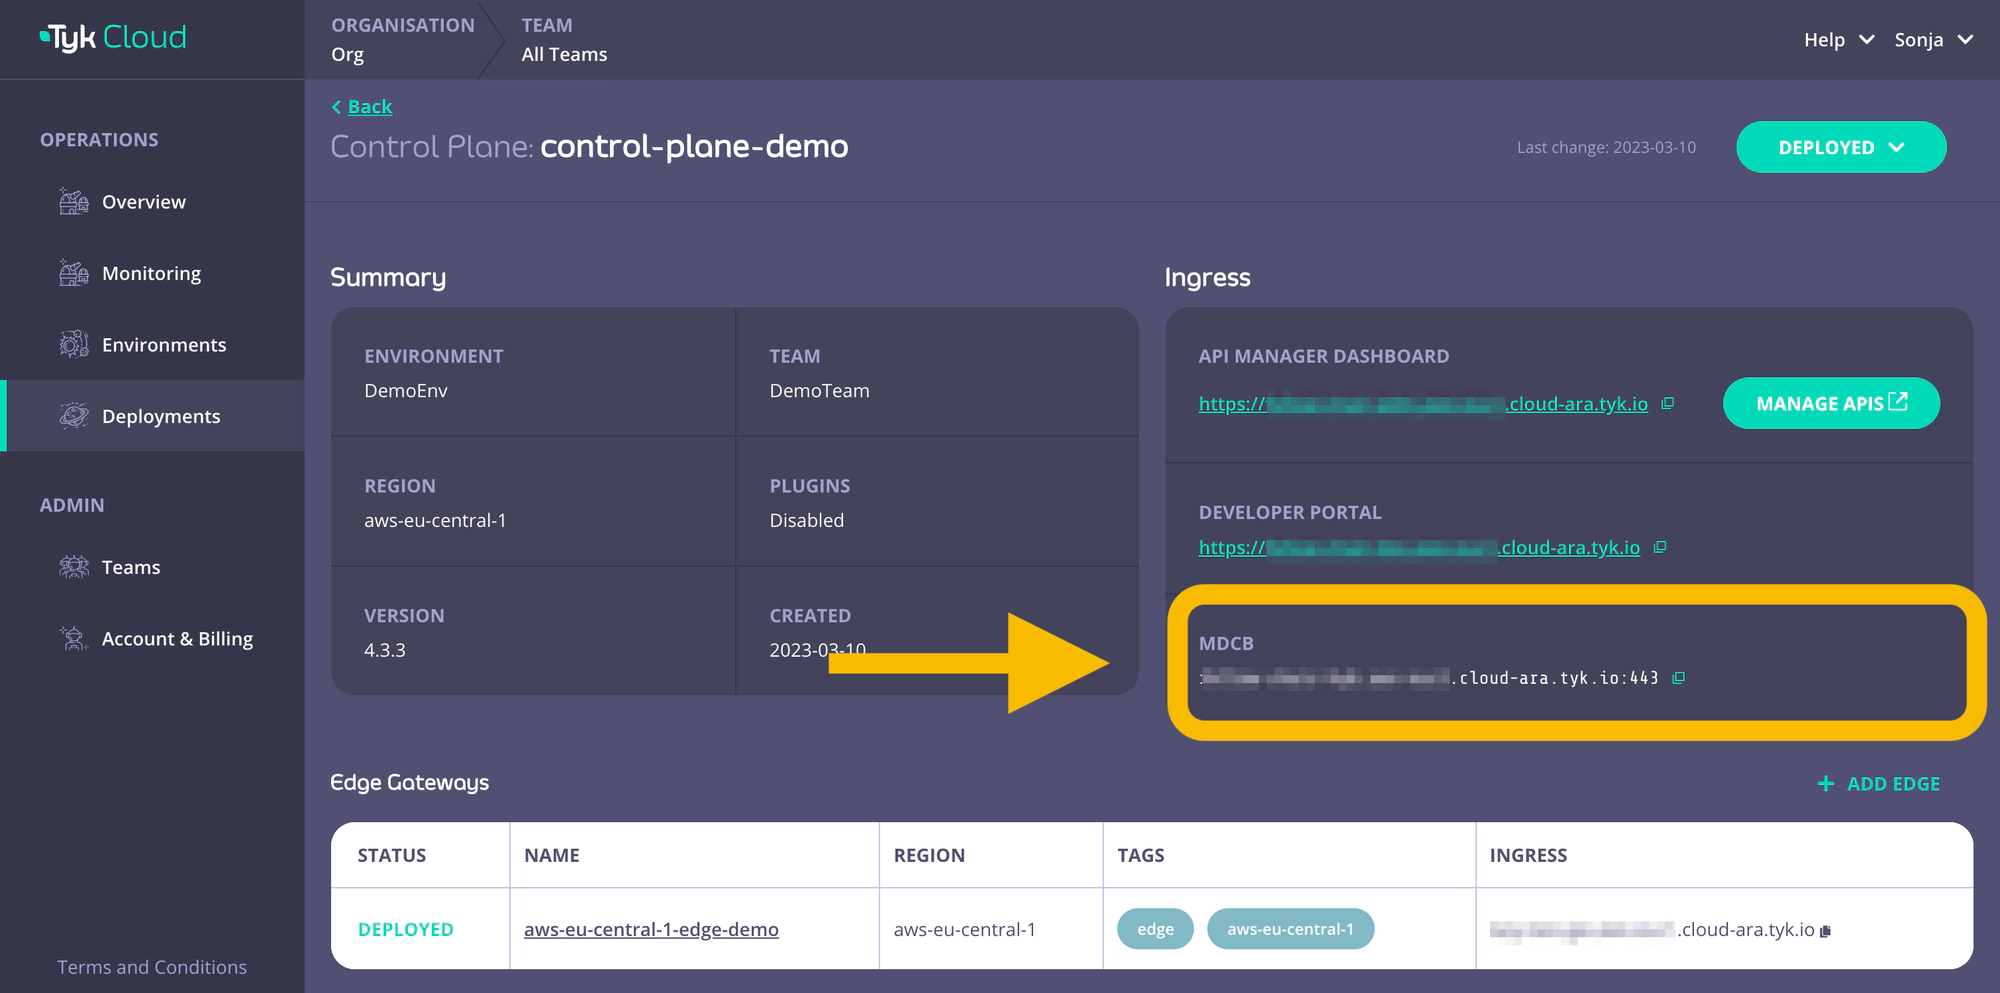
Copy this MDCB connection string for later use (connection_string setting in Docker, gateway.rpc.connString setting in helm).
Deploy with Docker
1. In your terminal, clone the demo application Tyk Gateway Docker repository
git clone https://github.com/TykTechnologies/tyk-gateway-docker.git
2. Configure Tyk Gateway and its connection to Tyk Cloud
You need to modify the following values in tyk.hybrid.conf configuration file:
rpc_key: Organisation IDapi_key: Tyk Dashboard API Access Credentials of the user created ealierconnection_string: MDCB connection string- (optional)
group_id: if you have multiple data plane (e.g. in different regions), specify the data plane grou (string) to which the gateway you are deploying belong. The data planes in the same group share one redis.
{
"rpc_key": "<ORG_ID>",
"api_key": "<API-KEY>",
"connection_string": "<MDCB-INGRESS>:443",
"group_id": "dataplane-europe",
}
- (optional) you can enable sharding to selectively load APIs to specific gateways, using the following:
{
  "db_app_conf_options": {
    "node_is_segmented": true,
    "tags": ["qa", "uat"]
  }
}
3. Configure the connection to redis
This example comes with a redis instance pre-configured and deployed with Docker compose. If you want to use another redis instance, you will have to update the storage part of tyk.hybrid.conf:
{
  "storage": {
        "type": "redis",
        "host": "tyk-redis",
        "port": 6379,
        "username": "",
        "password": "",
        "database": 0,
        "optimisation_max_idle": 2000,
        "optimisation_max_active": 4000
    }
}
4. Update docker compose file
Edit the <docker-compose.yml> file to to use the tyk.hybrid.conf that you have just configured.
From:
- ./tyk.standalone.conf:/opt/tyk-gateway/tyk.conf
To:
- ./tyk.hybrid.conf:/opt/tyk-gateway/tyk.conf
5. Run docker compose
Run the followng:
docker compose up -d
You should now have two running containers, a Gateway and a Redis.
6. Check that the gateway is up and running
Call the /hello endpoint using curl from your terminal (or any other HTTP client):
curl http://localhost:8080/hello -i
Expected result:
HTTP/1.1 200 OK
Content-Type: application/json
Date: Fri, 17 Mar 2023 12:41:11 GMT
Content-Length: 59

{"status":"pass","version":"4.3.3","description":"Tyk GW"}
Deploy in Kubernetes with Helm
1. Add the Tyk official Helm repo tyk-helm to your local Helm repository
helm repo add tyk-helm https://helm.tyk.io/public/helm/charts/
helm repo update
The helm charts are also available on ArtifactHub.
2. Then create a new namespace that will be hosting the Tyk Gateways
kubectl create namespace tyk
3. Get the default values.yaml for configuration
Before proceeding with installation of the chart we need to set some custom values. First save the full original values.yaml to a local copy:
helm show values tyk-helm/tyk-hybrid > values.yaml
4. Configure Tyk Gateway and its connection to Tyk Cloud
You need to modify the following values in your custom values.yaml file:
gateway.rpc.apiKey: Tyk Dashboard API Access Credentials of the user created ealiergateway.rpc.rpcKey: Organisation IDgateway.rpc.connString: MDCB connection string- (optional)
gateway.rpc.group_id: if you have multiple data plane (e.g. in different regions), specify the data plane group (string) to which the gateway you are deploying belong. The data planes in the same group share one redis instance. - (optional)
gateway.sharding.enabledandgateway.sharding.tags: you can enable sharding to selectively load APIs to specific gateways, using tags. By default, sharing is disabled and gateway will load all APIs.
5. Configure the connection to redis
You can connect the gateway to any Redis instance already deployed (as DBaaS or hosted in your private infrastructure).
In case you don’t have a Redis instance yet, here’s how to deploy Redis in Kubernetes using Bitnami Helm charts.
helm install tyk-redis bitnami/redis -n tyk
Follow the notes from the installation output to get connection details and password.
  Redis(TM) can be accessed on the following DNS names from within your cluster:

    tyk-redis-master.tyk.svc.cluster.local for read/write operations (port 6379)
    tyk-redis-replicas.tyk.svc.cluster.local for read-only operations (port 6379)

  export REDIS_PASSWORD=$(kubectl get secret --namespace tyk tyk-redis -o jsonpath="{.data.redis-password}" | base64 --decode)
You need to modify the following values in your custom values.yaml file:
redis.addrs: the name of the redis instance including the port as set by Bitnamityk-redis-master.tyk.svc.cluster.local:6379redis.pass: password set in redis ($REDIS_PASSWORD). Alternatively, you can use –set flag to set it during helm installation. For example--set redis.pass=$REDIS_PASSWORD.
6. Install Hybrid data plane
Install the chart using the configured custom values file:
helm install tyk-hybrid tyk-helm/tyk-hybrid -f values.yaml -n tyk
You should see the prompt:
At this point, Tyk Hybrid is fully installed and should be accessible.
7. Check that the installation was successful
The hybrid data planes are not yet visible in Tyk Cloud (coming soon!). Here is how you can check that the deployment was successfull.
Run this command in your terminal to check that all pods in the tyk namespace are running:
kubectl get pods -n tyk
Expected result:
NAME                                  READY   STATUS    RESTARTS   AGE
gateway-tyk-hybrid-54b6c498f6-2xjvx   1/1     Running   0          4m27s
tyk-redis-master-0                    1/1     Running   0          47m
tyk-redis-replicas-0                  1/1     Running   0          47m
tyk-redis-replicas-1                  1/1     Running   0          46m
tyk-redis-replicas-2                  1/1     Running   0          46m
Note: if you are using a redis instance hosted somewhere else, then no redis pods will appear here.
Run this command in your terminal to check that the services were correctly created:
kubectl get service -n tyk
Expected result:
NAME                     TYPE        CLUSTER-IP       EXTERNAL-IP   PORT(S)         AGE
gateway-svc-tyk-hybrid   NodePort    10.96.232.123    <none>        443:32668/TCP   44m
tyk-redis-headless       ClusterIP   None             <none>        6379/TCP        47m
tyk-redis-master         ClusterIP   10.109.203.244   <none>        6379/TCP        47m
tyk-redis-replicas       ClusterIP   10.98.206.202    <none>        6379/TCP        47m
Note: IP adresses might differ on your system.
Finally, from your terminal, send a HTTP call to the /hello endpoint of the gateway gateway-svc-tyk-hybrid:
Note: you may need to port forward if you’re testing on local machine, e.g. kubectl port-forward service/gateway-svc-tyk-hybrid -n tyk 8080:443
curl http://hostname:8080/hello -i
Expected result:
HTTP/1.1 200 OK
Content-Type: application/json
Date: Fri, 17 Mar 2023 10:35:35 GMT
Content-Length: 234

{
  "status":"pass",
  "version":"4.3.3",
  "description":"Tyk GW",
  "details":{
    "redis": {"status":"pass","componentType":"datastore","time":"2023-03-15T11:39:10Z"},
    "rpc": {"status":"pass","componentType":"system","time":"2023-03-15T11:39:10Z"}}
}
Next steps
Now it is time to publish a new API Task 5 - Deploy your Edge Gateway and add your first API