Create an OAS API
Table Of Contents
Introduction
This section will walk you through creating an OAS API. We will cover the following methods:
- Using the Tyk Open Source Gateway API
- Using the file based method for the Open Source Gateway
- Using the Tyk Dashboard
- Using the Dashboard API
We have a video that walks you through the process of creating an OAS API.
Tutorial: Create an OAS API with the Tyk Gateway API
Make sure you know your API secret
Your Tyk Gateway API secret is stored in your tyk.conf file, the property is called secret. You will need to use this as a header called x-tyk-authorization to make calls to the Gateway API.
Create an API
To create the API, send a Tyk OAS API Definition [link to glossary] to the apis endpoint (http://{your-tyk-host}:{port}/tyk/apis/oas), which will return the status and version of your Tyk Gateway. Change the x-tyk-authorization value and curl the domain name and port to be the correct values for your environment.
Note
The default Gateway API {port} is 8080.
| Property | Description |
|---|---|
| Resource URL | /tyk/apis/oas |
| Method | POST |
| Type | None |
| Body | Tyk OAS API Definition |
| Param | None |
It is possible to define a Tyk API definition in under 30 lines. We have chosen the example below because it includes examples of some additional features you may want to use early on in your time with Tyk and OAS.
curl --location --request POST 'http://{your-tyk-host}:{port}/tyk/apis/oas' \
--header 'x-tyk-authorization: {your-secret}' \
--header 'Content-Type: text/plain' \
--data-raw '{
  "openapi": "3.0.3",
  "info": {
    "description": "This is a sample server Petstore server.",
    "title": "OAS Petstore",
    "version": "1.0.0"
  },
  "basic-config-and-security/security": [
    {
      "api_key": []
    }
  ],
  "servers": [
    {
      "url": "https://petstore.swagger.io/v2"
    },
    {
      "url": "http://petstore.swagger.io/v2"
    }
  ],
  "components": {
    "requestBodies": {
      "Pet": {
        "content": {
          "application/json": {
            "schema": {
              "$ref": "#/components/schemas/Pet"
            }
          }
        },
        "description": "Pet object that needs to be added to the store",
        "required": true
      }
    },
    "schemas": {
      "Pet": {
        "properties": {
          "category": {
            "type": "string"
          },
          "id": {
            "format": "int64",
            "type": "integer"
          },
          "name": {
            "example": "doggie",
            "type": "string"
          },
          "status": {
            "description": "pet status in the store",
            "enum": [
              "available",
              "pending",
              "sold"
            ],
            "type": "string"
          },
          "tags": {
            "items": {
              "type": "string"
            },
            "type": "array"
          }
        },
        "required": [
          "name"
        ],
        "type": "object"
      }
    },
    "securitySchemes": {
      "api_key": {
        "in": "header",
        "name": "api_key",
        "type": "apiKey"
      }
    }
  },
  "paths": {
    "/pet": {
      "post": {
        "operationId": "addPet",
        "requestBody": {
          "$ref": "#/components/requestBodies/Pet"
        },
        "responses": {
          "405": {
            "description": "Invalid input"
          }
        },
        "summary": "Add a new pet to the store",
        "tags": [
          "pet"
        ]
      },
      "put": {
        "operationId": "updatePet",
        "requestBody": {
          "$ref": "#/components/requestBodies/Pet"
        },
        "responses": {
          "400": {
            "description": "Invalid ID supplied"
          },
          "404": {
            "description": "Pet not found"
          },
          "405": {
            "description": "Validation exception"
          }
        },
        "summary": "Update an existing pet",
        "tags": [
          "pet"
        ]
      }
    },
    "/pet/{petId}": {
      "get": {
        "description": "Returns a single pet",
        "operationId": "getPetById",
        "parameters": [
          {
            "description": "ID of pet to return",
            "in": "path",
            "name": "petId",
            "required": true,
            "schema": {
              "format": "int64",
              "type": "integer"
            }
          }
        ],
        "responses": {
          "200": {
            "content": {
              "application/json": {
                "schema": {
                  "$ref": "#/components/schemas/Pet"
                }
              }
            },
            "description": "successful operation"
          },
          "400": {
            "description": "Invalid ID supplied"
          },
          "404": {
            "description": "Pet not found"
          }
        },
        "summary": "Find pet by ID",
        "tags": [
          "pet"
        ]
      }
    }
  },
  "tags": [
    {
      "description": "Everything about your Pets",
      "name": "pet"
    }
  ],
  "x-tyk-api-gateway": {
    "info": {
      "name": "petstore",
      "state": {
        "active": true
      }
    },
    "upstream": {
      "url": "https://petstore.swagger.io/v2"
    },
    "server": {
      "listenPath": {
        "value": "/petstore-test/",
        "strip": true
      }
    }
  }
}'
Check request response
If the command succeeds, you will see the following response, where key contains the newly created API ID:
{
    "key": {api-id},
    "status": "ok",
    "action": "added"
}
What you have done is send a Tyk OAS API definition to the Tyk /apis/oas endpoint. Tyk OAS API definitions are discussed in detail in the OAS API section. These objects encapsulate all of the settings for an OAS API within your Tyk Gateway.
Restart or hot reload
Once you have created your API, you will need to either restart the Tyk Gateway, or issue a hot reload command with the following curl command:
curl -H "x-tyk-authorization: {your-secret}" -s http://{your-tyk-host}:{port}/tyk/reload/group
Using the Tyk Dashboard
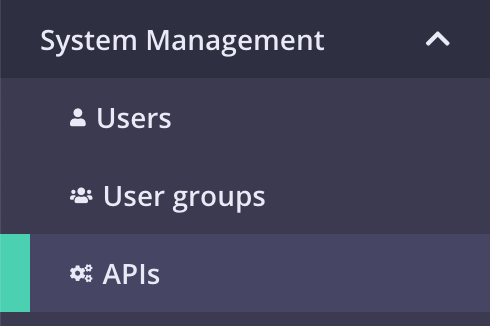
Select “APIs” from the “System Management” section
Add new API
If you have a fresh Tyk installation with no other APIs added, click Design new API:
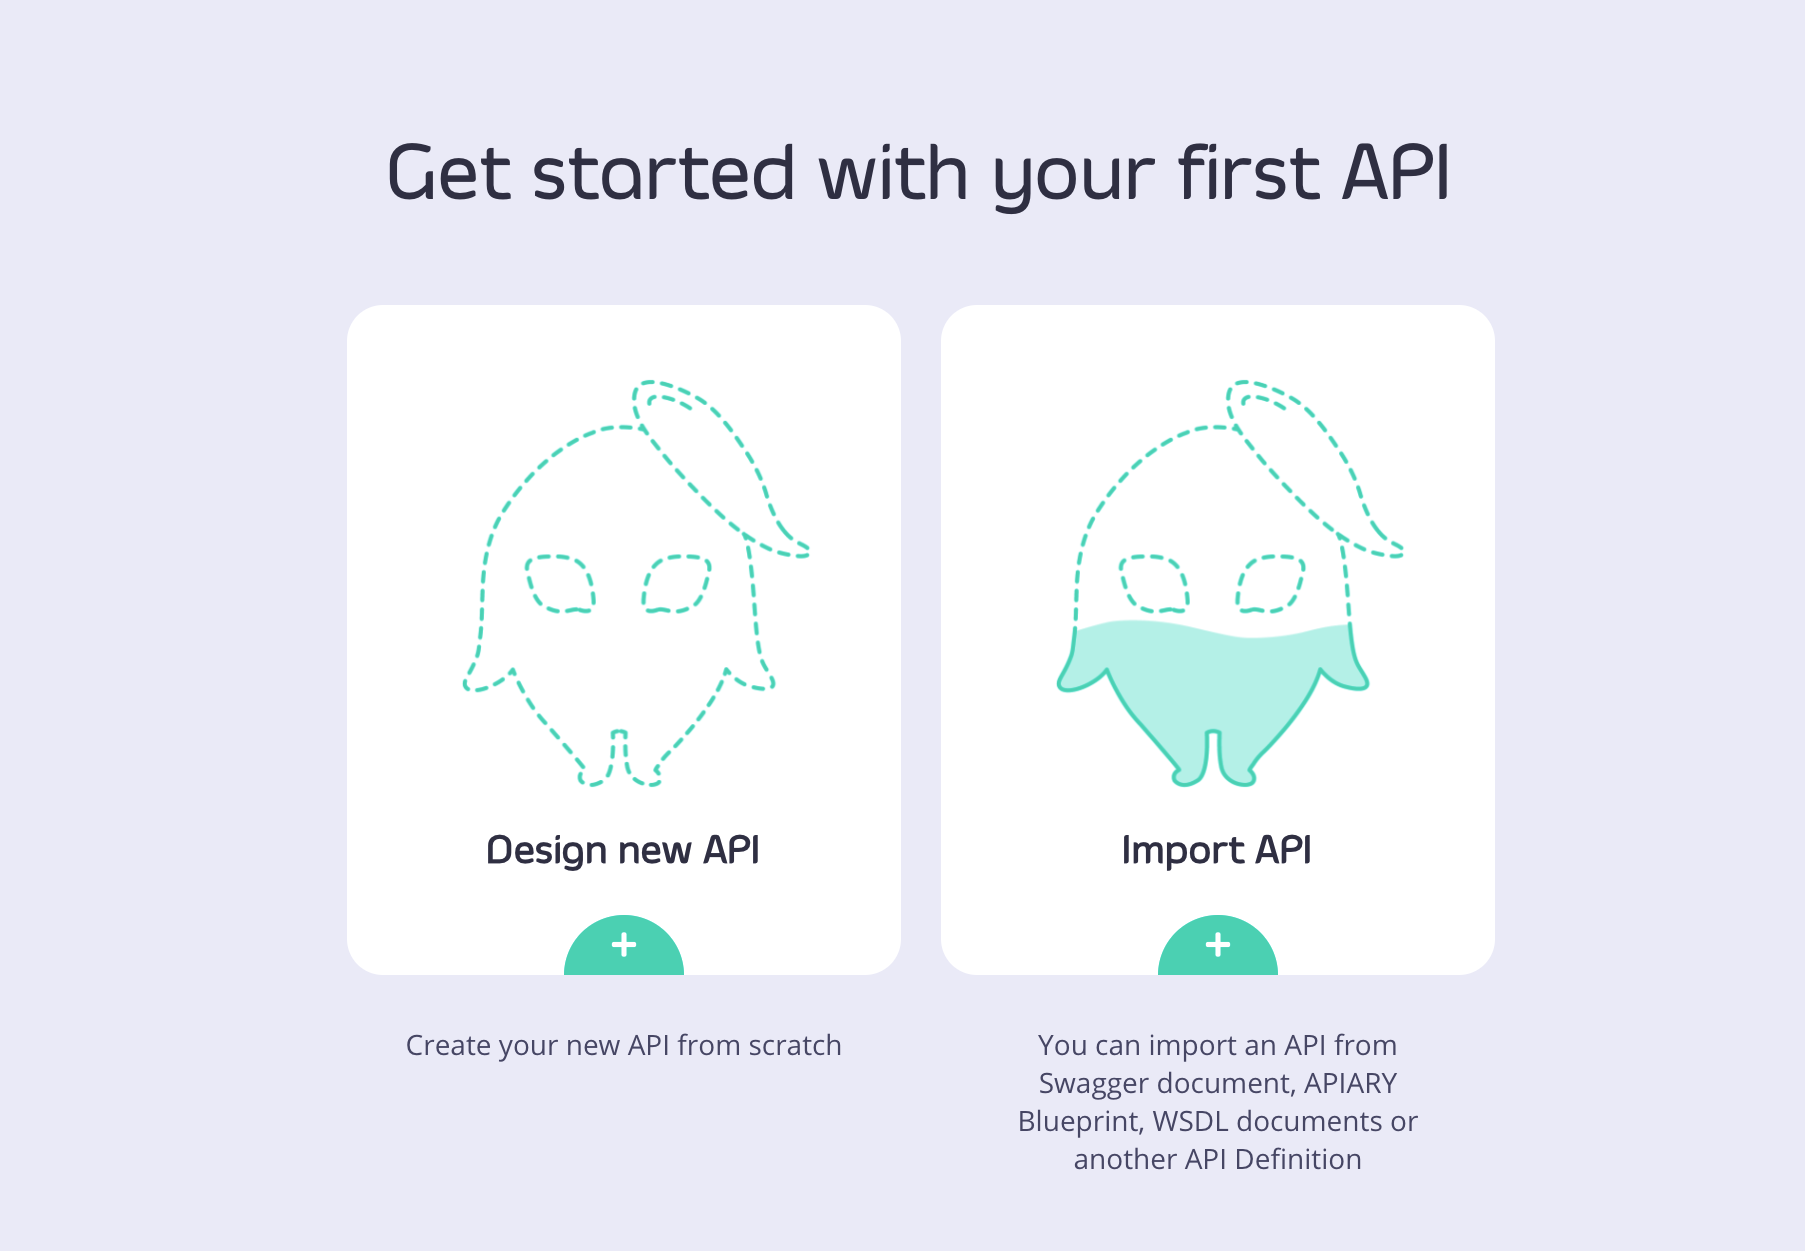
If you already have APIs in your Tyk installation, click Add new API:

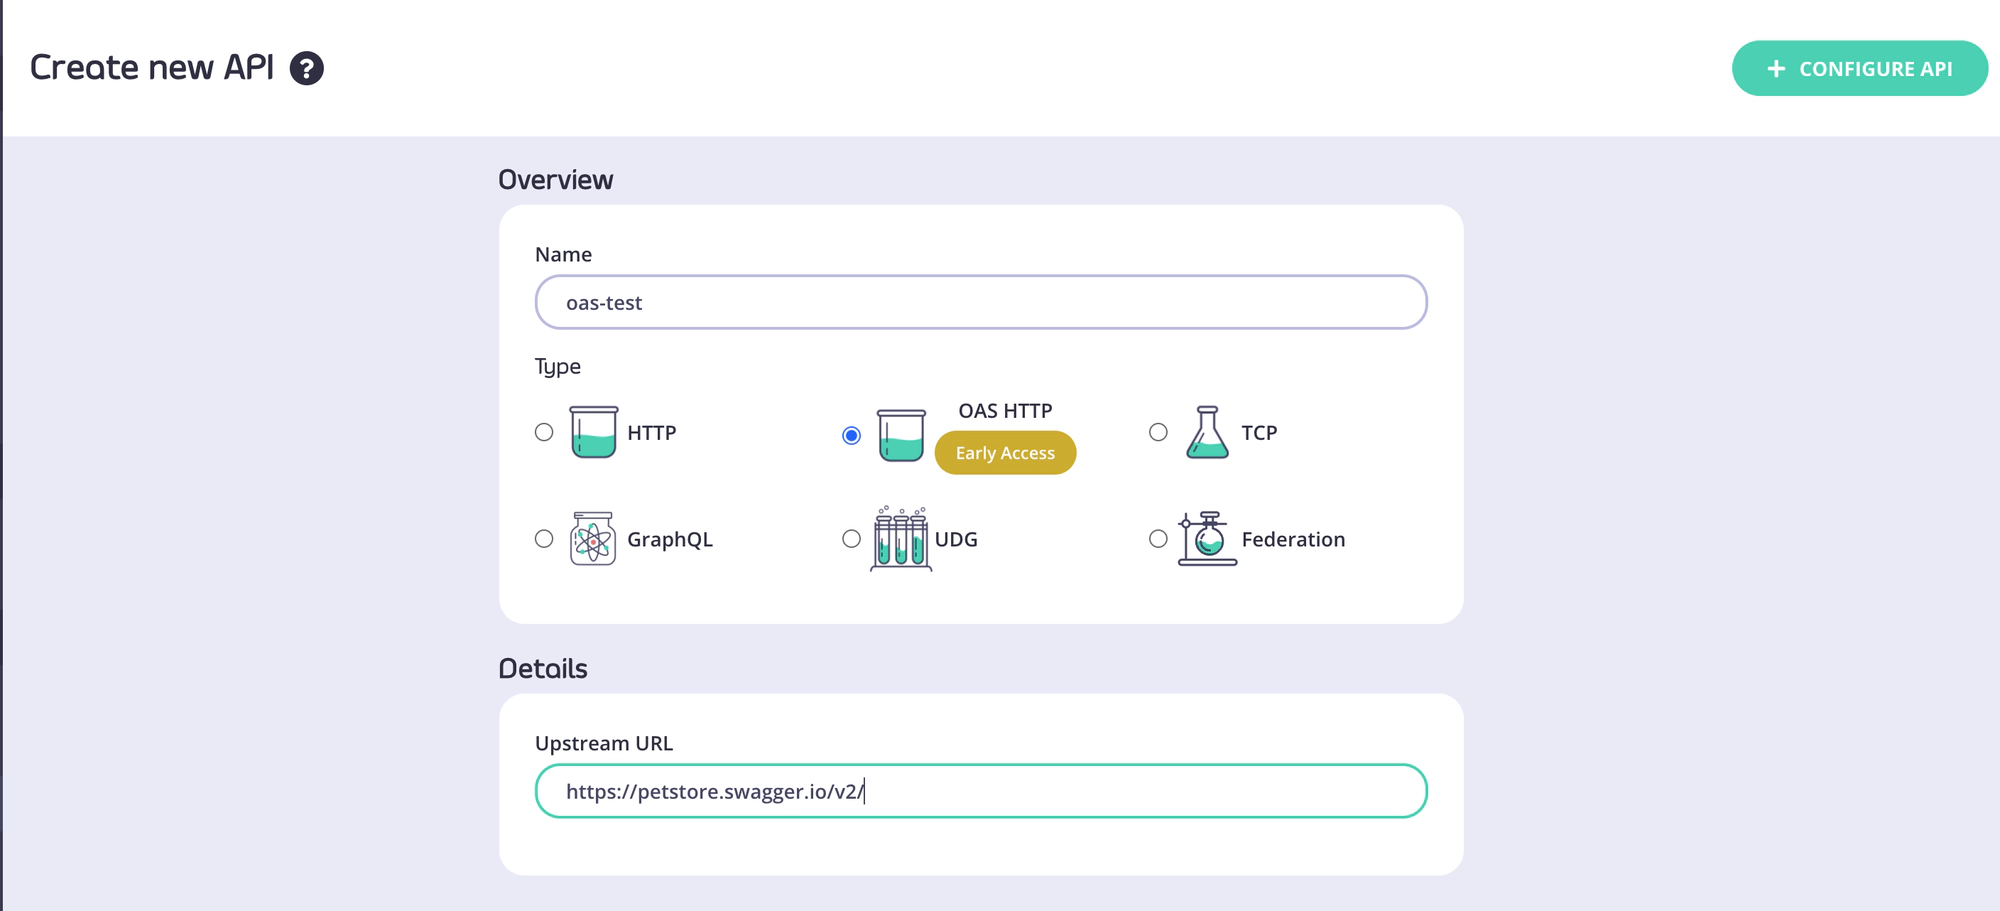
Set up the Base Configuration for your API
- From the Overview section, add your API Name and your API Type (We will use OAS HTTP for this tutorial, which is for now in early access.
- From the Details section, add your Target URL. This will set the upstream target that hosts the service you want to proxy to. For this tutorial you can use http://petstore.swagger.io/v2/.
- Click Configure API when you have finished.
Set the Gateway Status and Access
- You need to set the Gateway status to Active
- You need to set the Access setting to Internal (within your installation only) or External (available to external sources)
Click Save Changes.
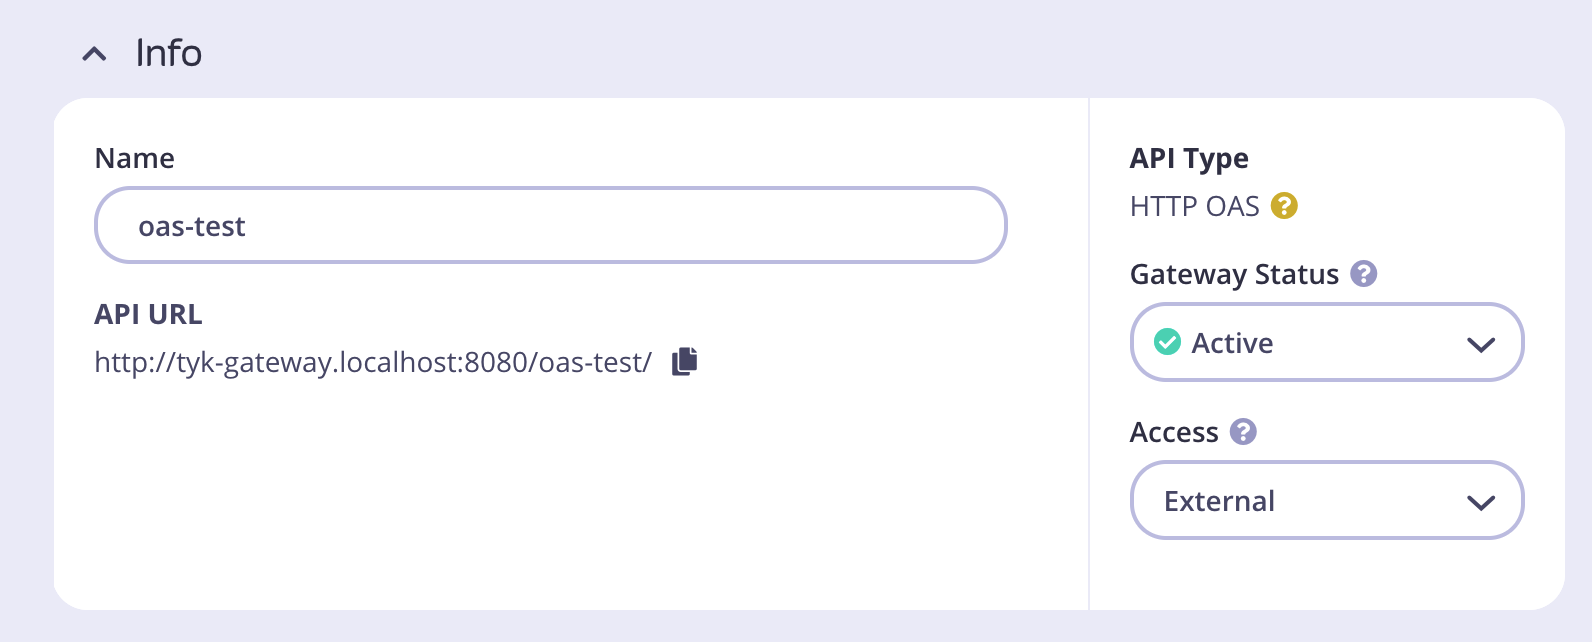
Once saved, you will be redirected to the newly created API screen.
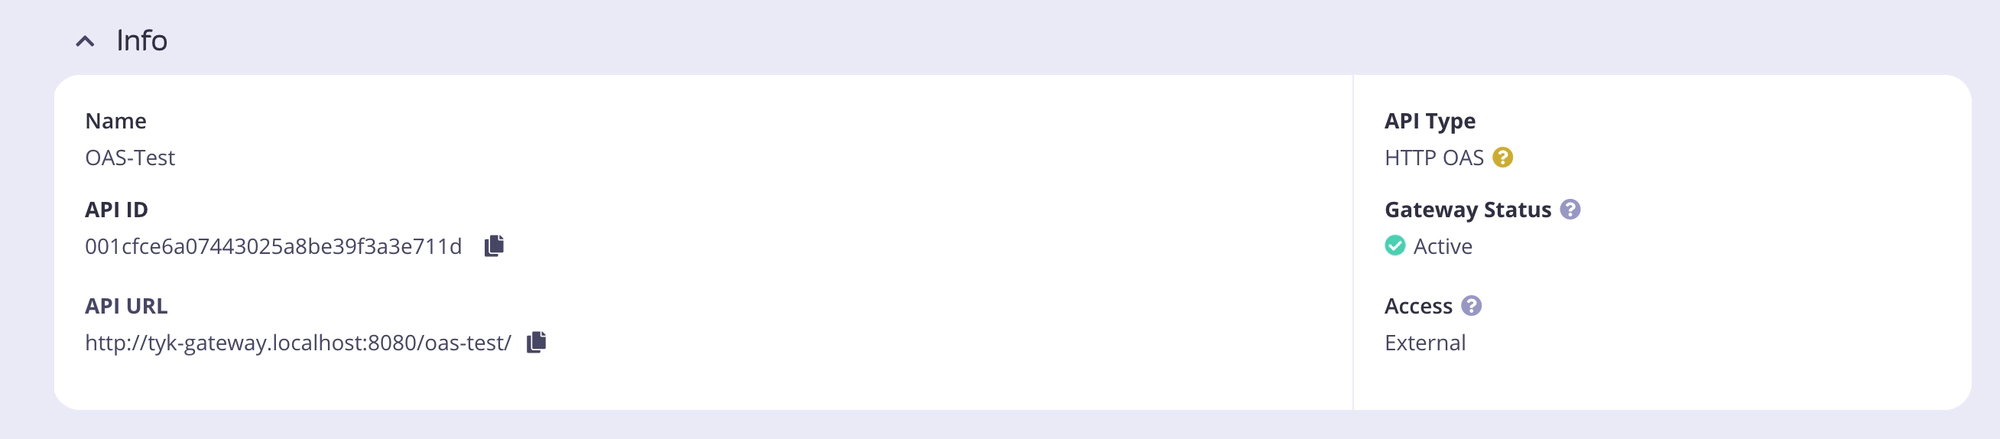
Note
To see the URL given to your API, check the Info section displayed at the top of the page:
Set up the Authentication for your API
From the API page:
- Click Edit
- Scroll down to the Authentication section and enable it.
- Select Auth Token from the drop-down list
- Enter a Authentication Configuration Name
- Select the Authentication Token Location to be picked up from the header
- Note that the header default value will be Authorization
- Save your API
Test your API
From the Settings tab of your API, copy the API URL and request the API without providing an authorization token:
curl --location --request GET 'http://localhost:8181/petstore/' \
--header 'Authorization: wrongkey'
Note that the Gateway will respond with the following error message:
{
    "error": "Access to this API has been disallowed"
}
Tutorial: Create an API with the Dashboard API
It is possible to create APIs using your Tyk Dashboard’s REST API. You will need an API key for your organisation and one command to create the API and make it live.
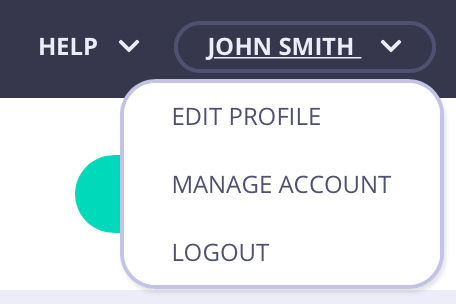
Obtain your Dashboard API key & Dashboard URL
From the Tyk Dashboard, select Users from the System Management section. Click Edit for your user, then scroll to the bottom of the page. Your API Key is the first entry:
Store your Dashboard Key, Dashboard URL & Gateway URL as environment variables so you don’t need to keep typing them in:
export DASH_KEY=db8adec7615d40db6419a2e4688678e0

# Locally installed dashboard
export DASH_URL=http://localhost:3000/api

# Tyk's Cloud Dashboard
export DASH_URL=https://admin.cloud.tyk.io/api

# Locally installed gateway
export GATEWAY_URL=http://localhost:8080

# Your Cloud Gateway
export GATEWAY_URL=https://YOUR_SUBDOMAIN.cloud.tyk.io
Query the /api/apis endpoint to see what APIs are loaded
| Property | Description |
|---|---|
| Resource URL | /apis |
| Method | GET |
| Type | None |
| Body | None |
| Param | None |
curl -H "Authorization: ${DASH_KEY}" ${DASH_URL}/apis
{"apis":[],"pages":1}
Note
For a fresh install, you will see that no APIs currently exist
Create your first API
This example Tyk OAS API definition configures the Tyk Gateway to forward requests to the https://petstore.swagger.io/v2 request/response service.
To view the raw API definition object, visit: https://bit.ly/39jUnuq
To create the API, send a Tyk OAS API Definition [link to glossary] to the Dashboard apis endpoint (http://{your-tyk-host}:{port}/api/apis/oas), which will return the status and the API ID of your just created API.
| Property | Description |
|---|---|
| Resource URL | /api/apis/oas |
| Method | POST |
| Type | None |
| Body | Tyk OAS API Definition |
| Param | None |
curl -H "Authorization: ${DASH_KEY}" -H "Content-Type: application/json" ${DASH_URL}/apis/oas \
  -d "$(wget -qO- https://bit.ly/39jUnuq)"
You’ll see the following response:
{
    "Status": "OK",
    "Message": "API created",
    "Meta": {api-id}
}
Test your new API
Create a new petstore pet
curl --location --request POST '${GATEWAY_URL}/petstore-test/pet' \
--header 'accept: */*' \
--header 'Content-Type: application/json' \
--data-raw '{
  "id": 123,
  "category": {
    "id": 0,
    "name": "dogs"
  },
  "name": "doggie",
  "tags": [
    {
      "id": 0,
      "name": "family_dogs"
    }
  ],
  "status": "available"
}'
Retrieve the pet that has just been created:
curl --location --request GET '${GATEWAY_URL}/petstore-test/pet/123' \
--header 'accept: */*' \
--header 'Content-Type: application/json'
What you have done is send a request to the Tyk Gateway on the listen path /petstore-test. Using this path-based-routing, the Gateway is able to identify the API the client intended to target.
The Gateway stripped the listen path, and reverse proxied the request to https://petstore.swagger.io/v2
Protect your API
You could specify the authentication method to use with your API when you first create it. You didn’t do that with our example above which gives us the opportunity to show how updating an API works via the Tyk Dashboard API. You could also edit the API directly on the Dashboard.
Request the API definition you created before and store the output to a file locally.
curl --location --request GET '${DASH_URL}/apis/oas/{api-id}' \
--header 'Authorization: ${DASH_KEY}' | python -mjson.tool > api.petstore.json
You can now edit the api.petstore.json file you created, and update the Tyk OAS API definition to enable authentication. See Authentication for more details.
In the OAS documentation part of the API Definition, there is already a security configuration documented, but this is not enabled yet for your Gateway to apply.
Existing OAS configuration:
...
"components": {
  "securitySchemes": {
    "api_key": {
        "in": "header",
        "name": "api_key",
        "type": "apiKey"
    }
  }
  ....
}
...
"basic-config-and-security/security": [
  {
    "api_key": []
  }
],
Add the following configuration in order to enable an Authentication Token to the API. (Check out an example of a full Tyk OAS API definition https://bit.ly/3mHuBTY)
...
"x-tyk-api-gateway": {
  ...
  "server": {
    ...
    "authentication": {
      "enabled": true,
      "securitySchemes": {
        "api_key": {
          "enabled": true
        }
      }
    }
  }
}
Then send a PUT request back to your Tyk Dashboard to update its configuration.
| Property | Description |
|---|---|
| Resource URL | /api/apis/oas/{api-id} |
| Method | PUT |
| Type | None |
| Body | Tyk OAS API Definition |
| Param | Path Param: {api-id} |
curl -H "Authorization: ${DASH_KEY}" -H "Content-Type: application/json" ${DASH_URL}/apis/oas/${api-id} -X PUT -d "@api.petstore.json"
You will get the following response:
curl -H "Authorization: ${DASH_KEY}" -H "Content-Type: application/json" ${DASH_URL}/apis/oas/${API_ID} -X PUT -d "@api.petstore.json"
Test your protected API
- Send a request without any credentials
curl --location --request GET '${GATEWAY_URL}/petstore-test/pet/123' \
--header 'accept: */*' \
--header 'Content-Type: application/json'
You will see the following response:
{
  "error": "Authorization field missing"
}
- Send a request with incorrect credentials
curl --location --request GET '${GATEWAY_URL}/petstore-test/pet/123' \
--header 'accept: */*' \
--header 'Content-Type: application/json' \
--header 'api_key: 12345'
You will see the following response:
{
  "error": "Access to this API has been disallowed"
}
- Send a request with correct credentials
curl --location --request GET '${GATEWAY_URL}/petstore-test/pet/123' \
--header 'accept: */*' \
--header 'Content-Type: application/json' \
--header 'api_key: ${API_KEY}'
If the command succeeds, you will see your new pet object:
{
    "id": 123,
    "category": {
        "id": 0,
        "name": "dogs"
    },
    "name": "doggie",
    "photoUrls": [],
    "tags": [
        {
            "id": 0,
            "name": "family_dogs"
        }
    ],
    "status": "available"
}
Congratulations! You have just created your first keyless API, then protected it using Tyk.
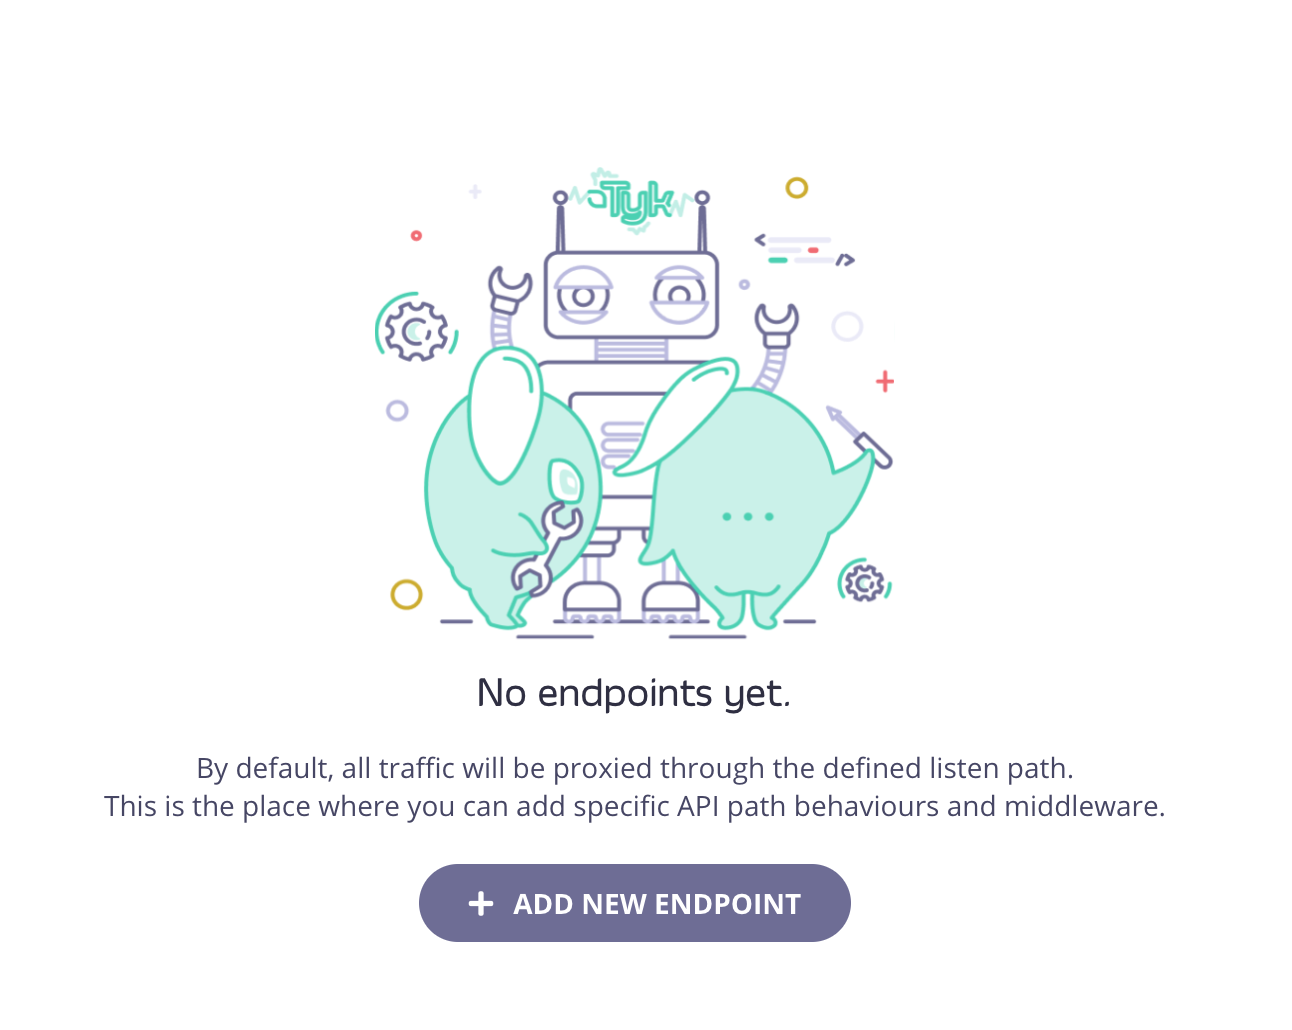
Add endpoints to your OAS API
We are implementing a new Endpoint Designer to be used with OAS APIs.
- After creating your OAS API, select the Endpoints tab.
- Click ADD NEW ENDPOINT
- Add the following details for your endpoint:
- Select the method for your endpoint from the drop-down list
- Add a path for your endpoint
- Add an optional summary and description
- Click ADD ENDPOINT
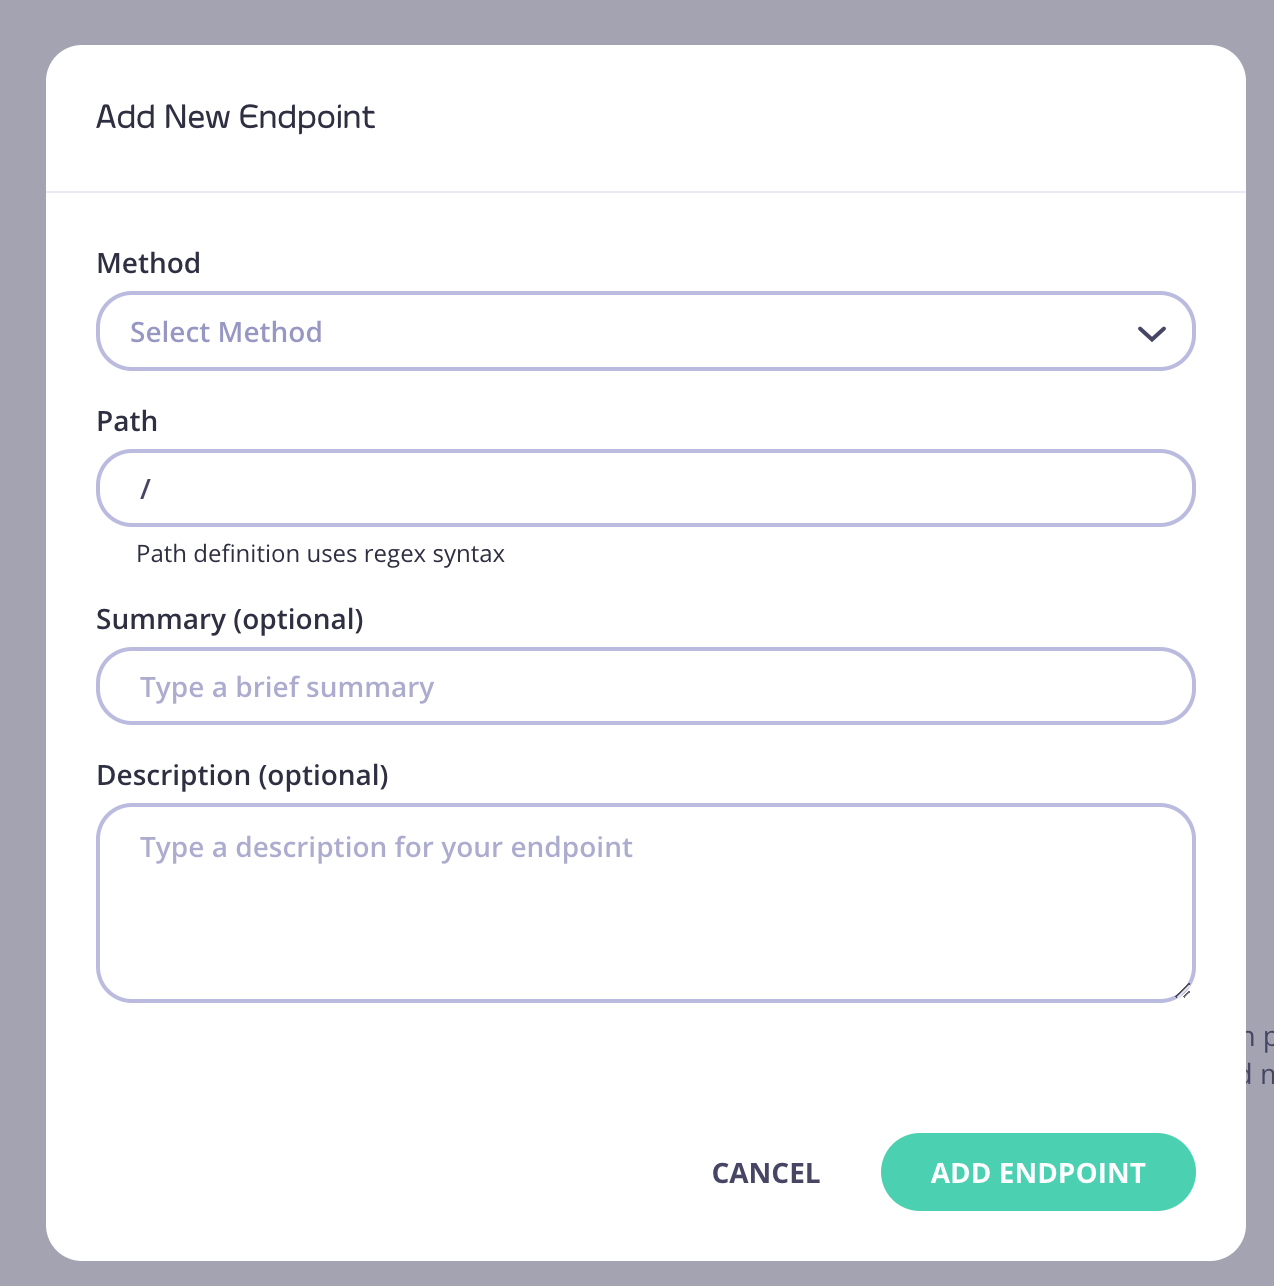
- Your endpoint will now be listed in the Endpoints tab

- You can now add middleware to your endpoint.
Note
We are introducing new middleware with the early access version of OAS API functionality. You may find not all middleware is currently supported.