Transform Traffic by using Tyk Middlewares

Last updated:

Overview

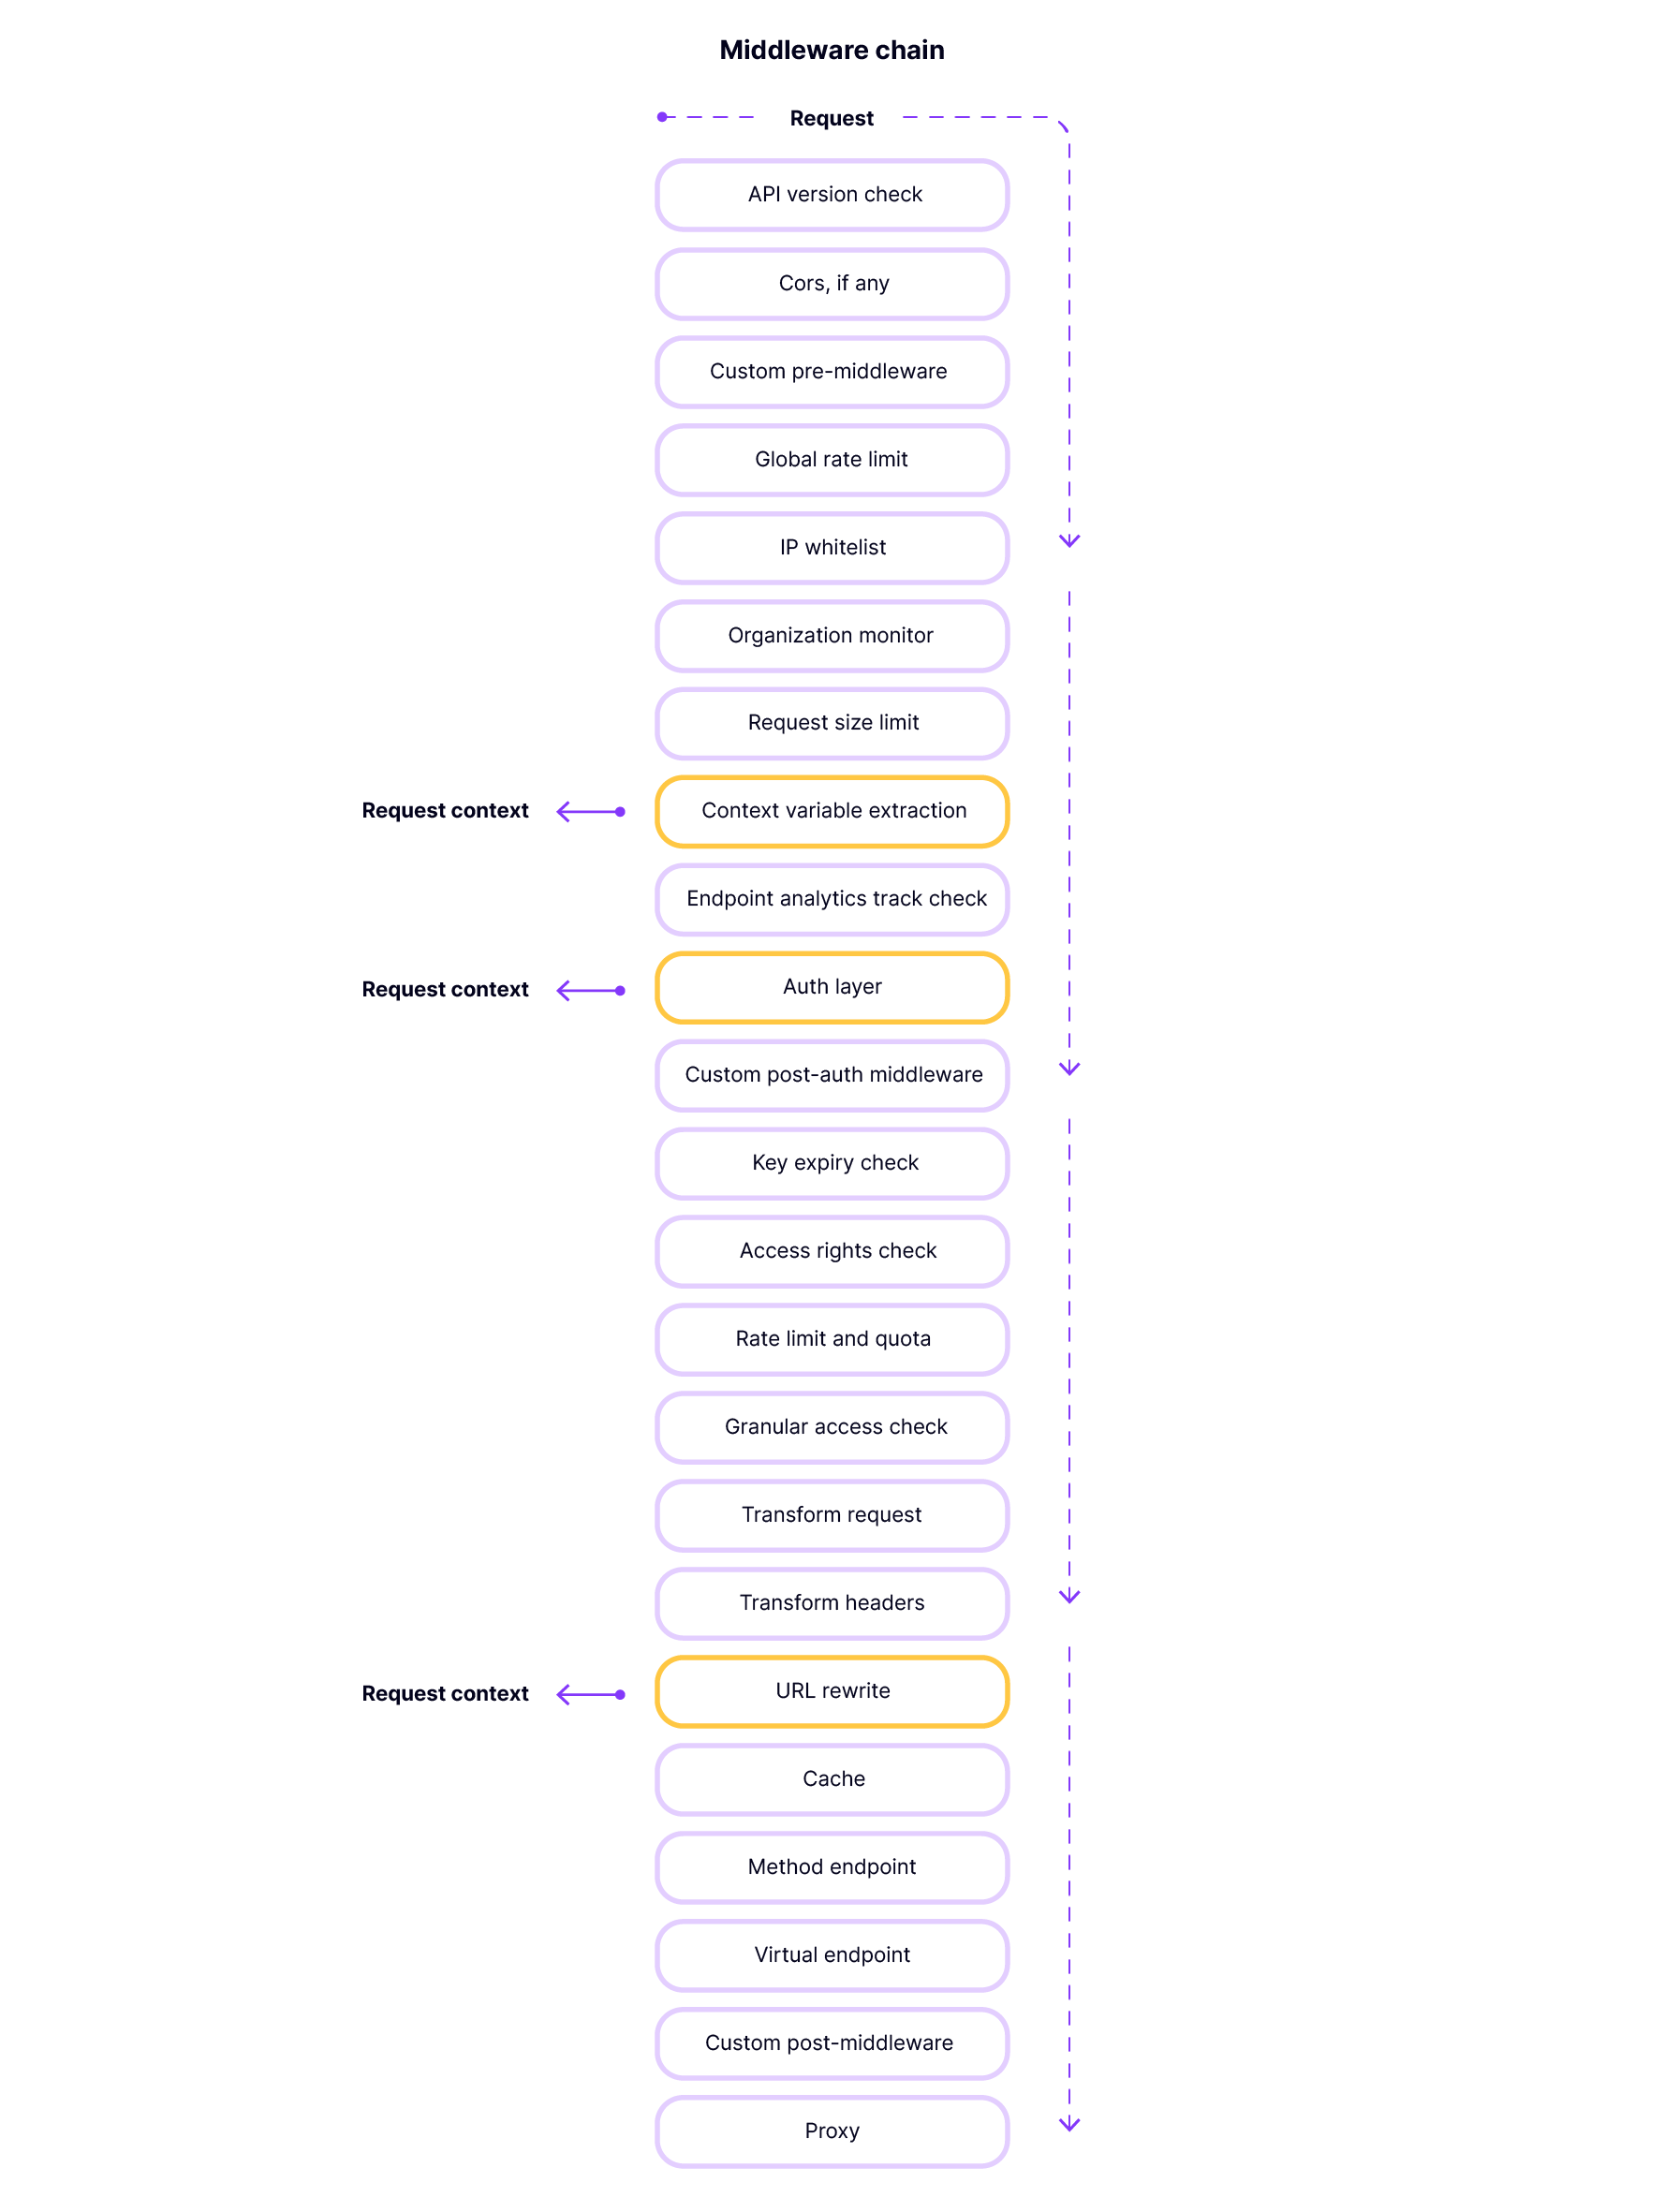
When you configure an API on Tyk, the Gateway will proxy all requests received at the listen path that you have defined through to the upstream (target) URL configured in the API definition. Responses from the upstream are likewise proxied on to the originating client. Requests and responses are processed through a powerful chain of middleware that perform security and processing functions.

Within that chain are a highly configurable set of optional middleware that can, on a per-endpint basis:

  • apply processing to API requests before they are proxied to the upstream service
  • apply customization to the API response prior to it being proxied back to the client

Tyk also supports a powerful custom plugin feature that enables you to add custom processing at different stages in the processing chains. For more details on custom plugins please see the dedicated guide.

Middleware applied to the API Request

The following standard middleware can optionally be applied to API requests on a per-endpoint basis.

Allow list

The Allow List middleware is a feature designed to restrict access to only specific API endpoints. It rejects requests to endpoints not specifically “allowed”, returning HTTP 403 Forbidden. This enhances the security of the API by preventing unauthorized access to endpoints that are not explicitly permitted.

Enabling the allow list will cause the entire API to become blocked other than for endpoints that have this middleware enabled. This is great if you wish to have very strict access rules for your services, limiting access to specific published endpoints.

Block list

The Block List middleware is a feature designed to prevent access to specific API endpoints. Tyk Gateway rejects all requests made to endpoints with the block list enabled, returning HTTP 403 Forbidden.

Cache

Tyk’s API-level cache does not discriminate between endpoints and will usually be configured to cache all safe requests. You can use the granular Endpoint Cache to ensure finer control over which API responses are cached by Tyk.

Circuit Breaker

The Circuit Breaker is a protective mechanism that helps to maintain system stability by preventing repeated failures and overloading of services that are erroring. When a network or service failure occurs, the circuit breaker prevents further calls to that service, allowing the affected service time to recover while ensuring that the overall system remains functional.

Do Not Track Endpoint

If traffic logging is enabled for your Tyk Gateway, then it will create transaction logs for all API requests (and responses) to deployed APIs. You can use the Do-Not-Track middleware to suppress creation of transaction records for specific endpoints.

Enforced Timeout

Tyk’s Enforced Timeout middleware can be used to apply a maximum time that the Gateway will wait for a response before it terminates (or times out) the request. This helps to maintain system stability and prevents unresponsive or long-running tasks from affecting the overall performance of the system.

Ignore Authentication

Adding the Ignore Authentication middleware means that Tyk Gateway will not perform authentication checks on requests to that endpoint. This plugin can be very useful if you have a specific endpoint (such as a ping) that you don’t need to secure.

Internal Endpoint

The Internal Endpoint middleware instructs Tyk Gateway not to expose the endpoint externally. Tyk Gateway will then ignore external requests to that endpoint while continuing to process internal requests from other APIs; this is often used with the internal looping functionality.

Method Transformation

The Method Transformation middleware allows you to change the HTTP method of a request.

Mock Response

A Mock Response is a simulated API response that can be returned by the API gateway without actually sending the request to the backend API. Mock responses are an integral feature for API development, enabling developers to emulate API behavior without the need for upstream execution.

Request Body Transform

The Request Body Transform middleware allows you to perform modification to the body (payload) of the API request to ensure that it meets the requirements of your upstream service.

Request Header Transform

The Request Header Transform middleware allows you to modify the header information provided in the request before it leaves the Gateway and is passed to your upstream API.

Request Size Limit

Tyk Gateway offers a flexible tiered system of limiting request sizes ranging from globally applied limits across all APIs deployed on the gateway down to specific size limits for individual API endpoints. The Request Size Limit middleware provides the most granular control over request size by enabling you to set different limits for individual endpoints.

Request Validation

Tyk’s Request Validation middleware provides a way to validate the presence, correctness and conformity of HTTP requests to make sure they meet the expected format required by the upstream API endpoints.

When working with Tyk OAS APIs, the request validation covers both headers and body (payload); with the older Tyk Classic API style we can validate only the request body (payload).

Track Endpoint

If you do not want to include all endpoints in your Activity by Endpoint statistics in Tyk Dashboard, you can enable this middleware for the endpoints to be included.

URL Rewrite

URL Rewriting in Tyk is a powerful feature that enables the modification of incoming API request paths to match the expected endpoint format of your backend services. This allows you to translate an outbound API interface to the internal structure of your services. It is a key capability used in internal looping

Virtual Endpoint

Tyk’s Virtual Endpoints is a programmable middleware component that allows you to perform complex interactions with your upstream service(s) that cannot be handled by one of the other middleware components.

Middleware applied to the API Response

The following transformations can be applied to the response recieved from the upstream to ensure that it contains the correct data and format expected by your clients.

Response Body Transform

The Response Body Transform middleware allows you to perform modification to the body (payload) of the response received from the upstream service to ensure that it meets the expectations of the client.

Response Header Transform

The Response Header Transform middleware allows you to modify the header information provided in the response before it leaves the Gateway and is passed to the client.

Allow List

Overview

The Allow List middleware is a feature designed to restrict access to only specific API endpoints. It rejects requests to endpoints not specifically “allowed”, returning HTTP 403 Forbidden. This enhances the security of the API by preventing unauthorized access to endpoints that are not explicitly permitted.

Note that this is not the same as Tyk’s IP allow list feature, which is used to restrict access to APIs based upon the IP of the requestor.

Use Cases

Restricting access to private endpoints

If you have a service that exposes endpoints or supports methods that you do not want to be available to clients, you should use the allow list to perform strict restriction to a subset of methods and paths. If the allow list is not enabled, requests to endpoints that are not explicitly defined in Tyk will be proxied to the upstream service and may lead to unexpected behavior.

Working

Tyk Gateway does not actually maintain a list of allowed endpoints but rather works on the model whereby if the allow list middleware is added to an endpoint then this will automatically block all other endpoints.

Tyk Gateway will subsequently return HTTP 403 Forbidden to any requested endpoint that doesn’t have the allow list middleware enabled, even if the endpoint is defined and configured in the API definition.


Note

If you enable the allow list feature by adding the middleware to any endpoint, ensure that you also add the middleware to any other endpoint for which you wish to accept requests.

Case sensitivity

By default the allow list is case-sensitive, so for example if you have defined the endpoint GET /userID in your API definition then only calls to GET /userID will be allowed: calls to GET /UserID or GET /userid will be rejected. You can configure the middleware to be case-insensitive at the endpoint level.

You can also set case sensitivity for the entire gateway in the Gateway configuration file tyk.conf. If case insensitivity is configured at the gateway level, this will override the endpoint-level setting.

Endpoint parsing

When using the allow list middleware, we recommend that you familiarize yourself with Tyk’s URL matching options.


Note

Tyk recommends that you use exact matching for maximum security, though prefix and wildcard strategies might also apply for your particular deployment or use case.


If you’re using Tyk OAS APIs, then you can find details and examples of how to configure the allow list middleware here.

If you’re using Tyk Classic APIs, then you can find details and examples of how to configure the allow list middleware here.

Using Tyk OAS

The allow list is a feature designed to restrict access to only specific API endpoints. It rejects requests to endpoints not specifically “allowed”, returning HTTP 403 Forbidden. This enhances the security of the API by preventing unauthorized access to endpoints that are not explicitly permitted.

When working with Tyk OAS APIs the middleware is configured in the Tyk OAS API Definition. You can do this via the Tyk Dashboard API or in the API Designer.

If you’re using the legacy Tyk Classic APIs, then check out the Tyk Classic page.

API Definition

The design of the Tyk OAS API Definition takes advantage of the operationId defined in the OpenAPI Document that declares both the path and method for which the middleware should be added. Endpoint paths entries (and the associated operationId) can contain wildcards in the form of any string bracketed by curly braces, for example /status/{code}. These wildcards are so they are human readable and do not translate to variable names. Under the hood, a wildcard translates to the “match everything” regex of: (.*).

The allow list middleware (allow) can be added to the operations section of the Tyk OAS Extension (x-tyk-api-gateway) in your Tyk OAS API Definition for the appropriate operationId (as configured in the paths section of your OpenAPI Document).

The allow object has the following configuration:

  • enabled: enable the middleware for the endpoint
  • ignoreCase: if set to true then the path matching will be case insensitive

For example:

 1
 2
 3
 4
 5
 6
 7
 8
 9
10
11
12
13
14
15
16
17
18
19
20
21
22
23
24
25
26
27
28
29
30
31
32
33
34
35
36
37
38
39
40
41
42
43
44
45
46
47
48
49
50
51
52
53
54
55
56
57
58
59
60
61
{
    "components": {},
    "info": {
        "title": "example-allow-list",
        "version": "1.0.0"
    },
    "openapi": "3.0.3",
    "paths": {
        "/anything": {
            "get": {
                "operationId": "anythingget",
                "responses": {
                    "200": {
                        "description": ""
                    }
                }
            },
            "put": {
                "operationId": "anythingput",
                "responses": {
                    "200": {
                        "description": ""
                    }
                }
            }
        }
    },
    "x-tyk-api-gateway": {
        "info": {
            "name": "example-allow-list",
            "state": {
                "active": true
            }
        },
        "upstream": {
            "url": "http://httpbin.org/"
        },
        "server": {
            "listenPath": {
                "value": "/example-allow-list/",
                "strip": true
            }
        },
        "middleware": {
            "operations": {
                "anythingget": {
                    "allow": {
                        "enabled": true,
                        "ignoreCase": true
                    }                
                },
                "anythingput": {
                    "allow": {
                        "enabled": true,
                        "ignoreCase": true
                    }                
                }
            }
        }
    }
}

In this example the allow list middleware has been configured for requests to the GET /anything and PUT /anything endpoints. Requests to any other endpoints will be rejected with HTTP 403 Forbidden, unless they also have the allow list middleware enabled. Note that the allow list has been configured to be case insensitive, so calls to GET /Anything will be allowed Note also that the endpoint path has not been terminated with $. Requests to, for example, GET /anything/foobar will be allowed as the regular expression pattern match will recognize this as GET /anything.

The configuration above is a complete and valid Tyk OAS API Definition that you can import into Tyk to try out the allow list feature.

API Designer

Adding the allow list to your API endpoints is easy is easy when using the API Designer in the Tyk Dashboard, simply follow these steps:

  1. Add an endpoint

    From the API Designer add an endpoint that matches the path and method to which you want to apply the middleware.

    Tyk OAS API Designer showing no endpoints created

    Adding an endpoint to an API using the Tyk OAS API Designer

    Tyk OAS API Designer showing no middleware enabled on endpoint

  2. Select the Allow List middleware

    Select ADD MIDDLEWARE and choose the Allow List middleware from the Add Middleware screen.

    Adding the Allow List middleware

  3. Optionally configure case-insensitivity

    If you want to disable case-sensitivity for the allow list, then you must select EDIT on the Allow List icon.

    Allow List middleware added to endpoint - click through to edit the config

    This takes you to the middleware configuration screen where you can alter the case sensitivity setting.

    Configuring case sensitivity for the Allow List

    Select UPDATE MIDDLEWARE to apply the change to the middleware configuration.

  4. Save the API

    Select SAVE API to apply the changes to your API.

Using Classic

The allow list is a feature designed to restrict access to only specific API endpoints. It rejects requests to endpoints not specifically “allowed”, returning HTTP 403 Forbidden. This enhances the security of the API by preventing unauthorized access to endpoints that are not explicitly permitted.

When working with Tyk Classic APIs the middleware is configured in the Tyk Classic API Definition. You can do this via the Tyk Dashboard API or in the API Designer.

If you’re using the newer Tyk OAS APIs, then check out the Tyk OAS page.

API Definition

To enable and configure the allow list you must add a new white_list object to the extended_paths section of your API definition.

Note

Historically, Tyk followed the out-dated whitelist/blacklist naming convention. We are working to remove this terminology from the product and documentation, however this configuration object currently retains the old name.

The white_list object has the following configuration:

  • path: the endpoint path
  • method: this should be blank
  • ignore_case: if set to true then the path matching will be case insensitive
  • method_actions: a shared object used to configure the mock response middleware

The method_actions object should be configured as follows, with an entry created for each allowed method on the path:

  • action: this should be set to no_action
  • code: this should be set to 200
  • headers : this should be blank

For example:

 1
 2
 3
 4
 5
 6
 7
 8
 9
10
11
12
13
14
15
16
17
18
19
20
21
22
23
24
{
    "extended_paths": {
        "white_list": [
            {
                "disabled": false,
                "path": "/status/200",
                "method": "",
                "ignore_case": false,
                "method_actions": {
                    "GET": {
                        "action": "no_action",
                        "code": 200,
                        "headers": {}
                    },
                    "PUT": {
                        "action": "no_action",
                        "code": 200,
                        "headers": {}
                    }            
                }
            }
        ]
    }
}

In this example the allow list middleware has been configured for HTTP GET and PUT requests to the /status/200 endpoint. Requests to any other endpoints will be rejected with HTTP 403 Forbidden, unless they also have the allow list middleware enabled. Note that the allow list has been configured to be case sensitive, so calls to GET /Status/200 will also be rejected. Note also that the endpoint path has not been terminated with $. Requests to, for example, GET /status/200/foobar will be allowed as the regular expression pattern match will recognize this as GET /status/200.

Consult section configuring the Allow List in Tyk Operator for details on how to configure allow lists for endpoints using Tyk Operator.

API Designer

You can use the API Designer in the Tyk Dashboard to configure the allow list middleware for your Tyk Classic API by following these steps.

  1. Add an endpoint for the path and select the plugin

    From the Endpoint Designer, add an endpoint that matches the path for which you want to allow access. Select the Whitelist plugin.

  2. Configure the allow list

    Once you have selected the middleware for the endpoint, the only additional feature that you need to configure is whether to make the middleware case insensitive by selecting Ignore Case.

    Allowlist options

  3. Save the API

    Use the save or create buttons to save the changes and activate the allow list middleware.

Tyk Operator

Similar to the configuration of a Tyk Classic API Definition you must add a new white_list object to the extended_paths section of your API definition. Furthermore, the use_extended_paths configuration parameter should be set to true.

Note

Historically, Tyk followed the out-dated whitelist/blacklist naming convention. We are working to remove this terminology from the product and documentation, however this configuration object currently retains the old name.

 1
 2
 3
 4
 5
 6
 7
 8
 9
10
11
12
13
14
15
16
17
18
19
20
21
22
23
24
25
26
27
28
29
30
31
32
33
34
apiVersion: tyk.tyk.io/v1alpha1
kind: ApiDefinition
metadata:
  name: httpbin-whitelist
spec:
  name: httpbin-whitelist
  use_keyless: true
  protocol: http
  active: true
  proxy:
    target_url: http://httpbin.org/
    listen_path: /httpbin
    strip_listen_path: true
  version_data:
    default_version: Default
    not_versioned: true
    versions:
      Default:
        name: Default
        use_extended_paths: true
        paths:
          black_list: []
          ignored: []
          white_list: []
        extended_paths:
          white_list:
            - ignore_case: true
              method_actions:
                GET:
                  action: "no_action"
                  code: 200
                  data: ""
                  headers: {}
              path: "/get"

In this example the allow list middleware has been configured for HTTP GET requests to the /get endpoint. Requests to any other endpoints will be rejected with HTTP 403 Forbidden, unless they also have the allow list middleware enabled. Note that the allow list has been configured to case insensitive, so calls to GET /Get will also be accepted. Note also that the endpoint path has not been terminated with $. Requests to, for example, GET /get/foobar will be allowed as the regular expression pattern match will recognize this as GET /get.

Block List

Overview

The Block List middleware is a feature designed to block access to specific API endpoints. Tyk Gateway rejects all requests made to endpoints with the block list enabled, returning HTTP 403 Forbidden.

Note that this is not the same as Tyk’s IP block list feature, which is used to restrict access to APIs based upon the IP of the requestor.

Use Cases

Prevent access to deprecated resources

If you are versioning your API and deprecating an endpoint then, instead of having to remove the functionality from your upstream service’s API you can simply block access to it using the block list middleware.

Working

Tyk Gateway does not actually maintain a list of blocked endpoints but rather works on the model whereby if the block list middleware is added to an endpoint then any request to that endpoint will be rejected, returning HTTP 403 Forbidden.

Case sensitivity

By default the block list is case-sensitive, so for example if you have defined the endpoint GET /userID in your API definition then only calls to GET /userID will be blocked: calls to GET /UserID or GET /userid will be allowed. You can configure the middleware to be case-insensitive at the endpoint level.

You can also set case sensitivity for the entire gateway in the Gateway configuration file tyk.conf. If case insensitivity is configured at the gateway level, this will override the endpoint-level setting.

Endpoint parsing

When using the block list middleware, we recommend that you familiarize yourself with Tyk’s URL matching options.


Note

Tyk recommends that you use exact matching for maximum security, though prefix and wildcard strategies might also apply for your particular deployment or use case.


If you’re using Tyk OAS APIs, then you can find details and examples of how to configure the block list middleware here.

If you’re using Tyk Classic APIs, then you can find details and examples of how to configure the block list middleware here.

Using Tyk OAS

The block list is a feature designed to block access to specific API endpoints. Tyk Gateway rejects all requests made to endpoints with the block list enabled, returning HTTP 403 Forbidden.

When working with Tyk OAS APIs the middleware is configured in the Tyk OAS API Definition. You can do this via the Tyk Dashboard API or in the API Designer.

If you’re using the legacy Tyk Classic APIs, then check out the Tyk Classic page.

API Definition

The design of the Tyk OAS API Definition takes advantage of the operationId defined in the OpenAPI Document that declares both the path and method for which the middleware should be added. The path can contain wildcards in the form of any string bracketed by curly braces, for example {user_id}. These wildcards are so they are human readable and do not translate to variable names. Under the hood, a wildcard translates to the “match everything” regex of: (.*).

The block list middleware (block) can be added to the operations section of the Tyk OAS Extension (x-tyk-api-gateway) in your Tyk OAS API Definition for the appropriate operationId (as configured in the paths section of your OpenAPI Document).

The block object has the following configuration:

  • enabled: enable the middleware for the endpoint
  • ignoreCase: if set to true then the path matching will be case insensitive

For example:

 1
 2
 3
 4
 5
 6
 7
 8
 9
10
11
12
13
14
15
16
17
18
19
20
21
22
23
24
25
26
27
28
29
30
31
32
33
34
35
36
37
38
39
40
41
42
43
44
45
46
47
48
49
50
51
52
53
54
55
56
57
58
59
60
61
{
    "components": {},
    "info": {
        "title": "example-block-list",
        "version": "1.0.0"
    },
    "openapi": "3.0.3",
    "paths": {
        "/anything": {
            "get": {
                "operationId": "anythingget",
                "responses": {
                    "200": {
                        "description": ""
                    }
                }
            },
            "put": {
                "operationId": "anythingput",
                "responses": {
                    "200": {
                        "description": ""
                    }
                }
            }
        }
    },
    "x-tyk-api-gateway": {
        "info": {
            "name": "example-block-list",
            "state": {
                "active": true
            }
        },
        "upstream": {
            "url": "http://httpbin.org/"
        },
        "server": {
            "listenPath": {
                "value": "/example-block-list/",
                "strip": true
            }
        },
        "middleware": {
            "operations": {
                "anythingget": {
                    "block": {
                        "enabled": true,
                        "ignoreCase": true
                    }                
                },
                "anythingput": {
                    "block": {
                        "enabled": true,
                        "ignoreCase": true
                    }                
                }
            }
        }
    }
}

In this example the block list middleware has been configured for requests to the GET /anything and PUT /anything endpoints. Requests to these endpoints will be rejected with HTTP 403 Forbidden. Note that the block list has been configured to be case insensitive, so calls to GET /Anything will also be blocked. Note also that the endpoint path has not been terminated with $. Requests to, for example, GET /anything/foobar will be rejected as the regular expression pattern match will recognize this as GET /anything.

The configuration above is a complete and valid Tyk OAS API Definition that you can import into Tyk to try out the block list feature.

API Designer

Adding the block list to your API endpoints is easy is easy when using the API Designer in the Tyk Dashboard, simply follow these steps:

  1. Add an endpoint

    From the API Designer add an endpoint that matches the path and method to which you want to apply the middleware.

    Tyk OAS API Designer showing no endpoints created

    Adding an endpoint to an API using the Tyk OAS API Designer

    Tyk OAS API Designer showing no middleware enabled on endpoint

  2. Select the Block List middleware

    Select ADD MIDDLEWARE and choose the Block List middleware from the Add Middleware screen.

    Adding the Block List middleware

  3. Optionally configure case-insensitivity

    If you want to disable case-sensitivity for the block list, then you must select EDIT on the Block List icon.

    Block List middleware added to endpoint - click through to edit the config

    This takes you to the middleware configuration screen where you can alter the case sensitivity setting.

    Configuring case sensitivity for the Block List

    Select UPDATE MIDDLEWARE to apply the change to the middleware configuration.

  4. Save the API

    Select SAVE API to apply the changes to your API.

Using Classic

The block list is a feature designed to block access to specific API endpoints. Tyk Gateway rejects all requests made to endpoints with the block list enabled, returning HTTP 403 Forbidden.

When working with Tyk Classic APIs the middleware is configured in the Tyk Classic API Definition. You can do this via the Tyk Dashboard API or in the API Designer.

If you’re using the newer Tyk OAS APIs, then check out the Tyk OAS page.

If you’re using Tyk Operator then check out the configuring the block list in Tyk Operator section below.

API Definition

To enable and configure the block list you must add a new black_list object to the extended_paths section of your API definition.

Note

Historically, Tyk followed the out-dated whitelist/blacklist naming convention. We are working to remove this terminology from the product and documentation, however this configuration object currently retains the old name.

The black_list object has the following configuration:

  • path: the endpoint path
  • method: this should be blank
  • ignore_case: if set to true then the path matching will be case insensitive
  • method_actions: a shared object used to configure the mock response middleware

The method_actions object should be configured as follows, with an entry created for each blocked method on the path:

  • action: this should be set to no_action
  • code: this should be set to 200
  • headers : this should be blank

For example:

 1
 2
 3
 4
 5
 6
 7
 8
 9
10
11
12
13
14
15
16
17
18
19
20
21
22
23
24
{
    "extended_paths": {
        "black_list": [
            {
                "disabled": false,
                "path": "/status/200",
                "method": "",
                "ignore_case": false,
                "method_actions": {
                    "GET": {
                        "action": "no_action",
                        "code": 200,
                        "headers": {}
                    }
                    "PUT": {
                        "action": "no_action",
                        "code": 200,
                        "headers": {}
                    }            
                }
            }
        ]
    }
}

In this example the block list middleware has been configured for HTTP GET and PUT requests to the /status/200 endpoint. Requests to these endpoints will be rejected with HTTP 403 Forbidden. Note that the block list has been configured to be case sensitive, so calls to GET /Status/200 will not be rejected. Note also that the endpoint path has not been terminated with $. Requests to, for example, GET /status/200/foobar will be rejected as the regular expression pattern match will recognize this as GET /status/200.

Consult section configuring the Allow List in Tyk Operator for details on how to configure allow lists for endpoints using Tyk Operator.

API Designer

You can use the API Designer in the Tyk Dashboard to configure the block list middleware for your Tyk Classic API by following these steps.

  1. Add an endpoint for the path and select the plugin

    From the Endpoint Designer add an endpoint that matches the path for which you want to prevent access. Select the Blacklist plugin.

  2. Configure the block list

    Once you have selected the middleware for the endpoint, the only additional feature that you need to configure is whether to make the middleware case insensitive by selecting Ignore Case.

    Blocklist options

  3. Save the API

    Use the save or create buttons to save the changes and activate the middleware.

Tyk Operator

Similar to the configuration of a Tyk Classic API Definition you must add a new black_list object to the extended_paths section of your API definition. Furthermore, the use_extended_paths configuration parameter should be set to true.

Note

Historically, Tyk followed the out-dated whitelist/blacklist naming convention. We are working to remove this terminology from the product and documentation, however this configuration object currently retains the old name.

 1
 2
 3
 4
 5
 6
 7
 8
 9
10
11
12
13
14
15
16
17
18
19
20
21
22
23
24
25
26
27
28
29
30
31
32
33
34
apiVersion: tyk.tyk.io/v1alpha1
kind: ApiDefinition
metadata:
  name: httpbin-blacklist
spec:
  name: httpbin-blacklist
  use_keyless: true
  protocol: http
  active: true
  proxy:
    target_url: http://httpbin.org/
    listen_path: /httpbin
    strip_listen_path: true
  version_data:
    default_version: Default
    not_versioned: true
    versions:
      Default:
        name: Default
        use_extended_paths: true
        paths:
          black_list: []
          ignored: []
          white_list: []
        extended_paths:
          black_list:
            - ignore_case: true
              method_actions:
                GET:
                  action: "no_action"
                  code: 200
                  data: ""
                  headers: {}
              path: "/get"

In this example the block list middleware has been configured for HTTP GET requests to the /get endpoint. Requests to this endpoint will be rejected with HTTP 403 Forbidden. Note that the block list has been configured to be case insensitive, so calls to GET /Get will not be rejected. Note also that the endpoint path has not been terminated with $. Requests to, for example, GET /get/foobar will be rejected as the regular expression pattern match will recognize this as GET /get.

Do Not Track

Overview

When transaction logging is enabled in the Tyk Gateway, a transaction record will be generated for every request made to an API endpoint deployed on the gateway. You can suppress the generation of transaction records for any API by enabling the do-not-track middleware. This provides granular control over request tracking.

Use Cases

Compliance and privacy

Disabling tracking on endpoints that handle personal or sensitive information is crucial for adhering to privacy laws such as GDPR or HIPAA. This action prevents the storage and logging of sensitive data, ensuring compliance and safeguarding user privacy.

Optimizing performance

For endpoints experiencing high traffic, disabling tracking can mitigate the impact on the analytics processing pipeline and storage systems. Disabling tracking on endpoints used primarily for health checks or load balancing can prevent the analytics data from being cluttered with information that offers little insight. These optimizations help to maintain system responsiveness and efficiency by reducing unnecessary data load and help to ensure that analytics efforts are concentrated on more meaningful data.

Cost Management

In scenarios where analytics data storage and processing incur significant costs, particularly in cloud-based deployments, disabling tracking for non-essential endpoints can be a cost-effective strategy. This approach allows for focusing resources on capturing valuable data from critical endpoints.

Working

When transaction logging is enabled, the gateway will automatically generate a transaction record for every request made to deployed APIs.

You can enable the do-not-track middleware on whichever endpoints for which you do not want to generate logs. This will instruct the Gateway not to generate any transaction records for those endpoints or APIs. As no record of these transactions will be generated by the Gateway, there will be nothing created in Redis and hence nothing for the pumps to transfer to the persistent storage and these endpoints will not show traffic in the Dashboard’s analytics screens.

Note

When working with Tyk Classic APIs, you can disable tracking at the API or endpoint-level. When working with Tyk OAS APIs, you can currently disable tracking only at the more granular endpoint-level.


If you’re using Tyk OAS APIs, then you can find details and examples of how to configure the do-not-track middleware here.

If you’re using Tyk Classic APIs, then you can find details and examples of how to configure the do-not-track middleware here.

Using Tyk OAS

The Do-Not-Track middleware provides the facility to disable generation of transaction records (which are used to track requests to your APIs). When working with Tyk OAS APIs, you can currently disable tracking only at the endpoint-level.

When working with Tyk OAS APIs the middleware is configured in the Tyk OAS API Definition either manually within the .json file or from the API Designer in the Tyk Dashboard.

If you’re using the legacy Tyk Classic APIs, then check out the Tyk Classic page.

API Definition

The design of the Tyk OAS API Definition takes advantage of the operationId defined in the OpenAPI Document that declares both the path and method for which the middleware should be added. The path can contain wildcards in the form of any string bracketed by curly braces, for example {user_id}. These wildcards are so they are human readable and do not translate to variable names. Under the hood, a wildcard translates to the “match everything” regex of: (.*).

The do-not-track middleware (doNotTrackEndpoint) can be added to the operations section of the Tyk OAS Extension (x-tyk-api-gateway) in your Tyk OAS API Definition for the appropriate operationId (as configured in the paths section of your OpenAPI Document).

The doNotTrackEndpoint object has the following configuration:

  • enabled: enable the middleware for the endpoint

For example:

 1
 2
 3
 4
 5
 6
 7
 8
 9
10
11
12
13
14
15
16
17
18
19
20
21
22
23
24
25
26
27
28
29
30
31
32
33
34
35
36
37
38
39
40
41
42
43
44
45
46
{
    "components": {},
    "info": {
        "title": "example-do-not-track",
        "version": "1.0.0"
    },
    "openapi": "3.0.3",
    "paths": {
        "/anything": {
            "get": {
                "operationId": "anythingget",
                "responses": {
                    "200": {
                        "description": ""
                    }
                }
            }
        }
    },
    "x-tyk-api-gateway": {
        "info": {
            "name": "example-do-not-track",
            "state": {
                "active": true
            }
        },
        "upstream": {
            "url": "http://httpbin.org/"
        },
        "server": {
            "listenPath": {
                "value": "/example-do-not-track/",
                "strip": true
            }
        },
        "middleware": {
            "operations": {
                "anythingget": {
                    "doNotTrackEndpoint": {
                        "enabled": true
                    }               
                }
            }
        }
    }
}

In this example the do-not-track middleware has been configured for requests to the GET /anything endpoint. Any such calls will not generate transaction records from the Gateway and so will not appear in the analytics.

The configuration above is a complete and valid Tyk OAS API Definition that you can import into Tyk to try out the do-not-track middleware.

API Designer

Adding do-not-track to your API endpoints is easy when using the API Designer in the Tyk Dashboard, simply follow these steps:

  1. Add an endpoint

    From the API Designer add an endpoint that matches the path and method to which you want to apply the middleware.

    Tyk OAS API Designer showing no endpoints created

    Adding an endpoint to an API using the Tyk OAS API Designer

    Tyk OAS API Designer showing no middleware enabled on endpoint

  2. Select the Do Not Track Endpoint middleware

    Select ADD MIDDLEWARE and choose the Do Not Track Endpoint middleware from the Add Middleware screen.

    Adding the Do Not Track middleware

  3. Save the API

    Select SAVE API to apply the changes to your API.

Using Classic

The Do-Not-Track middleware provides the facility to disable generation of transaction records (which are used to track requests) at the API or endpoint level.

When working with Tyk Classic APIs the middleware is configured in the Tyk Classic API Definition either manually within the .json file or from the API Designer in the Tyk Dashboard.

If you’re using the newer Tyk OAS APIs, then check out the Tyk OAS page.

If you’re using Tyk Operator then check out the configuring the middleware in Tyk Operator section below.

API Definition

You can prevent tracking for all endpoints of an API by configuring the do_not_track field in the root of your API definition.

  • true: no transaction logs will be generated for requests to the API
  • false: transaction logs will be generated for requests to the API

If you want to be more granular and disable tracking only for selected endpoints, then you must add a new do_not_track_endpoints object to the extended_paths section of your API definition.

The do_not_track_endpoints object has the following configuration:

  • path: the endpoint path
  • method: the endpoint HTTP method

The path can contain wildcards in the form of any string bracketed by curly braces, for example {user_id}. These wildcards are so they are human readable and do not translate to variable names. Under the hood, a wildcard translates to the “match everything” regex of: (.*).

For example:

 1
 2
 3
 4
 5
 6
 7
 8
 9
10
11
{
    "extended_paths": {
        "do_not_track_endpoints": [
            {
                "disabled": false,
                "path": "/anything",
                "method": "GET"
            }
        ]
    }
}

In this example the do-not-track middleware has been configured for requests to the GET /anything endpoint. Any such calls will not generate transaction records from the Gateway and so will not appear in the analytics.

API Designer

You can use the API Designer in the Tyk Dashboard to configure the per-endpoint Do-Not-Track middleware for your Tyk Classic API by following these steps. Note that the API-level middleware can only be configured from the Raw Definition screen.

  1. Add an endpoint for the path and select the plugin

    From the Endpoint Designer add an endpoint that matches the path for which you do not want to generate records. Select the Do not track endpoint plugin.

    Select the middleware

  2. Save the API

    Use the save or create buttons to save the changes and activate the middleware.

Tyk Operator

The process for configuring the middleware in Tyk Operator is similar to that explained in configuring the middleware in the Tyk Classic API Definition.

It is possible to prevent tracking for all endpoints of an API by configuring the do_not_track field in the root of your API definition as follows:

  • true: no transaction logs will be generated for requests to the API
  • false: transaction logs will be generated for requests to the API
 1
 2
 3
 4
 5
 6
 7
 8
 9
10
11
12
13
14
apiVersion: tyk.tyk.io/v1alpha1
kind: ApiDefinition
metadata:
  name: httpbin-do-not-track
spec:
  name: httpbin-do-not-track 
  use_keyless: true
  protocol: http
  active: true
  do_not_track: true
  proxy:
    target_url: http://example.com
    listen_path: /example
    strip_listen_path: true

If you want to disable tracking only for selected endpoints, then the process is similar to that defined in configuring the middleware in the Tyk Classic API Definition, i.e. you must add a new do_not_track_endpoints list to the extended_paths section of your API definition. This should contain a list of objects representing each endpoint path and method that should have tracking disabled:

 1
 2
 3
 4
 5
 6
 7
 8
 9
10
11
12
13
14
15
16
17
18
19
20
21
22
23
24
25
26
27
28
29
30
31
32
apiVersion: tyk.tyk.io/v1alpha1
kind: ApiDefinition
metadata:
  name: httpbin-endpoint-tracking
spec:
  name: httpbin - Endpoint Track
  use_keyless: true
  protocol: http
  active: true
  do_not_track: false
  proxy:
    target_url: http://httpbin.org/
    listen_path: /httpbin
    strip_listen_path: true
  version_data:
    default_version: Default
    not_versioned: true
    versions:
      Default:
        name: Default
        use_extended_paths: true
        paths:
          black_list: []
          ignored: []
          white_list: []
        extended_paths:
          track_endpoints:
            - method: GET
              path: "/get"
          do_not_track_endpoints:
            - method: GET
              path: "/headers"

In the example above we can see that the do_not_track_endpoints list is configured so that requests to GET /headers will have tracking disabled.

Ignore Authentication

Overview

The Ignore Authentication middleware instructs Tyk Gateway to skip the authentication step for calls to an endpoint, even if authentication is enabled for the API.

Use Cases

Health and liveness endpoints

This plugin can be very useful if you have an endpoint (such as a ping or health check) that you don’t need to secure.

Working

When the Ignore Authentication middleware is configured for a specific endpoint, it instructs the gateway to bypass the client authentication process for requests made to that endpoint. If other (non-authentication) middleware are configured for the endpoint, they will still execute on the request.

It is important to exercise caution when using the Ignore Authentication middleware, as it effectively disables Tyk’s security features for the ignored paths. Only endpoints that are designed to be public or have independent security mechanisms should be configured to bypass authentication in this way. When combining Ignore Authentication with response transformations be careful not to inadvertently expose sensitive data or rely on authentication or session data that is not present.

Case sensitivity

By default the ignore authentication middleware is case-sensitive. If, for example, you have defined the endpoint GET /ping in your API definition then only calls to GET /ping will ignore the authentication step: calls to GET /Ping or GET /PING will require authentication. You can configure the middleware to be case insensitive at the endpoint level.

You can also set case sensitivity for the entire Tyk Gateway in its configuration file tyk.conf. If case insensitivity is configured at the gateway level, this will override the endpoint-level setting.

Endpoint parsing

When using the ignore authentication middleware, we recommend that you familiarize yourself with Tyk’s URL matching options.


Note

Tyk recommends that you use exact matching for maximum security, though prefix and wildcard strategies might also apply for your particular deployment or use case.


If you’re using Tyk OAS APIs, then you can find details and examples of how to configure the ignore authentication middleware here.

If you’re using Tyk Classic APIs, then you can find details and examples of how to configure the ignore authentication middleware here.

Using Tyk OAS

The Ignore Authentication middleware instructs Tyk Gateway to skip the authentication step for calls to an endpoint, even if authentication is enabled for the API.

When working with Tyk OAS APIs the middleware is configured in the Tyk OAS API Definition. You can do this via the Tyk Dashboard API or in the API Designer.

If you’re using the legacy Tyk Classic APIs, then check out the Tyk Classic page.

API Definition

The design of the Tyk OAS API Definition takes advantage of the operationId defined in the OpenAPI Document that declares both the path and method for which the middleware should be added. Endpoint paths entries (and the associated operationId) can contain wildcards in the form of any string bracketed by curly braces, for example /status/{code}. These wildcards are so they are human readable and do not translate to variable names. Under the hood, a wildcard translates to the “match everything” regex of: (.*).

The ignore authentication middleware (ignoreAuthentication) can be added to the operations section of the Tyk OAS Extension (x-tyk-api-gateway) in your Tyk OAS API Definition for the appropriate operationId (as configured in the paths section of your OpenAPI Document).

The ignoreAuthentication object has the following configuration:

  • enabled: enable the middleware for the endpoint
  • ignoreCase: if set to true then the path matching will be case insensitive

For example:

 1
 2
 3
 4
 5
 6
 7
 8
 9
10
11
12
13
14
15
16
17
18
19
20
21
22
23
24
25
26
27
28
29
30
31
32
33
34
35
36
37
38
39
40
41
42
43
44
45
46
47
48
49
50
51
52
53
54
55
56
57
58
59
60
61
62
63
64
65
66
67
68
69
70
71
72
73
{
    "info": {
        "title": "example-ignore-authentication",
        "version": "1.0.0"
    },
    "openapi": "3.0.3",
    "servers": [
        {
            "url": "http://localhost:8181/example-ignore-authentication/"
        }
    ], 
    "security": [
        {
            "authToken": []
        }
    ],     
    "paths": {
        "/anything": {
            "get": {
                "operationId": "anythingget",
                "responses": {
                    "200": {
                        "description": ""
                    }
                }
            }
        }
    },
    "components": {
        "securitySchemes": {
            "authToken": {
                "type": "apiKey",
                "in": "header",
                "name": "Authorization"
            }
        }        
    },    
    "x-tyk-api-gateway": {
        "info": {
            "name": "example-ignore-authentication",
            "state": {
                "active": true,
                "internal": false
            }
        },
        "upstream": {
            "url": "http://httpbin.org/"
        },
        "server": {
            "authentication": {
                "enabled": true,
                "securitySchemes": {
                    "authToken": {
                        "enabled": true
                    }
                }
            },
            "listenPath": {
                "strip": true,
                "value": "/example-ignore-authentication/"
            }        
        },
        "middleware": {
            "operations": {
                "anythingget": {
                    "ignoreAuthentication": {
                        "enabled": true
                    }
                }
            }
        }
    }
}

In this example the ignore authentication middleware has been configured for requests to the GET /anything endpoint. Any such calls will skip the authentication step in the Tyk Gateway’s processing chain.

  • the middleware has been configured to be case sensitive, so calls to GET /Anything will not skip authentication

The configuration above is a complete and valid Tyk OAS API Definition that you can import into Tyk to try out the Ignore Authentication middleware.

API Designer

Adding and configuring the Ignore Authentication middleware to your API endpoints is easy when using the API Designer in the Tyk Dashboard, simply follow these steps:

  1. Add an endpoint

    From the API Designer add an endpoint that matches the path and method to which you want to apply the middleware.

    Tyk OAS API Designer showing no endpoints created

    Adding an endpoint to an API using the Tyk OAS API Designer

    Tyk OAS API Designer showing no middleware enabled on endpoint

  2. Select the Ignore Authentication middleware

    Select ADD MIDDLEWARE and choose the Ignore Authentication middleware from the Add Middleware screen.

    Adding the Ignore Authentication middleware

  3. Optionally configure case-insensitivity

    If you want to disable case-sensitivity for the path that you wish to skip authentication, then you must select EDIT on the Ignore Authentication icon.

    Ignore Authentication middleware added to endpoint - click through to edit the config

    This takes you to the middleware configuration screen where you can alter the case sensitivity setting.

    Configuring case sensitivity for the path for which to ignore authentication

    Select UPDATE MIDDLEWARE to apply the change to the middleware configuration.

  4. Save the API

    Select SAVE API to apply the changes to your API.

Using Classic

The Ignore Authentication middleware instructs Tyk Gateway to skip the authentication step for calls to an endpoint, even if authentication is enabled for the API.

When working with Tyk Classic APIs the middleware is configured in the Tyk Classic API Definition. You can do this via the Tyk Dashboard API or in the API Designer.

If you’re using the newer Tyk OAS APIs, then check out the Tyk OAS page.

If you’re using Tyk Operator then check out the configuring the middleware in Tyk Operator section below.

API Definition

To enable the middleware you must add a new ignored object to the extended_paths section of your API definition.

The ignored object has the following configuration:

  • path: the endpoint path
  • method: this should be blank
  • ignore_case: if set to true then the path matching will be case insensitive
  • method_actions: a shared object used to configure the mock response middleware

The method_actions object should be configured as follows, with an entry created for each allowed method on the path:

  • action: this should be set to no_action
  • code: this should be set to 200
  • headers : this should be blank

For example:

 1
 2
 3
 4
 5
 6
 7
 8
 9
10
11
12
13
14
15
16
17
18
19
{
    "extended_paths": {
        "ignored": [
            {
                "disabled": false,
                "path": "/status/200",
                "method": "",
                "ignore_case": false,
                "method_actions": {
                    "GET": {
                        "action": "no_action",
                        "code": 200,
                        "headers": {}
                    }          
                }
            }
        ]
    }
}

In this example the ignore authentication middleware has been configured for requests to the GET /status/200 endpoint. Any such calls will skip the authentication step in the Tyk Gateway’s processing chain.

  • the middleware has been configured to be case sensitive, so calls to GET /Status/200 will not skip authentication

API Designer

You can use the API Designer in the Tyk Dashboard to configure the Ignore Authentication middleware for your Tyk Classic API by following these steps.

  1. Add an endpoint for the path and select the plugin

    From the Endpoint Designer add an endpoint that matches the path for which you want to ignore authentication. Select the Ignore plugin.

    Adding the ignore authentication middleware to a Tyk Classic API endpoint

  2. Configure the middleware

    Once you have selected the Ignore middleware for the endpoint, the only additional feature that you need to configure is whether to make it case-insensitive by selecting Ignore Case.

    Ignore options

  3. Save the API

    Use the save or create buttons to save the changes and activate the middleware.

Tyk Operator

The process for configuring the middleware in Tyk Operator is similar to that explained in configuring the middleware in the Tyk Classic API Definition. It is possible to configure an enforced timeout using the ignored object within the extended_paths section of the API Definition.

In the example below the ignore authentication middleware has been configured for requests to the GET /get endpoint. Any such calls will skip the authentication step in the Tyk Gateway’s processing chain.

  • the middleware has been configured to be case insensitive, so calls to GET /Get will also skip authentication
 1
 2
 3
 4
 5
 6
 7
 8
 9
10
11
12
13
14
15
16
17
18
19
20
21
22
23
24
25
26
27
28
29
30
31
32
33
34
35
apiVersion: tyk.tyk.io/v1alpha1
kind: ApiDefinition
metadata:
  name: httpbin-ignored
spec:
  name: httpbin-ignored
  use_keyless: false
  use_standard_auth: true
  protocol: http
  active: true
  proxy:
    target_url: http://httpbin.org/
    listen_path: /httpbin
    strip_listen_path: true
  version_data:
    default_version: Default
    not_versioned: true
    versions:
      Default:
        name: Default
        use_extended_paths: true
        paths:
          black_list: []
          ignored: []
          white_list: []
        extended_paths:
          ignored:
            - ignore_case: true
              method_actions:
                GET:
                  action: "no_action"
                  code: 200
                  data: ""
                  headers: {}
              path: "/get"

Internal Endpoint

Overview

The Internal Endpoint middleware instructs Tyk Gateway to ignore external requests to the endpoint (which is a combination of HTTP method and path). Internal requests from other APIs will be processed.

Use Cases

Internal routing decisions

Internal endpoints are frequently used to make complex routing decisions that cannot be handled by the standard routing features. A single externally published endpoint can receive requests and then, based on inspection of the requests, the URL rewrite middleware can route them to different internal endpoints and on to the appropriate upstream services.

Working

When the Internal Endpoint middleware is configured for a specific endpoint, it instructs the Gateway to ignore requests to the endpoint that originate from outside Tyk.

An internal endpoint can be targeted from another API deployed on Tyk using the tyk:// prefix instead of http://.

For example, if GET /status/200 is configured to be an Internal Endpoint on the listen path http://my-tyk-install.org/my-api/ then external calls to this endpoint will be rejected with HTTP 403 Forbidden. Other APIs on Tyk will be able to direct traffic to this endpoint by setting their target_url to tyk://my-api/status/200.

Addressing an internal endpoint

An internal endpoint can be addressed using three different identifiers in the format tyk://{identifier}/{endpoint}.

The options for the identifier are:

  • self (only if the endpoint is in the same API)
  • api_id (the unique API Identifier assigned to the API within Tyk)
  • listen path (the listen path defined for the API)

For example, let’s say you have two APIs:

api_id listen path Endpoint 1 Endpoint 2 (with internal endpoint middleware)
f1c63fa5177de2719 /api1 endpoint1_ext endpoint1_int
2e90b33a879945918 /api2 endpoint2_ext endpoint2_int

An external request directed at /api1/endpoint1_int will be rejected with HTTP 403 Forbidden, since this is an internal endpoint.

This endpoint could, however, be called from within either endpoint in /api2 as either:

  • tyk://api1/endpoint1_int
  • tyk://f1c63fa5177de2719/endpoint1_int

Or from within /api1/endpoint1_ext as:

  • tyk://api1/endpoint1_int
  • tyk://f1c63fa5177de2719/endpoint1_int
  • tyk://self/endpoint1_int

If you’re using Tyk OAS APIs, then you can find details and examples of how to configure the Internal Endpoint middleware here.

If you’re using Tyk Classic APIs, then you can find details and examples of how to configure the Internal Endpoint middleware here.

Using Tyk OAS

The Internal Endpoint middleware instructs Tyk Gateway not to process external requests to the endpoint (which is a combination of HTTP method and path). Internal requests from other APIs will be processed.

When working with Tyk OAS APIs, the middleware is configured in the Tyk OAS API Definition. You can do this via the Tyk Dashboard API or in the API Designer.

If you’re using the legacy Tyk Classic APIs, then check out the Tyk Classic page.

API Definition

The design of the Tyk OAS API Definition takes advantage of the operationId defined in the OpenAPI Document that declares both the path and method for which the middleware should be added. Endpoint paths entries (and the associated operationId) can contain wildcards in the form of any string bracketed by curly braces, for example /status/{code}. These wildcards are so they are human readable and do not translate to variable names. Under the hood, a wildcard translates to the “match everything” regex of: (.*).

The internal endpoint middleware (internal) can be added to the operations section of the Tyk OAS Extension (x-tyk-api-gateway) in your Tyk OAS API Definition for the appropriate operationId (as configured in the paths section of your OpenAPI Document).

The internal object has the following configuration:

  • enabled: enable the middleware for the endpoint

For example:

 1
 2
 3
 4
 5
 6
 7
 8
 9
10
11
12
13
14
15
16
17
18
19
20
21
22
23
24
25
26
27
28
29
30
31
32
33
34
35
36
37
38
39
40
41
42
43
44
45
46
47
48
49
50
51
52
53
54
55
56
57
58
59
60
61
62
63
{
    "components": {},
    "info": {
        "title": "example-internal-endpoint",
        "version": "1.0.0"
    },
    "openapi": "3.0.3",
    "paths": {
        "/anything": {
            "get": {
                "operationId": "anythingget",
                "responses": {
                    "200": {
                        "description": ""
                    }
                }
            }
        },
        "/redirect": {
            "get": {
                "operationId": "redirectget",
                "responses": {
                    "200": {
                        "description": ""
                    }
                }
            }
        }
    },
    "x-tyk-api-gateway": {
        "info": {
            "name": "example-internal-endpoint",
            "state": {
                "active": true
            }
        },
        "upstream": {
            "url": "http://httpbin.org/"
        },
        "server": {
            "listenPath": {
                "value": "/example-internal-endpoint/",
                "strip": true
            }
        },
        "middleware": {
            "operations": {
                "anythingget": {
                    "internal": {
                        "enabled": true
                    }
                },
                "redirectget": {
                    "urlRewrite": {
                        "enabled": true,
                        "pattern": ".*",
                        "rewriteTo": "tyk://self/anything"
                    }
                }
            }
        }
    }
}

In this example, two endpoints have been defined:

  • the internal endpoint middleware has been configured for requests to the GET /anything endpoint
  • the URL rewrite middleware has been configured for requests to the GET /redirect endpoint

Any calls made directly to GET /example-internal-endpoint/anything will be rejected, with Tyk returning HTTP 403 Forbidden, since the /anything endpoint is internal.

Any calls made to GET /example-internal-endpoint/redirect will be redirected to GET /example-internal-endpoint/anything. These will be proxied to the upstream because they originate from within Tyk Gateway (i.e. they are internal requests) - so the response from GET http://httpbin.org/anything will be returned.

The configuration above is a complete and valid Tyk OAS API Definition that you can import into Tyk to try out the internal endpoint middleware.

API Designer

Adding the Internal Endpoint middleware to your API endpoints is easy when using the API Designer in the Tyk Dashboard, simply follow these steps:

  1. Add an endpoint

    From the API Designer add an endpoint that matches the path and method to which you want to apply the middleware.

    Tyk OAS API Designer showing no endpoints created

    Adding an endpoint to an API using the Tyk OAS API Designer

    Tyk OAS API Designer showing no middleware enabled on endpoint

  2. Select the Internal Endpoint middleware

    Select ADD MIDDLEWARE and choose the Internal middleware from the Add Middleware screen.

    Adding the Internal Endpoint middleware

  3. Save the API

    Select SAVE API to apply the changes to your API.

Using Classic

The Internal Endpoint middleware instructs Tyk Gateway not to process external requests to the endpoint (which is a combination of HTTP method and path). Internal requests from other APIs will be processed.

When working with Tyk Classic APIs, the middleware is configured in the Tyk Classic API Definition. You can do this via the Tyk Dashboard API or in the API Designer.

If you’re using the newer Tyk OAS APIs, then check out the Tyk OAS page.

If you’re using Tyk Operator then check out the configuring the middleware in Tyk Operator section below.

API Definition

To enable the middleware you must add a new internal object to the extended_paths section of your API definition.

The internal object has the following configuration:

  • path: the endpoint path
  • method: the endpoint HTTP method

For example:

 1
 2
 3
 4
 5
 6
 7
 8
 9
10
11
{
    "extended_paths": {
        "internal": [
            {
                "disabled": false,
                "path": "/status/200",
                "method": "GET"
            }
        ]
    }
}

In this example the internal endpoint middleware has been configured for HTTP GET requests to the /status/200 endpoint. Any requests made to this endpoint that originate externally to Tyk will be rejected with HTTP 403 Forbidden. Conversely, the endpoint can be reached internally by another API at tyk://<listen_path>/status/200.

API Designer

You can use the API Designer in the Tyk Dashboard to configure the internal endpoint middleware for your Tyk Classic API by following these steps.

  1. Add an endpoint for the path and select the plugin

    From the Endpoint Designer add an endpoint that matches the path that you wish to set as internal. Select the Internal plugin.

    Adding the internal endpoint middleware to a Tyk Classic API endpoint

  2. Save the API

    Use the save or create buttons to save the changes and activate the middleware.

Tyk Operator

The process for configuring the middleware in Tyk Operator is similar to that explained in configuring the middleware in the Tyk Classic API Definition. The middleware can be configured by adding a new internal object to the extended_paths section of your API definition.

In the example below the internal endpoint middleware has been configured for HTTP GET requests to the /status/200 endpoint. Any requests made to this endpoint that originate externally to Tyk will be rejected with HTTP 403 Forbidden. Conversely, the endpoint can be reached internally by another API at tyk://<listen_path>/status/200.

 1
 2
 3
 4
 5
 6
 7
 8
 9
10
11
12
13
14
15
16
17
18
19
20
21
22
23
24
25
26
27
28
apiVersion: tyk.tyk.io/v1alpha1
kind: ApiDefinition
metadata:
  name: httpbin-endpoint-internal
spec:
  name: httpbin - Endpoint Internal
  use_keyless: true
  protocol: http
  active: true
  proxy:
    target_url: http://httpbin.org/
    listen_path: /httpbin-internal
    strip_listen_path: true
  version_data:
    default_version: Default
    not_versioned: true
    versions:
      Default:
        name: Default
        use_extended_paths: true
        paths:
          black_list: []
          ignored: []
          white_list: []
        extended_paths:
          internal:
            - path: /status/200
              method: GET

Request Method

Overview

Tyk’s Request Method Transform middleware allows you to modify the HTTP method of incoming requests to an API endpoint prior to the request being proxied to the upstream service. You might use this to map POST requests from clients to upstream services that support only PUT and DELETE operations, providing a modern interface to your users. It is a simple middleware that changes only the method and not the payload or headers. You can, however, combine this with the Request Header Transform and Request Body Tranform to apply more complex transformation to requests.

Use Cases

Simplifying API consumption

In cases where an upstream API requires different methods (e.g. PUT or DELETE) for different functionality but you want to wrap this in a single client-facing API, you can provide a simple interface offering a single method (e.g. POST) and then use the method transform middleware to map requests to correct upstream method.

Enforcing API governance and standardization

You can use the transform middleware to ensure that all requests to a service are made using the same HTTP method, regardless of the original method used by the client. This can help maintain consistency across different client applications accessing the same upstream API.

Error Handling and Redirection

You can use the method transformation middleware to handle errors and redirect requests to different endpoints, such as changing a DELETE request to a GET request when a specific resource is no longer available, allowing for graceful error handling and redirection.

Testing and debugging

Request method transformation can be useful when testing or debugging API endpoints; temporarily changing the request method can help to identify issues or test specific functionalities.

Working

This is a very simple middleware that is assigned to an endpoint and configured with the HTTP method to which the request should be modified. The Request Method Transform middleware modifies the request method for the entire request flow, not just for the specific upstream request, so all subsequent middleware in the processing chain will use the new (transformed) method.


If you’re using Tyk OAS APIs, then you can find details and examples of how to configure the request method transform middleware here.

If you’re using Tyk Classic APIs, then you can find details and examples of how to configure the request method transform middleware here.

Using Tyk OAS

Tyk’s request method transform middleware is configured at the endpoint level, where it modifies the HTTP method used in the request to a configured value.

When working with Tyk OAS APIs the transformation is configured in the Tyk OAS API Definition. You can do this via the Tyk Dashboard API or in the API Designer.

If you’re using the legacy Tyk Classic APIs, then check out the Tyk Classic page.

API Definition

The request method transform middleware (transformRequestMethod) can be added to the operations section of the Tyk OAS Extension (x-tyk-api-gateway) in your Tyk OAS API Definition for the appropriate operationId (as configured in the paths section of your OpenAPI Document). Endpoint paths entries (and the associated operationId) can contain wildcards in the form of any string bracketed by curly braces, for example /status/{code}. These wildcards are so they are human readable and do not translate to variable names. Under the hood, a wildcard translates to the “match everything” regex of: (.*).

You only need to enable the middleware (set enabled:true) and then configure toMethod as the new HTTP method to which the request should be transformed. The design of the Tyk OAS API Definition takes advantage of the operationId defined in the OpenAPI Document that declares both the path and method for which the method should be transformed.

All standard HTTP methods are supported: GET, PUT, POST, PATCH, DELETE, HEAD, OPTIONS.

For example:

 1
 2
 3
 4
 5
 6
 7
 8
 9
10
11
12
13
14
15
16
17
18
19
20
21
22
23
24
25
26
27
28
29
30
31
32
33
34
35
36
37
38
39
40
41
42
43
44
45
46
47
{
    "components": {},
    "info": {
        "title": "example-request-method",
        "version": "1.0.0"
    },
    "openapi": "3.0.3",
    "paths": {
        "/status/200": {
            "get": {
                "operationId": "status/200get",
                "responses": {
                    "200": {
                        "description": ""
                    }
                }
            }
        }
    },
    "x-tyk-api-gateway": {
        "info": {
            "name": "example-request-method",
            "state": {
                "active": true
            }
        },
        "upstream": {
            "url": "http://httpbin.org/"
        },
        "server": {
            "listenPath": {
                "value": "/example-request-method/",
                "strip": true
            }
        },
        "middleware": {
            "operations": {
                "status/200get": {
                    "transformRequestMethod": {
                        "enabled": true,
                        "toMethod": "POST"
                    }
                }
            }
        }
    }
}

In this example the Request Method Transform middleware has been configured for requests to the GET /status/200 endpoint. Any request received to that endpoint will be modified to POST /status/200.

The configuration above is a complete and valid Tyk OAS API Definition that you can import into Tyk to try out the request method transform.

API Designer

Adding the transform to your API endpoints is easy when using the API Designer in the Tyk Dashboard, simply follow these steps:

  1. Add an endpoint

    From the API Designer add an endpoint that matches the path and method to which you want to apply the middleware.

    Tyk OAS API Designer showing no endpoints created

    Adding an endpoint to an API using the Tyk OAS API Designer

    Tyk OAS API Designer showing no middleware enabled on endpoint

  2. Select the Method Transform middleware

    Select ADD MIDDLEWARE and choose the Method Transform middleware from the Add Middleware screen.

    Adding the Request Method Transform middleware

  3. Configure the middleware

    Select the new HTTP method to which requests to this endpoint should be transformed

    Selecting the new HTTP method for requests to the endpoint

    Select ADD MIDDLEWARE to apply the change to the middleware configuration.

  4. Save the API

    Select SAVE API to apply the changes to your API.

Using Classic

Tyk’s request method transform middleware is configured at the endpoint level, where it modifies the HTTP method used in the request to a configured value.

When working with Tyk Classic APIs the transformation is configured in the Tyk Classic API Definition. You can do this via the Tyk Dashboard API or in the API Designer.

If you’re using the newer Tyk OAS APIs, then check out the Tyk OAS page.

If you’re using Tyk Operator then check out the configuring a Request Method Transform in Tyk Operator section below.

API Definition

To configure a transformation of the request method you must add a new method_transforms object to the extended_paths section of your API definition.

It has the following configuration:

  • path: the endpoint path
  • method: the endpoint HTTP method
  • to_method: The new HTTP method to which the request should be transformed

All standard HTTP methods are supported: GET, PUT, POST, PATCH, DELETE, HEAD, OPTIONS.

For example:

{
    "method_transforms": [
        {
            "path": "/status/200",
            "method": "GET",
            "to_method": "POST"
        }
    ]
}

In this example the Request Method Transform middleware has been configured for HTTP GET requests to the /status/200 endpoint. Any request received to that endpoint will be modified to POST /status/200.

API Designer

You can use the API Designer in the Tyk Dashboard to configure the request method transform middleware for your Tyk Classic API by following these steps.

  1. Add an endpoint for the path and select the Method Transform plugin

    From the Endpoint Designer add an endpoint that matches the path for which you want to perform the transformation. Select the Method Transform plugin.

    Method Transform

  2. Configure the transform

    Then select the HTTP method to which you wish to transform the request.

    Method Path

  3. Save the API

    Use the save or create buttons to save the changes and activate the middleware.

Tyk Operator

The process for configuring a request method transform for an endpoint in Tyk Operator is similar to that defined in section configuring a Request Method Transform in the Tyk Classic API Definition.

To configure a transformation of the request method you must add a new method_transforms object to the extended_paths section of your API definition:

 1
 2
 3
 4
 5
 6
 7
 8
 9
10
11
12
13
14
15
16
17
18
19
20
21
22
23
24
25
26
27
28
29
apiVersion: tyk.tyk.io/v1alpha1
kind: ApiDefinition
metadata:
  name: httpbin
spec:
  name: httpbin
  use_keyless: true
  protocol: http
  active: true
  proxy:
    target_url: http://httpbin.default.svc:8000
    listen_path: /transform
    strip_listen_path: true
  version_data:
    default_version: v1
    not_versioned: true
    versions:
      v1:
        name: v1
        use_extended_paths: true
        paths:
          black_list: []
          ignored: []
          white_list: []
        extended_paths:
          method_transforms:
            - path: /anything
              method: GET
              to_method: POST

The example API Definition above configures an API to listen on path /transform and forwards requests upstream to http://httpbin.org.

In this example the Request Method Transform middleware has been configured for HTTP GET requests to the /anything endpoint. Any request received to that endpoint will be modified to POST /anything.

Request Body

Overview

Tyk enables you to modify the payload of API requests before they are proxied to the upstream. This makes it easy to transform between payload data formats or to expose legacy APIs using newer schema models without having to change any client implementations. This middleware is only applicable to HTTP methods that can support a request body (i.e. PUT, POST or PATCH).

With the body transform middleware you can modify XML or JSON formatted payloads to ensure that the response contains the information required by your upstream service. You can enrich the request by adding contextual data that is held by Tyk but not included in the original request from the client.

This middleware changes only the payload and not the headers. You can, however, combine this with the Request Header Transform middleware to apply more complex transformation to requests.

There is a closely related Response Body Transform middleware that provides the same functionality on the response from the upstream, prior to it being returned to the client.

Use Cases

Maintaining compatibility with legacy clients

Sometimes you might have a legacy API and need to migrate the transactions to a new upstream service but do not want to upgrade all the existing clients to the newer upstream API. Using request body transformation, you can convert the incoming legacy XML or JSON request structure into a newer, cleaner JSON format that your upstream services expect.

Shaping requests received from different devices

You can detect device types via headers or context variables and transform the request payload to optimize it for that particular device. For example, you might send extra metadata to the upstream for mobile apps.

SOAP to REST translation

A common use of the request body transform middleware is to surface a legacy SOAP service with a REST API. Full details of how to perform this conversion using Tyk are provided here.

Working

Tyk’s body transform middleware uses the Go template language to parse and modify the provided input. We have bundled the Sprig Library (v3) which provides over 70 pre-written functions for transformations to assist the creation of powerful Go templates to transform your API requests.

The Go template can be defined within the API Definition or can be read from a file that is accessible to Tyk, for example alongside your error templates.

We have provided more detail, links to reference material and some examples of the use of Go templating here.

Note

Tyk evaluates templates stored in files on startup, so if you make changes to a template you must remember to restart the gateway.

Supported request body formats

The body transformation middleware can modify request payloads in the following formats:

  • JSON
  • XML

When working with JSON format data, the middleware will unmarshal the data into a data structure, and then make that data available to the template in dot-notation.

Data accessible to the middleware

The middleware has direct access to the request body and also to dynamic data as follows:

  • context variables, extracted from the request at the start of the middleware chain, can be injected into the template using the ._tyk_context.KEYNAME namespace
  • session metadata, from the Tyk Session Object linked to the request, can be injected into the template using the ._tyk_meta.KEYNAME namespace
  • inbound form or query data can be accessed through the ._tyk_context.request_data namespace where it will be available in as a key:[]value map
  • values from key-value (KV) storage can be injected into the template using the notation appropriate to the location of the KV store

The request body transform middleware can iterate through list indices in dynamic data so, for example, calling {{ index ._tyk_context.request_data.variablename 0 }} in a template will expose the first entry in the request_data.variablename key/value array.

Note

As explained in the documentation, templates are executed by applying them to a data structure. The template receives the decoded JSON or XML of the request body. If session variables or meta data are enabled, additional fields will be provided: _tyk_context and _tyk_meta respectively.

Automatic XML <-> JSON Transformation

A very common transformation that is applied in the API Gateway is to convert between XML and JSON formatted body content.

The Request Body Transform supports two helper functions that you can use in your Go templates to facilitate this:

  • jsonMarshal performs JSON style character escaping on an XML field and, for complex objects, serialises them to a JSON string (example)
  • xmlMarshal performs the equivalent conversion from JSON to XML (example)

If you’re using Tyk OAS APIs, then you can find details and examples of how to configure the request body transformation middleware here.

If you’re using Tyk Classic APIs, then you can find details and examples of how to configure the request body transformation middleware here.

Using Tyk OAS

The request body transform middleware provides a way to modify the payload of API requests before they are proxied to the upstream.

The middleware is configured in the Tyk OAS API Definition. You can do this via the Tyk Dashboard API or in the API Designer.

If you’re using the legacy Tyk Classic APIs, then check out the Tyk Classic page.

API Definition

The design of the Tyk OAS API Definition takes advantage of the operationId defined in the OpenAPI Document that declares both the path and method for which the middleware should be added. Endpoint paths entries (and the associated operationId) can contain wildcards in the form of any string bracketed by curly braces, for example /status/{code}. These wildcards are so they are human readable and do not translate to variable names. Under the hood, a wildcard translates to the “match everything” regex of: (.*).

The request body transformation middleware (transformRequestBody) can be added to the operations section of the Tyk OAS Extension (x-tyk-api-gateway) in your Tyk OAS API Definition for the appropriate operationId (as configured in the paths section of your OpenAPI Document).

The transformRequestBody object has the following configuration:

  • enabled: enable the middleware for the endpoint
  • format: the format of input data the parser should expect (either xml or json)
  • body: [see note] this is a base64 encoded representation of your template
  • path: [see note] this is the path to the text file containing the template

Note

You should configure only one of body or path to indicate whether you are embedding the template within the middleware or storing it in a text file. The middleware will automatically select the correct source based on which of these fields you complete. If both are provided, then body will take precedence and path will be ignored.

For example:

 1
 2
 3
 4
 5
 6
 7
 8
 9
10
11
12
13
14
15
16
17
18
19
20
21
22
23
24
25
26
27
28
29
30
31
32
33
34
35
36
37
38
39
40
41
42
43
44
45
46
47
48
{
    "components": {},
    "info": {
        "title": "example-request-body-transform",
        "version": "1.0.0"
    },
    "openapi": "3.0.3",
    "paths": {
        "/anything": {
            "put": {
                "operationId": "anythingput",
                "responses": {
                    "200": {
                        "description": ""
                    }
                }
            }
        }
    },
    "x-tyk-api-gateway": {
        "info": {
            "name": "example-request-body-transform",
            "state": {
                "active": true
            }
        },
        "upstream": {
            "url": "http://httpbin.org/"
        },
        "server": {
            "listenPath": {
                "value": "/example-request-body-transform/",
                "strip": true
            }
        },
        "middleware": {
            "operations": {
                "anythingput": {
                    "transformRequestBody": {
                        "enabled": true,
                        "format": "json",
                        "body": "ewogICJ2YWx1ZTEiOiAie3sudmFsdWUyfX0iLAogICJ2YWx1ZTIiOiAie3sudmFsdWUxfX0iLAogICJyZXEtaGVhZGVyIjogInt7Ll90eWtfY29udGV4dC5oZWFkZXJzX1hfSGVhZGVyfX0iLAogICJyZXEtcGFyYW0iOiAie3suX3R5a19jb250ZXh0LnJlcXVlc3RfZGF0YS5wYXJhbX19Igp9"
                    }
                }
            }
        }
    }
}

In this example the request body transform middleware has been configured for requests to the PUT /anything endpoint. The body contains a base64 encoded Go template (which you can check by pasting the value into a service such as base64decode.org).

Decoded, this template is:

{
  "value1": "{{.value2}}",
  "value2": "{{.value1}}",
  "req-header": "{{._tyk_context.headers_X_Header}}",
  "req-param": "{{._tyk_context.request_data.param}}"
}

So if you make a request to PUT /anything?param=foo as follows:

PUT /anything?param=foo
HTTP/1.1
Host: my-gateway.host
X-Header: bar

{
    "value1": "world",
    "value2": "hello"
}

You will receive a response from the upstream with this payload:

{
    "req-header": "bar",
    "req-param": "[foo]",
    "value1": "hello",
    "value2": "world"
}

The /anything endpoint returns the details of the request that was received by httpbin.org. You can see that Tyk has swapped value1 and value2 and embedded the X-Header header and param query values into the body of the request.

The configuration above is a complete and valid Tyk OAS API Definition that you can import into Tyk to try out the mock response middleware.

Note

If using a template in a file (i.e. you configure path in the transformRequestBody object), remember that Tyk will load and evaluate the template when the Gateway starts up. If you modify the template, you will need to restart Tyk in order for the changes to take effect.

API Designer

Adding Request Body Transformation to your API endpoints is easy when using the API Designer in the Tyk Dashboard, simply follow the following steps:

  1. Add an endpoint

    From the API Designer add an endpoint that matches the path and method to which you want to apply the middleware.

    Tyk OAS API Designer showing no endpoints created

    Adding an endpoint to an API using the Tyk OAS API Designer

    Tyk OAS API Designer showing no middleware enabled on endpoint

  2. Select the Request Body Transform middleware

    Select ADD MIDDLEWARE and choose the Request Body Transform middleware from the Add Middleware screen.

    Adding the Request Body Transform middleware

  3. Configure the middleware

    Now you can select the request body format (JSON or XML) and add either a path to the file containing the template, or directly enter the transformation template in the text box.

    Configuring the Request Body Transform middleware

    The Test with data control will allow you to test your body transformation function by providing an example request body and generating the output from the transform. It is not possible to configure headers, other request parameters, context or session metadata to this template test so if you are using these data sources in your transform it will not provide a complete output, for example:

    Testing the Request Body Transform

  4. Save the API

    Select SAVE API to apply the changes to your API.

Using Classic

The request body transform middleware provides a way to modify the payload of API requests before they are proxied to the upstream.

This middleware is configured in the Tyk Classic API Definition at the endpoint level. You can do this via the Tyk Dashboard API or in the API Designer.

If you want to use dynamic data from context variables, you must enable context variables for the API to be able to access them from the request header transform middleware.

If you’re using the newer Tyk OAS APIs, then check out the Tyk OAS page.

If you’re using Tyk Operator then check out the Configuring the middleware in Tyk Operator section below.

API Definition

To enable the middleware you must add a new transform object to the extended_paths section of your API definition.

The transform object has the following configuration:

  • path: the path to match on
  • method: this method to match on
  • template_data: details of the Go template to be applied for the transformation of the request body

The Go template is described in the template_data object by the following fields:

  • input_type: the format of input data the parser should expect (either xml or json)
  • enable_session: set this to true to make session metadata available to the transform template
  • template_mode: instructs the middleware to look for the template either in a file or in a base64 encoded blob; the actual file location (or base64 encoded template) is provided in template_source
  • template_source: if template_mode is set to file, this will be the path to the text file containing the template; if template_mode is set to blob, this will be a base64 encoded representation of your template

For example:

 1
 2
 3
 4
 5
 6
 7
 8
 9
10
11
12
13
14
15
16
{
    "extended_paths": {
        "transform": [
            {
                "path": "/anything",
                "method": "POST",
                "template_data": {
                    "template_mode": "file",
                    "template_source": "./templates/transform_test.tmpl",
                    "input_type": "json",
                    "enable_session": true
                }
            }
        ]
    }
}

In this example, the Request Body Transform middleware is directed to use the template located in the file at location ./templates/transform_test.tmpl. The input (pre-transformation) request payload will be json format and session metadata will be available for use in the transformation.

Note

Tyk will load and evaluate the template file when the Gateway starts up. If you modify the template, you will need to restart Tyk in order for the changes to take effect.

API Designer

You can use the API Designer in the Tyk Dashboard to configure the request body transform middleware for your Tyk Classic API by following these steps.

  1. Add an endpoint for the path and select the plugin

From the Endpoint Designer add an endpoint that matches the path for which you want to perform the transformation. Select the Body Transforms plugin.

Endpoint designer

  1. Configure the middleware

Ensure that you have selected the REQUEST tab, then select your input type, and then add the template you would like to use to the Template input box.

Setting the body request transform

  1. Test the Transform

If sample input data is available, you can use the Input box to add it, and then test it using the Test button. You will see the effect of the template on the sample input displayed in the Output box.

Testing the body transform function

  1. Save the API

Use the save or create buttons to save the changes and activate the Request Body Transform middleware.

Tyk Operator

The process for configuring a request body transform is similar to that defined in section configuring the middleware in the Tyk Classic API Definition. Tyk Operator allows you to configure a request body transform by adding a transform object to the extended_paths section of your API definition.

In the example below the Request Body middleware (transform) has been configured for HTTP POST requests to the /anything endpoint. The Request Body Transform middleware is directed to use the template located in the blob included in the template_source field. The input (pre-transformation) request payload will be json format and session metadata will be available for use in the transformation.

 1
 2
 3
 4
 5
 6
 7
 8
 9
10
11
12
13
14
15
16
17
18
19
20
21
22
23
24
25
26
27
28
29
30
31
32
33
34
35
36
37
38
39
40
41
42
43
44
45
46
47
48
49
50
51
52
53
54
55
56
57
58
59
60
apiVersion: tyk.tyk.io/v1alpha1
kind: ApiDefinition
metadata:
  name: httpbin-transform
spec:
  name: httpbin-transform
  use_keyless: true
  protocol: http
  active: true
  proxy:
    target_url: http://httpbin.org
    listen_path: /httpbin-transform
    strip_listen_path: true
  response_processors:
    - name: response_body_transform
    - name: header_injector
  version_data:
    default_version: Default
    not_versioned: true
    versions:
      Default:
        name: Default
        use_extended_paths: true
        paths:
          black_list: []
          ignored: []
          white_list: []
        extended_paths:
          transform:
            - method: POST
              path: /anything
              template_data:
                enable_session: false
                input_type: json
                template_mode: blob
                # base64 encoded template
                template_source: eyJiYXIiOiAie3suZm9vfX0ifQ==
          transform_headers:
            - delete_headers:
                - "remove_this"
              add_headers:
                foo: bar
              path: /anything
              method: POST
          transform_response:
            - method: GET
              path: /xml
              template_data:
                enable_session: false
                input_type: xml
                template_mode: blob
                # base64 encoded template
                template_source: e3sgLiB8IGpzb25NYXJzaGFsIH19
          transform_response_headers:
            - method: GET
              path: /xml
              add_headers:
                Content-Type: "application/json"
              act_on: false
              delete_headers: []

Request Headers

Overview

Tyk allows you to modify the headers of incoming requests to your API endpoints before they are passed to your upstream service.

There are two options for this:

  • API-level modification that is applied to all requests to the API
  • endpoint-level modification that is applied only to requests to a specific endpoint

With the header transform middleware you can append or delete any number of headers to ensure that the request contains the information required by your upstream service. You can enrich the request by adding contextual data that is held by Tyk but not included in the original request from the client.

This middleware changes only the headers and not the method or payload. You can, however, combine this with the Request Method Transform and Request Body Tranform to apply more complex transformation to requests.

There are related Response Header Transform middleware (at API-level and endpoint-level) that provide the same functionality on the response from your upstream, prior to it being returned to the client.

Use Cases

Adding Custom Headers

A common use of this feature is to add custom headers to requests, such as adding a secure header to all upstream requests (to verify that traffic is coming from the gateway), or adding a timestamp for tracking purposes.

Modifying Headers for Compatibility

You could use the request header transform middleware to modify headers for compatibility with a downstream system, such as changing the Content-Type header from “application/json” to “application/xml” for an API that only accepts XML requests while using the Request Body Tranform to transform the payload.

Prefixing or Suffixing Headers

Upstream systems or corporate policies might mandate that a prefix or suffix is added to header names, such as adding a “Bearer” prefix to all Authorization headers for easier identification internally, without modifying the externally published API consumed by the client applications.

Adding multi-user access to a service

You can add multi-user access to an upstream API that has a single authentication key and you want to add multi-user access to it without modifying it or adding clunky authentication methods to it to support new users.

Working

The request header transform can be applied per-API or per-endpoint; each has a separate entry in the API definition so that you can configure both API-level and endpoint-level transforms for a single API.

The middleware is configured with a list of headers to delete from the request and a list of headers to add to the request. Each header to be added to the request is configured as a key:value pair.

The “delete header” functionality is intended to ensure that any header in the delete list is not present once the middleware completes - so if a header is not originally present in the request but is on the list to be deleted, the middleware will ignore its omission.

The “add header” functionality will capitalize any header name provided, for example if you configure the middleware to append x-request-id it will be added to the request as X-Request-Id.

In the request middleware chain, the API-level transform is applied before the endpoint-level transform so if both middleware are enabled, the endpoint-level transform will operate on the headers that have been added by the API-level transform (and will not receive those that have been deleted by it).

Injecting dynamic data into headers

You can enrich the request headers by injecting data from context variables or session objects into the headers.

  • context variables are extracted from the request at the start of the middleware chain and can be injected into added headers using the $tyk_context. namespace
  • session metadata, from the Tyk Session Object linked to the request, can be injected into added headers using the $tyk_meta. namespace
  • values from key-value (KV) storage can be injected into added headers using the notation appropriate to the location of the KV store

If you’re using Tyk OAS APIs, then you can find details and examples of how to configure the request header transform middleware here.

If you’re using Tyk Classic APIs, then you can find details and examples of how to configure the request header transform middleware here.

Using Tyk OAS

Tyk’s request header transform middleware enables you to append or delete headers on requests to your API endpoints before they are passed to your upstream service.

There are two options for this:

  • API-level modification that is applied to all requests to the API
  • endpoint-level modification that is applied only to requests to a specific endpoint

Note

If both API-level and endpoint-level middleware are configured, the API-level transformation will be applied first.

When working with Tyk OAS APIs the transformation is configured in the Tyk OAS API Definition. You can do this via the Tyk Dashboard API or in the API Designer.

If you’re using the legacy Tyk Classic APIs, then check out the Tyk Classic page.

API Definition

The API-level and endpoint-level request header transforms are configured in different sections of the API definition, though have a common configuration.

API-level transform

To append headers to, or delete headers from, all requests to your API (i.e. for all endpoints) you must add a new transformRequestHeaders object to the middleware.global section of the Tyk OAS Extension (x-tyk-api-gateway) in your Tyk OAS API Definition.

You only need to enable the middleware (set enabled:true) and then configure the details of headers to add and those to remove.

For example:

 1
 2
 3
 4
 5
 6
 7
 8
 9
10
11
12
13
14
15
16
17
18
19
20
21
22
23
24
25
26
27
28
29
30
31
32
33
34
35
36
37
38
39
40
41
42
43
44
45
46
47
48
49
50
51
52
53
54
55
56
57
58
59
60
61
{
    "components": {},
    "info": {
        "title": "example-request-header",
        "version": "1.0.0"
    },
    "openapi": "3.0.3",
    "paths": {
        "/status/200": {
            "get": {
                "operationId": "status/200get",
                "responses": {
                    "200": {
                        "description": ""
                    }
                }
            }
        }
    },
    "x-tyk-api-gateway": {
        "info": {
            "name": "example-request-header",
            "state": {
                "active": true
            }
        },
        "upstream": {
            "url": "http://httpbin.org/"
        },
        "server": {
            "listenPath": {
                "value": "/example-request-header/",
                "strip": true
            }
        },
        "middleware": {
            "global": {
                "transformRequestHeaders": {
                    "enabled": true,
                    "remove": [
                        "Auth_Id"
                    ],
                    "add": [
                        {
                            "name": "X-Static",
                            "value": "foobar"
                        },
                        {
                            "name": "X-Request-ID",
                            "value": "$tyk_context.request_id"
                        },
                        {
                            "name": "X-User-ID",
                            "value": "$tyk_meta.uid"
                        }
                    ]
                }
            }
        }
    }
}

This configuration will add three new headers to each request:

  • X-Static with the value foobar
  • X-Request-ID with a dynamic value taken from the request_id context variables
  • X-User-ID with a dynamic value taken from the uid field in the session metadata

It will also delete one header (if present) from each request:

  • Auth_Id

The configuration above is a complete and valid Tyk OAS API Definition that you can import into Tyk to try out the API-level request header transform.

Endpoint-level transform

The design of the Tyk OAS API Definition takes advantage of the operationId defined in the OpenAPI Document that declares both the path and method for which the middleware should be added. Endpoint paths entries (and the associated operationId) can contain wildcards in the form of any string bracketed by curly braces, for example /status/{code}. These wildcards are so they are human readable and do not translate to variable names. Under the hood, a wildcard translates to the “match everything” regex of: (.*).

The request header transform middleware (transformRequestHeaders) can be added to the operations section of the Tyk OAS Extension (x-tyk-api-gateway) in your Tyk OAS API Definition for the appropriate operationId (as configured in the paths section of your OpenAPI Document).

The transformRequestHeaders object has the following configuration:

  • enabled: enable the middleware for the endpoint
  • add: a list of headers, in key:value pairs, to be appended to the request
  • remove: a list of headers to be deleted from the request (if present)

For example:

 1
 2
 3
 4
 5
 6
 7
 8
 9
10
11
12
13
14
15
16
17
18
19
20
21
22
23
24
25
26
27
28
29
30
31
32
33
34
35
36
37
38
39
40
41
42
43
44
45
46
47
48
49
50
51
52
53
54
55
{
    "components": {},
    "info": {
        "title": "example-request-header",
        "version": "1.0.0"
    },
    "openapi": "3.0.3",
    "paths": {
        "/status/200": {
            "get": {
                "operationId": "status/200get",
                "responses": {
                    "200": {
                        "description": ""
                    }
                }
            }
        }
    },
    "x-tyk-api-gateway": {
        "info": {
            "name": "example-request-header",
            "state": {
                "active": true
            }
        },
        "upstream": {
            "url": "http://httpbin.org/"
        },
        "server": {
            "listenPath": {
                "value": "/example-request-header/",
                "strip": true
            }
        },
        "middleware": {
            "operations": {
                "status/200get": {
                    "transformRequestHeaders": {
                        "enabled": true,
                        "remove": [
                            "X-Static"
                        ],
                        "add": [
                            {
                                "name": "X-Secret",
                                "value": "the-secret-key-is-secret"
                            }
                        ]
                    }
                }
            }
        }
    }
}

In this example the Request Header Transform middleware has been configured for requests to the GET /status/200 endpoint. Any request received to that endpoint will have the X-Static header removed and the X-Secret header added, with the value set to the-secret-key-is-secret.

The configuration above is a complete and valid Tyk OAS API Definition that you can import into Tyk to try out the endpoint-level request header transform.

Combining API-level and Endpoint-level transforms

If the API-level transform in the previous example is applied to the same API, then because the API-level transformation is performed first, the X-Static header will be added (by the API-level transform) and then removed (by the endpoint-level transform) such that the overall effect of the two transforms for a call to GET /status/200 would be to add three headers:

  • X-Request-ID
  • X-User-ID
  • X-Secret

and to remove one:

  • Auth_Id

API Designer

Adding and configuring the transforms to your API endpoints is easy when using the API Designer in the Tyk Dashboard, simply follow these steps:

Adding an API-level transform

From the API Designer on the Settings tab, after ensuring that you are in edit mode, toggle the switch to Enable Transform request headers in the Middleware section:

Tyk OAS API Designer showing API-level Request Header Transform

Then select NEW HEADER as appropriate to add or remove a header from API requests. You can add or remove multiple headers by selecting ADD HEADER to add another to the list:

Configuring the API-level Request Header Transform in Tyk OAS API Designer

Adding an endpoint level transform

  1. Add an endpoint

    From the API Designer add an endpoint that matches the path and method to which you want to apply the middleware.

    Tyk OAS API Designer showing no endpoints created

    Adding an endpoint to an API using the Tyk OAS API Designer

    Tyk OAS API Designer showing no middleware enabled on endpoint

  2. Select the Request Header Transform middleware

    Select ADD MIDDLEWARE and choose the Request Header Transform middleware from the Add Middleware screen.

    Adding the Request Header Transform middleware

  3. Configure header transformation

    Select NEW HEADER to configure a header to be added to or removed from the request.

    Configuring the Request Header transformation

    You can add multiple headers to either list by selecting NEW HEADER again.

    Adding another header to the transformation

  4. Save the API

    Select ADD MIDDLEWARE to save the middleware configuration. Remember to select SAVE API to apply the changes.

Using Classic

Tyk’s request header transform middleware enables you to append or delete headers on requests to your API endpoints before they are passed to your upstream service.

There are two options for this:

  • API-level modification that is applied to all requests to the API
  • endpoint-level modification that is applied only to requests to a specific endpoint

Note

If both API-level and endpoint-level middleware are configured, the API-level transformation will be applied first.

When working with Tyk Classic APIs the transformation is configured in the Tyk Classic API Definition. You can do this via the Tyk Dashboard API or in the API Designer.

If you want to use dynamic data from context variables, you must enable context variables for the API to be able to access them from the request header transform middleware.

If you’re using the newer Tyk OAS APIs, then check out the Tyk OAS page.

If you’re using Tyk Operator then check out the configuring the Request Header Transform in Tyk Operator section below.

API Definition

The API-level and endpoint-level request header transforms have a common configuration but are configured in different sections of the API definition.

API-level transform

To append headers to all requests to your API (i.e. for all endpoints) you must add a new global_headers object to the versions section of your API definition. This contains a list of key:value pairs, being the names and values of the headers to be added to requests.

To delete headers from all requests to your API, you must add a new global_headers_remove object to the versions section of the API definition. This contains a list of the names of existing headers to be removed from requests.

For example:

 1
 2
 3
 4
 5
 6
 7
 8
 9
10
11
12
13
14
15
16
{
    "version_data": {
        "versions": {
            "Default": {
                "global_headers": {
                    "X-Static": "foobar",
                    "X-Request-ID":"$tyk_context.request_id",
                    "X-User-ID": "$tyk_meta.uid"
                },
                "global_headers_remove": [
                    "Auth_Id"
                ]
            }
        }
    },
}

This configuration will add three new headers to each request:

  • X-Static with the value foobar
  • X-Request-ID with a dynamic value taken from the request_id context variables
  • X-User-ID with a dynamic value taken from the uid field in the session metadata

It will also delete one header (if present) from each request:

  • Auth_Id
Endpoint-level transform

To configure a transformation of the request header for a specific endpoint you must add a new transform_headers object to the extended_paths section of your API definition.

It has the following configuration:

  • path: the endpoint path
  • method: the endpoint HTTP method
  • delete_headers: A list of the headers that should be deleted from the request
  • add_headers: A list of headers, in key:value pairs, that should be added to the request

The path can contain wildcards in the form of any string bracketed by curly braces, for example {user_id}. These wildcards are so they are human readable and do not translate to variable names. Under the hood, a wildcard translates to the “match everything” regex of: (.*).

For example:

{
    "transform_headers": [
        {
            "path": "status/200",
            "method": "GET",
            "delete_headers": ["X-Static"],
            "add_headers": {"X-Secret": "the-secret-key-is-secret"}
        }
    ]
}

In this example the Request Header Transform middleware has been configured for HTTP GET requests to the /status/200 endpoint. Any request received to that endpoint will have the X-Static header removed and the X-Secret header added, with the value set to the-secret-key-is-secret.

Combining API-level and Endpoint-level transforms

If the API-level transform in the previous example is applied to the same API, then because the API-level transformation is performed first, the X-Static header will be added (by the API-level transform) and then removed (by the endpoint-level transform) such that the overall effect of the two transforms for a call to GET /status/200 would be to add three headers:

  • X-Request-ID
  • X-User-ID
  • X-Secret

and to remove one:

  • Auth_Id

API Designer

You can use the API Designer in the Tyk Dashboard to configure the request header transform middleware for your Tyk Classic API by following these steps.

API-level transform

Configuring the API-level request header transform middleware is very simple when using the Tyk Dashboard.

In the Endpoint Designer you should select the Global Version Settings and ensure that you have selected the Request Headers tab:

Global version settings

Note that you must click ADD to add a header to the list (for appending or deletion).

Endpoint-level transform
  1. Add an endpoint for the path and select the Header Transform plugin

    From the Endpoint Designer add an endpoint that matches the path for which you want to perform the transformation. Select the Modify Headers plugin.

    Endpoint designer

  2. Select the “Request” tab

    This ensures that this will only be applied to inbound requests.

    Request tab

  3. Declare the headers to be modified

    Select the headers to delete and insert using the provided fields. You need to click ADD to ensure they are added to the list.

    Header transforms

  4. Save the API

    Use the save or create buttons to save the changes and activate the middleware.

Tyk Operator

The process for configuring a request header transform is similar to that defined in section Configuring the Request Header Transform in the Tyk Classic API Definition. Tyk Operator allows you to configure a request size limit for all endpoints of an API or for a specific API endpoint.

API-level transform

Request headers can be removed and inserted using the following fields within an ApiDefinition:

  • global_headers: Mapping of key values corresponding to headers to add to API requests.
  • global_headers_remove: List containing the name of headers to remove from API requests.

The example below shows an ApiDefinition custom resource that adds foo-req and bar-req headers to the request before it is sent upstream. The foo-req header has a value of foo-val and the bar-req header has a value of bar-val. Furthermore, the hello header is removed from the request before it is sent upstream.

 1
 2
 3
 4
 5
 6
 7
 8
 9
10
11
12
13
14
15
16
17
18
19
20
21
22
23
24
25
26
27
28
29
apiVersion: tyk.tyk.io/v1alpha1
kind: ApiDefinition
metadata:
  name: httpbin-global-headers
spec:
  name: httpbin-global-headers
  use_keyless: true
  protocol: http
  active: true
  proxy:
    target_url: http://httpbin.org
    listen_path: /httpbin-global-headers
    strip_listen_path: true
  version_data:
    default_version: Default
    not_versioned: true
    versions:
      Default:
        name: Default
        use_extended_paths: true
        paths:
          black_list: []
          ignored: []
          white_list: []
        global_headers:
          foo-req: my-foo
          bar-req: my-bar
        global_headers_remove:
          - hello
Endpoint-level transform

The process of configuring a transformation of a request header for a specific endpoint is similar to that defined in section Endpoint-level transform. To configure a transformation of the request header for a specific endpoint you must add a new transform_headers object to the extended_paths section of your API definition.

In the example below the Request Header Transform middleware (transform_headers) has been configured for HTTP POST requests to the /anything endpoint. Any request received to that endpoint will have the remove_this header removed and the foo header added, with the value set to bar.

 1
 2
 3
 4
 5
 6
 7
 8
 9
10
11
12
13
14
15
16
17
18
19
20
21
22
23
24
25
26
27
28
29
30
31
32
33
34
35
36
37
38
39
40
41
42
43
44
45
46
47
48
49
50
51
52
53
54
55
56
57
58
59
60
apiVersion: tyk.tyk.io/v1alpha1
kind: ApiDefinition
metadata:
  name: httpbin-transform
spec:
  name: httpbin-transform
  use_keyless: true
  protocol: http
  active: true
  proxy:
    target_url: http://httpbin.org
    listen_path: /httpbin-transform
    strip_listen_path: true
  response_processors:
    - name: response_body_transform
    - name: header_injector
  version_data:
    default_version: Default
    not_versioned: true
    versions:
      Default:
        name: Default
        use_extended_paths: true
        paths:
          black_list: []
          ignored: []
          white_list: []
        extended_paths:
          transform:
            - method: POST
              path: /anything
              template_data:
                enable_session: false
                input_type: json
                template_mode: blob
                # base64 encoded template
                template_source: eyJiYXIiOiAie3suZm9vfX0ifQ==
          transform_headers:
            - delete_headers:
                - "remove_this"
              add_headers:
                foo: bar
              path: /anything
              method: POST
          transform_response:
            - method: GET
              path: /xml
              template_data:
                enable_session: false
                input_type: xml
                template_mode: blob
                # base64 encoded template
                template_source: e3sgLiB8IGpzb25NYXJzaGFsIH19
          transform_response_headers:
            - method: GET
              path: /xml
              add_headers:
                Content-Type: "application/json"
              act_on: false
              delete_headers: []

Request Size Limits

Overview

With Tyk, you can apply limits to the size of requests made to your HTTP APIs. You might use this feature to protect your Tyk Gateway or upstream services from excessive memory usage or brute force attacks.

Tyk Gateway offers a flexible tiered system of limiting request sizes ranging from globally applied limits across all APIs deployed on the gateway down to specific size limits for individual API endpoints.

Use Case

Protecting the entire Tyk Gateway from DDoS attacks

You can configure a system-wide request size limit that protects all APIs managed by the Tyk Gateway from being overwhelmed by excessively large requests, which could be part of a DDoS attack, ensuring the stability and availability of the gateway.

Limiting request sizes for a lightweight microservice

You might expose an API for a microservice that is designed to handle lightweight, fast transactions and is not equipped to process large payloads. You can set an API-level size limit that ensures the microservice behind this API is not forced to handle requests larger than it is designed for, maintaining its performance and efficiency.

Controlling the size of GraphQL queries

A GraphQL API endpoint might be susceptible to complex queries that can lead to performance issues. By setting a request size limit for the GraphQL endpoint, you ensure that overly complex queries are blocked, protecting the backend services from potential abuse and ensuring a smooth operation.

Restricting upload size on a file upload endpoint

An API endpoint is designed to accept file uploads, but to prevent abuse, you want to limit the size of uploads to 1MB. To enforce this, you can enable the Request Size Limit middleware for this endpoint, configuring a size limit of 1MB. This prevents users from uploading excessively large files, protecting your storage and bandwidth resources.

Working

Tyk compares each incoming API request with the configured maximum size for each level of granularity in order of precedence and will reject any request that exceeds the size you have set at any level of granularity, returning an HTTP 4xx error as detailed below.

All size limits are stated in bytes and are applied only to the request body (or payload), excluding the headers.

Precedence Granularity Error returned on failure
1st System (gateway) 413 Request Entity Too Large
2nd API 400 Request is too large
3rd Endpoint 400 Request is too large

Note

The system level request size limit is the only size limit applied to TCP and Websocket connections.


Applying a system level size limit

You can configure a request size limit (in bytes) that will be applied to all APIs on your Tyk Gateway by adding max_request_body_size to the http_server_options element of your tyk.conf Gateway configuration. For example:

"max_request_body_size": 5000

A value of zero (default) means that no maximum is set and the system-wide size limit check will not be performed.

This limit will be evaluated before API-level or endpoint-level configurations. If this test fails, the Tyk Gateway will return an error HTTP 413 Request Entity Too Large.

Note

Tyk Cloud Classic enforces a strict request size limit of 1MB on all inbound requests via our cloud architecture. This limit does not apply to Tyk Cloud users.


If you’re using Tyk OAS APIs, then you can find details and examples of how to configure an API or endpoint-level request size limit here.

If you’re using Tyk Classic APIs, then you can find details and examples of how to configure an API or endpoint-level request size limit here.

Using Tyk OAS

The request size limit middleware enables you to apply limits to the size of requests made to your HTTP APIs. You might use this feature to protect your Tyk Gateway or upstream services from excessive memory usage or brute force attacks.

The middleware is configured in the Tyk OAS API Definition. You can do this via the Tyk Dashboard API or in the API Designer.

If you’re using the legacy Tyk Classic APIs, then check out the Tyk Classic page.

API Definition

There are three different levels of granularity that can be used when configuring a request size limit.

Applying a size limit for a specific API

The API-level size limit has not yet been implemented for Tyk OAS APIs.

You can work around this by implementing a combination of endpoint-level size limits and allow or block lists.

Applying a size limit for a specific endpoint

The design of the Tyk OAS API Definition takes advantage of the operationId defined in the OpenAPI Document that declares both the path and method for which the middleware should be added. Endpoint paths entries (and the associated operationId) can contain wildcards in the form of any string bracketed by curly braces, for example /status/{code}. These wildcards are so they are human readable and do not translate to variable names. Under the hood, a wildcard translates to the “match everything” regex of: (.*).

The virtual endpoint middleware (requestSizeLimit) can be added to the operations section of the Tyk OAS Extension (x-tyk-api-gateway) in your Tyk OAS API Definition for the appropriate operationId (as configured in the paths section of your OpenAPI Document).

The requestSizeLimit object has the following configuration:

  • enabled: enable the middleware for the endpoint
  • value: the maximum size permitted for a request to the endpoint (in bytes)

For example:

 1
 2
 3
 4
 5
 6
 7
 8
 9
10
11
12
13
14
15
16
17
18
19
20
21
22
23
24
25
26
27
28
29
30
31
32
33
34
35
36
37
38
39
40
41
42
43
44
45
46
47
48
{
    "components": {},
    "info": {
        "title": "example-request-size-limit",
        "version": "1.0.0"
    },
    "openapi": "3.0.3",
    "paths": {
        "/anything": {
            "post": {
                "operationId": "anythingpost",
                "responses": {
                    "200": {
                        "description": ""
                    }
                }
            }
        }
    },
    "x-tyk-api-gateway": {
        "info": {
            "name": "example-request-size-limit",
            "state": {
                "active": true,
                "internal": false
            }
        },
        "upstream": {
            "url": "http://httpbin.org/"
        },          
        "server": {
            "listenPath": {
                "value": "/example-request-size-limit/",                
                "strip": true
            }
        },      
        "middleware": {
            "operations": {
                "anythingpost": {
                    "requestSizeLimit": {
                        "enabled": true,
                        "value": 100
                    }
                }
            }
        }
    }
}

In this example the endpoint-level Request Size Limit middleware has been configured for HTTP POST requests to the /anything endpoint. For any call made to this endpoint, Tyk will check the size of the payload (Request body) and, if it is larger than 100 bytes, will reject the request, returning HTTP 400 Request is too large.

The configuration above is a complete and valid Tyk OAS API Definition that you can import into Tyk to try out the virtual endpoint middleware.

API Designer

Adding the Request Size Limit middleware to your API endpoints is easy when using the API Designer in the Tyk Dashboard, simply follow these steps:

  1. Add an endpoint for the path

    From the API Designer add an endpoint that matches the path for you want to limit the size of requests.

    Tyk OAS API Designer showing no endpoints created

    Adding an endpoint to an API using the Tyk OAS API Designer

    Tyk OAS API Designer showing no middleware enabled on endpoint

  2. Select the Request Size Limit middleware

    Select ADD MIDDLEWARE and choose the Request Size Limit middleware from the Add Middleware screen.

    Adding the Request Size Limit middleware

  3. Configure the middleware

    Now you can set the size limit that the middleware should enforce - remember that this is given in bytes.

    Setting the size limit that should be enforced

  4. Save the API

    Select ADD MIDDLEWARE to save the middleware configuration. Remember to select SAVE API to apply the changes to your API.

Using Classic

The request size limit middleware enables you to apply limits to the size of requests made to your HTTP APIs. You might use this feature to protect your Tyk Gateway or upstream services from excessive memory usage or brute force attacks.

This middleware is configured in the Tyk Classic API Definition. You can do this via the Tyk Dashboard API or in the API Designer.

If you’re using the newer Tyk OAS APIs, then check out the Tyk OAS page.

If you’re using Tyk Operator then check out the configuring the middleware in Tyk Operator section below.

API Definition

There are three different levels of granularity that can be used when configuring a request size limit.

Applying a size limit for a specific API

You can configure a request size limit (in bytes) to an API by configuring the global_size_limit within the version element of the API Definition, for example:

"global_size_limit": 2500 

A value of zero (default) means that no maximum is set and the API-level size limit check will not be performed.

This limit is applied for all endpoints within an API. It is evaluated after the Gateway-wide size limit and before any endpoint-specific size limit. If this test fails, the Tyk Gateway will report HTTP 400 Request is too large.

Applying a size limit for a specific endpoint

The most granular control over request sizes is provided by the endpoint-level configuration. This limit will be applied after any Gateway-level or API-level size limits and is given in bytes. If this test fails, the Tyk Gateway will report HTTP 400 Request is too large.

To enable the middleware you must add a new size_limits object to the extended_paths section of your API definition.

The size_limits object has the following configuration:

  • path: the endpoint path
  • method: the endpoint HTTP method
  • size_limit: the maximum size permitted for a request to the endpoint (in bytes)

For example:

 1
 2
 3
 4
 5
 6
 7
 8
 9
10
11
12
{
    "extended_paths": {
        "size_limits": [
            {
                "disabled": false,
                "path": "/anything",
                "method": "POST",
                "size_limit": 100
            }
        ]
    }
}

In this example the endpoint-level Request Size Limit middleware has been configured for HTTP POST requests to the /anything endpoint. For any call made to this endpoint, Tyk will check the size of the payload (Request body) and, if it is larger than 100 bytes, will reject the request, returning HTTP 400 Request is too large.

API Designer

You can use the API Designer in the Tyk Dashboard to configure a request size limit for your Tyk Classic API by following these steps.

  1. Add an endpoint for the path and select the plugin

    From the Endpoint Designer add an endpoint that matches the path for which you want to limit the size of requests. Select the Request size limit plugin.

    Select middleware

  2. Configure the middleware

    Set the request size limit, in bytes.

    Configure limit

  3. Save the API

    Use the save or create buttons to save the changes and activate the middleware.

    Note

    The Tyk Classic API Designer does not provide an option to configure global_size_limit, but you can do this from the Raw Definition editor.

Tyk Operator

The process for configuring a request size limit is similar to that defined in section configuring the middleware in the Tyk Classic API Definition. Tyk Operator allows you to configure a request size limit for all endpoints of an API or for a specific API endpoint.

Applying a size limit for a specific API

The process for configuring the request size_limits middleware for a specific API is similar to that explained in applying a size limit for a specific API.

You can configure a request size limit (in bytes) for all endpoints within an API by configuring the global_size_limit within the version element of the API Definition, for example:

 1
 2
 3
 4
 5
 6
 7
 8
 9
10
11
12
13
14
15
16
17
18
19
20
apiVersion: tyk.tyk.io/v1alpha1
kind: ApiDefinition
metadata:
  name: httpbin-global-limit
spec:
  name: httpbin-global-limit
  use_keyless: true
  protocol: http
  active: true
  proxy:
    target_url: http://httpbin.org
    listen_path: /httpbin-global-limit
    strip_listen_path: true
  version_data:
    default_version: Default
    not_versioned: true
    versions:
      Default:
        global_size_limit: 5
        name: Default

The example API Definition above configures an API to listen on path /httpbin-global-limit and forwards requests upstream to http://httpbin.org.

In this example the request size limit is set to 5 bytes. If the limit is exceeded then the Tyk Gateway will report HTTP 400 Request is too large.

Applying a size limit for a specific endpoint

The process for configuring the request size_limits middleware for a specific endpoint is similar to that explained in applying a size limit for a specific endpoint.

To configure the request size_limits middleware you must add a new size_limits object to the extended_paths section of your API definition, for example:

 1
 2
 3
 4
 5
 6
 7
 8
 9
10
11
12
13
14
15
16
17
18
19
20
21
22
23
24
25
apiVersion: tyk.tyk.io/v1alpha1
kind: ApiDefinition
metadata:
  name: httpbin-limit
spec:
  name: httpbin-limit
  use_keyless: true
  protocol: http
  active: true
  proxy:
    target_url: http://httpbin.org
    listen_path: /httpbin-limit
    strip_listen_path: true
  version_data:
    default_version: Default
    not_versioned: true
    versions:
      Default:
        name: Default
        use_extended_paths: true
        extended_paths:
          size_limits:
            - method: POST
              path: /post
              size_limit: 5

The example API Definition above configures an API to listen on path /httpbin-limit and forwards requests upstream to http://httpbin.org.

In this example the endpoint-level Request Size Limit middleware has been configured for HTTP POST requests to the /post endpoint. For any call made to this endpoint, Tyk will check the size of the payload (Request body) and, if it is larger than 5 bytes, will reject the request, returning HTTP 400 Request is too large.

Response Body

Overview

Tyk enables you to modify the payload of API responses received from your upstream services before they are passed on to the client that originated the request. This makes it easy to transform between payload data formats or to expose legacy APIs using newer schema models without having to change any client implementations. This middleware is only applicable to endpoints that return a body with the response.

With the body transform middleware you can modify XML or JSON formatted payloads to ensure that the response contains the information required by your upstream service. You can enrich the response by adding contextual data that is held by Tyk but not included in the original response from the upstream.

This middleware changes only the payload and not the headers. You can, however, combine this with the Response Header Transform to apply more complex transformation to responses.

There is a closely related Request Body Transform middleware that provides the same functionality on the request sent by the client prior to it being proxied to the upstream.

Use Cases

Maintaining compatibility with legacy clients

Sometimes you might have a legacy API and need to migrate the transactions to a new upstream service but do not want to upgrade all the existing clients to the newer upstream API. Using response body transformation, you can convert the new format that your upstream services provide into legacy XML or JSON expected by the clients.

Shaping responses for different devices

You can detect the client device types via headers or context variables and transform the response payload to optimize it for that particular device. For example, you might optimize the response content for mobile apps.

SOAP to REST translation

A common use of the response body transform middleware is when surfacing a legacy SOAP service with a REST API. Full details of how to perform this conversion using Tyk are provided here.

Working

Tyk’s body transform middleware uses the Go template language to parse and modify the provided input. We have bundled the Sprig Library (v3) which provides over 70 pre-written functions for transformations to assist the creation of powerful Go templates to transform your API responses.

The Go template can be defined within the API Definition or can be read from a file that is accessible to Tyk, for example alongside your error templates.

We have provided more detail, links to reference material and some examples of the use of Go templating here.

Note

Tyk evaluates templates stored in files on startup, so if you make changes to a template you must remember to restart the gateway.

Supported response body formats

The body transformation middleware can modify response payloads in the following formats:

  • JSON
  • XML

When working with JSON format data, the middleware will unmarshal the data into a data structure, and then make that data available to the template in dot-notation.

Data accessible to the middleware

The middleware has direct access to the response body and also to dynamic data as follows:

  • Context variables, extracted from the request at the start of the middleware chain, can be injected into the template using the ._tyk_context.KEYNAME namespace
  • Session metadata, from the Tyk Session Object linked to the request, can be injected into the template using the ._tyk_meta.KEYNAME namespace
  • Inbound form or query data can be accessed through the ._tyk_context.request_data namespace where it will be available in as a key:[]value map
  • values from key-value (KV) storage can be injected into the template using the notation appropriate to the location of the KV store

The response body transform middleware can iterate through list indices in dynamic data so, for example, calling {{ index ._tyk_context.request_data.variablename 0 }} in a template will expose the first entry in the request_data.variablename key/value array.

Note

As explained in the documentation, templates are executed by applying them to a data structure. The template receives the decoded JSON or XML of the response body. If session variables or meta data are enabled, additional fields will be provided: _tyk_context and _tyk_meta respectively.

Automatic XML <-> JSON Transformation

A very common transformation that is applied in the API Gateway is to convert between XML and JSON formatted body content.

The Response Body Transform supports two helper functions that you can use in your Go templates to facilitate this:

  • jsonMarshal performs JSON style character escaping on an XML field and, for complex objects, serialises them to a JSON string (example)
  • xmlMarshal performs the equivalent conversion from JSON to XML (example)

If you’re using Tyk OAS APIs, then you can find details and examples of how to configure the response body transformation middleware here.

If you’re using Tyk Classic APIs, then you can find details and examples of how to configure the response body transformation middleware here.

Using Tyk OAS

The response body transform middleware provides a way to modify the payload of API responses before they are returned to the client.

The middleware is configured in the Tyk OAS API Definition. You can do this via the Tyk Dashboard API or in the API Designer.

If you’re using the legacy Tyk Classic APIs, then check out the Tyk Classic page.

API Definition

The design of the Tyk OAS API Definition takes advantage of the operationId defined in the OpenAPI Document that declares both the path and method for which the middleware should be added. Endpoint paths entries (and the associated operationId) can contain wildcards in the form of any string bracketed by curly braces, for example /status/{code}. These wildcards are so they are human readable and do not translate to variable names. Under the hood, a wildcard translates to the “match everything” regex of: (.*).

The response body transformation middleware (transformResponseBody) can be added to the operations section of the Tyk OAS Extension (x-tyk-api-gateway) in your Tyk OAS API Definition for the appropriate operationId (as configured in the paths section of your OpenAPI Document).

The transformResponseBody object has the following configuration:

  • enabled: enable the middleware for the endpoint
  • format: the format of input data the parser should expect (either xml or json)
  • body: [see note] this is a base64 encoded representation of your template
  • path: [see note] this is the path to the text file containing the template

Note

You should configure only one of body or path to indicate whether you are embedding the template within the middleware or storing it in a text file. The middleware will automatically select the correct source based on which of these fields you complete. If both are provided, then body will take precedence and path will be ignored.

For example:

 1
 2
 3
 4
 5
 6
 7
 8
 9
10
11
12
13
14
15
16
17
18
19
20
21
22
23
24
25
26
27
28
29
30
31
32
33
34
35
36
37
38
39
40
41
42
43
44
45
46
47
48
{
    "components": {},
    "info": {
        "title": "example-response-body-transform",
        "version": "1.0.0"
    },
    "openapi": "3.0.3",
    "paths": {
        "/anything": {
            "put": {
                "operationId": "anythingput",
                "responses": {
                    "200": {
                        "description": ""
                    }
                }
            }
        }
    },
    "x-tyk-api-gateway": {
        "info": {
            "name": "example-response-body-transform",
            "state": {
                "active": true
            }
        },
        "upstream": {
            "url": "http://httpbin.org/"
        },
        "server": {
            "listenPath": {
                "value": "/example-response-body-transform/",
                "strip": true
            }
        },
        "middleware": {
            "operations": {
                "anythingput": {
                    "transformResponseBody": {
                        "enabled": true,
                        "format": "json",
                        "body": "ewogICJ2YWx1ZTEiOiAie3sudmFsdWUyfX0iLAogICJ2YWx1ZTIiOiAie3sudmFsdWUxfX0iLAogICJyZXEtaGVhZGVyIjogInt7Ll90eWtfY29udGV4dC5oZWFkZXJzX1hfSGVhZGVyfX0iLAogICJyZXEtcGFyYW0iOiAie3suX3R5a19jb250ZXh0LnJlcXVlc3RfZGF0YS5wYXJhbX19Igp9"
                    }
                }
            }
        }
    }
}

In this example the response body transform middleware has been configured for requests to the PUT /anything endpoint. The body contains a base64 encoded Go template (which you can check by pasting the value into a service such as base64decode.org).

Decoded, this template is:

{
    "value1": "{{.value2}}",
    "value2": "{{.value1}}",
    "req-header": "{{._tyk_context.headers_X_Header}}",
    "req-param": "{{._tyk_context.request_data.param}}"
}

So if you make a request to PUT /anything?param=foo, configuring a header X-Header:bar and providing this payload:

{
    "value1": "world",
    "value2": "hello"
}

httpbin.org will respond with the original payload in the response and, if you do not have the response body transform middleware enabled, the response from Tyk will include:

{
    "value1": "world",
    "value2": "hello"
}

If, however, you enable the response body transform middleware, Tyk will modify the response to include this content:

{
    "req-header": "bar",
    "req-param": "[foo]",
    "value1": "hello",
    "value2": "world"
}

You can see that Tyk has swapped value1 and value2 and embedded the X-Header header and param query values from the request into the body of the response.

The configuration above is a complete and valid Tyk OAS API Definition that you can import into Tyk to try out the mock response middleware.

Note

If using a template in a file (i.e. you configure path in the transformResponseBody object), remember that Tyk will load and evaluate the template when the Gateway starts up. If you modify the template, you will need to restart Tyk in order for the changes to take effect.

API Designer

Adding Response Body Transformation to your API endpoints is easy when using the API Designer in the Tyk Dashboard, simply follow the following steps:

  1. Add an endpoint

    From the API Designer add an endpoint that matches the path and method to which you want to apply the middleware.

    Tyk OAS API Designer showing no endpoints created

    Adding an endpoint to an API using the Tyk OAS API Designer

    Tyk OAS API Designer showing no middleware enabled on endpoint

  2. Select the Response Body Transform middleware

    Select ADD MIDDLEWARE and choose the Response Body Transform middleware from the Add Middleware screen.

    Adding the Response Body Transform middleware

  3. Configure the middleware

    Now you can select the response body format (JSON or XML) and add either a path to the file containing the template, or directly enter the transformation template in the text box.

    Configuring the Response Body Transform middleware

    The Test with data control will allow you to test your body transformation function by providing an example response body and generating the output from the transform. It is not possible to configure headers, other request parameters, context or session metadata to this template test so if you are using these data sources in your transform it will not provide a complete output, for example:

    Testing the Response Body Transform

  4. Save the API

    Select SAVE API to apply the changes to your API.

Using Classic

The response body transform middleware provides a way to modify the payload of API responses before they are returned to the client.

This middleware is configured in the Tyk Classic API Definition at the endpoint level. You can do this via the Tyk Dashboard API or in the API Designer.

If you’re using the newer Tyk OAS APIs, then check out the Tyk OAS page.

If you’re using Tyk Operator then check out the configuring the middleware in Tyk Operator section below.

API Definition

To enable the middleware you must add a new transform_response object to the extended_paths section of your API definition.

The transform_response object has the following configuration:

  • path: the path to match on
  • method: this method to match on
  • template_data: details of the Go template to be applied for the transformation of the response body

The Go template is described in the template_data object by the following fields:

  • input_type: the format of input data the parser should expect (either xml or json)
  • enable_session: set this to true to make session metadata available to the transform template
  • template_mode: instructs the middleware to look for the template either in a file or in a base64 encoded blob; the actual file location (or base64 encoded template) is provided in template_source
  • template_source: if template_mode is set to file, this will be the path to the text file containing the template; if template_mode is set to blob, this will be a base64 encoded representation of your template

For example:

 1
 2
 3
 4
 5
 6
 7
 8
 9
10
11
12
13
14
15
16
{
    "extended_paths": {
        "transform_response": [
            {
                "path": "/anything",
                "method": "POST",
                "template_data": {
                    "template_mode": "file",
                    "template_source": "./templates/transform_test.tmpl",
                    "input_type": "json",
                    "enable_session": true 
                }
            }
        ]
    }
}

In this example, the Response Body Transform middleware is directed to use the template located in the file at location ./templates/transform_test.tmpl. The input (pre-transformation) response payload will be json format and session metadata will be available for use in the transformation.

Note

Tyk will load and evaluate the template file when the Gateway starts up. If you modify the template, you will need to restart Tyk in order for the changes to take effect.

Note
Prior to Tyk 5.3, there was an additional step to enable response body transformation. You would need to add the following to the Tyk Classic API definition:

{
    "response_processors":[
        {"name": "response_body_transform"}
    ]
}

If using the Endpoint Designer in the Tyk Dashboard, this would be added automatically.

We removed the need to configure the response_processors element in Tyk 5.3.0.

API Designer

You can use the API Designer in the Tyk Dashboard to configure the response body transform middleware for your Tyk Classic API by following these steps.

  1. Add an endpoint for the path and select the plugin

    From the Endpoint Designer add an endpoint that matches the path for which you want to perform the transformation. Select the Body Transforms plugin.

    Endpoint designer

  2. Configure the middleware

    Ensure that you have selected the RESPONSE tab, then select your input type, and then add the template you would like to use to the Template input box.

    Setting the body response transform

  3. Test the Transform

    If you have sample input data, you can use the Input box to add it, and then test it using the Test button. You will see the effect of the template on the sample input in the Output box.

    Testing the body transform function

  4. Save the API

    Use the save or create buttons to save the changes and activate the Response Body Transform middleware.

Tyk Operator

The process of configuring a transformation of a response body for a specific endpoint is similar to that defined in section configuring the middleware in the Tyk Classic API Definition for the Tyk Classic API definition. To enable the middleware you must add a new transform_response object to the extended_paths section of your API definition.

In the examples below, the Response Body Transform middleware (transform_response) is directed to use the template located in the template_source, decoding the xml in the base64 encoded string. The input (pre-transformation) response payload will be xml format and there is no session metadata provided for use in the transformation.

Example
 1
 2
 3
 4
 5
 6
 7
 8
 9
10
11
12
13
14
15
16
17
18
19
20
21
22
23
24
25
26
27
28
29
30
31
32
33
34
35
36
37
38
39
40
41
42
43
44
45
46
47
48
49
50
51
52
53
54
55
56
57
apiVersion: tyk.tyk.io/v1alpha1
kind: ApiDefinition
metadata:
  name: httpbin-transform
spec:
  name: httpbin-transform
  use_keyless: true
  protocol: http
  active: true
  proxy:
    target_url: http://httpbin.org
    listen_path: /httpbin-transform
    strip_listen_path: true
  version_data:
    default_version: Default
    not_versioned: true
    versions:
      Default:
        name: Default
        use_extended_paths: true
        paths:
          black_list: []
          ignored: []
          white_list: []
        extended_paths:
          transform:
            - method: POST
              path: /anything
              template_data:
                enable_session: false
                input_type: json
                template_mode: blob
                # base64 encoded template
                template_source: eyJiYXIiOiAie3suZm9vfX0ifQ==
          transform_headers:
            - delete_headers:
                - "remove_this"
              add_headers:
                foo: bar
              path: /anything
              method: POST
          transform_response:
            - method: GET
              path: /xml
              template_data:
                enable_session: false
                input_type: xml
                template_mode: blob
                # base64 encoded template
                template_source: e3sgLiB8IGpzb25NYXJzaGFsIH19
          transform_response_headers:
            - method: GET
              path: /xml
              add_headers:
                Content-Type: "application/json"
              act_on: false
              delete_headers: []
Tyk Gateway < 5.3.0 Example

If using Tyk Gateway < v5.3.0 then a response_processor object must be added to the API definition containing a response_body_transform item, as highlighted below:

 1
 2
 3
 4
 5
 6
 7
 8
 9
10
11
12
13
14
15
16
17
18
19
20
21
22
23
24
25
26
27
28
29
30
31
32
33
34
35
36
37
38
39
40
41
42
43
44
45
46
47
48
49
50
51
52
53
54
55
56
57
58
59
60
apiVersion: tyk.tyk.io/v1alpha1
kind: ApiDefinition
metadata:
  name: httpbin-transform
spec:
  name: httpbin-transform
  use_keyless: true
  protocol: http
  active: true
  proxy:
    target_url: http://httpbin.org
    listen_path: /httpbin-transform
    strip_listen_path: true
  response_processors:
    - name: response_body_transform
    - name: header_injector
  version_data:
    default_version: Default
    not_versioned: true
    versions:
      Default:
        name: Default
        use_extended_paths: true
        paths:
          black_list: []
          ignored: []
          white_list: []
        extended_paths:
          transform:
            - method: POST
              path: /anything
              template_data:
                enable_session: false
                input_type: json
                template_mode: blob
                # base64 encoded template
                template_source: eyJiYXIiOiAie3suZm9vfX0ifQ==
          transform_headers:
            - delete_headers:
                - "remove_this"
              add_headers:
                foo: bar
              path: /anything
              method: POST
          transform_response:
            - method: GET
              path: /xml
              template_data:
                enable_session: false
                input_type: xml
                template_mode: blob
                # base64 encoded template
                template_source: e3sgLiB8IGpzb25NYXJzaGFsIH19
          transform_response_headers:
            - method: GET
              path: /xml
              add_headers:
                Content-Type: "application/json"
              act_on: false
              delete_headers: []

Response Headers

Overview

Tyk enables you to modify header information when a response is proxied back to the client. This can be very useful in cases where you have an upstream API that potentially exposes sensitive headers that you need to remove.

There are two options for this:

  • API-level modification that is applied to responses for all requests to the API
  • endpoint-level modification that is applied only to responses for requests to a specific endpoint

With the header transform middleware you can append or delete any number of headers to ensure that the response contains the information required by your client. You can enrich the response by adding contextual data that is held by Tyk but not included in the original response from the upstream.

This middleware changes only the headers and not the payload. You can, however, combine this with the Response Body Transform to apply more complex transformation to responses.

There are related Request Header Transform middleware (at API-level and endpoint-level) that provide the same functionality on the request from a client, prior to it being proxied to the upstream.

Use Cases

Customizing responses for specific clients

A frequent use case for response header transformation is when a client requires specific headers for their application to function correctly. For example, a client may require a specific header to indicate the status of a request or to provide additional information about the response.

Adding security headers

The response header transform allows you to add security headers to the response to protect against common attacks such as cross-site scripting (XSS) and cross-site request forgery (CSRF). Some security headers may be required for compliance with industry standards and, if not provided by the upstream, can be added by Tyk before forwarding the response to the client.

Adding metadata to response headers

Adding metadata to response headers can be useful for tracking and analyzing API usage, as well as for providing additional information to clients. For example, you may want to add a header that indicates the version of the API being used or the time taken to process the request.

Modifying response headers for dynamic performance optimization

You can use response header transformation to dynamically optimize the performance of the API. For example, you may want to indicate to the client the maximum number of requests that they can make in a given time period. By doing so through the response headers, you can perform dynamic optimization of the load on the upstream service without triggering the rate limiter and so avoiding errors being sent to the client.

Working

The response header transform can be applied per-API or per-endpoint; each has a separate entry in the API definition so that you can configure both API-level and endpoint-level transforms for a single API.

The middleware is configured with a list of headers to delete from the response and a list of headers to add to the response. Each header to be added to the response is configured as a key:value pair.

  • the “delete header” functionality is intended to ensure that any header in the delete list is not present once the middleware completes. If a header in the delete list is not present in the upstream response, the middleware will ignore the omission
  • the “add header” functionality will capitalize any header name provided. For example, if you configure the middleware to append x-request-id it will be added to the response as X-Request-Id

In the response middleware chain, the endpoint-level transform is applied before the API-level transform. Subsequently, if both middleware are enabled, the API-level transform will operate on the headers that have been added by the endpoint-level transform (and will not have access to those that have been deleted by it).

Injecting dynamic data into headers

You can enrich the response headers by injecting data from context variables or session objects into the headers.

  • context variables, extracted from the request at the start of the middleware chain, can be injected into added headers using the $tyk_context. namespace
  • session metadata, from the Tyk Session Object linked to the request, can be injected into added headers using the $tyk_meta. namespace
  • values from key-value (KV) storage can be injected into added headers using the notation appropriate to the location of the KV store

If you’re using Tyk OAS APIs, then you can find details and examples of how to configure the response header transform middleware here.

If you’re using Tyk Classic APIs, then you can find details and examples of how to configure the response header transform middleware here.

Using Tyk OAS

Tyk’s response header transform middleware enables you to append or delete headers on responses received from the upstream service before sending them to the client.

There are two options for this:

  • API-level modification that is applied to all responses for the API
  • endpoint-level modification that is applied only to responses from a specific endpoint

Note

If both API-level and endpoint-level middleware are configured, the endpoint-level transformation will be applied first.

When working with Tyk OAS APIs the transformation is configured in the Tyk OAS API Definition. You can do this via the Tyk Dashboard API or in the API Designer.

If you’re using the legacy Tyk Classic APIs, then check out the Tyk Classic page.

API Definition

The API-level and endpoint-level response header transforms have a common configuration but are configured in different sections of the API definition.

API-level transform

To append headers to, or delete headers from, responses from all endpoints defined for your API you must add a new transformResponseHeaders object to the middleware.global section of the Tyk OAS Extension (x-tyk-api-gateway) in your Tyk OAS API Definition.

You only need to enable the middleware (set enabled:true) and then configure the details of headers to add and those to remove.

For example:

 1
 2
 3
 4
 5
 6
 7
 8
 9
10
11
12
13
14
15
16
17
18
19
20
21
22
23
24
25
26
27
28
29
30
31
32
33
34
35
36
37
38
39
40
41
42
43
44
45
46
47
48
49
50
51
52
53
54
55
56
57
58
59
60
61
{
    "components": {},
    "info": {
        "title": "example-response-header",
        "version": "1.0.0"
    },
    "openapi": "3.0.3",
    "paths": {
        "/status/200": {
            "get": {
                "operationId": "status/200get",
                "responses": {
                    "200": {
                        "description": ""
                    }
                }
            }
        }
    },
    "x-tyk-api-gateway": {
        "info": {
            "name": "example-response-header",
            "state": {
                "active": true
            }
        },
        "upstream": {
            "url": "http://httpbin.org/"
        },
        "server": {
            "listenPath": {
                "value": "/example-response-header/",
                "strip": true
            }
        },
        "middleware": {
            "global": {
                "transformResponseHeaders": {
                    "enabled": true,
                    "remove": [
                        "X-Secret"
                    ],
                    "add": [
                        {
                            "name": "X-Static",
                            "value": "foobar"
                        },
                        {
                            "name": "X-Request-ID",
                            "value": "$tyk_context.request_id"
                        },
                        {
                            "name": "X-User-ID",
                            "value": "$tyk_meta.uid"
                        }
                    ]
                }
            }
        }
    }
}

This configuration will add three new headers to each response:

  • X-Static with the value foobar
  • X-Request-ID with a dynamic value taken from the request_id context variable
  • X-User-ID with a dynamic value taken from the uid field in the session metadata

It will also delete one header (if present) from each response:

  • X-Secret

The configuration above is a complete and valid Tyk OAS API Definition that you can import into Tyk to try out the API-level response header transform.

Endpoint-level transform

The design of the Tyk OAS API Definition takes advantage of the operationId defined in the OpenAPI Document that declares both the path and method for which the middleware should be added. Endpoint paths entries (and the associated operationId) can contain wildcards in the form of any string bracketed by curly braces, for example /status/{code}. These wildcards are so they are human readable and do not translate to variable names. Under the hood, a wildcard translates to the “match everything” regex of: (.*).

The response header transform middleware (transformResponseMethod) can be added to the operations section of the Tyk OAS Extension (x-tyk-api-gateway) in your Tyk OAS API Definition for the appropriate operationId (as configured in the paths section of your OpenAPI Document).

You only need to enable the middleware (set enabled:true) and then configure the details of headers to add and those to remove.

For example:

 1
 2
 3
 4
 5
 6
 7
 8
 9
10
11
12
13
14
15
16
17
18
19
20
21
22
23
24
25
26
27
28
29
30
31
32
33
34
35
36
37
38
39
40
41
42
43
44
45
46
47
48
49
50
51
52
53
54
55
{
    "components": {},
    "info": {
        "title": "example-response-method",
        "version": "1.0.0"
    },
    "openapi": "3.0.3",
    "paths": {
        "/status/200": {
            "get": {
                "operationId": "status/200get",
                "responses": {
                    "200": {
                        "description": ""
                    }
                }
            }
        }
    },
    "x-tyk-api-gateway": {
        "info": {
            "name": "example-response-method",
            "state": {
                "active": true
            }
        },
        "upstream": {
            "url": "http://httpbin.org/"
        },
        "server": {
            "listenPath": {
                "value": "/example-response-method/",
                "strip": true
            }
        },
        "middleware": {
            "operations": {
                "status/200get": {
                    "transformResponseHeaders": {
                        "enabled": true,
                        "remove": [
                            "X-Static"
                        ],
                        "add": [
                            {
                                "name": "X-Secret",
                                "value": "the-secret-key-is-secret"
                            }
                        ]
                    }
                }
            }
        }
    }
}

In this example the Response Header Transform middleware has been configured for HTTP GET requests to the /status/200 endpoint. Any response received from the upstream service following a request to that endpoint will have the X-Static header removed and the X-Secret and X-New headers added (with values set to the-secret-key-is-secret and another-header).

The configuration above is a complete and valid Tyk OAS API Definition that you can import into Tyk to try out the endpoint-level response header transform.

Combining API-level and Endpoint-level transforms

If the example API-level and endpoint-level transforms are applied to the same API, then the X-Secret header will be added (by the endpoint-level transform first) and then removed (by the API-level transform). Subsequently, the result of the two transforms for a call to GET /status/200 would be to add four headers:

  • X-Request-ID
  • X-User-ID
  • X-Static
  • X-New

API Designer

Adding and configuring the transforms to your API endpoints is easy when using the API Designer in the Tyk Dashboard, simply follow these steps:

Adding an API-level transform

From the API Designer on the Settings tab, after ensuring that you are in edit mode, toggle the switch to Enable Transform response headers in the Middleware section:

Tyk OAS API Designer showing API-level Response Header Transform

Then select NEW HEADER as appropriate to add or remove a header from API responses. You can add or remove multiple headers by selecting ADD HEADER to add another to the list:

Configuring the API-level Response Header Transform in Tyk OAS API Designer

Adding an endpoint level transform
  1. Add an endpoint

    From the API Designer add an endpoint that matches the path and method to which you want to apply the middleware.

    Tyk OAS API Designer showing no endpoints created

    Adding an endpoint to an API using the Tyk OAS API Designer

    Tyk OAS API Designer showing no middleware enabled on endpoint

  2. Select the Response Header Transform middleware

    Select ADD MIDDLEWARE and choose the Response Header Transform middleware from the Add Middleware screen.

    Adding the URL Rewrite middleware

  3. Configure header transformation

    Select NEW HEADER to configure a header to be added to or removed from the response, you can add multiple headers to either list by selecting NEW HEADER again.

    Configuring the rewrite rules for Advanced Triggers

    Configuring the Response Header Transform

  4. Save the API

    Select ADD MIDDLEWARE to save the middleware configuration. Remember to select SAVE API to apply the changes.

Using Classic

Tyk’s response header transform middleware enables you to append or delete headers on responses received from the upstream service before sending them to the client.

There are two options for this:

  • API-level modification that is applied to all responses for the API
  • endpoint-level modification that is applied only to responses from a specific endpoint

Note

If both API-level and endpoint-level middleware are configured, the endpoint-level transformation will be applied first.

When working with Tyk Classic APIs the transformation is configured in the Tyk Classic API Definition. You can do this via the Tyk Dashboard API or in the API Designer.

If you want to use dynamic data from context variables, you must enable context variables for the API to be able to access them from the response header transform middleware.

If you’re using the newer Tyk OAS APIs, then check out the Tyk OAS page.

If you’re using Tyk Operator then check out the configuring the Response Header Transform in Tyk Operator section below.

API Definition

The API-level and endpoint-level response header transforms have a common configuration but are configured in different sections of the API definition.

Note
Prior to Tyk 5.3.0, there was an additional step to enable response header transforms (both API-level and endpoint-level). You would need to add the following to the Tyk Classic API definition:

{
    "response_processors":[
        {"name": "header_injector"}
    ]
}

If using the Endpoint Designer in the Tyk Dashboard, this would be added automatically.

We removed the need to configure the response_processors element in Tyk 5.3.0.

API-level transform

To append headers to all responses from your API (i.e. for all endpoints) you must add a new global_response_headers object to the versions section of your API definition. This contains a list of key:value pairs, being the names and values of the headers to be added to responses.

To delete headers from all responses from your API (i.e. for all endpoints), you must add a new global_response_headers_remove object to the versions section of the API definition. This contains a list of the names of existing headers to be removed from responses.

For example:

 1
 2
 3
 4
 5
 6
 7
 8
 9
10
11
12
13
14
15
16
{
    "version_data": {
        "versions": {
            "Default": {
                "global_response_headers": {
                    "X-Static": "foobar",
                    "X-Request-ID":"$tyk_context.request_id",
                    "X-User-ID": "$tyk_meta.uid"
                },
                "global_response_headers_remove": [
                    "X-Secret"
                ]
            }
        }
    },
}

This configuration will add three new headers to each response:

  • X-Static with the value foobar
  • X-Request-ID with a dynamic value taken from the request_id context variable
  • X-User-ID with a dynamic value taken from the uid field in the session metadata

It will also delete one header (if present) from each response:

  • X-Secret
Endpoint-level transform

To configure response header transformation for a specific endpoint you must add a new transform_response_headers object to the extended_paths section of your API definition.

It has the following configuration:

  • path: the endpoint path
  • method: the endpoint HTTP method
  • delete_headers: a list of the headers that should be deleted from the response
  • add_headers: a list of headers, in key:value pairs, that should be added to the response

For example:

 1
 2
 3
 4
 5
 6
 7
 8
 9
10
11
12
13
{
    "transform_response_headers": [
        {
            "path": "status/200",
            "method": "GET",
            "delete_headers": ["X-Static"],
            "add_headers": [
                {"X-Secret": "the-secret-key-is-secret"},
                {"X-New": "another-header"}
            ],
        }
    ]
}

In this example the Response Header Transform middleware has been configured for HTTP GET requests to the /status/200 endpoint. Any response received from the upstream service following a request to that endpoint will have the X-Static header removed and the X-Secret and X-New headers added (with values set to the-secret-key-is-secret and another-header).

Combining API-level and Endpoint-level transforms

If the example API-level and endpoint-level transforms are applied to the same API, then the X-Secret header will be added (by the endpoint-level transform first) and then removed (by the API-level transform). Subsequently, the result of the two transforms for a call to GET /status/200 would be to add four headers:

  • X-Request-ID
  • X-User-ID
  • X-Static
  • X-New
Fixing response headers that leak upstream server data

A middleware called header_transform was added in Tyk 2.1 specfically to allow you to ensure that headers such as Location and Link reflect the outward facade of your API Gateway and also align with the expected response location to be terminated at the gateway, not the hidden upstream proxy.

This is configured by adding a new rev_proxy_header_cleanup object to the response_processors section of your API definition.

It has the following configuration:

  • headers: a list of headers in the response that should be modified
  • target_host: the value to which the listed headers should be updated

For example:

{
    "response_processors": [
        {
            "name": "header_transform",
            "options": {
                "rev_proxy_header_cleanup": {
                    "headers": ["Link", "Location"],
                    "target_host": "http://TykHost:TykPort"
                }
            }
        }
    ]
}

In this example, the Link and Location headers will be modified from the server-generated response, with the protocol, domain and port of the value set in target_host.

This feature is rarely used and has not been implemented in the Tyk Dashboard UI, nor in the Tyk OAS API.

API Designer

You can use the API Designer in the Tyk Dashboard to configure the response header transform middleware for your Tyk Classic API by following these steps.

API-level transform

Configuring the API-level response header transform middleware is very simple when using the Tyk Dashboard.

In the Endpoint Designer you should select the Global Version Settings and ensure that you have selected the Response Headers tab:

Configuring the API-level response header transform

Note that you must click ADD to add a header to the list (for appending or deletion).

Endpoint-level transform
  1. Add an endpoint for the path and select the Header Transform plugin

    From the Endpoint Designer add an endpoint that matches the path for which you want to perform the transformation. Select the Modify Headers plugin.

    Adding the Modify Headers plugin to an endpoint

  2. Select the “Response” tab

    This ensures that the transform will be applied to responses prior to them being sent to the client.

    Selecting the response header transform

  3. Declare the headers to be modified

    Select the headers to delete and insert using the provided fields. You need to click ADD to ensure they are added to the list.

    Configuring the response header transform

  4. Save the API

    Use the save or create buttons to save the changes and activate the middleware.

Tyk Operator

The process for configuring a response header transform in Tyk Operator is similar to that defined in section configuring the Response Header Transform in the Tyk Classic API Definition. Tyk Operator allows you to configure a response header transformation for all endpoints of an API or for a specific API endpoint.

API-level transform

The process of configuring transformation of response headers for a specific API in Tyk Operator is similar to that defined in section API-level transform for the Tyk Classic API definition.

To append headers to all responses from your API (i.e. for all endpoints) you must add a new global_response_headers object to the versions section of your API definition. This contains a list of key:value pairs, being the names and values of the headers to be added to responses.

To delete headers from all responses from your API (i.e. for all endpoints), you must add a new global_response_headers_remove object to the versions section of the API definition. This contains a list of the names of existing headers to be removed from responses.

An example is listed below:

 1
 2
 3
 4
 5
 6
 7
 8
 9
10
11
12
13
14
15
16
17
18
19
20
21
22
23
24
25
26
27
28
29
30
apiVersion: tyk.tyk.io/v1alpha1
kind: ApiDefinition
metadata:
  name: httpbin-global-header
spec:
  name: httpbin-global-header
  use_keyless: true
  protocol: http
  active: true
  proxy:
    target_url: http://httpbin.org
    listen_path: /httpbin-global-header
    strip_listen_path: true
  version_data:
    default_version: Default
    not_versioned: true
    versions:
      Default:
        name: Default
        use_extended_paths: true
        paths:
          black_list: []
          ignored: []
          white_list: []
        global_response_headers:
          X-Static: foobar
          X-Request-ID: "$tyk_context.request_id"
          X-User-ID: "$tyk_meta.uid"
        global_response_headers_remove:
          - X-Secret

The example API Definition above configures an API to listen on path /httpbin-global-header and forwards requests upstream to http://httpbin.org.

This configuration will add three new headers to each response:

  • X-Static with the value foobar
  • X-Request-ID with a dynamic value taken from the request_id context variable
  • X-User-ID with a dynamic value taken from the uid field in the session metadata

It will also delete one header (if present) from each response:

  • X-Secret
Endpoint-level transform

The process of configuring a transformation of a response header for a specific endpoint in Tyk Operator is similar to that defined in section endpoint-level transform for the Tyk Classic API definition. To configure a transformation of the response headers for a specific endpoint you must add a new transform_response_headers object to the extended_paths section of your API definition.

In this example the Response Header Transform middleware (transform_response_headers) has been configured for HTTP GET requests to the /xml endpoint. Any response received from the upstream service following a request to that endpoint will have the Content-Type header added with a value set to application/json.

Example
 1
 2
 3
 4
 5
 6
 7
 8
 9
10
11
12
13
14
15
16
17
18
19
20
21
22
23
24
25
26
27
28
29
30
31
32
33
34
35
36
37
38
39
40
41
42
43
44
45
46
47
48
49
50
51
52
53
54
55
56
57
apiVersion: tyk.tyk.io/v1alpha1
kind: ApiDefinition
metadata:
  name: httpbin-transform
spec:
  name: httpbin-transform
  use_keyless: true
  protocol: http
  active: true
  proxy:
    target_url: http://httpbin.org
    listen_path: /httpbin-transform
    strip_listen_path: true
  version_data:
    default_version: Default
    not_versioned: true
    versions:
      Default:
        name: Default
        use_extended_paths: true
        paths:
          black_list: []
          ignored: []
          white_list: []
        extended_paths:
          transform:
            - method: POST
              path: /anything
              template_data:
                enable_session: false
                input_type: json
                template_mode: blob
                # base64 encoded template
                template_source: eyJiYXIiOiAie3suZm9vfX0ifQ==
          transform_headers:
            - delete_headers:
                - "remove_this"
              add_headers:
                foo: bar
              path: /anything
              method: POST
          transform_response:
            - method: GET
              path: /xml
              template_data:
                enable_session: false
                input_type: xml
                template_mode: blob
                # base64 encoded template
                template_source: e3sgLiB8IGpzb25NYXJzaGFsIH19
          transform_response_headers:
            - method: GET
              path: /xml
              add_headers:
                Content-Type: "application/json"
              act_on: false
              delete_headers: []
Tyk Gateway < 5.3.0 Example

If using Tyk Gateway < v5.3.0 then a response_processor object must be added to the API definition containing a header_injector item, as highlighted below:

 1
 2
 3
 4
 5
 6
 7
 8
 9
10
11
12
13
14
15
16
17
18
19
20
21
22
23
24
25
26
27
28
29
30
31
32
33
34
35
36
37
38
39
40
41
42
43
44
45
46
47
48
49
50
51
52
53
54
55
56
57
58
59
60
apiVersion: tyk.tyk.io/v1alpha1
kind: ApiDefinition
metadata:
  name: httpbin-transform
spec:
  name: httpbin-transform
  use_keyless: true
  protocol: http
  active: true
  proxy:
    target_url: http://httpbin.org
    listen_path: /httpbin-transform
    strip_listen_path: true
  response_processors:
    - name: response_body_transform
    - name: header_injector
  version_data:
    default_version: Default
    not_versioned: true
    versions:
      Default:
        name: Default
        use_extended_paths: true
        paths:
          black_list: []
          ignored: []
          white_list: []
        extended_paths:
          transform:
            - method: POST
              path: /anything
              template_data:
                enable_session: false
                input_type: json
                template_mode: blob
                # base64 encoded template
                template_source: eyJiYXIiOiAie3suZm9vfX0ifQ==
          transform_headers:
            - delete_headers:
                - "remove_this"
              add_headers:
                foo: bar
              path: /anything
              method: POST
          transform_response:
            - method: GET
              path: /xml
              template_data:
                enable_session: false
                input_type: xml
                template_mode: blob
                # base64 encoded template
                template_source: e3sgLiB8IGpzb25NYXJzaGFsIH19
          transform_response_headers:
            - method: GET
              path: /xml
              add_headers:
                Content-Type: "application/json"
              act_on: false
              delete_headers: []

Request Validation

Overview

Requests to your upstream services should meet the contract that you have defined for those APIs. Checking the content and format of incoming requests before they are passed to the upstream APIs can avoid unexpected errors and provide additional security to those services. Tyk’s request validation middleware provides a way to validate the presence, correctness and conformity of HTTP requests to make sure they meet the expected format required by the upstream API endpoints.

Request validation enables cleaner backend APIs, better standardization across consumers, easier API evolution and reduced failure risk leading to higher end-to-end reliability.

Use Cases

Improving security of upstream services

Validating incoming requests against a defined schema protects services from unintended consequences arising from bad input, such as SQL injection or buffer overflow errors, or other unintended failures caused by missing parameters or invalid data types. Offloading this security check to the API Gateway provides an early line of defense as potentially bad requests are not proxied to your upstream services.

Offloading contract enforcement

You can ensure that client requests adhere to a defined contract specifying mandatory headers or parameters before sending requests upstream. Performing these validation checks in the API Gateway allows API developers to focus on core domain logic.

Supporting data transformation

Validation goes hand-in-hand with request header and body transformation by ensuring that a request complies with the expected schema prior to transformation. For example, you could validate that a date parameter is present, then transform it into a different date format as required by your upstream API dynamically on each request.

Working

The incoming request is compared with a defined schema, which is a structured description of the expected format for requests to the endpoint. This request schema defines the required and optional elements such as headers, path/query parameters, payloads and their data types. It acts as a contract for clients.

If the incoming request does not match the schema, it will be rejected with an HTTP 422 Unprocessable Entity error. This error code can be customized if required.

When using Tyk OAS APIs, request validation is performed by the Validate Request middleware which can be enabled per-endpoint. The schema against which requests are compared is defined in the OpenAPI description of the endpoint. All elements of the request can have a schema defined in the OpenAPI description so requests to Tyk OAS APIs can be validated for headers, path/query parameters and body (payload).

When using the legacy Tyk Classic APIs, request validation is performed by the Validate JSON middleware which can be enabled per-endpoint. The schema against which requests are compared is defined in the middleware configuration and is limited to the request body (payload). Request headers and path/query parameters cannot be validated when using Tyk Classic APIs.


If you’re using Tyk OAS APIs, then you can find details and examples of how to configure the request validation middleware here.

If you’re using Tyk Classic APIs, then you can find details and examples of how to configure the request validation middleware here.

Using Tyk OAS

The request validation middleware provides a way to validate the presence, correctness and conformity of HTTP requests to make sure they meet the expected format required by the upstream API endpoints. If the incoming request fails validation, the Tyk Gateway will reject the request with an HTTP 422 Unprocessable Entity response. Tyk can be configured to return a different HTTP status code if required.

The middleware is configured in the Tyk OAS API Definition. You can do this via the Tyk Dashboard API or in the API Designer.

If you’re using the legacy Tyk Classic APIs, then check out the Tyk Classic page.

Request schema in OpenAPI Specification

The OpenAPI Specification supports the definition of a schema to describe and limit the content of any field in an API request or response.

Tyk’s request validation middleware automatically parses the schema for the request in the OpenAPI description part of the Tyk OAS API Definition and uses this to compare against the incoming request.

An OpenAPI schema can reference other schemas defined elsewhere, letting you write complex validations very efficiently since you don’t need to re-define the validation for a particular object every time you wish to refer to it. Tyk only supports local references to schemas (within the same OpenAPI document).

As explained in the OpenAPI documentation, the structure of an API request is described by two components:

  • parameters (headers, query parameters, path parameters)
  • request body (payload)
Request parameters

The parameters field in the OpenAPI description is an array of parameter objects that each describe one variable element in the request. Each parameter has two mandatory fields:

  • in: the location of the parameter (path, query, header)
  • name: a unique identifier within that location (i.e. no duplicate header names for a given operation/endpoint)

There are also optional description and required fields.

For each parameter, a schema can be declared that defines the type of data that can be stored (e.g. boolean, string) and any example or default values.

Operation (endpoint-level) parameters

An operation is a combination of HTTP method and path or, as Tyk calls it, an endpoint - for example GET /users. Operation, or endpoint-level parameters can be defined in the OpenAPI description and will apply only to that operation within the API. These can be added or modified within Tyk Dashboard’s API designer.

Common (path-level) parameters

Common parameters, that apply to all operations within a path, can be defined at the path level within the OpenAPI description. Tyk refers to these as path-level parameters and displays them as read-only fields in the Dashboard’s API designer. If you need to add or modify common parameters you must use the Raw Definition editor, or edit your OpenAPI document outside Tyk and update the API.

Request body

The requestBody field in the OpenAPI description is a Request Body Object. This has two optional fields (description and required) plus the content section which allows you to define a schema for the expected payload. Different schemas can be declared for different media types that are identified by content-type (e.g. application/json, application/xml and text/plain).

Configuring the request validation middleware

When working with Tyk OAS APIs, the request validation middleware automatically determines the validation rules based on the API schema. The only configurable option for the middleware is to set the desired HTTP status code that will be returned if a request fails validation. The default response will be HTTP 422 Unprocessable Entity unless otherwise configured.

Enabling the request validation middleware

If the middleware is enabled for an endpoint, then Tyk will automatically validate requests made to that endpoint against the schema defined in the API definition.

When you create a Tyk OAS API by importing your OpenAPI description, you can instruct Tyk to enable request validation automatically for all endpoints with defined schemas.

If you are creating your API without import, or if you only want to enable request validation for some endpoints, you can manually enable the middleware in the Tyk OAS API definition.

Automatically enabling the request validation middleware

The request validation middleware can be enabled for all endpoints that have defined schemas when importing an OpenAPI Document to create a Tyk OAS API.

  • if you are using the POST /apis/oas/import endpoint in the Tyk Dashboard API or Tyk Gateway API then you can do this by setting the validateRequest=true query parameter
  • if you are using the API Designer, select the Auto-generate middleware to validate requests option on the Import API screen

Select the option during OpenAPI import to validate requests

As noted, the automatic application of request validation during import will apply the middleware to all endpoints declared in your OpenAPI description. If you want to adjust this configuration, for example to remove validation from specific endpoints or to change the HTTP status code returned on error, you can update the Tyk OAS API definition as described here.

Manually enabling the request validation middleware

The design of the Tyk OAS API Definition takes advantage of the operationId defined in the OpenAPI Document that declares both the path and method for which the middleware should be added. Endpoint paths entries (and the associated operationId) can contain wildcards in the form of any string bracketed by curly braces, for example /status/{code}. These wildcards are so they are human readable and do not translate to variable names. Under the hood, a wildcard translates to the “match everything” regex of: (.*).

The request validation middleware (validateRequest) can be added to the operations section of the Tyk OAS Extension (x-tyk-api-gateway) in your Tyk OAS API Definition for the appropriate operationId. The operationId for an endpoint can be found within the paths section of your OpenAPI specification.

The validateRequest object has the following configuration:

  • enabled: enable the middleware for the endpoint
  • errorResponseCode: [optional] the HTTP status code to be returned if validation fails (this defaults to HTTP 422 Unprocessable Entity if not set)

For example:

 1
 2
 3
 4
 5
 6
 7
 8
 9
10
11
12
13
14
15
16
17
18
19
20
21
22
23
24
25
26
27
28
29
30
31
32
33
34
35
36
37
38
39
40
41
42
43
44
45
46
47
48
49
50
51
52
53
54
55
56
57
58
59
60
61
62
63
64
65
66
67
68
69
70
71
72
73
74
75
76
77
{
    "components": {},
    "info": {
        "title": "example-validate-request",
        "version": "1.0.0"
    },
    "openapi": "3.0.3",
    "paths": {
        "/anything": {
            "get": {
                "operationId": "anythingget",
                "parameters": [
                    {
                        "in": "header",
                        "name": "X-Security",
                        "required": true,
                        "schema": {
                            "type": "boolean"
                        }
                    }
                ],                
                "requestBody": {
                    "required": true,
                    "content": {
                        "application/json": {
                            "schema": {
                                "properties": {
                                    "firstname": {
                                        "description": "The person's first name",
                                        "type": "string"
                                    },
                                    "lastname": {
                                        "description": "The person's last name",
                                        "type": "string"
                                    }
                                },
                            "type": "object"
                            }
                        }
                    }
                },
                "responses": {
                    "200": {
                        "description": ""
                    }
                }
            }
        }
    },
    "x-tyk-api-gateway": {
        "info": {
            "name": "example-validate-request",
            "state": {
                "active": true
            }
        },
        "upstream": {
            "url": "http://httpbin.org/"
        },
        "server": {
            "listenPath": {
                "value": "/example-validate-request/",
                "strip": true
            }
        },
        "middleware": {
            "operations": {
                "anythingget": {
                    "validateRequest": {
                        "enabled": true,
                        "errorResponseCode": 400
                    }
                }
            }
        }
    }
}

In this example the request validation middleware has been configured for requests to the GET /anything endpoint. The middleware will check for the existence of a header named X-Security and the request body will be validated against the declared schema. If there is no match, the request will be rejected and Tyk will return HTTP 400 (as configured in errorResponseCode).

The configuration above is a complete and valid Tyk OAS API Definition that you can import into Tyk to try out the request validation middleware.

API Designer

Adding and configuring Request Validation for your API endpoints is easy when using the API Designer in the Tyk Dashboard, simply follow these steps:

  1. Add an endpoint

    From the API Designer add an endpoint that matches the path and method to which you want to apply the middleware.

    Tyk OAS API Designer showing no endpoints created

    Adding an endpoint to an API using the Tyk OAS API Designer

    Tyk OAS API Designer showing no middleware enabled on endpoint

  2. Select the Validate Request middleware

    Select ADD MIDDLEWARE and choose Validate Request from the Add Middleware screen.

    Adding the Validate Request middleware

    The API Designer will show you the request body and request parameters schema detected in the OpenAPI description of the endpoint.

    Validate Request middleware schema is automatically populated

  3. Configure the middleware

    If required, you can select an alternative HTTP status code that will be returned if request validation fails.

    Configuring the Request Validation error response

  4. Save the API

    Select ADD MIDDLEWARE to save the middleware configuration. Remember to select SAVE API to apply the changes.

Using Classic

The request validation middleware provides a way to validate the presence, correctness and conformity of HTTP requests to make sure they meet the expected format required by the upstream API endpoints.

When working with legacy Tyk Classic APIs, request validation is performed by the Validate JSON middleware which can be enabled per-endpoint. The schema against which requests are compared is defined in the middleware configuration and is limited to the request body (payload). Request headers and path/query parameters cannot be validated when using Tyk Classic APIs.

This middleware is configured in the Tyk Classic API Definition. You can do this via the Tyk Dashboard API or in the API Designer.

If you’re using the newer Tyk OAS APIs, then check out the Tyk OAS page.

If you’re using Tyk Operator then check out the configuring the middleware in Tyk Operator section below.

API Definition

To enable the middleware you must add a new validate_json object to the extended_paths section of your API definition.

The validate_json object has the following configuration:

  • path: the endpoint path
  • method: the endpoint HTTP method
  • schema: the JSON schema against which the request body will be compared
  • error_response_code: the HTTP status code that will be returned if validation fails (defaults to 422 Unprocessable Entity)

For example:

 1
 2
 3
 4
 5
 6
 7
 8
 9
10
11
12
13
14
15
16
17
18
19
20
21
22
23
24
25
{
    "extended_paths": {
        "validate_json": [
            {
                "disabled": false,
                "path": "/register",
                "method": "POST",
                "schema": {
                    "type": "object",
                    "properties": {
                        "firstname": {
                            "type": "string",
                            "description": "The person's first name"
                        },
                        "lastname": {
                            "type": "string",
                            "description": "The person's last name"
                        }
                    }
                },
                "error_response_code": 422
            }
        ]
    }
}

In this example the Validate JSON middleware has been configured for requests to the POST /register endpoint. For any call made to this endpoint, Tyk will compare the request body with the schema and, if it does not match, the request will be rejected with the error code HTTP 422 Unprocessable Entity.

Note

The Validate JSON middleware supports JSON Schema draft-04. Using another version will return an unsupported schema error, unable to validate error in the Tyk Gateway logs.

API Designer

You can use the API Designer in the Tyk Dashboard to configure the request validation middleware for your Tyk Classic API by following these steps.

  1. Add an endpoint for the path and select the plugin

    From the Endpoint Designer add an endpoint that matches the path for which you want to validate the request payload. Select the Validate JSON plugin.

    validate json plugin

  2. Configure the middleware

    Once you have selected the request validation middleware for the endpoint, you can select an error code from the drop-down list (if you don’t want to use the default 422 Unprocessable Entity) and enter your JSON schema in the editor.

    Adding schema to the Validate JSON middleware

  3. Save the API

    Use the save or create buttons to save the changes and activate the middleware.

Tyk Operator

The process for configuring the middleware in Tyk Operator is similar to that explained in configuring the middleware in the Tyk Classic API Definition. To configure the request validation middleware you must add a new validate_json object to the extended_paths section of your API definition, for example:

The example API Definition below configures an API to listen on path /httpbin and forwards requests upstream to http://httpbin.org.

In this example, the Validate JSON middleware has been configured for requests to the GET /get endpoint. For any call made to this endpoint, Tyk will compare the request body with the schema and, if it does not match, the request will be rejected with the error code HTTP 422 Unprocessable Entity.

 1
 2
 3
 4
 5
 6
 7
 8
 9
10
11
12
13
14
15
16
17
18
19
20
21
22
23
24
25
26
27
28
29
30
31
32
33
34
35
36
37
38
39
40
41
apiVersion: tyk.tyk.io/v1alpha1
kind: ApiDefinition
metadata:
  name: httpbin-json-schema-validation
spec:
  name: httpbin-json-schema-validation
  use_keyless: true
  protocol: http
  active: true
  proxy:
    target_url: http://httpbin.org
    listen_path: /httpbin
    strip_listen_path: true
  version_data:
    default_version: Default
    not_versioned: true
    versions:
      Default:
        name: Default
        use_extended_paths: true
        paths:
          black_list: []
          ignored: []
          white_list: []
        extended_paths:
          validate_json:
            - error_response_code: 422
              disabled: false
              path: /get
              method: GET
              schema:
                properties:
                  userName:
                    type: string
                    minLength: 2
                  age:
                    type: integer
                    minimum: 1
                required:
                  - userName
                type: object

Mock Response

Overview

A mock response is a simulated API response that can be returned by the API gateway without actually sending the request to the backend API service. Mock responses are an integral feature for API development, enabling developers to emulate API behavior without the need for upstream execution.

Tyk’s mock response middleware offers this functionality by allowing the configuration of custom responses for designated endpoints. This capability is crucial for facilitating front-end development, conducting thorough testing, and managing unexpected scenarios or failures.

When is it useful

Rapid API Prototyping

Developers can create predefined static (mock) responses during early API prototyping phases to simulate responses without any backend. This is useful for several reasons:

  • Validate API Design Early: It enables trying an API before writing any code. API designers and product managers can validate concepts without waiting for full API implementations.
  • Enable Dependent Development: Allows development of apps and tooling that depend on the upstream service to progress. For example, the front-end team can build their interface based on the mocked responses.
  • Support Test-Driven Development (TDD) and Behavior-Driven Development (BDD): Supports writing test cases for the API before implementation, enabling design and testing of the API without writing any backend code.
Legacy System Migration

When migrating from a legacy system to new APIs, mock responses can be used to emulate the old system’s outputs during the transitional phases. This provides continuity for client apps relying on the old system while new APIs are built that will eventually replace the legacy hooks.

Disaster Recovery Testing

The ability for a gateway to return well-formed mocks when backend APIs are unavailable helps test disaster recovery plans. By intentionally taking APIs offline and verifying the mocks’ surface instead, developers gain confidence in the gateway’s fallback and business continuity capabilities

Enhanced CI/CD pipeline

Test cases that rely on API interactions can mock those dependencies and provide virtual test data. This removes wait times for real API calls to complete during automated builds. Consumer testing can verify that provider APIs meet expected contracts using mocks in the CI pipeline. This ensures the contract remains intact across code changes before deployment. Front-end/client code can scale release cycles faster than backend APIs by using mocks to simulate planned API behaviors before they are ready.

Working

When the Mock Response middleware is configured for a specific endpoint, it terminates requests to the endpoint and generates an HTTP response that will be returned to the client as if it had come from the upstream service. No request will be passed to the upstream. The mock response to an API request should be designed to emulate how the service would respond to requests. To enable this, the content of the response can be configured to match the API contract for the service: you can set the HTTP status code, body and headers for the response.

Advanced mock responses with Tyk OAS

When working with Tyk OAS APIs, Tyk Gateway can parse the examples and schema in the OpenAPI description and use this to automatically generate responses using those examples. Where multiple examples are defined, for example for different response codes, Tyk enables you to configure special headers in the request to select the desired mock response.

Middleware execution order during request processing

With Tyk OAS APIs
  • the mock response middleware is executed at the end of the request processing chain, immediately prior to the request being proxied to the upstream
  • all other request processing middleware (e.g. authentication, request transforms) will be executed prior to the mock response.
With Tyk Classic APIs
  • the mock response middleware is executed at the start of the request processing chain
  • an endpoint with a mock response will not run any other middleware and will immediately return the mocked response for any request. As such, it is always an unauthenticated (keyless) call.

If you’re using Tyk OAS APIs, then you can find details and examples of how to configure the mock response middleware here.

If you’re using Tyk Classic APIs, then you can find details and examples of how to configure the response body transformation middleware here.

Mock Responses using OpenAPI Metadata

The OpenAPI Specification provides metadata that can be used by automatic documentation generators to create comprehensive reference guides for APIs. Most objects in the specification include a description field that offers additional human-readable information for documentation. Alongside descriptions, some OpenAPI objects can include sample values in the OpenAPI Document, enhancing the generated documentation by providing representative content that the upstream service might return in responses.

Tyk leverages examples from your API documentation (in OpenAPI Spec format) to generate mock responses for the API exposed via the gateway. Based on this data, Tyk adds a new middleware named “Mock Response” and returns various mock responses according to your spec. Refer to the Mock configuration guide to learn how to do this.

The specification provides three methods for Tyk to deduce the mock response: example, examples and schema.

  1. example: A sample value that could be returned in a specific field in a response (see below)
  2. examples: A map pairing an example name with an Example Object (see below)
  3. schema: JSON schema for the expected response body (see below

Note:

  • example and examples are mutually exclusive within the OpenAPI Document for a field in the responses object: the developer cannot provide both for the same object.
  • The content-type (e.g. application/json, text/plain), per OpenAPI Specification, must be declared for each example or examples in the API description.

Let’s see how to use each method:

Using example to generate a mock response

In the following extract from an OpenAPI description, a single example has been declared for a request to GET /get - the API developer indicates that such a call could return HTTP 200 and the body value Response body example in plain text format.

 1
 2
 3
 4
 5
 6
 7
 8
 9
10
11
12
13
14
15
16
17
18
19
{
  "paths": {
    "/get": {
      "get": {
        "operationId": "getget",
        "responses": {
          "200": {
            "content": {
                "text/plain": {
                    "example": "Response body example"
                }
            },
            "description": "200 OK response for /get with a plain text"
          }
        }
      }
    }
  }
}

Using examples to generate a mock response

In this extract, the API developer also indicates that a call to GET /get could return HTTP 200 but here provides two example body values Response body from first-example and Response body from second-example, again in plain text format.

 1
 2
 3
 4
 5
 6
 7
 8
 9
10
11
12
13
14
15
16
17
18
19
20
21
22
23
24
25
26
{  
  "paths": {
    "/get": {
      "get": {
        "operationId": "getget",
        "responses": {
          "200": {
            "content": {
              "text/plain": {
                "examples": {
                    "first-example": {
                        "value": "Response body from first-example"
                    },
                    "second-example": {
                        "value": "Response body from second-example"
                    }
                }
              }
            },
            "description": "This is a mock response example with 200OK"
          }
        }
      }
    }
  }
}

The exampleNames for these two values have been configured as first-example and second-example and can be used to invoke the desired response from a mocked endpoint.

Using schema to generate a mock response

If there is no example or examples defined for an endpoint, Tyk will try to find a schema for the response. If there is a schema, it will be used to generate a mock response. Tyk can extract values from referenced or nested schema objects when creating the mock response.

Response headers schema

Response headers do not have standalone example or examples attributes, however, they can have a schema - the Mock Response middleware will include these in the mock response if provided in the OpenAPI description.

The schema properties may have an example field, in which case they will be used to build a mock response. If there is no example value in the schema then default values are used to build a response as follows:

  • string > "string"
  • integer > 0
  • boolean > true

For example, below is a partial OpenAPI description, that defines a schema for the GET /get endpoint

 1
 2
 3
 4
 5
 6
 7
 8
 9
10
11
12
13
14
15
16
17
18
19
20
21
22
23
24
25
26
27
28
29
30
31
32
33
34
35
36
37
38
39
40
41
{
    "paths": {
        "/get": {
            "get": {
                "operationId": "getget",
                "responses": {
                    "200": {
                        "headers": {
                            "X-Status": {
                                "schema": {
                                    "type": "string",
                                    "example": "status-example"
                                }
                            }
                        },
                        "content": {
                            "application/json": {
                                "schema": {
                                    "type": "object",
                                    "properties": {
                                        "lastName": {
                                            "example": "Lastname-placeholder",
                                            "type": "string"
                                        },
                                        "firstname": {
                                            "type": "string"
                                        },
                                        "id": {
                                            "type": "integer"
                                        }
                                    }
                                }
                            }
                        },
                        "description": "This is a mock response example with 200OK"
                    }
                }
            }
        }
    }
}

Tyk Gateway could use the above to generate the following mock response:

HTTP/1.1 200 OK
X-Status: status-example
Content-Type: application/json
 
{
    "lastName": "Lastname-placeholder",
    "firstname": "string",
    "id": 0
}

Notice that in the mock response above, firstname has the value string since there was no example for it in the OpenAP document so Tyk used the word string as the value for this field.

Using Tyk OAS

This tutorial is for Tyk OAS API definition users. If you’re using the legacy Tyk Classic APIs, please refer to the Tyk Classic Mock Response tutorial.

The Mock Response middleware allows you to configure Tyk to return a response for an API endpoint without requiring an upstream service.

When working with Tyk OAS APIs, this middleware is executed at the end of the request processing chain immediately prior to the upstream proxy stage. Thus, any other request processing middleware - including authentication - will be run before the request reaches the mock response.

The middleware is defined in the Tyk OAS API Definition. To create this definition, you can use the Tyk Dashboard API or the API Designer in the Tyk Dashboard UI.

To configure or create a Mock Response middleware you have two modes, manual and automatic. Following please find detailed guidance for each mode.

Manual configuration

You can configure a mock response directly in the API definition, in the middleware object under the Tyk extension section, x-tyk-api-gateway. Once added, you need to update or import it to Tyk Dashboard using Tyk Dashboard API or via Tyk Dashboard UI. This is useful when you have already tested your API in dev environments and now you need to deploy it to staging or production in a declarative manner.

The design of the Tyk OAS API Definition takes advantage of the operationId defined in the OpenAPI Document that declares both the path and method for which the middleware should be added.

The mock response middleware (mockResponse) can be added to the x-tyk-api-gateway.middleware.operations section (Tyk OAS Extension) in your Tyk OAS API Definition for the appropriate operationId (as configured in the paths section of your OpenAPI Document).

For basic operation, the mockResponse object has the following configuration:

  • enabled: enable the middleware for the endpoint
  • code: the HTTP status code to be provided with the response (this defaults to 200 if not set)
  • body: the payload to be returned as the body of the response
  • headers: the headers to inject with the response

Please remember that this API definition needs to be updated in Tyk Dashboard. In the Dashboard UI it might be trivial but if you are doing it declaratively, you need to use the Tyk Dashboard API endpoint to update an existing API (PUT) or import as a new API (POST). Once updated, Tyk Gateway/s will return mock responses to all valid requests to the endpoint, depending on the content of the request.

In the following example, we configure a mock response middleware for requests to the GET /example-mock-response1/anything endpoint:

 1
 2
 3
 4
 5
 6
 7
 8
 9
10
11
12
13
14
15
16
17
18
19
20
21
22
23
24
25
26
27
28
29
30
31
32
33
34
35
36
37
38
39
40
41
42
43
44
45
46
47
48
49
50
51
52
53
54
{
  "components": {},
  "info": {
    "title": "example-mock-response1",
    "version": "1.0.0"
  },
  "openapi": "3.0.3",
  "paths": {
    "/anything": {
      "get": {
        "operationId": "anythingget",
        "responses": {
          "200": {
            "description": "200OK for /anything using anythingget"
          }
        }
      }
    }
  },
  "x-tyk-api-gateway": {
    "info": {
      "name": "example-mock-response1",
      "state": {
        "active": true
      }
    },
    "upstream": {
      "url": "http://httpbin.org/"
    },
    "server": {
      "listenPath": {
        "value": "/example-mock-response1/",
        "strip": true
      }
    },
    "middleware": {
      "operations": {
        "anythingget": {
          "mockResponse": {
            "enabled": true,
            "code": 200,
            "body": "This is the mock response body",
            "headers": [
              {
                "name": "X-Mock-Example",
                "value": "mock-header-value"
              }
            ]
          }
        }
      }
    }
  }
}

Once this API definition is updated in Tyk Dashboard, a call to GET /example-mock-response1/anything would return:

HTTP/1.1 200 OK
X-Mock-Example: mock-header-value
Content-Type: text/plain; charset=utf-8
 
This is the mock response body

The configuration above is a complete and valid Tyk OAS API Definition that you can import into Tyk to try out the mock response middleware.

Automatic configuration inferred from your OpenAPI Document

Tyk will parse the examples and schema in the OpenAPI document and use them to generate mock responses automatically.

The design of the Tyk OAS API Definition takes advantage of the operationId defined in the OpenAPI Document that declares both the path and method for which the middleware should be added. Endpoint paths entries (and the associated operationId) can contain wildcards in the form of any string bracketed by curly braces, for example /status/{code}. These wildcards are so they are human-readable and do not translate to variable names. Under the hood, a wildcard translates to the “match everything” regex of: (.*).

The mock response middleware (mockResponse) can be added to the operations section of the Tyk OAS Extension (x-tyk-api-gateway) in your Tyk OAS API Definition for the appropriate operationId (as configured in the paths section of your OpenAPI Document).

For basic operation, the mockResponse object has the following configuration:

  • enabled: enable the middleware for the endpoint
  • fromOASExamples: an object used to instruct Tyk Gateway to return a response from the OpenAPI description

The fromOASExamples object has the following configuration:

  • enabled: enable the automatic configuration of mock response
  • code: [optional] identifies which HTTP status code to be provided with the response (defaults to 200 if not set)
  • contentType: [optional] identifies which response body type to use (defaults to application/json if not set)
  • exampleName: [optional] the sample response to be returned from an examples list

The three optional fields (code, contentType, exampleName) are used to identify which sample response should be returned by the mock if multiple sample responses are declared in the OpenAPI description.

In the following example, the OpenAPI description declares three possible responses: two for HTTP 200 and one for HTTP 300. We have configured the Mock Response middleware to return the value defined for HTTP 200 (code) with exampleName set to “second-example”. The JSON below shows the updated Tyk OAS API definition, after Tyk has generated and added the mock response middleware:

 1
 2
 3
 4
 5
 6
 7
 8
 9
10
11
12
13
14
15
16
17
18
19
20
21
22
23
24
25
26
27
28
29
30
31
32
33
34
35
36
37
38
39
40
41
42
43
44
45
46
47
48
49
50
51
52
53
54
55
56
57
58
59
60
61
62
63
64
65
66
67
68
69
70
71
72
{  
    "components": {},
    "info": {
        "title": "example-mock-response2",
        "version": "1.0.0"
    },
    "openapi": "3.0.3",
    "paths": {
        "/anything": {
            "get": {
                "operationId": "anythingget",
                "responses": {
                    "200": {
                        "content": {
                            "text/plain": {
                                "examples": {
                                    "first-example": {
                                        "value": "My favorite is pasta"
                                    },
                                    "second-example": {
                                        "value": "My second favorite is pizza"
                                    }
                                }
                            }
                        },
                        "description": ""
                    },
                    "300": {
                        "content": {
                            "text/plain": {
                                "example": "There's too much choice"
                            }
                        },
                        "description": ""
                    }
                }
            }
        }
    },
    "x-tyk-api-gateway": {
        "info": {
            "name": "example-mock-response2",
            "state": {
                "active": true
            }
        },
        "upstream": {
            "url": "http://httpbin.org/"
        },
        "server": {
            "listenPath": {
                "value": "/example-mock-response2/",
                "strip": true
            }
        },
        "middleware": {
            "operations": {
                "anythingget": {
                    "mockResponse": {
                        "enabled": true,
                        "fromOASExamples": {
                            "enabled": true,
                            "code": 200,
                            "contentType": "text/plain",
                            "exampleName": "second-example"
                        }
                    }
                }
            }
        }
    }
}

Once this API definition is updated in Tyk Dashboard, a call to GET /example-mock-response2/anything would return:

HTTP/1.1 200 OK
Content-Type: text/plain
 
"My second favorite is pizza"

If you add "code":300 in the fromOASExamples object, a call to GET /example-mock-response2/anything would instead respond as follows:

HTTP/1.1 300 Multiple Choices
Content-Type: text/plain
 
"There's too much choice"

Note

If multiple examples are defined in the OpenAPI description but no default exampleName is set in the middleware configuration fromOASExamples Tyk will select randomly from the multiple examples. Yes, that means the response may change with every request. You can control which response will be returned using special headers in the request.

The configuration above is a complete and valid Tyk OAS API Definition that you can import into Tyk to try out the mock response middleware.

Multiple mock responses for a single endpoint

When the mock response middleware in your Tyk OAS API is configured to return responses from the OpenAPI description within the API definition, you can invoke a specific response, overriding the defaults configured in the middleware, by providing specific headers in your request.

To invoke a non-default response from a mocked endpoint, you must add one or more special headers to the request:

  • Accept: This standard HTTP header will override the response content type (e.g. application/json, text/plain)
  • X-Tyk-Accept-Example-Code: This will select the HTTP response code for which to return the example response (e.g. 400)
  • X-Tyk-Accept-Example-Name: This identifies which example to select from an examples list

If an example response can’t be found for the configured code, contentType or exampleName, an HTTP 404 error will be returned to inform the client that there is no declared example for that configuration.

In the example below, the OpenAPI document declares two possible responses: one for HTTP 200 and one for HTTP 300. We have configured the Mock Response middleware to return the value defined for HTTP 200 for which the body (content) is in JSON format and a custom header X-Status which will take the default value of true.

 1
 2
 3
 4
 5
 6
 7
 8
 9
10
11
12
13
14
15
16
17
18
19
20
21
22
23
24
25
26
27
28
29
30
31
32
33
34
35
36
37
38
39
40
41
42
43
44
45
46
47
48
49
50
51
52
53
54
55
56
57
58
59
60
61
62
63
64
65
66
67
68
69
70
71
72
73
74
75
76
77
78
79
80
81
82
83
84
85
86
87
88
89
90
91
92
93
94
{  
    "components": {},
    "info": {
        "title": "example-mock-response3",
        "version": "1.0.0"
    },
    "openapi": "3.0.3",
    "paths": {
        "/anything": {
            "get": {
                "operationId": "anythingget",
                "responses": {
                    "200": {
                        "headers": {
                            "X-Status": {
                                "schema": {
                                    "type": "boolean"
                                }
                            }
                        },
                        "content": {
                            "application/json": {
                                "schema": {
                                    "type": "object",
                                    "properties": {
                                        "lastName": {
                                            "example": "Bar",
                                            "type": "string"
                                        },
                                        "name": {
                                            "example": "Foo",
                                            "type": "string"
                                        },
                                        "id": {
                                            "type": "integer"
                                        }
                                    }
                                }
                            }
                        },
                        "description": ""
                    },
                    "300": {
                        "headers": {
                            "X-Status": {
                                "schema": {
                                    "type": "boolean",
                                    "example": false
                                }
                            }
                        },
                        "content": {
                            "text/plain": {
                                "example": "Baz"
                            }
                    },
                    "description": ""
                    } 
               }
            }
        }
    },
    "x-tyk-api-gateway": {
        "info": {
            "name": "example-mock-response3",
            "state": {
                "active": true
            }
        },
        "upstream": {
            "url": "http://httpbin.org/"
        },
        "server": {
            "listenPath": {
                "value": "/example-mock-response3/",
                "strip": true
            }
        },
        "middleware": {
            "operations": {
                "anythingget": {
                    "mockResponse": {
                        "enabled": true,
                        "fromOASExamples": {
                            "enabled": true,
                            "code": 200,
                            "contentType": "application/json"
                        }
                    }
                }
            }
        }
    }
}

You can trigger the mock response for HTTP 300 by adding the following headers to your request:

  • X-Tyk-Accept-Example-Code: 300
  • Accept: text/plain

This would return a plain text body and the X-Status header set to false.

The configuration above is a complete and valid Tyk OAS API Definition that you can import into Tyk to try out the mock response middleware.

Configuring mock response using Tyk Dashboard UI

Adding a mock response to your API endpoints is easy when using the API Designer in the Tyk Dashboard UI, simply follow the steps appropriate to the configuration method you wish to use:

Manual configuration
  1. Add an endpoint

    From the API Designer add an endpoint that matches the path and method to which you want to apply the middleware.

    Tyk OAS API Designer showing no endpoints created

    Adding an endpoint to an API using the Tyk OAS API Designer

    Tyk OAS API Designer showing no middleware enabled on endpoint

  2. Select the Mock Response middleware

    Select ADD MIDDLEWARE and choose Mock Response middleware from the Add Middleware screen.

    Adding the Mock Response middleware

  3. Configure the middleware

    Select Manually configure mock response

    Mock Response middleware added to endpoint - select the configuration method you require

    This takes you to the middleware configuration screen where you can:

    • choose the HTTP status code that you want Tyk Gateway to return
    • select the content type
    • add a description for your mock response
    • define headers to be provided with the response
    • define the body that will be returned in the response (note that this must be defined as a JSON schema)

    Configuring the mock response

    Select UPDATE MIDDLEWARE to apply the change to the middleware configuration.

  4. Save the API

    Select SAVE API to apply the changes to your API.

Automatic configuration
  1. Import an OpenAPI Document containing sample responses or schema

    Import your OpenAPI Document (from file, URL or by pasting the JSON into the text editor) configure the upstream URL and listen path, and select Auto-generate middleware to deliver mock responses.

    Selecting this option will cause Tyk Dashboard to check for sample responses or schema in the OpenAPI description and will automatically add the Mock Response middleware for any endpoints that have suitable data.

    Configuring the OpenAPI document import to create Mock Responses

  2. Edit the Mock Response middleware

    Select EDIT and then the Mock Response middleware from the Endpoints tab. This will take you to the Edit Middleware screen. Note that Use mock response from Open API Specification has been selected.

    Editing the Mock Response middleware

  3. Configure the middleware

    Tyk Dashboard will automatically select a valid HTTP response code from the drop-down. When you select a valid content-type for which a mock response is configured in the OpenAPI specification, the API Designer will display the associated response.

    Mock Response middleware automatically configured from OpenAPI description

    Here you can edit the mock response:

    • modify, add or delete Response Body examples (note that this must follow the selected content-type)
    • choose a default Response Body example that will be provided (unless overridden in the request)
    • add a description for your mock response
    • define headers to be provided with the response (note that these must be defined as a JSON schema)
    • add a schema

    You can create and edit mock responses for multiple HTTP status codes by choosing a different status code from the drop-down.

    Select UPDATE MIDDLEWARE to apply the change to the middleware configuration.

  4. Save the API

    Select SAVE API to apply the changes to your API.

Note

Modifying the automatically configured Mock Response middleware will update the OpenAPI description part of your Tyk OAS API definition, as the detail of the mock response is not set in the x-tyk-api-gateway extension but is automatically generated in response to the particular request received to the endpoint.

Using Classic

The Mock Response middleware allows you to configure Tyk to return a response for an API endpoint without requiring an upstream service. This can be useful when creating a new API or making a development API available to an external team.

When working with Tyk Classic APIs, this middleware is executed at the start of the request processing chain. Thus an endpoint with the mock response middleware will not be authenticated, will not process other middleware configured for the API (neither API nor endpoint level) and will have no analytics created. It will simply return the configured response for any request made to that endpoint.

The middleware is configured in the Tyk Classic API Definition. You can do this via the Tyk Dashboard API, the API Designer or in Tyk Operator.

If you’re using the newer Tyk OAS APIs, then check out the Tyk OAS page.

API Definition

If you’re using Tyk Operator then check out the configuring the middleware in Tyk Operator section below.

To enable mock response, you must first add the endpoint to a list - one of allow list, block list or ignore authentication. This will add a new object to the extended_paths section of your API definition - white_list, black_list or ignored. The mock response can then be configured within the method_actions element within the new object.

The white_list, black_list and ignored objects all have the same structure and configuration as follows:

  • path: the endpoint path
  • method: this should be blank
  • ignore_case: if set to true then the path matching will be case insensitive
  • method_actions: the configuration of the mock response

The method_actions object should be configured as follows, with an entry created for each method on the path for which you wish to configure the mock response:

  • action: this should be set to reply
  • code: the HTTP status code to be provided with the response
  • headers: the headers to inject with the response
  • data: the payload to be returned as the body of the response

For example:

 1
 2
 3
 4
 5
 6
 7
 8
 9
10
11
12
13
14
15
16
17
18
19
20
21
22
{
    "extended_paths": {
        "white_list": [
            {
                "disabled": false,
                "path": "/anything",
                "method": "",
                "ignore_case": false,
                "method_actions": {
                    "GET": {
                        "action": "reply",
                        "code": 200,
                        "data": "This is the mock response body",
                        "headers": {
                            "X-Example-Header": "foobar"
                        }
                    }          
                }
            }
        ]
    }
}

In this example the mock response middleware has been configured for requests to the GET /anything endpoint. The allow list middleware has been enabled for this endpoint and is case sensitive, so calls to GET /Anything will not return the mock response.

A call to GET /anything would return:

HTTP/1.1 200 OK
X-Example-Header: foobar
Date: Wed, 31 Jan 2024 16:21:05 GMT
Content-Length: 30
Content-Type: text/plain; charset=utf-8

This is the mock response body

API Designer

You can use the API Designer in the Tyk Dashboard to configure the Mock Response middleware for your Tyk Classic API by following these steps.

  1. Add an endpoint for the path and configure a list plugin

    For the mock response to be enabled, the endpoint must also be in a list. We recommend adding the path to an allow list by selecting the Whitelist plugin.

  2. Add the mock response plugin

    Now select the Mock response plugin.

Selecting the mock response middleware for a Tyk Classic API

  1. Configure the middleware

    Once you have selected the Mock response middleware for the endpoint, you can configure the HTTP status code, headers and body to be included in the response. Remember to click ADD, to add each header to the response.

    Configuring the mock response middleware for a Tyk Classic API

  2. Save the API

    Use the save or create buttons to save the changes and activate the middleware.

Note

For the mock response to be enabled, the endpoint must also be in a list. We recommend adding the path to an allow list. If this isn’t done, then the mock will not be saved when you save your API in the designer.

Tyk Operator

The process of configuring a mock response is similar to that defined in the configuring the middleware in Tyk Classic API definition section.

To configure a mock response, you must first add a mock response configuration object to the extended_paths section, e.g. one of allow list (white_list), block list (black_list) or ignore authentication (ignore). The mock response configuration object has the following properties:

  • path: the path of the endpoint, e.g /foo.
  • ignore_case: when set to true the path matching is case insensitive.
  • method_actions: a configuration object that allows the mock response to be configured for a given method, including the response body, response headers and status code. This object should also contain an action field with a value set to reply.

In the example below we can see that a mock response is configured to ignore authentication (ignore) for the GET /foo endpoint. When a request is made to the endpoint then authentication will be ignored and a mock response is returned with status code 200 and a response body payload of {"foo": "bar"}. The middleware has been configured to be case sensitive, so calls to GET /Foo will not ignore authentication.

 1
 2
 3
 4
 5
 6
 7
 8
 9
10
11
12
13
14
15
16
17
18
19
20
21
22
23
24
25
26
27
28
29
30
31
32
33
34
apiVersion: tyk.tyk.io/v1alpha1
kind: ApiDefinition
metadata:
  name: httpbin
spec:
  name: httpbin
  protocol: http
  active: true
  use_keyless: true
  proxy: 
    target_url: http://httpbin.org
    listen_path: /httpbin
    strip_listen_path: true
  version_data:
    default_version: Default
    not_versioned: true
    versions:
      Default:
        name: Default
        use_extended_paths: true
        paths:
          black_list: []
          ignored: []
          white_list: []
        extended_paths:
            ignored:
              - ignore_case: false
                method_actions:
                  GET:
                    action: "reply"
                    code: 200
                    data: "{\"foo\": \"bar\"}"
                    headers: {}
                path: /foo

URL Rewriting

Overview

URL rewriting in Tyk is a powerful feature that enables the modification of incoming API request paths to match the expected endpoint format of your backend services. This process is accomplished by using regular expressions (regexes) to identify and capture specific segments of the request URL, which can then be rearranged or augmented to construct the desired endpoint URL.

The flexibility of Tyk’s URL rewriting mechanism allows for conditional rewrites based on the presence of certain parameters within the request, ensuring that the rewrite logic is applied only when appropriate. This allows for granular redirection of requests, for example to direct certain users to a beta service while others are sent to the production version.

By employing URL rewriting, Tyk facilitates seamless communication between client applications and backend services, ensuring that API requests are efficiently routed and processed. This feature is instrumental in maintaining a clean and organized API architecture, while also providing the adaptability required to handle evolving backend systems.

Use Cases

Internal Looping

API requests can be redirected to other endpoints or APIs deployed on Tyk using the URL rewrite functionality. This allows requests to be redirected to internal APIs that are not directly exposed on the Gateway (for example to reduce complexity of the external interface or to perform additional processing or security checks before reaching sensitive upstream APIs). We refer to this practice as looping. By performing the looping internally using the URL rewrite middleware, latency is reduced because the redirection is handled entirely within Tyk with no unnecessary external network calls.

Improved Performance Optimization

You can use URL rewriting to route traffic intelligently to particular API endpoints, distributing the processing burden evenly across your system and minimizing load on your backend resources. This reduces the chances of overwhelming individual nodes and ensures consistent performance levels throughout the entire infrastructure.

Enhanced Scalability

As your API portfolio scales, you may find yourself dealing with an ever-increasing array of unique URLs. Instead of creating separate endpoints for every permutation, URL rewriting allows you to consolidate those disparate routes into a centralised location. This simplification makes it easier to monitor and manage the overall system, ultimately enhancing its resilience and stability.

Better User Experiences

With URL rewriting, you can design cleaner, more straightforward navigation structures for your APIs, making it simpler for consumers to locate and interact with the information they require.

Working

Tyk’s URL rewrite middleware uses the concepts of triggers and rules. These can be combined in flexible ways to create sophisticated logic to direct requests made to a single endpoint to various upstream services (or other APIs internally exposed within Tyk).

A rule is a simple pattern match - you identify the location of a key and define a regex (called the pattern). Tyk will examine the API request and compare the key with the pattern. If there is a match, the rule will pass.

A trigger combines one or more rules with a target (or rewriteTo) URL. If the logical combination of the rules results in a pass outcome, then the trigger is considered to have been fired and the target URL for the request will be rewritten.

More detail on URL Rewrite triggers and rules can be found here.

If you’re using Tyk OAS APIs, then you can find details and examples of how to configure the URL rewrite middleware here.

If you’re using Tyk Classic APIs, then you can find details and examples of how to configure the URL rewrite middleware here.

URL Rewrite middleware

Tyk’s URL rewrite middleware uses the concepts of triggers and rules to determine if the request (target) URL should be modified. These can be combined in flexible ways to create sophisticated logic to direct requests made to a single endpoint to various upstream services (or other APIs internally exposed within Tyk Gateway through looping).

URL rewrite rules

The URL rewrite middleware compares a key with a pattern to determine if there is a match; the rules define the location of the key and the structure of the pattern.

Key

The key value is the content of a field in some element of the request; as such each key has a location (which element of the request) and a name (the name of the field within that element). For example, to obtain the key value book from the request GET /asset?type=book the key location would be query parameter and the key name would be type.

Keys can be located in the following elements of the request:

  • request path / path parameter (i.e. components of the path itself)
  • request header
  • query parameter
  • request body (payload)
  • session metadata
  • request context (for example to match by IP address or JWT scope)

Note

Note that there is no key name when using the request body location, as the entire body (payload) of the request is used as the key value.

When using the request header location, the key name is the normalized form of the header name: with capitalization and use of - as separator. For example, the header namecustomer_identifier would be identified in a rule via the key name Customer-Identifier.

When using the request path location, you can use wildcards in the key name (which is the URL path) - for example /asset/{type}/author/. The URL rewrite middleware will treat the wildcard as a (.*) regex so that any value matches. The wildcard value itself will be ignored, is not extracted from the key, and is not available for use in constructing the rewrite path.

Pattern

The pattern takes the form of a regular expression (regex) against which the key value will be compared.

This pattern can be a static regex or can contain dynamic variables:

  • context variables, extracted from the request at the start of the middleware chain, can be injected into the pattern regex using the $tyk_context. namespace
  • session metadata, from the Tyk Session Object linked to the request, can be injected into the pattern regex using the $tyk_meta.METADATA_KEY namespace

Percent-encoded (URL-encoded) characters can be used in the pattern regex when the key is the request path or path parameter

  • if the middleware is called with percent-encoded characters in the key, matching will first be attempted using the raw URL as provided
  • if there is no match, the percent-encoded characters will be replaced with their non-encoded form (e.g. %2D -> -) and checked again

Note

Tyk does not check all combinations of encoded and decoded characters in the same string (so my-test%2Durl will only be checked as my-test%2Durl and my-test-url, it will not be checked against my%2Dtest%2Durl or my%2Dtest-url).

URL rewrite triggers

There are two types of trigger in the URL rewriter: basic and advanced.

Basic trigger

The basic trigger has a single rule for which the key location is always the request path. For the simplest case of URL rewriting, you can simply configure the pattern regex and rewriteTo target URL for this basic trigger.

Advanced triggers

One or more advanced triggers can be configured alongside the basic trigger. These are processed in the order that they are defined in the API Definition. When using the API Designer in Tyk Dashboard, advanced triggers are automatically numbered in the order they are created and will be processed in numberical order.

Advanced triggers can have multiple rules that can be combined using a logical AND or OR operation, such that either all the rules must pass or any rule must pass for the trigger to fire.

Within advanced triggers, but not the basic trigger, each rule can be negated such that the rule is considered to have passed if the pattern does not match the key value.

Once an advanced trigger has fired, the middleware will apply its rewriteTo target and stop processing any more triggers.

Note

The basic trigger acts as a control switch for any advanced triggers that are defined for the middleware: if the basic trigger is not fired then no rewriting will take place even if an advanced trigger would have fired based on the request.

Creating the rewrite path

Each trigger (basic or advanced) defines a rewriteTo target.

  • if just the basic trigger is fired, then the request path (target URL) will be rewritten with the rewriteTo value defined in that trigger.
  • if both an advanced trigger and the basic trigger are fired, then the request path will be written with the rewriteTo value defined for the advanced trigger.
  • if the basic trigger does not fire then no rewriting will take place.
Dynamic data in the rewrite path

The rewriteTo values can be simple URLs or they can be dynamically created using data available to the middleware:

Note

You can redirect to a new hostname but to do so you must provide the full URL, for example:

https://my-new-target-host.com/library/service?value1=books&value2=author
Using data from the key in the rewrite path

For the basic trigger, each capture group you specify in the pattern regex is designated with an index (n), and can then be referenced in the rewriteTo target using the format $n.

  • for example, if the pattern to be matched is "(\w+)/(\w+)" then the regex will attempt to capture two word groups. The first of these will be given index 1 and the second will be index 2. You can reference these in the rewriteTo target using $1 and $2 such as: "my/service?value1=$1&value2=$2"

With advanced triggers, the key values used in the pattern matches for each rule are stored as context variables which can then be referenced in the rewriteTo target as for other context variables.

The format for these advanced trigger context variables is: $tyk_context.trigger-{n}-{name}-{i} where n is the trigger index, name is the key name and i is the index of that match (since query strings and headers can be arrays of values).

  • for example, if the first trigger fires based on a rule where the key is the query parameter “type”, a context variable with the name trigger-0-type-0 will be created and can be referenced in the rewriteTo target
Using data from KV storage in the rewrite path

You can retrieve a value from KV storage by including a reference in the appropriate notation for the KV location where the key-value pair is stored.

If you use a value retrieved from Consul or Vault, this must be the last part in the rewriteTo URL.

For example, say you have a key named userName with value jo in my Consul KV store:

  • if you configure rewriteTo as /my-api/users/$secret_consul.userName this will redirect calls to /my-api/users/jo
  • if, however, you configure my rewriteTo as /my-api/users/$secret_consul.userName/contract this will not redirect to my-api/jo/contract but instead the KV lookup will fail, as Tyk will check for a key named userName/contract in Consul (returning null), so the URL rewrite middleware will redirect to /my-api/users

This limitation does not apply to KV accessed from the other supported KV stores (environment variable or Gateway secrets).

Using Tyk OAS

Tyk’s URL rewriter uses the concepts of triggers and rules to determine if the request (target) URL should be modified. These can be combined in flexible ways to create sophisticated logic to direct requests made to a single endpoint to various upstream services (or other APIs internally exposed within Tyk).

URL rewrite triggers and rules are explained in detail here.

When working with Tyk OAS APIs the rules and triggers are configured in the Tyk OAS API Definition; this can be done manually within the .json file or from the API Designer in the Tyk Dashboard.

If you’re using the legacy Tyk Classic APIs, then check out this page.

API Definition

The design of the Tyk OAS API Definition takes advantage of the operationId defined in the OpenAPI Document that declares both the path and method for which the middleware should be added. Endpoint paths entries (and the associated operationId) can contain wildcards in the form of any string bracketed by curly braces, for example /status/{code}. These wildcards are so they are human readable and do not translate to variable names. Under the hood, a wildcard translates to the “match everything” regex of: (.*).

The URl rewrite middleware can be added to the operations section of the Tyk OAS Extension (x-tyk-api-gateway) in your Tyk OAS API Definition for the appropriate operationId (as configured in the paths section of your OpenAPI Document).

Using the basic trigger

For the basic trigger, you only need to enable the middleware (set enabled:true) and then configure the pattern and the rewriteTo (target) URL. The design of the Tyk OAS API Definition takes advantage of the operationID defined in the OpenAPI Document that declares both the path and method required by the basic trigger.

 1
 2
 3
 4
 5
 6
 7
 8
 9
10
11
12
13
14
15
16
17
18
19
20
21
22
23
24
25
26
27
28
29
30
31
32
33
34
35
36
37
38
39
40
41
42
43
44
45
46
47
48
49
50
51
52
53
54
55
56
57
{
  "info": {
    "title": "example-url-rewrite",
    "version": "1.0.0"
  },
  "openapi": "3.0.3",
  "servers": [
    {
      "url": "http://localhost:8181/example-url-rewrite/"
    }
  ],
  "security": [],
  "paths": {
    "/json": {
      "get": {
        "operationId": "jsonget",
        "responses": {
          "200": {
            "description": ""
          }
        }
      }
    }
  },
  "components": {
    "securitySchemes": {}
  },
  "x-tyk-api-gateway": {
    "info": {
      "name": "example-url-rewrite",
      "state": {
        "active": true,
        "internal": false
      }
    },
    "middleware": {
      "operations": {
        "jsonget": {
          "urlRewrite": {
            "enabled": true,
            "pattern": "/(\\w+)/(\\w+)",
            "rewriteTo": "anything?value1=$1&value2=$2"
          }
        }
      }
    },
    "server": {
      "listenPath": {
        "strip": true,
        "value": "/example-url-rewrite/"
      }
    },
    "upstream": {
      "url": "http://httpbin.org/"
    }
  }
}

In this example the basic trigger has been configured to match the path for a request to the GET /json endpoint against the regex /(\w+)/(\w+). This is looking for two word groups in the path (after the API listen path) which, if found, will store the first string in context variable $1 and the second in $2. The request (target) URL will then be rewritten to anything?value1=$1&value2=$2.

If you send a request to GET http://localhost:8181/example-url-rewrite/json/hello

1
2
3
4
5
6
7
GET /example-url-rewrite/json/hello HTTP/1.1
User-Agent: PostmanRuntime/7.36.3
Accept: */*
Postman-Token: 1a84a792-f0c4-4c40-932a-795485cdd252
Host: localhost:8181
Accept-Encoding: gzip, deflate, br
Connection: keep-alive

The URL rewrite middleware will match the pattern: /json/hello -> /(\w+)/(\w+) -> $1 will take the value json and $2 will take the value hello

It will then rewrite the target URL to /anything?value1=json&value2=hello and httpbin.org will respond with:

 1
 2
 3
 4
 5
 6
 7
 8
 9
10
11
12
13
14
15
16
17
18
19
20
21
22
23
24
25
26
27
28
29
30
31
32
HTTP/1.1 200 OK
Access-Control-Allow-Credentials: true
Access-Control-Allow-Origin: *
Content-Length: 536
Content-Type: application/json
Date: Mon, 18 Mar 2024 17:37:40 GMT
Server: gunicorn/19.9.0
X-Ratelimit-Limit: 0
X-Ratelimit-Remaining: 0
X-Ratelimit-Reset: 0
 
{
"args": {
"value1": "json",
"value2": "hello"
},
"data": "",
"files": {},
"form": {},
"headers": {
"Accept": "*/*",
"Accept-Encoding": "gzip, deflate, br",
"Host": "httpbin.org",
"Postman-Token": "1a84a792-f0c4-4c40-932a-795485cdd252",
"User-Agent": "PostmanRuntime/7.36.3",
"X-Amzn-Trace-Id": "Root=1-65f87be4-18c50d554886f46f6b73d42b"
},
"json": null,
"method": "GET",
"origin": "::1, 85.9.213.196",
"url": "http://httpbin.org/anything?value1=json&value2=hello"
}

The configuration above is a complete and valid Tyk OAS API Definition that you can import into Tyk to try out the URL rewrite middleware.

Using advanced triggers

You can add advanced triggers to your URL rewriter configuration by adding the triggers element within the urlRewrite middleware configuration for the operation.

The triggers element is an array, with one entry per advanced trigger. For each of those triggers you configure:

  • condition to set the logical condition to be applied to the rules (any or all)
  • rules a list of rules for the trigger
  • rewriteTo the address to which the (target) URL should be rewritten if the trigger fires

The rules are defined using this format:

{
    "in": key_location,
    "name": key_name,
    "pattern": pattern,
    "negate": true/false //set to true to trigger if pattern does not match
}

Key locations are encoded as follows:

  • header - request header parameter
  • query - query parameter
  • path - path parameter (i.e. components of the path itself)
  • sessionMetadata - session metadata
  • requestBody- request body
  • requestContext- request context

For example:

 1
 2
 3
 4
 5
 6
 7
 8
 9
10
11
12
13
14
15
16
17
18
19
20
21
22
23
24
25
26
27
28
29
30
31
32
33
34
35
36
37
38
39
40
41
42
43
44
45
46
47
48
49
50
51
52
53
54
55
56
57
58
59
60
61
62
63
64
65
66
67
68
69
70
71
72
73
74
75
76
77
78
79
80
81
{
    "info": {
        "title": "example-url-rewrite2",
        "version": "1.0.0"
    },
    "openapi": "3.0.3",
    "paths": {
        "/json": {
            "get": {
                "operationId": "jsonget",
                "responses": {
                    "200": {
                        "description": ""
                    }
                }
            }
        }
    },
    "components": {},   
    "x-tyk-api-gateway": {
        "info": {
            "name": "example-url-rewrite2",
            "state": {
                "active": true,
                "internal": false
            }
        },
        "middleware": {
            "operations": {
                "jsonget": {
                    "urlRewrite": {
                        "enabled": true,
                        "pattern": "/(\\w+)/(\\w+)",
                        "rewriteTo": "anything?value1=$1&value2=$2",
                        "triggers": [
                            {
                                "condition": "all",
                                "rewriteTo": "anything?value1=$1&query=$tyk_context.trigger-0-numBytes-0",
                                "rules": [
                                    {
                                        "in": "query",
                                        "pattern": "[0-9]+",
                                        "negate": false,
                                        "name": "numBytes"
                                    },
                                    {
                                        "in": "header",
                                        "pattern": "true",
                                        "negate": true,
                                        "name": "x-bytes"
                                    }
                                ]
                            },
                            {
                                "condition": "any",
                                "rewriteTo": "bytes/$tyk_context.trigger-1-numBytes-0",
                                "rules": [
                                    {
                                        "in": "query",
                                        "pattern": "[0-9]+",
                                        "negate": false,
                                        "name": "numBytes"
                                    }
                                ]
                            }
                        ]
                    }
                }
            }
        },
        "server": {
            "listenPath": {
                "strip": true,
                "value": "/example-url-rewrite2/"
            }
        },
        "upstream": {
            "url": "http://httpbin.org/"
        } 
    }
}

In this example, the basic trigger is configured as before, but two advanced triggers have been added.

The first advanced trigger will fire if the request has this configuration:

  • query parameter numBytes is provided with a numeric value, AND
  • header parameter x-bytes is not set to true (note that negate is set to true in this rule)

Such a request will be redirected to /anything passing two query parameters

  • value1 with the first string matched in the basic trigger (i.e. json)
  • query with the value provided in the numBytes query parameter

The second advanced trigger will fire if the first doesn’t and if this condition is met:

  • query parameter numBytes is provided with a numeric value

Such a request will be redirected to /bytes/{numBytes}, which will return numBytes random bytes from httpbin.org.

If neither advanced trigger fires, then the basic trigger will redirect the request to /anything?value1=json&value2=hello as before.

The configuration above is a complete and valid Tyk OAS API Definition that you can import into Tyk to try out the URL rewrite middleware.

API Designer

Adding and configuring the URL rewrite feature to your API endpoints is easy when using the API Designer in the Tyk Dashboard, simply follow these steps:

  1. Add an endpoint

    From the API Designer add an endpoint that matches the path and method to which you want to apply the middleware.

    Tyk OAS API Designer showing no endpoints created

    Adding an endpoint to an API using the Tyk OAS API Designer

    Tyk OAS API Designer showing no middleware enabled on endpoint

  2. Select the URL Rewrite middleware

    Select ADD MIDDLEWARE and choose the URL Rewrite middleware from the Add Middleware screen.

    Adding the URL Rewrite middleware

  3. Configure the basic trigger

    Add the match pattern and the new URL to configure the basic trigger rule.

    Configuring the rewrite rule for the Basic Trigger

  4. Optionally configure advanced triggers

    You can optionally apply advanced triggers by selecting ADD TRIGGER for each trigger you wish to configure. For each advanced trigger you can add one or more rules, selecting ADD RULE to add the second, third, etc.

    Configuring the rewrite rules for Advanced Triggers

  5. Save the API

    Select ADD MIDDLEWARE to save the middleware configuration. Remember to select SAVE API to apply the changes.

Using Classic

Tyk’s URL rewriter uses the concepts of triggers and rules to determine if the request (target) URL should be modified. These can be combined in flexible ways to create sophisticated logic to direct requests made to a single endpoint to various upstream services (or other APIs internally exposed within Tyk).

URL rewrite triggers and rules are explained in detail here.

When working with Tyk Classic APIs the rules and triggers are configured in the Tyk Classic API Definition; this can be done manually within the .json file or from the API Designer in the Tyk Dashboard.

If you want to use dynamic data from context variables, you must enable context variables for the API to be able to access them from the request header transform middleware.

If you’re using the newer Tyk OAS APIs, then check out this page.

If you’re using Tyk Operator then check out the configuring the URL rewriter in Tyk Operator section below.

API Definition

To configure the URL rewriter you must add a new url_rewrites object to the extended_paths section of your API definition, for example:

{
    "url_rewrites": [
        {
            "path": "books/author",
            "method": "GET",
            "match_pattern": "(\w+)/(\w+)",
            "rewrite_to": "library/service?value1=$1&value2=$2"
        }
    ]
}

In this example the basic trigger has been configured to match the path for a request to the GET /books/author endpoint against the pure regex (\w+)/(\w+). This is looking for two word groups in the path which, if found, will store the first string (books) in context variable $1 and the second (author) in $2. The request (target) URL will then be rewritten to library/service?value1=books&value2=author ready for processing by the next middleware in the chain.

You can add advanced triggers to your URL rewriter configuration by adding the triggers element within the url_rewrites object.

The triggers element is an array, with one entry per advanced trigger. For each of those triggers you configure:

  • on to set the logical condition to be applied to the rules (any or all)
  • options a list of rules for the trigger
  • rewrite_to the address to which the (target) URL should be rewritten if the trigger fires

The rules are defined using this format:

{
    key_location: {
        key_name: {
            "match_rx": pattern
            "reverse": true/false (set to true to trigger if pattern does not match)
        }
    }
}

Key locations are encoded as follows:
- `header_matches` - request header parameter
- `query_val_matches` - query parameter
- `path_part_matches` - path parameter (i.e. components of the path itself)
- `session_meta_matches` - session metadata
- `payload_matches`- request body
- `request_context_matches`- request context

For example:

```json
{
    "url_rewrites": [
        {
            "path": "books/author",
            "method": "GET",
            "match_pattern": "(\w+)/(\w+)",
            "rewrite_to": "library/service?value1=$1&value2=$2",
            "triggers": [
                {
                    "on": "any",
                    "options": {
                        "query_val_matches": {
                            "genre": {
                                "match_rx": "fiction",
                                "reverse": false
                            }
                        }
                    },
                    "rewrite_to": "library/service/author?genre=$tyk_context.trigger-0-genre-0"
                },
                {
                    "on": "all",
                    "options": {
                        "header_matches": {
                            "X-Enable-Beta": {
                                "match_rx": "true",
                                "reverse": false
                            }
                        },
                        "session_meta_matches": {
                            "beta_enabled": {
                                "match_rx": "true",
                                "reverse": false
                            }
                        }
                    },
                    "rewrite_to": "https://beta.library.com/books/author"
                }
            ]
        }
    ]
}

In this example, the basic trigger is configured as before, but two advanced triggers have been added.

The first advanced trigger has this configuration:

  • key location is query parameter
  • key name is genre
  • pattern is fiction

So if a GET request is made to /books/author?genre=fiction the advanced trigger will fire and the URL will be rewritten to library/service/author?genre=fiction.

The second advanced trigger has this configuration:

  • rule condition: ALL
  • rule 1
    • key location is header parameter
    • key name is X-Enable-Beta
    • pattern is `true``
  • rule 2
    • key location is session metadata
    • key name is beta_enabled
    • pattern is true

So if a request is made to GET /books/author with a header "X-Enable-Beta":"true" and, within the session metadata, "beta_enabled":"true" the second advanced trigger will fire and the URL will be written to https://beta.library.com/books/author taking the request to a different upstream host entirely.

API Designer

You can use the API Designer in the Tyk Designer to configure the URL rewrite middleware for your Tyk Classic API by following these steps.

  1. Add an endpoint for the path and select the URL rewrite plugin

    From the Endpoint Designer add an endpoint that matches the path you want to rewrite. Select the URL Rewrite plugin.

    Endpoint designer

  2. Configure the basic trigger

    Add the regex capture groups and the new URL to the relevant sections.

    URL rewrite configuration

  3. Configure an advanced trigger

    You can optionally configure advanced triggers by using the Create Advanced Trigger option from the URL Rewriter plugin.

    You will see a screen like this:

    URL rewrite add trigger

    When triggers are added, you can edit or remove them inside the Advanced URL rewrite section:

    URL rewrite list trigger

  4. Save the API

    Use the save or create buttons to save the changes and activate the middleware.

Tyk Operator

The process for configuring the URL rewriter in Tyk Operator is similar to that explained in configuring the URL rewriter in the Tyk Classic API Definition. To configure the URL rewriter you must add a new url_rewrites object to the extended_paths section of your API definition.

The example API Definition provides the corresponding custom resource configuration for the Tyk Classic API Definition example, configuring an API to listen on path /url-rewrite and forward requests upstream to http://httpbin.org. The URL rewrites middleware would match the path for a request to the GET /anything/books/author endpoint against the pure regex /anything/(\w+)/(\w+). The request (target) URL will then be rewritten to /anything/library/service?value1=$1&value2=$2.

 1
 2
 3
 4
 5
 6
 7
 8
 9
10
11
12
13
14
15
16
17
18
19
20
21
22
23
24
25
26
27
28
29
30
31
apiVersion: tyk.tyk.io/v1alpha1
kind: ApiDefinition
metadata:
  name: url-rewrite
spec:
  name: URL Rewrite
  use_keyless: true
  protocol: http
  active: true
  proxy:
    target_url: http://httpbin.org
    listen_path: /url-rewrite
    strip_listen_path: true
  version_data:
    default_version: Default
    not_versioned: true
    versions:
      Default:
        name: Default
        use_extended_paths: true
        paths:
          black_list: []
          ignored: []
          white_list: []
        extended_paths:
          url_rewrites:
            - path: /anything/books/author
              match_pattern: /anything/(\w+)/(\w+)
              method: GET
              rewrite_to: /anything/library/service?value1=$1&value2=$2
              triggers: []

URL Rewrite Triggers can be specified in a similar way. The Tyk Operator example below is the equivalent for the advanced triggers example included in the configuring the URL rewriter in the Tyk Classic API Definition section above.

 1
 2
 3
 4
 5
 6
 7
 8
 9
10
11
12
13
14
15
16
17
18
19
20
21
22
23
24
25
26
27
28
29
30
31
32
33
34
35
36
37
38
39
40
41
42
43
44
45
46
47
48
49
apiVersion: tyk.tyk.io/v1alpha1
kind: ApiDefinition
metadata:
  name: url-rewrite-advanced
spec:
  name: URL Rewrite Advanced
  use_keyless: true
  protocol: http
  active: true
  proxy:
    target_url: http://httpbin.org
    listen_path: /url-rewrite
    strip_listen_path: true
  version_data:
    default_version: Default
    not_versioned: true
    versions:
      Default:
        name: Default
        use_extended_paths: true
        paths:
          black_list: []
          ignored: []
          white_list: []
        extended_paths:
          url_rewrites:
            - path: /anything/books/author
              match_pattern: /anything/(\w+)/(\w+)
              method: GET
              rewrite_to: /anything/library/service?value1=$1&value2=$2
              triggers: 
                - "on": "any"
                  "rewrite_to": "library/service/author?genre=$tyk_context.trigger-0-genre-0"
                  "options":
                    "query_val_matches": 
                      "genre": 
                          "match_rx": "fiction"
                          "reverse": false
                - "on": "all"
                  "options": 
                    "header_matches": 
                        "X-Enable-Beta": 
                            "match_rx": "true"
                            "reverse": false
                    "session_meta_matches": 
                        "beta_enabled": 
                            "match_rx": "true"
                            "reverse": false
                  "rewrite_to": "https://beta.library.com/books/author"

For further examples check out the internal looping page.

Virtual Endpoints

Overview

Tyk’s Virtual Endpoint is a programmable middleware component that is invoked towards the end of the request processing chain. It can be enabled at the per-endpoint level and can perform complex interactions with your upstream service(s) that cannot be handled by one of the other middleware components.

Virtual endpoint middleware provides a serverless compute function that allows for the execution of custom logic directly within the gateway itself, without the need to proxy the request to an upstream service. This functionality is particularly useful for a variety of use cases, including request transformation, aggregation of responses from multiple services, or implementing custom authentication mechanisms.

The Virtual Endpoint is an extremely powerful feature that is unique to Tyk and provides exceptional flexibility to your APIs.

Use Cases

Aggregating data from multiple services

From a virtual endpoint, you can make calls out to other internal and upstream APIs. You can then aggregate and process the responses, returning a single response object to the originating client. This allows you to configure a single externally facing API to simplify interaction with multiple internal services, leaving the heavy lifting to Tyk rather than starting up an aggregation service within your stack.

Enforcing custom policies

Tyk provides a very flexible middleware chain where you can combine functions to implement the access controls you require to protect your upstream services. Of course, not all scenarios can be covered by Tyk’s standard middleware functions, but you can use a virtual endpoint to apply whatever custom logic you require to optimize your API experience.

Dynamic Routing

With a virtual endpoint you can implement complex dynamic routing of requests made to a single external endpoint on to different upstream services. The flexibility of the virtual endpoint gives access to data within the request (including the key session) and also the ability to make calls to other APIs to make decisions on the routing of the request. It can operate as a super-powered URL rewrite middleware.

Working

The virtual endpoint middleware provides a JavaScript engine that runs the custom code that you provide either inline within the API definition or in a source code file accessible to the Gateway. The JavaScript Virtual Machine (JSVM) provided in the middleware is a traditional ECMAScript5 compatible environment which does not offer the more expressive power of something like Node.js.

The virtual endpoint terminates the request, so the JavaScript function must provide the response to be passed to the client. When a request hits a virtual endpoint, the JSVM executes the JavaScript code which can modify the request, make calls to other APIs or upstream services, process data, and ultimately determines the response returned to the client.

Note

You will need to enable Tyk’s JavaScript Virtual Machine by setting enable_jsvm to true in your tyk.conf file for your virtual endpoints to work.

Scripting virtual endpoint functions

The middleware scripting guide provides guidance on writing JS functions for your virtual endpoints, including how to access key session data and custom attributes from the API definition.

Function naming

The virtual endpoint middleware will invoke a named function within the JS code that you provide (either inline or in a file). Both the filename and function name are configurable per endpoint, but note that function names must be unique across your API portfolio because all plugins run in the same virtual machine. This means that you can share a single function definition across multiple endpoints and APIs but you cannot have two different functions with the same name (this applies across all JavaScript middleware components).

Inline mode is mainly used by the dashboard to make code injection easier on multiple node deployments.

Virtual endpoint library

We have put together a library of JS functions that you could use in your virtual endpoints. We welcome submissions from the Tyk community so if you’ve created a function that you think would be useful to other users, please open an issue in the Github repository and we can discuss bringing it into the library.

Note

Virtual endpoints are not available in Tyk Cloud Classic.


If you’re using Tyk OAS APIs, then you can find details and examples of how to configure the virtual endpoint middleware here.

If you’re using Tyk Classic APIs, then you can find details and examples of how to configure the virtual endpoint middleware here.

Using Tyk OAS

The virtual endpoint middleware provides a serverless compute function that allows for the execution of custom logic directly within the gateway itself, without the need to proxy the request to an upstream service. This functionality is particularly useful for a variety of use cases, including request transformation, aggregation of responses from multiple services, or implementing custom authentication mechanisms.

The middleware is configured in the Tyk OAS API Definition. You can do this via the Tyk Dashboard API or in the API Designer.

If you’re using the legacy Tyk Classic APIs, then check out the Tyk Classic page.

API Definition

The design of the Tyk OAS API Definition takes advantage of the operationId defined in the OpenAPI Document that declares both the path and method for which the middleware should be added. Endpoint paths entries (and the associated operationId) can contain wildcards in the form of any string bracketed by curly braces, for example /status/{code}. These wildcards are so they are human readable and do not translate to variable names. Under the hood, a wildcard translates to the “match everything” regex of: (.*).

The virtual endpoint middleware (virtualEndpoint) can be added to the operations section of the Tyk OAS Extension (x-tyk-api-gateway) in your Tyk OAS API Definition for the appropriate operationId (as configured in the paths section of your OpenAPI Document).

The virtualEndpoint object has the following configuration:

  • enabled: enable the middleware for the endpoint
  • functionName: the name of the JavaScript function that will be executed when the virtual endpoint is triggered
  • body: [optional] a base64 encoded string containing the JavaScript code
  • path: [optional] the relative path to the source file containing the JavaScript code
  • proxyOnError: [optional, defaults to false] a boolean that determines the behavior of the gateway if an error occurs during the execution of the virtual endpoint’s function; if set to true the request will be proxied to upstream if the function errors, if set to false the request will not be proxied and Tyk will return an error response
  • requireSession: [optional defaults to false] a boolean that indicates whether the virtual endpoint should have access to the session object; if true then the key session data will be provided to the function as the session variable

Note

One of either path or body must be provided, depending on whether you are providing the JavaScript code in a file or inline within the API definition. If both are provided then body will take precedence.

For example:

 1
 2
 3
 4
 5
 6
 7
 8
 9
10
11
12
13
14
15
16
17
18
19
20
21
22
23
24
25
26
27
28
29
30
31
32
33
34
35
36
37
38
39
40
41
42
43
44
45
46
47
48
49
50
51
52
53
54
55
56
57
58
59
60
61
62
63
{
    "components": {},
    "info": {
        "title": "example-virtual-endpoint",
        "version": "1.0.0"
    },
    "openapi": "3.0.3",
    "paths": {
        "/anything": {
            "get": {
                "operationId": "anythingget",
                "responses": {
                    "200": {
                        "description": ""
                    }
                }
            }
        }
    },
    "x-tyk-api-gateway": {
        "info": {
            "name": "example-virtual-endpoint",
            "state": {
                "active": true,
                "internal": false
            }
        },
        "upstream": {
            "url": "http://httpbin.org/"
        },          
        "server": {
            "listenPath": {
                "value": "/example-virtual-endpoint/",                
                "strip": true
            }
        },      
        "middleware": {
            "global": {
                "pluginConfig": {
                    "data": {
                        "enabled": true,
                        "value": {
                            "map": {
                                "key": 3
                            },
                        "num": 4,
                        "string": "example"
                        }
                    }
                }
            },
            "operations": {
                "anythingget": {
                    "virtualEndpoint": {
                        "enabled": true,
                        "functionName": "myVirtualHandler",
                        "body": "ZnVuY3Rpb24gbXlWaXJ0dWFsSGFuZGxlciAocmVxdWVzdCwgc2Vzc2lvbiwgY29uZmlnKSB7ICAgICAgCiAgdmFyIHJlc3BvbnNlT2JqZWN0ID0gewogICAgQm9keTogIlZpcnR1YWwgRW5kcG9pbnQgIitjb25maWcuY29uZmlnX2RhdGEuc3RyaW5nLAogICAgSGVhZGVyczogewogICAgICAiZm9vLWhlYWRlciI6ICJiYXIiLAogICAgICAibWFwLWhlYWRlciI6IEpTT04uc3RyaW5naWZ5KGNvbmZpZy5jb25maWdfZGF0YS5tYXApLAogICAgICAic3RyaW5nLWhlYWRlciI6IGNvbmZpZy5jb25maWdfZGF0YS5zdHJpbmcsCiAgICAgICJudW0taGVhZGVyIjogSlNPTi5zdHJpbmdpZnkoY29uZmlnLmNvbmZpZ19kYXRhLm51bSkKICAgIH0sCiAgICBDb2RlOiAyMDAKICB9CiAgcmV0dXJuIFR5a0pzUmVzcG9uc2UocmVzcG9uc2VPYmplY3QsIHNlc3Npb24ubWV0YV9kYXRhKQp9"
                    }
                }
            }
        }
    }
}

In this example the virtual endpoint middleware has been configured for requests to the GET /anything endpoint. We have also configured the following custom attributes in the pluginConfig section of the API definition:

{
    "map": {
        "key": 3
    },
    "num": 4,
    "string": "example"
}

The body field value is a base64 encoded string containing this JavaScript code, which will be invoked by the virtual endpoint middleware:

function myVirtualHandler (request, session, config) {      
  var responseObject = {
    Body: "Virtual Endpoint "+config.config_data.string,
    Headers: {
      "foo-header": "bar",
      "map-header": JSON.stringify(config.config_data.map),
      "string-header": config.config_data.string,
      "num-header": JSON.stringify(config.config_data.num)
    },
    Code: 200
  }
  return TykJsResponse(responseObject, session.meta_data)
}

A call to the GET /anything endpoint returns:

HTTP/1.1 200 OK
Date: Fri, 01 Mar 2024 12:14:36 GMT
Foo-Header: bar
Map-Header: {"key":3}
Num-Header: 4
Server: tyk
String-Header: example
Content-Length: 24
Content-Type: text/plain; charset=utf-8
 
Virtual Endpoint example

The configuration above is a complete and valid Tyk OAS API Definition that you can import into Tyk to try out the virtual endpoint middleware.

API Designer

Adding a Virtual Endpoint to your API endpoints is easy when using the API Designer in the Tyk Dashboard, simply follow these steps:

  1. Add an endpoint

    From the API Designer add an endpoint that matches the path and method to which you want to apply the middleware.

    Tyk OAS API Designer showing no endpoints created

    Adding an endpoint to an API using the Tyk OAS API Designer

    Tyk OAS API Designer showing no middleware enabled on endpoint

  2. Select the Virtual Endpoint middleware

    Select ADD MIDDLEWARE and choose Virtual Endpoint from the Add Middleware screen.

    Adding the Virtual Endpoint middleware

  3. Configure the middleware

    Now you can provide either the path to a file containing the JavaScript function to be run by the middleare, or you can directly enter the JavaScript in the code editor.

    For both sources, you must provide the function name that should be called when the middleware executes.

    You can also optionally configure the behavior required if the function should return an error and also indicate to Tyk whether the virtual middleware requires access to the key session metadata.

    Configuring the Virtual Endpoint middleware

  4. Save the API

    Select ADD MIDDLEWARE to save the middleware configuration. Remember to select SAVE API to apply the changes.

Using Classic

The virtual endpoint middleware provides a serverless compute function that allows for the execution of custom logic directly within the gateway itself, without the need to proxy the request to an upstream service. This functionality is particularly useful for a variety of use cases, including request transformation, aggregation of responses from multiple services, or implementing custom authentication mechanisms.

This middleware is configured in the Tyk Classic API Definition. You can do this via the Tyk Dashboard API or in the API Designer.

If you’re using the newer Tyk OAS APIs, then check out the Tyk OAS page.

If you’re using Tyk Operator then check out the configuring the middleware in Tyk Operator section below.

API Definition

If you want to use Virtual Endpoints, you must enable Tyk&rsquo;s JavaScript Virtual Machine by setting enable_jsvm to true in your tyk.conf file.

To enable the middleware you must add a new virtual object to the extended_paths section of your API definition.

The virtual object has the following configuration:

  • path: the endpoint path
  • method: the endpoint HTTP method
  • response_function_name: this is the name of the JavaScript function that will be executed when the virtual endpoint is triggered
  • function_source_type: instructs the middleware to look for the JavaScript code either in a file or in a base64 encoded blob; the actual file location (or base64 encoded code) is provided in function_source_uri
  • function_source_uri: if function_source_type is set to file, this will be the relative path to the source file containing the JavaScript code; if function_source_type if set to blob, this will be a base64 encoded string containing the JavaScript code
  • use_session: a boolean that indicates whether the virtual endpoint should have access to the session object; if true then the key session data will be provided to the function as the session variable
  • proxy_on_error: a boolean that determines the behavior of the gateway if an error occurs during the execution of the virtual endpoint’s function; if set to true the request will be proxied to upstream if the function errors, if set to false the request will not be proxied and Tyk will return an error response

For example:

 1
 2
 3
 4
 5
 6
 7
 8
 9
10
11
12
13
14
15
{
    "extended_paths": {
        "virtual": [
            {
                "response_function_name": "myUniqueFunctionName",
                "function_source_type": "blob",
                "function_source_uri": "ZnVuY3Rpb24gbXlVbmlxdWVGdW5jdGlvbk5hbWUocmVxdWVzdCwgc2Vzc2lvbiwgY29uZmlnKSB7CiB2YXIgcmVzcG9uc2VPYmplY3QgPSB7IAogIEJvZHk6ICJUSElTIElTIEEgVklSVFVBTCBSRVNQT05TRSIsIAogIENvZGU6IDIwMCAKIH0KIHJldHVybiBUeWtKc1Jlc3BvbnNlKHJlc3BvbnNlT2JqZWN0LCBzZXNzaW9uLm1ldGFfZGF0YSkKfQ==",
                "path": "/anything",
                "method": "GET",
                "use_session": false,
                "proxy_on_error": false
            }
        ]
    }
}

In this example the Virtual Endpoint middleware has been configured for requests to the GET /anything endpoint. For any call made to this endpoint, Tyk will invoke the function myUniqueFunctionName that is base64 encoded in the function_source_uri field. This virtual endpoint does not require access to the session data and will not proxy the request on to the upstream if there is an error when processing the myUniqueFunctionName function.

Decoding the value in function_source_uri we can see that the JavaScript code is:

1
2
3
4
5
6
7
function myUniqueFunctionName(request, session, config) {
 var responseObject = { 
  Body: "THIS IS A VIRTUAL RESPONSE", 
  Code: 200 
 }
 return TykJsResponse(responseObject, session.meta_data)
}

This function will terminate the request without proxying it to the upstream returning HTTP 200 as follows:

HTTP/1.1 200 OK
Date: Wed, 28 Feb 2024 20:52:30 GMT
Server: tyk
Content-Type: text/plain; charset=utf-8
Content-Length: 26
 
THIS IS A VIRTUAL RESPONSE

If, however, we introduce an error to the JavaScript, such that Tyk fails to process the function, we will receive an HTTP 500 Internal Server Error as follows:

HTTP/1.1 500 Internal Server Error
Date: Wed, 28 Feb 2024 20:55:27 GMT
Server: tyk
Content-Type: application/json
Content-Length: 99
 
{
"error": "Error during virtual endpoint execution. Contact Administrator for more details."
}

If we set proxy_on_error to true and keep the error in the Javascript, the request will be forwarded to the upstream and Tyk will return the response received from that service.

API Designer

You can use the API Designer in the Tyk Dashboard to configure a virtual endpoint for your Tyk Classic API by following these steps.

  1. Add an endpoint for the path and select the plugin

    From the Endpoint Designer add an endpoint that matches the path for which you want to trigger the virtual endpoint. Select the Virtual Endpoint plugin.

    Selecting the middleware

  2. Configure the middleware

    Once you have selected the virtual endpoint middleware for the endpoint, you need to supply:

    • JS function to call
    • Source type (file or inline)

    If you select source type file you must provide the path to the file:

    Configuring file based JS code

    If you select inline you can enter the JavaScript code in the Code Editor window.

    Configuring inline JS code

  3. Save the API

    Use the save or create buttons to save the changes and activate the Virtual Endpoint middleware.

Note

The Tyk Classic API Designer does not provide options to configure use_session or proxy_on_error, but you can do this from the Raw Definition editor.

Tyk Operator

The process for configuring a virtual endpoint using Tyk Operator is similar to that explained in configuring the middleware in the Tyk Classic API Definition

The example API Definition below configures an API to listen on path /httpbin and forwards requests upstream to http://httpbin.org. The Virtual Endpoint middleware has been configured for requests to the GET /virtual endpoint. For any call made to this endpoint, Tyk will invoke the function myVirtualHandler that is base64 encoded in the function_source_uri field. This virtual endpoint does not require access to the session data and will not proxy the request on to the upstream if there is an error when processing the myVirtualHandler function.

 1
 2
 3
 4
 5
 6
 7
 8
 9
10
11
12
13
14
15
16
17
18
19
20
21
22
23
24
25
26
27
28
29
30
31
32
33
34
35
apiVersion: tyk.tyk.io/v1alpha1
kind: ApiDefinition
metadata:
  name: test-config-data-test
spec:
  name: test-config-data-test
  protocol: http
  proxy:
    listen_path: /httpbin/
    target_url: http://httpbin.org
    strip_listen_path: true
  active: true
  use_keyless: true
  enable_context_vars: true
  version_data:
    default_version: Default
    not_versioned: false
    versions:
      Default:
        name: Default
        use_extended_paths: true
        extended_paths:
          virtual:
            - function_source_type: blob
              response_function_name: myVirtualHandler
              function_source_uri: "ZnVuY3Rpb24gbXlWaXJ0dWFsSGFuZGxlciAocmVxdWVzdCwgc2Vzc2lvbiwgY29uZmlnKSB7ICAgICAgCiAgdmFyIHJlc3BvbnNlT2JqZWN0ID0gewogICAgQm9keTogIlRISVMgSVMgQSAgVklSVFVBTCBSRVNQT05TRSIsCiAgICBIZWFkZXJzOiB7CiAgICAgICJmb28taGVhZGVyIjogImJhciIsCiAgICAgICJtYXAtaGVhZGVyIjogSlNPTi5zdHJpbmdpZnkoY29uZmlnLmNvbmZpZ19kYXRhLm1hcCksCiAgICAgICJzdHJpbmctaGVhZGVyIjogY29uZmlnLmNvbmZpZ19kYXRhLnN0cmluZywKICAgICAgIm51bS1oZWFkZXIiOiBKU09OLnN0cmluZ2lmeShjb25maWcuY29uZmlnX2RhdGEubnVtKQogICAgfSwKICAgICAgQ29kZTogMjAwCiAgfQogIHJldHVybiBUeWtKc1Jlc3BvbnNlKHJlc3BvbnNlT2JqZWN0LCBzZXNzaW9uLm1ldGFfZGF0YSkKfQ=="
              path: /virtual
              method: GET
              use_session: false
              proxy_on_error: false
  config_data:
    string: "string"
    map:
      key: 3
    num: 4

Decoding the value in function_source_uri we can see that the JavaScript code is:

function myVirtualHandler (request, session, config) {      
  var responseObject = {
    Body: "THIS IS A  VIRTUAL RESPONSE",
    Headers: {
      "foo-header": "bar",
      "map-header": JSON.stringify(config.config_data.map),
      "string-header": config.config_data.string,
      "num-header": JSON.stringify(config.config_data.num)
    },
    Code: 200
  }
  return TykJsResponse(responseObject, session.meta_data)
}

This function will terminate the request without proxying it to the upstream, returning HTTP 200 as follows:

HTTP/1.1 200 OK
Date: Wed, 14 Aug 2024 15:37:46 GMT
Foo-Header: bar
Map-Header: {"key":3}
Num-Header: 4
Server: tyk
String-Header: string
Content-Length: 27
Content-Type: text/plain; charset=utf-8
 
THIS IS A VIRTUAL RESPONSE

If, however, we introduce an error to the JavaScript, such that Tyk fails to process the function, we will receive an HTTP 500 Internal Server Error as follows:

HTTP/1.1 500 Internal Server Error
Date: Wed, 14 Aug 2024 15:37:46 GMT
Server: tyk
Content-Type: application/json
Content-Length: 99
 
{
"error": "Error during virtual endpoint execution. Contact Administrator for more details."
}

If we set proxy_on_error to true and keep the error in the Javascript, the request will be forwarded to the upstream and Tyk will return the response received from that service.

Examples

Accessing Tyk data objects

In this example, we demonstrate how you can access different external Tyk objects (API request, session key, API definition).

  1. Enable the Virtual Endpoint middleware on an endpoint of your API and paste this JavaScript into the API Designer (or save in a file and reference it from the middleware config):
function myFirstVirtualHandler (request, session, config) {
  log("Virtual Test running")
  
  log("Request Body: " + request.Body)
  log("Session: " + JSON.stringify(session.allowance))
  log("Config: " + JSON.stringify(config.APIID))
  log("param-1: " + request.Params["param1"]) // case sensitive
  log("auth Header: " + request.Headers["Authorization"]) // case sensitive
  
  var responseObject = {
    Body: "VIRTUAL ENDPOINT EXAMPLE #1",
    Headers: {
      "x-test": "virtual-header",
      "x-test-2": "virtual-header-2"
    },
    Code: 200
  }
  
  return TykJsResponse(responseObject, session.meta_data)   
}
log("Virtual Test initialised")
  1. Make a call to your API endpoint passing a request body, a value in the Authorization header and a query parameter param1.

  2. The virtual endpoint will terminate the request and return this response:

HTTP/1.1 200 OK
Date: Thu, 29 Feb 2024 17:39:00 GMT
Server: tyk
X-Test: virtual-header
X-Test-2: virtual-header-2
Content-Length: 27
Content-Type: text/plain; charset=utf-8
 
VIRTUAL ENDPOINT EXAMPLE #1
  1. The gateway logs will include:
time="" level=info msg="Virtual Test running" prefix=jsvm type=log-msg
time="" level=info msg="Request Body: <your-request-body>" prefix=jsvm type=log-msg
time="" level=info msg="Session: <allowance-from-your-session-key>" prefix=jsvm type=log-msg
time="" level=info msg="Config: <your-APIID>" prefix=jsvm type=log-msg
time="" level=info msg="param-1: <your_query_parameter>" prefix=jsvm type=log-msg
time="" level=info msg="auth Header: <your-auth-header>" prefix=jsvm type=log-msg

Accessing custom attributes in the API Definition

You can add custom attributes to the API definition and access these from within your Virtual Endpoint.

  1. Add the following custom attributes to your API definition:
{
  "string": "string",
  "map": {
    " key": 3
  },
  "num": 4
}
  1. Enable the Virtual Endpoint middleware on an endpoint of your API and paste this JavaScript into the API Designer (or save in a file and reference it from the middleware config):
function mySecondVirtualHandler (request, session, config) {      
  var responseObject = {
    Body: "VIRTUAL ENDPOINT EXAMPLE #2",
    Headers: {
      "foo-header": "bar",
      "map-header": JSON.stringify(config.config_data.map),
      "string-header": config.config_data.string,
      "num-header": JSON.stringify(config.config_data.num)
    },
      Code: 200
  }
  return TykJsResponse(responseObject, session.meta_data)
}
  1. Make a call to your API endpoint.

  2. The virtual endpoint will terminate the request and return this response:

HTTP/1.1 200 OK
Date: Thu, 29 Feb 2024 17:29:12 GMT
Foo-Header: bar
Map-Header: {" key":3}
Num-Header: 4
Server: tyk
String-Header: string
Content-Length: 26
Content-Type: text/plain; charset=utf-8
 
VIRTUAL ENDPOINT EXAMPLE #2

Advanced example

In this example, every line in the script gives an example of a functionality usage, including:

  • how to get form param
  • how to get to a specific key inside a JSON variable
  • the structure of the request object
  • using TykMakeHttpRequest to make an HTTP request from within the virtual endpoint, and the json it returns - .Code and .Body.
function myVirtualHandlerGetHeaders (request, session, config) {
  rawlog("Virtual Test running")
    
  //Usage examples:
  log("Request Session: " + JSON.stringify(session))
  log("API Config:" + JSON.stringify(config))
 
  log("Request object: " + JSON.stringify(request))   
  log("Request Body: " + JSON.stringify(request.Body))
  log("Request Headers:" + JSON.stringify(request.Headers))
  log("param-1:" + request.Params["param1"])
    
  log("Request header type:" + typeof JSON.stringify(request.Headers))
  log("Request header:" + JSON.stringify(request.Headers.Location))
    

  //Make api call to upstream target
  newRequest = {
    "Method": "GET",
    "Body": "",
    "Headers": {"location":JSON.stringify(request.Headers.Location)},
    "Domain": "http://httpbin.org",
    "Resource": "/headers",
    "FormData": {}
  };
  rawlog("--- before get to upstream ---")
  response = TykMakeHttpRequest(JSON.stringify(newRequest));
  rawlog("--- After get to upstream ---")
  log("response type: " + typeof response);
  log("response: " + response);
  usableResponse = JSON.parse(response);
  var bodyObject = JSON.parse(usableResponse.Body);
    
  var responseObject = {
    //Body: "THIS IS A VIRTUAL RESPONSE",
    Body: "yo yo",
    Headers: {
      "test": "virtual",
      "test-2": "virtual",
      "location" : bodyObject.headers.Location
    },
    Code: usableResponse.Code
  }
    
  rawlog("Virtual Test ended")
  return TykJsResponse(responseObject, session.meta_data)   
}

Running the Advanced example

You can find a Tyk Classic API definition here that includes the advanced example, with the JS encoded inline within the middleware config for the GET /headers endpoint.

Create a new Tyk Classic API using that API definition and then run the following command to send a request to the API endpoint:

curl http://tyk-gateway:8080/testvirtualendpoint2/headers -H "location: /get" -v

This should return the following:

Trying 127.0.0.1...
TCP_NODELAY set
Connected to tyk-gateway (127.0.0.1) port 8080 (#0)
GET /testvirtualendpoint2/headers HTTP/1.1
Host: tyk-gateway:8080
User-Agent: curl/7.54.0
Accept: */*
location: /get

HTTP/1.1 200 OK
Date: Fri, 08 Jun 2018 21:53:57 GMT
**Location: /get**
Server: tyk
Test: virtual
Test-2: virtual
Content-Length: 5
Content-Type: text/plain; charset=utf-8

Connection #0 to host tyk-gateway left intact
yo yo

Checking the Tyk Gateway Logs

The log and rawlog commands in the JS function write to the Tyk Gateway logs. If you check the logs you should see the following:

[Jun 13 14:45:21] DEBUG jsvm: Running: myVirtualHandlerGetHeaders
Virtual Test running
[Jun 13 14:45:21]  INFO jsvm-logmsg: Request Session: {"access_rights":null,"alias":"","allowance":0,"apply_policies":null,"apply_policy_id":"","basic_auth_data":{"hash_type":"","password":""},"certificate":"","data_expires":0,"enable_detail_recording":false,"expires":0,"hmac_enabled":false,"hmac_string":"","id_extractor_deadline":0,"is_inactive":false,"jwt_data":{"secret":""},"last_check":0,"last_updated":"","meta_data":null,"monitor":{"trigger_limits":null},"oauth_client_id":"","oauth_keys":null,"org_id":"","per":0,"quota_max":0,"quota_remaining":0,"quota_renewal_rate":0,"quota_renews":0,"rate":0,"session_lifetime":0,"tags":null} type=log-msg
[Jun 13 14:45:21]  INFO jsvm-logmsg: API Config:{"APIID":"57d72796c5de45e649f22da390d7df43","OrgID":"5afad3a0de0dc60001ffdd07","config_data":{"bar":{"y":3},"foo":4}} type=log-msg
[Jun 13 14:45:21]  INFO jsvm-logmsg: Request object: {"Body":"","Headers":{"Accept":["*/*"],"Location":["/get"],"User-Agent":["curl/7.54.0"]},"Params":{"param1":["I-am-param-1"]},"URL":"/testvirtualendpoint2/headers"} type=log-msg
[Jun 13 14:45:21]  INFO jsvm-logmsg: Request Body: "" type=log-msg
[Jun 13 14:45:21]  INFO jsvm-logmsg: Request Headers:{"Accept":["*/*"],"Location":["/get"],"User-Agent":["curl/7.54.0"]} type=log-msg
[Jun 13 14:45:21]  INFO jsvm-logmsg: param-1:I-am-param-1 type=log-msg
[Jun 13 14:45:21]  INFO jsvm-logmsg: Request header type:[object Object] type=log-msg
[Jun 13 14:45:21]  INFO jsvm-logmsg: Request header: ["/get"] type=log-msg
[Jun 13 14:45:21]  INFO jsvm-logmsg: Request location type: object type=log-msg
[Jun 13 14:45:21]  INFO jsvm-logmsg: Request location type: string type=log-msg
[Jun 13 14:45:21]  INFO jsvm-logmsg: Request location: /get type=log-msg
--- before get to upstream ---
--- After get to upstream ---
[Jun 13 14:45:22]  INFO jsvm-logmsg: response type: string type=log-msg
[Jun 13 14:45:22]  INFO jsvm-logmsg: response: {"Code":200,"Body":"{\"headers\":{\"Accept-Encoding\":\"gzip\",\"Connection\":\"close\",\"Host\":\"httpbin.org\",\"Location\":\"/get\",\"User-Agent\":\"Go-http-client/1.1\"}}\n","Headers":{"Access-Control-Allow-Credentials":["true"],"Access-Control-Allow-Origin":["*"],"Content-Length":["133"],"Content-Type":["application/json"],"Date":["Wed, 13 Jun 2018 13:45:21 GMT"],"Server":["gunicorn/19.8.1"],"Via":["1.1 vegur"]},"code":200,"body":"{\"headers\":{\"Accept-Encoding\":\"gzip\",\"Connection\":\"close\",\"Host\":\"httpbin.org\",\"Location\":\"/get\",\"User-Agent\":\"Go-http-client/1.1\"}}\n","headers":{"Access-Control-Allow-Credentials":["true"],"Access-Control-Allow-Origin":["*"],"Content-Length":["133"],"Content-Type":["application/json"],"Date":["Wed, 13 Jun 2018 13:45:21 GMT"],"Server":["gunicorn/19.8.1"],"Via":["1.1 vegur"]}} type=log-msg
Virtual Test ended
[Jun 13 14:45:22] DEBUG JSVM Virtual Endpoint execution took: (ns) 191031553

Aggregating upstream calls using batch processing

One of the most common use cases for virtual endpoints is to provide some form of aggregate data to your users, combining the responses from multiple upstream service calls. This virtual endpoint function will do just that using the batch processing function from the JavaScript API

function batchTest(request, session, config) {
  // Set up a response object
  var response = {
    Body: "",
    Headers: {
      "test": "virtual-header-1",
      "test-2": "virtual-header-2",
      "content-type": "application/json"
    },
    Code: 200
  }
    
  // Batch request
  var batch = {
    "requests": [
      {
        "method": "GET",
        "headers": {
          "x-tyk-test": "1",
          "x-tyk-version": "1.2",
          "authorization": "1dbc83b9c431649d7698faa9797e2900f"
        },
        "body": "",
        "relative_url": "http://httpbin.org/get"
      },
      {
        "method": "GET",
        "headers": {},
        "body": "",
        "relative_url": "http://httpbin.org/user-agent"
      }
    ],
    "suppress_parallel_execution": false
  }
    
  log("[Virtual Test] Making Upstream Batch Request")
  var newBody = TykBatchRequest(JSON.stringify(batch))
    
  // We know that the requests return JSON in their body, lets flatten it
  var asJS = JSON.parse(newBody)
  for (var i in asJS) {
    asJS[i].body = JSON.parse(asJS[i].body)
  }
    
  // We need to send a string object back to Tyk to embed in the response
  response.Body = JSON.stringify(asJS)
    
  return TykJsResponse(response, session.meta_data)
    
}
log("Batch Test initialised")                

Transformation Use Case: SOAP To REST

You can transform an existing SOAP service to a JSON REST service. This can be done from the Tyk Dashboard with no coding involved and should take around 10 minutes to perform the transform.

We also have a video which walks you through the SOAP to REST transform.

Prerequisites

An existing SOAP service and the WSDL definition. For this example, we will use:

  1. Import the WSDL API

    1. Select APIs from the System Management menu

      APIs Menu

    2. Click Import API

      img src="/img/2.10/import_api_button.png" alt=“Import API” >}}

    3. Select From WSDL from the Import an API Definition window

    4. In the Upstream Target field, enter https://www.dataaccess.com/webservicesserver/numberconversion.wso as listed in the Prerequisites.

    5. Paste the WSDL definition from the link in Prerequisites

    6. Click Generate API. You should now have an API named NumberConversion in your API list

      img src="/img/2.10/numberservice_api.png" alt=“NumberService API” >}}

  2. Add the transforms to an Endpoint

    1. From the API list, select Edit from the Actions menu for the NumberConversion API

    2. Select the Endpoint Designer tab. You should see 2 POST endpoints that were imported. We will apply the transforms to the NumberToWords endpoint.

      Endpoints

    3. Expand the NumberToWords endpoint. The following plugins should have been added as part of the import process.

      • URL rewrite
      • Track endpoint

      Note

      To make the URL a little friendlier, we’re going to amend the Relative Path to just /NumberToWords. Update your API after doing this.

    4. Add the following plugins from the Plugins drop-down list:

      • Body transform
      • Modify headers
  3. Modify the Body Transform Plugin

    Set up the Request

    We use the {{.FieldName}} Golang template syntax to access the JSON request. For this template we will use {{.numberToConvert}}.

    1. Expand the Body transform plugin. From the Request tab, copy the following into the Template section:
    <soapenv:Envelope xmlns:soapenv="http://schemas.xmlsoap.org/soap/envelope/" xmlns:web="http://www.dataaccess.com/webservicesserver/">
    <soapenv:Header/>
    <soapenv:Body>
        <web:NumberToDollars>
            <web:dNum>{{.numberToConvert}}</web:dNum>
        </web:NumberToDollars>
    </soapenv:Body>
    </soapenv:Envelope>
    
    1. In the Input field, enter the following:
    {
        "numberToConvert": 35
    }
    

    Note

    The ‘35’ integer can be any number you want to convert

    1. Click Test. You should get the following in the Output field:
    <soapenv:Envelope xmlns:soapenv="http://schemas.xmlsoap.org/soap/envelope/" xmlns:web="http://www.dataaccess.com/webservicesserver/">
    <soapenv:Header/>
    <soapenv:Body>
        <web:NumberToDollars>
            <web:dNum>35</web:dNum>
        </web:NumberToDollars>
    </soapenv:Body>
    </soapenv:Envelope>
    

    Set up the Response

    Again, for the response, we will be using the {{.FieldName}} syntax as the following {{.Envelope.Body.NumberToDollarsResponse.NumberToDollarsResult}}

    1. For the Input Type, select XML

    Response Input Type

    1. In the Template section enter:
    {
        "convertedNumber": "{{.Envelope.Body.NumberToDollarsResponse.NumberToDollarsResult}}"
    }
    
    1. Enter the following into the input field:
    <soap12:Envelope xmlns:soap12="http://www.w3.org/2003/05/soap-envelope">
    <soap12:Body>
        <NumberToDollarsResponse xmlns="http://www.dataaccess.com/webservicesserver/">
        <NumberToDollarsResult>thirty five dollars</NumberToDollarsResult>
        </NumberToDollarsResponse>
    </soap12:Body>
    </soap12:Envelope>
    
    1. Click Test. You should get the following in the Output field:
    {
        "convertedNumber": "thirty five dollars"
    }
    
  4. Change the Content-Type Header

    We now need to change the content-type header to allow the SOAP service to receive the payload in XML. We do this by using the Modify header plugin

    1. Expand the Modify Header plugin

    2. From the Request tab enter the following in the Add this header section

      • Header Name: content-type
      • Header Value: text/xml
    3. Click Add

      Modify Header Request

    4. From the Response tab enter the following in the Add this header section

      • Header Name: content-type
      • Header Value: application/json

      Modify Header Response

    5. Click Add

    6. Click Update

    Update API

Testing the Endpoint

You now need to test the endpoint. We are going to use Postman.

Note

We have not set up any Authentication for this API, it has defaulted to Open (Keyless).

  1. Copy the URL for your NumberConversion API with the NumberToWords endpoint - https://tyk-url/numberconversion/NumberToWords/
  2. Paste it as a POST URL in the Postman URL Request field
  3. Enter the following as a raw Body request
{
    "numberToConvert": 35
}

Your Postman request should look similar to below (apart from the URL used)

Postman

Go Templates

Tyk’s request and response body transform middleware use the Go template language to parse and modify the provided input.

Go templates are also used by Tyk’s webhook event handler to produce the payload for the HTTP request sent to the target system.

In this section of the documentation, we provide some guidance and a few examples on the use of Go templating with Tyk.

Data format conversion using helper functions

Tyk provides two helper functions to assist with data format translation between JSON and XML:

  • jsonMarshal performs JSON style character escaping on an XML field and, for complex objects, serialises them to a JSON string (example)
  • xmlMarshal performs the equivalent conversion from JSON to XML (example)

When creating these functions within your Go templates, please note:

  • the use of . in the template refers to the entire input, whereas something like .myField refers to just the myField field of the input
  • the pipe | joins together the things either side of it, which is typically input data on the left and a receiving command to process the data on the right, such as jsonMarshal

Hence {{ . | jsonMarshal }} will pass the entire input to the jsonMarshal helper function.

Using functions within Go templates

You can define and use functions in the Go templates that are used for body transforms in Tyk. Functions allow you to abstract common template logic for cleaner code and to aid reusability. Breaking the template into functions improves readability of more complex tenplates.

Here is an example where we define a function called myFunction that accepts one parameter:

{{- define "myFunction" }}
  Hello {{.}}!
{{- end}}

We can call that function and pass “world” as the parameter:

{
  "message": {{ call . "myFunction" "world"}}
}

The output would be:

{
  "message": "Hello world!" 
}

We have bundled the Sprig Library (v3) which provides over 70 pre-written functions for transformations to assist the creation of powerful Go templates to transform your API requests.

Additional resources

Here’s a useful blogpost and YouTube tutorial that can help you to learn about using Go templates.

Go templating examples

Here we provide worked examples for both JSON and XML formatted inputs. We also explain examples using the jsonMarshal and xmlMarshal helper functions.

Example JSON transformation template

Imagine you have a published API that accepts the request listed below, but your upstream service requires a few alterations, namely:

  • swapping the values of parameters value1 and value2
  • renaming the value_list to transformed_list
  • adding a user-id extracted from the session metadata
  • adding a client-ip logging the client IP
  • adding a req-type that logs the value provided in query parameter type

Input

  • Session metadata uid = user123
  • IP address of calling client = 192.0.0.1
  • Query parameter type = strict
{
  "value1": "value-1",
  "value2": "value-2",
  "value_list": [
    "one",
    "two",
    "three"
  ]
}

Template

{
  "value1": "{{.value2}}",
  "value2": "{{.value1}}",
  "transformed_list": [
    {{range $index, $element := index . "value_list"}}
    {{if $index}}, {{end}}
    "{{$element}}"
    {{end}}
  ],
  "user-id": "{{._tyk_meta.uid}}",
  "user-ip": "{{._tyk_context.remote_addr}}",
  "req-type": "{{ ._tyk_context.request_data.param.type }}" 
}

In this template:

  • .value1 accesses the “value1” field of the input JSON
  • we swap value1 and value2
  • we use the range function to loop through the “value_list” array
  • ._tyk_meta.uid injects the “uid” session metadata value
  • ._tyk_context.remote_addr injects the client IP address from the context
  • ._tyk_context.request_data.param.type injects query parameter “type”

Output

{
  "value1": "value-2",
  "value2": "value-1",
  "transformed_list": [
    "one",
    "two",
    "three"
  ],
  "user-id": "user123"
  "user-ip": "192.0.0.1"
  "req-type": "strict"
}

Example XML transformation template

XML cannot be as easily decoded into strict structures as JSON, so the syntax is a little different when working with an XML document. Here we are performing the reverse translation, starting with XML and converting to JSON.

Input

  • Session metadata uid = user123
  • IP address of calling client = 192.0.0.1
  • Query parameter type = strict
<?xml version="1.0" encoding="UTF-8"?>
<data>
  <body>
    <value1>value-1</value1>
    <value2>value-2</value2>
    <valueList>
      <item>one</item>
      <item>two</item>
      <item>three</item>
    </valueList>
  </body>
</data>

Template

<?xml version="1.0" encoding="UTF-8"?>
<data>
  <body>
    <value1>{{ .data.body.value2 }}</value1>
    <value2>{{ .data.body.value1 }}</value2>
    <transformedList>
      {{range $index, $element := .data.body.valueList.item }}
      <item>{{$element}}</item>
      {{end}}
    </transformedList>
    <userId>{{ ._tyk_meta.uid }}</userId>
    <userIp>{{ ._tyk_context.remote_addr }}</userIp>
    <reqType>{{ ._tyk_context.request_data.param.type }}</reqType>
  </body>
</data>

In this template:

  • .data.body.value1 accesses the “value1” field of the input XML
  • we swap value1 and value2
  • we use the range function to loop through the “value_list” array
  • ._tyk_meta.uid injects the “uid” session metadata value
  • ._tyk_context.remote_addr injects the client IP address from the context
  • ._tyk_context.request_data.param.type injects query parameter “type”

Output

<?xml version="1.0" encoding="UTF-8"?>
<data>
  <body>
    <value1>value-2</value1>
    <value2>value-1</value2>
    <transformedList>
      <item>one</item>
      <item>two</item>
      <item>three</item>
    </transformedList>
    <userId>user123</userId>
    <userIp>192.0.0.1</userIp>
    <reqType>strict</reqType>
  </body>
</data>

XML to JSON conversion using jsonMarshal

The jsonMarshal function converts XML formatted input into JSON, for example:

Input

<hello>world</hello>

Template

{{ . | jsonMarshal }}

Output

{"hello":"world"}

Note that in this example, Go will step through the entire data structure provided to the template. When used in the Request or Response Body Transform middleware, this would include Context Variables and Session Metadata if provided to the middleware.

JSON to XML conversion using xmlMarshal

The xmlMarshal function converts JSON formatted input into XML, for example:

Input

{"hello":"world"}

Template

{{ . | xmlMarshal }}

Output

<hello>world</hello>

Note that in this example, Go will step through the entire data structure provided to the template. When used in the Request or Response Body Transform middleware, this would include Context Variables and Session Metadata if provided to the middleware.

JQ Transforms

Note

This feature is experimental and can be used only if you compile Tyk yourself own using jq tag: go build --tags 'jq'

If you work with JSON you are probably aware of the popular jq command line JSON processor. For more details, see https://stedolan.github.io/jq/.

Now you can use the full power of its queries and transformations to transform requests, responses, headers and even context variables.

We have added two new plugins:

  • transform_jq - for request transforms.
  • transform_jq_response - for response transforms

Both have the same structure, similar to the rest of our plugins: { "path": "<path>", "method": "<method>", "filter": "<content>" }

Request Transforms

Inside a request transform you can use following variables:

  • .body - your current request body
  • ._tyk_context - Tyk context variables. You can use it to access request headers as well.

Your JQ request transform should return an object in the following format: { "body": <transformed-body>, "rewrite_headers": <set-or-add-headers>, "tyk_context": <set-or-add-context-vars> }.

body is required, while rewrite_headers and tyk_context are optional.

Response Transforms

Inside a response transform you can use following variables:

  • .body - your current response body
  • ._tyk_context - Tyk context variables. You can use it to access request headers as well.
  • ._tyk_response_headers - Access to response headers

Your JQ response transform should return an object in the following format: { "body": <transformed-body>, "rewrite_headers": <set-or-add-headers>}.

body is required, while rewrite_headers is optional.

Example

"extended_paths": {
  "transform_jq": [{
    "path": "/post",
    "method": "POST",
    "filter": "{\"body\": (.body + {\"TRANSFORMED-REQUEST-BY-JQ\": true, path: ._tyk_context.path, user_agent: ._tyk_context.headers_User_Agent}), \"rewrite_headers\": {\"X-added-rewrite-headers\": \"test\"}, \"tyk_context\": {\"m2m_origin\": \"CSE3219/C9886\", \"deviceid\": .body.DEVICEID}}"
   }],
  "transform_jq_response": [{
    "path": "/post",
    "method": "POST",
    "filter": "{\"body\": (.body + {\"TRANSFORMED-RESPONSE-BY-JQ\": true, \"HEADERS-OF-RESPONSE\": ._tyk_response_headers}), \"rewrite_headers\": {\"JQ-Response-header\": .body.origin}}"
  }]
}

Request Context Variables

Context variables are extracted from the request at the start of the middleware chain. These values can be very useful for later transformation of request data, for example, in converting a form POST request into a JSON PUT request or to capture an IP address as a header.

Note

When using Tyk Classic APIs, you must enable context variables for the API to be able to access them. When using Tyk OAS APIs, the context variables are always available to the context-aware middleware.

Available context variables

  • request_data: If the inbound request contained any query data or form data, it will be available in this object. For the header injector Tyk will format this data as key:value1,value2,valueN;key:value1,value2 etc.
  • path_parts: The components of the path, split on /. These values should be in the format of a comma delimited list.
  • token: The inbound raw token (if bearer tokens are being used) of this user.
  • path: The path that is being requested.
  • remote_addr: The IP address of the connecting client.
  • request_id Allows the injection of request correlation ID (for example X-Request-ID)
  • jwt_claims_CLAIMNAME - If JWT tokens are being used, then each claim in the JWT is available in this format to the context processor. CLAIMNAME is case sensitive so use the exact claim.
  • cookies_COOKIENAME - If there are cookies, then each cookie is available in context processor in this format. COOKIENAME is case sensitive so use the exact cookie name and replace any - in the cookie name with _.
  • headers_HEADERNAME - Headers are obviously exposed in context processor. You can access any header in the request using the following format: Convert the first letter in each word of an incoming header is to Capital Case. This is due to the way GoLang handles header parsing. You also need to replace any - in the HEADERNAME name with _.
    For example, to get the value stored in test-header, the syntax would be $tyk_context.headers_Test_Header.

Middleware that can use context variables:

Context variables are exposed in three middleware plugins but are accessed differently depending on the caller as follows:

  1. URL Rewriter - Syntax is $tyk_context.CONTEXTVARIABLES. See URL Rewriting for more details.
  2. Modify Headers - Syntax is $tyk_context.CONTEXTVARIABLES. See Request Headers for more details.
  3. Body Transforms - Syntax is {{ ._tyk_context.CONTEXTVARIABLES }}. See Body Transforms for more details.

Note

The Body Transform can fully iterate through list indices within context data so, for example, calling {{ index ._tyk_context.path_parts 0 }} in the Go Template in a Body Transform will expose the first entry in the path_parts list.

URL Rewriter and Header Transform middleware cannot iterate through list indices.

Example use of context variables

Examples of the syntax to use with all the available context varibles:

"x-remote-addr": "$tyk_context.remote_addr",
"x-token": "$tyk_context.token",
"x-jwt-sub": "$tyk_context.jwt_claims_sub",
"x-part-path": "$tyk_context.path_parts",
"x-jwt-pol": "$tyk_context.jwt_claims_pol",
"x-cookie": "$tyk_context.cookies_Cookie_Context_Var",
"x-cookie-sensitive": "$tyk_context.cookies_Cookie_Case_sensitive",
"x-my-header": "$tyk_context.headers_My_Header",
"x-path": "$tyk_context.path",
"x-request-data": "$tyk_context.request_data",
"x-req-id": "$tyk_context.request_id"

Example of the syntax in the UI

The context variable values in the response:

"My-Header": "this-is-my-header",
"User-Agent": "PostmanRuntime/7.4.0",
"X-Cookie": "this-is-my-cookie",
"X-Cookie-Sensitive": "case-sensitive",
"X-Jwt-Pol": "5bca6a739afe6a00017eb267",
"X-Jwt-Sub": "[email protected]",
"X-My-Header": "this-is-my-header",
"X-Part-Path": "context-var-example,anything",
"X-Path": "/context-var-example/anything",
"X-Remote-Addr": "127.0.0.1",
"X-Req-Id": "e3e99350-b87a-4d7d-a75f-58c1f89b2bf3",
"X-Request-Data": "key1:val1;key2:val2",
"X-Token": "5bb2c2abfb6add0001d65f699dd51f52658ce2d3944d3d6cb69f07a2"

Enabling Context Variables for use with Tyk Classic APIs

  1. In the your Tyk Dashboard, select APIs from the System Management menu
  2. Open the API you want to add Context Variable to
  3. Click the Advanced Options tab and then select the Enable context variables option

Context Variables

If not using a Tyk Dashboard, add the field enable_context_vars to your API definition file at root level and set it to true.

If you are using Tyk Operator, set the field spec.enable_context_vars to true.

The example API Definition below enabled context variable:

 1
 2
 3
 4
 5
 6
 7
 8
 9
10
11
12
13
14
apiVersion: tyk.tyk.io/v1alpha1
kind: ApiDefinition
metadata:
  name: httpbin
spec:
  name: httpbin
  use_keyless: true
  protocol: http
  active: true
  enable_context_vars: true
  proxy:
    target_url: http://httpbin.org
    listen_path: /httpbin
    strip_listen_path: true