Create an API
The Cloud is simply the SaaS version of the Self-Managed product, but there are a few differences. Please make sure you follow the Cloud Get Started guide instead.
Want to learn more from one of our team?
Prerequisites
In order to complete this tutorial, you need to have Tyk Self Managed installed.
Tutorial: Create an API with the Dashboard
We have a video walkthrough for creating an API and testing an endpoint via Postman.
We will use the Tyk Dashboard to create a very simple API that has no special elements set up.
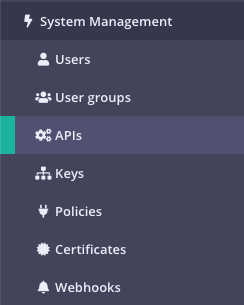
Step 1: Select “APIs” from the “System Management” section
Step 2: Click “ADD NEW API”

Step 3: Set up the Base Configuration for your API

- From the Overview section, add your API Name and your API Type (We will use REST for this tutorial).
- From the Details section, add your Target URL. This will set the upstream origin that hosts the service you want to proxy to. For this tutorial you can use http://httpbin.org. If you wish to use more than one target URL you can select Enable round-robin load balancing. For this tutorial, we will just use a single upstream target. See Load Balancing for more details. The API Slug will reflect the name you added in the Overview section.
- Click Configure API when you have finished
Step 4: Set up the Authentication for your API
From the Authentication section:
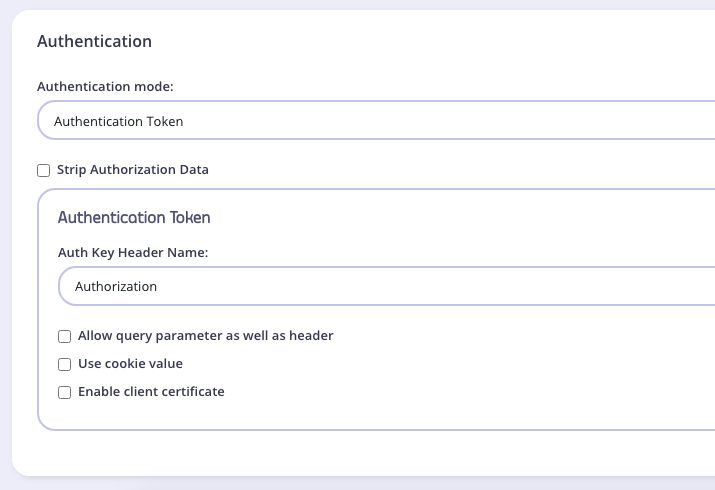
You have the following options:
- Authentication mode: This is the security method to use with your API. For this tutorial, set it to
Open (Keyless). See Authentication and Authorization for more details on securing your API. - Strip Authorization Data: Select this option to strip any authorization data from your API requests.
- Auth Key Header Name: The header name that will hold the token on inbound requests. The default for this is
Authorization. - Allow Query Parameter As Well As Header: Set this option to enable checking the query parameter as well as the header for an auth token. For this tutorial, leave this
unchecked. - Use Cookie Value: It is possible to use a cookie value as well as the other two token locations. Set this as
unchecked. - Enable client certificate: Select this to use Mutual TLS. See Mutual TLS for details on implementing mutual TLS.
Step 5: Save the API
Click SAVE

Once saved, you will be taken back to the API list, where the new API will be displayed.
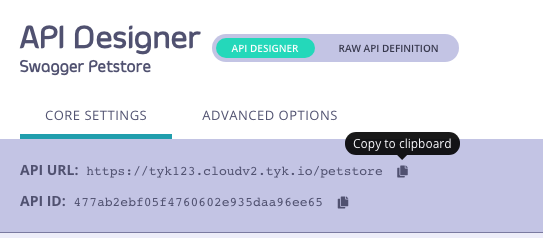
To see the URL given to your API, select the API from the list to open it again. The API URL will be displayed in the top of the editor:
Tutorial: Create an API with the Dashboard API
It is possible to create APIs using Tyk Dashboard’s REST API. You will need an API key for your organisation and one command to create the API and make it live.
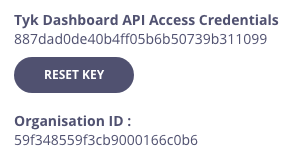
Obtain your Dashboard API key & Dashboard URL
From the Tyk Dashboard, select “Users” from the “System Management” section. Click Edit for your user, then scroll to the bottom of the page. Your API Key is the first entry:
Store your Dashboard Key, Dashboard URL & Gateway URL as environment variables so you don’t need to keep typing them in:
export DASH_KEY=db8adec7615d40db6419a2e4688678e0

# Locally installed dashboard
export DASH_URL=http://localhost:3000/api

# Tyk's Cloud Dashboard
export DASH_URL=https://admin.cloud.tyk.io/api

# Locally installed gateway
export GATEWAY_URL=http://localhost:8080

# Your Cloud Gateway
export GATEWAY_URL=https://YOUR_SUBDOMAIN.cloud.tyk.io
Query the /api/apis endpoint to see what APIs are loaded
curl -H "Authorization: ${DASH_KEY}" ${DASH_URL}/apis
{"apis":[],"pages":1}
For a fresh install, you will see that no APIs currently exist
Create your first API
This example API definition configures the Tyk Gateway to reverse proxy to the http://httpbin.org request/response service.
To view the raw API definition object, you may visit: https://bit.ly/2PdEHuv
curl -H "Authorization: ${DASH_KEY}" -H "Content-Type: application/json" ${DASH_URL}/apis \
  -d "$(wget -qO- https://bit.ly/2PdEHuv)"
{"Status":"OK","Message":"API created","Meta":"5de83a40767e0271d024661a"}
Take note of the API ID returned in the meta above - you will need it later.
export API_ID=5de83a40767e0271d024661a
Test your new API
curl ${GATEWAY_URL}/httpbin/get
{
  "args": {},
  "headers": {
    "Accept": "*/*",
    "Accept-Encoding": "gzip",
    "Host": "httpbin.org",
    "User-Agent": "curl/7.54.0"
  },
  "origin": "127.0.0.1, 188.220.131.154, 127.0.0.1",
  "url": "https://httpbin.org/get"
}
We sent a request to the gateway on the listen path /httpbin. Using this path-based-routing, the gateway was able
to identify the API the client intended to target.
The gateway stripped the listen path, and reverse proxied the request to http://httpbin.org/get
Protect your API
Let’s grab the API definition we created before and store the output to a file locally.
curl -s -H "Authorization: ${DASH_KEY}" -H "Content-Type: application/json" ${DASH_URL}/apis/${API_ID} | python -mjson.tool > api.httpbin.json
We can now edit the api.httpbin.json file we just created, and modify a couple of fields to enable authentication.
Change use_keyless from true to false.
Change auth.auth_header_name to apikey. Note from v2.9.2 auth.auth_header_name has been deprecated and you should use auth_configs.authToken.auth_header_name instead.
Then send a PUT request back to Tyk Dashboard to update it’s configurations.
curl -H "Authorization: ${DASH_KEY}" -H "Content-Type: application/json" ${DASH_URL}/apis/${API_ID} -X PUT -d "@api.httpbin.json"
{"Status":"OK","Message":"Api updated","Meta":null}
Test protected API
Send request without any credentials
curl -I ${GATEWAY_URL}/httpbin/get
HTTP/1.1 401 Unauthorized
Content-Type: application/json
X-Generator: tyk.io
Date: Wed, 04 Dec 2019 23:35:34 GMT
Content-Length: 46
Send request with incorrect credentials
curl -I ${GATEWAY_URL}/httpbin/get -H 'apikey: somejunk'
HTTP/1.1 403 Forbidden
Content-Type: application/json
X-Generator: tyk.io
Date: Wed, 04 Dec 2019 23:36:16 GMT
Content-Length: 57
Congratulations - You have just created your first keyless API, then protected it using Tyk!
If the command succeeds, you will see:
{
  "action": "added",
  "key": "xxxxxxxxx",
  "status": "ok"
}
What did we just do?
We just sent an API definition to the Tyk /apis endpoint, API definitions are discussed in detail in the Tyk Gateway API documentationapi-definition-objects/). These objects encapsulate all of the settings for an API within Tyk.
Want to learn more from one of our team?
Prerequisites
In order to complete this tutorial, you need to have the Tyk Community Edition installed.
Creation Methods
With Tyk On-Premises Community Edition, it is possible to create APIs using Tyk’s Gateway API or to generate a file with the same object and store it in the /apps folder of the Tyk Gateway installation folder. This is demonstrated here.
Tutorial: Create an API with the Tyk Gateway API
See our video for adding an API to the Open Source Gateway via the Gateway API and Postman:
In order to use the Gateway API you will need an API key for your Gateway and one command to create the API and make it live.
Step 1: Make sure you know your API secret
Your Tyk Gateway API secret is stored in your tyk.conf file, the property is called secret, you will need to use this as a header called x-tyk-authorization to make calls to the Gateway API.
Step 2: Create an API
To create the API, lets send a definition to the apis endpoint, which will return the status and version of your Gateway. Change the x-tyk-authorization value and curl domain name and port to be the correct values for your environment.
curl -v -H "x-tyk-authorization: {your-secret}" \
  -s \
  -H "Content-Type: application/json" \
  -X POST \
  -d '{
    "name": "Hello-World",
    "slug": "hello-world",
    "api_id": "Hello-World",
    "org_id": "1",
    "use_keyless": true,
    "auth": {
      "auth_header_name": "Authorization"
    },
    "definition": {
      "location": "header",
      "key": "x-api-version"
    },
    "version_data": {
      "not_versioned": true,
      "versions": {
        "Default": {
          "name": "Default",
          "use_extended_paths": true
        }
      }
    },
    "proxy": {
      "listen_path": "/hello-world/",
      "target_url": "http://echo.tyk-demo.com:8080/",
      "strip_listen_path": true
    },
    "active": true
}' http://{your-tyk-host}:{port}/tyk/apis | python -mjson.tool
If the command succeeds, you will see:
{
  "key": "Hello-World",
  "status": "ok",
  "action": "added"
}
What did we just do?
We just sent an API definition to the Tyk /apis endpoint. API definitions are discussed in detail in the API section of this documentation. These objects encapsulate all of the settings for an API within Tyk Gateway.
Restart or hot reload
Once you have created the file, you will need to either restart the Tyk Gateway, or issue a hot reload command, lets do the latter:
curl -H "x-tyk-authorization: {your-secret}" -s http://{your-tyk-host}:{port}/tyk/reload/group | python -mjson.tool
This command will hot-reload your API Gateway(s) and the new API will be loaded, if you take a look at the output of the Gateway (or the logs), you will see that it should have loaded Hello-World API on /hello-world/.
Tutorial: Create an API in File-based Mode
To create a file-based API definition is very easy.
Create a file called api1.json and place it in the /apps folder of your Tyk Gateway installation (usually in /var/tyk-gateway), then add the following:
{
  "name": "Test API",
  "slug": "test-api",
  "api_id": "1",
  "org_id": "1",
  "auth_configs": {
    "authToken": {
      "auth_header_name": "Authorization"
    }
  },
  "definition": {
    "location": "header",
    "key": "x-api-version"
  },
  "version_data": {
    "not_versioned": true,
    "versions": {
      "Default": {
        "name": "Default",
        "use_extended_paths": true
    }
   }
  },
  "proxy": {
    "listen_path": "/test-api/",
    "target_url": "http://echo.tyk-demo.com:8080/",
    "strip_listen_path": true
  },
  "active": true
}
Restart or hot reload
Once you have created the file, you will need to either restart the Tyk Gateway, or issue a hot reload command, lets do the latter:
curl -H "x-tyk-authorization: {your-secret}" -s https://{your-tyk-host}:{port}/tyk/reload/group | python -mjson.tool
This command will hot-reload your API Gateway(s) and the new API will be loaded, if you take a look at the output of the Gateway (or the logs), you will see that it should have loaded Test API on /test-api/.
Your API is now ready to use via the Gateway.