Deploy Hybrid Gateways
Tyk Cloud hosts and manages the control planes for you. You can deploy the data planes across multiple locations:
- as Cloud Gateways: deployed and managed in Tyk Cloud, in any of 5 regions available. No need to care about deployment and operational concerns.
- as Hybrid Gateways: deployed locally and managed by you: in your own data centre, public or private cloud or even on your own machine
This page describes the deployment of hybrid data planes and how to connect them to Tyk Cloud, in both Kubernetes and Docker environments.
Pre-requisites
- Tyk Cloud Account, register here if you don’t have one yet:
free trial - A Redis instance for each data plane, used as temporary storage for distributed rate limiting, token storage and analytics. You will find instructions for a simple Redis installation in the steps below.
- No incoming firewalls rules are needed, as the connection between Hybrid Gateways and Tyk Cloud is always initiated from the Gateways, not from Tyk Cloud.
Create hybrid data plane configuration
The hybrid data plane can connect to control plane in Tyk Cloud by using the Tyk Dashboard API Access Credentials. Follow the guides below to create the configuration that we will be used in later sections to create a deployment:
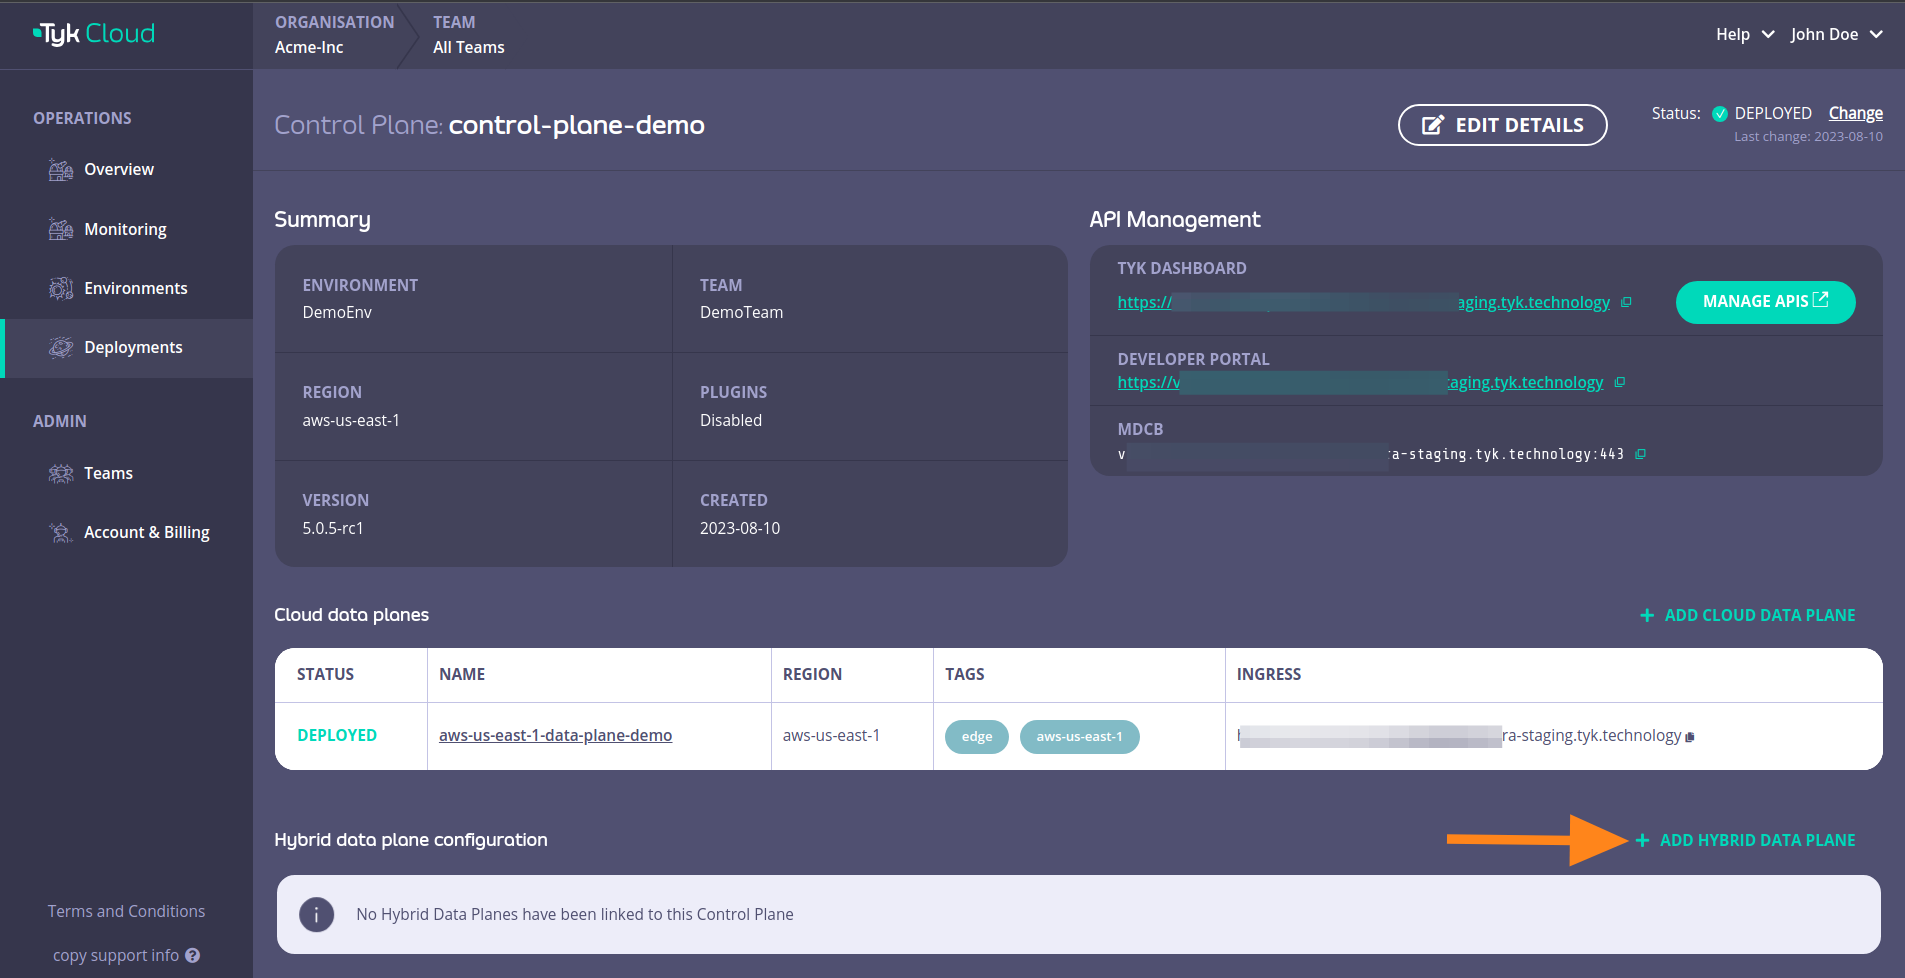
Login to your Tyk Cloud account deployments section and click on ADD HYBRID DATA PLANE
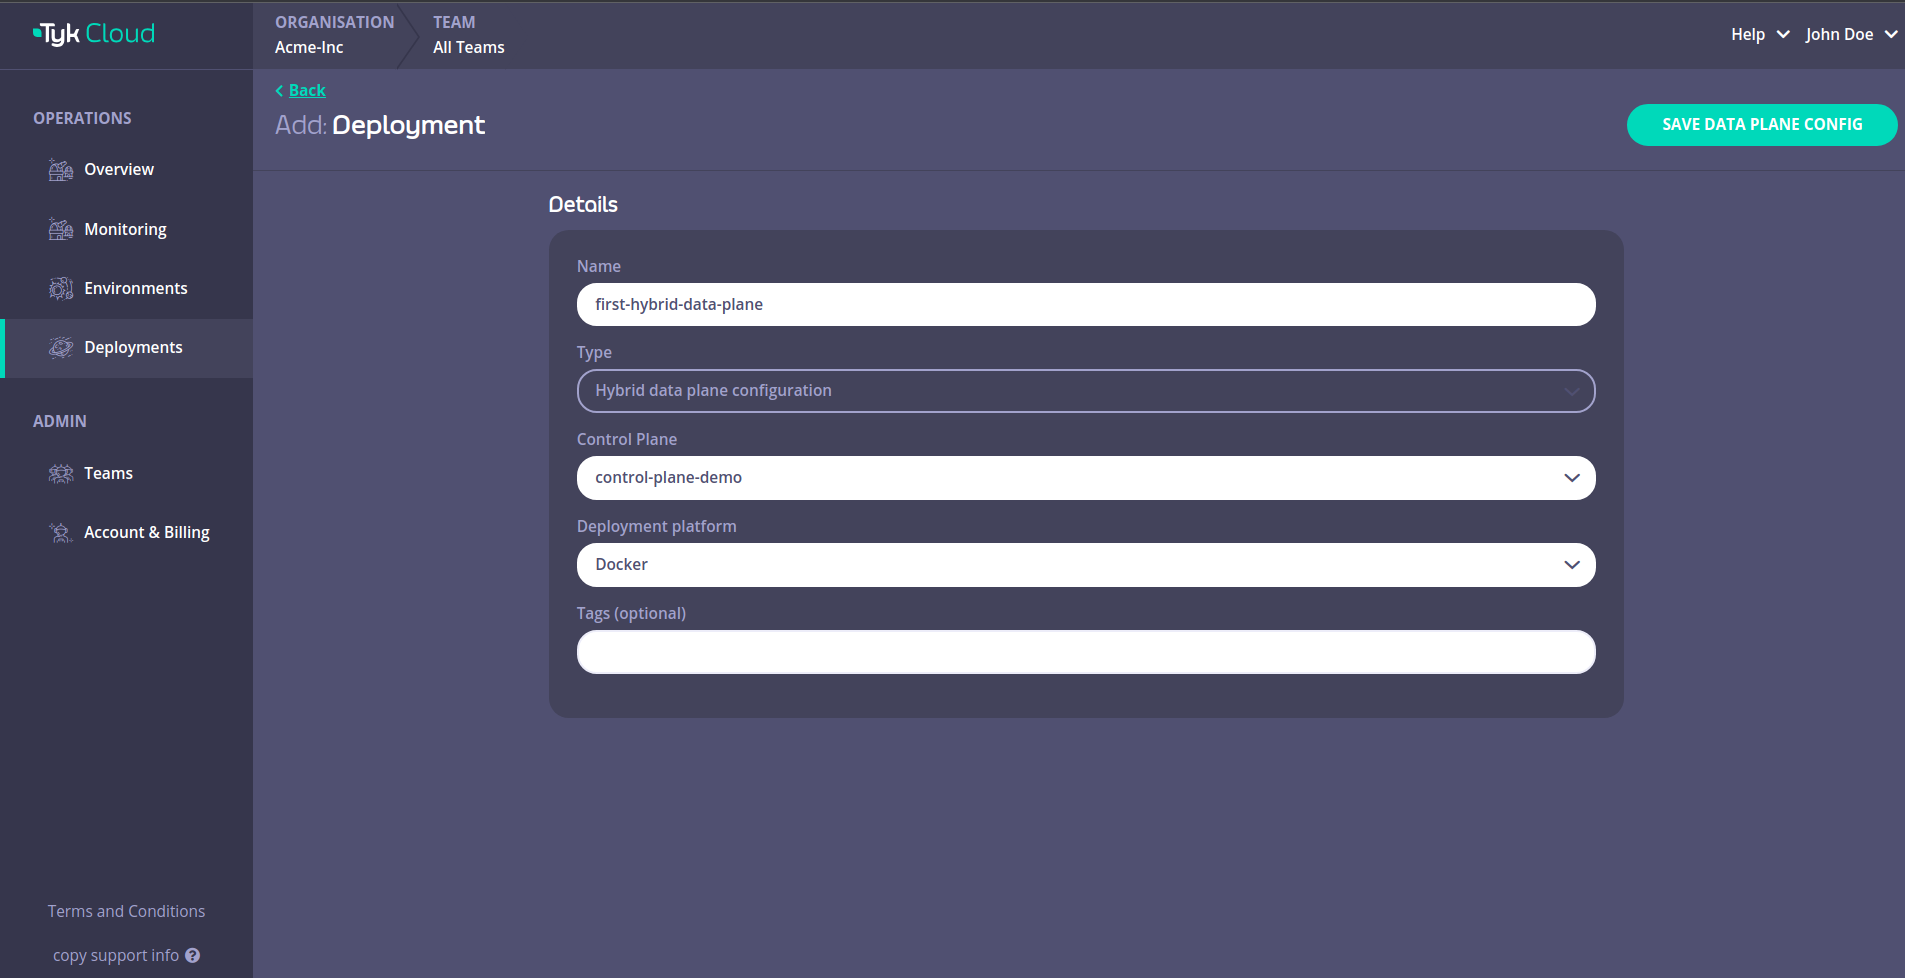
Fill in the details and then click SAVE DATA PLANE CONFIG
This will open up a page that has the data plane configuration details that we need.
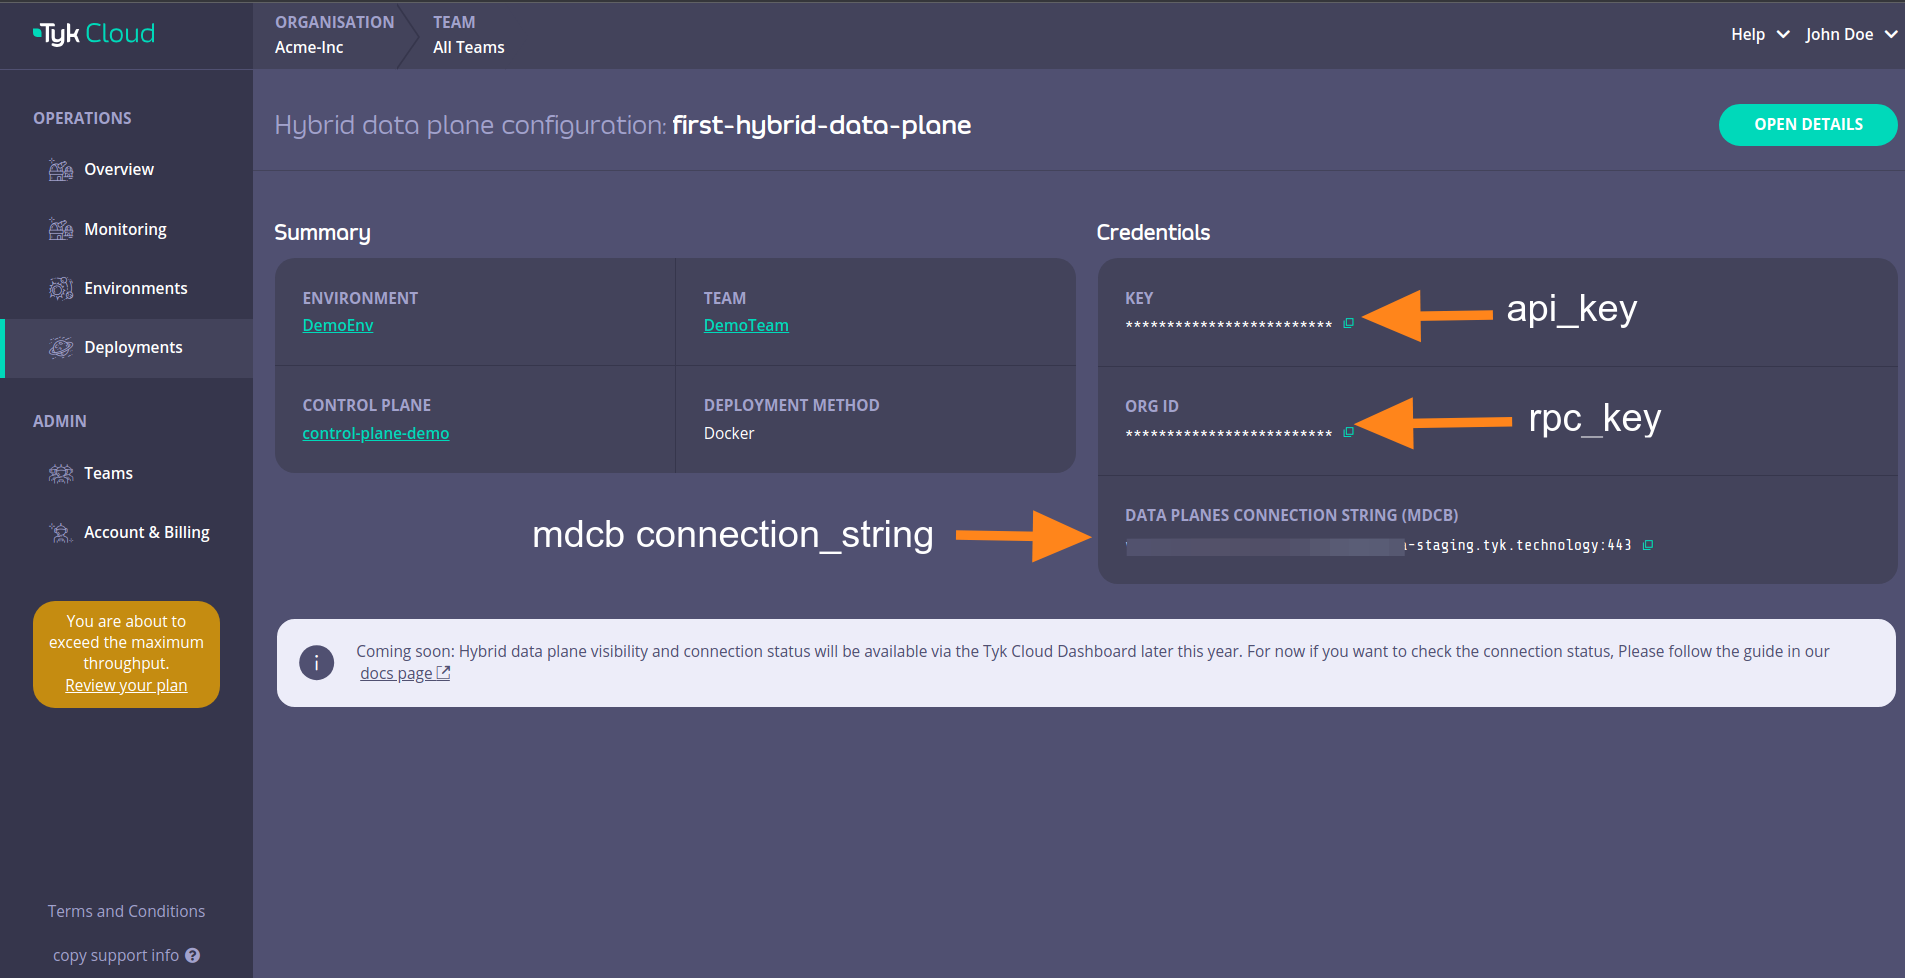
Those details are:
| Docker | Helm | |
|---|---|---|
| key | api_key | gateway.rpc.apiKey |
| org_id | rpc_key | gateway.rpc.rpcKey |
| data_planes_connection_string (mdcb) | connection_string | gateway.rpc.connString |
You can also click on OPEN DETAILS
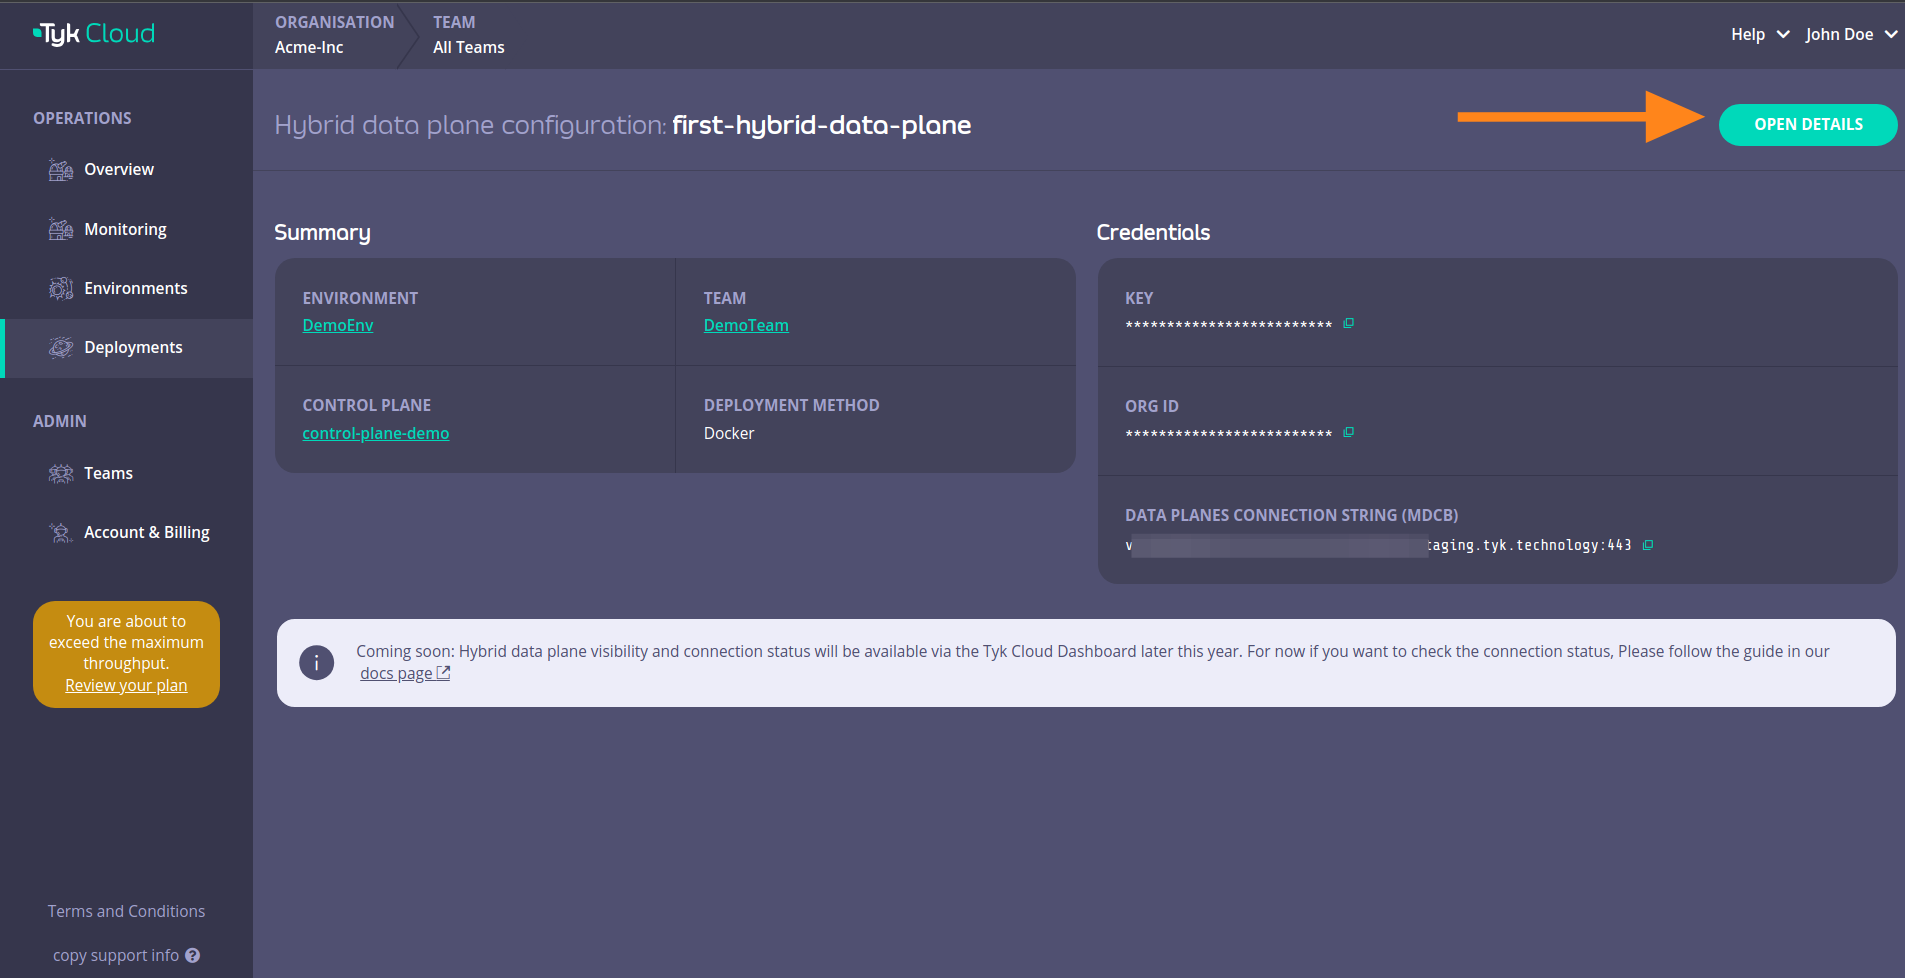
This will reveal instructions that you can use to connect your hybrid data plane to Tyk Cloud.
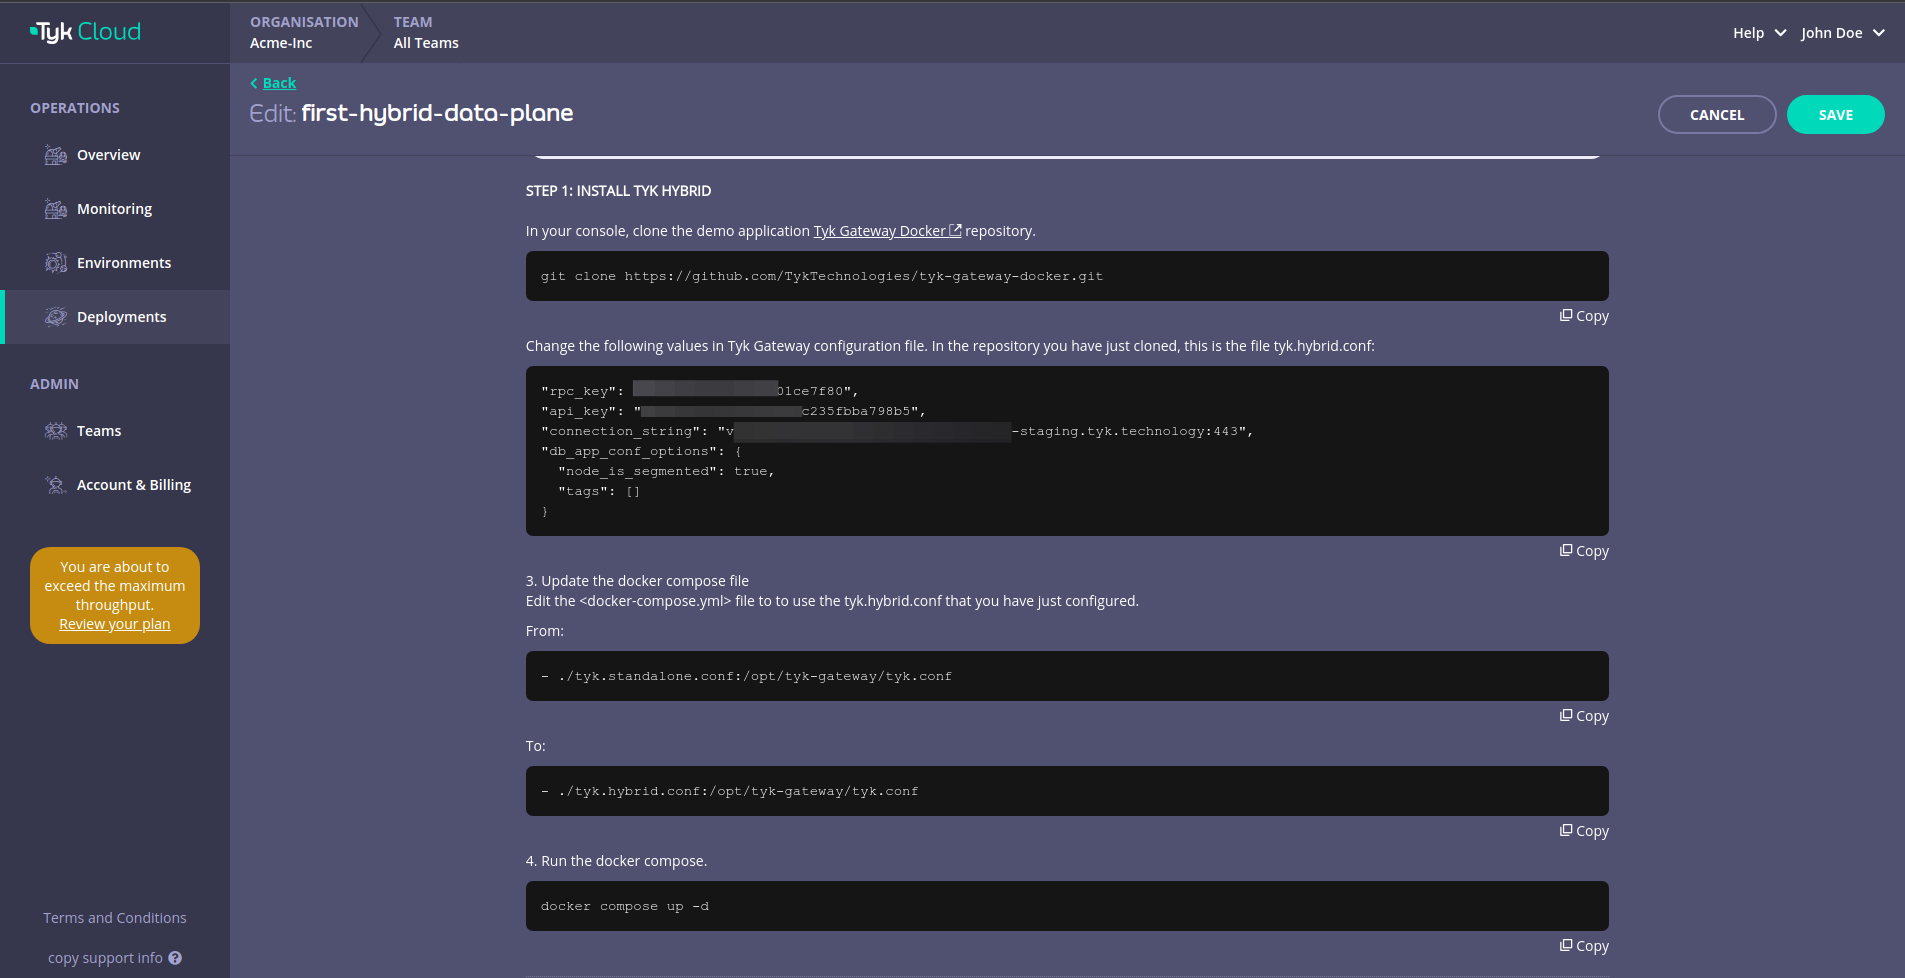
Deploy with Docker
1. In your terminal, clone the demo application Tyk Gateway Docker repository
git clone https://github.com/TykTechnologies/tyk-gateway-docker.git
2. Configure Tyk Gateway and its connection to Tyk Cloud
You need to modify the following values in tyk.hybrid.conf configuration file:
rpc_key- Organisation IDapi_key- Tyk Dashboard API Access Credentials of the user created earlierconnection_string: MDCB connection stringgroup_id(optional) - if you have multiple data plane (e.g. in different regions), specify the data plane group (string) to which the gateway you are deploying belongs. The data planes in the same group share one Redis.
{
"rpc_key": "<ORG_ID>",
"api_key": "<API-KEY>",
"connection_string": "<MDCB-INGRESS>:443",
"group_id": "dataplane-europe",
}
- (optional) you can enable sharding to selectively load APIs to specific gateways, using the following:
{
  "db_app_conf_options": {
    "node_is_segmented": true,
    "tags": ["qa", "uat"]
  }
}
3. Configure the connection to redis
This example comes with a redis instance pre-configured and deployed with Docker compose. If you want to use another redis instance, you will have to update the storage part of tyk.hybrid.conf:
{
  "storage": {
        "type": "redis",
        "host": "tyk-redis",
        "port": 6379,
        "username": "",
        "password": "",
        "database": 0,
        "optimisation_max_idle": 2000,
        "optimisation_max_active": 4000
    }
}
4. Update docker compose file
Edit the <docker-compose.yml> file to use the tyk.hybrid.conf that you have just configured.
From:
- ./tyk.standalone.conf:/opt/tyk-gateway/tyk.conf
To:
- ./tyk.hybrid.conf:/opt/tyk-gateway/tyk.conf
5. Run docker compose
Run the following:
docker compose up -d
You should now have two running containers, a Gateway and a Redis.
6. Check that the gateway is up and running
Call the /hello endpoint using curl from your terminal (or any other HTTP client):
curl http://localhost:8080/hello -i
Expected result:
HTTP/1.1 200 OK
Content-Type: application/json
Date: Fri, 17 Mar 2023 12:41:11 GMT
Content-Length: 59

{"status":"pass","version":"4.3.3","description":"Tyk GW"}
Deploy in Kubernetes with Helm
Tyk is working to provide a new set of Helm charts, and will progressively roll them out at tyk-charts. It will provide component charts for all Tyk Components, as well as umbrella charts as reference configurations for open source and Tyk Self Managed users.
Status of the New Charts
| Umbrella Charts | Description | Status |
|---|---|---|
| tyk-oss | Tyk Open Source | Stable |
| tyk-single-dc | Tyk Self Managed (Single DC) | Beta |
| tyk-mdcb-control-plane | Tyk Self Managed (MDCB) Control Plane | Coming Soon |
| tyk-mdcb-data-plane | Tyk Self Managed (MDCB) Data Plane Tyk Hybrid Data Plane |
Stable |
To deploy hybrid data planes using the new Helm chart, please use tyk-mdcb-data-plane chart.
Tyk MDCB Data Plane
tyk-mdcb-data-plane provides the default deployment of a Tyk data plane for Tyk Self Managed MDCB or Tyk Cloud users. It will deploy the data plane components that remotely connect to a MDCB control plane.
It includes the Tyk Gateway, an open source Enterprise API Gateway, supporting REST, GraphQL, TCP and gRPC protocols; and Tyk Pump, an analytics purger that moves the data generated by your Tyk gateways to any back-end. Furthermore, it has all the required modifications to easily connect to Tyk Cloud or Multi Data Center (MDCB) control plane.
Introduction
By default, this chart installs following components as subcharts on a Kubernetes cluster using the Helm package manager.
| Component | Enabled by Default | Flag |
|---|---|---|
| Tyk Gateway | true | n/a |
| Tyk Pump | true | global.components.pump |
To enable or disable each component, change the corresponding enabled flag.
Also, you can set the version of each component through image.tag. You could find the list of version tags available from Docker hub.
Prerequisites
- Kubernetes 1.19+
- Helm 3+
- Redis should already be installed or accessible by the gateway. For Redis installations instruction, follow the Redis installation guide below.
- Connection details to remote control plane. See the section below for how to obtain them from Tyk Cloud.
Quick Start
Quick start using tyk-mdcb-data-plane and Bitnami Redis chart
NAMESPACE=tyk
APISecret=foo
MDCB_UserKey=9d20907430e440655f15b851e4112345
MDCB_OrgId=64cadf60173be90001712345
MDCB_ConnString=mere-xxxxxxx-hyb.aws-euw2.cloud-ara.tyk.io:443
MDCB_GroupId=dc-uk-south

helm upgrade tyk-redis oci://registry-1.docker.io/bitnamicharts/redis -n $NAMESPACE --create-namespace --install --set image.tag=6.2.13

helm upgrade hybrid-dp tyk-helm/tyk-mdcb-data-plane -n $NAMESPACE --create-namespace \
  --install \
  --set global.remoteControlPlane.userApiKey=$MDCB_UserKey \
  --set global.remoteControlPlane.orgId=$MDCB_OrgId \
  --set global.remoteControlPlane.connectionString=$MDCB_ConnString \
  --set global.remoteControlPlane.groupID=$MDCB_GroupId \
  --set global.secrets.APISecret="$APISecret" \
  --set global.redis.addrs="{tyk-redis-master.$NAMESPACE.svc.cluster.local:6379}" \
  --set global.redis.passSecret.name=tyk-redis \
  --set global.redis.passSecret.keyName=redis-password
Gateway is now accessible through service gateway-svc-hybrid-dp-tyk-gateway at port 8080.
Pump is also configured with Hybrid Pump which sends aggregated analytics to MDCB or Tyk Cloud, and Prometheus Pump which expose metrics locally at :9090/metrics.
Obtain your Remote Control Plane Connection Details
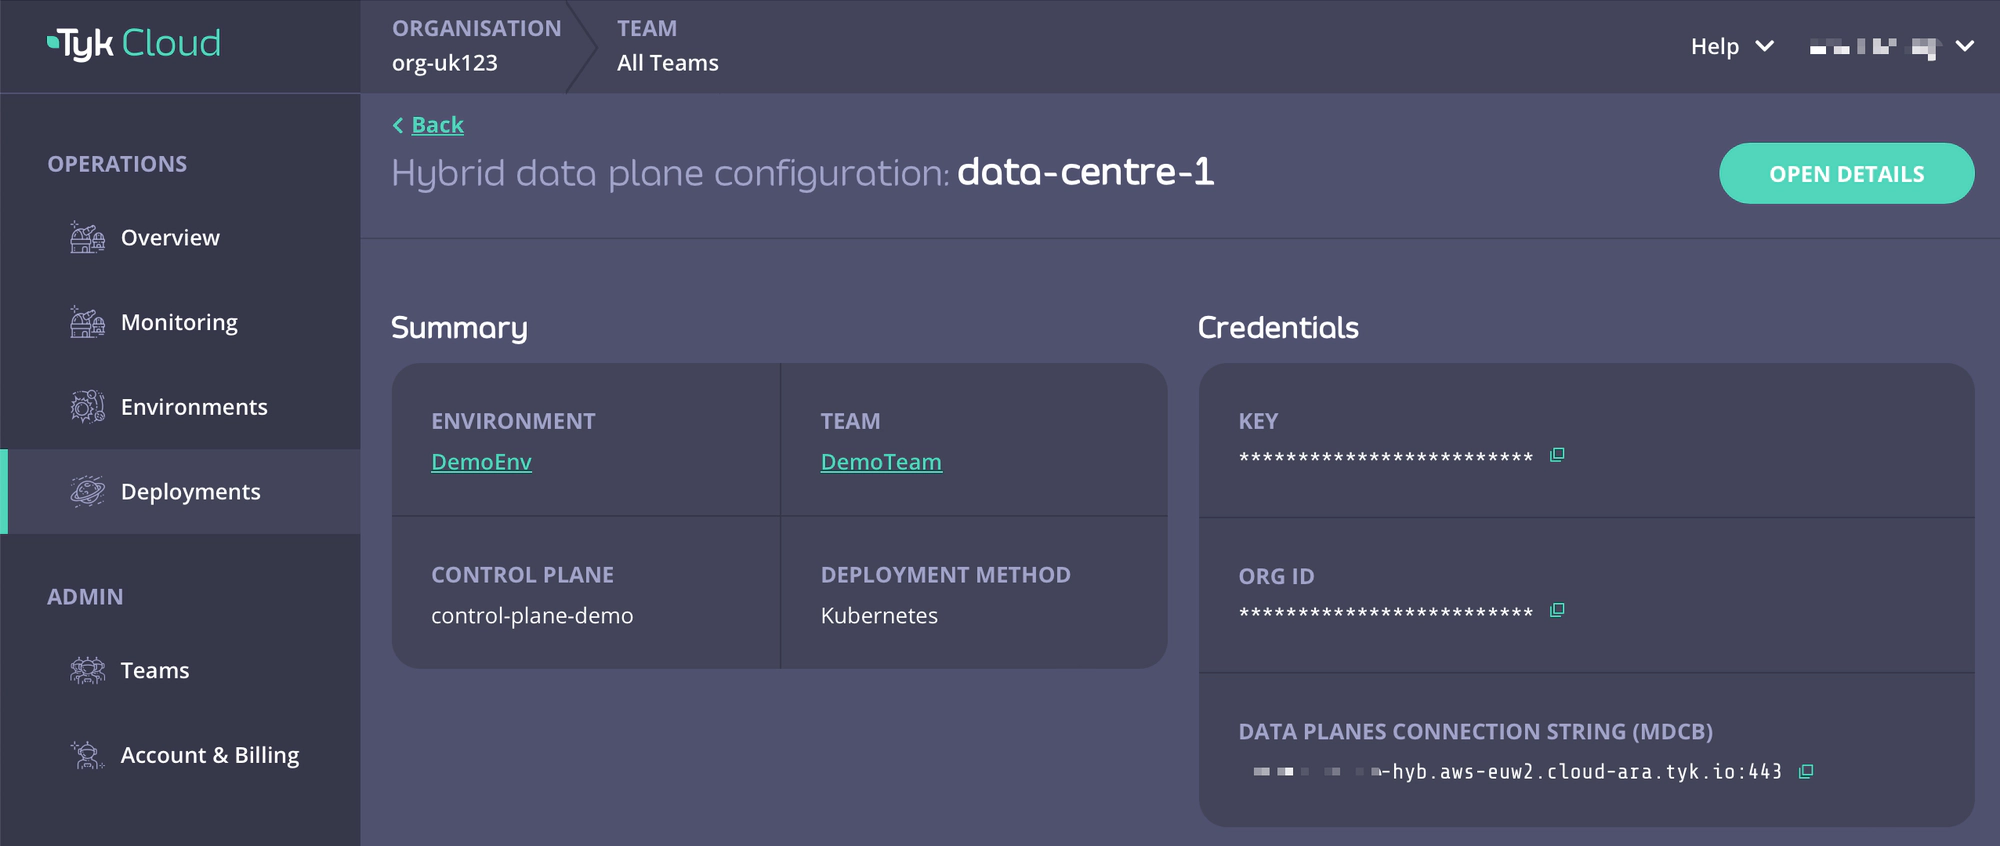
You can easily obtain your remote control plane connection details on Tyk Cloud.
- Go to Deployment tab and create a Hybrid data plane configuration. You can also select from an existing one.
- Copy Key, Org ID, and Data Planes Connection String (MDCB) as
global.remoteControlPlane’suserApiKey,orgId, andconnectionStringrespectively.
Installing the Chart
To install the chart from the Helm repository in namespace tyk with the release name tyk-data-plane:
    helm repo add tyk-helm https://helm.tyk.io/public/helm/charts/
    helm repo update
    helm show values tyk-helm/tyk-mdcb-data-plane > values-data-plane.yaml
See Configuration section for the available config options and modify your local values-data-plane.yaml file accordingly. Then install the chart:
helm install tyk-data-plane tyk-helm/tyk-mdcb-data-plane -n tyk --create-namespace -f values-data-plane.yaml
Uninstalling the Chart
helm uninstall tyk-data-plane -n tyk
This removes all the Kubernetes components associated with the chart and deletes the release.
Upgrading Chart
helm upgrade tyk-data-plane tyk-helm/tyk-mdcb-data-plane -n tyk
Note
tyk-hybrid chart users
If you were using tyk-hybrid chart for existing release, you cannot upgrade directly. Please modify the values.yaml base on your requirements and install using the new tyk-mdcb-data-plane chart.
Configuration
To get all configurable options with detailed comments:
helm show values tyk-helm/tyk-mdcb-data-plane > values.yaml
You can update any value in your local values.yaml file and use -f [filename] flag to override default values during installation.
Alternatively, you can use --set flag to set it in Tyk installation.
Set Redis Connection Details (Required)
Tyk uses Redis for distributed rate-limiting and token storage. You may use the Bitnami chart to install or Tyk’s simple-redis chart for POC purpose.
Set the following values after installing Redis:
| Name | Description |
|---|---|
global.redis.addrs |
Redis addresses |
global.redis.pass |
Redis password in plain text |
global.redis.passSecret.name |
If global.redis.pass is not provided, you can store it in a secret and provide the secret name here |
global.redis.passSecret.keyName |
key name to retrieve redis password from the secret |
Recommended: via Bitnami chart
For Redis you can use these rather excellent charts provided by Bitnami. Copy the following commands to add it:
helm upgrade tyk-redis oci://registry-1.docker.io/bitnamicharts/redis -n tyk --create-namespace --install --set image.tag=6.2.13
Follow the notes from the installation output to get connection details and password.
  Redis(TM) can be accessed on the following DNS names from within your cluster:

    tyk-redis-master.tyk.svc.cluster.local for read/write operations (port 6379)
    tyk-redis-replicas.tyk.svc.cluster.local for read-only operations (port 6379)

  export REDIS_PASSWORD=$(kubectl get secret --namespace tyk tyk-redis -o jsonpath="{.data.redis-password}" | base64 --decode)
The Redis address as set by Bitnami is tyk-redis-master.tyk.svc.cluster.local:6379
You can reference the password secret generated by Bitnami chart by --set global.redis.passSecret.name=tyk-redis and --set global.redis.passSecret.keyName=redis-password, or just set global.redis.pass=$REDIS_PASSWORD
Evaluation only: via simple-redis chart
Another option for Redis, to get started quickly, is to use our simple-redis chart.
Warning
Please note that these provided charts must never be used in production or for anything but a quick start evaluation only. Use Bitnami Redis or Official Redis Helm chart in any other case. We provide this chart, so you can quickly deploy Tyk gateway, but it is not meant for long term storage of data.
helm install redis tyk-helm/simple-redis -n tyk
The Tyk Helm Chart can connect to simple-redis in the same namespace by default. You do not need to set Redis address and password in values.yaml.
Gateway Configurations
Configure below inside tyk-gateway section.
Update Tyk Gateway Version
Set version of gateway at tyk-gateway.gateway.image.tag. You can find the list of version tags available from Docker hub. Please check Tyk Release notes carefully while upgrading or downgrading.
Enabling TLS
Enable TLS
We have provided an easy way to enable TLS via the global.tls.gateway flag. Setting this value to true will
automatically enable TLS using the certificate provided under tyk-gateway/certs/.
Configure TLS secret
If you want to use your own key/cert pair, please follow the following steps:
- Create a TLS secret using your cert and key pair.
- Set
global.tls.gatewayto true. - Set
tyk-gateway.gateway.tls.useDefaultTykCertificateto false. - Set
tyk-gateway.gateway.tls.secretNameto the name of the newly created secret.
Add Custom Certificates
To add your custom Certificate Authority(CA) to your containers, you can mount your CA certificate directly into /etc/ssl/certs folder.
   extraVolumes:
     - name: self-signed-ca
       secret:
         secretName: self-signed-ca-secret
   extraVolumeMounts:
     - name: self-signed-ca
       mountPath: "/etc/ssl/certs/myCA.pem"
       subPath: myCA.pem
Accessing Gateway
Service Port
Default service port of gateway is 8080. You can change this at global.servicePorts.gateway.
Ingress
An Ingress resource is created if tyk-gateway.gateway.ingress.enabled is set to true.
    ingress:
      # if enabled, creates an ingress resource for the gateway
      enabled: true
Control Port
Set tyk-gateway.gateway.control.enabled to true will allow you to run the Gateway API on a separate port and protect it behind a firewall if needed.
Sharding
Configure the gateways to load APIs with specific tags only by enabling tyk-gateway.gateway.sharding.enabled, and set tags to comma separated lists of matching tags.
    # Sharding gateway allows you to selectively load APIs to specific gateways.
    # If enabled make sure you have at least one gateway that is not sharded.
    # Also be sure to match API segmentation tags with the tags selected below.
    sharding:
      enabled: true
      tags: "edge,dc1,product"
Setting Environment Variable
You can add environment variables for Tyk Gateway under extraEnvs. This can be used to override any default settings in the chart, e.g.
    extraEnvs:
      - name: TYK_GW_HASHKEYS
        value: "false"
Here is a reference of all Tyk Gateway Configuration Options.
Pump Configurations
To enable Pump, set global.components.pump to true, and configure below inside tyk-pump section.
| Pump | Configuration |
|---|---|
| Prometheus Pump (Default) | Add prometheus to tyk-pump.pump.backend, and add connection details for prometheus under tyk-pump.pump.prometheusPump. |
| Hybrid Pump (Default) | Add hybrid to tyk-pump.pump.backend, and add remoteControlPlane details under global.remoteControlPlane. |
| Other Pumps | Add the required environment variables in tyk-pump.pump.extraEnvs |
Prometheus Pump
Add prometheus to tyk-pump.pump.backend, and add connection details for prometheus under tyk-pump.pump.prometheusPump.
We also support monitoring using Prometheus Operator. All you have to do is set tyk-pump.pump.prometheusPump.prometheusOperator.enabled to true.
This will create a PodMonitor resource for your Pump instance.
Hybrid Pump
Add hybrid to tyk-pump.pump.backend, and add remoteControlPlane details under global.remoteControlPlane.
  # Set remoteControlPlane connection details if you want to configure hybrid pump.
  remoteControlPlane:
      # connection string used to connect to an MDCB deployment. For Tyk Cloud users, you can get it from Tyk Cloud Console and retrieve the MDCB connection string.
      connectionString: ""
      # orgID of your dashboard user
      orgId: ""
      # API key of your dashboard user
      userApiKey: ""
      # needed in case you want to have multiple data-planes connected to the same redis instance
      groupID: ""
      # enable/disable ssl
      useSSL: true
      # Disables SSL certificate verification
      sslInsecureSkipVerify: true
  # hybridPump configures Tyk Pump to forward Tyk metrics to a Tyk Control Plane.
  # Please add "hybrid" to .Values.pump.backend in order to enable Hybrid Pump.
  hybridPump:
    # Specify the frequency of the aggregation in minutes or simply turn it on by setting it to true
    enableAggregateAnalytics: true
    # Hybrid pump RPC calls timeout in seconds.
    callTimeout: 10
    # Hybrid pump connection pool size.
    poolSize: 5
Other Pumps
To setup other backends for pump, refer to this document and add the required environment variables in tyk-pump.pump.extraEnvs
Remove hybrid data plane configuration
Warning
Please note the action of removing a hybrid data plane configuration cannot be undone.
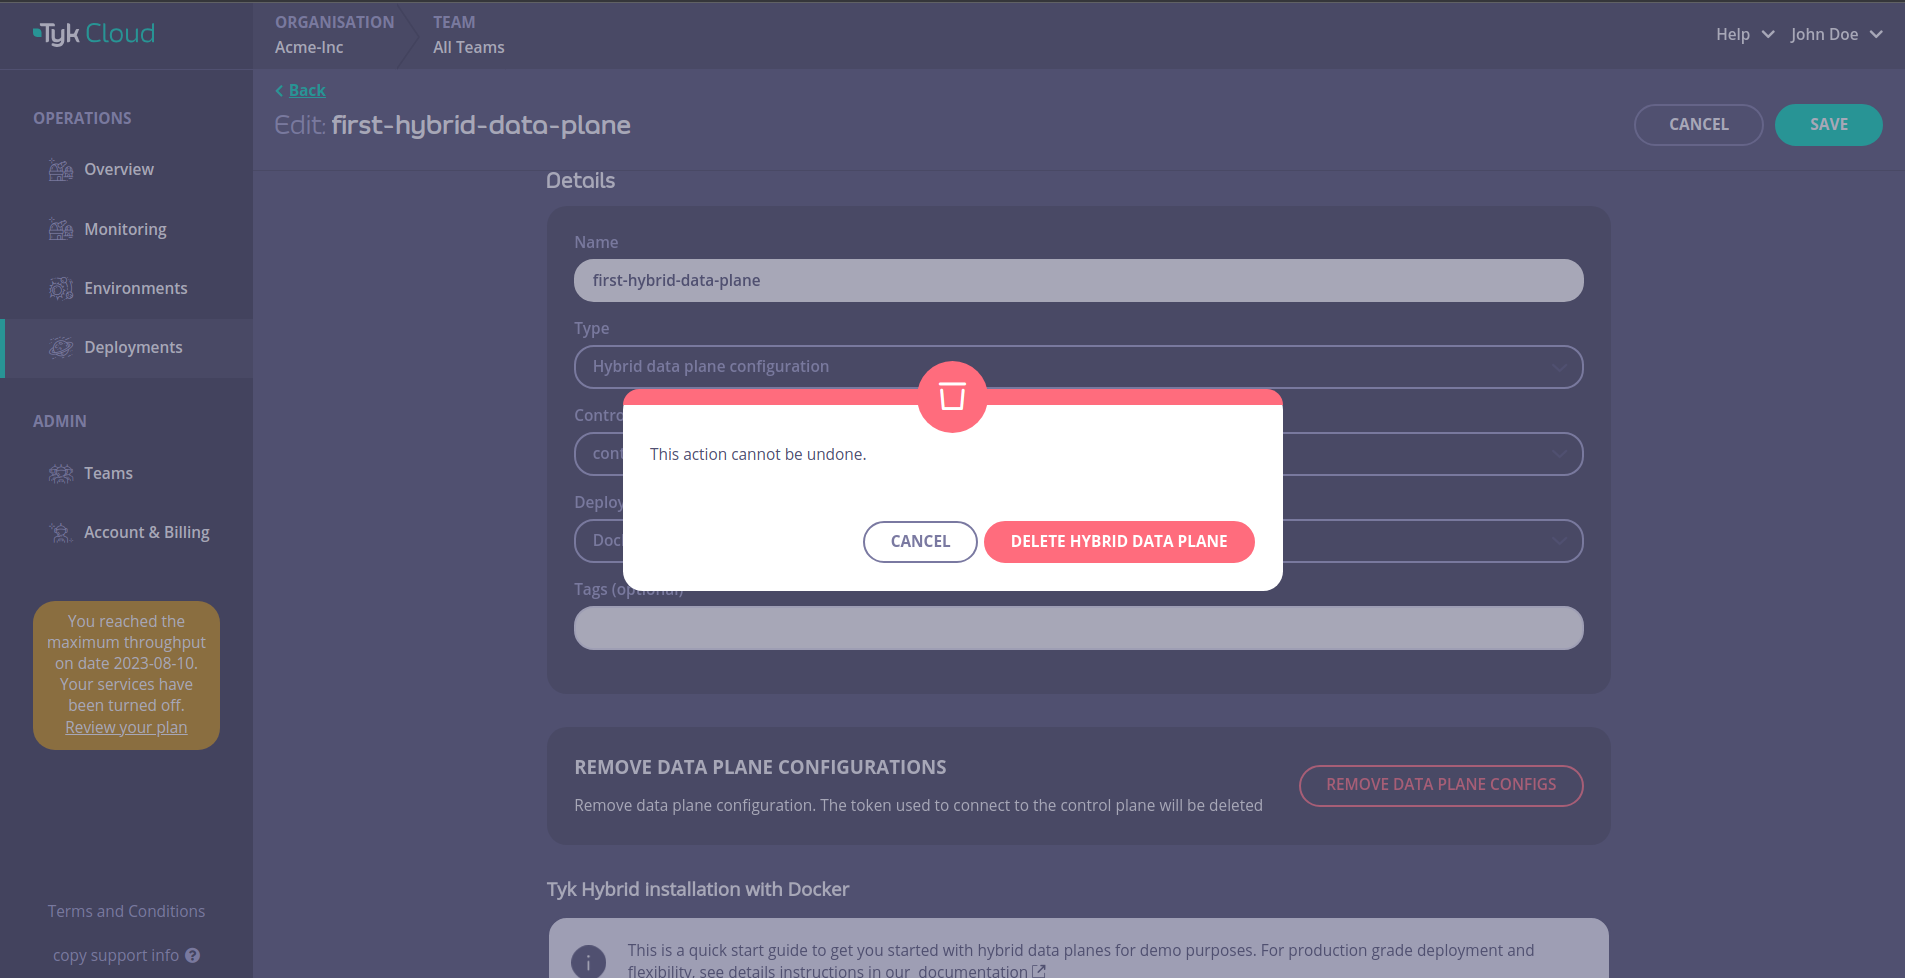
To remove the hybrid data plane configuration, navigate to the page of the hybrid data plane you want to remove and click OPEN DETAILS

Then click on REMOVE DATA PLANE CONFIGS
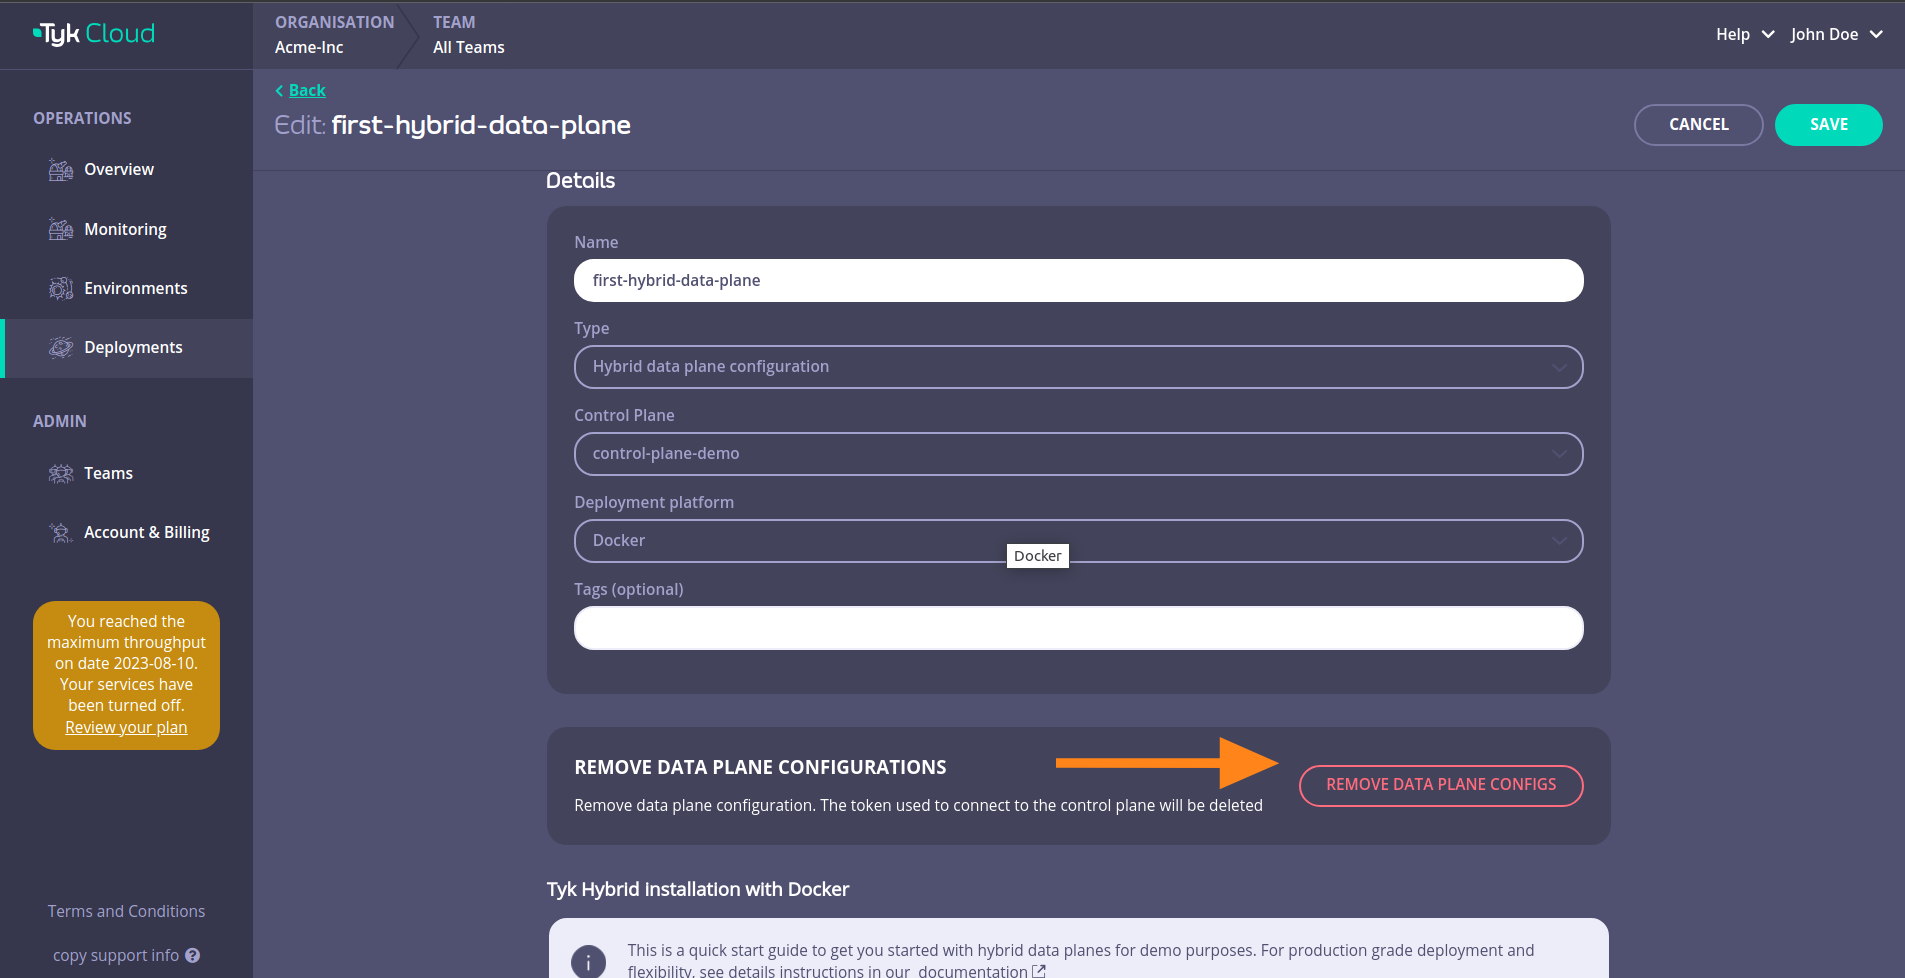
Confirm the removal by clicking DELETE HYBRID DATA PLANE
