Import an API
Tyk supports importing both API Blueprint and Swagger (OpenAPI) JSON definitions from either the Gateway or the Dashboard. Tyk will output the converted file to to stdout. Below are the commands you can use to get Tyk to switch to command mode and generate the respective API definitions for both API Blueprint and Swagger files.
API Blueprint is being deprecated
Our support for API Blueprint is being deprecated. We have been packaging aglio in our Docker images for the Dashboard which enables rendering API Blueprint Format in the portal. This module is no longer maintained and is not compatible with newer NodeJS. If you wish to continue using this feature, you can do so by installing the module yourself in your Dockerfile. The imapct of this change is that our Docker images will no longer contain this functionality.
As a work around, you can do the following:
- Create API Blueprint in JSON format using the Apiary Drafter tool
- Convert API Blueprint to OpenAPI (Swagger) using the Apiary API Elements CLI tool.
Import APIs via the Gateway
Using API Blueprint
Note
See API Blueprint being deprecated section above.
Tyk supports an easy way to import Apiary API Blueprints in JSON format using the command line.
Blueprints can be imported and turned into standalone API definitions (for new APIs) and also imported as versions into existing APIs.
It is possible to import APIs and generate mocks or to generate White Lists that pass-through to an upstream URL.
All imported Blueprints must be in the JSON representation of Blueprint’s markdown documents. This can be created using Apiary’s Snow Crash tool.
Tyk outputs all new API definitions to stdout, so redirecting the output to a file is advised in order to generate new definitions to use in a real configuration.
Importing a Blueprint as a new API:
Create a new definition from the Blueprint:
./tyk --import-blueprint=blueprint.json --create-api --org-id=<id> --upstream-target="http://widgets.com/api/"
Importing a definition as a version in an existing API:
Add a version to a definition:
./tyk --import-blueprint=blueprint.json --for-api=<path> --as-version="version_number"
Creating your API versions as a mock
As the API Blueprint definition allows for example responses to be embedded, these examples can be imported as forced replies, in effect mocking out the API. To enable this mode, when generating a new API or importing as a version, simply add the --as-mock parameter.
Using Swagger (OpenAPI)
Tyk supports importing Swagger documents to create API definitions and API versions. Swagger imports do not support mocking though, so sample data and replies will need to be added manually later.
Importing a Swagger document as a new API
Create a new definition from Swagger:
./tyk --import-swagger=petstore.json --create-api --org-id=<id> --upstream-target="http://widgets.com/api/"
Note
When creating a new definition from an OAS 3.0 spec, you will have to manually add the listen path after the API is created.
Importing a Swagger document as a version into an existing API
Add a version to a definition:
./tyk --import-swagger=petstore.json --for-api=<path> --as-version="version_number"
Mocks
Tyk supports API mocking using our versioning use_extended_paths setup, adding mocked URL data to one of the three list types (white-list, black-list or ignored). In order to handle a mocked path, use an entry that has action set to reply:
"ignored": [
  {
    "path": "/v1/ignored/with_id/{id}",
    "method_actions": {
      "GET": {
        "action": "reply",
        "code": 200,
        "data": "Hello World",
        "headers": {
          "x-tyk-override": "tyk-override"
        }
      }
    }
  }
],
See Versioning for more details.
Import APIs via the Dashboard API
Import API - Swagger
| Property | Description |
|---|---|
| Resource URL | /api/import/swagger/ |
| Method | POST |
| Type | None |
| Body | None |
| Param | None |
Sample Request
POST /api/import/swagger/
Host: localhost:3000
authorization:7a7b140f-2480-4d5a-4e78-24049e3ba7f8
{
  "swagger": "{swagger data...}",
  "insert_into_api": false,
  "api_id": "internal API id",
  "version_name": "yourversionname",
  "upstream_url": "yourupstreamurl"
}
Parameters:
insert_into_api: If set totruethe import will replace an existing API. Setting tofalsewill import into a new API.api_id: The internal MongoDB object id for your API.version_name: Your versioning convention name for the imported API.upstream_url: The URL the API is served by.
Sample Response
{
  "Status": "OK",
  "Message": "API Imported",
  "Meta": "new_api_id"
}
Import API - Blueprint
| Property | Description |
|---|---|
| Resource URL | /api/import/blueprint/ |
| Method | POST |
| Type | None |
| Body | None |
| Param | None |
Sample Request
POST /api/import/blueprint/
Host: localhost:3000
authorization:7a7b140f-2480-4d5a-4e78-24049e3ba7f8
{
  "blueprint": "{blueprint data...}",
  "insert_into_api": false,
  "api_id": "internal API id",
  "as_mock": false,
  "version_name": "yourversionname",
  "upstream_url": "yourupstreamurl"
}
Parameters:
insert_into_api: If set totruethe import will replace an existing API. Setting tofalsewill import into a new API.api_id: The internal MongoDB object id for your API.as_mock: If set to true, enables our mocking support for Blueprint imported API. See Mocks above for more details.version_name: Your versioning convention name for the imported API.upstream_url: The URL the API is served by.
Sample Response
{
  "Status": "OK",
  "Message": "API Imported",
  "Meta": "new_api_id"
}
Import APIs via the Dashboard
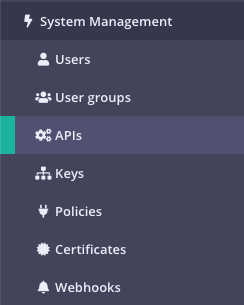
Step 1: Select “APIs” from the “System Management” section

Step 2: Click “IMPORT API”

Tyk supports the following import options:
- From an Existing Tyk API definition
- From a Apiary Blueprint (JSON) file
- From a Swagger/OpenAPI (JSON only) file
- From a SOAP WSDL definition file (new from v1.9)
To import a Tyk Definition, just copy and paste the definition into the code editor.
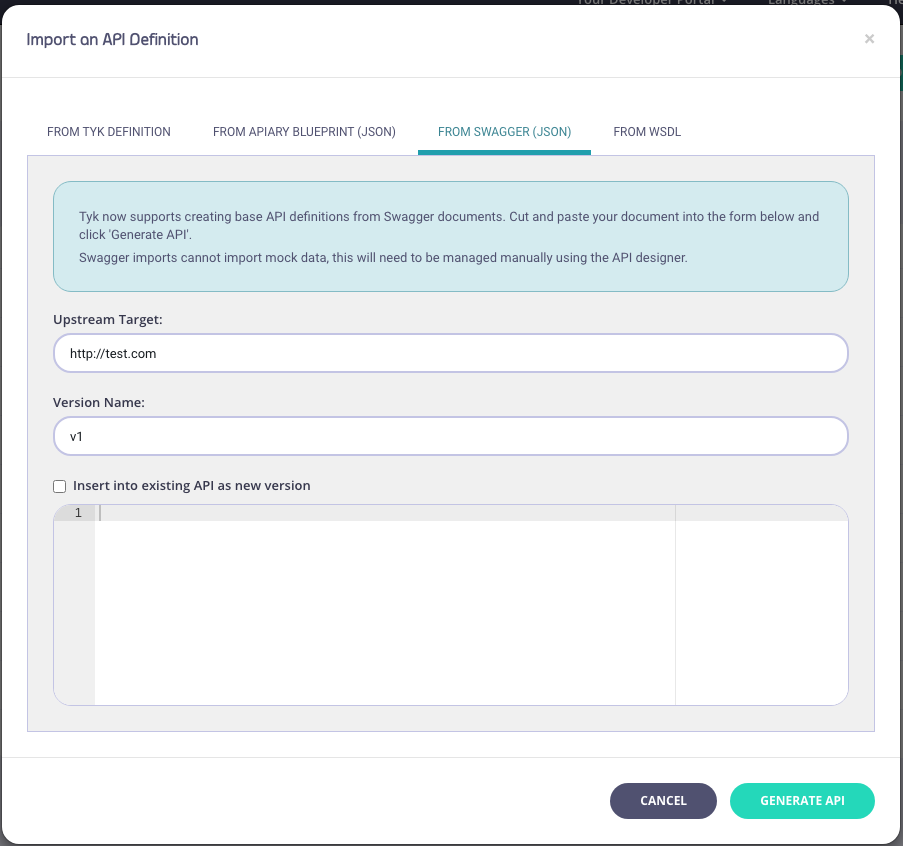
For Apiary Blueprint and Swagger/OpenAPI, the process is the same. For example:
Click the “From Swagger (JSON)” option from the pop-up

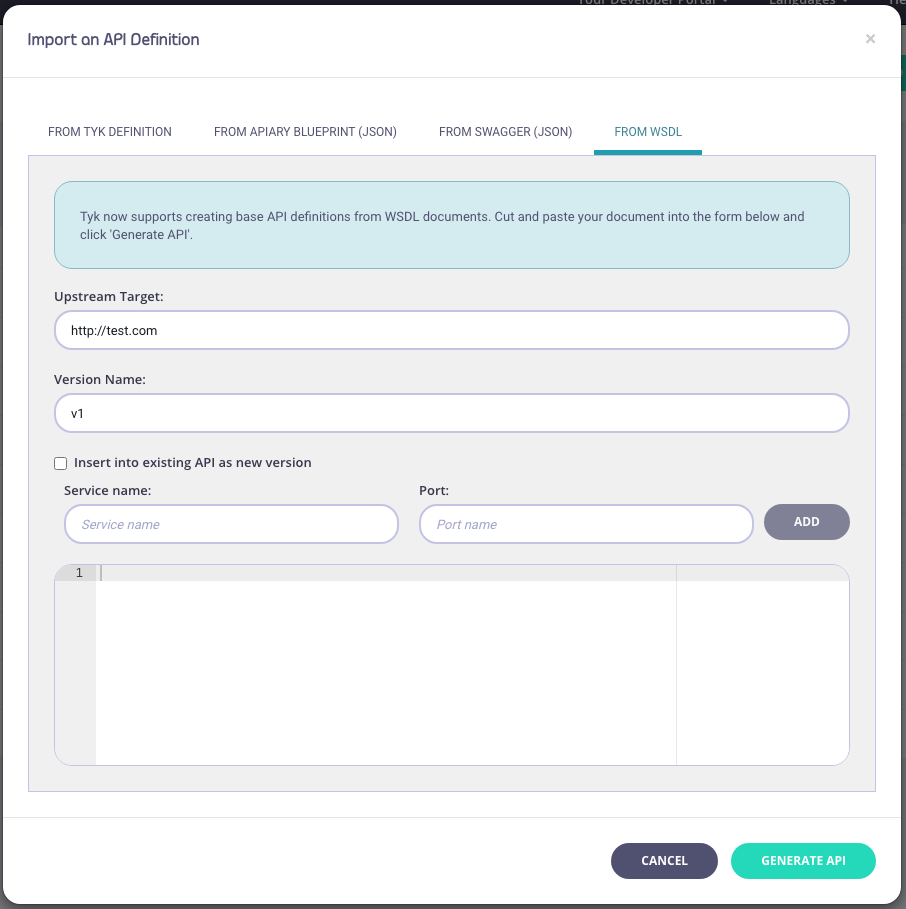
For WSDL:

Step 3: Enter API Information
You need to enter the following information:
- Your Upstream Target
- A Version Name (optional)
- An optional Service Name and Port (WSDL only)
- Copy code into the editor
Step 4: Click “Generate API”
Your API will appear in your APIs list. If you select EDIT from the ACTIONS drop-down list, you can see the endpoints (from the Endpoint Designer) that have been created as part of the import process.
