JSON Web Tokens
Protecting an API with JWT
This assumes you’ve already setup an API and are ready to protect it with JWT.
Getting JWT support set up in the Dashboard only requires a few fields to be set up in the Core settings tab:
Step 1: Set Authentication Mode
Select JSON Web Tokens as the Authentication mode:

Step 2: Set the JWT Signing Method
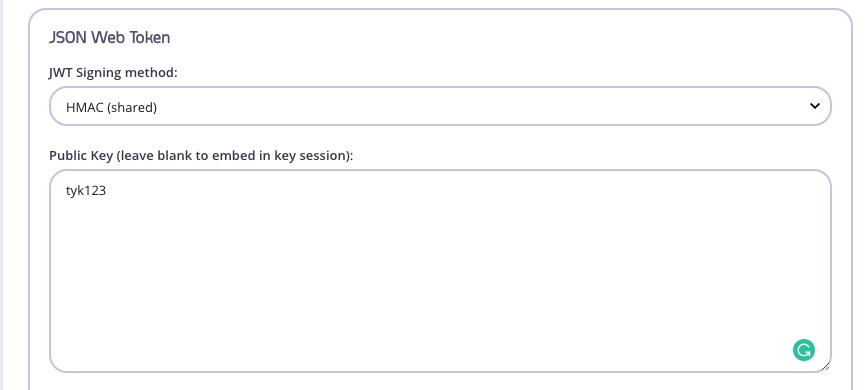
Set the cryptographic signing method to HMAC (shared) and the public secret as tyk123

Step 3: Set the Identity Source and Policy Field Name
The “sub” is unique to our end user or client. The policy rate limiting, authorization, will apply to this unique bearer.

We are telling Tyk to extract this unique ID from the sub Header, which is the JWT standard. Read more here
Step 4: Set a Default Policy
If Tyk cannot find a pol claim, it will apply this Default Policy. Select a policy that gives access to this API we are protecting, or go create one first if it doesn’t exist.

Make sure to save the changes to the API Definition.
Generate a JWT
Let’s generate a JWT so we can test our new protected API.
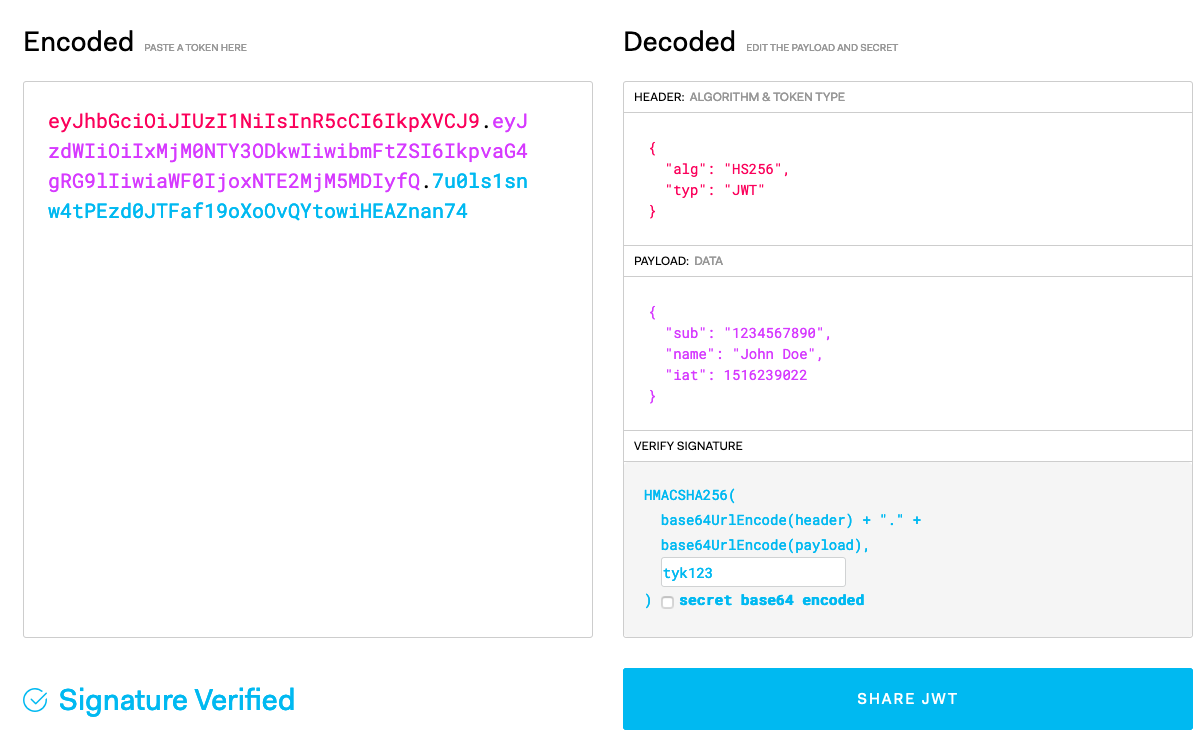
Head on over to https://jwt.io/. Sign the default JWT with our HMAC Shared Secret tyk123 in the VERIFY SIGNATURE section. Your screen should look similar to this:

Copy the Encoded JWT and let’s make a cURL against the Tyk API Definition:
$ curl http://localhost:8080/my-jwt-api/get \
--header "Authorization: Bearer eyJhbGciOiJIUzI1NiIsInR5cCI6IkpXVCJ9.eyJzdWIiOiIxMjM0NTY3ODkwIiwibmFtZSI6IkpvaG4gRG9lIiwiaWF0IjoxNTE2MjM5MDIyfQ.7u0ls1snw4tPEzd0JTFaf19oXoOvQYtowiHEAZnan74"
You should receive response from your Upstream API.
About JWTs
A JSON Web Token (JWT) is a JSON-based open standard (RFC 7519) for passing claims between parties in a web application environment. The tokens are designed to be compact, URL-safe and usable especially in web browser single sign-on (SSO) context.
One of the best things about a JWT is that it is cryptographically signed, and can be signed in a number of ways such as using HMAC shared secret and RSA public/private key pairs.
What is useful is when a token is issued by a third-party (e.g. an OAuth provider, or an SSO interface), that third party can use a private key to sign the claims of the token, and then any third-party can verify that the claims were issued by a safe third-party by validating the signature using a public key.
JWT Signing Method
Tyk allows you to select which cryptographic method to verify the JWT signature with with from:
- RSA public key
- HMAC shared secret
- ECDSA
- Public JWKS Url
For example, if you are using a third-party identity provider (IdP) that can issue JWTs, you can embed their public key in your API Definition, and Tyk will use this public key to validate the claims on the inbound token.
Note, if you want this to be configured at the key level, leave this field blank.
HMAC JWT secrets can be any string, but the secret is shared and therefore less secure since the same key is used for signing and validation.
RSA secrets must be a PEM encoded PKCS1 or PKCS8 RSA private key, these can be generated on a Linux box using:
openssl genrsa -out key.rsa
openssl rsa -in key.rsa -pubout > key.rsa.pub
Individual JWT secrets
Tyk supports validating an inbound token against a stored key. Tyk will not issue JWTs, but can issue a token ID that is bound to a JWT key so that inbound tokens that bear this id (key) can be validated.
Then set your tokens up with these new fields when you create them:
"jwt_data": {
  "secret": "Secret"
}
Using this approach, when a JWT is passed to Tyk for validation, it must use the kid header field, as this is the internal access token (when creating a key) that is used to track the rate limits, policies and quotas for the token owner.
If Tyk cannot find a kid header, it will try to find an ID in the sub field of the claims section. This is not recommended, but is supported as many JWT libraries do not necessarily set the kid header claim (especially publicly available test generators).
The benefit here is that if RSA is used, then all that is stored in a Tyk installation that uses hashed keys is the hashed ID of the end user and their public key, so it is very secure.
Identity Source and Policy Field Name
-
The Identity Source: This is the identity that will be affected by the underlying policy (e.g. if you set this to use the
subclaim, and this is traditionally a user ID of some sort, then Tyk will begin a rate limiter and quota counter for this specific identity). If you wanted to instead limit a client, e.g. all the users of a specific application, then you can use a different identity claim that identifies the group (i.e. one that is shared by all JWTs issued). -
The Policy Field Name: This is a required input, but your JWT doesn’t need to include it. Tyk will check this claim in the JWT for a policy ID (e.g
72ab02b3be743101c6132342) to apply to this session.
Scope Claims
See Setting JWT Scope Claims for more details on this option.
Dynamic public key rotation using public JWKs URL
Instead of specifying static public key in API definition, it is possible to specify URL pointing to JSON Web Key Set (JWKs). At the most basic level, the JWKs is a set of keys containing the public keys that should be used to verify any JWT issued by the authorization server. You can read more about JWKs here: https://auth0.com/docs/jwks
Using JWKs you can maintan dynamic list of currently active public keys, and safely rotate them, since both old and new JWT tokens will work, until you remove expired JWK. Generated JWT keys should have kid a claim, which should match with the kid field of JWK, used for validating the token.
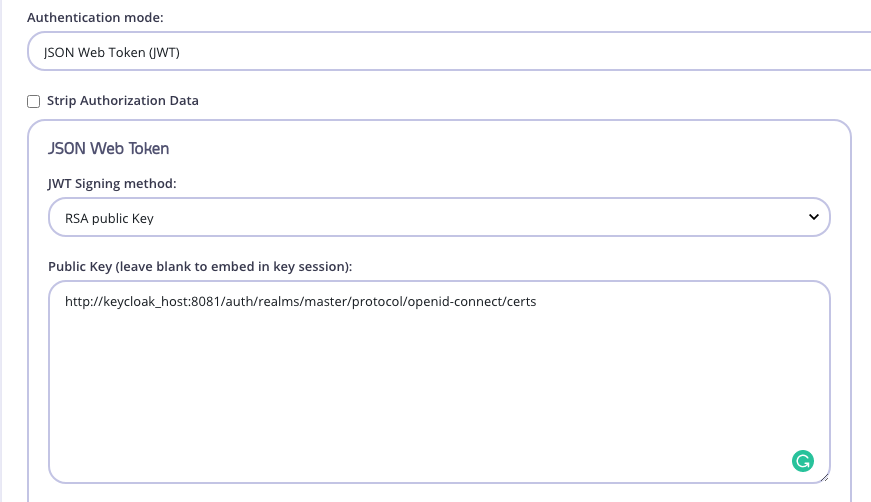
So, instead of using a static public key, we would use the REST URL for the JWKS well known endpoint:

cURLing the URL in the “Public Key” field in the screenshot above returns the following payload:
$ curl http://keycloak_host:8081/auth/realms/master/protocol/openid-connect/certs
{
  "keys": [
      {
          "kid": "St1x2ip3-wzbrvdk4yVa3-inKWdOwbkD3Nj3gpFJwYM",
          "kty": "RSA",
          "alg": "RS256",
          "use": "sig",
          "n": "k-gUvKl9-sS1u8odZ5rZdVCGTe...m2bMmw",
          "e": "AQAB",
          "x5c": [
              "MIICmzCCAYMCBgFvyVrRq....K9XQYuuWSV5Tqvc7mzPd/7mUIlZQ="
          ],
          "x5t": "6vqj9AeFBihIS6LjwZhwFLmgJXM",
          "x5t#S256": "0iEMk3Dp0XWDITtA1hd0qsQwgES-BTxrz60Vk5MjGeQ"
      }
  ]
}
This is a JWKS complaint payload as it contains the “x5c” entry which contains the public key. Also, the issuer generates the the ID Token or Access Token with a header that includes a “kid” that matches the one in the JWKS payload.
Here’s an example of a header belonging to an access token generated by the issuer above.
{
  "alg": "RS256",
  "typ": "JWT",
  "kid": "St1x2ip3-wzbrvdk4yVa3-inKWdOwbkD3Nj3gpFJwYM"
}
The Bearer tokens will be signed by the private key of the issuer, which in this example is our keycloak host. This bearer token can be verified by Tyk using the public key available in the above payload under “x5C”.
All of this happens automatically. You just need to specify to Tyk what the JWKs url is, and then apply a “sub” and default policy in order for everything to work. See Step #3, 4, and 5 under option #1 for explanations and examples.
JWT Clock Skew Configuration
Due to the nature of distributed systems it is expected that despite best efforts you can end up in a situation with clock skew between the issuing party (An OpenID/OAuth provider) and the validating party (Tyk).
This means that in certain circumstances Tyk would reject requests to an API endpoint secured with JWT with the Token is not valid yet error . This occurs due to the clock on the Tyk server being behind the clock on the Identity Provider server even with all servers ntp sync’d from the same ntp server.
You can now configure JWT clock skew using the following variables. All values are in seconds. The default is 0 (i.e. no skew).
"jwt_issued_at_validation_skew": 0,
"jwt_expires_at_validation_skew": 0,
"jwt_not_before_validation_skew": 0
JWT scope to policy mapping support
Note
This feature is available starting from v2.9
You can map JWT scopes to security policies to be applied to a key. To enable this feature you will need to specify the following fields in your API spec:
  "jwt_scope_to_policy_mapping": {
    "admin": "59672779fa4387000129507d",
    "developer": "53222349fa4387004324324e"
  },
  "jwt_scope_claim_name": "our_scope"
}
Here we have set:
"jwt_scope_to_policy_mapping"provides mapping of scopes (read from claim) to actual policy ID. I.e. in this example we specify that scope “admin” will apply policy"59672779fa4387000129507d"to a key"jwt_scope_claim_name"identifies the JWT claim name which contains scopes. This API Spec field is optional with default value"scope". This claim value could be any of the following:- a string with space delimited list of values (by standard)
- a slice of strings
- a string with space delimited list of values inside a nested key. In this case, provide
"jwt_scope_claim_name"in dot notation. For eg."scope1.scope2","scope2"will be having the list of values nested inside"scope1" - a slice of strings inside a nested key. In this case, provide
"jwt_scope_claim_name"in dot notation. For eg."scope1.scope2","scope2"will be having a slice of strings nested inside"scope1"
Note
Several scopes in JWT claim will lead to have several policies applied to a key. In this case all policies should have "per_api" set to true and shouldn’t have the same API ID in access rights. I.e. if claim with scopes contains value "admin developer" then two policies "59672779fa4387000129507d" and "53222349fa4387004324324e" will be applied to a key (with using our example config above).
JWT Diagram in Tyk API Gateway

