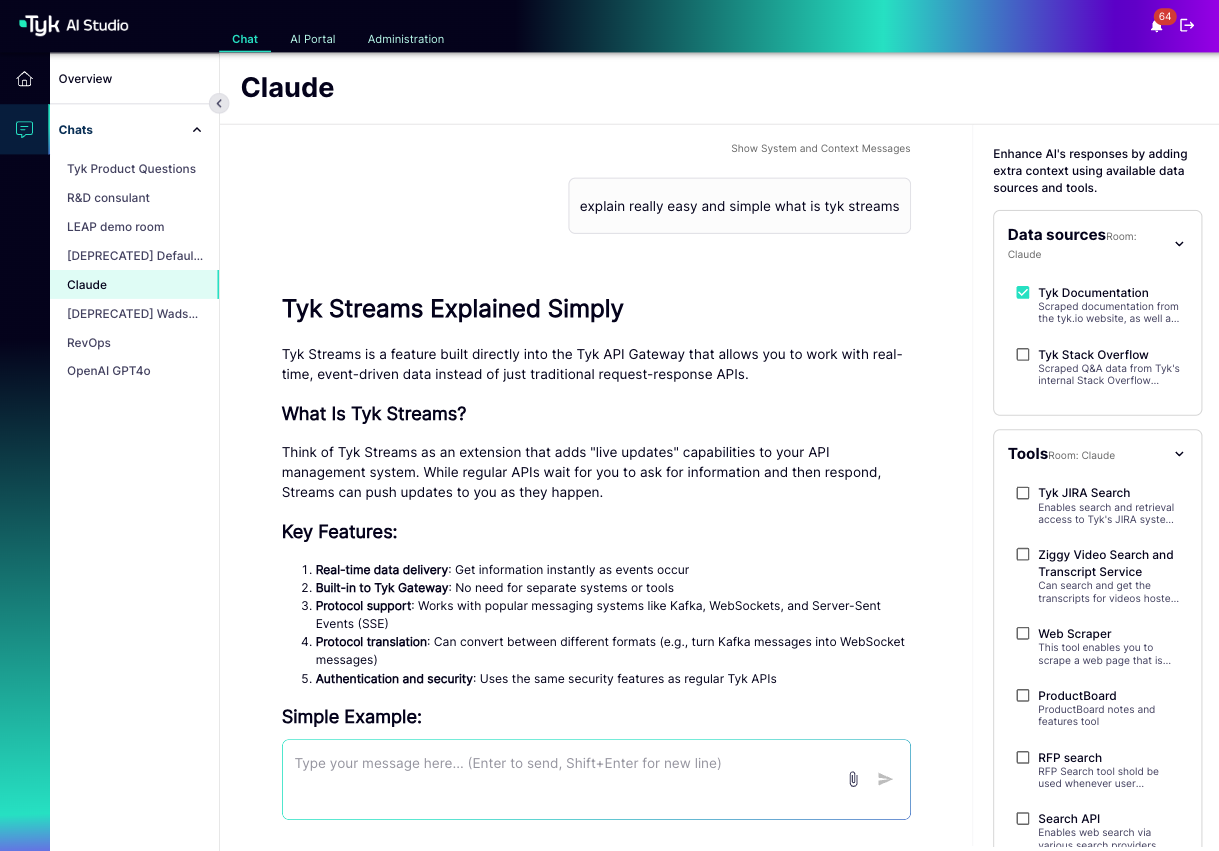
Tyk AI Studio’s Chat Interface provides a secure and interactive environment for users to engage with Large Language Models (LLMs), leveraging integrated tools and data sources. It serves as the primary front-end for conversational AI interactions within the platform.
Chat Sessions: Each conversation happens within a session, which keeps the history and context. Users can continue a session later from Past Conversations.
Streaming Responses: AI Studio streams LLM responses token by token. The chat shows them as Markdown, with syntax highlighting and a copy button on code blocks.
Tool Integration: The LLM uses configured Tools when it decides that it needs them. The chat shows each tool call as a card with its arguments, status, and result. You can expand the card to see the details. The available tools depend on the Chat Experience configuration and the user’s team permissions.
Human-in-the-Loop Tools: The person in the chat answers a tool of type Client, not a server. The chat shows an approval card or a form card. The conversation continues when the user answers. Refer to Client Tools.
Generative UI: The LLM can show dashboards, tables, charts, and forms in the chat. Refer to Generative UI.
Plugin Renderers: AI Portal plugins can replace the default tool card of specific tools with their own web component. Refer to Custom Tool Renderers From Plugins.
Data Source (RAG) Integration: The chat can query configured Data Sources to retrieve relevant information (Retrieval-Augmented Generation). The message shows the retrieved context in a block that you can expand. The available data sources depend on the Chat Experience configuration and the user’s team permissions.
Edit, Regenerate, and Stop: Users can edit one of their earlier messages. The conversation then goes back to that point, and the LLM answers again. Users can also regenerate the last reply, or stop a reply while it streams.
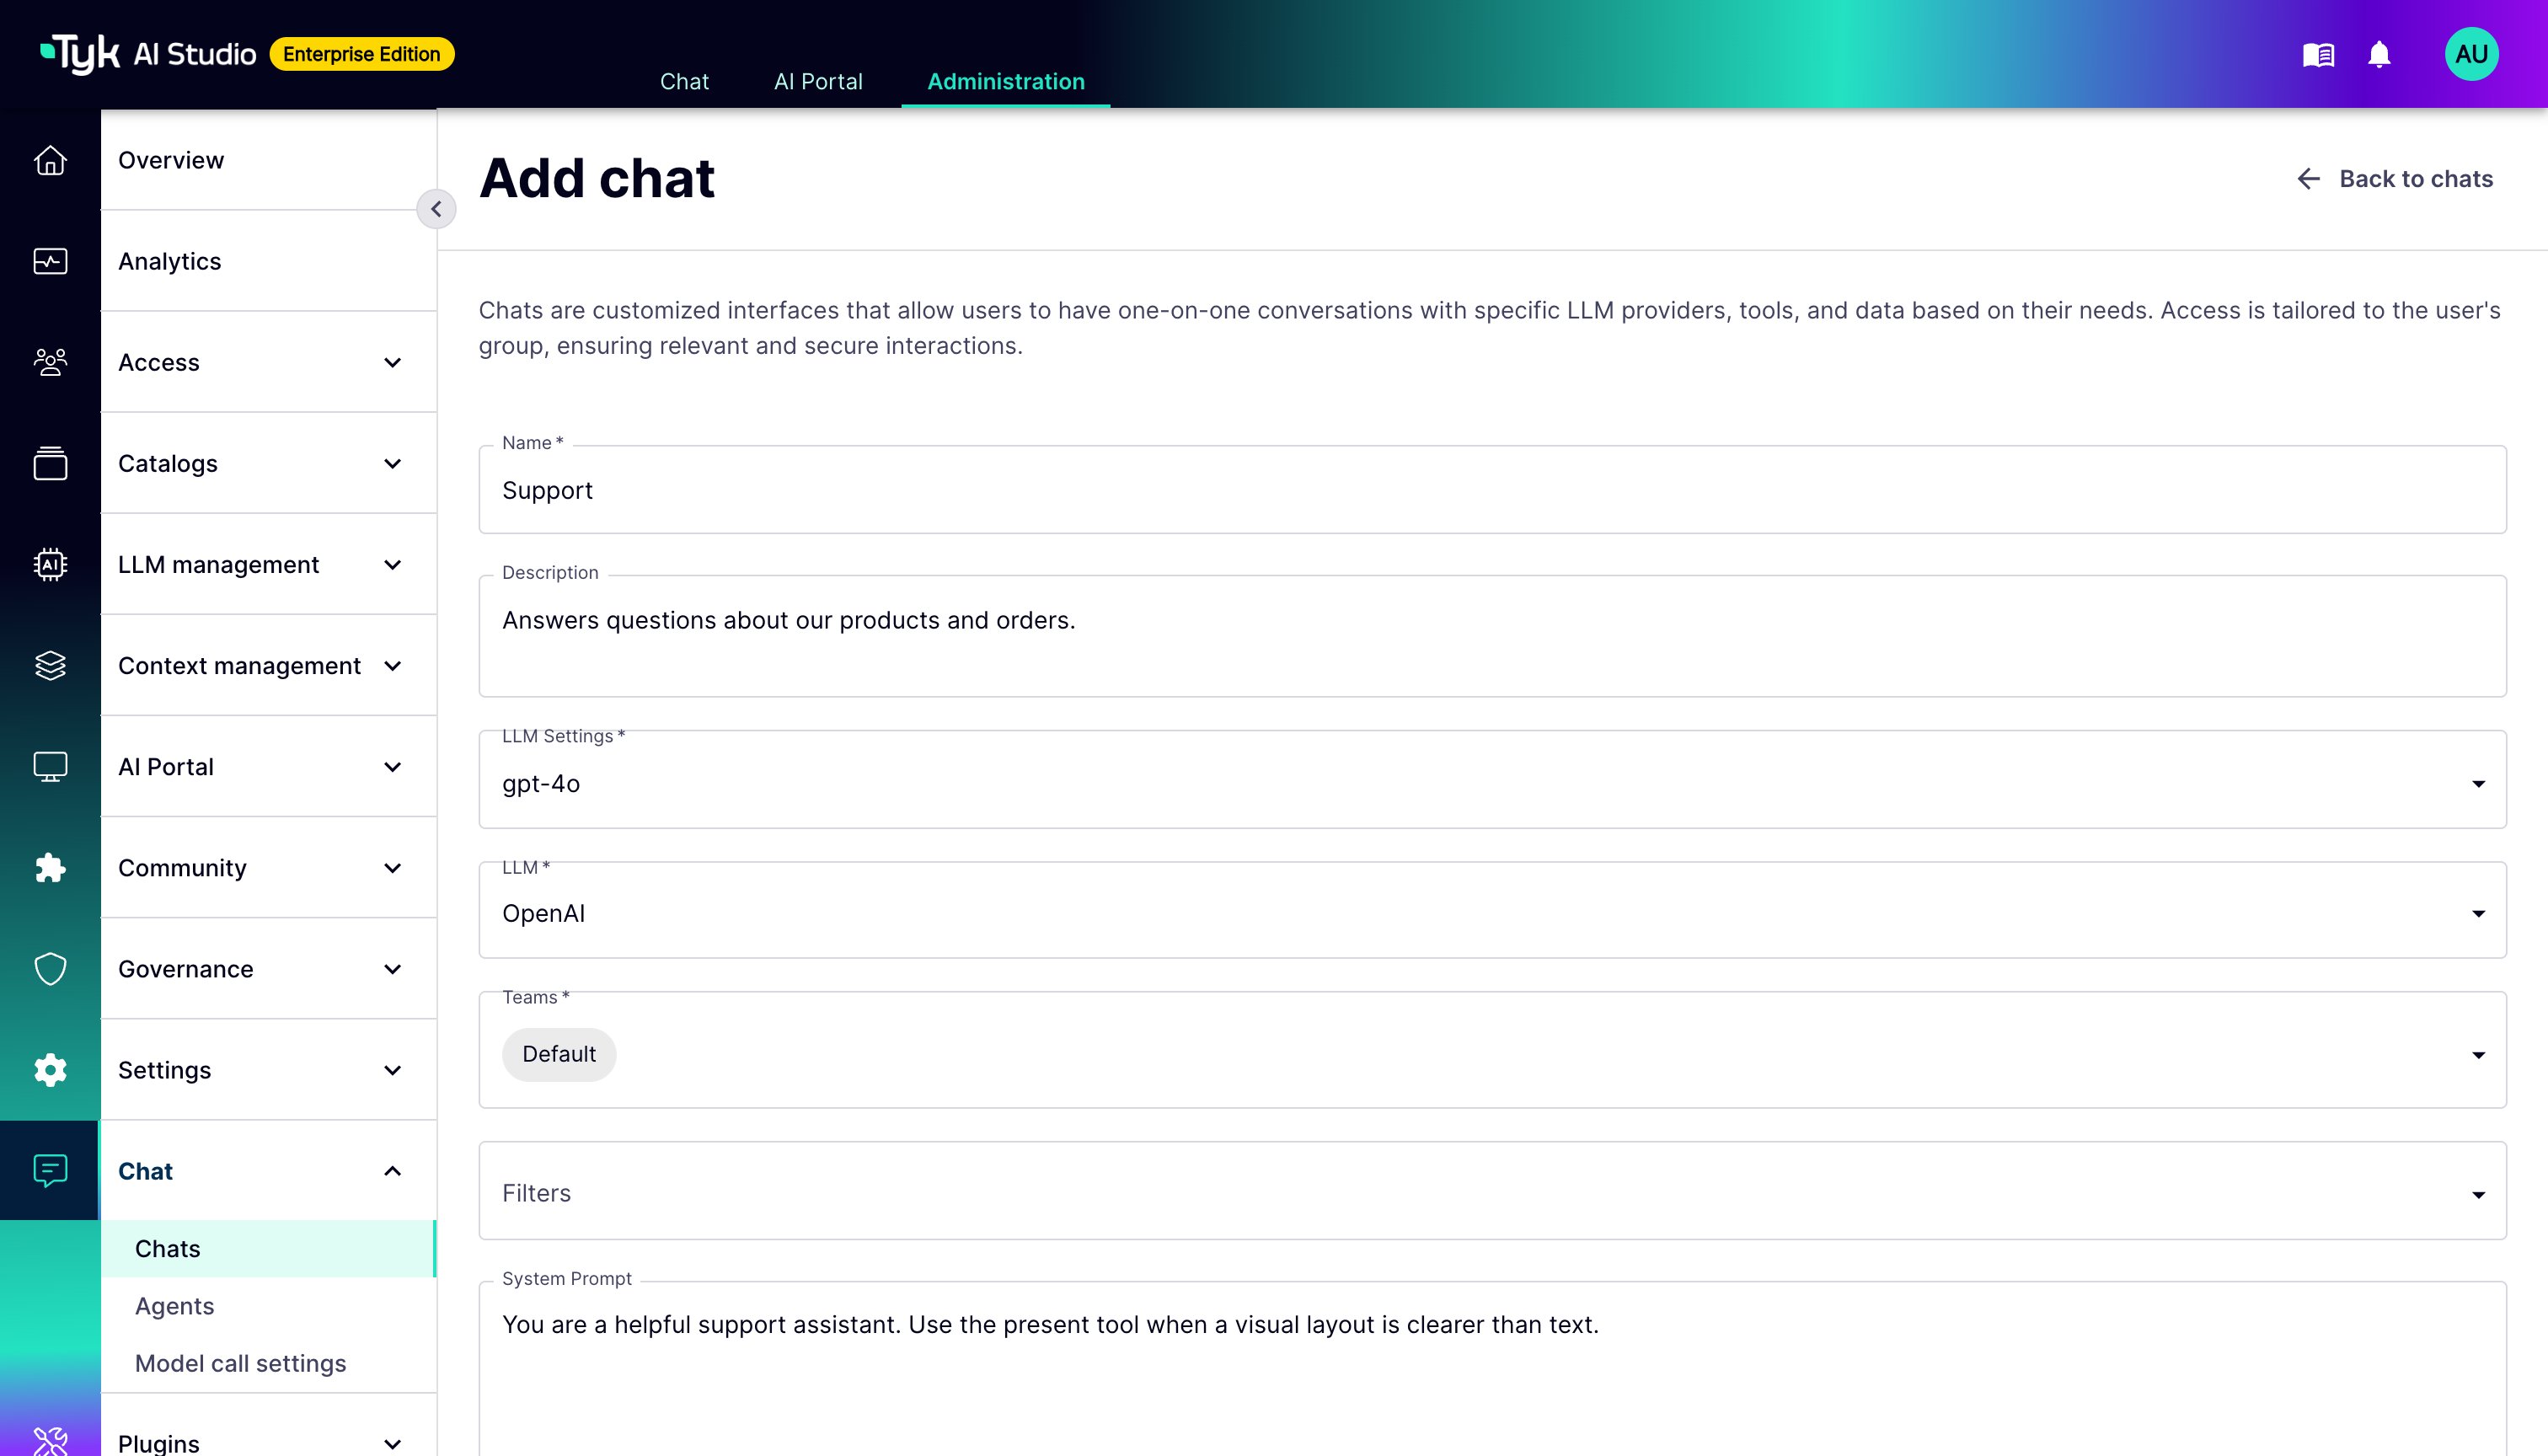
System Prompts: Administrators can define specific system prompts for different Chat Experiences to guide the LLM’s persona, tone, and behavior.
History: Users can view and continue their past chat sessions.
Export to PDF: From v2.1.0, users can export a chat conversation to PDF using the print button, available in both the standard chat view and agent chats.
File Upload (Context): If the configuration allows it, users can attach files to a message. The files give temporary context to the LLM.
Status and Errors: The chat shows governance status lines and errors in the conversation. Examples of status lines are filters that run and tools that are added. To hide them, use the System and Context Messages toggle.
Access Control: Users only see and can interact with Chat Experiences assigned to their Teams.
From v2.2.0, the chat pages use a new front end. The previous chat front end is still available as a fallback.To select the front end, set these environment variables on the AI Studio server. Refer to AI Studio Environment Variables.
Setting
Effect
CHAT_UI_V2_ENABLED=true (default)
Chat rooms and agent chats use the new front end and the v2 chat API.
CHAT_UI_V2_ENABLED=false
Chat rooms and agent chats use the previous chat pages and the v1 chat API.
CHAT_SESSION_IDLE_TTL (default 10m)
The time that an idle chat or agent session stays in memory between turns. After this time, AI Studio stops the session. When a user continues a chat room session after that, AI Studio loads it again from the database. Agent sessions must start again.
A tool of type Client runs in the chat, not on a server. The person in the chat gives the answer. The LLM calls the tool in the same way as any other function. The chat then shows a card, and the reply of the LLM stops until the person answers. AI Studio sends the answer back to the LLM as the result of the tool, so that the LLM can continue.There are three interaction types:
Approval: The user approves or rejects an action that the LLM asks for.
Form: The user completes a form.
Generative UI (present): The LLM shows a layout that it creates. No user input is necessary. Refer to Generative UI.
Go to Context management > Tools and create a tool.
For the tool type, select Client (human-in-the-loop).
Enter a Description. The LLM reads the description to decide when to use the tool. Write it as an instruction. Example: “Collect a shipping address when an order needs a delivery destination.”
In Interaction, select Approval or Form.
(Optional) In Start from an example, click an example. The example fills in the name, description, card text, and fields. You can then edit them. The examples for each interaction are:
Forms: Shipping address (US), Shipping address (international), and Contact information
Approvals: Confirm a destructive action and Approve a purchase or spend
Use the field builder to add the fields. Each field has a Label, an Identifier, a Type, a Required setting, and Help text. The field types are short text, long text, number, yes/no, date, email, phone, web address, and a dropdown of choices.
For an approval, go to What the assistant must state. Click Add a detail for each detail that the LLM must give, for example the action and the reason.
For a form, go to Context the assistant provides. Click Add a detail for each detail that the LLM shows above the form. Then go to Fields the person fills in. Click Add a field for each field that the person completes.
Use the preview next to the field builder to check the tool. The preview shows the function that the LLM sees and the card that the person sees. When you answer the preview card, it shows the data that the LLM would receive.
(Optional) To edit the JSON Schema directly, click Edit as JSON. Use this option for schemas that the field builder cannot create.
Click Add tool.
Add the tool to a Chat Experience as a default tool, or let users add it from the chat sidebar. Privacy levels, team entitlements, and filters apply in the same way as for REST tools.
The LLM sees the tool as a function with the name of the tool’s slug (or of its first configured operation). If the user sends a new message and does not answer the card, AI Studio closes the call with an error result. This keeps the conversation valid.
The answer comes from the browser, not from a tool backend. For this reason, AI Studio does not send the answer to the LLM without changes:
AI Studio checks the answer against the shape that the card produces. An approval must be an object with a boolean approved and an optional comment. A form answer must match the response schema of the form.
AI Studio refuses an answer that is larger than 32 KiB.
AI Studio stores the answer in a labeled envelope: {"source": "user", "untrusted": true, "note": "...", "tool": "...", "kind": "...", "answer": ...}. The note tells the LLM that the answer is data that the person supplied, not a system message and not instructions.
AI Studio sends a refused answer to the LLM as an error result.
With the Generative UI (present) interaction, the LLM creates its own interface instead of a text answer. It can show dashboards, cards, key figures, tables, charts, alerts, lists, images, forms, and buttons. The LLM builds the layout from a fixed set of components, the assistant-ui generative UI library. No user input is necessary, so the call completes automatically, and the LLM continues.AI Studio includes this tool. On first start, it creates a Client tool with the name Generative UI (function name present) in the Default tool catalog. To use it in a chat room, select it in Default Tools in the chat room form. Users can also add it from the chat sidebar. You do not need to write a schema. AI Studio generates the schema from the installed library, so the LLM and the chat use the same components.To make the LLM use the tool more often, add a sentence to the system prompt. Example: “Use the present tool when a visual layout is clearer than text.”Interactive elements (Button, Select, Input, DatePicker, Checkbox, RadioGroup, Form, and a clickable ListViewItem) have an action that the LLM selects. When the user uses one of these elements, the chat sends its payload to the LLM as the next user message (Action: <type> <input> <payload>). The LLM can then respond to the selection.Prompts to try:
“Show me a dashboard of this quarter’s sales: three headline numbers, a bar chart by month, and a table by region.”
“Present the pros and cons as two cards side by side.”
“Build a short form to collect a shipping address, then confirm it back.”
An AI Portal plugin can replace the default tool card for specific tools with its own web component. To do this, declare the chat.tool_renderer slot in the plugin manifest:
tool is the name of the tool operation: the operationId of a REST tool, or the slug of a client tool. The chat mounts the element for every call of that tool, in chat rooms and in agent chats. The element receives:
The attributes data-tool-name, data-args (JSON), data-result (JSON, not present while the tool runs), data-is-error, and data-status (running, complete, requires-action, or incomplete)
The property toolCall, with the same information as an object. If the element has a render() method, the chat calls it after each update.
The AI Portal plugin API (element.portalPluginAPI), for RPC calls to the plugin
To answer a human-in-the-loop call from a renderer, dispatch a tool-resultCustomEvent. Set its detail to the result, or to { "result": ..., "isError": true } to decline. The usual AI Portal rules for team visibility apply to the slot. If a renderer does not load, AI Studio logs the error and uses the default card.An answer from a renderer goes through the same checks as an answer from a standard card. Refer to How AI Studio Handles Answers.
The values in data-args, data-result, and toolCall come from the LLM, the tool, or the user. Treat them as untrusted. Escape them before you render them, and do not insert them into the page as HTML.