Install and Configure Tyk Enterprise Developer Portal
Last updated:
Tyk Enterprise Developer Portal
If you are interested in getting access contact us at support@tyk.io
Tyk Enterprise Developer Portal is available as a Docker container. To install Tyk Enterprise Developer Portal, you need to launch the Docker image for the portal with a database to store the portal metadata. Optionally, you may decide to use S3 to store the portal CMS assets (image and theme files)
This guide explains how to install and bootstrap the Tyk Enterprise Developer Portal. On average, it should take around 5-10 minutes to install it depending on your setup.
Enterprise Developer Portal Components
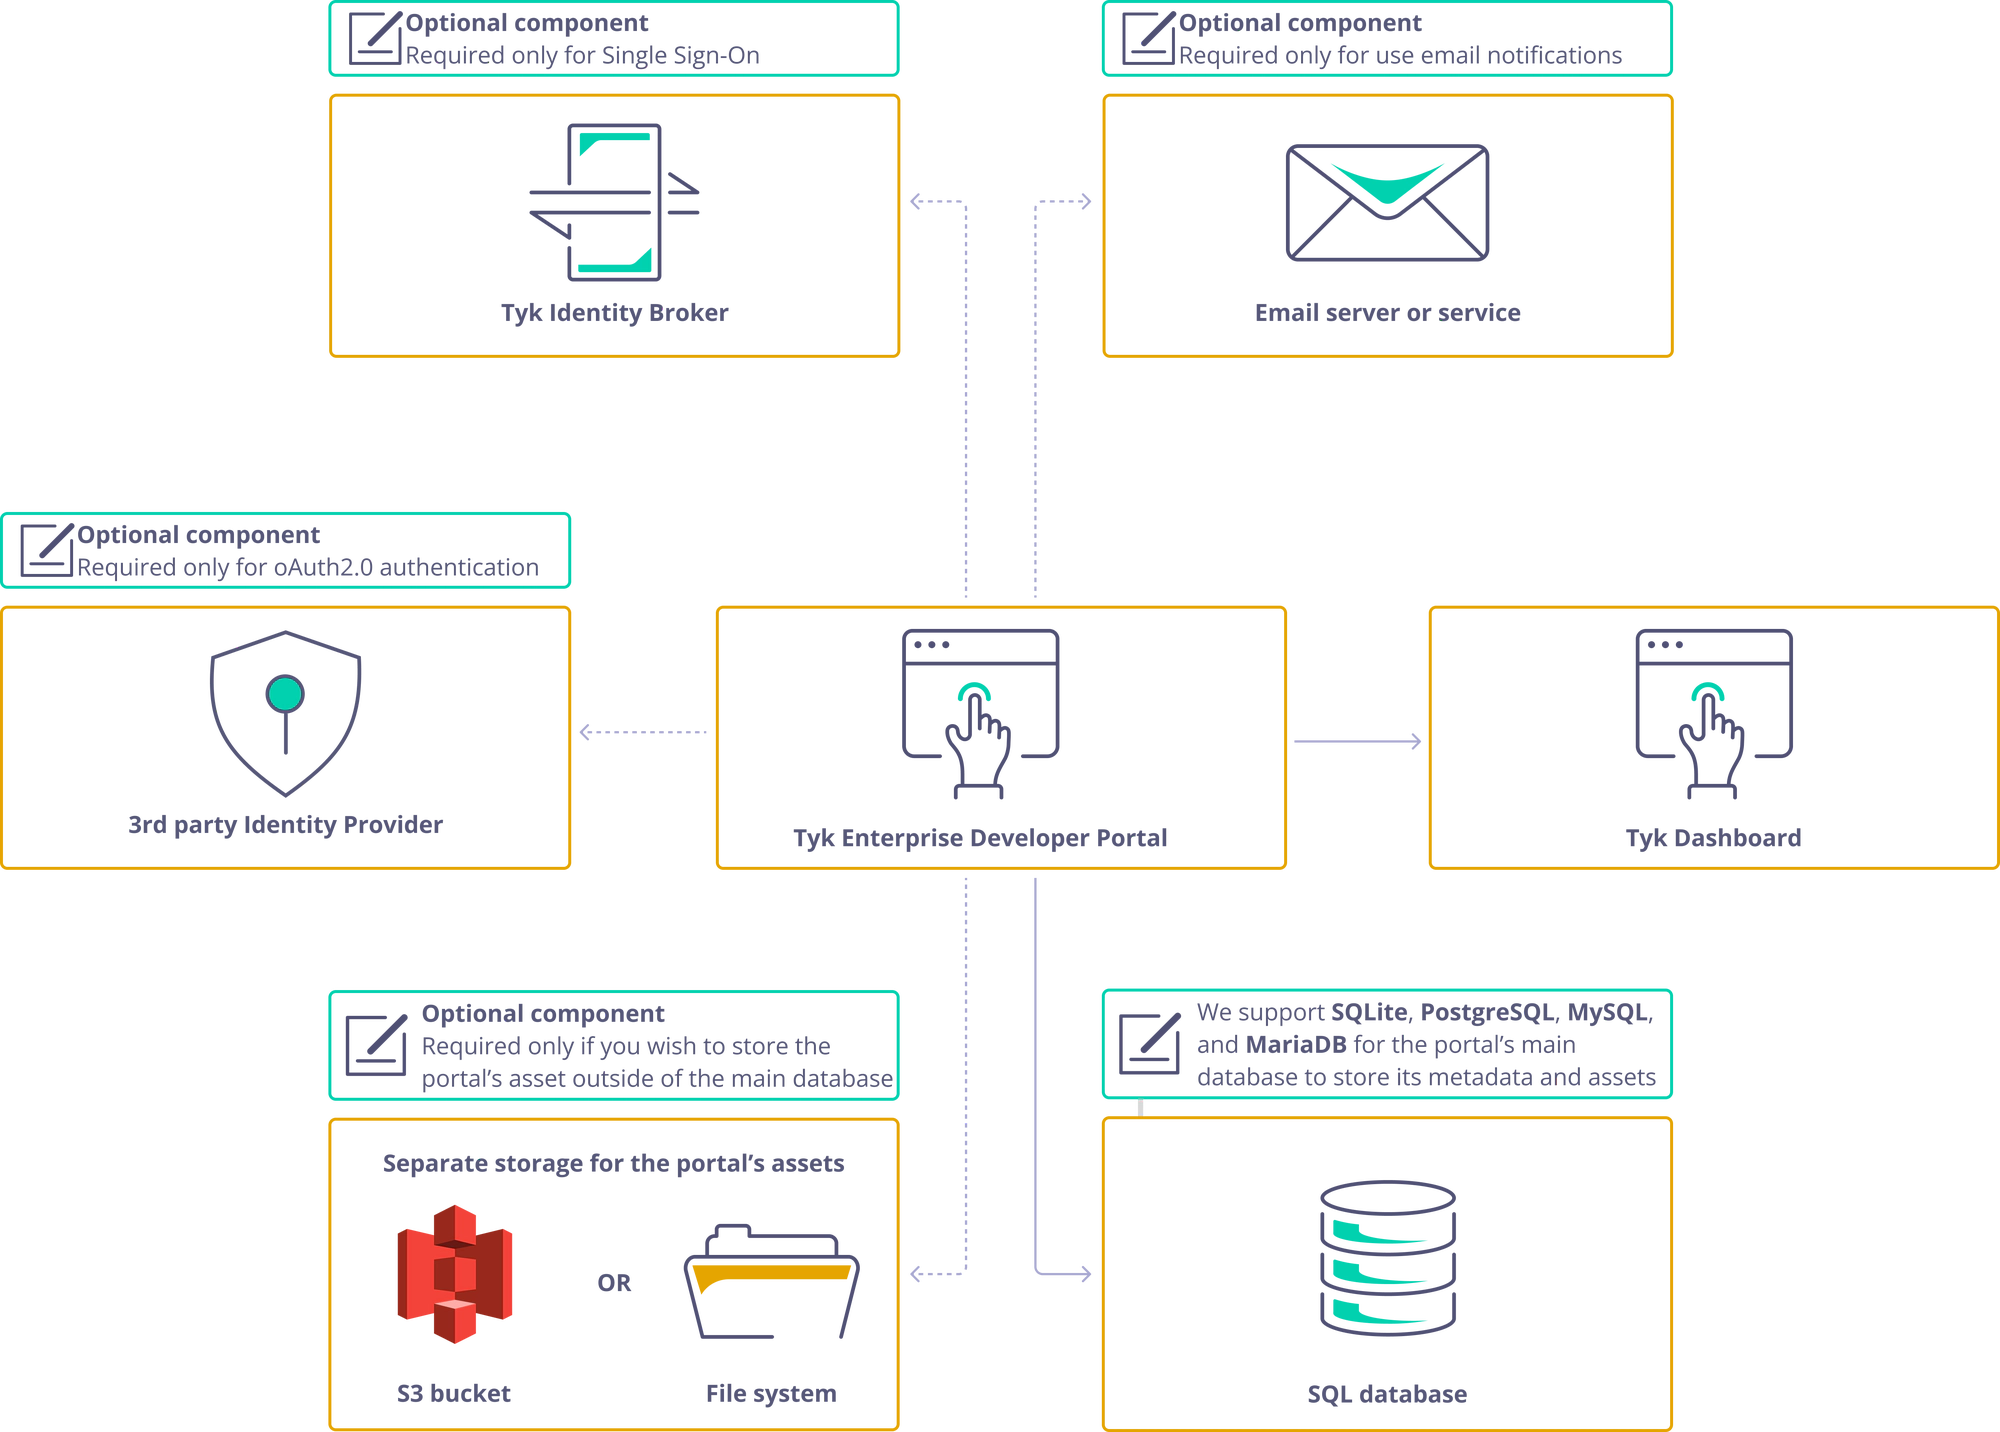
The portal deployment comprises of three main components:
- The portal application itself
- The portal’s main database that stores metadata related to the portal, such as API products, plans, developers, applications, and more
- The asset storage, which stores CMS assets such as images, themes, and OpenAPI specification files. The assets could reside in the portal’s main database or separately in an S3 bucket or filesystem volume.
Optionally, there could be three additional components:
- 3rd party identity provider. To enable oAuth2.0 for your API Products, you’ll need to utilize an OpenID-compliant third-party identity provider. It’s essential to note that the Tyk Stack doesn’t include third-party identity providers, so you should refer to your Identity Provider’s documentation for instructions on configuring and deploying it. This component is optional and required only for enabling oAuth2.0
- Tyk Identity Broker. You only need this component if you want to configure Single Sign-On for the Tyk Enterprise Developer Portal. For more guidance on this topic, please consult the Single Sign-On section of the documentation
- Email server. The portal is capable of sending notifications to both admin users and developers when specific events happen within the portal. To enable this feature, you need to specify a connection configuration to an email server or service, and configure other email settings. You can choose to use a server that is installed on your premises or an SMTP-compatible SaaS product. For step-by-step instructions, please refer to the Email Settings section
Portal Installation Process
The portal installation process comprises two steps:
- Install the portal application. To install the portal and launch it in the bootstrap mode, you need to configure your portal instance by specifying settings such as TLS, log level, and database connection. For further guidance on launching the portal, please refer to one of the installation options: Docker container, Docker Compose, Helm chart, or RPM package.
- Bootstrap the portal After you’ve launched the portal, it will wait for you to provide credentials for the super admin user before it starts accepting traffic. Once you’ve created the super admin user, the portal will complete its installation process by creating the necessary database structure and initialising the required assets for its operations. You can bootstrap the portal either through the UI or using the bootstrap API. Please refer to the Bootstrapping section for implementing this step.
Installation Options for Enterprise Developer Portal
The Tyk Enterprise Developer Portal supports multiple installation flavors. Check out the guides below to deploy the portal on the platform that suits you best.
 Install with Docker
Install with Docker Compose
 Install on Kubernetes
![]() Install on Red Hat
Install on Red Hat
Docker
This section explains how to install Tyk Enterprise Developer Portal in a container using Docker. Depending on your preferences, you can use MariaDB, MySQL, PostgreSQL or SQLite as database.
In this recipe, the database and the portal container will run on the same network, with the database storing its data on a volume. The portal’s CMS assets (images, files and themes) are stored in the database, although this guide provides links to the documentation to use a persistent volume or an S3 bucket as a storage medium for CMS assets. Additionally, all settings for the Portal are configured using an env-file.
Note
This document is just an example. Customize all fields, including the username, password, root password, database name and more.
Be sure to update the connection DSN in the env-file accordingly.
Prerequisites To successfully install the Tyk Enterprise Developer Portal with Docker, you should have installed Docker on the machine where you want to install the portal.
Using PostgreSQL
-
Create a network for the portal deployment
To start with, you need to create a Docker network for communication between the database and the portal. Execute the following command to create it:
docker network create tyk-portal -
Create an init script for PostgreSQL
To initialize a PostgreSQL database, you need to create an init script that will later be used to launch the PostgreSQL instance. Copy the content below to a file named
init.sql, which you will need in the next step.-- init.sql -- Creating user CREATE USER admin WITH ENCRYPTED PASSWORD 'secr3t'; CREATE DATABASE portal; GRANT ALL PRIVILEGES ON DATABASE portal TO admin; -
Create the database volume and launch the database
The next step is to launch the PostgreSQL database for the portal. To achieve this, create a data volume for the database first:
docker volume create tyk-portal-postgres-dataThen launch the PostgreSQL instance by executing the following command:
docker run \
-d \
--name tyk-portal-postgres \
--restart on-failure:5 \
-e POSTGRES_PASSWORD=secr3t \
-e PGDATA=/var/lib/postgresql/data/pgdata \
--mount type=volume,source=tyk-portal-postgres-data,target=/var/lib/postgresql/data/pgdata \
--mount type=bind,src=$(pwd)/init.sql,dst=/docker-entrypoint-initdb.d/init.sql \
--network tyk-portal \
-p 5432:5432 \
postgres:10-alpine
Note
The above PostgreSQL configuration is an example. You can customize deployment of your PostgreSQL instance. Please refer to [the PostgreSQL documentation](https://www.postgresql.org/docs/current/installation.html) for further guidance. -
Create an environment variables file
Creating an environment variables file to specify settings for the portal is the next step. This is optional, as you can alternatively specify all the variables using the -e option when starting your deployment.
Here is an example of a sample environment file. For a comprehensive reference of environment variables, please refer to the configuration section in the Tyk Enterprise Developer Portal documentation.
PORTAL_HOSTPORT=3001
PORTAL_DATABASE_DIALECT=postgres
PORTAL_DATABASE_CONNECTIONSTRING=host=tyk-portal-postgres port=5432 dbname=portal user=admin password=secr3t sslmode=disable
PORTAL_DATABASE_ENABLELOGS=false
PORTAL_THEMING_THEME=default
PORTAL_STORAGE=db
PORTAL_LICENSEKEY=<your-license-here>
Once you have completed this step, you are ready to launch the portal application with PostgreSQL in a Docker container.
-
Pull and launch the portal container
To pull and launch the portal using Docker, use the command provided below. Ensure that you replace
<tag>with the specific version of the portal you intend to launch before executing the command, e.g.tykio/portal:v1.7for the portal v1.7. You can browse all available versions on Docker Hub and in the release notes section.docker run -d \ -p 3001:3001 \ --env-file .env \ --network tyk-portal \ --name tyk-portal \ tykio/portal:<tag>This command will launch the portal on localhost at port 3001. Now, you can bootstrap the portal and start managing your API products.
-
Bootstrap the portal
Now the portal is running on port 3001, but it needs to be bootstrapped by providing credentials for the super admin user since it’s the first time you are launching it. Follow the bootstrapping section of the documentation to bootstrap the portal via the UI or the admin API.
-
Clean up
If you want to clean up your environment or start the installation process from scratch, execute the following commands to stop and remove the portal container:
docker stop tyk-portal
docker rm tyk-portal
docker stop tyk-portal-postgres
docker rm tyk-portal-postgres
docker volume rm tyk-portal-postgres-data
Using MySQL
-
Create a network for the portal deployment
To start with, you need to create a Docker network for communication between the database and the portal. Execute the following command to create it:
docker network create tyk-portal -
Create the database volume and launch the database
The next step is to launch the MySQL database for the portal. To achieve this, create a data volume for the database first:
docker volume create tyk-portal-mysql-dataThen launch the MySQL instance by executing the following command:
docker run \
-d \
--name tyk-portal-mysql \
--restart on-failure:5 \
-e MYSQL_ROOT_PASSWORD=sup3rsecr3t \
-e MYSQL_DATABASE=portal \
-e MYSQL_USER=admin \
-e MYSQL_PASSWORD=secr3t \
--mount type=volume,source=tyk-portal-mysql-data,target=/var/lib/mysql \
--network tyk-portal \
-p 3306:3306 \
mysql:5.7 --character-set-server=utf8mb4 --collation-server=utf8mb4_unicode_ci --sql-mode=ALLOW_INVALID_DATES
**Note** The above MySQL configuration is an example. You can customize deployment of your MySQL instance. Please refer to the [MySQL documentation](https://dev.mysql.com/doc/refman/5.7/en/charset-applications.html) for further guidance.**Note** SQLite support will be deprecated from Tyk 5.7.0. To avoid disrupution, please transition to PostgreSQL, MongoDB or one of the listed compatible alternatives. -
Create an environment variables file
Creating an environment variables file to specify settings for the portal is the next step. This is optional, as you can alternatively specify all the variables using the -e option when starting your deployment.
Here is an example of a sample environment file. For a comprehensive reference of environment variables, please refer to the configuration section in the Tyk Enterprise Developer Portal documentation.
MYSQL_ROOT_PASSWORD=sup3rsecr3t
MYSQL_DATABASE=portal
MYSQL_USER=admin
MYSQL_PASSWORD=secr3t
PORTAL_HOSTPORT=3001
PORTAL_DATABASE_DIALECT=mysql
PORTAL_DATABASE_CONNECTIONSTRING=admin:secr3t@tcp(tyk-portal-mysql:3306)/portal?charset=utf8mb4&parseTime=true
PORTAL_DATABASE_ENABLELOGS=false
PORTAL_THEMING_THEME=default
PORTAL_STORAGE=db
PORTAL_LICENSEKEY=<your-license-here>
Once you have completed this step, you are ready to launch the portal application with MySQL in a Docker container or via Docker Compose.
-
Pull and launch the portal container
To pull and launch the portal using Docker, use the command provided below. Ensure that you replace
<tag>with the specific version of the portal you intend to launch before executing the command, e.g.tykio/portal:v1.7for the portal v1.7. You can browse all available versions on Docker Hub and in the release notes section.docker run -d \ -p 3001:3001 \ --env-file .env \ --network tyk-portal \ --name tyk-portal \ --mount type=bind,src=/tmp/portal/themes,dst=/opt/portal/themes \ --mount type=bind,src=/tmp/portal/system,dst=/opt/portal/public/system \ tykio/portal:<tag>This command will launch the portal on localhost at port 3001. Now, you can bootstrap the portal and start managing your API products.
-
Bootstrap the portal
Now the portal is running on port 3001, but it needs to be bootstrapped by providing credentials for the super admin user since it’s the first time you are launching it. Follow the bootstrapping section of the documentation to bootstrap the portal via the UI or the admin API.
-
Clean up
If you want to clean up your environment or start the installation process from scratch, execute the following commands to stop and remove the portal container:
docker stop tyk-portal
docker rm tyk-portal
docker stop tyk-portal-mysql
docker rm tyk-portal-mysql
docker volume rm tyk-portal-mysql-data
Using Sqlite
Note
Tyk no longer supports SQLite as of Tyk 5.7.0. To avoid disruption, please transition to PostgreSQL, MongoDB, or one of the listed compatible alternatives.
-
Create a volume for the portal’s database
To start with, you need to create a single volume for sqlite:
mkdir -p /tmp/portal/db chmod -R o+x,o+w /tmp/portal -
Create an environment variables file
Creating an environment variables file to specify settings for the portal is the next step. This is optional, as you can alternatively specify all the variables using the -e option when starting your deployment.
Here is an example of a sample environment file. For a comprehensive reference of environment variables, please refer to the configuration] section in the Tyk Enterprise Developer Portal documentation.
PORTAL_HOSTPORT=3001
PORTAL_DATABASE_DIALECT=sqlite3
PORTAL_DATABASE_CONNECTIONSTRING=db/portal.db
PORTAL_DATABASE_ENABLELOGS=false
PORTAL_THEMING_THEME=default
PORTAL_STORAGE=db
PORTAL_LICENSEKEY=<your-license-here>
Once you have completed this step, you are ready to launch the portal application with SQLite in a Docker container.
-
Pull and launch the portal container
To pull and launch the portal using Docker, use the command provided below. Ensure that you replace
<tag>with the specific version of the portal you intend to launch before executing the command, e.g.tykio/portal:v1.7for the portal v1.7. You can browse all available versions on Docker Hub and in the release notes section.docker run -d \ -p 3001:3001 \ --env-file .env \ --mount type=bind,src=/tmp/portal/db,dst=/opt/portal/db \ --mount type=bind,src=/tmp/portal/themes,dst=/opt/portal/themes \ --mount type=bind,src=/tmp/portal/system,dst=/opt/portal/public/system \ --name tyk-portal \ tykio/portal:<tag>This command will launch the portal on localhost at port 3001. Now, you can bootstrap the portal and start managing your API products.
-
Bootstrap the portal
Now the portal is running on port 3001, but it needs to be bootstrapped by providing credentials for the super admin user since it’s the first time you are launching it. Follow the bootstrapping section of the documentation to bootstrap the portal via the UI or the admin API.
-
Clean Up
If you want to clean up your environment or start the installation process from scratch, execute the following commands to stop and remove the portal container:
docker stop tyk-portal
docker rm tyk-portal
Since the SQLite data is persisted in the file system, you need to remove the following file for a complete deletion of the portal:
rm -rf /tmp/portal/db
Docker Compose
This section provides a clear and concise, step-by-step recipe for launching the Tyk Enterprise Developer Portal in a container using Docker Compose. Depending on your preferences, you can use MariaDB, MySQL, PostgreSQL or SQLite as database.
In this recipe, the database and the portal containers will run on the same network, with the database storing it’s data on a volume. The portal’s CMS assets (images, files and themes) are stored in the database, although this guide provides links to the documentation to use a persistent volume or an S3 bucket as a storage medium for CMS assets. Additionally, all settings for the Portal are configured using an env-file.
Note
This document is just an example. Customize all fields, including the username, password, root password, database name and more.
Prerequisites
To successfully install the Tyk Enterprise Developer Portal with Docker Compose, you should have installed the following software:
Using PostgreSQL
-
Create an init script for PostgreSQL
To initialize a PostgreSQL database, you need to create an init script that will later be used to launch the PostgreSQL instance. Copy the content below to a file named
init.sql, which you will need in the next step.-- init.sql -- Creating user CREATE USER admin WITH ENCRYPTED PASSWORD 'secr3t'; CREATE DATABASE portal; GRANT ALL PRIVILEGES ON DATABASE portal TO admin; -
Create an environment variables file for configuring the portal and the database
Creating an environment file to specify settings for the portal is the next step.
Here is an example of a sample environment file. For a comprehensive reference of environment variables, please refer to the configuration section in the Tyk Enterprise Developer Portal documentation.
PORTAL_HOSTPORT=3001
PORTAL_DATABASE_DIALECT=postgres
PORTAL_DATABASE_CONNECTIONSTRING=host=tyk-portal-postgres port=5432 dbname=portal user=admin password=secr3t sslmode=disable
PORTAL_DATABASE_ENABLELOGS=false
PORTAL_THEMING_THEME=default
PORTAL_LICENSEKEY=<your-license-here>
PORTAL_STORAGE=db
Once you have completed this step, you are ready to launch the portal application with PostgreSQL via Docker Compose.
-
Create a docker-compose file
Before launching the portal using docker-compose, you will need to create a
docker-compose.yamlfile. An example of the portal’s docker-compose file is provided below, which you can use as a starting point and further customize to meet your specific requirements.Ensure that you replace
<tag>with the specific version of the portal you intend to launch before executing the command, e.g.tykio/portal:v1.7for the portal v1.7. You can browse all available versions on Docker Hub and in the release notes section.version: '3.6' services: tyk-portal: depends_on: - tyk-portal-postgres image: tykio/portal:<tag> networks: - tyk-portal ports: - 3001:3001 environment: - PORTAL_DATABASE_DIALECT=${PORTAL_DATABASE_DIALECT} - PORTAL_DATABASE_CONNECTIONSTRING=${PORTAL_DATABASE_CONNECTIONSTRING} - PORTAL_THEMING_THEME=${PORTAL_THEMING_THEME} - PORTAL_THEMING_PATH=${PORTAL_THEMING_PATH} - PORTAL_LICENSEKEY=${PORTAL_LICENSEKEY} - PORTAL_STORAGE=${PORTAL_STORAGE} tyk-portal-postgres: image: postgres:10-alpine volumes: - tyk-portal-postgres-data:/var/lib/postgresql/data/pgdata - ${PWD}/init.sql:/docker-entrypoint-initdb.d/init.sql networks: - tyk-portal environment: - POSTGRES_PASSWORD=secr3t - PGDATA=/var/lib/postgresql/data/pgdata volumes: tyk-portal-postgres-data: networks: tyk-portal: -
Pull and launch the portal container using docker-compose
To launch the portal using docker-compose, execute the command provided below.
docker-compose --env-file .env up -d
docker-compose --env-file .env up -d
This command will launch the portal on localhost at port 3001. Now, you can bootstrap the portal and start managing your API products.
-
Bootstrap the portal
Now the portal is running on port 3001, but it needs to be bootstrapped by providing credentials for the super admin user since it’s the first time you are launching it. Follow the bootstrapping section of the documentation to bootstrap the portal via the UI or the admin API.
-
Clean up
If you want to clean up your environment or start the installation process from scratch, execute the following commands to stop and remove the portal container:
docker-compose down
docker-compose down
Using MySQL
-
Create an environment variables file for configuring the portal and the database
The first step is to create an environment file to specify settings for the portal.
Here is an example of a sample environment file. For a comprehensive reference of environment variables, please refer the configuration section in the Tyk Enterprise Developer Portal documentation.
MYSQL_ROOT_PASSWORD=sup3rsecr3t
MYSQL_DATABASE=portal
MYSQL_USER=admin
MYSQL_PASSWORD=secr3t
PORTAL_HOSTPORT=3001
PORTAL_DATABASE_DIALECT=mysql
PORTAL_DATABASE_CONNECTIONSTRING=admin:secr3t@tcp(tyk-portal-mysql:3306)/portal?charset=utf8mb4&parseTime=true
PORTAL_DATABASE_ENABLELOGS=false
PORTAL_THEMING_THEME=default
PORTAL_STORAGE=db
PORTAL_LICENSEKEY=<your-license-here>
Once you have completed this step, you are ready to launch the portal application with MySQL via Docker Compose.
-
Create a docker-compose file
Before launching the portal using docker-compose, you will need to create a
docker-compose.yamlfile. An example of the portal’s docker-compose file is provided below, which you can use as a starting point and further customize to meet your specific requirements.Ensure that you replace
<tag>with the specific version of the portal you intend to launch before executing the command, e.g.tykio/portal:v1.7for the portal v1.7. You can browse all available versions on Docker Hub and in the release notes section.version: '3.6' services: tyk-portal: depends_on: - tyk-portal-mysql image: tykio/portal:<tag> networks: - tyk-portal ports: - 3001:3001 environment: - PORTAL_DATABASE_DIALECT=${PORTAL_DATABASE_DIALECT} - PORTAL_DATABASE_CONNECTIONSTRING=${PORTAL_DATABASE_CONNECTIONSTRING} - PORTAL_THEMING_THEME=${PORTAL_THEMING_THEME} - PORTAL_THEMING_PATH=${PORTAL_THEMING_PATH} - PORTAL_LICENSEKEY=${PORTAL_LICENSEKEY} - PORTAL_STORAGE=${PORTAL_STORAGE} tyk-portal-mysql: image: mysql:5.7 command: --character-set-server=utf8mb4 --collation-server=utf8mb4_unicode_ci volumes: - tyk-portal-mysql-data:/var/lib/mysql networks: - tyk-portal environment: - MYSQL_ROOT_PASSWORD=${MYSQL_ROOT_PASSWORD} - MYSQL_DATABASE=${MYSQL_DATABASE} - MYSQL_USER=${MYSQL_USER} - MYSQL_PASSWORD=${MYSQL_PASSWORD} volumes: tyk-portal-mysql-data: networks: tyk-portal: -
Pull and launch the portal container using docker-compose
To launch the portal using docker-compose, execute the command provided below.
docker-compose --env-file .env up -d
docker-compose --env-file .env up -d
This command will launch the portal on localhost at port 3001. Now, you can bootstrap the portal and start managing your API products.
-
Bootstrap the portal
Now the portal is running on port 3001, but it needs to be bootstrapped by providing credentials for the super admin user since it’s the first you are launching it. Follow the bootstrapping section of the documentation to bootstrap the portal via the UI or the admin API.
-
Clean up
If you want to clean up your environment or start the installation process from scratch, execute the following commands to stop and remove the portal container:
docker-compose down
docker-compose down
Using Sqlite
-
Create an environment variables file for configuring the portal and the database
Creating an environment file to specify settings for the portal is the next step. This is optional, as you can alternatively specify all the variables using the -e option when starting your deployment.
Here is an example of a sample environment file. For a comprehensive reference of environment variables, please refer to the [configuration section(//tyk.io/docs/5.7/product-stack/tyk-enterprise-developer-portal/deploy/configuration/)] in the Tyk Enterprise Developer Portal documentation.
PORTAL_HOSTPORT=3001
PORTAL_DATABASE_DIALECT=sqlite3
PORTAL_DATABASE_CONNECTIONSTRING=db/portal.db
PORTAL_DATABASE_ENABLELOGS=false
PORTAL_THEMING_THEME=default
PORTAL_THEMING_PATH=./themes
PORTAL_LICENSEKEY=<your-license-here>
PORTAL_STORAGE=db
Once you have completed this step, you are ready to launch the portal application with SQLite via Docker Compose.
-
Create a docker-compose file
Before launching the portal using docker-compose, you will need to create a
docker-compose.yamlfile. An example of the portal’s docker-compose file is provided below, which you can use as a starting point and further customize to meet your specific requirements.version: '3.6' services: tyk-portal: image: tykio/portal:<tag> volumes: - /tmp/portal/db:/opt/portal/db ports: - 3001:3001 environment: - PORTAL_DATABASE_DIALECT=${PORTAL_DATABASE_DIALECT} - PORTAL_DATABASE_CONNECTIONSTRING=${PORTAL_DATABASE_CONNECTIONSTRING} - PORTAL_THEMING_THEME=${PORTAL_THEMING_THEME} - PORTAL_THEMING_PATH=${PORTAL_THEMING_PATH} - PORTAL_LICENSEKEY=${PORTAL_LICENSEKEY} - PORTAL_STORAGE=${PORTAL_STORAGE} -
Pull and launch the portal container using docker-compose
To launch the portal using docker-compose, execute the command provided below.
docker-compose --env-file .env up -d
docker-compose --env-file .env up -d
This command will launch the portal on localhost at port 3001. Now, you can bootstrap the portal and start managing your API products.
-
Bootstrap the portal
Now the portal is running on port 3001, but it needs to be bootstrapped by providing credentials for the super admin user since it’s the first time you are launching it. Follow the bootstrapping section of the documentation to bootstrap the portal via the UI or the admin API.
-
Clean up
If you want to clean up your environment or start the installation process from scratch, execute the following commands to stop and stop and remove the portal container:
docker-compose down
docker-compose down
Since the SQLite data is persisted in the mounted volume (
/tmp/portal/dbin the above example), to completely erase the deployment, you will also need to delete it for a complete clean-up:rm -rf /tmp/portal/db rm -rf /tmp/portal/db
Kubernetes
Using New Helm Chart
There are two ways to install Tyk Enterprise Developer Portal. You can enable global.components.devPortal during Tyk Self-Managed deployment by following the Tyk Self-Managed installation instruction using our tyk-stack umbrella chart. It will install Tyk Enterprise Developer Portal together with Tyk Gateway and Dashboard in the same namespace.
Alternatively, you can install Tyk Enterprise Developer Portal as standalone component using our tyk-dev-portal chart. This page provides a clear and concise, step-by-step guide for installing the Tyk Enterprise Developer Portal as standalone component using the new helm chart.
To install the portal using helm charts, you need to take the following steps:
- Create the
tyk-dev-portal-confsecret - Specify config settings for the portal in
values.yaml - Launch the portal using the helm chart
-
Create the
tyk-dev-portal-confsecretMake sure the
tyk-dev-portal-confsecret exists in your namespace. This secret will automatically be generated if Tyk Dashboard instance was bootstrapped with tyk-boostrap component chart andbootstrap.devPortalwas set totruein thevalues.yaml.If the secret does not exist, you can create it by running the following command.
kubectl create secret generic tyk-dev-portal-conf -n ${NAMESPACE} \
--from-literal=TYK_ORG=${TYK_ORG} \
--from-literal=TYK_AUTH=${TYK_AUTH}
The fields
TYK_ORGandTYK_AUTHare the Tyk Dashboard Organization ID and the Tyk Dashboard API Access Credentials respectively. These can be obtained under your profile in the Tyk Dashboard. -
Config settings
You must set the following values in the
values.yamlor with--set {field-name}={field-value}using the helm upgrade command:Field Name Description global.adminUser.emailandglobal.adminUser.passwordSet portal admin username and email for bootstrapping global.secrets.devPortalEnable portal bootstrapping by providing secret name licenseTyk license key for your portal installation storage.typePortal storage type, e.g. fs, s3 and db image.tagEnterprise Portal version. You can get the latest version image tag from Docker Hub database.dialectPortal database dialect, e.g. mysql, postgres and sqlite3 database.connectionStringConnection string to the Portal’s database, e.g. for the mysql dialect: admin:secr3t@tcp(tyk-portal-mysql:3306)/portal?charset=utf8mb4&parseTime=trueIn addition to
values.yaml, you can also define the environment variables described in the configuration section to further customize your portal deployment. These environment variables can also be listed as a name value list under theextraEnvssection of the helm chart. -
Launch the portal using the helm chart
Run the following command to update your infrastructure and install the developer portal:
helm install tyk-dev-portal tyk-helm/tyk-dev-portal -f values.yaml -n tyk
Configuration
Please refer to this guide for an explanation of all configuration options.
Note: Helm chart supports Enterprise Portal v1.2.0+.
Using Legacy Helm Chart
Note
It is recommended to use new helm charts instead of legacy charts. Guide for new charts can be found here
To install the portal using helm charts, you need to take the following steps:
- Create the
tyk-enterprise-portal-confsecret - Specify config settings for the portal in
values.yaml - Launch the portal using the helm chart
This guide provides a clear and concise, step-by-step recipe for installing the Tyk Enterprise Developer Portal using helm charts.
-
Create the
tyk-enterprise-portal-confsecretMake sure the
tyk-enterprise-portal-confsecret exists in your namespace. This secret will automatically be generated during the Tyk Dashboard bootstrap if thedash.enterprisePortalSecretvalue is set totruein thevalues.yaml.If the secret does not exist, you can create it by running the following command.
kubectl create secret generic tyk-enterprise-portal-conf -n ${NAMESPACE} \
--from-literal=TYK_ORG=${TYK_ORG} \
--from-literal=TYK_AUTH=${TYK_AUTH}
Where
TYK_ORGandTYK_AUTHare the Tyk Dashboard Organization ID and the Tyk Dashboard API Access Credentials respectively. Which can be obtained under your profile in the Tyk Dashboard. -
Config settings
**Note**

Tyk no longer supports SQLite as of Tyk 5.7.0. To avoid disruption, please transition to [PostgreSQL](//tyk.io/docs/5.7/tyk-self-managed/#postgresql), [MongoDB](//tyk.io/docs/5.7/tyk-self-managed/#mongodb), or one of the listed compatible alternatives.
You must set the following values in the
values.yamlor with--set {field-name}={field-value}with the helm upgrade command:Field Name Description enterprisePortal.enabledEnable Portal installation enterprisePortal.bootstrapEnable Portal bootstrapping enterprisePortal.licenseTyk license key for your portal installation enterprisePortal.storage.typePortal database dialect, e.g mysql, postgres or sqlite3 enterprisePortal.storage.connectionStringConnection string to the Portal’s database, e.g for the mysql dialect: admin:secr3t@tcp(tyk-portal-mysql:3306)/portal?charset=utf8mb4&parseTime=trueIn addition to values.yaml, you can also define the environment variables described in the configuration section to further customize your portal deployment. These environment variables can also be listed as a name value list under the
extraEnvssection of the helm chart. -
Launch the portal using the helm chart
Run the following command to update your infrastructure and install the developer portal:
helm upgrade tyk-pro tyk-helm/tyk-pro -f values.yaml -n tyk
Note: Helm chart supports Enterprise Portal v1.2.0+.
Red Hat (RHEL / CentOS)
This guide provides a step-by-step recipe for launching the Tyk Enterprise Developer Portal using an RPM package in Red Hat environment (RHEL / CentOS).
Note
This document is just an example. Customize all fields, including the username, password, root password, database name and more.
Be sure to update the connection DSN in the env-file accordingly.
Prerequisites
To successfully install the Tyk Enterprise Developer Portal using RPM, your environment should satisfy the following requirements:
- Connectivity to packagecloud.io. If your environment doesn’t have connectivity to packagecloud, you will need to download the portal package and copy it to the target host.
- RPM Package Manager should be installed on the host machine.
Steps for Installation
-
Download the portal package
To start with, you need to download the portal package from packagecloud.io. To keep things organized, first create a directory where all installation assets (packages and config files) will be stored:
mkdir ~/portal-install
cd ~/portal-install
Next, download the portal package from packagecloud.io by executing the command below. Ensure to replace package-version with actual package version e.g. https://packagecloud.io/tyk/portal-unstable/packages/el/8/portal-1.7.0-1.x86_64.rpm/download.rpm?distro_version_id=205 for the portal v1.7.0 for x86_64.
wget --content-disposition "https://packagecloud.io/tyk/portal-unstable/packages/<package-version>" -
Install the portal package
Once the package is downloaded, you need to install using RPM. Execute the below command to so. Once again, ensure to replace
portal-1.7.0-1.x86_64.rpmwith an actual filename of the package you have downloaded on the previous step.sudo rpm -i portal-1.7.0-1.x86_64.rpm -
Update the configuration file with your license
**Note**

Tyk no longer supports SQLite as of Tyk 5.7.0. To avoid disruption, please transition to [PostgreSQL](//tyk.io/docs/5.7/tyk-self-managed/#postgresql), [MongoDB](//tyk.io/docs/5.7/tyk-self-managed/#mongodb), or one of the listed compatible alternatives.
Before starting the portal service, you need to configure the portal. Once the rpm package has been installed, the portal configuration file will be located in
/opt/portal/portal.conf. Initially, the config file is filled with the default values. The minimal configuration change to start the portal is to add theLicenseKeyproperty to the config file. The below sample configuration will start the portal on portal 3001 with SQLite as a database, no TLS enabled, and all CMS assets (images, theme files, etc.) are stored in the filesystem. You can, however, customize the provided example and make more suitable for your need using the configuration reference.{ "HostPort": 3001, "LicenseKey": "<your-license-here>", "Database": { "Dialect": "sqlite3", "ConnectionString": "portal.db", "EnableLogs": false }, "Blog": { "Enable": true }, "Site": { "Enable": true }, "Forms": { "Enable": false }, "StoreSessionName": "portal-store-session-name", "PortalAPISecret": "123456", "Storage": "fs", "S3": { "AccessKey": "your-access-key-here", "SecretKey": "your-secret-key-here", "Region": "s3-region", "Endpoint": "if-any", "Bucket": "your-bucket-here", "ACL": "", "PresignURLs": true }, "TLSConfig": { "Enable": false, "InsecureSkipVerify": false, "Certificates":[ { "Name": "localhost", "CertFile": "portal.crt", "KeyFile": "portal.key" } ] } } -
Start the portal service
Now when the portal package is installed and the configuration is updated, it is time to start the portal by executing the following command:
sudo systemctl start portal.serviceTo check status and log of the portal execute the following command:
systemctl status portal.service -
Bootstrap the portal
Now the portal is running on port 3001, but it needs to be bootstrapped by providing credentials for the super admin user since it’s the first you are launching it. Follow the bootstrapping section of the documentation to bootstrap the portal via the UI or the admin API.
Bootstrapping Enterprise Developer Portal
When launching the Tyk Enterprise Developer portal for the first time, it starts in a special bootstrap mode, which is required to create the first admin user who will act as the super admin. After launching the portal, you can bootstrap it using either the portal UI or the bootstrap API.
This section explains how to bootstrap the portal using both the portal UI and the bootstrap API.
Bootstrapping the Portal via the UI
After launching the portal for the first time, you can use its UI to bootstrap it. The portal will display a form that allows you to create a super admin user and set their password.
Navigate to the portal UI in your browser to start bootstrapping the portal. You should see the following:
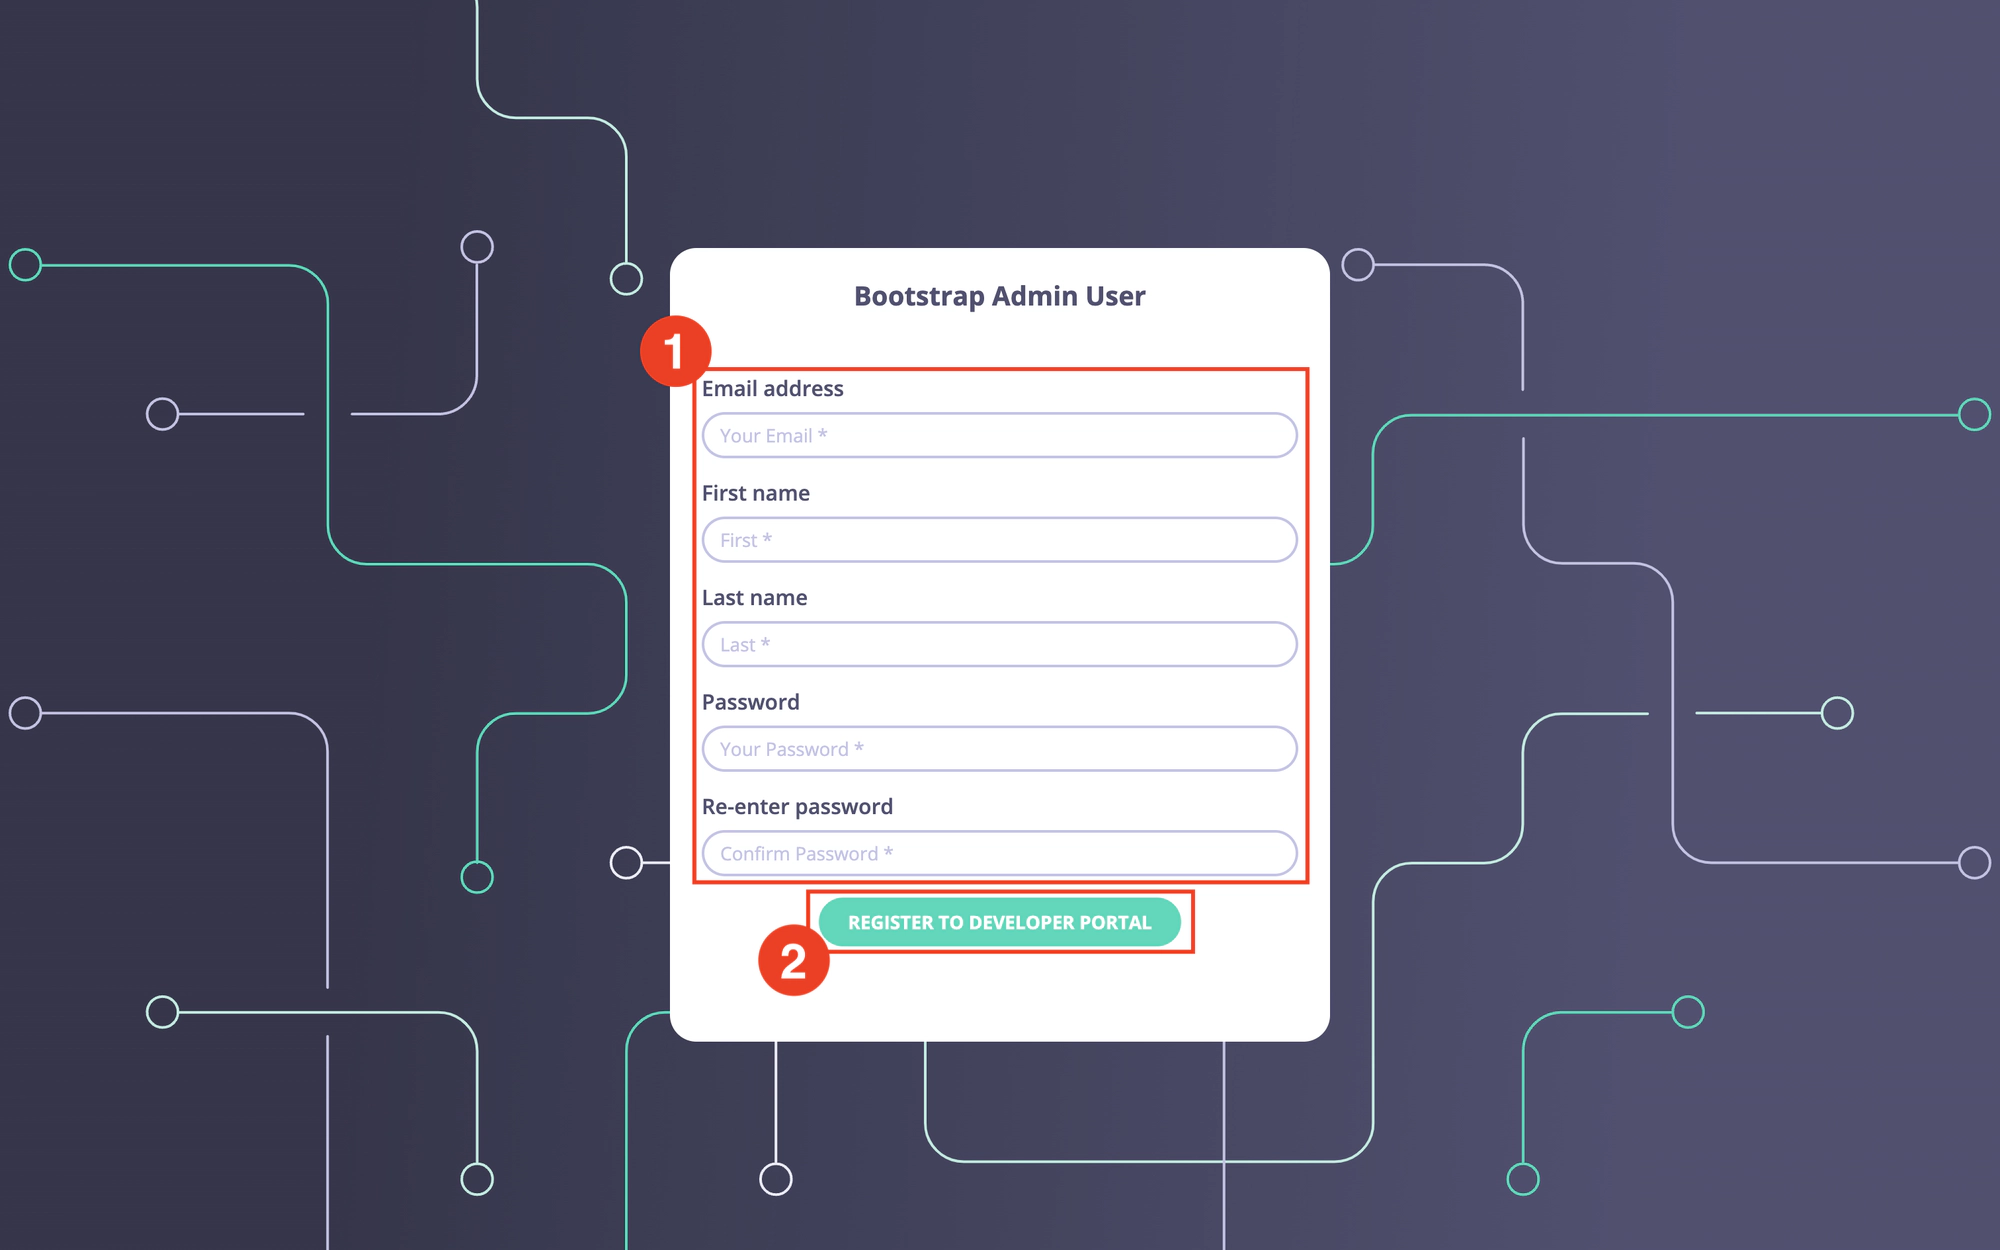
Enter the admin email, password, first name, and last name. Then click on the Register to Developer portal button to complete the bootstrapping process.
The bootstrap process should take no longer than a couple of seconds, so almost instantly the portal will display the following page, which confirms the successful bootstrap.
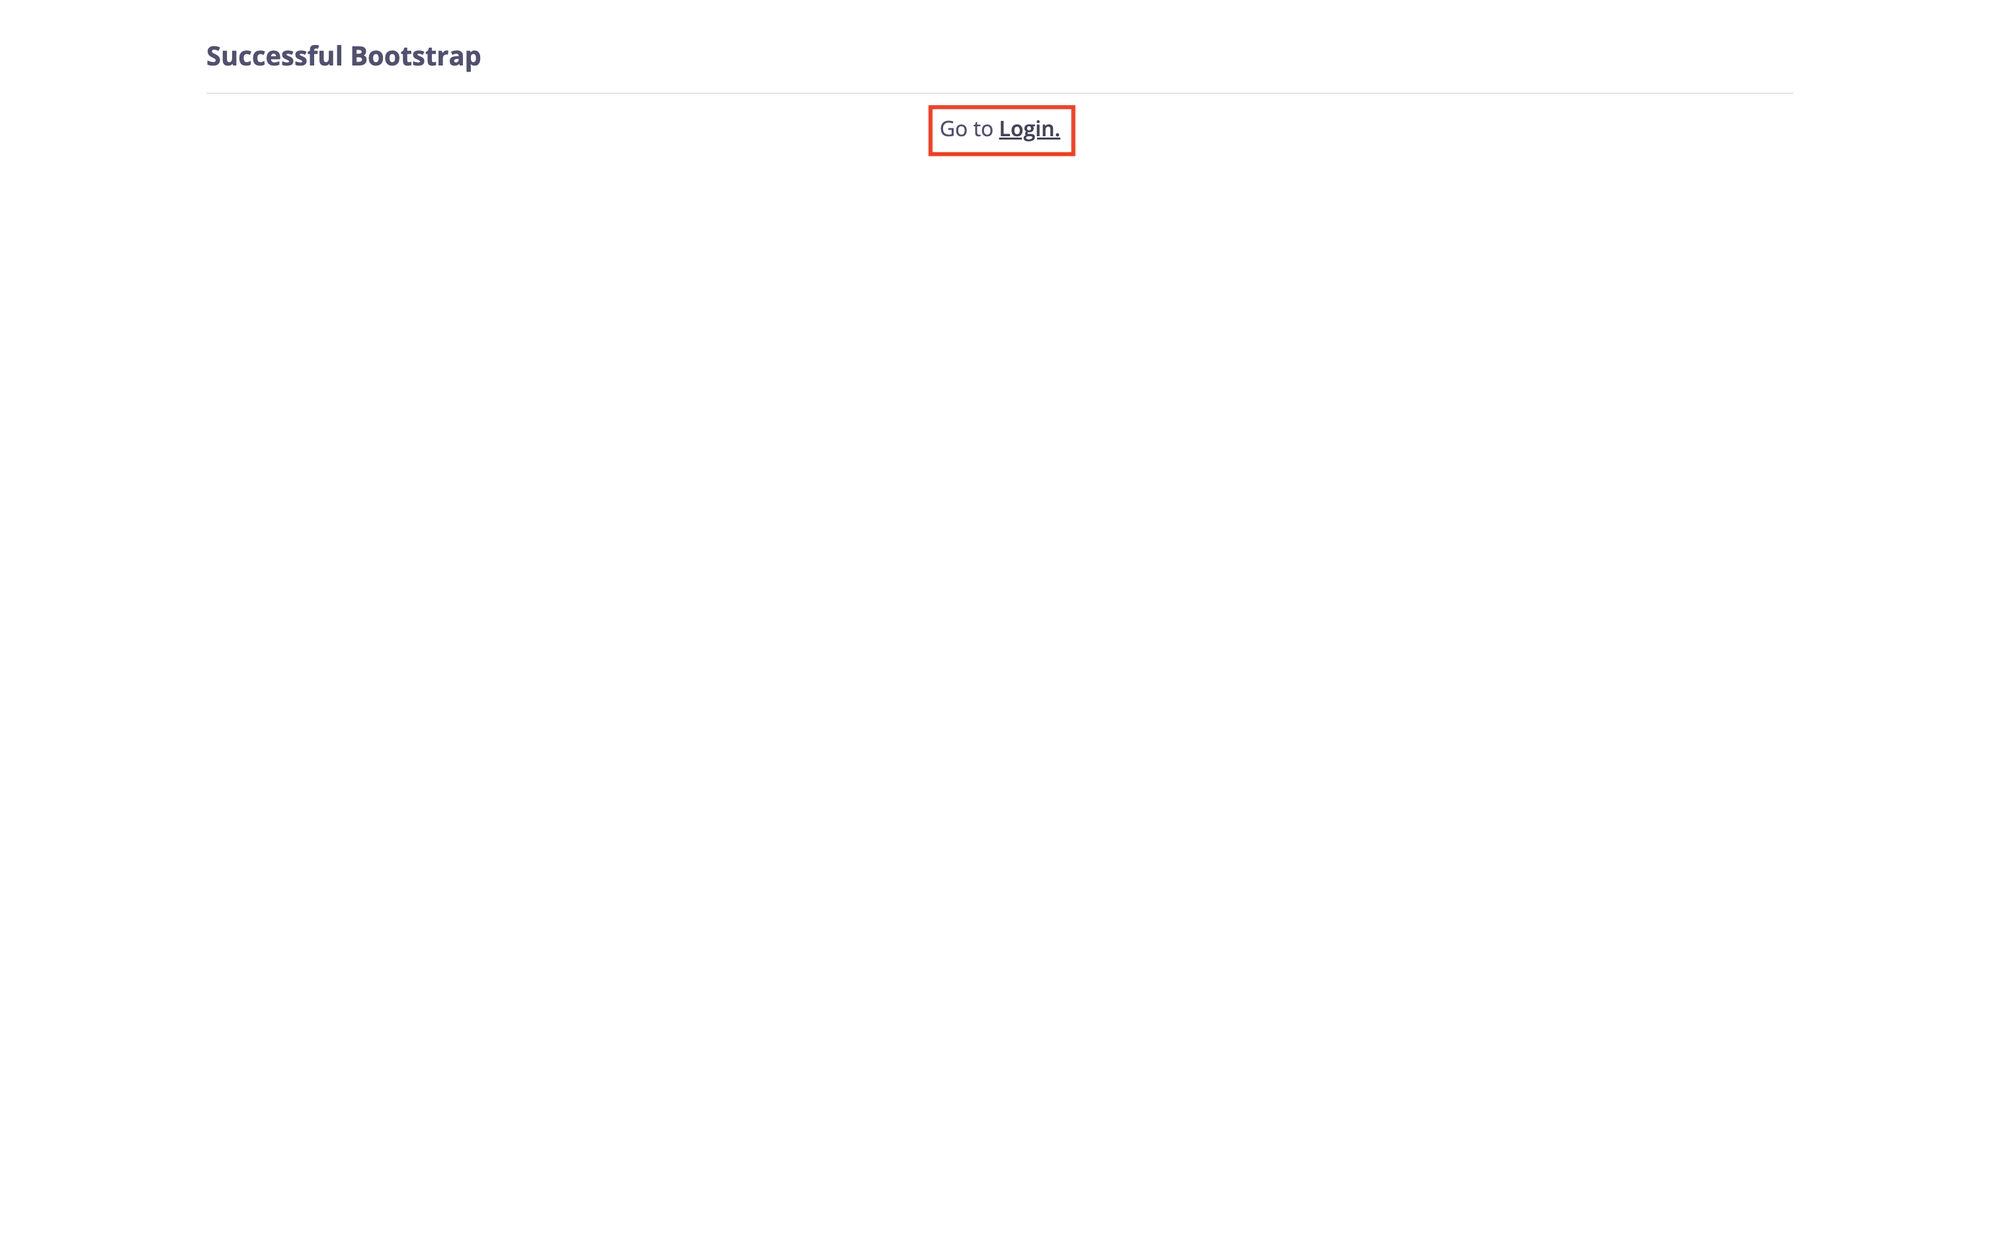
Click on the Login button to proceed to the login page, where you can use the newly created super admin credentials to log in to the portal.
Bootstrapping the Portal via the API
The second approach to bootstrap the portal is through the bootstrap API, which allows you to programmatically bootstrap the portal.
To bootstrap the portal via an API call, call the bootstrap API:
curl --location 'http://<your-portal-host>:<your-portal-port>/portal-api/bootstrap' \
--header 'Content-Type: application/json' \
--data-raw '{
    "username":"super-admin@tyk.io",
    "password": "tyk123",
    "first_name":"John",
    "last_name":"Doe"
}'
The bootstrap API accepts the following parameters:
- username - email of the super admin, it is also used as their login
- password - the super admin login password
- first_name - first name of the super admin
- last_name - first name of the super admin
The bootstrap process should take no longer than a couple of seconds. You will receive the following response as a confirmation of the successful bootstrapping:
{
    "code": "OK",
    "message": "Bootstrapped user successfully",
    "data": {
        "api_token": "eyJhbGciOiJIUzI1NiIsInR5cCI6IkpXVCJ9.eyJQcm92aWRlciI6Im5vbmUiLCJVc2VySUQiOiIkMmEkMTAkREF0czZhZTY0ZEZXSkFTbnR2OS8yLmMxcS91VTFhbTRGYk53RVJhTE1Ed2c0NHFsSXJnMkMifQ.ExTNl6UvjQA6WqrPE-7OkSNCBBixc2NGMnh3dnlk5Nw"
    }
}
Take a note of the api_token field
You will need this to call other Portal APIs.
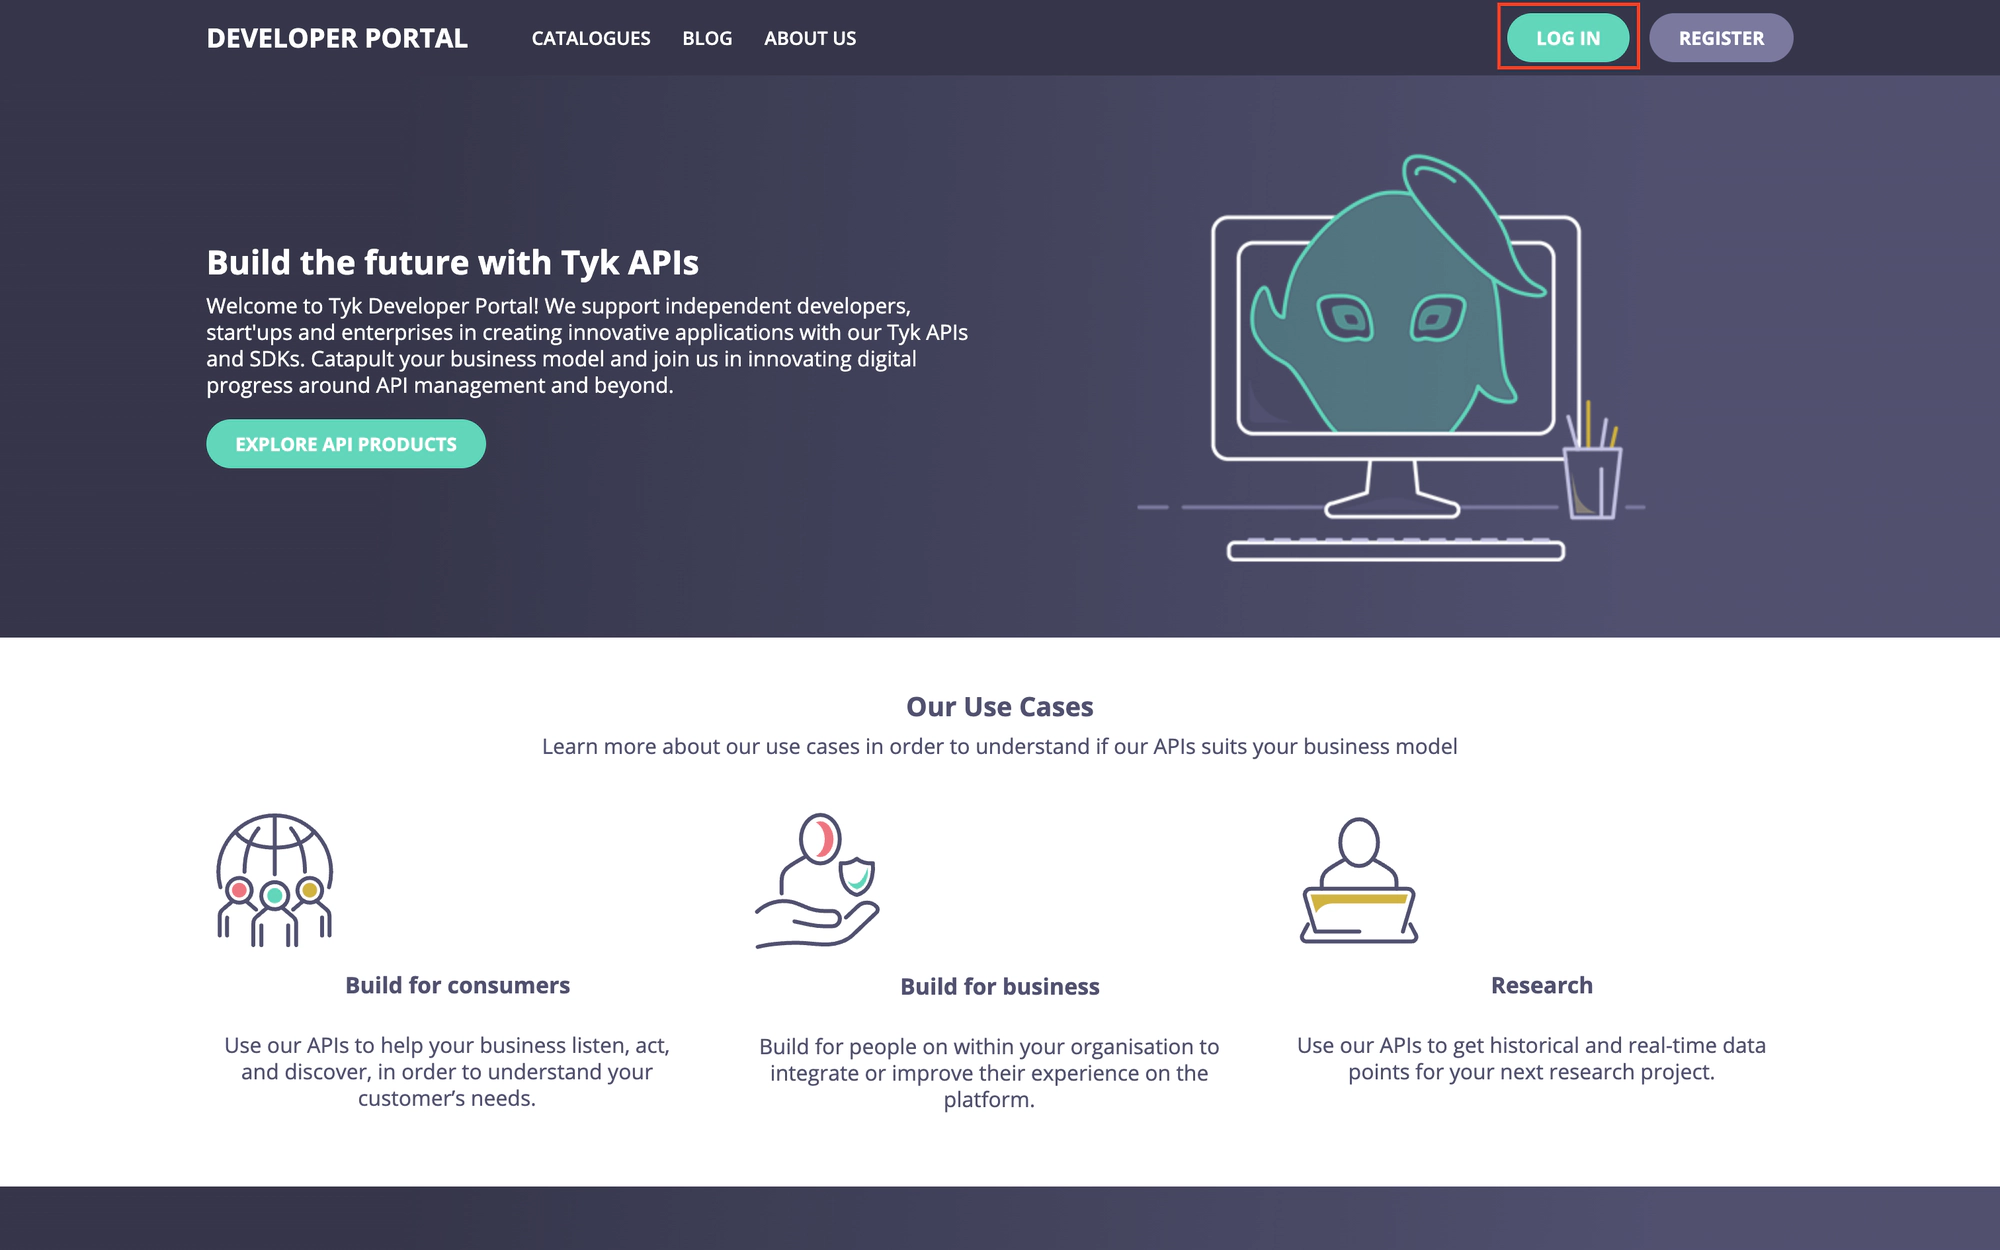
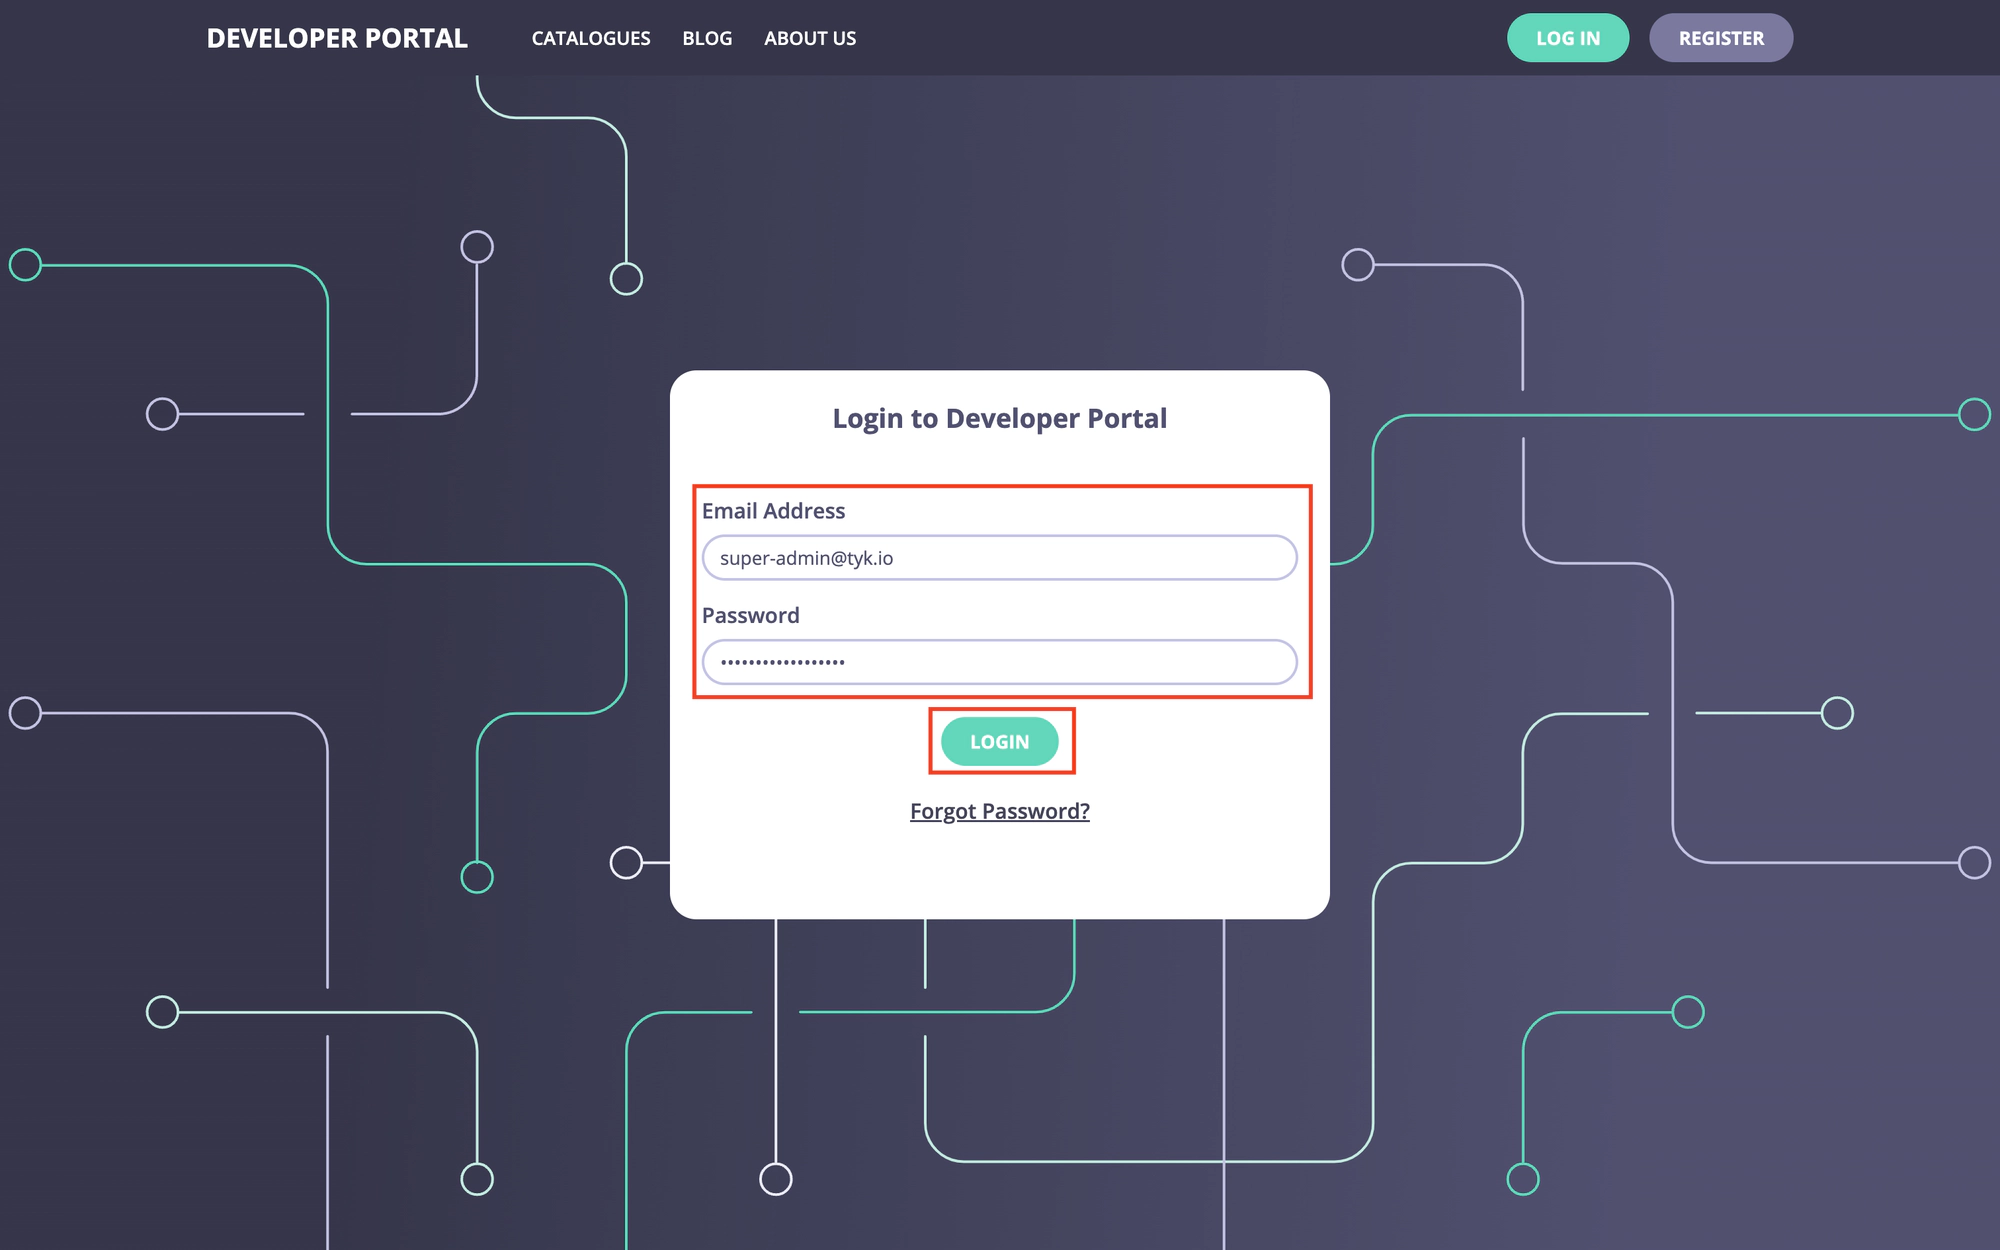
Login as the super admin
After you have bootstrapped the portal, either via the UI or the bootstrap API, you can use the super admin’s login credentials to log in to the portal. Open the portal UI in your browser and click on the ‘Login’ button to open the login page.
On the login page, enter the super admin credentials for logging into the portal:
Congratulations!
Now you have a fully functional portal.
You can continue configuring and customizing it either via the UI or the portal admin API. Please refer to the Tyk Enterprise Developer Portal Concepts section for further guidance.
Environment Variable Reference
For global configurations of the Developer Portal deployment refer this config file.
API Documentation
The Dashboard exposes two APIs: