Split Token
Last updated: 7 minutes read.
OAuth2, OIDC, and their foundation, named JWT, have been a standard industry for many years, without slowing down. However, the OAuth RFC continues to be iteratively improved, aligning with FHIR and Open Banking principles. We expect the OAuth flow to continue to reign supreme.
There are two types of access token in the OAuth flow, opaque and JWT (JWS more precisely). The problem with the JWT is the inherent leakiness. There is a massive debate amongst the community where some consider JWT for auth as insecure as it leaks information (by b64 decoding the body). Others argue that you shouldn’t put sensitive information in there at all.
JWT Access Tokens can contain a lot of sensitive information. That means that if they get in the wrong hands, everything contained inside the JWT is visible to the user with the key. There is a solution to fix this problem.
The solution is to use the Split Token Flow. This flow suggests to use just the signature of the JWT access token on the client side, and store the header and then claim the JWT server side. Thus, the split token flow satisfies both camps. Firstly, we get the flexibility of JWTs by being able to store session information in JWT claims, and secondly we get the security of an Opaque access token because we don’t actually expose the entire token, only the signature.
How can this be achieved with Tyk?
First, let’s take an example of client credentials flow, where we exchange a client id and secret for a JWT access token that we can use to access our APIs:
$ curl -X POST -H 'Content-Type: application/x-www-form-urlencoded' \
https://keycloak-host/auth/realms/tyk/protocol/openid-connect/token \
-d grant_type=client_credentials \
-d client_id=efd952c8-df3a-4cf5-98e6-868133839433 \
-d client_secret=0ede3532-f042-4120-bece-225e55a4a2d6 -s | jq

{
  "access_token": "eyJhbGciOiJIUzI1NiIsInR5cCI6IkpXVCJ9.eyJzdWIiOiIxMjM0NTY3ODkwIiwibmFtZSI6IkpvaG4gRG9lIiwiaWF0IjoxNTE2MjM5MDIyLCJlbWFpbCI6ImhlbGxvQHdvcmxkLmNvbSJ9.EwIaRgq4go4R2M2z7AADywZ2ToxG4gDMoG4SQ1X3GJ0",
  "expires_in": 300,
  "token_type": "bearer",
  "not-before-policy": 0,
  "scope": "email profile"
}
So here you get a JWT access token back:
eyJhbGciOiJIUzI1NiIsInR5cCI6IkpXVCJ9.eyJzdWIiOiIxMjM0NTY3ODkwIiwibmFtZSI6IkpvaG4gRG9lIiwiaWF0IjoxNTE2MjM5MDIyLCJlbWFpbCI6ImhlbGxvQHdvcmxkLmNvbSJ9.EwIaRgq4go4R2M2z7AADywZ2ToxG4gDMoG4SQ1X3GJ0
Header
eyJhbGciOiJIUzI1NiIsInR5cCI6IkpXVCJ9
Body
eyJzdWIiOiIxMjM0NTY3ODkwIiwibmFtZSI6IkpvaG4gRG9lIiwiaWF0IjoxNTE2MjM5MDIyLCJlbWFpbCI6ImhlbGxvQHdvcmxkLmNvbSJ9
Signature
EwIaRgq4go4R2M2z7AADywZ2ToxG4gDMoG4SQ1X3GJ0
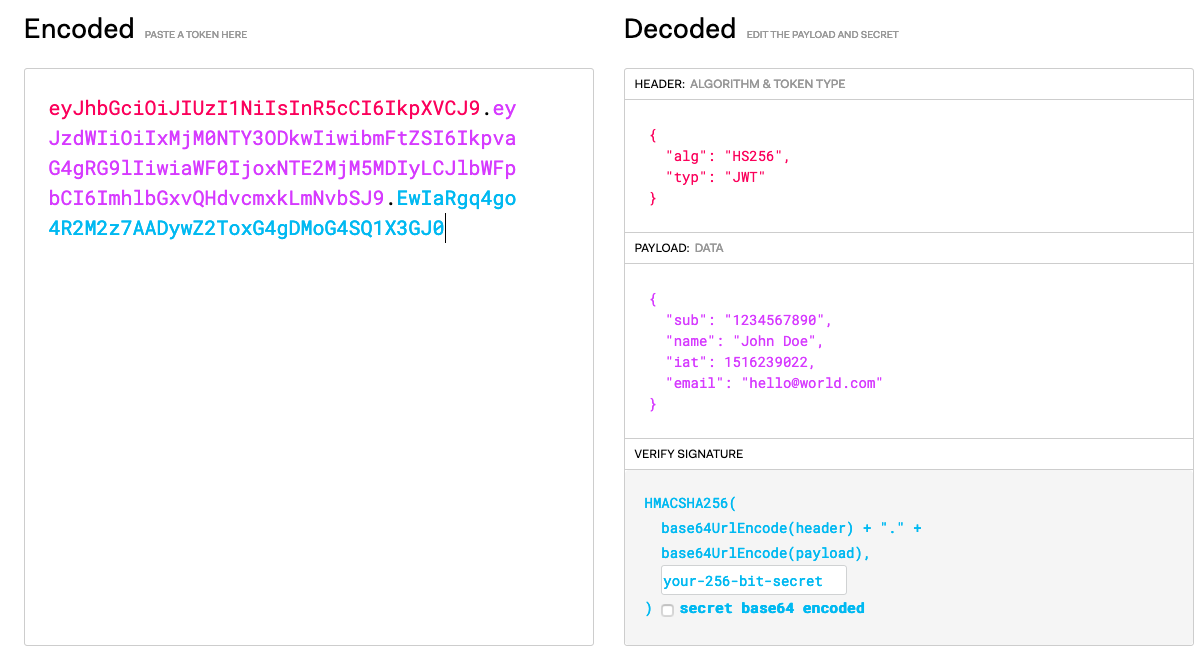
You can plug the whole thing into jwt.io and see the decoded payload as follows:

So back to Tyk, the API Gateway is perfectly positioned to act as a broker between the client and the authorisation server. It can accept requests for new access tokens, given a client id and secret, and exchange that for an access token with the authorisation server. Then, it will break apart the JWT and return only the signature portion back to the client. It then stores the rest of the JWT internally.
This means that the client can then simply use the signature as an access token and Tyk can validate the token as if it was a normal API Key. Then it will pull the JWT out of cache and inject claims into the request or even rebuild the access token, which is safe.
Let’s get started IdP
Inside Tyk, create a virtual endpoint or API, listening to the path /token. This virtual endpoint is responsible for receiving the auth request from the client, and acting as an identity broker with the authorisation server.
Let’s take a look at some sample code for the Virtual Endpoint:
function login(request, session, config) {
	var credentials = request.Body.split("&")
        .map(function(item, index) {
    	    return item.split("=");
	  }).reduce(function(p, c) {
     	    p[c[0]] = c[1];
     	    return p;
	  }, {});

	var newRequest = {
  	"Headers": {"Content-Type": "application/x-www-form-urlencoded"},
  	"Method": "POST",
  	"FormData": {
      	grant_type: credentials.grant_type,
      	client_id: credentials.client_id,
      	client_secret: credentials.client_secret
  	},
  	"Domain": "https://keycloak-host",
  	"resource": "/auth/realms/tyk/protocol/openid-connect/token",
	};

	var response = TykMakeHttpRequest(JSON.stringify(newRequest));
	var usableResponse = JSON.parse(response);

	if (usableResponse.Code !== 200) {
  	return TykJsResponse({
    	Body: usableResponse.Body,
    	Code: usableResponse.Code
  	}, session.meta_data)
	}

	var bodyObj = JSON.parse(usableResponse.Body);
	var accessTokenComplete = bodyObj.access_token;
	var signature = accessTokenComplete.split(".")[2];

	log("completeAccessToken: " + accessTokenComplete);

	// create key inside Tyk
	createKeyInsideTyk(signature, bodyObj)

	// override signature
	bodyObj.access_token = signature;
	delete bodyObj.refresh_expires_in;
	delete bodyObj.refresh_token;
	delete bodyObj.foo;

  var responseObject = {
	Body: JSON.stringify(bodyObj),
	Code: usableResponse.Code
  }
  return TykJsResponse(responseObject, session.meta_data)
}

function createKeyInsideTyk(customKey, meta) {
	// TODO: this needs to be a bit more dynamic. e.g. work out the policy id & API ID etc... based on the metadata
	var accessRights = {
    	"c399587af48441d17bc5700339aa34fa": {
        	"api_name": "Test API",
        	"api_id": "c399587af48441d17bc5700339aa34fa",
        	"versions": [
            	"Default"
        	]
    	}
	}

	log("meta: " + JSON.stringify(meta));

	var keyRequestBody = keyRequestTemplate;
	keyRequestBody.access_rights = accessRights;

	var newRequest = {
  	"Headers": {"Content-Type": "application/json", "Authorization": "Bearer a4fcbde85a3c477d424922990eb16e01"},
  	"Method": "POST",
  	"Body": JSON.stringify(keyRequestBody),
  	"Domain": "http://localhost:3000",
  	"resource": "/api/keys/" + customKey,
	};

	var response = TykMakeHttpRequest(JSON.stringify(newRequest));
	log("createkeyintykres: " + response);
}

var keyRequestTemplate = {
	"apply_policies": [],
	"org_id" : "5d67b96d767e02015ea84a6f",
	"expires": 0,
	"allowance": 0,
	"per": 0,
	"quota_max": 0,
	"rate": 0,
	"access_rights": {}
}
The code does the following:
- The Virtual Endpoint receives a request containing a client ID + Secret.
- It makes a call to the authorization server to receive the access JWT token.
- It splits the access token to create an opaque key in Tyk which is the signature of the JWT access token.
- It adds the Header and the Body of the access token as metadata to the opaque key so that we can look it up on subsequent requests.
- It returns the opaque key (signature) to the client where they can use it to access APIs.
From the client perspective, when logging in at the token endpoint, you can see as follows:
$ curl http://tyk-gw:8080/auth/token -X POST \
-H 'Content-Type: application/x-www-form-urlencoded' \
-d client_id=efd952c8-df3a-4cf5-98e6-868133839433 \
-d client_secret=0ede3532-f042-4120-bece-225e55a4a2d6 \
-d grant_type=client_credentials

{"access_token":"MEwIaRgq4go4R2M2z7AADywZ2ToxG4gDMoG4SQ1X3GJ0","expires_in":300,"not-before-policy":0,"scope":"email profile","session_state":"fb8754d1-d518-40e8-a84f-85347a0639c8","token_type":"bearer"}
Notice that the returned response is considerably smaller than before, as it is just the signature of the access_token field. The client can then simply use that access token as a bearer token for subsequent REST API calls via the Tyk Gateway.
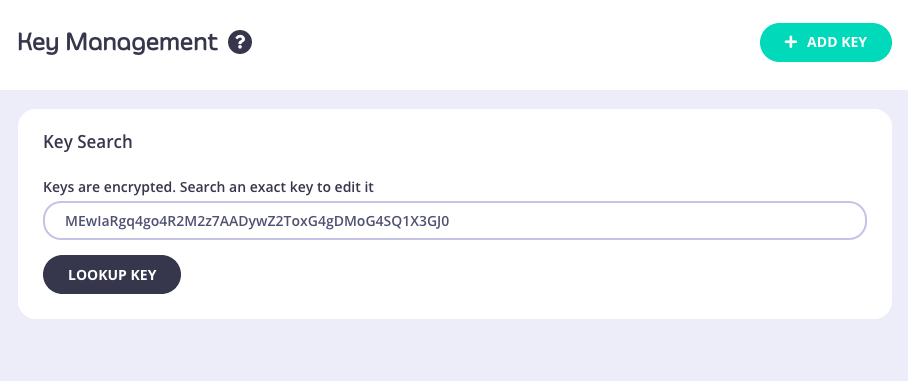
If you are on Tyk Self-Managed, you can even look up the key in the Dashboard:

And also the key’s metadata:

Let’s test your API key (signature) against the API we added to the access rights in the Create Key payload:
$ curl localhost:8080/basic-protected-api/get -H "Authorization: MEw….GJ0"
{
  "args": {},
  "headers": {
	"Accept": "*/*",
	"Accept-Encoding": "gzip",
	"Authorization": "MEwIaRgq4go4R2M2z7AADywZ2ToxG4gDMoG4SQ1X3GJ0",
	"Host": "httpbin",
	"User-Agent": "curl/7.64.1"
  },
  "origin": "192.168.80.1",
  "url": "http://httpbin/get"
}
Tyk validates the opaque token and allows access to the API. So how do you pass the original access token to the underlying services? You need to reconstruct the full JWT.
In the previous step, we stored the full JWT in the session token’s metadata inside Tyk. We can extract the JWT from the request’s session metadata and then inject it into the requests headers.
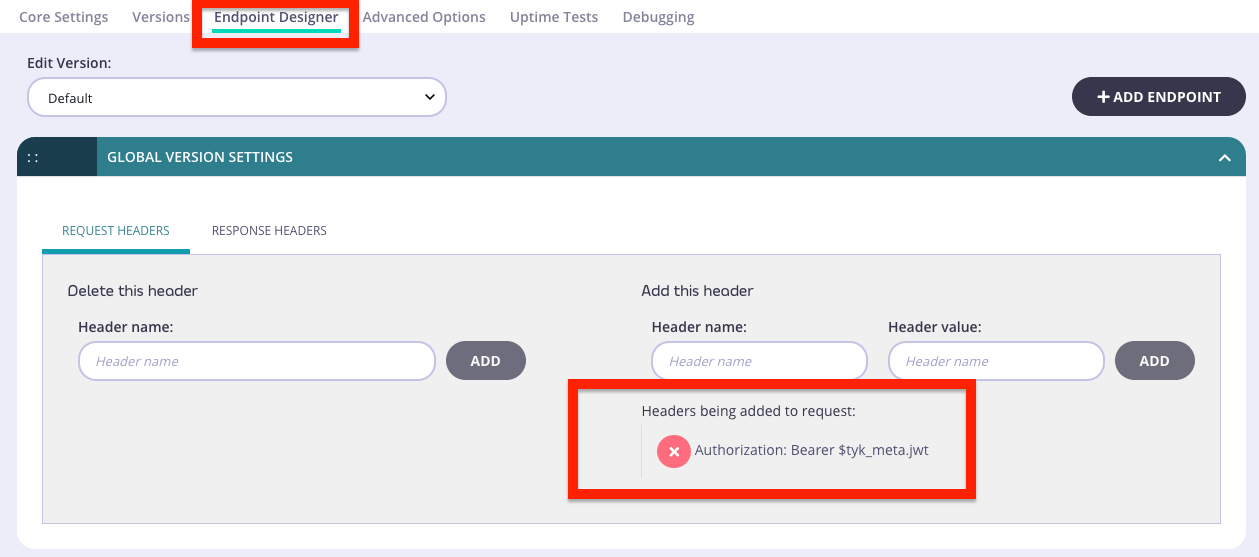
Let’s configure the API to inject a global header as follows:

This will instruct Tyk to combine the JWT Header and Body from the session metadata, with the opaque token that the client is using to make an API request, and inject the new value as an Authorization header.
Let’s try the API call again:
$ curl localhost:8080/basic-protected-api/get -H "Authorization: MEw….GJ0"
{
  "args": {},
  "headers": {
	"Accept": "*/*",
	"Accept-Encoding": "gzip",
	"Authorization": "Bearer eyJh...1X3GJ0",
	"Host": "httpbin",
	"User-Agent": "curl/7.64.1"
  },
  "origin": "192.168.80.1",
  "url": "http://httpbin/get"
}
As you can see, even though you only sent an opaque token in the request, Tyk injected the rest of the JWT where our upstream can now use it to perform business logic.
The quick instruction to use Split Token Flow by using OSS Gateway is as follows:
- Launch Tyk Gateway and Redis using Docker:
docker-compose up
- Add your IdP details to modify the
login.jsscript that Tyk will execute. Fill in the details with your IdP to recreate the above API call. - Reload the file In order to load the changes we did in step 2, execute the following API call:
$ curl localhost:8080/tyk/reload -H "x-tyk-authorization:foo"
     {"status":"ok","message":""}
- Make the same API call, through Tyk now:
$ curl -X POST -H 'Content-Type: application/x-www-form-urlencoded' \
http://localhost:8080/auth/token \
-d grant_type=client_credentials \
-d client_id=myclientid \
-d client_secret=5e7c5b4a-6a1c-4010-8219-897a0b45d08b

{
  "access_token": "EwIaRgq4go4R2M2z7AADywZ2ToxG4gDMoG4SQ1X3GJ0",
  "expires_in": 300,
  "not-before-policy": 0,
  "scope": "profile email",
  "session_state": "ab844564-265c-4bcd-8a73-5f46e92600bc",
  "token_type": "bearer"
}
You will receive a much smaller response this time, because the access token contained just the signature of the JWT access token that the Idp created.
When you call the auth/token endpoint, you call the auth_api.json reverse proxy configuration. On the token endpoint on that auth API, you set up a Virtual Endpoint. You see that in auth_api.json.
"extended_paths": {
    "virtual": [
    {
        "response_function_name": "login",
        "function_source_type": "file",
        "function_source_uri": "./middleware/login.js",
        "path": "token",
        "method": "POST",
        "use_session": false,
        "proxy_on_error": false
    }
    ]
}
This is a Tyk built-in plugin that enables you to execute Javascript code on an endpoint. This invokes your login.js script which you loaded into Tyk.
5. Make API call using the opaque token returned in step 4
{
  "args": {},
  "headers": {
    "Accept": "*/*",
    "Accept-Encoding": "gzip",
    "Authorization": "Bearer eyJhbGciOiJSUzI1NiIsInR5cCIgOiAiSldUIiwia2lkIiA6ICJxUU5fTG5NaHk3emltSlNKRm9wVXYtWW0weEhMdlQ4eVRNSExQTGlYTk5FIn0.eyJleHAiOjE2MDcxNzgwNTgsImlhdCI6MTYwNzE3Nzc1OCwianRpIjoiOTJkN2M5NDEtZWE2YS00N2Y5LThlYTgtMTY1NWQ0YjIzOTgzIiwiaXNzIjoiaHR0cHM6Ly9rZXljbG9hay5kby5wb2MudHlrLnRlY2hub2xvZ3kvYXV0aC9yZWFsbXMvdHlrIiwiYXVkIjoiYWNjb3VudCIsInN1YiI6IjA0Mzc1YTE2LWMxMmItNDAwNi04MzBkLWExNTAzZTJjMWYxMCIsInR5cCI6IkJlYXJlciIsImF6cCI6Im15Y2xpZW50aWQiLCJzZXNzaW9uX3N0YXRlIjoiYWI4NDQ1NjQtMjY1Yy00YmNkLThhNzMtNWY0NmU5MjYwMGJjIiwiYWNyIjoiMSIsInJlYWxtX2FjY2VzcyI6eyJyb2xlcyI6WyJvZmZsaW5lX2FjY2VzcyIsInVtYV9hdXRob3JpemF0aW9uIl19LCJyZXNvdXJjZV9hY2Nlc3MiOnsiYWNjb3VudCI6eyJyb2xlcyI6WyJtYW5hZ2UtYWNjb3VudCIsIm1hbmFnZS1hY2NvdW50LWxpbmtzIiwidmlldy1wcm9maWxlIl19fSwic2NvcGUiOiJwcm9maWxlIGVtYWlsIiwiY2xpZW50SWQiOiJteWNsaWVudGlkIiwiY2xpZW50SG9zdCI6IjE3Mi4xOC4wLjEiLCJlbWFpbF92ZXJpZmllZCI6ZmFsc2UsInByZWZlcnJlZF91c2VybmFtZSI6InNlcnZpY2UtYWNjb3VudC1teWNsaWVudGlkIiwiY2xpZW50QWRkcmVzcyI6IjE3Mi4xOC4wLjEifQ.EHLdSwmE4jg-GmELBT5C0FCvEZNMYIJ-OhdXXm97QsO9sQF51A-mH_Ebf__HJRnHgJ9BKYzuIdI1XO77iqflK-JYba1_BivnholKOO4YFsdLS9lTFaKJtq5MP-BQy7QQlN2x0pqj1s3MBaw2D9j8miHdLYqS3dWEv1kr5WkGsbukFA14sJVfMRVdFgQ-8U5X5_yDcOjKgR2bLRTgPYG6RWWRu3uJ6LQ-UbAMSaoykTKTmYCTWVHpkp_Bx_vXqEfjZQsT9c6hwwGM63q4uZhsFCM6oL51azKba0RiFFY-vbk1uCXybrrrlhYXgTKHd5aLTVyktTXsL9Tlnrenf5YIMQ",
    "Host": "httpbin.org",
    "User-Agent": "curl/7.64.1",
    "X-Amzn-Trace-Id": "Root=1-5fcb96a7-0299119443a2e1a019f21fff"
  },
  "origin": "192.168.144.1, 99.242.139.220",
  "url": "http://httpbin.org/get"
}
All this is possible on the OSS version of Tyk.
If you have any questions or want to start a conversation, I encourage you to email community forums with any questions.