Create an API
What does it mean to create an API in Tyk
You have a running service with an API that you want your users to consume; you want to protect and manage access to that API using Tyk Gateway - how do you do that?
For Tyk Gateway to protect and reverse proxy calls to your upstream service, you need to configure an API on Tyk Gateway. The minimum information that Tyk requires is the listen path (which is a path on the Tyk Gateway URL that you want your consumers to call) and your API URL (which is the URL of your service to which Tyk should forward requests).
This information and other configuration values are stored in an object called a Tyk API Definition. Once you have created your Tyk API Definition and deployed it in the Gateway, Tyk can start serving your consumers, forwarding their requests to your upstream service’s API.
To reach a detailed guide to creating Tyk API Definitions, please choose the tab for the product you are using:
Tyk Cloud is the SaaS version of the Self-Managed product, though there are a few differences.
Please use the Tyk Cloud Getting Started guide to create your first API.
Want to learn more from one of our team?
Note: Integration with your OpenAPI documentation
In Tyk v4.1 we introduced support for APIs defined according to the OpenAPI Specification v3.0.3 (OAS).
This introduces a standard way to describe the vendor-agnostic elements of an API (the OpenAPI Definition, stored as an OpenAPI Document); we take this and add Tyk-specific configuration options to create the Tyk OAS API Definition. You can import your own OpenAPI document and Tyk will use this to generate the Tyk OAS API Definition.
For a detailed tutorial on using OAS with Tyk Gateway, check out our guide to creating a Tyk OAS API Definition.
Prerequisites
In order to complete this tutorial, you need to have Tyk Self Managed installed.
Tutorial: Create an API with the Dashboard
We have a video walkthrough for creating an API and testing an endpoint via Postman.
We will use the Tyk Dashboard to create a very simple API that has no special elements set up.
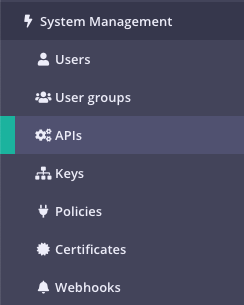
Step 1: Select “APIs” from the “System Management” section

Step 2: Click “ADD NEW API”

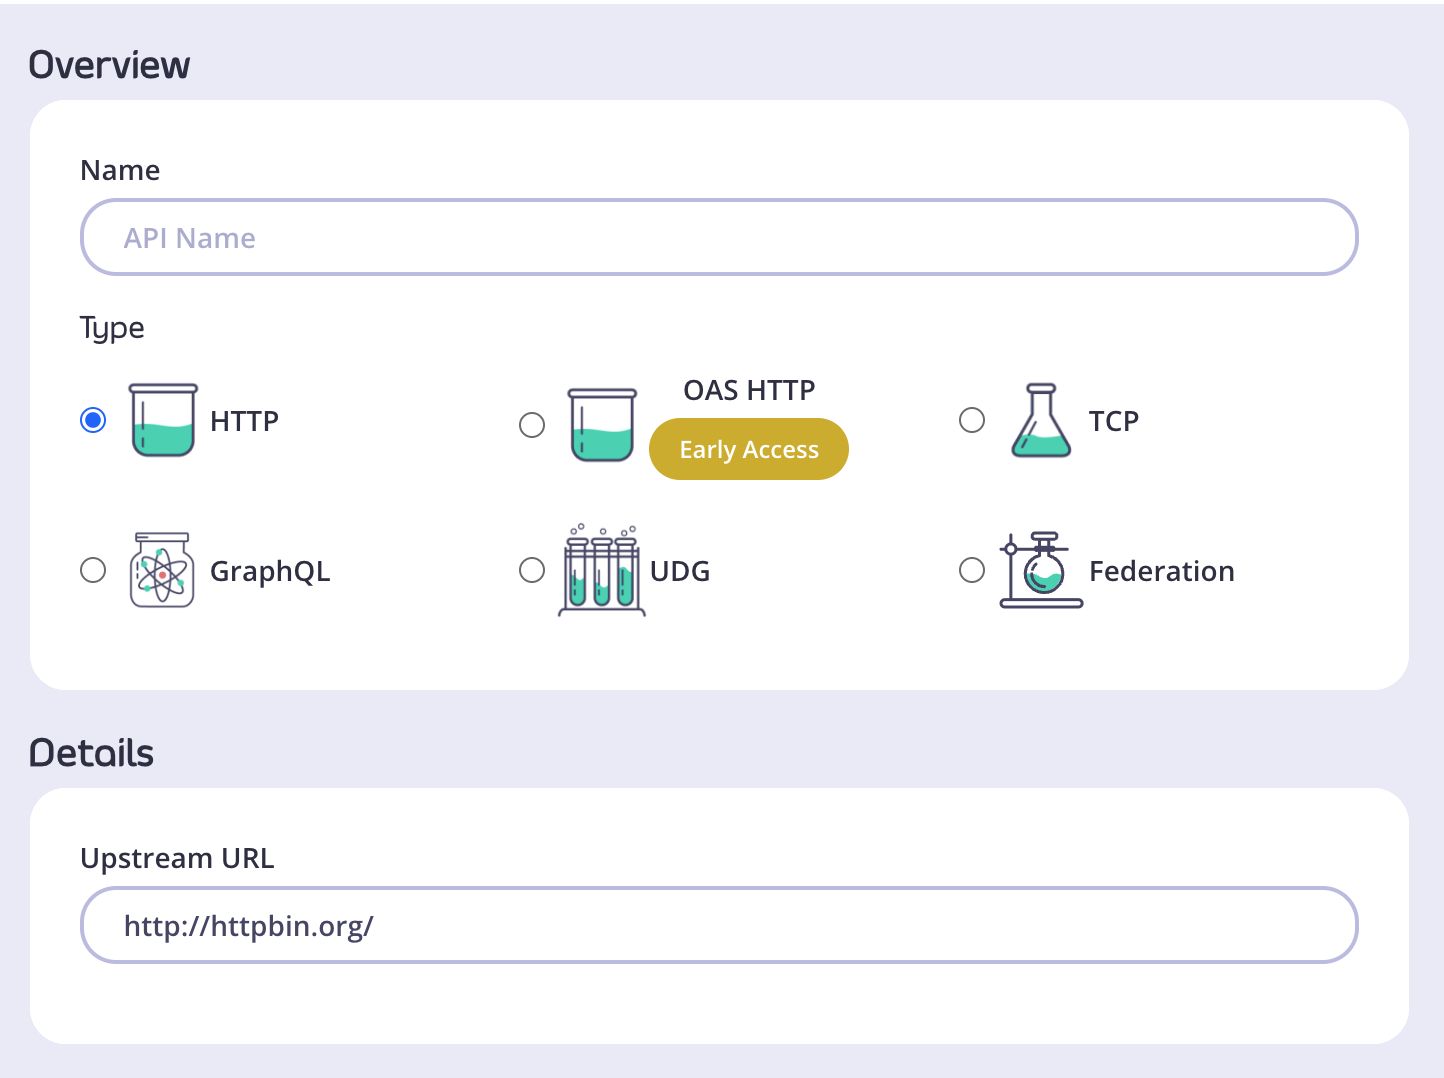
Step 3: Set up the basic configuration of your API

- In the Overview section, add a Name for your API and select the Type of API you wish to create. We will use HTTP for this tutorial.
- In the Details section, add the Upstream URL. This is the Target URL that hosts the service to which you want to proxy incoming requests. You can configure Tyk to perform round-robin load balancing between multiple upstream servers (Target URLs) by selecting Enable round-robin load balancing; see Load Balancing for more details. For this tutorial, we will use a single upstream target: http://httpbin.org.
- Click Configure API when you have finished.
Step 4: Set up authentication for your API
Take a look at the Authentication section:

You have the following options:
- Authentication mode: This is the method that Tyk should use to authenticate requests to call your API. Tyk supports several different authentication modes - see Authentication and Authorization for more details on securing your API. For this tutorial, you should select
Open (Keyless). - Strip Authorization Data: Select this option to ensure that any security (authentication) tokens provided to authorise requests to your API on Tyk are not leaked to the upstream. You can leave this unchecked for this tutorial.
- Auth Key Header Name: The header parameter that will hold the authentication token (or key) for requests to this API; the default for this is
Authorization. - Allow query parameter as well as header: This option allows the authentication token to be set in the query parameter, not just in the Request Header. For this tutorial, leave this unchecked.
- Use Cookie Value: Tyk also supports the use of a cookie value as an alternative authentication token location. For this tutorial, leave this unchecked.
- Enable client certificate: Tyk supports the use of Mutual TLS to authenticate requests to your API; you would use this checkbox to enable this mode. See Mutual TLS for details on implementing this feature. For this tutorial, leave this unchecked.
Step 5: Save the API
Click SAVE

Once saved, you will be taken back to the API list, where your new API will be displayed.
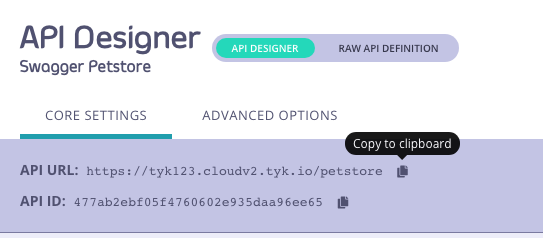
If you select the API from the list to open it again, the API URL will be displayed in the top of the editor. This is the URL that your consumers will need to call to invoke your API.

Tutorial: Create an API with the Dashboard API
It is easy to create APIs using Tyk Dashboard’s own REST API.
You will need an API key for your organisation (to authenticate with the Dashboard API) and issue a request using these credentials to create your new API and make it live.
Step 1: Obtain your Tyk Dashboard API access credentials key & Dashboard URL
- From the Tyk Dashboard, select “Users” in the “System Management” section.
- Click Edit for your username, then scroll to the bottom of the page.
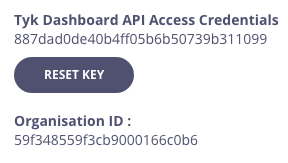
- Your personal API key, granting you access to the Dashboard API, is labelled Tyk Dashboard API Access Credentials key

- Store your Dashboard Key, Dashboard URL & Gateway URL as environment variables so you don’t need to keep typing them in
export DASH_KEY=db8adec7615d40db6419a2e4688678e0

# Locally installed dashboard
export DASH_URL=http://localhost:3000/api

# Locally installed gateway
export GATEWAY_URL=http://localhost:8080


### Step 2: Query the `/api/apis` endpoint to see what APIs are loaded on the Gateway

```curl
curl -H "Authorization: ${DASH_KEY}" ${DASH_URL}/apis
{"apis":[],"pages":1}
As you’ve got a fresh install, you will see that no APIs currently exist
Step 3: Create your first API
We’ve created a simple Tyk Classic API definition that configures the Tyk Gateway to reverse proxy to the http://httpbin.org request/response service. The API definition object is stored here: https://bit.ly/2PdEHuv.
To load the API definition to the Gateway via the Dashboard API you issue this command:
curl -H "Authorization: ${DASH_KEY}" -H "Content-Type: application/json" ${DASH_URL}/apis \
  -d "$(wget -qO- https://bit.ly/2PdEHuv)"
{"Status":"OK","Message":"API created","Meta":"5de83a40767e0271d024661a"}
Important Take note of the API ID returned in the Meta field - you will need it later as this is the Tyk Gateway’s internal identifier for the new API.
export API_ID=5de83a40767e0271d024661a
Step 4: Test your new API
You can now make a call to your new API as follows:
curl ${GATEWAY_URL}/httpbin/get
{
  "args": {},
  "headers": {
    "Accept": "*/*",
    "Accept-Encoding": "gzip",
    "Host": "httpbin.org",
    "User-Agent": "curl/7.54.0"
  },
  "origin": "127.0.0.1, 188.220.131.154, 127.0.0.1",
  "url": "https://httpbin.org/get"
}
We sent a request to the gateway on the listen path /httpbin. Using this path-based-routing, the gateway was able to identify the API the client intended to target.
The gateway stripped the listen path and reverse proxied the request to http://httpbin.org/get
Step 5: Protect your API
Let’s grab the API definition we created before and store the output to a file locally.
curl -s -H "Authorization: ${DASH_KEY}" -H "Content-Type: application/json" ${DASH_URL}/apis/${API_ID} | python -mjson.tool > api.httpbin.json
We can now edit the api.httpbin.json file we just created, and modify a couple of fields to enable authentication.
Change use_keyless from true to false.
Change auth_configs.authToken.auth_header_name to apikey.
Note Prior to ** Tyk v2.9.2** auth_configs.authToken.auth_header_name was called auth.auth_header_name
Then send a PUT request back to Tyk Dashboard to update its configuration.
curl -H "Authorization: ${DASH_KEY}" -H "Content-Type: application/json" ${DASH_URL}/apis/${API_ID} -X PUT -d "@api.httpbin.json"
{"Status":"OK","Message":"Api updated","Meta":null}
Step 6: Test your protected API
First try sending a request without any credentials, as before:
curl -I ${GATEWAY_URL}/httpbin/get
HTTP/1.1 401 Unauthorized
Content-Type: application/json
X-Generator: tyk.io
Date: Wed, 04 Dec 2019 23:35:34 GMT
Content-Length: 46
As you can see, you received an HTTP 401 Unauthorized response.
Now send a request with incorrect credentials:
curl -I ${GATEWAY_URL}/httpbin/get -H 'apikey: somejunk'
HTTP/1.1 403 Forbidden
Content-Type: application/json
X-Generator: tyk.io
Date: Wed, 04 Dec 2019 23:36:16 GMT
Content-Length: 57
As you can see, you received an HTTP 403 Forbidden response.
Try sending another request, this time with a valid API key.
Congratulations - You have just created your first keyless API, then protected it using Tyk!
If the command succeeds, you will see:
{
  "action": "added",
  "key": "xxxxxxxxx",
  "status": "ok"
}
What did we just do?
We just sent an API definition to the Tyk /apis endpoint. See API definition objects for details of all the available objects. These objects encapsulate all of the settings for an API within Tyk.
Want to learn more from one of our team of engineers?
Note: Integration with your OpenAPI documentation
In Tyk v4.1 we introduced support for APIs defined according to the OpenAPI Specification v3.0.3 (OAS).
This introduces a standard way to describe the vendor-agnostic elements of an API (the OpenAPI Definition, stored as an OpenAPI Document); we take this and add Tyk-specific configuration options to create the Tyk OAS API Definition. You can import your own OpenAPI document and Tyk will use this to generate the Tyk OAS API Definition.
For a detailed tutorial on using OAS with Tyk Gateway, check out our guide to creating a Tyk OAS API Definition.
Prerequisites
Before you continue this tutorial, you will need a running Tyk OSS gateway. Click the button for instructions on how to install Tyk Gateway:
Creating an API on Tyk Gateway
There are two ways to configure Tyk Gateway with an API definition:
- Create an API with the Tyk Gateway API - Tyk Gateway has its own APIs which provides various services including the registering of Tyk API Definitions on the Gateway.
- Create an API in File-based Mode - alternatively you can create a Tyk API Definition in a file and then load it to the Gateway.
Tutorial: Create an API with the Tyk Gateway API
Watch our video to learn how to add an API to Tyk’s Open Source Gateway using Postman.
In order to use the Gateway API to create a Tyk API Definition you will need the API key for your deployment’s Gateway API and then issue just one command to create the API and make it live.
Step 1: Make sure you know your API secret
The API key to access your Tyk Gateway API is stored in your tyk.conf file; the property is called secret. You will need to provide this value in a header called x-tyk-authorization when making calls to the Gateway API.
Step 2: Create an API
To create the API, let’s send a Tyk API definition to the /apis endpoint on your Tyk Gateway. Remember to change the x-tyk-authorization value (API key) in the header of your API call and set the domain name and port to target your Tyk Gateway in the curl command.
curl -v -H "x-tyk-authorization: {your-secret}" \
  -s \
  -H "Content-Type: application/json" \
  -X POST \
  -d '{
    "name": "Hello-World",
    "slug": "hello-world",
    "api_id": "Hello-World",
    "org_id": "1",
    "use_keyless": true,
    "auth": {
      "auth_header_name": "Authorization"
    },
    "definition": {
      "location": "header",
      "key": "x-api-version"
    },
    "version_data": {
      "not_versioned": true,
      "versions": {
        "Default": {
          "name": "Default",
          "use_extended_paths": true
        }
      }
    },
    "proxy": {
      "listen_path": "/hello-world/",
      "target_url": "http://echo.tyk-demo.com:8080/",
      "strip_listen_path": true
    },
    "active": true
}' http://{your-tyk-host}:{port}/tyk/apis | python -mjson.tool
If the command succeeds, you will see:
{
  "key": "Hello-World",
  "status": "ok",
  "action": "added"
}
Note
All APIs deployed on Tyk Gateway are given a unique API ID; if you don’t provide one in the Tyk API Definition when creating the API, then an API ID will be generated automatically.
What did we just do?
We just registered a new API on your Tyk Gateway by sending a Tyk API definition to your Gateway’s /apis endpoint.
Tyk API definitions encapsulate all of the settings for an API within Tyk Gateway and are discussed in detail in the API section of this documentation.
Restart or hot reload
Once you have created the file, you will need to either restart the Tyk Gateway, or issue a hot reload command, lets do the latter:
curl -H "x-tyk-authorization: {your-secret}" -s http://{your-tyk-host}:{port}/tyk/reload/group | python -mjson.tool
This command will hot-reload your API Gateway(s) and the new API will be loaded, if you take a look at the output of the Gateway (or the logs), you will see that it should have loaded Hello-World API on /hello-world/.
Tutorial: Create an API in File-based Mode
Note
APIs created without API ID in file based mode are invalid.
To create a file-based API definition is very easy.
Create a file called api1.json and place it in the /apps folder of your Tyk Gateway installation (usually in /var/tyk-gateway), then add the following:
{
  "name": "Test API",
  "slug": "test-api",
  "api_id": "1",
  "org_id": "1",
  "auth_configs": {
    "authToken": {
      "auth_header_name": "Authorization"
    }
  },
  "definition": {
    "location": "header",
    "key": "x-api-version"
  },
  "version_data": {
    "not_versioned": true,
    "versions": {
      "Default": {
        "name": "Default",
        "use_extended_paths": true
    }
   }
  },
  "proxy": {
    "listen_path": "/test-api/",
    "target_url": "http://echo.tyk-demo.com:8080/",
    "strip_listen_path": true
  },
  "active": true
}
Restart or hot reload
Once you have created the file, you will need to either restart the Tyk Gateway, or issue a hot reload command, lets do the latter:
curl -H "x-tyk-authorization: {your-secret}" -s https://{your-tyk-host}:{port}/tyk/reload/group | python -mjson.tool
This command will hot-reload your API Gateway(s) and the new API will be loaded, if you take a look at the output of the Gateway (or the logs), you will see that it should have loaded Test API on /test-api/.
Your API is now ready to use via the Gateway.
