Access an API
Tutorial: Create an API Key with the Dashboard
The Tyk Dashboard is the simplest way to generate a new Key.
We have a video walkthrough for creating an API Key.
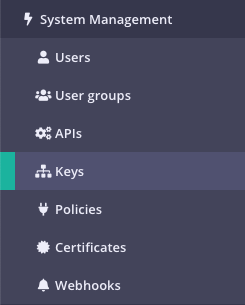
Step 1: Select “Keys” from the “System Management” section
Step 2: Click CREATE
Step 3: Add a Policy or API to your Key
You have the option to add your new key to either an existing Policy or an existing individual API. For this Tutorial we are going to use an API.
Add an API to your Key
To select an API, you can either:
- Scroll through your API Name list
- Use the Search field
- You can also Group by Authentication Type to filter your APIs
- You can also Group by Category
You can leave all other options at their default settings.
Step 4: Add Configuration Details
You use the Configuration section to set the following:
- Enable Detailed Logging. This is disabled by default and isn’t required for this tutorial
- Give your Key an Alias. This makes your key easier
- Set an Expiry time after which the key will expire. Select a value from the drop-down list. This is a required setting. See Key Expiry for more details.
- Add Tags to your policy. Any tags you add can be used when filtering Analytics Data. Tags are case sensitive.
- Add Metadata to your policy. Adding metadata such as User IDs can be used by middleware components. See Session Metadata for more details.
Step 4: Click CREATE
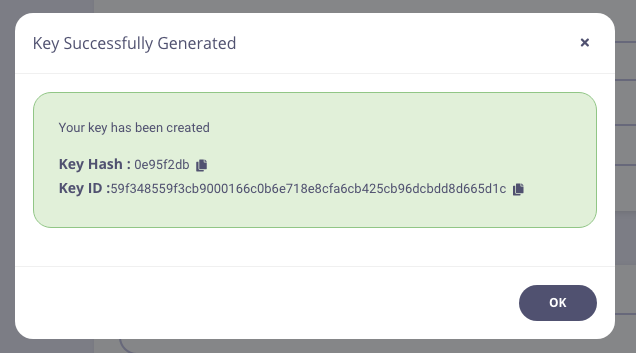
A Key successfully generated pop-up will be displayed with the key shown. You must save this somewhere for future reference as it will not be displayed again. Click Copy to clipboard and paste into a text document.
That’s it, you’ve created a key - now you can try and use it.
Tutorial: Create an API Key with the API
To create an API key, you will need the API ID that we wish to grant the key access to. Creating the token is then an API call to the endpoint.
You will also need your own API Key, to get these values:
- Select Users from the System Management section.
- In the users list, click Edit for your user.
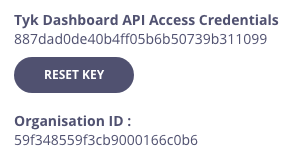
- The API key is the Tyk Dashboard API Access Credentials, copy this somewhere you can reference it.
- Select APIs from the System Management section.
- From the Actions menu for your API, select Copy API ID

Once you have these values, you can use them to access the Dashboard API, the below curl command will generate a key for one of your APIs:
Note
- Replace the
authorizationheader value with your Tyk Dashboard API Access Credentials - Replace the API ID (
ad5004d961a147d4649fd3216694ebe2) with your API ID - It’s recommended to validate the JSON using JSON validator to avoid any
malformed inputerror
curl -X POST -H "authorization: 1238b7e0e2ff4c2957321724409ee2eb" \
  -s \
  -H "Content-Type: application/json" \
  -X POST \
  -d '{
    "allowance": 1000,
    "rate": 1000,
    "per": 1,
    "expires": -1,
    "quota_max": -1,
    "quota_renews": 1449051461,
    "quota_remaining": -1,
    "quota_renewal_rate": 60,
    "access_rights": {
      "ad5004d961a147d4649fd3216694ebe2": {
        "api_id": "ad5004d961a147d4649fd3216694ebe2",
        "api_name": "test-api",
        "versions": ["Default"]
      }
    },
    "meta_data": {}
  }' https://admin.cloud.tyk.io/api/keys | python -mjson.tool
You will see a 200 response with your new key:
{
  "api_model": {},
  "key_id": "59bf9159adbab8abcdefghijac9299a1271641b94fbaf9913e0e048c",
  "data": {...}
}
The value returned in the key_id parameter of the response is the access key you can now use to access the API that was specified in the access_rights section of the call.
Tutorial: Create an API Key with the Dashboard
The Tyk Dashboard is the simplest way to generate a new Key.
We have a video walkthrough for creating an API Key.
Step 1: Select “Keys” from the “System Management” section

Step 2: Click CREATE

Step 3: Add a Policy or API to your Key
You have the option to add your new key to either an existing Policy or an existing individual API. For this Tutorial we are going to use an API.
Add an API to your Key
To select an API, you can either:
- Scroll through your API Name list
- Use the Search field
- You can also Group by Authentication Type to filter your APIs
- You can also Group by Category
You can leave all other options at their default settings.
Step 4: Add Configuration Details
You use the Configuration section to set the following:
- Enable Detailed Logging. This is disabled by default and isn’t required for this tutorial
- Give your Key an Alias. This makes your key easier
- Set an Expiry time after which the key will expire. Select a value from the drop-down list. This is a required setting. See Key Expiry for more details.
- Add Tags to your policy. Any tags you add can be used when filtering Analytics Data. Tags are case sensitive.
- Add Metadata to your policy. Adding metadata such as User IDs can be used by middleware components. See Session Metadata for more details.
Step 4: Click CREATE

A Key successfully generated pop-up will be displayed with the key shown. You must save this somewhere for future reference as it will not be displayed again. Click Copy to clipboard and paste into a text document.

That’s it, you’ve created a key - now you can try and use it.
Tutorial: Create an API Key with the API
To create an API key, you will need the API ID that we wish to grant the key access to. Creating the token is then an API call to the endpoint.
You will also need your own API Key, to get these values:
- Select Users from the System Management section.
- In the users list, click Edit for your user.
- The API key is the Tyk Dashboard API Access Credentials, copy this somewhere you can reference it.

- Select APIs from the System Management section.
- From the Actions menu for your API, select Copy API ID

Once you have these values, you can use them to access the Dashboard API, the below curl command will generate a key for one of your APIs:
Note
- Replace the
authorizationheader value with your Tyk Dashboard API Access Credentials - Replace the API ID (
ad5004d961a147d4649fd3216694ebe2) with your API ID - It’s recommended to validate the JSON using JSON validator to avoid any
malformed inputerror
curl -X POST -H "authorization: 1238b7e0e2ff4c2957321724409ee2eb" \
  -s \
  -H "Content-Type: application/json" \
  -X POST \
  -d '{
    "allowance": 1000,
    "rate": 1000,
    "per": 1,
    "expires": -1,
    "quota_max": -1,
    "quota_renews": 1449051461,
    "quota_remaining": -1,
    "quota_renewal_rate": 60,
    "access_rights": {
      "ad5004d961a147d4649fd3216694ebe2": {
        "api_id": "ad5004d961a147d4649fd3216694ebe2",
        "api_name": "test-api",
        "versions": ["Default"]
      }
    },
    "meta_data": {}
  }' https://admin.cloud.tyk.io/api/keys | python -mjson.tool
You will see a response with your new key:
{
  "action": "create",
  "key": "c2cb92a78f944e9a46de793fe28e847e",
  "status": "ok"
}
The value returned in the key parameter of the response is the access key you can now use to access the API that was specified in the access_rights section of the call
To create an API Key, you will need the API ID that we wish to grant the key access to, then creating the key is an API call to the endpoint.
Prerequisite
- You will need your API secret, this is the
secretproperty of thetyk.conffile.
Once you have this value, you can use them to access the Gateway API, the below curl command will generate a key for one of your APIs, remember to replace {API-SECRET}, {API-ID} and {API-NAME} with the real values as well as the curl domain name and port to be the correct values for your environment.
curl -X POST -H "x-tyk-authorization: {API-SECRET}" \
  -s \
  -H "Content-Type: application/json" \
  -X POST \
  -d '{
    "allowance": 1000,
    "rate": 1000,
    "per": 1,
    "expires": -1,
    "quota_max": -1,
    "org_id": "1",
    "quota_renews": 1449051461,
    "quota_remaining": -1,
    "quota_renewal_rate": 60,
    "access_rights": {
      "{API-ID}": {
        "api_id": "{API-ID}",
        "api_name": "{API-NAME}",
        "versions": ["Default"]
      }
    },
    "meta_data": {}
  }' http://localhost:8080/tyk/keys/create | python -mjson.tool
You will see a response with your new key:
{
  "action": "create",
  "key": "c2cb92a78f944e9a46de793fe28e847e",
  "status": "ok"
}
The value returned in the key parameter of the response is the access key you can now use to access the API that was specified in the access_rights section of the call.
