Kubernetes Demo

The tyk-k8s-demo repository allows you to start up an entire Tyk Stack with all its dependencies as well as other tools that can integrate with Tyk. The repository will spin up everything in Kubernetes using helm and bash magic to get you started. Purpose Minimize the amount of effort needed to start up the Tyk infrastructure and show examples of how Tyk can be set up in k8s using different deployment architectures as well as different integrations.

Prerequisites

Required Packages

You will need the following tools to be able to run this project.
  • Kubectl - CLI tool for controlling Kubernetes clusters
  • Helm - Helps manage Kubernetes applications through Helm charts
  • jq - CLI for working with JSON output and manipulating it
  • git - CLI used to obtain the project from GitHub
  • Terraform (only when using --cloud flag)
Tested on Linux/Unix based systems on AMD64 and ARM architectures

License Requirements

  • Tyk OSS: No license required as it is open-source.
  • Licensed Products: Sign up here using the button below, and choose “Get in touch” to receive a guided evaluation of the Tyk Dashboard and your temporary license.
How to use the license key Once you obtained the license key, create a .env file using the example provided and update it with your licenses as follows:
Depending on the deployments you would like to install set values of the LICENSE, MDCB_LICENSE, and PORTAL_LICENSE inside the .env file.

Minikube

If you are deploying this demo on Minikube, you will need to enable the ingress addon. You can do so by running the following commands:

Quick Start

This quick start command will start up the entire Tyk stack along with the Tyk Enterprise Portal, Tyk Operator, and httpbin CRD example.

Possible deployments

  • tyk-stack: A comprehensive Tyk Self Managed setup for a single region
  • tyk-cp: Tyk control plane in a multi-region Tyk deployment
  • tyk-dp: Data plane of hybrid gateways that connect to either Tyk Cloud or a Tyk Control Plane, facilitating scalable deployments
  • tyk-gateway: Open Source Software (OSS) version of Tyk, self-managed and suitable for single-region deployments

Dependencies Options

Redis Options
  • redis: Bitnami Redis deployment
  • redis-cluster: Bitnami Redis Cluster deployment
  • redis-sentinel: Bitnami Redis Sentinel deployment
Storage Options Supplementary Deployments Please see this page for Tyk deployments compatibility charts.
  • cert-manager: deploys cert-manager.
  • datadog: deploys Datadog agent and starts up Tyk Pump to push analytics data from the Tyk platform to Datadog. It will also create a Datadog dashboard for you to view the analytics.
  • elasticsearch: deploys Elasticsearch and starts up Tyk pump to push analytics data from the Tyk platform to Elasticsearch.
    • elasticsearch-kibana: deploys the Elasticsearch deployment as well as a Kibana deployment and creates a Kibana dashboard for you to view the analytics.
  • Jaeger: deploys the Jaeger operator, a Jaeger instance, and the OpenTelemetry collector and configures the Tyk deployment to send telemetry data to Jaeger through the OpenTelemetry collector.
  • k6: deploys a Grafana K6 Operator.
    • k6-slo-traffic: deploys a k6 CRD to generate a load of traffic to seed analytics data.
  • keycloak: deploys the Keycloak Operator and a Keycloak instance.
    • keycloak-dcr: starts up a Keycloak Dynamic Client Registration example.
    • keycloak-jwt: starts up a Keycloak JWT Authentication example with Tyk.
    • keycloak-sso: starts up a Keycloak SSO example with the Tyk Dashboard.
  • newrelic: deploys New Relic and starts up a Tyk Pump to push analytics data from the Tyk platform to New Relic.
  • opa: enables Open Policy Agent to allow for Dashboard APIs governance.
  • opensearch: deploys OpenSearch and starts up Tyk Pump to push analytics data from the Tyk platform to OpenSearch.
  • operator: deploys the Tyk Operator and its dependency cert-manager.
    • operator-federation: starts up Federation v1 API examples using the tyk-operator.
    • operator-graphql: starts up GraphQL API examples using the tyk-operator.
    • operator-httpbin: starts up an API examples using the tyk-operator.
    • operator-jwt-hmac: starts up API examples using the tyk-operator to demonstrate JWT HMAC auth.
    • operator-udg: starts up Universal Data Graph API examples using the tyk-operator.
  • portal: deploys the Tyk Enterprise Developer Portal as well as its dependency PostgreSQL.
  • prometheus: deploys Prometheus and starts up Tyk Pump to push analytics data from the Tyk platform to Prometheus.
    • prometheus-grafana: deploys the Prometheus deployment as well as a Grafana deployment and creates a Grafana dashboard for you to view the analytics.
  • vault: deploys Vault Operator and a Vault instance.
If you are running a POC and would like an example of how to integrate a specific tool, you are welcome to submit a feature request Example
The deployment process takes approximately 10 minutes, as the installation is sequential and some dependencies take time to initialize. Once the installation is complete, the script will output a list of all the services that were started, along with instructions on how to access them. Afterward, the k6 job will begin running in the background, generating traffic for 15 minutes. To monitor live traffic, you can use the credentials provided by the script to access Grafana or the Tyk Dashboard

Bash Script Usage


Start Tyk deployment

Create and start up the deployments

Stop Tyk deployment

Shutdown deployment
Clusters You can get the repository to create demo clusters for you on AWS, GCP, or Azure. That can be set using the --cloud flag and requires the respective cloud CLI to be installed and authorized on your system. You will also need to specify the CLUSTER_LOCATION, CLUSTER_MACHINE_TYPE, CLUSTER_NODE_COUNT, and GCP_PROJECT (for GCP only) parameters in the .env file. You can find examples of .env files here: For more information about cloud CLIs:

Customization

This repository can also act as a guide to help you get set up with Tyk. If you just want to know how to set up a specific tool with Tyk, you can run the repository with the --dry-run and --verbose flags. This will output all the commands that the repository will run to stand up any installation. This can help debug as well as figure out what configuration options are required to set these tools up. Furthermore, you can also add any Tyk environment variables to your .env file and those variables will be mapped to their respective Tyk deployments. Example:

Variables

The script has defaults for minimal settings in this env file, and it will give errors if something is missing. You can also add or change any Tyk environment variables in the .env file, and they will be mapped to the respective extraEnvs section in the helm charts.

Docker Demo

Purpose

With tyk-demo repository, using docker-compose, you can set up quickly a complete Tyk stack, including dependencies and integrations. Minimize the amount of effort needed to start up the Tyk infrastructure and show end-to-end complete examples of how to set up various capabilities in Tyk as well as different integrations.

Key Features

  • Full Tyk stack deployment
  • Pre-configured demo APIs
  • Analytics and monitoring tools
  • Integration with common third-party services
Watch the video What Is Tyk Demo for an overview and learn about the key features from our experts -

Prerequisites

  1. Docker compose Make sure you have docker compose and that docker is running on your machine.
  2. License key This Demo deploys and runs the full Tyk platform which is a licensed product. Please sign up using the button below, to obtain a license key. In the link, choose “Get in touch” to get a guided evaluation of the Tyk Dashboard and receive your temporary license.

Quick Start

The following steps will enable you to quickly get started:
  1. Clone the repository:
  1. Navigate to the directory:
  1. Add license key to .env file:
  1. Run the setup script:
  1. Access Tyk Dashboard: http://localhost:3000
To complete the instruction above we have a tutorial video of tyk demo that covers:
  • Downloading and starting tyk-demo
  • Setting up your license
  • Logging in to Tyk Dashboard

Docker Compose Setup

Who is this page for?

This is the guide we recommend for a easy quick start. The instructions are the ones shared with you when you register to a free trial. You can also use this guide for your PoC since it spins up a full Tyk Self Managed stack for you using our project Docker Pro Demo, however, if you are interested in learning Tyk, there’s an option for Tyk Demo which is a project that spins up full Tyk stack that includes a prepopulate API definitions of all kinds, with various middleware options and can also spin up supporting tools such as Prometheus, Keycloak (IDP) etc.

What’s included?

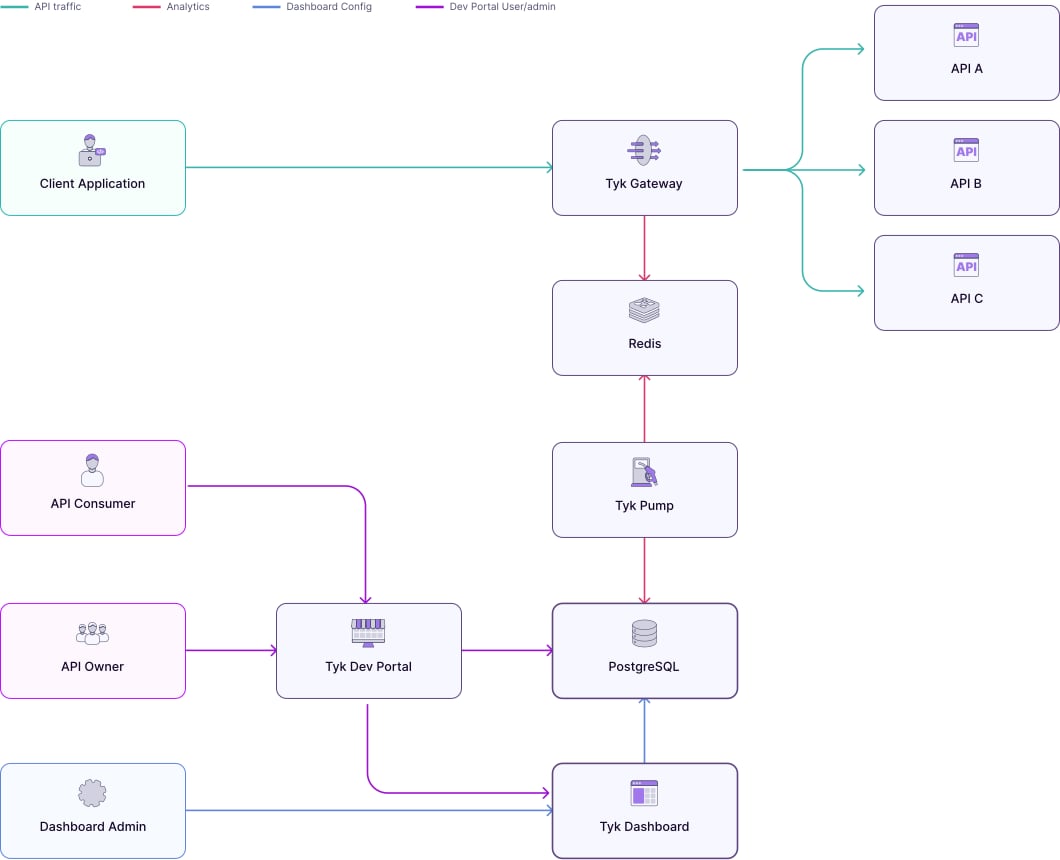
The Tyk Pro Docker Demo is our Self-Managed solution, which includes our Gateway, Dashboard, and analytics processing pipeline. This demo will run Tyk Self-Managed on your machine, which contains 5 containers: Tyk Gateway, Tyk Dashboard, Tyk Pump, Redis and MongoDB. This demo is great for proof of concept and demo purposes, but if you want to test performance, you will need to move each component to a separate machine.
This demo is NOT intended for production use or performance testing, since it uses docker compose and the configuration files are not specifically tuned for performance testing or high loads. Please visit the Planning for Production page to learn how to configure settings for optimal performance.
The Tyk Pro Docker demo does not provide access to the Developer Portal.

Prerequisites

Steps for Installation

  1. Clone the GitHub repo
Clone the Docker demo repo from GitHub to a location on your machine.
  1. Edit your hosts file
You need to add the following to your hosts file:
  1. Add your developer license
From your installation folder: Create an .env file - cp .env.example .env. Then add your license string to TYK_DB_LICENSEKEY.
  1. Initialise the Docker containers
With MongoDB Run the following command from your installation folder:
With PostgreSQL Run the following command from your installation folder:
This will will download and setup the five Docker containers. This may take some time and will run in non-daemonised mode so you can see all the output.
  1. Bootstrap the Tyk installation
Go to http://localhost:3000 in your browser. You will be presented with the Bootstrap UI to create your first organization and admin user. Tyk Bootstrap sceen
  1. Create your organization and default user
You need to enter the following:
  • Your Organization Name
  • Your Organization Slug
  • Your User Email Address
  • Your User First and Last Name
  • A Password for your User
  • Re-enter your user Password
    For a password, we recommend a combination of alphanumeric characters, with both upper and lower case letters.
Click Bootstrap to save the details.
  1. log in to the Tyk Dashboard
You can now log in to the Tyk Dashboard from 127.0.0.1:3000, using the username and password created in the Dashboard Setup screen.

Removing the demo installation

To delete all containers as well as remove all volumes from your host: With MongoDB
With PostgreSQL:

Using Windows

Tyk Pro on Windows using Docker Desktop

The Tyk Pro Docker demo is our full On-Premises Pro solution, which includes our Gateway, Dashboard, and analytics processing pipeline. This demo will run Tyk Self-Managed Pro on your machine, which contains 5 containers: Tyk Gateway, Tyk Dashboard, Tyk Pump, Redis and MongoDB. This demo is great for proof of concept and demo purposes, but if you want to test performance, you will need to move each component to a separate machine.
This demo is NOT designed for production use or performance testing.
You use this at your own risk. Tyk is not supported on the Windows platform. However you can test it as a proof of concept using our Pro Demo Docker installation.
Prerequisites Step 1 - Clone the Repo Clone the repo above to a location on your machine. Step 2 - Edit your hosts file You need to add the following to your Windows hosts file:
Step 3 - Add your Developer License You should have received your free developer license via email. Copy the license key in the following location from your \confs\tyk_analytics.conf file:
Step 4 - Run the Docker Compose File From PowerShell, run the following command from your installation folder:
This will will download and setup the five Docker containers. This may take some time and will display all output. Step 5 - Test the Tyk Dashboard URL Go to:
You should get to the Tyk Dashboard Setup screen: Tyk Dashboard Bootstrap Screen Step 6 - Create your Organization and Default User You need to enter the following:
  • Your Organization Name
  • Your Organization Slug
  • Your User Email Address
  • Your User First and Last Name
  • A Password for your User
  • Re-enter your user Password
    For a password, we recommend a combination of alphanumeric characters, with both upper and lower case letters.
Click Bootstrap to save the details. You can now log in to the Tyk Dashboard from 127.0.0.1:3000, using the username and password created in the Dashboard Setup screen. Step 7 - Set up a Portal Catalog This creates a portal catalog for your developer portal. For the Authorization Header, the Value you need to enter is the access_key value from the create user request. In the body add the org_id value created in Step One.
  • Request: POST
  • URL: 127.0.0.1:3000/api/portal/catalogue
  • Header: Key Authorzation Value SECRET_VALUE
  • Body (raw set to application/json):
Sample Request
Sample Response
Step 8 - Create your default Portal Pages This creates the default home page for your developer portal. For the Authorization Header, the Value you need to enter is the access_key value from the create user request.
  • Request: POST
  • URL: 127.0.0.1:3000/api/portal/catalogue
  • Header: Key Authorzation Value SECRET_VALUE
  • Body (raw set to application/json):
Sample Request
Sample Response
Step 9 - Setup the Portal URL This creates the developer portal URL. For the Authorization Header, the Value you need to enter is the secret value from your /confs/tyk_analytics.conf.
  • Request: POST
  • URL: 127.0.0.1:3000/api/portal/configuration
  • Header: Key Authorzation Value SECRET_VALUE
  • Body (raw set to application/json):
Sample Request
Sample Response

Tyk Pro on Windows using WSL

The Tyk Pro Docker demo is our full Self-Managed solution, which includes our Gateway, Dashboard, and analytics processing pipeline. This demo will run Tyk Self-Managed on your machine, which contains 5 containers: Tyk Gateway, Tyk Dashboard, Tyk Pump, Redis and MongoDB. This demo is great for proof of concept and demo purposes, but if you want to test performance, you will need to move each component to a separate machine.
This demo is NOT designed for production use or performance testing.
You use this at your own risk. Tyk is not supported on the Windows platform. However you can test it as a proof of concept using our Pro Demo Docker installation.
Prerequisites Step 1 - Clone the Repo Clone the repo above to a location on your machine. Step 2 - Edit your hosts file You need to add the following to your Windows hosts file:
Step 3 - Configure file permissions In order to mount the files, you need to allow Docker engine has access to your Drive. You can do that by going to the Docker settings, Shared Drives view, and manage the access. If after all you will get issue regarding path permissions, you will need to create a separate user specifically for the docker according to this instructions https://github.com/docker/for-win/issues/3385#issuecomment-571267988 Step 4 - Add your Developer License You should have received your free developer license via email. Copy the license key in the following location from your \confs\tyk_analytics.conf file:
Step 5 - Run the Docker Compose File From PowerShell, run the following command from your installation folder:
This will will download and setup the five Docker containers. This may take some time and will display all output. NOTE If you are getting issues related to errors when mounting files, you may need to modify docker-compose.yml file, and change configs paths from related to absolute, and from linux format to windows format, like this:
Step 6 - Got to the Dashboard URL Go to:
You should get to the Tyk Dashboard Setup screen: Tyk Dashboard Bootstrap Screen Step 7 - Create your Organization and Default User You need to enter the following:
  • Your Organization Name
  • Your Organization Slug
  • Your User Email Address
  • Your User First and Last Name
  • A Password for your User
  • Re-enter your user Password
    For a password, we recommend a combination of alphanumeric characters, with both upper and lower case letters.
Click Bootstrap to save the details. You can now log in to the Tyk Dashboard from 127.0.0.1:3000, using the username and password created in the Dashboard Setup screen. Configure your Developer Portal To set up your Developer Portal follow our Self-Managed tutorial on publishing an API to the Portal Catalog.