Overview
This section provides guides and recommendations for upgrading your Tyk installation. When upgrading Tyk, consider the following:- Deployment model: SaaS, Self-Managed, Hybrid, or OSS.
- Installation type: Docker, Helm, K8S, or various Linux distributions.
- Components: Depending on your model, upgrade relevant components such as Gateway, Pump, Dashboard, or Go Plugins.
Tyk Upgrade Standards and Recommendations
Our upgrade process adheres to the following standards:- Breaking changes: Breaking changes are rare and will be explicitly stated in the release notes.
- Configuration files: Upgrades do not overwrite your configuration files. However, it’s good practice to routinely back up these files (using git or another tool) before upgrading, so any customizations are saved.
- Migration scripts: Migration scripts for your APIs, policies, or other assets are generally not required unless specified in the release notes.
- Long Term Support: Refer to our versioning and long-term support policies for details on major and minor releases, patches, and support dates.
- Preparations: Review the preparation guidelines before starting the upgrade.
- Release notes: Always check the “Upgrade Instructions” section in the relevant release notes.
- Backups: Follow our comprehensive backup guide before starting the upgrade.
-
Docker: Upgrading with Docker is straightforward - pull the new images from public repositories. Refer to the following links for our releases:
- Docker & Kubernetes - Docker Hub - https://hub.docker.com/u/tykio
- Helm install - Artifact Hub - https://artifacthub.io/packages/search?repo=tyk-helm
- Linux - Packagecloud - https://packagecloud.io/tyk
- If you experience issues with the new version you pulled, contact Tyk Support or visit Tyk community forum.
Tyk Upgrade Guides for Different Deployment Models
Use the table below to find the appropriate upgrade guide for your platform:Supporting Tools
Tyk offers supporting tools for database migration and backing up APIs and policies.Migrating from MongoDB to SQL
Use our migration tool to manage the switch from MongoDB to SQL.Backup APIs Script
Utilize our bash backup script to export and restore all Tyk API Definitions and Policies.Preparations
Upgrade Guidelines
When considering upgrading your current configuration to a new Tyk release, we recommend you consider the following:Upgrade strategy
Which strategy do you intend to use?- If following the Blue-Green upgrade strategy, has the green environment been configured and verified as production-ready?
- If pursuing the Rolling upgrade strategy, do all Tyk components have a second instance?
- If you’ll have downtime, estimate the expected duration of the upgrade process and plan for potential downtime.
Backups
Have backups been performed?- Databases: Have databases been properly backed up?
- configuration files: Have you safely backed up these files (using version control system such as git)?
- Testing: Have you tested the backups to verify they can be successfully restored in a separate environment?
- Backup guide: Have you checked our comprehensive guide for backing up Tyk?
Go plugins
Do you use custom Go plugins with your APIs?- Go plugin must be recompiled for the new version.
- Identify all Go plugins in use with all your API definitions.
- Allow sufficient time for testing and troubleshooting Go plugins after the upgrade.
Linux users
Which Linux distributions are currently in use?- Was Tyk deployed via a repository or a local package file
.rpm(used be CentOS and RHEL) or.deb(Debian and its derivative Ubuntu)? - Is the targeted version available on packagecloud.io/tyk or in an intended repository?
Communication
Communicate with stakeholders and users about the upgrade schedule and expected impact on services.Upgrade Checklist:
- Choose an upgrade strategy or manage downtime
- Check Linux distribution and Tyk version availability
- Perform and test backups
- Identify and plan for custom Go plugin recompilation and testing
- Communicate with stakeholders
Next Steps
Use the Upgrade Guides ToC to choose the appropriate upgrade guide for your platform.Upgrade Strategies
Tyk is compatible with both rolling and blue-green upgrade strategies.Rolling Upgrade
A rolling upgrade updates servers incrementally rather than simultaneously. This approach helps reduce application downtime and mitigates the risk of unforeseen consequences or errors during software updates. Steps for Rolling Upgrade:- Redundancy: Ensure there are at least two instances of each Tyk component that needs upgrading.
- Load Balancer: Use a load balancer to distribute traffic for the Dashboard and Gateway components, ensuring continuous availability during the upgrade process. Note that the Pump operates with one-way traffic and does not require load balancing.
- Upgrade Process:
- Direct traffic to one instance while upgrading the other.
- Once the first instance is upgraded, switch traffic to it and upgrade the remaining instance.
- After both instances are upgraded, configure the load balancer to route traffic to both instances simultaneously.
Blue-Green Upgrade
A blue-green deployment involves two identical production environments, labeled blue and green. At any time, only one environment is live and serving traffic, while the other is inactive. For example, if the blue environment is live, the green environment will be inactive, and vice versa. Steps for Blue-Green Upgrade:- Replication: Replicate the entire environment into a separate environment.
- Traffic Routing: Use a load balancer or DNS to route traffic to the green environment (current production) while the blue environment undergoes the upgrade.
- Upgrade Process:
- A VM snapshot is a recommended method for replication, but other methods, such as a new deployment process, can also be used.
- If using a new deployment process, follow the deployment instructions appropriate for your platform.
- Switch Environments: Once the upgrade is complete, switch the traffic to the upgraded environment.
Deployment Model
Tyk Cloud Upgrade Guide
Tyk Cloud
Preparations Before proceeding with the upgrade process, ensure that you have thoroughly reviewed and completed the steps outlined in the upgrade guidelines. Once you have adequately prepared, follow the instructions below to upgrade your Tyk components and plugins in this specified order. Adhering to the provided sequence is crucial for a smooth and successful upgrade. Step 1. Upgrade Control Plane Follow our guide for upgrading Cloud Control Planes. Step 2. Upgrade Go Plugins Follow our guide for deploying your Go plugins on Tyk Cloud. Subsequently, follow the steps below according to the target upgrade version of the Gateway. Gateway Versions < 4.1.0.- Proceed with upgrading your Tyk Data Plane (Gateway)
- Update the custom_middleware_bundle field in the API Definitions of all APIs that use your plugin. The field should be updated to use the new bundle file containing your upgrade plugin.
- Validate that your plugin is working per your expectations.
- Update the custom_middleware_bundle field in the API Definitions of all APIs that use your plugin. The field should be updated to use the new bundle file containing your upgraded plugin.
-
Validate that your plugin is working per your expectations as at this stage, your Gateway will be running the plugin for your current version still.
This step is a sanity check to catch any potential issues with the bundle for the current version and will ensure that any requests that your Gateway processes prior to being upgraded are able to invoke the plugin as you expect.
- Proceed with upgrading your Tyk Data Plane (Gateway). Given that you loaded your target version plugin in step 1, this version will be loaded automatically once you upgrade.
- Validate that your plugin is working per your expectations, as the Gateway now should have loaded the plugin for the target version automatically.
Step 3. Upgrade Cloud Data Plane
Follow our guide for upgrading Cloud Data Planes. Upgrade Guide Video Please refer to our upgrade guide video below for visual guidance:Tyk Hybrid
A Hybrid SaaS deployment is a shared responsibility model where Tyk is responsible for hosting the Control Plane while the client is responsible for hosting their Data Plane, be it hosted on a public cloud provider or on their own infrastructure. The control plane includes the following components:- Tyk Dashboard
- Tyk Control Plane
- MDCB
- MongoDB
- Redis (Master Instance)
- Hybrid Gateway(s)
- Redis instance
- Tyk Pump (optional)
- Upgrade the control plane on Tyk Cloud
- Upgrade your Tyk self-managed data plane. When upgrading your data plane, upgrade the components in the
following order:
- Go Plugins (if applicable)
- Hybrid Pump (if applicable)
- Hybrid Gateway(s)
- Proceed with upgrading your Tyk Data Plane Hybrid Gateways.
- Update the custom_middleware_bundle field in the API Definitions of all APIs that use your plugin. The field should be updated to use the new bundle file containing your upgrade plugin.
- Validate that your plugin is working per your expectations.
- Update the custom_middleware_bundle field in the API Definitions of all APIs that use your plugin. The field should be updated to use the new bundle file containing your upgraded plugin.
- Validate that your plugin is working per your expectations as at this stage, your Gateway will be running the plugin for your current version still.
This step is a sanity check to catch any potential issues with the bundle for the current version and will ensure that any requests that your Gateway processes prior to being upgraded are able to invoke the plugin as you expect.
- Proceed with upgrading your Tyk Data Plane Hybrid Gateways. Given that you loaded your target version plugin in step 1, this version will be loaded automatically once you upgrade.
- Validate that your plugin is working per your expectations.
Step 3. Upgrade your Tyk Data Plane Hybrid Gateway(s)
Follow the instructions for the component deployment type: Upgrade Guide Video Please refer to our video for further support with upgrading Tyk Self-Managed (RPM).Go Plugin
This guide explains how to deploy your custom Go plugins on Tyk Cloud:- Navigate into the plugins directory that contains your Go module
- Compile your custom Go plugins.
- Use the table below to follow the deployment process for the version of Tyk you are upgrading to:
Path 1 - Current Version < 4.1.0 and Target Version < 4.1.0
-
Create a plugin bundle that includes the newly compiled version

- Upload this bundle to your configured S3 bucket if using Cloud SaaS. If you’re using Hybrid SaaS, upload this bundle to your bundle server.
Version >= 4.1.0 and Target Version >= 4.2.0
-
Create a plugin bundle that includes both your current version’s plugin along with the newly compiled version

manifest.jsonwill look something like this:In this example -- the CustomGoPlugin.so in the file list would be the filename of the plugin you’re using with your current version. You will already have this file available as this is what has been running in your environment.
- The CustomGoPlugin_v4.3.3_linux_amd64.so file represents the plugin compiled for the target version.
- “_v4.3.3_linux_amd64” postfix is generated automatically by the compiler. If your target version was 5.2.0, then “_v5.2.0_linux_amd64” would be appended to the shared object filename that the compiler creates
- Your bundle zip file should include both the current version and target versions of the plugin.
- Upload this bundle to your configured S3 bucket if using Cloud SaaS. If you’re using Hybrid SaaS, upload this bundle to your bundle server.
Tyk Self-Managed Upgrade Guide
Preparations Before proceeding with the upgrade process, ensure that you have thoroughly reviewed and completed the steps outlined in the upgrade guidelines. Once you have adequately prepared, follow the instructions below to upgrade your Tyk components and plugins in this specified order. Adhering to the provided sequence is crucial for a smooth and successful upgrade. Upgrade Order In a production environment where the Dashboard, Gateway, and Pump are installed on separate machines, you should always upgrade components in the following sequence:- Tyk Dashboard
- Tyk Gateway
- Tyk Pump
Upgrade order with Multi Data Center Bridge (MDCB)
For Enterprise customers, the Tyk control plane contains all the standard components of a Self-Managed installation with the addition of the Multi Data Center Bridge (MDCB). Our recommended sequence for upgrading a self-managed MDCB installation is as follows: Stage 1: Upgrade the components of the Tyk control plane in this order:- MDCB
- Tyk Pump (if applicable)
- Tyk Dashboard
- Tyk Gateway
- Go Plugins (if applicable)
- Tyk Pump (if applicable)
- Tyk Gateway
- Forward compatibility - that we don’t have forward-compatibility issues of the new Gateway using the old MDCB.
- Connectivity issues - It’s extremely fast to see if there are connectivity issues and gateways (in Hybrid mode) will continue to function even if disconnected from their control plane.
MCP Gateway (v5.13+)
Tyk v5.13 introduces MCP Gateway, which adds specific ordering requirements on top of the standard upgrade sequence above. These apply only to deployments that will use MCP Gateway functionality. Self-managed (no MDCB) No additional ordering requirements. Tyk Pump writes MCP analytics directly to your configured storage backend (MongoDB or SQL). The standard Dashboard → Gateway → Pump upgrade order applies. Distributed deployments The standard MDCB-first ordering applies with one additional requirement: theenable_mcp_aggregation flag on Tyk Pump must remain false during the upgrade and only be enabled once all components are on the new version.
This flag tells the Hybrid Pump to send MCP analytics to MDCB using the new PurgeAnalyticsDataMCPAggregated RPC. If you enable it before MDCB is running the new version, the RPC calls will fail and MCP analytics records will be silently dropped.
The correct sequence for upgrading distributed deployments is:
- Upgrade MDCB.
- Upgrade Tyk Pump — with
enable_mcp_aggregationstill set tofalse. - Upgrade Tyk Gateway and Tyk Dashboard.
- Only now set
enable_mcp_aggregation: trueon every Hybrid Pump and restart.
enable_mcp_aggregation flag is not required for single-DC self-managed deployments (no MDCB in the analytics path) or for Tyk Cloud (no customer-side Pump).
Tyk Operator
If you use Tyk Operator to manage API definitions via TykMCPProxyDefinition custom resources, deploy the new Operator version only after Tyk Dashboard and Tyk Gateway are running the new version. The Operator controller calls the Dashboard /api/mcps endpoint, which only exists from v5.13 onwards. Deploying the Operator first will cause reconciliation failures on all MCP custom resources.
Tyk Developer Portal
If your deployment includes the Tyk Developer Portal, upgrade Portal before or at the same time as Tyk Dashboard, and definitely before creating any MCP Proxy policies in the Dashboard. From v1.17.2, Portal prevents MCP Proxy policies from appearing as API Products in the Developer Portal so that they cannot accidentally be exposed in Catalogs. An older Portal version running against a new Dashboard with MCP Proxy policies configured will surface those policies which could then be exposed to API Consumers who will not be able to consume them.
Tyk Cloud
Tyk Cloud does not run a customer-side Pump — MCP analytics are written directly by the Gateway and MDCB to the managed store. The deployment order is:
- MDCB
- Tyk Gateway and Tyk Dashboard
- Tyk Operator (if used) — after Dashboard is running
- Tyk Developer Portal — before MCP Proxy policies are created in Dashboard
enable_mcp_aggregation flag to configure in a Cloud deployment.
Upgrade guides
We provide upgrade guides for Linux, Docker, Helm and K8S. To continue the upgrade process, please refer to the relevant installation guide under this section.Docker
Step 1. Upgrade Tyk Dashboard Upgrading Tyk Dashboard is the same as Tyk Gateway just with the name of the docker image of tyk dashboardtykio/tyk-dashboard. Please check the instructions for Tyk Gateway in the next section.
Step 2. Upgrade Tyk Gateway and Tyk Pump
Follow our Tyk OSS guide for upgrading Tyk Gateway and Tyk Pump
Helm
Upgrade instructions for Tyk Dashboard, Tyk Pump and MDCBThe instruction below refer to upgrading Tyk Gateway. You can follow the same steps for Tyk Dashboard, Tyk Pump
and MDCB.
- Backup your gateway config file (
tyk.confor the name you chose for it),.envandvalues.yaml. Even if you’re using the environment variables from thevalues.yamlto define your configuration, there still might be a config file used and loaded with field values you rely on. - Backup your
.envandvalues.yaml - Update the image version in your values.yaml
For example, in this values.yaml change the version of the tagtag: v5.3to the version you want. - Run
Helm upgradewith your relevantvalues.yamlfile/s.
Check the helm upgrade docs for more details on theupgradecommand.
Kubernetes
Upgrade instructions for Tyk Dashboard, Tyk Pump and MDCBThe instruction below refer to upgrading Tyk Gateway. You can follow the same steps for Tyk Dashboard, Tyk Pump
and MDCB.
- Backup your gateway config file (
tyk.confor the name you chose for it) - Update the image version in the manifest file.
- Apply the file/s using kubectl
kubectl get pods to get the pod name):
- Check the log to see that the new version is used and if the gateway is up and running
- Check the gateway is healthy
RollingUpdate strategy to ensure zero downtime. For more information on upgrade strategies, see the Upgrade Strategies section.
Upgrade Tyk K8S Demo deployment
- In the Tyk k8s Demo repo, change the version in .env file,
GATEWAY_VERSION=v5.1to the version you want - Restart the deployment
- Check the log file
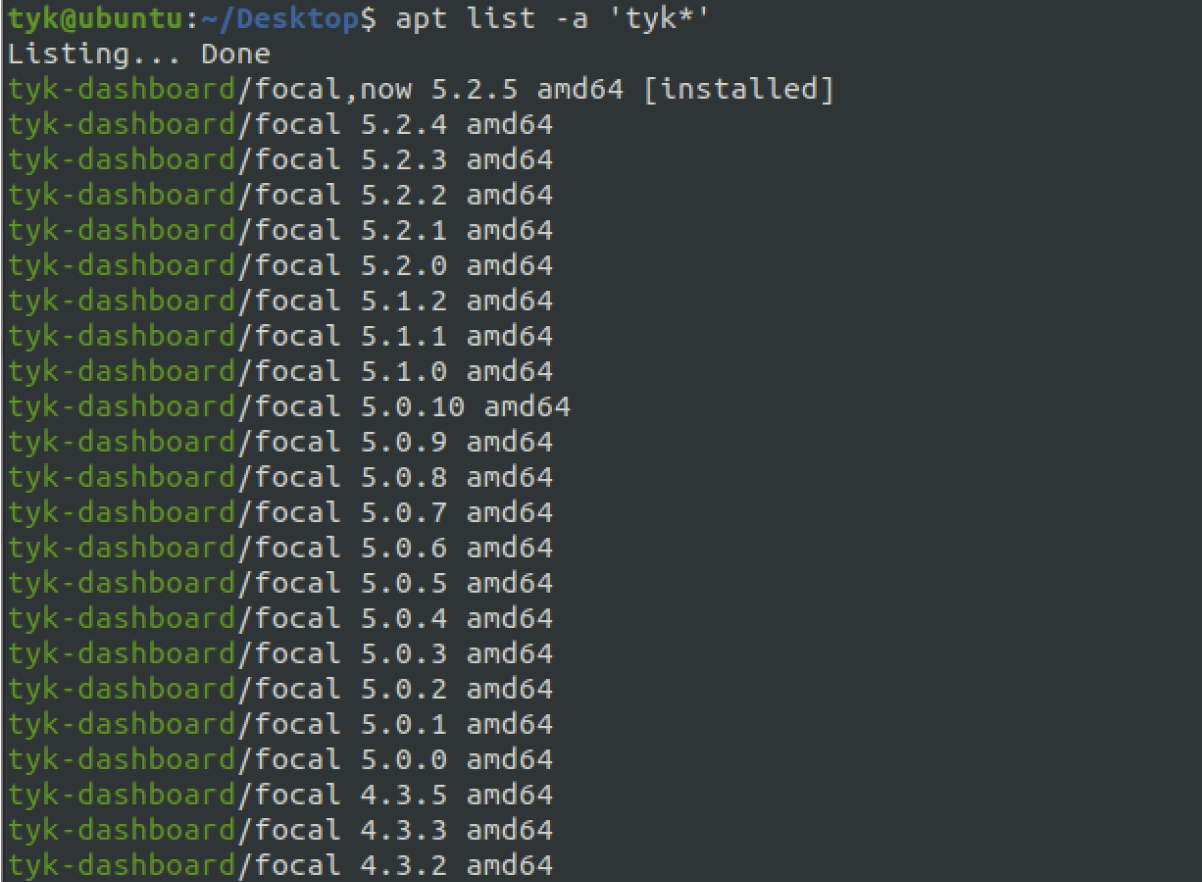
Linux - Debian
The following guide explains how to upgrade Tyk Self-Managed running on Debian Upgrade Guide Video Please refer to our upgrade guide video below for visual guidance of upgrading Tyk Self-Managed (DEB).
Preparations
After reviewing guidelines for preparing for upgrade,
follow the instructions below to upgrade your Tyk components and plugins.
Upgrade order:
Please note that upgrade order is as explained in the upgrade overview
Distro versions
Tyk supports the following version for Debian and its derivative Ubuntu:
Our repositories will be updated at https://packagecloud.io/tyk when new versions are released.
During the initial deployment of Tyk, your team may have utilized APT repositories or directly downloaded the .deb files. To verify the presence of APT repositories on the server, inspect the following locations:
- Dashboard:
/etc/apt/sources.list.d/tyk_tyk-dashboard.list - Gateway:
/etc/apt/sources.list.d/tyk_tyk-gateway.list - Pump:
/etc/apt/sources.list.d/tyk_tyk-pump.list
Backups
Configuration files: Please take a backup of the below configuration files of each Tyk component. This will be useful in case you need to cross-reference configuration changes or need to roll back your deployment.- Dashboard Configuration File:
/opt/tyk-dashboard/tyk_analytics.conf - Gateway Configuration File:
/opt/tyk-gateway/tyk.conf - Pump Configuration File:
/opt/tyk-pump/pump.conf
Redis and MongoDB are not Tyk products and what we provide here are basic backup and restore instructions. It is advisable to consult the official documentation for Redis and MongoDB on backups.
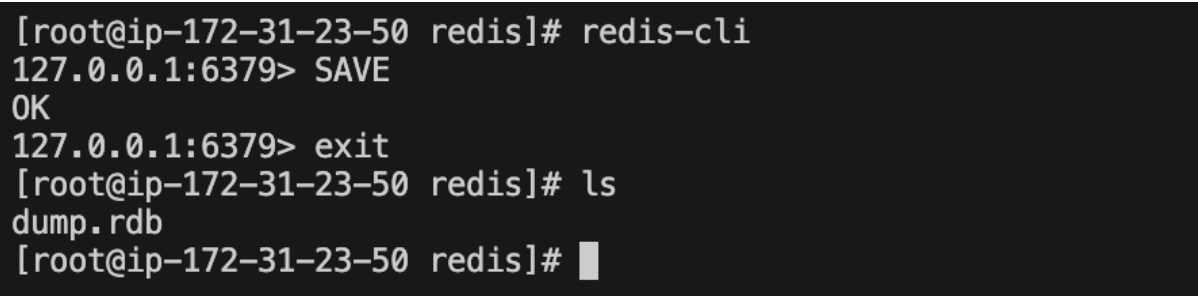
- Move the Redis backup file (dump.rdb) to your Redis directory.
- Start the Redis server


Reverting the Upgrade
If the upgrade fails you can revert to the old version by following the steps below. Step 1. Inspect package logs In case the upgrade fails for some reason, you can use the command below to check your history of package installs:These commands are provided as general guidelines and should be used with caution. It’s advisable to consult with your system administrator or seek assistance from a qualified professional before executing any system-level commands
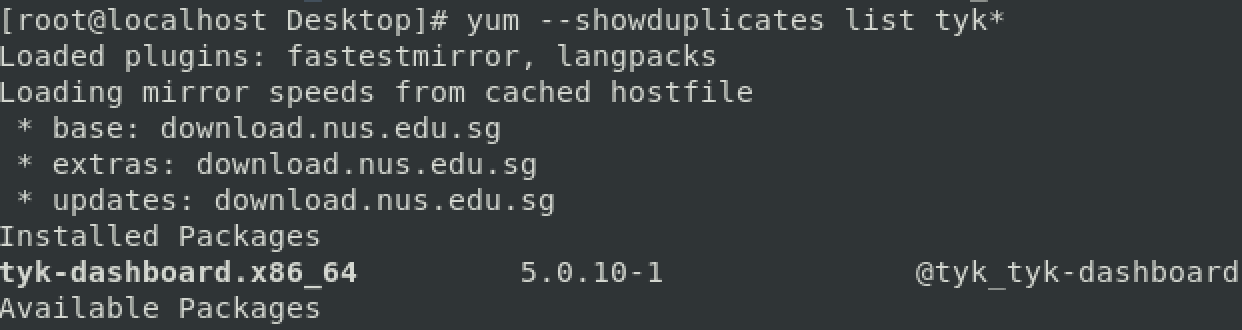
Linux - RedHat (CentOS)
The following guide explains how to upgrade Tyk Self-Managed running on RHEL Upgrade guide video Please refer to our upgrade guide video below for visual guidance of upgrading Tyk Self-Managed (RPM).Preparations After reviewing guidelines for preparing for upgrade, follow the instructions below to upgrade your Tyk components and plugins. Upgrade order: Please note that upgrade order is as explained in the upgrade overview Distro versions Tyk supports the following Centos and Rhel distributions:
Our repositories will be updated at https://packagecloud.io/tyk when new versions are released.
During the initial deployment of Tyk, your team may have utilized YUM repositories or directly downloaded the .rpm files. To verify the presence of YUM repositories on the server, inspect the following locations:
- Dashboard:
/etc/yum.repos.d/tyk_tyk-dashboard.repo - Gateway:
/etc/yum.repos.d/tyk_tyk-gateway.repo - Pump:
/etc/yum.repos.d/tyk_tyk-pump.repo
Backups
Before upgrading, ensure that the configuration files and databases are backed up. Configuration files Please take a backup of the following configuration files for each Tyk component. This will be useful in case you need to cross-reference configuration changes or need to roll back your deployment.- Dashboard Configuration File:
/opt/tyk-dashboard/tyk_analytics.conf - Gateway Configuration File:
/opt/tyk-gateway/tyk.conf - Pump Configuration File:
/opt/tyk-pump/pump.conf
Redis and MongoDB are not Tyk products and what we provide here are basic backup and restore instructions. It is advisable to consult the official documentation for Redis and MongoDB on backups.
- Move the Redis backup file (dump.rdb) to your Redis directory.
- Start the Redis server
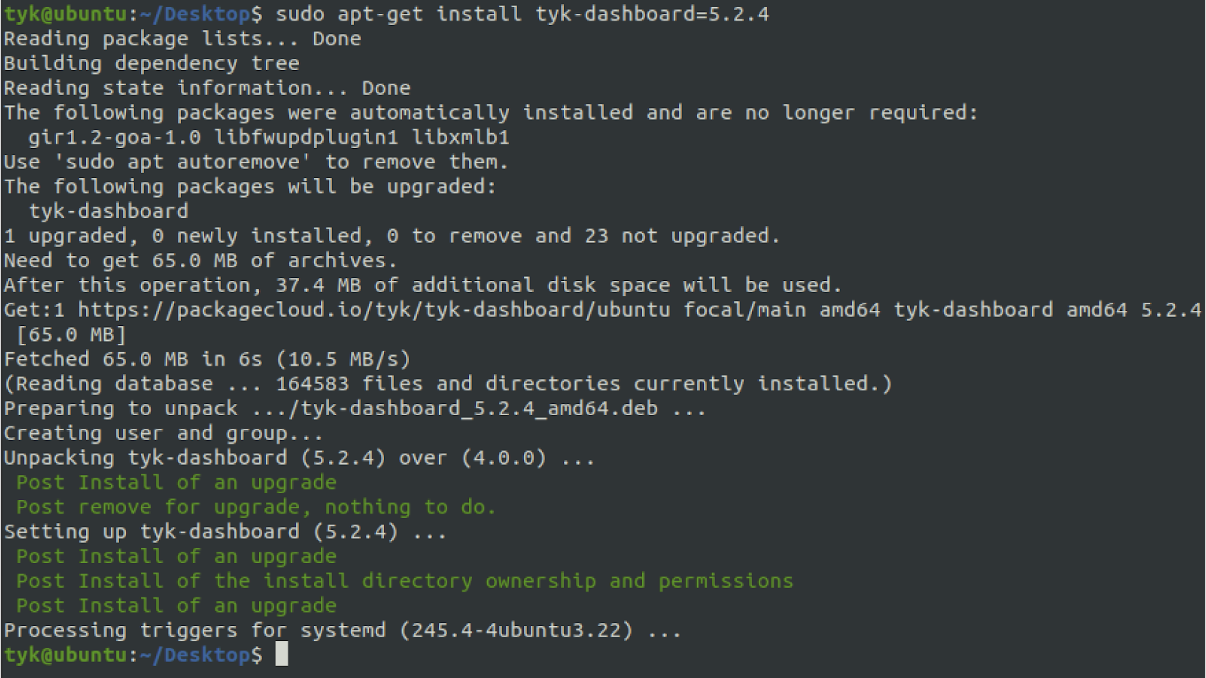
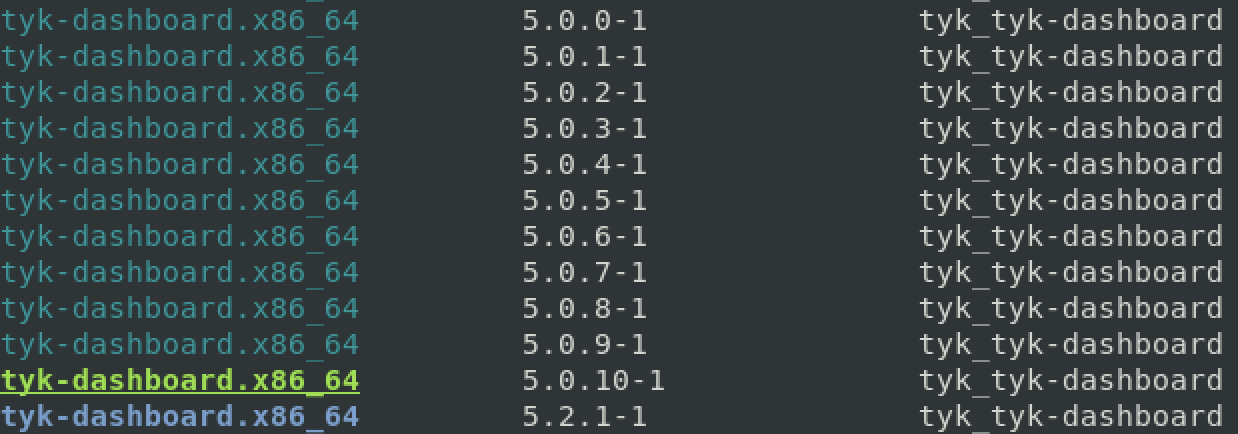
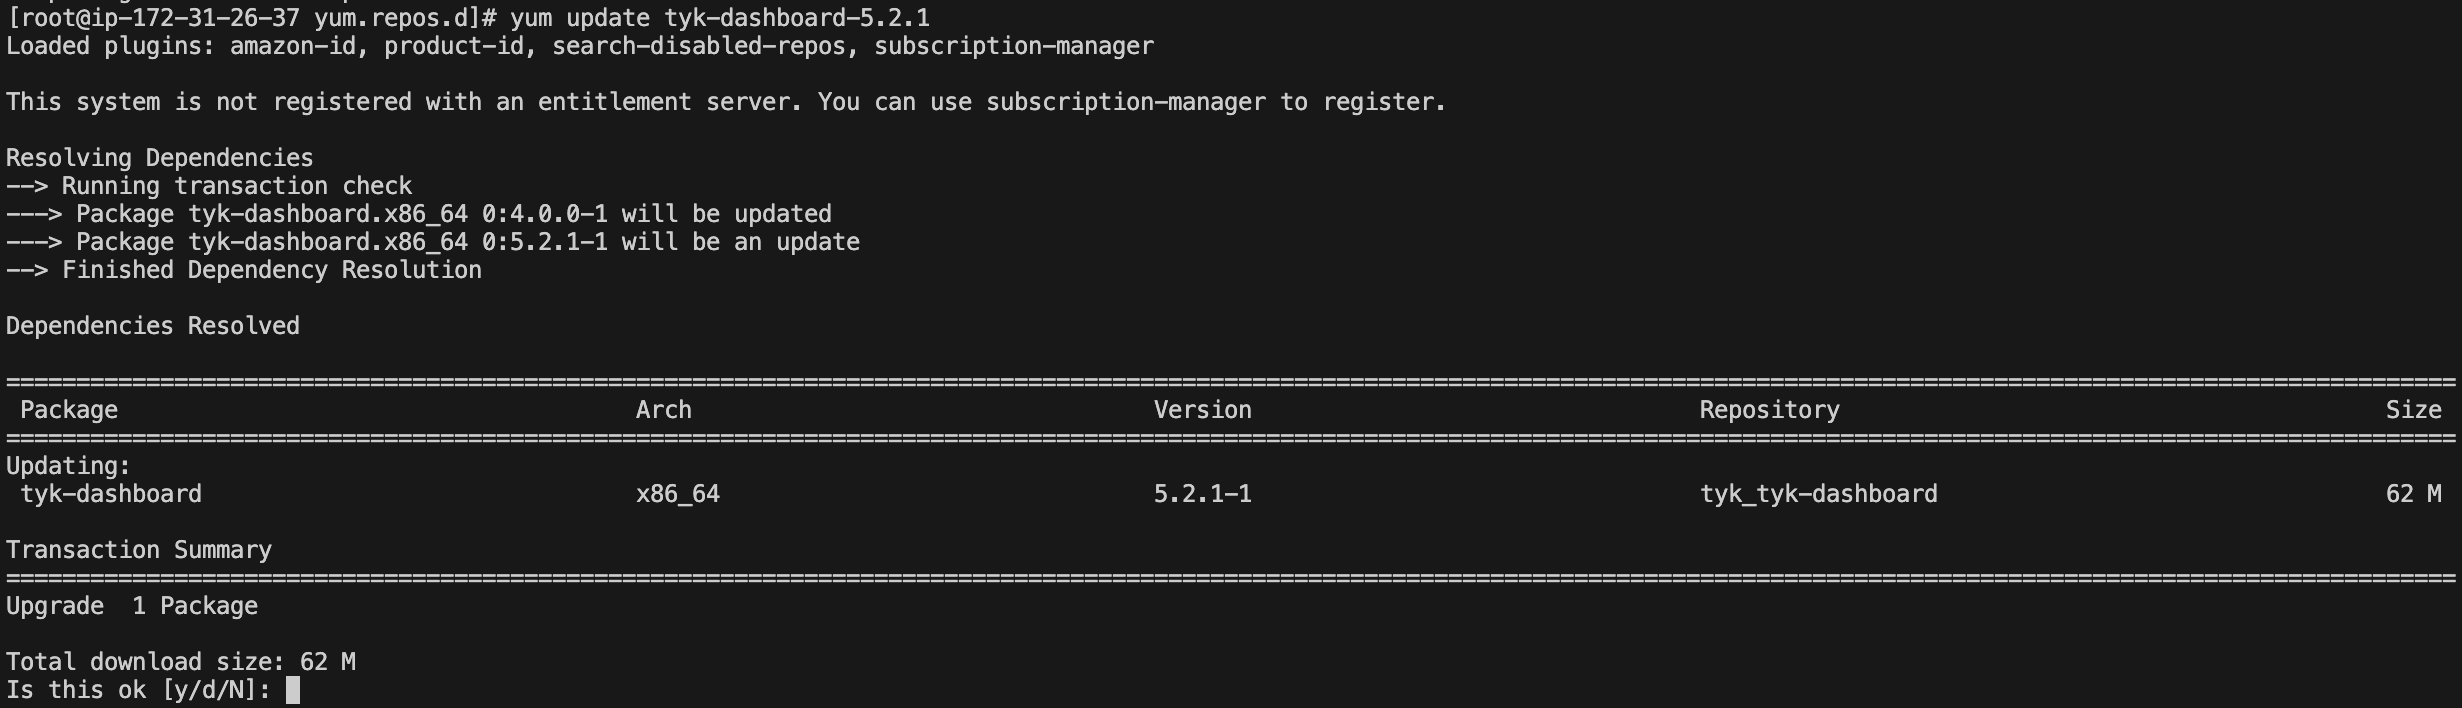
Upgrade Tyk Packages
Before executing the upgrade, ensure that you have consulted and performed all the necessary steps in the pre-upgrade checklist. Step 1. Update Tyk Repositories Fetch and update information about the available packages from the specified repositories.
Reverting the Upgrade
If the upgrade fails you can revert to the old version by following the steps below. Step 1. Inspect package logs Use the command below to fetch information for all updates, noting the ID for the specific “update” action to revert to allow verifying the packages: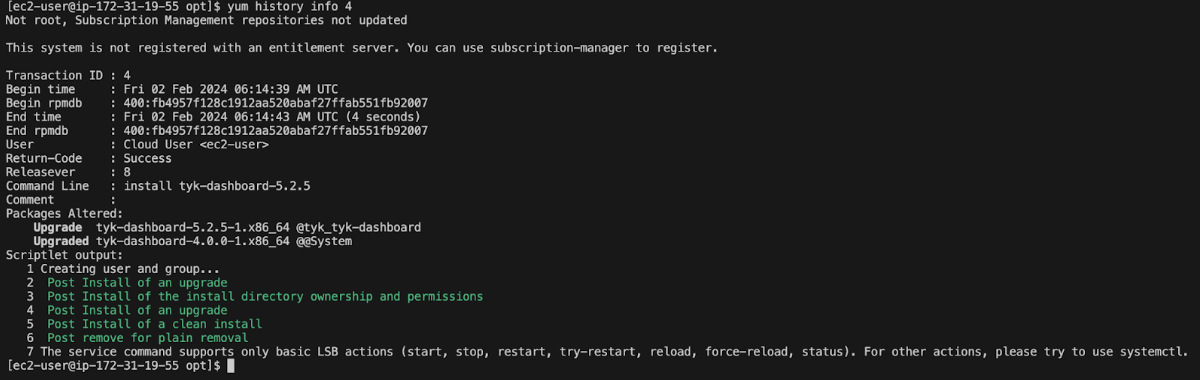
These commands are provided as general guidelines and should be used with caution. It’s advisable to consult with your system administrator or seek assistance from a qualified professional before executing any system-level commands
Open-Source Upgrade Guide
The following guide explains how to upgrade Tyk Gateway when using Docker. For guides of other installation types check the self-managed section, and look for the instruction regarding Tyk Gateway. Before proceeding with the upgrade process, ensure that you have thoroughly reviewed and completed the steps outlined in the pre-upgrade guidelines. Once you have adequately prepared, follow the instructions below to upgrade your Tyk components and plugins in this specified order. Adhering to the provided sequence is crucial for a smooth and successful upgrade. Upgrade Order In a production environment, where we recommend installing the Dashboard, Gateway, and Pump on separate machines, you should upgrade components in the following sequence:- Tyk Gateway
- Tyk Pump
- Backup your gateway config file (
tyk.confor the name you chose for it) - Update the image version in the docker command or script
- Restart the gateway. For example, update the following command to
v5.1and run it as follows:
- Backup your gateway config file (
tyk.confor the name you chose for it) - Update the image version in the
docker-compose.yamlfile.
For example, Tyk Gateway version4.3.3is defined in yourdocker-compose.yamlasimage: docker.tyk.io/tyk-gateway/tyk-gateway:v4.3.3. Change4.3.3to the version you want to use. - Restart the gateway (or stop and start it)
- Check the log to see that the new version is used and if the gateway is up and running
- Check that the gateway is healthy
- Backup your Gateway config file
- Use Docker’s best practices for a rolling update
- Review and complete the steps outlined in the pre-upgrade guidelines.
- Define the version in your setup script (for example in
.envfile). The new image will be pulled once it’s executed. If your script is doingdocker pull, update the version of the gateway in that command to the target version. - Check the log to see that the new version is used and if the gateway is up and running
- Check that the Gateway is healthy using the open /hello API ( run
curl localhost:8080/hello | jq .)
tykio/tyk-pump-docker-pub
Go-Plugins Upgrade Guide
This guide shows you how to compile your custom Go plugins for upgrade. The table below links you to the upgrade steps for the version of Tyk you are upgrading from and to:Path 1 - Current Version < 4.1.0 and Target Version < 4.1.0
- Open a terminal/command prompt in the directory of your plugin source file(s)
- Run the following commands to initialise your plugin:
Path 2 - Current Version < 4.1.0 and Target Version >= 4.1.0
- Open a terminal/command prompt in the directory of your plugin source file(s)
- Based on your Target Version run the appropriate commands to initialize your plugin:
Target Version <= v4.2.0- Target Version > v4.2.0 and < v5.1
- Target Version >= v5.1.0
Path 3 - Current Version >= 4.1.0 and Target Version >= 5.1.0
- Open a terminal/command prompt in the directory of your plugin source file(s)
- Based on your Target Version run the appropriate commands to initialise your plugin:
- Target Version > v4.2.0 and < v5.1.0
- Target Version >= v5.1.0
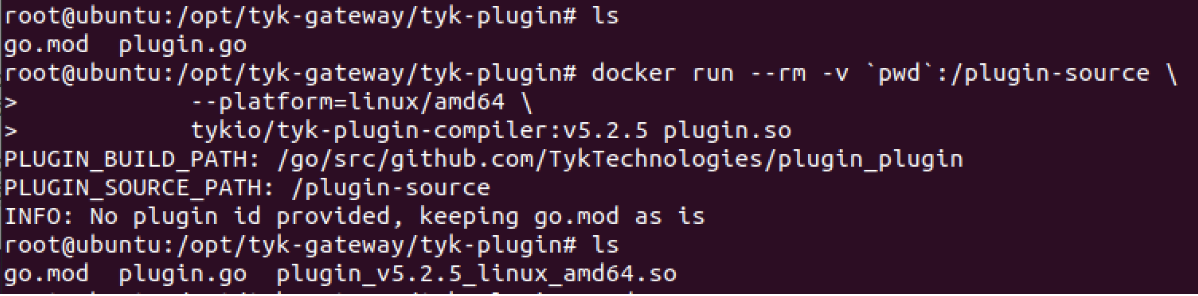
Compile the plugins
Download the plugin compiler for the target Gateway version you’re upgrading to (e.g. 5.2.5). Docker images for plugin compiler versions are available in the Tyk Docker Hub.