Documentation Index
Fetch the complete documentation index at: https://tyk.io/docs/llms.txt
Use this file to discover all available pages before exploring further.
Introduction
Tyk Identity Broker (TIB) is a solution for integrating various Identity Management Systems (such as LDAP, Social OAuth, Okta) with your Tyk installation.
With TIB, you gain the flexibility to connect your existing user directories to Tyk Dashboard or Developer Portal, streamlining access management and enhancing security. Whether you’re looking to implement SSO, leverage social logins, or integrate with enterprise identity providers, TIB provides the tools and configurations to make it happen.
This page introduces general features of Tyk Identity Broker (TIB) and how to configure them. If you are looking for global configurations of the TIB deployment refer this config file.
What is Tyk Identity Broker (TIB)?
Tyk Identity Broker (TIB) is a component providing a bridge between various Identity Management Systems such as LDAP, Social OAuth (e.g. GPlus, Twitter, GitHub) or Basic Authentication providers, to your Tyk installation.
TIB can act as a bridge between the API Gateway, Tyk Portal or even the Tyk Dashboard, and makes it easy to integrate custom IDMs to your system.
Starting from Tyk v3.0 TIB has been added as a built-in feature of the Tyk Dashboard. You no longer have to setup a separated instance of the service to make it work with the Dashboard. You now have two options:
- Internal TIB: Embedded in dashboard. Easy configuration and set up. Share the same port as the dashboard
- External TIB: Installation of TIB as a different component for advanced use cases. Requires changes to the config files and separate port.
What can you do with the Tyk Identity Broker (TIB)?
By using the identity broker in conjunction with an IDP you have the ability to perform actions such as:
- Enabling easy access via social logins to the developer portal (e.g. GitHub login)
- Enabling internal access to the dashboard (e.g. via LDAP/ActiveDirectory)
- Enabling easy token generation from a third party for things such as mobile apps and webapps without complex configuration
Working of Tyk Identity Broker (TIB)
TIB provides a simple API through which traffic can be sent. The API will match the request to a profile which then exposes two things:
- An Identity Provider that will authorize a user and validate their identity
- An Identity Handler that will authenticate a user with a delegated service (in this case, Tyk)
Identity Providers
Identity providers can be anything, as long as they implement the tap.TAProvider interface. Bundled with TIB at the moment you have four provider types:
- Social - this provides OAuth handlers for many popular social logins (such as Google, Github and Bitbucket)
- LDAP - a simple LDAP protocol binder that can validate a username and password against an LDAP server (tested against OpenLDAP)
- Proxy - a generic proxy handler that will forward a request to a third party and provides multiple “validators” to identify whether a response is successful or not (e.g. status code, content match and regex)
- SAML - provides a way to authenticate against a SAML IDP.
Identity Handlers
An identity handler will perform a predefined set of actions once a provider has validated an identity. These actions are defined as a set of action types:
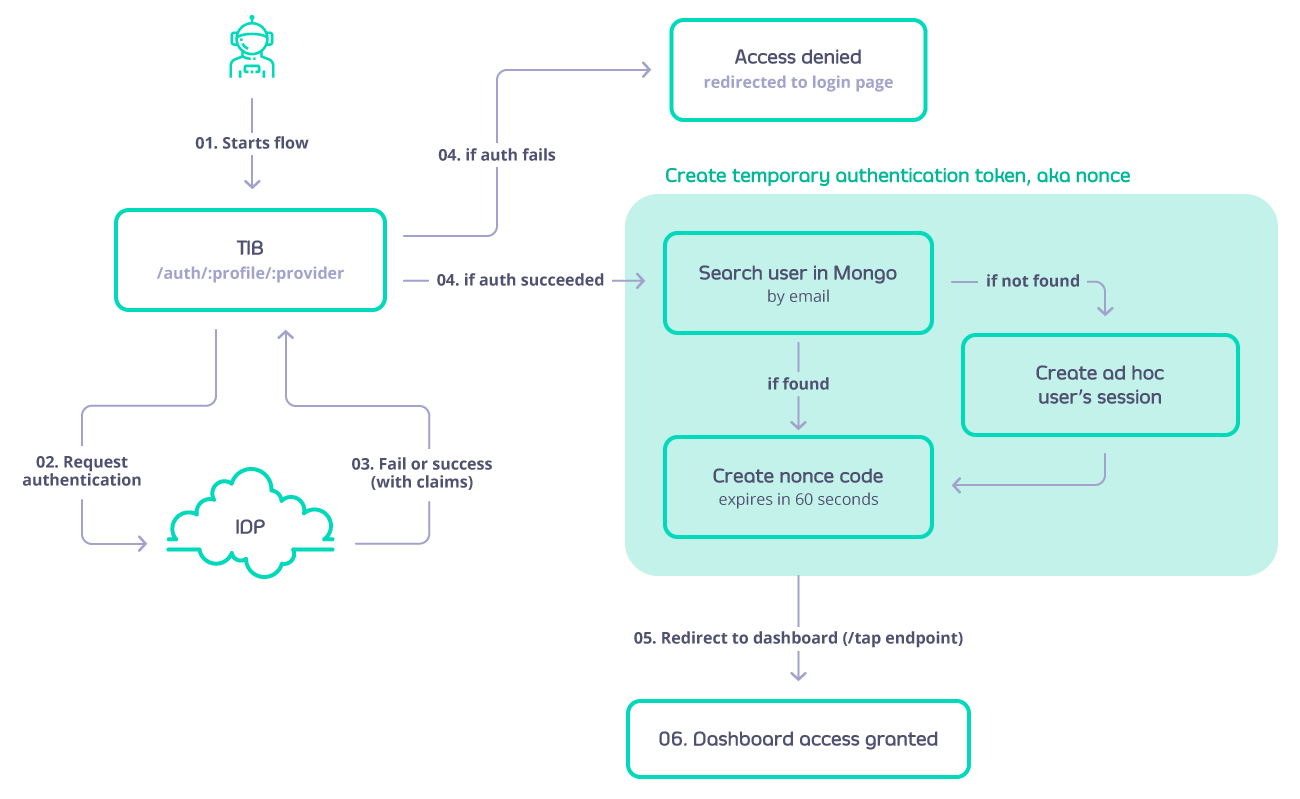
GenerateOrLoginUserProfile - this will log a user into the Tyk Dashboard (this does not create a user, it only creates a temporary session for the user to have access). This flow is defined as next:
-
GenerateOrLoginDeveloperProfile - this will create or login a user to the Tyk Developer Portal. The flow is similar to GenerateOrLoginUserProfile but in this case if the developer doesn’t exist then it will be created.
-
GenerateOAuthTokenForClient - this will act as a client ID delegate and grant an Tyk provided OAuth token for a user using a fragment in the redirect URL (standard flow). The flow is defined as:

Exploring TIB Profiles
TIB takes as input one or many profiles that are stored in mongo or a file (it depends on the type of installation), a profile is a configuration that outlines of how to match a identity provider with a handler and what action to perform (Example: enable Dashboard SSO using OpenID and Microsoft Azure as IDP). The Dashboard adds a user interface to manage the profiles.

Anatomy of a Profile
Each profile is outlined by a series of attributes that will describe: action to perform, IDP to connect, URL’s to redirect on success and failure, etc.
In order to know and understand each of the attributes, implications as well as configure your own profile please consult the profile structure below:
Fields that are common for all the providers
| Field | Description | Required |
|---|
| ID | ID of the profile, is a string, use the name of the profile | |
| OrgID | Organization ID | Yes |
| ActionType | Which action is expected to be executed while using this profile, valid values are:GenerateOrLoginDeveloperProfile: SSO portalGenerateOrLoginUserProfile: SSO dashboardGenerateOAuthTokenForClient: generate OAuth tokens
| Yes |
| Type | Valid values are:passthrough: for LDAP and ProxyProviderredirect: for SAML and Social
| Yes |
| CustomEmailField | Name of the claim associated with the email value stored in the IDP (Identity Provider). | No |
| CustomUserIDField | Name of the claim associated with the User ID value stored in the IDP (Identity Provider). | No |
| IdentityHandlerConfig.DashboardCredential | API Key that will be used to consume the dashboard API to issue nonce codes and validate user data | yes |
| ReturnURL | Where to redirect and send the claims from the IDP on login. For dashboard SSO it would be http://dashboard-host/tap. For classic portal SSO it would be http://{portal-host}/sso | yes |
| DefaultUserGroup | When mapping groups, if a group is not found, specify which group to fallback to. | No |
| CustomUserGroupField | Name of the claim associated with the Group ID values stored in the Identity Provider | No |
| UserGroupMapping | Map that contains the matching between Tyk groups and IDP group. | No |
| UserGroupSeparator | The IDP might send the groups to which the user belongs to as a single string separated by any symbol or empty spaces, with this field you can set which symbol to use to split as an array | No |
| SSOOnlyForRegisteredUsers | A boolean value to restrict the SSO only to users that already exists in the database. Users that do not exist in the database and successfully logins in the IDP will not have access to tyk | No |
LDAP profile fields
| Field | Description | Required |
|---|
| LDAPUseSSL | Whether to connect with the LDAP server via TLS, e.g. true or false | No |
| LDAPServer | LDAP Server address, e.g. ldap://hostname. | Yes |
| LDAPPort | LDAP Port, e.g. 389 or 636. | Yes |
| LDAPUserDN | Required to uniquely identify and locate a user’s entry in the LDAP directory | Yes |
| LDAPBaseDN | Distinguished Name from where the search will start | No |
| LDAPFilter | Used for filtering in the LDAP server | No |
| LDAPEmailAttribute | The name of the field in the LDAP schema that represents the user’s email. Defaults to mail. | No |
| LDAPFirstNameAttribute | The name of the field in the LDAP schema that represents the user’s first name. Defaults to givenName | No |
| LDAPLastNameAttribute | The name of the field in the LDAP schema that represents the user’s last name. Defaults to sn. | No |
| LDAPAdminUser | Admin user name | No |
| LDAPAdminPassword | Admin password | No |
| LDAPAttributes | List of attributes to return when a matching LDAP record is found, for example [‘cn’, ‘mail’, ‘ou’] | Yes. It can be an empty list |
| LDAPSearchScope | The scope is an integer value that determines the depth of the search in the directory hierarchy | No |
| FailureRedirect | In the event of a login failure this is the URL that the user will be redirected to. | Yes |
| DefaultDomain | Domain in which the LDAP is running. Used to build the username but not to perform the requests. | No |
| GetAuthFromBAHeader | A boolean value that, when set to true, instructs TIB to gather the user and password from the Authorization header when handling the request. | No |
| SlugifyUserName | When set to true enhance the username so that is URL friendly. | No |
ProxyProvider profile fields
| Field | Description | Required |
|---|
| TargetHost | URL of the server | Yes |
| OKCode | This is an integer represents the HTTP status code that represents a successful response from the target service. If the response code matches this value the identity broker treats it as a successful interaction. | No. But one of OKCode, OKResponse, or OKRegex should be filled |
| OKResponse | This field specifies a particular string that should match with the response body to be considered successful. | No. But one of OKCode, OKResponse, or OKRegex should be filled |
| OKRegex | Is used to validate the content of the response beyond just the HTTP status code. If the response body contains data that matches this regular expression, it is considered a successful response. | No. But one of OKCode, OKResponse, or OKRegex should be filled |
| ResponseIsJson | This parameter helps the identity broker understand how to interpret the response body from the target service. If ResponseIsJson is set to true, the broker will expect the response to be in JSON format and will process it accordingly. This includes parsing JSON data to extract relevant information. This is a boolean field. | No |
| AccessTokenField | The name of the field that contains the access token. | No |
| UsernameField | The name of the field that contains the username. | No |
| ExrtactUserNameFromBasicAuthHeader | A boolean value that, when set to true, instructs TIB to gather the user and password from the Authorization header when handling the request. | No |
Social profile fields
| Field | Description | Required |
|---|
| CallbackBaseURL | URL to be redirected on success login | Yes |
| FailureRedirect | URL to be redirected on failure | Yes |
| UseProviders.Name | Name of the provider to be used. Valid values: gplus, github, twitter, linkedin, dropbox, digitalocean, bitbucket, salesforce, openid-connect | Yes |
| UseProviders.Key | Oauth Client key | yes |
| UseProviders.Secret | Oauth Client Secret | yes |
| UseProviders.DiscoverURL | used to dynamically retrieve the OpenID Provider’s configuration metadata, including endpoints and supported features, in JSON format from /.well-known/openid-configuration. | Only required when using openid-connect |
| UseProviders.Scopes | Specifies the level of access or permissions a client is requesting from the user and the authorization server, for example [“openid”,“email”]. | No, however when using openID the scope ‘openid’ should be added |
| UseProviders.SkipUserInfoRequest | Determines whether to bypass the UserInfo endpoint request, improving performance by relying on the ID token alone for user details. | No |
| JWE.Enabled | When set to true, JWE will be enabled, allowing Tyk to decrypt the ID token received from the IdP. If set to false, the ID token will not be decrypted. | No |
| JWE.PrivateKeyLocation | Specifies the path or identifier (certid) for the certificate that contains the private key used to decrypt the ID token when JWE is enabled. This certificate must be in PEM format and include both the public certificate and the private key. | Is only required if JWE is enabled |
SAML profile fields
| Field | Description | Required |
|---|
| IDPMetadataURL | This is a URL, e.g. https://login.microsoftonline.com/your-tenant-id/federationmetadata/2007-06/federationmetadata.xml, that links to XML metadata containing information necessary for interaction with SAML-enabled identity or service providers. The document contains example URLs of endpoints, information about supported bindings, identifiers and public keys. Once you create your TIB profile you can find the SP metadata file under {Dashboard HOST}/auth/{TIB Profile Name}/saml/metadata | Yes |
| CertLocation | An X.509 certificate and the private key for signing your requests to the IDP. The value for CertLocation should be the path to a single file with the cert and key concatenated, e.g. /etc/ssl/certs/example_cert.pem. When used in an embedded TIB instance in the dashboard then the CertLocation value can be the certId from the certificate manager. For further details please refer to SSO with SAML | Yes |
| SAMLBaseURL | The host of TIB, e.g. http://tyk-dashboard:3000/, that will be used in the metadata document for the Service Provider. This will form part of the metadata URL used as the Entity ID by the IDP. The redirects configured in the IDP must match the expected Host and URI configured in the metadata document made available by Tyk Identity Broker. | Yes |
| ForceAuthentication | Ignore any session held by the IDP and force re-login every request. Defaults to false | No |
| SAMLBinding | Key for looking up the email claim in the SAML assertion form the IDP. Defaults to: https://schemas.xmlsoap.org/ws/2005/05/identity/claims.xsd | No |
| SAMLEmailClaim | Key for looking up the email claim in the SAML assertion form the IDP. Defaults to: https://schemas.xmlsoap.org/ws/2005/05/identity/claims.xsd | No |
| SAMLForenameClaim | Key for looking up the forename claim in the SAML assertion form the IDP. Defaults to: https://schemas.xmlsoap.org/ws/2005/05/identity/claims.xsd | No |
| SAMLSurnameClaim | Key for looking up the surname claim in the SAML assertion form the IDP. Defaults to: https://schemas.xmlsoap.org/ws/2005/05/identity/claims.xsd | No |
| FailureRedirect | URL to redirect the user if the login is not successful | Yes |
| EntityId | It is used to distinguish between different entities (IDP & SP) and ensure proper routing and validation of SAML assertions and requests. Defaults to the value set in the field IDPMetadataURL | No |
Installing Tyk Identity Broker (TIB)
There are two ways to install TIB:
-
Embedded TIB: Starting from Tyk Dashboard v3.0 TIB is built-in to the dashboard, in this case TIB will store the profiles in the same mongo database configured for dashboard
-
Standalone TIB: Deployed as a seperate entity. In the standalone TIB, the profiles will be stored in file indicated when the app is started
Pre-requisites
Below are the prerequisites of TIB:
- Tyk Gateway v1.9.1+
- Redis
- Tyk Dashboard v0.9.7.1+ (Only if you want to do SSO to Tyk Dashboard UI or Tyk Developer Portal)
Enable Embedded TIB
For the embedded TIB you don’t have to do anything, only ensure that in the Dashboard’s config file identity_broker is not pointing to an external service, and identity_broker.enabled is set to true. For example:
"identity_broker": {
    "enabled": true,
},
- If
enabled = false then neither the external or internal TIB will be loaded
- If
enabled = true and the tib host is not present the internal TIB will be loaded
- If
enabled = true and the tib host is set, then external TIB will be loaded
Install Standalone TIB
Below are the three deployment options to install TIB as a standalone application:
-
Docker:
You can install via Docker.
-
Linux Packages:
You can install via packages (deb or rpm).
-
Helm Chart for Kubernetes:
Tyk Helm Chart does not support installing TIB as separate application. If you want to enable embedded TIB in Dashboard, you can do so by updating
tib.enabled to true in tyk-dashboard chart. If you are using an umbrella chart from us (e.g. tyk-stack and tyk-control-plane), you can do so by updating tyk-dashboard.tib.enabled to true.
Important TIB Configurations
To secure session cookies within Tyk Identity Broker (TIB) when integrating with social providers, setting the TYK_IB_SESSION_SECRET environment variable is crucial. This variable plays a pivotal role in hashing session cookies, thereby enhancing security. By default, if this variable isn’t explicitly set, TIB falls back to using the Tyk Dashboard’s admin_secret when it’s embedded in the dashboard.
For a seamless and secure setup, start by generating a strong, unique secret string. It is recommended to use a string with 32 or 64 bytes to ensure optimal security, this string will be your session secret. In a Linux, Unix, or MacOS environment, you can set this variable by running the command export TYK_IB_SESSION_SECRET='your_secret'.
Setting Absolute Paths
No command line arguments are needed, but if you are running TIB from another directory or during startup, you will need to set the absolute paths to the profile and config files:
Usage of ./tyk-auth-proxy:
  -c=string
        Path to the config file (default "tib.conf")
  -p#=string
        Path to the profiles file (default "profiles.json")
Exploring Tyk Identity Broker REST API
Refer to this document
Single Sign On (SSO)
SSO gives users the ability to log in to multiple applications without the need to enter their password more than once.
Authentication protocols such as OpenID Connect and SAML enable an application to verify the identity of users from an organization without the need to self store and manage them, and without doing the identification process and exposing their passwords to that application. Their lists of users and passwords are kept safe in one single place, in the IDP that the organization has chosen to use. The Authorization server of the IdP identify the users for a pre-registered and approved application (client in OAuth and OIDC terminology).
Using our Tyk-Identity-Broker (TIB), you can do both - use your existing users directory to login to the Dashboard or Developer Portal and have an SSO. TIB, among other options, supports four methods for login to Tyk’s UI:
To activate SSO on the Dashboard or Developer portal, there’s no requirement to install TIB separately; it is integrated into the Dashboard and Developer Portal. You have two configurations for SSO within the dashboard:
- Using Embedded TIB: No need to install it separately.
- Using External TIB: If you are using a previous version of the Dashboard or Portal, you can still use SSO with TIB installed as a separate application.
- Login with 3rd party social providers
- Login with any IdP that supports OIDC
- Login with any IdP that supports SAML
- Login with LDAP
Tyk’s REST API for SSO
The SSO API allows you to implement custom authentication schemes for the Dashboard and Portal. You can access the API by both admin and dashboard APIs.
Our Tyk Identity Broker (TIB) internally also uses these APIs.
Generate authentication token
The Dashboard exposes two APIs:
which allow you to generate a temporary authentication token, valid for 60 seconds. They make same thing you can select one of them and use it.
However, the admin API requires admin-auth header which should be same with admin-secret parameter in tyk_analytics.conf, the regular API requires authorization header which should be same with the user authentication token.
Using the Token
Once you have issued a token you can login to the dashboard using the /tap url, or to the portal using the <portal-url>/sso URL, and provide an authentication token via the nonce query param.
If nonce is valid, Tyk will create a temporary user and log them in.
If you want to re-use existing dashboard users, instead of creating temporary ones, you can set "sso_enable_user_lookup": true variable in the Dashboard config file (tyk_analytics.conf). This way you can set individual permissions for users logged via SSO.
Set up default permissions for the dashboard
If you use the token with dashboard scope, and would like to avoid login in as admin user (which is the default permissions), you can add the sso_permission_defaults configuration option to the Dashboard config file (tyk_analytics.conf) to specify SSO user permissions in the following format:
"sso_permission_defaults": {
  "analytics": "read",
  "apis": "write",
  "hooks": "write",
  "idm": "write",
  "keys": "write",
  "policies": "write",
  "portal": "write",
  "system": "write",
  "users": "write",
  "user_groups": "write"
}
sso_default_group_id to specify User Group ID assigned to SSO users.
In order to set individual user permissions, you should first create this users in the dashboard first, set needed permissions, enable sso_enable_user_lookup to true inside dashboard config. If SSO user with the same email will be found in Dashboard users, it will re-use his permissions.
Sample Login Request
GET /tap?nonce=YTNiOGUzZjctYWZkYi00OTNhLTYwODItZTAzMDI3MjM0OTEw HTTP/1.1
Host: localhost:3000