> ## Documentation Index
> Fetch the complete documentation index at: https://tyk.io/docs/llms.txt
> Use this file to discover all available pages before exploring further.
# Dynamic Client Registration
> Learn how to use Dynamic Client Registration to grant access to API Products
## Introduction
Dynamic Client Registration (DCR) is an [IETF protocol](https://datatracker.ietf.org/doc/html/rfc7591) that automates the registration of OAuth 2.0 clients with an authorization server. The Tyk Developer Portal uses DCR so that when an API Consumer is approved for access to an API Product, they receive OAuth 2.0 credentials automatically. The API Consumer has no direct interaction with the IdP during this process; the Portal handles client registration on their behalf.
DCR requires an Identity Provider (IdP) that acts as an OAuth 2.0 authorization server, supports the DCR protocol, and exposes an OIDC well-known configuration endpoint. [OpenID Connect (OIDC)](https://openid.net/connect/) is an identity layer built on top of OAuth 2.0 that standardizes the discovery endpoint used by the Portal to locate the IdP's DCR and token endpoints.
This page covers JWT-based flows, where the IdP issues access tokens as JSON Web Tokens (JWTs). When an API Consumer's access request is approved, the Portal registers a new client with the IdP and writes the resulting IdP configuration into Tyk.
At runtime, the API Consumer uses their credentials to obtain a JWT from the IdP, then presents it to Tyk Gateway when calling an API. The Gateway [validates the token's signature](/api-management/authentication/jwt-signature-validation) using the public keys published by the IdP at its JWKS endpoint, and maps the token's [scopes](#oauth-2-0-scopes) to Tyk policies to enforce access control.
```mermaid theme={null}
sequenceDiagram
participant Dev as Developer / App
participant Portal as Tyk Developer Portal
participant IdP as Identity Provider (IdP)
participant GW as Tyk Gateway
rect rgb(235, 245, 255)
Note over Dev,GW: Setup: one time, on access request approval
Dev->>Portal: Submit access request
Portal->>IdP: Register OAuth 2.0 client (DCR)
IdP-->>Portal: Client credentials
Portal->>GW: Write JWKS URI + scope mappings
Note over Portal,GW: via Identity Provider Registry or API definition
Portal-->>Dev: Approval notification + credentials
end
rect rgb(240, 255, 240)
Note over Dev,GW: Runtime: every API request
Dev->>IdP: Request JWT (client credentials)
IdP-->>Dev: JWT (signed access token)
Dev->>GW: API call with JWT
GW-->>IdP: Fetch JWKS (cached)
GW->>GW: Validate signature + map scopes to policies
GW-->>Dev: API response
end
```
### Developer Apps and OAuth Clients
A Developer App in the Portal corresponds 1:1 to an OAuth 2.0 client registered in the IdP. When a DCR access request is approved, the Portal registers an OAuth client in the IdP on the API Consumer's behalf and stores the resulting credentials against the Developer App. The API Consumer uses these credentials to request access tokens from the IdP.
A single Developer App can hold access to multiple API Products and Plans. Each subsequent approval adds the new scopes to the same OAuth client in the IdP rather than creating a new one. The API Consumer's credentials remain unchanged; their scope set grows.
### OAuth 2.0 Scopes
OAuth 2.0 scopes are central to how Tyk enforces access control in the DCR flow. Understanding their role makes the configuration steps that follow easier to understand.
In Tyk's DCR flow, scopes serve as the link between the IdP, the API Consumer's access token, and Tyk's access control policies. Each API Product and each Plan has a unique scope name assigned to it. That scope name is what gets embedded in the access token by the IdP, and it is what Tyk Gateway uses to look up which policy to apply.
Tyk's scope-to-policy mapping resolves one scope name to exactly one Tyk policy. No two API Products or Plans may share a scope; a duplicate would cause both to resolve to the same policy. Tyk Gateway combines the policies resolved from all scopes present in the token to authorize the request.
The full sequence is:
1. When an access request is approved, the Portal sends the scope names for the approved Product and Plan to the IdP as part of registering the OAuth 2.0 client. The IdP associates those scopes with that client, constraining what it can request.
2. When the API Consumer requests an access token, they must explicitly include those scope names. The IdP will only return scopes that are both registered with the client and present in the token request.
3. Tyk Gateway reads the scopes in the incoming JWT and maps each one to its corresponding Tyk policy, enforcing the access control and rate limits defined for that Product and Plan.
Every API Product and Plan used with DCR must therefore have a unique scope assigned, and that scope must exist in the IdP before the Product or Plan is published. Publishing makes it available for access requests; if a scope is missing when a request is approved, the Portal's attempt to register the OAuth client will fail. Scope names must exactly match between the IdP and the Portal.
## How Portal Manages Identity Providers
Identity Providers are configured in the Portal under the **OAuth 2.0 Providers** menu. This is the Portal's term for an IdP. The two are the same concept: an OAuth 2.0 Provider in the Portal represents an external IdP that the Portal will register DCR clients with.
There are two approaches to how the Portal stores IdP configuration in Tyk.
| Approach | Available From | Where Scope Mappings Are Written |
| :--------------------------------------- | :------------------------ | :------------------------------- |
| Identity Provider Registry (recommended) | Portal 1.18.0, Tyk 5.14.0 | Identity Provider Registry |
| API Definition | All versions | API definitions |
The **Identity Provider Registry** approach is recommended for all new deployments. It stores IdP configuration centrally in the Tyk Dashboard, decoupled from API definitions, eliminating write conflicts between the Portal and Tyk Dashboard and ensuring that IdP configuration is kept up to date as API Products change and as OAuth 2.0 Providers are created, updated, or deleted. Refer to the [Identity Provider Registry](/api-management/client-idp-registry) page for more detail.
The **API definition** approach is available for installations running Tyk prior to 5.14.0, or for deployments where the Registry cannot be used. The Portal writes the JWKS URI and scope-to-policy mappings directly into the relevant API definitions when an access request is approved.
Refer to [Migrating to the Identity Provider Registry](#migrating-to-the-identity-provider-registry) if you have an existing installation using DCR and wish to use the IdP Registry.
## Configure Your Identity Provider
Before configuring Tyk Developer Portal, you need to prepare the IdP in two ways: authorize the Portal to register OAuth 2.0 clients on behalf of API Consumers, and define the OAuth 2.0 scopes that will be included in access tokens.
These steps are required regardless of which approach you use.
### Authorize the Portal
Most IdPs use an [initial access token](https://openid.net/specs/openid-connect-registration-1_0.html#Terminology) to authorize a trusted client to register new OAuth 2.0 clients via the DCR protocol. The Portal presents this token when registering a client for an API Consumer, proving it has permission to do so.
Some IdPs use a different authorization mechanism and do not require an initial access token, for example:
* Gluu uses a `dynamicRegistrationEnabled` flag on each scope instead.
* Auth0 uses a separate authorization model and does not issue initial access tokens.
### Define OAuth 2.0 Scopes
Create scopes in the IdP for each API Product and Plan you intend to use with DCR, following the naming and uniqueness requirements in the [OAuth 2.0 Scopes](#oauth-2-0-scopes) section above. Scopes must exist before the Product or Plan is published; see that section for details.
The provider-specific tabs below show how to create scopes in each supported IdP.
### Provider-Specific Instructions
Follow the [Keycloak client registration guide](https://www.keycloak.org/securing-apps/client-registration) to obtain the initial access token.
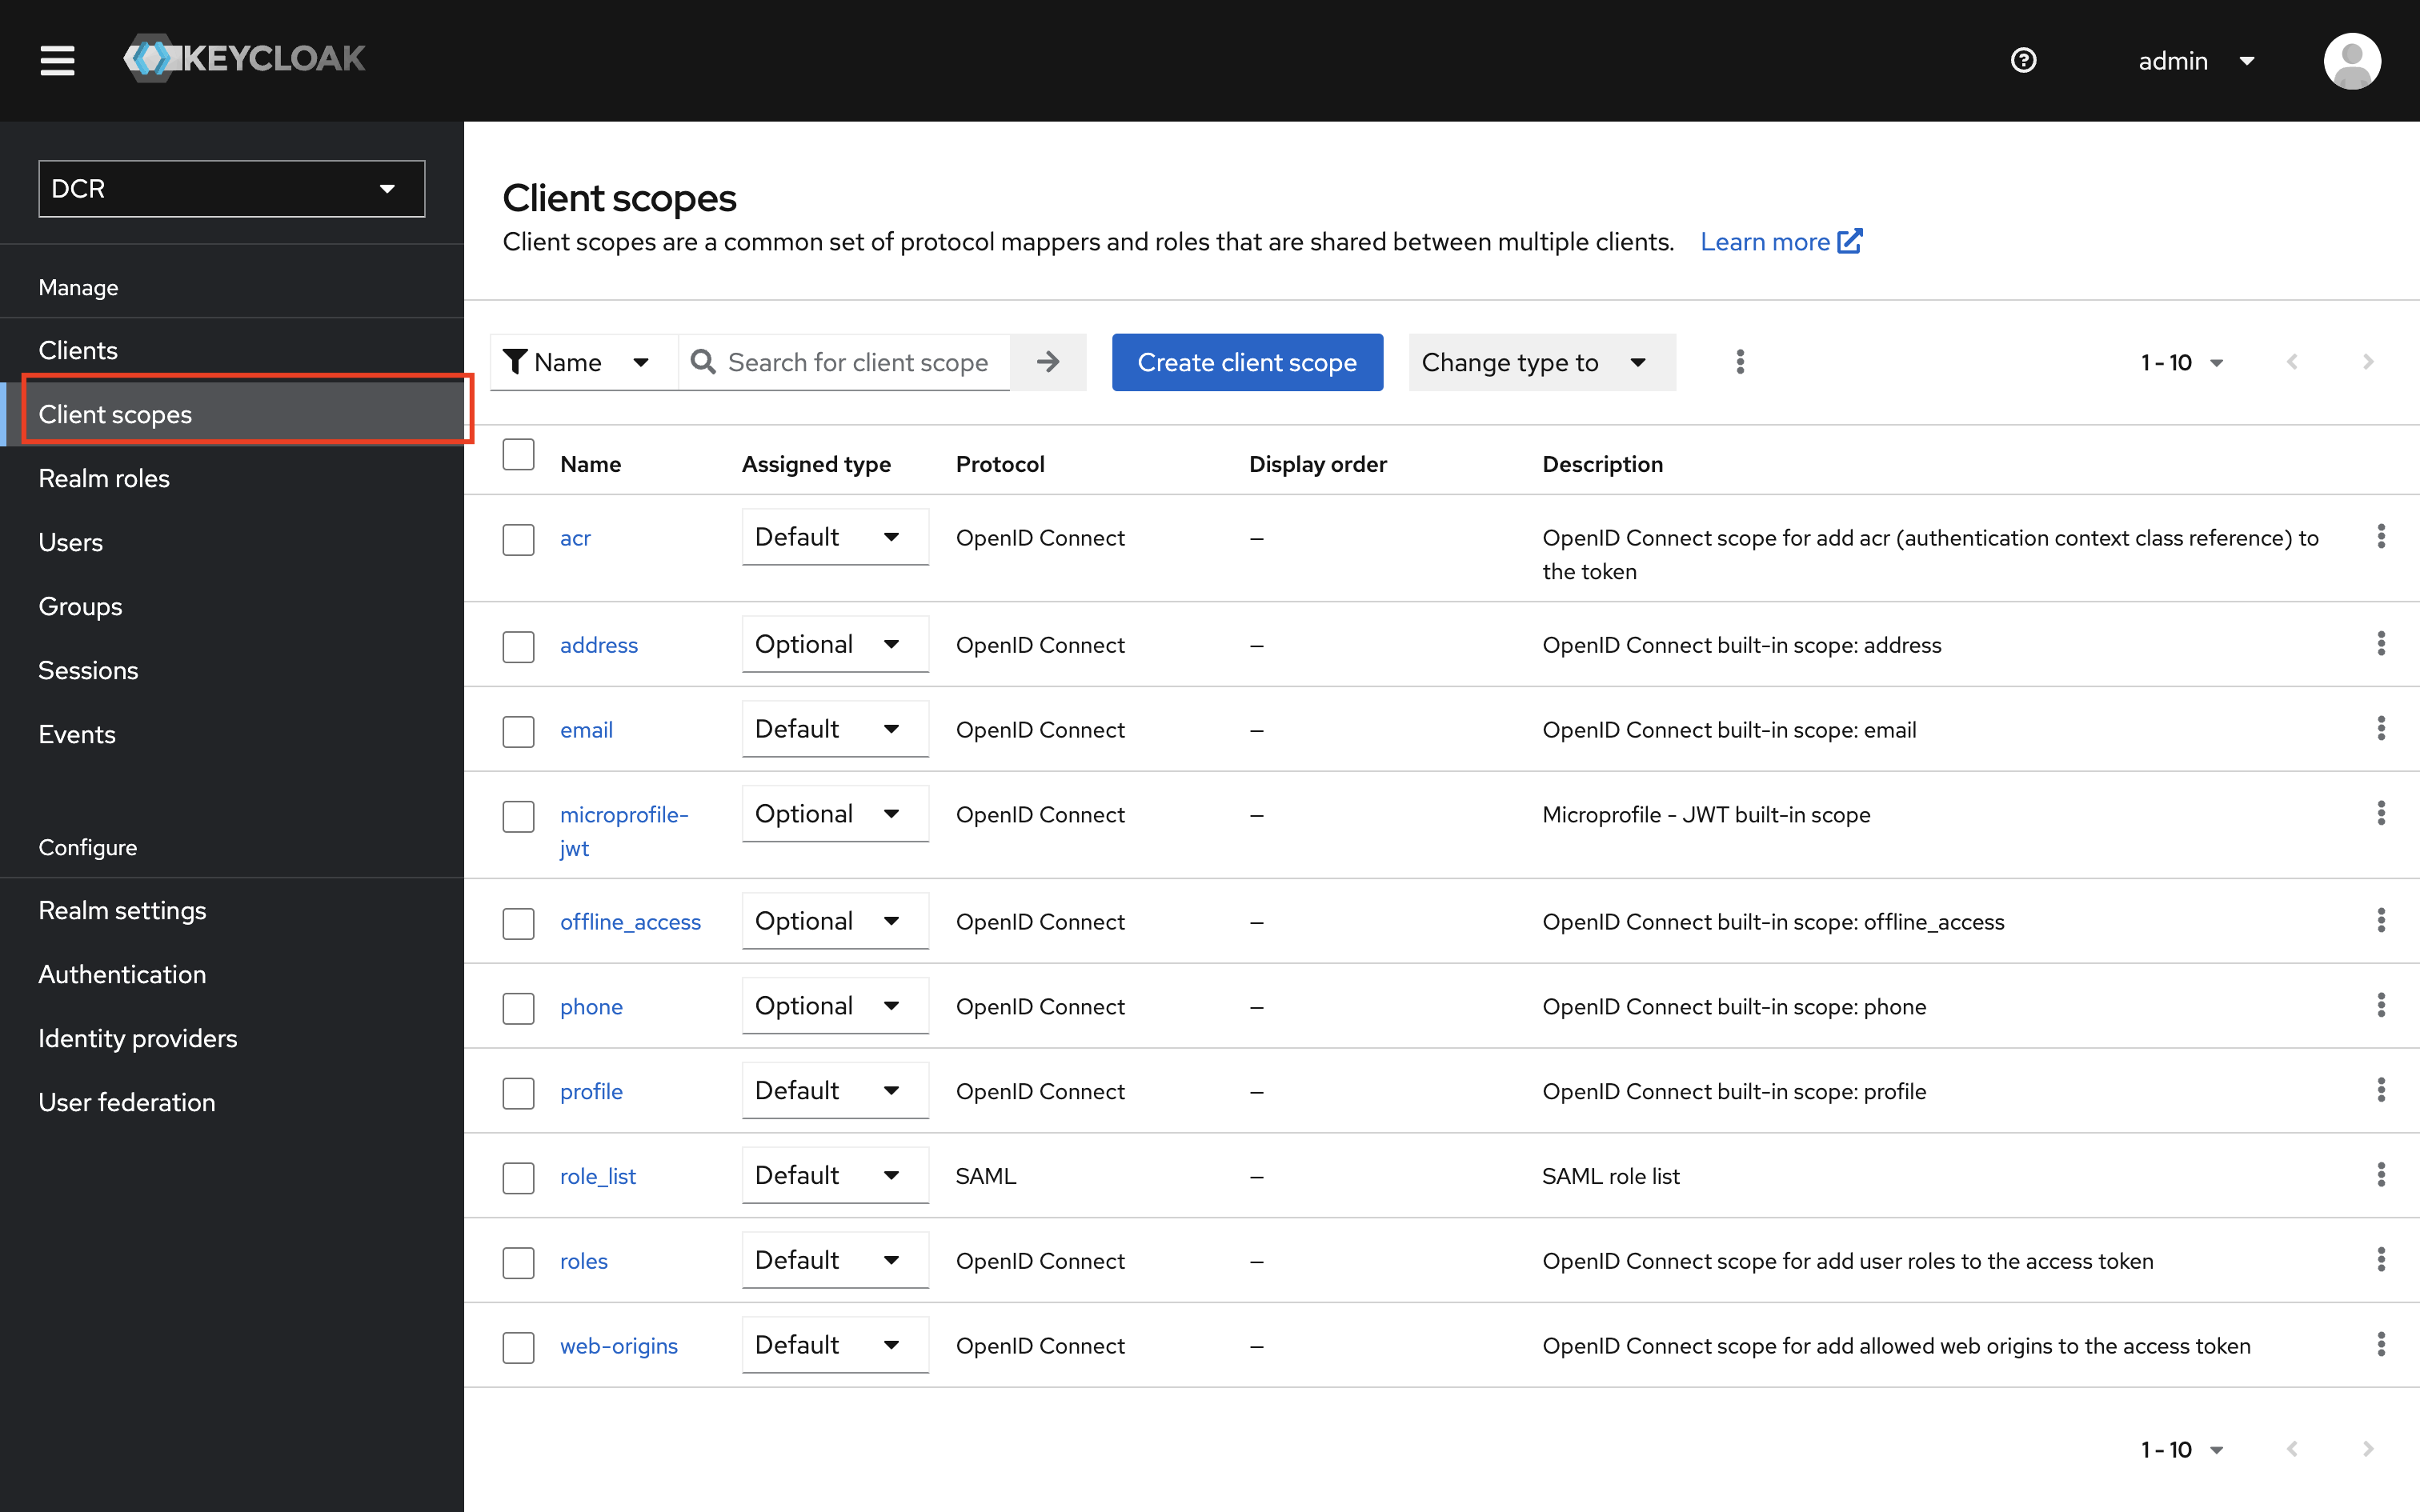
Create scopes for each API Product and Plan from the **Client scopes** menu item. Set the scope type to **Optional**. Default scopes are applied automatically to all clients, but optional scopes can be requested on a case-by-case basis. The Portal requests specific scopes during client registration; using optional scopes ensures those scopes are included only when explicitly requested.
 To obtain a Registration Access Token for Okta, go to **Okta Admin Console > Security > API > Tokens** and click **Create New Token**. Copy the token value; you will need it when configuring the OAuth 2.0 Provider in the Portal. For more details, refer to the [Okta Dynamic Client Registration guide](https://developer.okta.com/docs/reference/api/oauth-clients/).
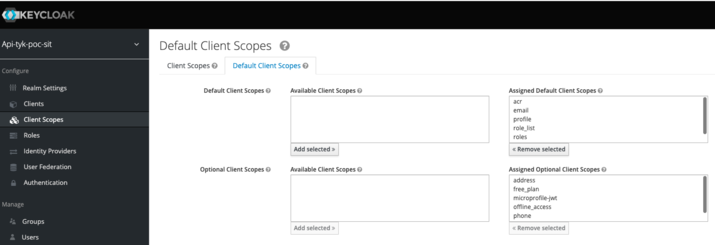
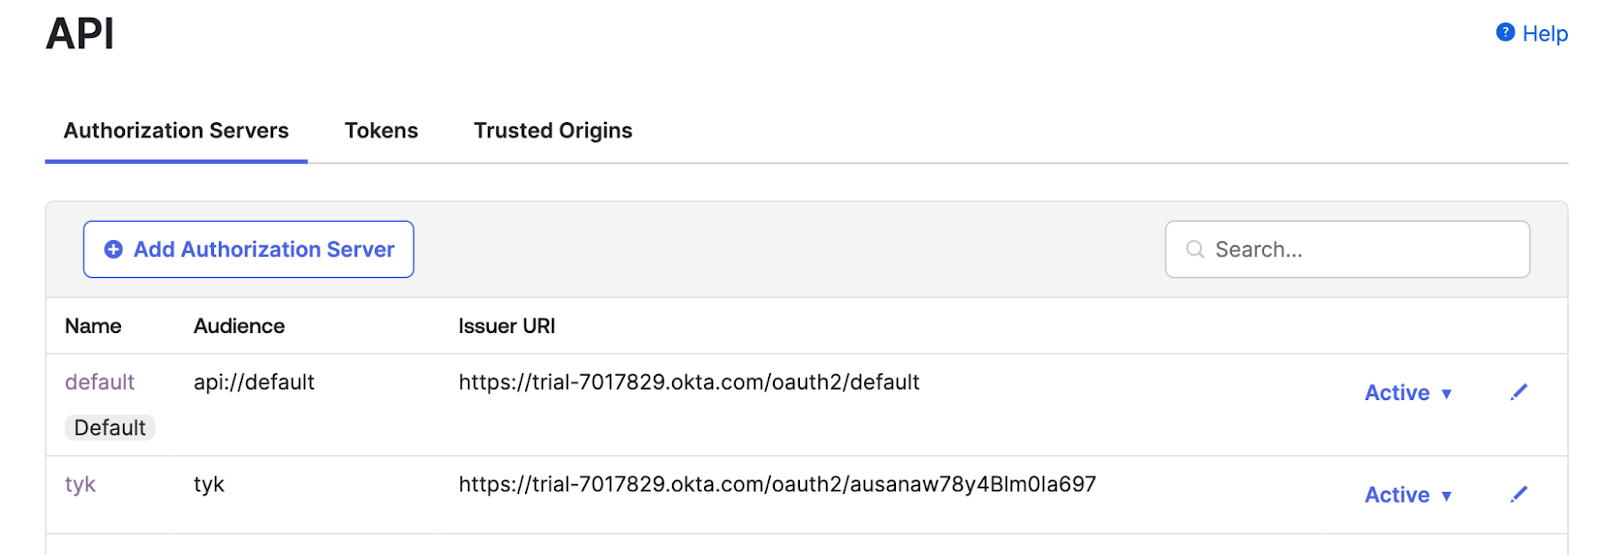
Create scopes for each API Product and Plan from the **Scopes** tab on the **Security > API** screen. All scopes must be associated with an authorization server. If you do not have a custom authorization server, use the **Default** one. Note the authorization server's issuer URL; you will need it when setting the OIDC well-known configuration URL in the Portal. The URL takes the form `https://{your-domain}/oauth2/default/.well-known/openid-configuration`.
To obtain a Registration Access Token for Okta, go to **Okta Admin Console > Security > API > Tokens** and click **Create New Token**. Copy the token value; you will need it when configuring the OAuth 2.0 Provider in the Portal. For more details, refer to the [Okta Dynamic Client Registration guide](https://developer.okta.com/docs/reference/api/oauth-clients/).
Create scopes for each API Product and Plan from the **Scopes** tab on the **Security > API** screen. All scopes must be associated with an authorization server. If you do not have a custom authorization server, use the **Default** one. Note the authorization server's issuer URL; you will need it when setting the OIDC well-known configuration URL in the Portal. The URL takes the form `https://{your-domain}/oauth2/default/.well-known/openid-configuration`.
 Auth0 does not require an initial access token. Follow the [Auth0 Dynamic Client Registration guide](https://auth0.com/docs/get-started/applications/dynamic-client-registration) to configure DCR.
Create scopes for each API Product and Plan by navigating to **Dashboard > Applications > APIs**, selecting your API, and opening the **Permissions** tab. Enter the permission name and description for each scope, then click **Add**.
When using [Curity](https://curity.io) as the Identity Provider, you must configure the DCR endpoint to use `no-authentication`. By default, Curity requires a nonce token with a `dcr` scope to authenticate the DCR endpoint, but nonce tokens are one-time-use and cannot be stored as a reusable credential in the Portal. Setting the authentication method to `no-authentication` allows the Portal to register clients without presenting a token.
Ensure that network access to the Curity DCR endpoint is restricted to Tyk only, since it will be unauthenticated.
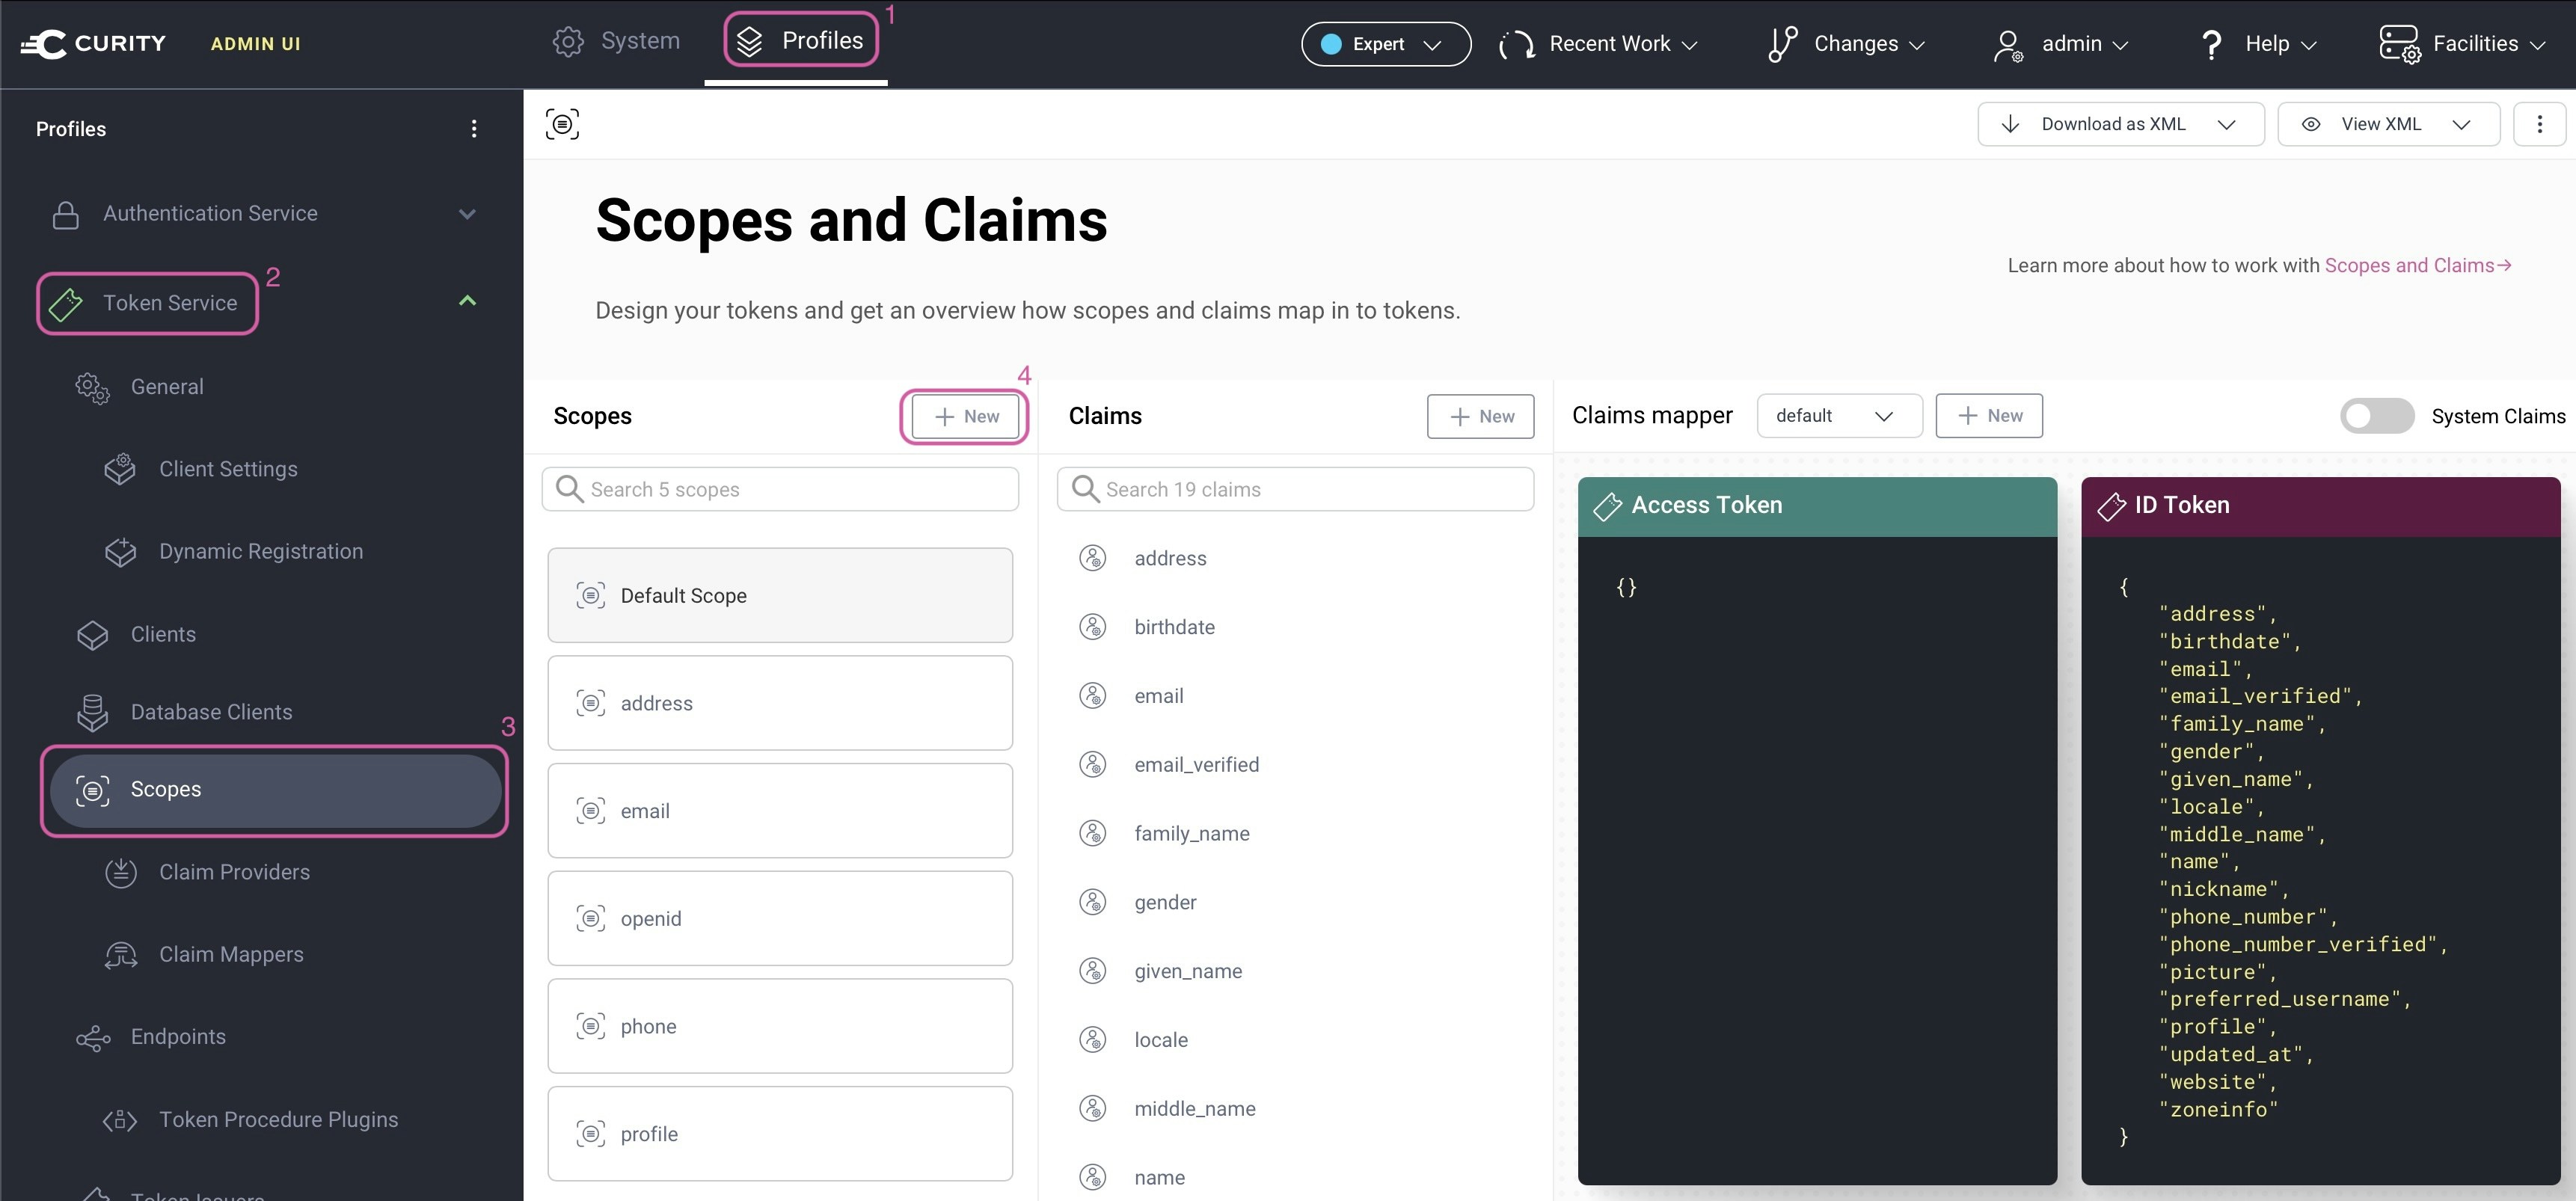
To configure this: go to **Profiles > Token Service > Dynamic Registration**, scroll to the **Non-templatized** section, and set **Authentication Method** to `no-authentication`.
Create scopes for each API Product and Plan from **Profiles > Token Service > Scopes**.
Auth0 does not require an initial access token. Follow the [Auth0 Dynamic Client Registration guide](https://auth0.com/docs/get-started/applications/dynamic-client-registration) to configure DCR.
Create scopes for each API Product and Plan by navigating to **Dashboard > Applications > APIs**, selecting your API, and opening the **Permissions** tab. Enter the permission name and description for each scope, then click **Add**.
When using [Curity](https://curity.io) as the Identity Provider, you must configure the DCR endpoint to use `no-authentication`. By default, Curity requires a nonce token with a `dcr` scope to authenticate the DCR endpoint, but nonce tokens are one-time-use and cannot be stored as a reusable credential in the Portal. Setting the authentication method to `no-authentication` allows the Portal to register clients without presenting a token.
Ensure that network access to the Curity DCR endpoint is restricted to Tyk only, since it will be unauthenticated.
To configure this: go to **Profiles > Token Service > Dynamic Registration**, scroll to the **Non-templatized** section, and set **Authentication Method** to `no-authentication`.
Create scopes for each API Product and Plan from **Profiles > Token Service > Scopes**.
 For more information, see the [Curity DCR documentation](https://curity.io/docs/identity-server/profiles/token-profile/clients/dcr).
[Gluu](https://gluu.org/) does not use an initial access token for DCR. Instead, DCR is authorized per-scope via the **Dynamic Registration** toggle.
Create scopes for each API Product and Plan by navigating to **Configuration > OpenID Connect > Scopes** and clicking **Add Scope**. For each scope, enable the **Dynamic Registration** toggle so that it can be included in DCR client registration requests.
For more information, see the [Gluu Server documentation](https://docs.gluu.org).
## Configure Tyk Developer Portal
### Enable the Identity Provider Registry (Recommended)
The Identity Provider Registry is available from Tyk Developer Portal 1.18.0 when using Tyk Dashboard 5.14.0 or later.
It must be explicitly enabled in Tyk Developer Portal by setting [`TYK_PORTAL_ENABLEIDPREGISTRY=true`](/product-stack/tyk-enterprise-developer-portal/deploy/configuration#tyk-portal-enableidpregistry) (or `EnableIDPRegistry = true` in the config file) and restarting the Portal.
Ensure that Tyk Gateway and Tyk Dashboard are running on version 5.14.0 or later before starting Tyk Developer Portal with this flag enabled.
If you are running Tyk Dashboard prior to 5.14.0, skip this step as the IdP Registry is not available.
### Configure OAuth 2.0 Providers
In the Admin Portal, navigate to **OAuth 2.0 Providers** (the Developer Portal's name for Identity Providers) and create an entry for each IdP you want to use with DCR.
#### Connection Settings
For more information, see the [Curity DCR documentation](https://curity.io/docs/identity-server/profiles/token-profile/clients/dcr).
[Gluu](https://gluu.org/) does not use an initial access token for DCR. Instead, DCR is authorized per-scope via the **Dynamic Registration** toggle.
Create scopes for each API Product and Plan by navigating to **Configuration > OpenID Connect > Scopes** and clicking **Add Scope**. For each scope, enable the **Dynamic Registration** toggle so that it can be included in DCR client registration requests.
For more information, see the [Gluu Server documentation](https://docs.gluu.org).
## Configure Tyk Developer Portal
### Enable the Identity Provider Registry (Recommended)
The Identity Provider Registry is available from Tyk Developer Portal 1.18.0 when using Tyk Dashboard 5.14.0 or later.
It must be explicitly enabled in Tyk Developer Portal by setting [`TYK_PORTAL_ENABLEIDPREGISTRY=true`](/product-stack/tyk-enterprise-developer-portal/deploy/configuration#tyk-portal-enableidpregistry) (or `EnableIDPRegistry = true` in the config file) and restarting the Portal.
Ensure that Tyk Gateway and Tyk Dashboard are running on version 5.14.0 or later before starting Tyk Developer Portal with this flag enabled.
If you are running Tyk Dashboard prior to 5.14.0, skip this step as the IdP Registry is not available.
### Configure OAuth 2.0 Providers
In the Admin Portal, navigate to **OAuth 2.0 Providers** (the Developer Portal's name for Identity Providers) and create an entry for each IdP you want to use with DCR.
#### Connection Settings
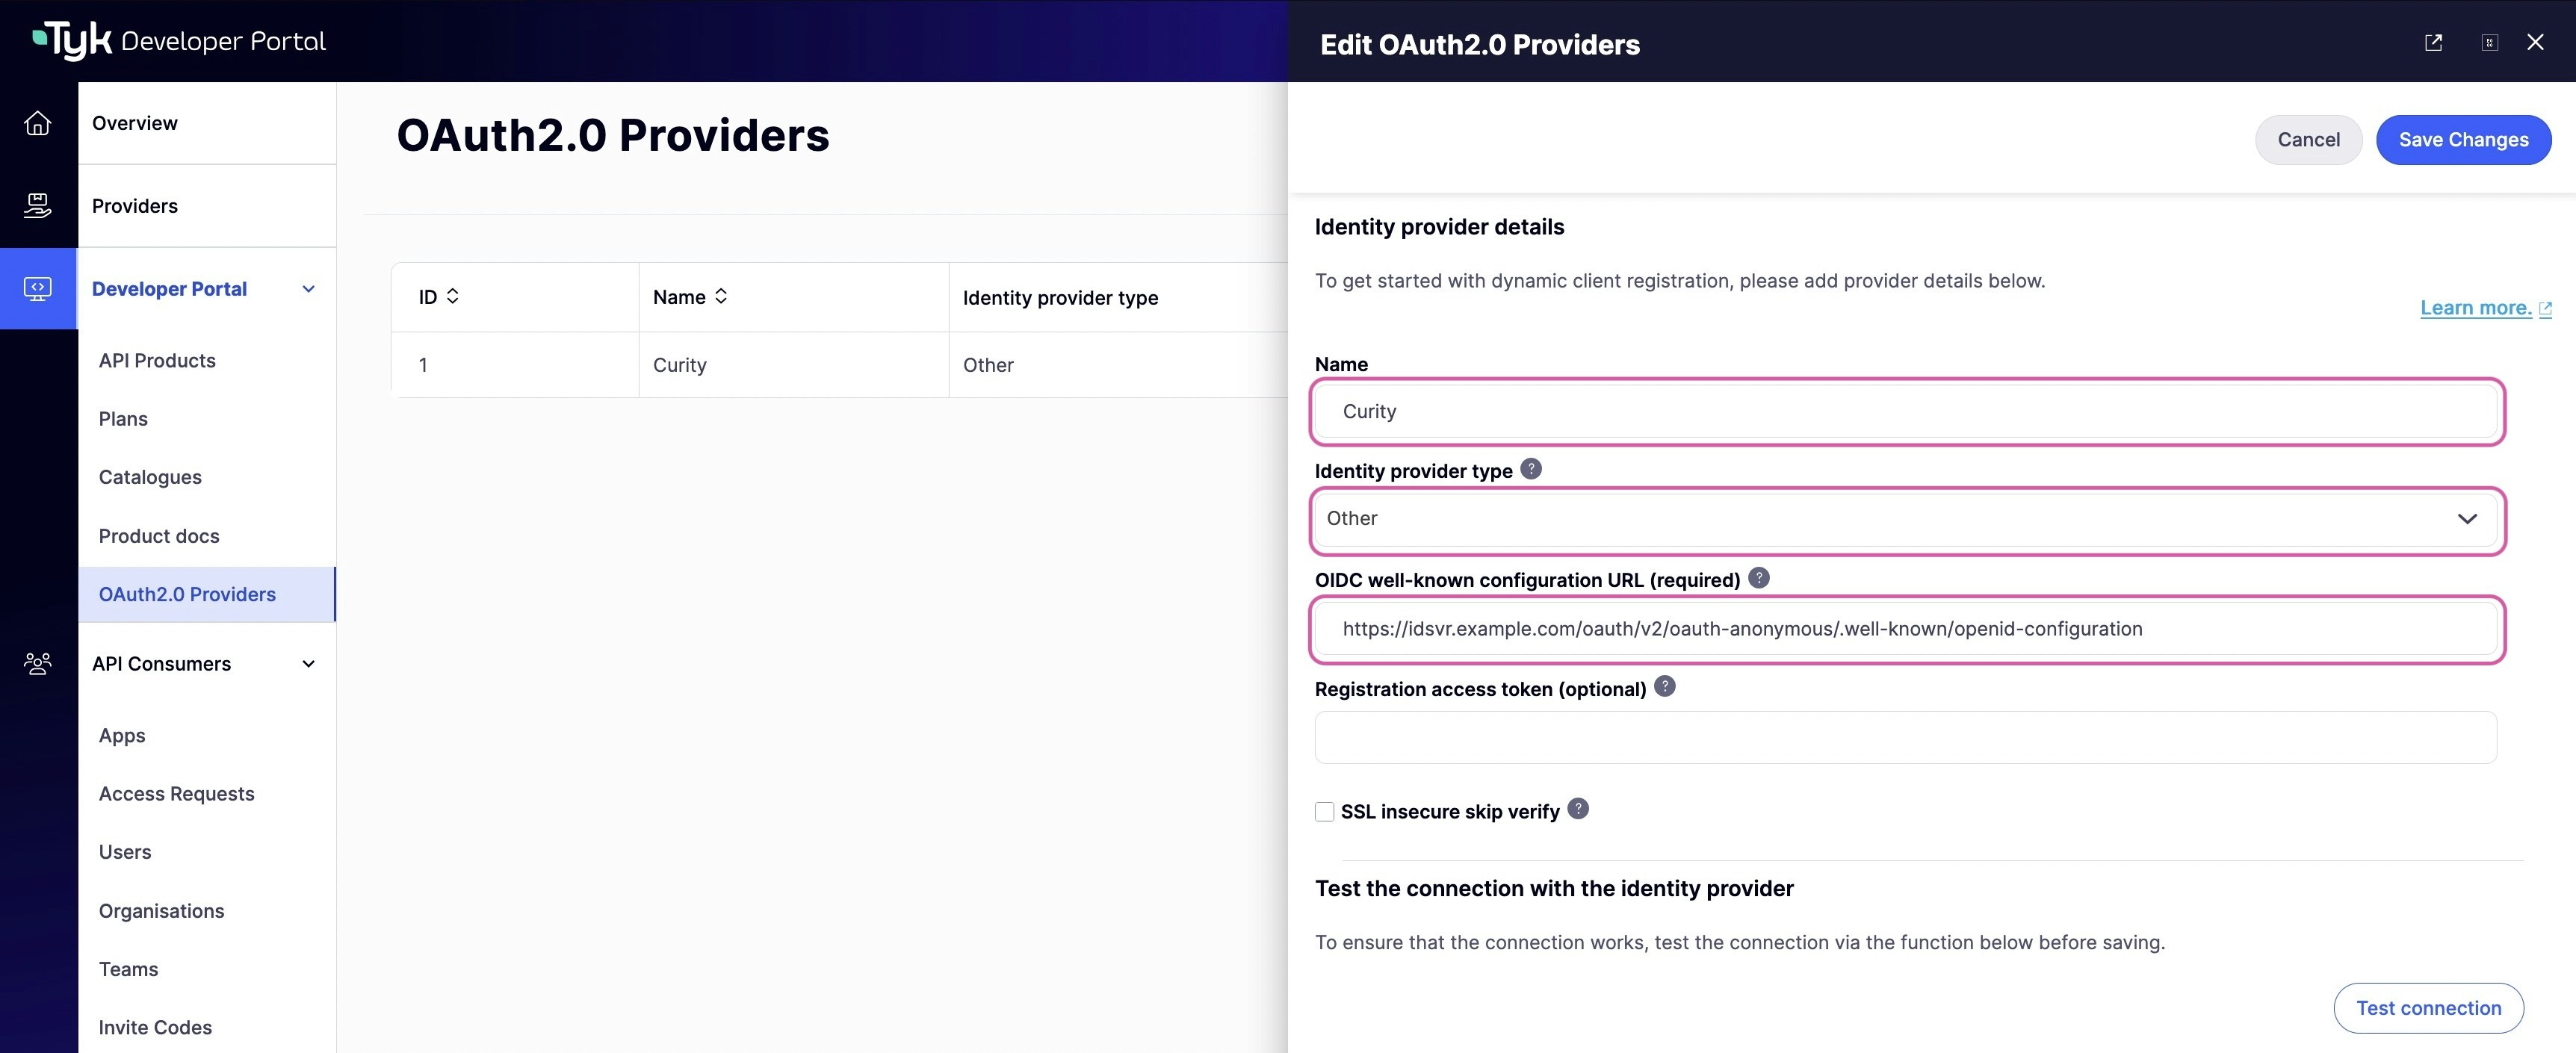 | Field | Description |
| :----------------------------------------------- | :------------------------------------------------------------------------------------------------------------------------------------------------------------------------------------------------------------------------------------------------------------------------------------------------------------------- |
| **Name** | A label to identify this OAuth 2.0 Provider in the Portal UI. This is also stored as the name of the corresponding entry in the Identity Provider Registry. |
| **Identity provider type** | Select your IdP from the dropdown. If it is not listed, select **Other** to use a standard RFC 7591-compliant client registration flow. |
| **OIDC well-known configuration URL** (required) | The OIDC discovery endpoint for your IdP. |
| **Scope claim name** (optional) | The JWT claim that contains the token's scopes. Different IdPs use different claim names: `scope` is the most common, but some use `scp` or another custom claim. Defaults to `scope`. Used by Tyk Gateway when [mapping token scopes to policies](/api-management/authentication/jwt-authorization#scope-policies). |
| **Registration access token** (optional) | The token obtained in the [Authorize the Portal](#authorize-the-portal) section. |
| **SSL insecure skip verify** (optional) | Enable only if your IdP uses a self-signed or privately issued certificate that Tyk cannot verify. This disables TLS certificate verification for connections to the IdP and should not be used in production. |
#### Client Profiles
When the Portal registers an OAuth 2.0 client in the IdP on behalf of an API Consumer, it must specify certain parameters that describe how access tokens will be obtained. These include the OAuth [grant type](https://datatracker.ietf.org/doc/html/rfc6749#section-1.3) and the authentication method used by the token endpoint. A **Client Profile** is a named template for these parameters (referred to as a **client type** in the Portal UI).
You can define multiple Client Profiles to support different use cases. For example, you might define one Client Profile using the client credentials grant for server-to-server integrations and another using the authorization code grant for user-facing applications.
When requesting access to an API Product in the Portal, API Consumers select from the list of Client Profiles defined for the IdP. The Portal uses that template when registering the OAuth 2.0 client that the IdP will use to issue tokens to that API Consumer.
To add a Client Profile, scroll to **Client Types** and click **Add client type**.
| Field | Description |
| :----------------------------------------------- | :------------------------------------------------------------------------------------------------------------------------------------------------------------------------------------------------------------------------------------------------------------------------------------------------------------------- |
| **Name** | A label to identify this OAuth 2.0 Provider in the Portal UI. This is also stored as the name of the corresponding entry in the Identity Provider Registry. |
| **Identity provider type** | Select your IdP from the dropdown. If it is not listed, select **Other** to use a standard RFC 7591-compliant client registration flow. |
| **OIDC well-known configuration URL** (required) | The OIDC discovery endpoint for your IdP. |
| **Scope claim name** (optional) | The JWT claim that contains the token's scopes. Different IdPs use different claim names: `scope` is the most common, but some use `scp` or another custom claim. Defaults to `scope`. Used by Tyk Gateway when [mapping token scopes to policies](/api-management/authentication/jwt-authorization#scope-policies). |
| **Registration access token** (optional) | The token obtained in the [Authorize the Portal](#authorize-the-portal) section. |
| **SSL insecure skip verify** (optional) | Enable only if your IdP uses a self-signed or privately issued certificate that Tyk cannot verify. This disables TLS certificate verification for connections to the IdP and should not be used in production. |
#### Client Profiles
When the Portal registers an OAuth 2.0 client in the IdP on behalf of an API Consumer, it must specify certain parameters that describe how access tokens will be obtained. These include the OAuth [grant type](https://datatracker.ietf.org/doc/html/rfc6749#section-1.3) and the authentication method used by the token endpoint. A **Client Profile** is a named template for these parameters (referred to as a **client type** in the Portal UI).
You can define multiple Client Profiles to support different use cases. For example, you might define one Client Profile using the client credentials grant for server-to-server integrations and another using the authorization code grant for user-facing applications.
When requesting access to an API Product in the Portal, API Consumers select from the list of Client Profiles defined for the IdP. The Portal uses that template when registering the OAuth 2.0 client that the IdP will use to issue tokens to that API Consumer.
To add a Client Profile, scroll to **Client Types** and click **Add client type**.
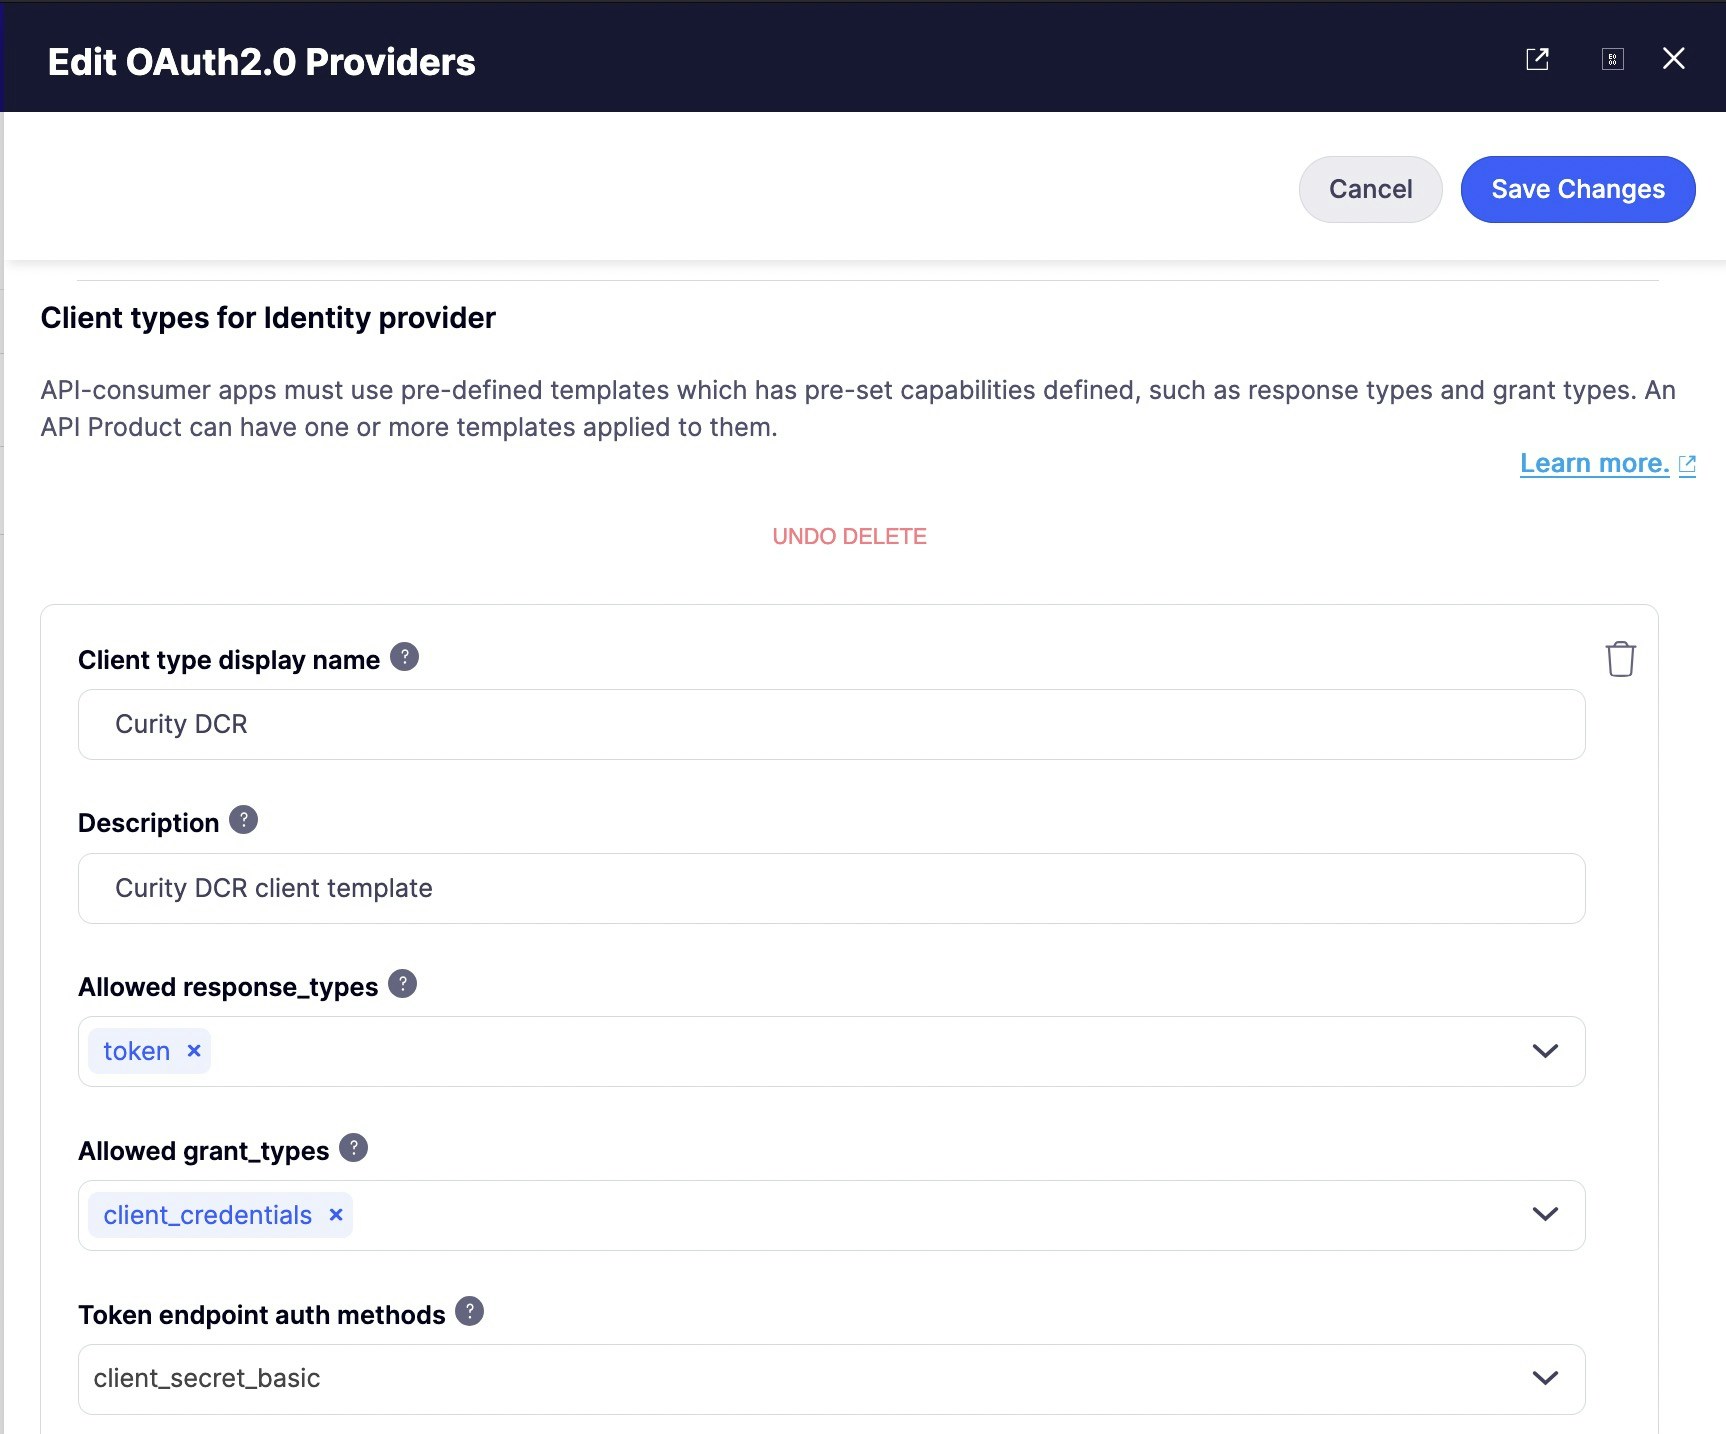 | Field | Description |
| :------------------------------------ | :---------------------------------------------------------------------------------------------------------------------------------------------------------------------------------------------------------------------------------------------------------------------------------------------------------------------------------------------------------------------------------------------------------------------------------------------- |
| **Client type display name** | The name shown to API Consumers at checkout. Keep it short and descriptive, for example "Server-to-server" or "Web application". |
| **Description** | Additional context to help API Consumers choose the right Client Profile. Not shown by default but configurable via templates. |
| **Allowed response types** | Controls what the IdP returns to the API Consumer's application after authorization. Note: when using Okta with the client credentials grant, set this to `token`.
| Field | Description |
| :------------------------------------ | :---------------------------------------------------------------------------------------------------------------------------------------------------------------------------------------------------------------------------------------------------------------------------------------------------------------------------------------------------------------------------------------------------------------------------------------------- |
| **Client type display name** | The name shown to API Consumers at checkout. Keep it short and descriptive, for example "Server-to-server" or "Web application". |
| **Description** | Additional context to help API Consumers choose the right Client Profile. Not shown by default but configurable via templates. |
| **Allowed response types** | Controls what the IdP returns to the API Consumer's application after authorization. Note: when using Okta with the client credentials grant, set this to `token`. - `code`: authorization code to exchange for tokens
- `token`: access token returned directly
- `id_token`: identity token (OIDC)
See the [OIDC specification](https://openid.net/specs/openid-connect-core-1_0.html#Authentication) for details. |
| **Allowed grant types** | The OAuth 2.0 grant flow the API Consumer's application will use to obtain tokens. - `client_credentials`: server-to-server, no user involved
- `authorization_code`: user-facing applications
- `refresh_token`: obtain new access tokens without re-authenticating
See the [OAuth 2.0 specification](https://datatracker.ietf.org/doc/html/rfc6749#section-1.3) for details. |
| **Token endpoint auth methods** | How the API Consumer's application authenticates to the IdP's token endpoint. - `client_secret_basic`: credentials as a Base64-encoded Authorization header
- `client_secret_post`: credentials in the request body
See the [OIDC specification](https://openid.net/specs/openid-connect-core-1_0.html#ClientAuthentication) for details. |
| **Okta application type** (Okta only) | The Okta application type to create: `web` for server-side apps, `native` for mobile or desktop, `browser` for single-page apps, `service` for machine-to-machine. |
Your IdP may override some of these settings based on its own configuration.
When you have finished, click **Save Changes**.
When an OAuth 2.0 Provider is created, updated, or deleted in Portal, the corresponding entry in the Identity Provider Registry is updated immediately on every connected Tyk Dashboard. No approval is required to propagate the change.
### API Products and Plans
Each API Product and each Plan used with DCR must have a unique OAuth 2.0 scope assigned, matching a scope you created in the IdP. See the [OAuth 2.0 Scopes](#oauth-2-0-scopes) section for the full requirements.
See [API Products](/portal/api-products#dynamic-client-registration) and [API Plans](/portal/api-plans#dynamic-client-registration) for configuration instructions.
When APIs are added to or removed from a DCR-enabled API Product, or when its DCR scopes are changed, the scope-to-policy mappings in the Identity Provider Registry are updated immediately. Existing tokens gain or lose access without requiring a new approval.
This applies only when at least one access request for the API Product has already been approved. If no approval has ever been made, the Registry has no entry for that Product yet and there is nothing to update; the first approval will write the full mapping.
## End-to-End DCR Flow
This section walks through the complete DCR flow from the perspective of each actor: an API Consumer requesting access, an API Owner approving it, and the API Consumer using their credentials to call an API. It covers what happens at each stage and what to expect as output.
Before proceeding, confirm that the following are in place:
* At least one [OAuth 2.0 Provider](#configure-your-identity-provider) is configured in the Portal, with at least one [Client Profile](#client-profiles) defined.
* At least one API in Tyk Dashboard has JWT authentication enabled.
* An API Product includes that API and has DCR enabled, with a scope assigned.
* A Plan has a scope assigned.
* Both scopes [exist in the IdP](#oauth-2-0-scopes).
### Request Access to the API Product
The API Consumer discovers the DCR-enabled API Product in the catalog and submits an access request. As part of checkout, they select how their application will obtain tokens.
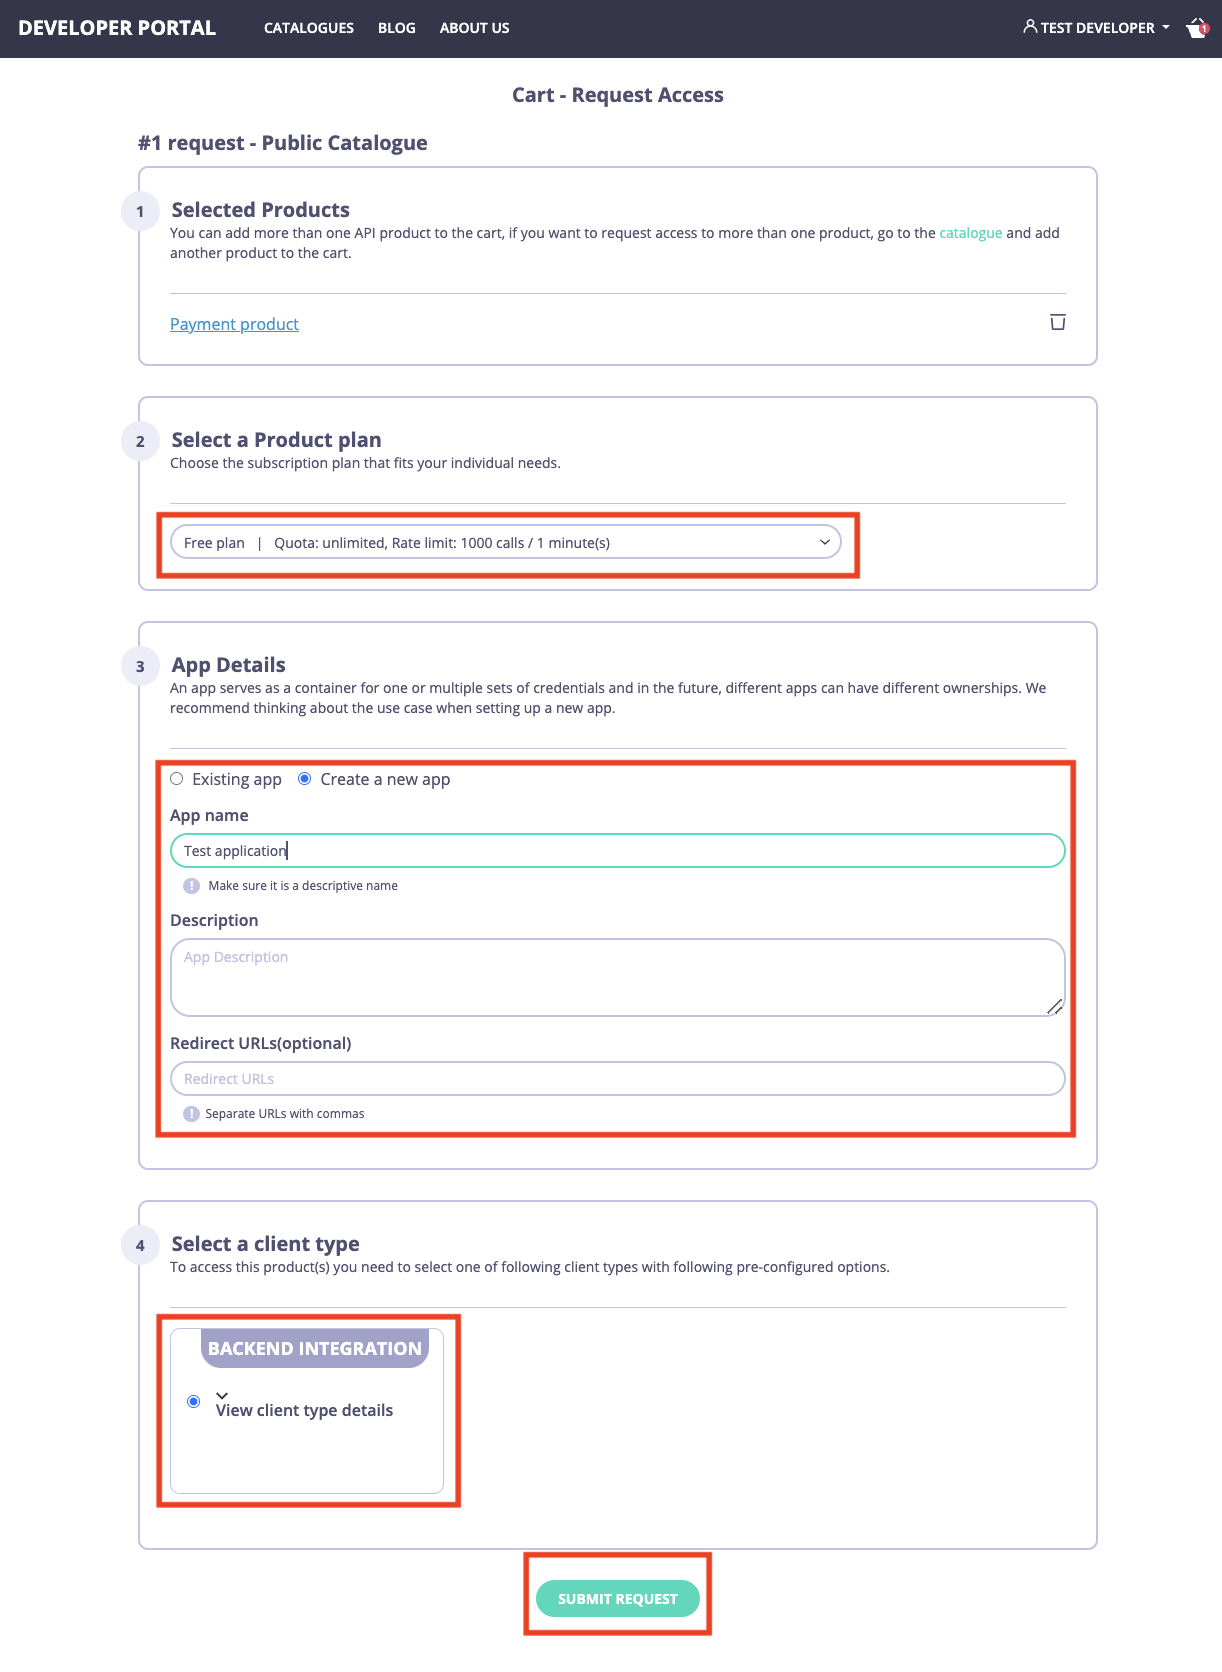
As an API Consumer, log in and navigate to the catalog page. Select the DCR-enabled API Product, proceed to checkout, and complete the following:
* Select a Plan.
* Select an existing Developer App or create a new one.
* Select a Client Profile (**client type** in the Portal UI).
* If your Client Profile uses the authorization code grant, enter your application's redirect URI in the **Redirect URLs** field. This is the URL the IdP will redirect the user to after authentication, carrying the authorization code your application exchanges for a token. Separate multiple URIs with commas.
* Click **Submit request**.
 ### Approve the Access Request
An API Owner reviews and approves the request.
The Portal then registers a new OAuth 2.0 client with the IdP on the API Consumer's behalf, using the selected Client Profile to determine the grant type and token endpoint authentication method. The scopes from the API Product and Plan are associated with that client in the IdP.
As part of the same process, the Portal retrieves the JWKS URI from the IdP and writes it, together with the scope-to-policy mappings, into Tyk. With `EnableIDPRegistry = true`, these are written to the Identity Provider Registry. Otherwise, they are written into the API definition.
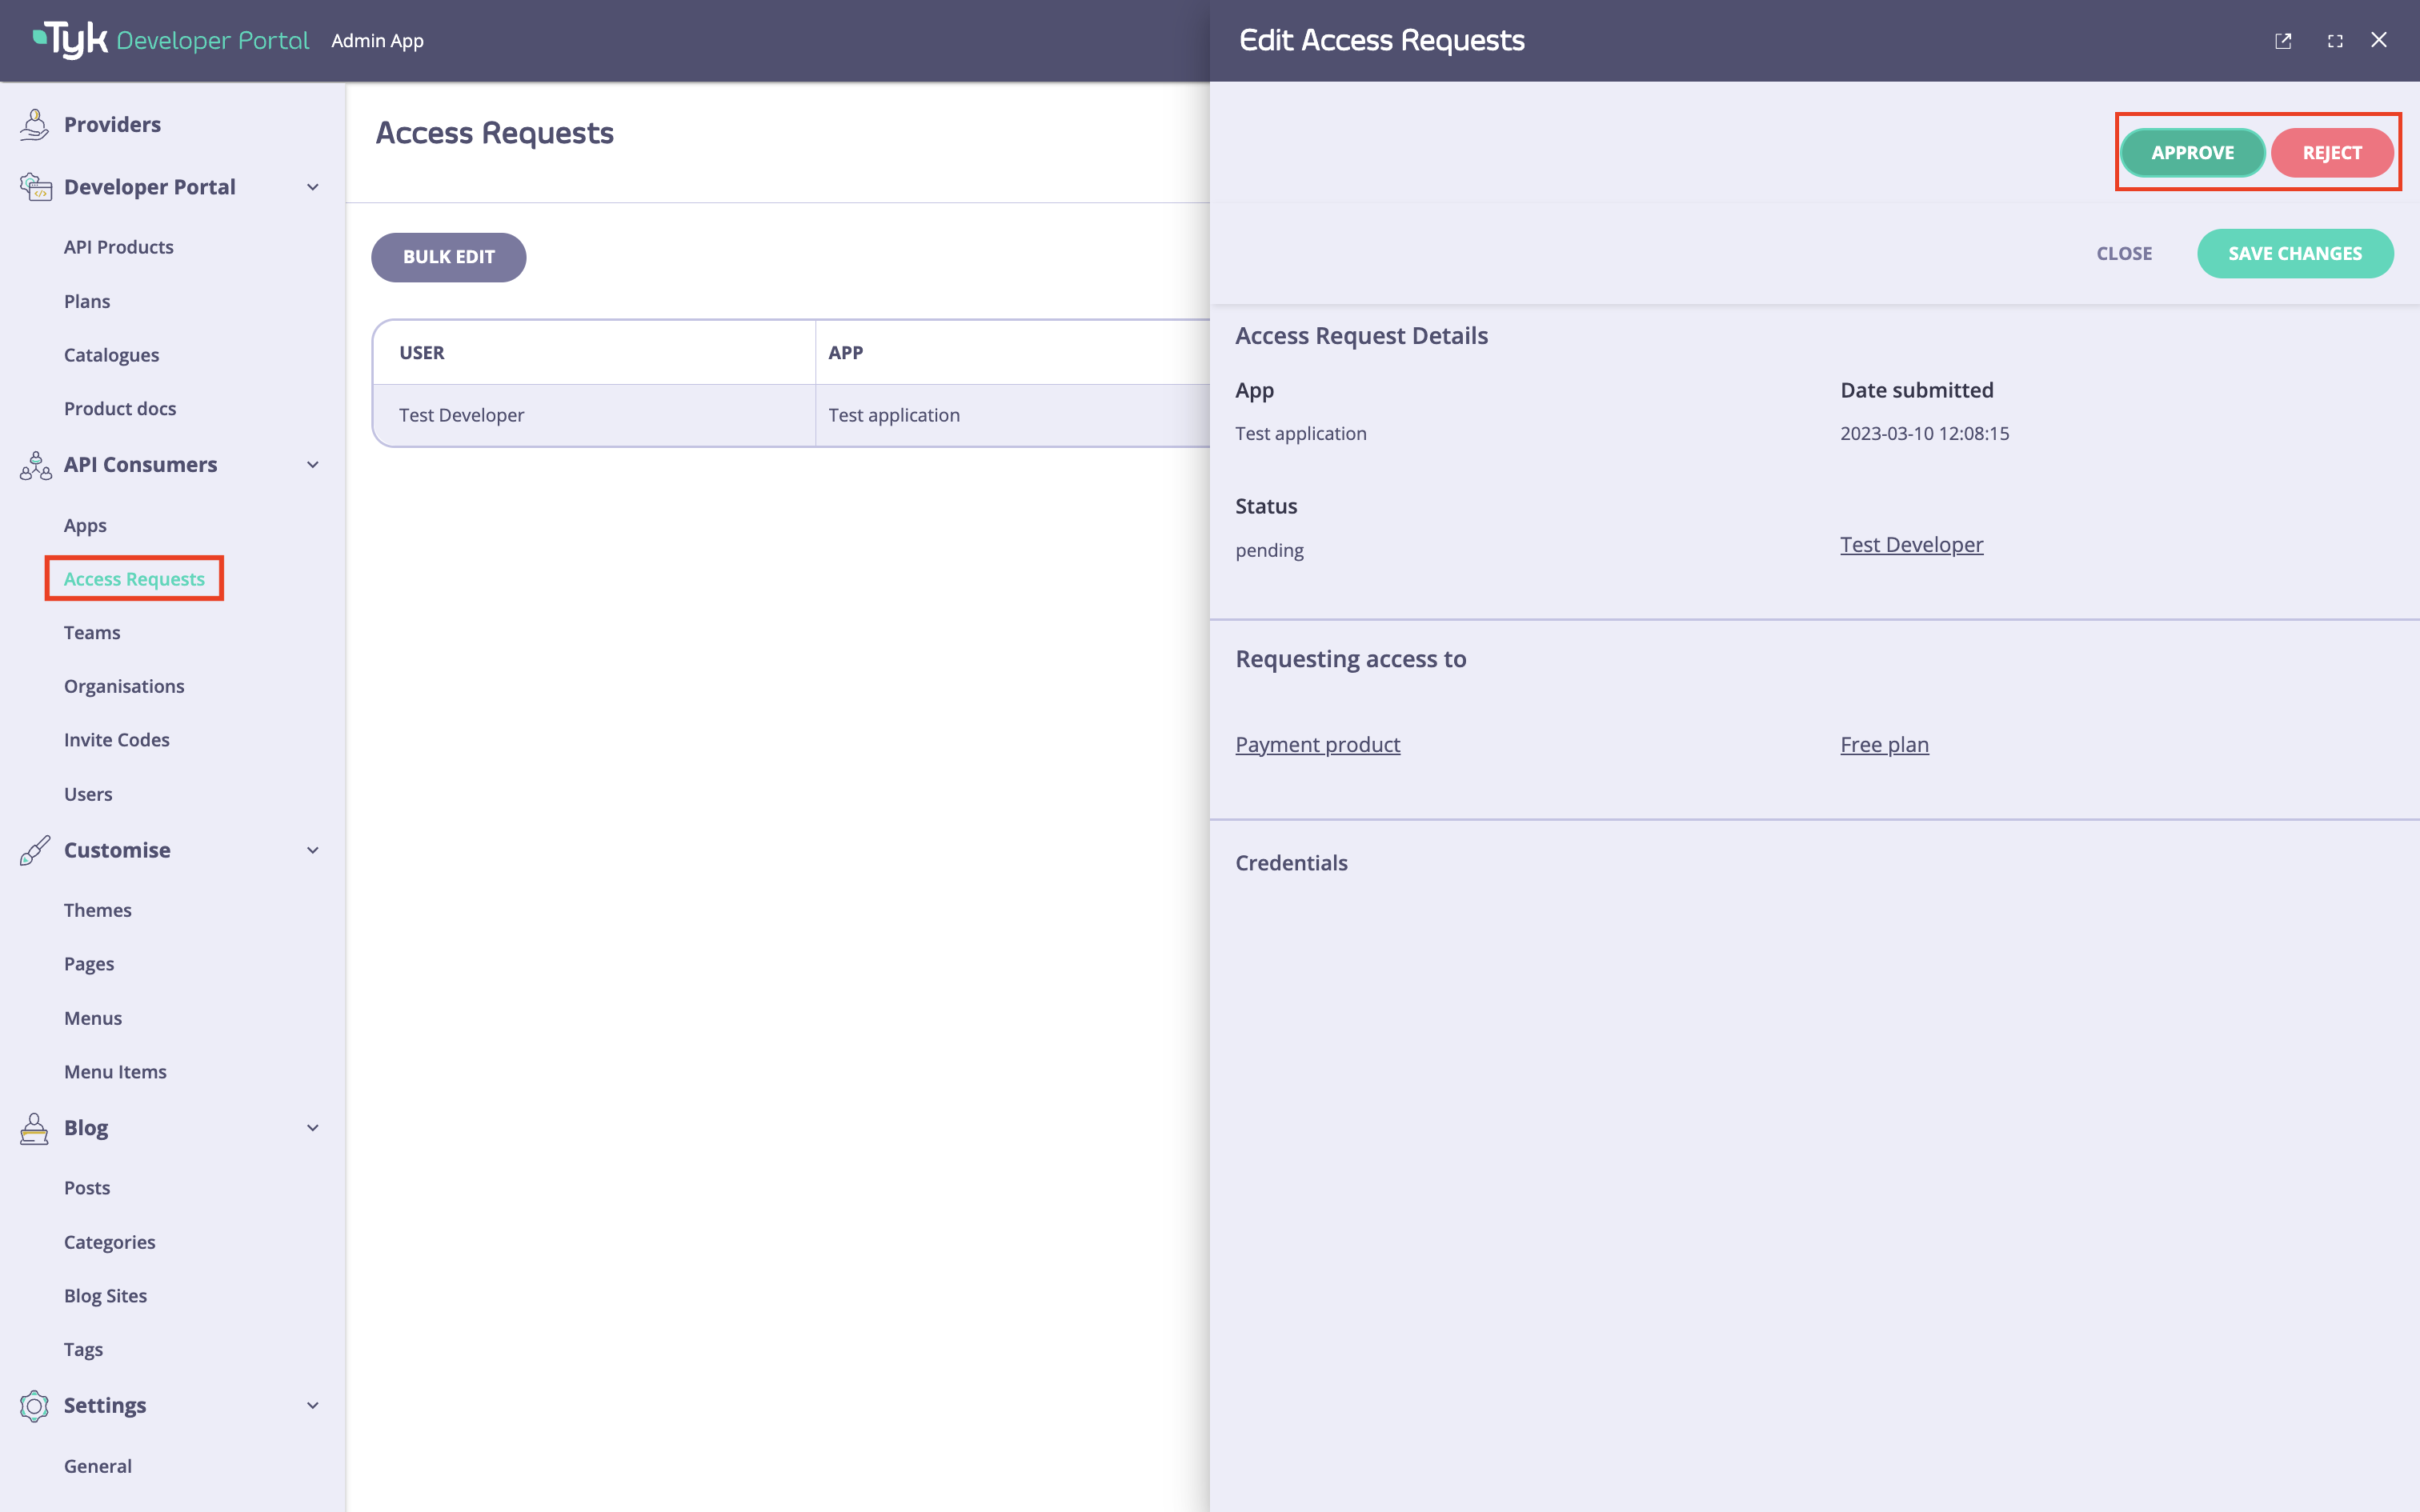
As an API Owner, navigate to **Access Requests**, select the request, and click **Approve**.
### Approve the Access Request
An API Owner reviews and approves the request.
The Portal then registers a new OAuth 2.0 client with the IdP on the API Consumer's behalf, using the selected Client Profile to determine the grant type and token endpoint authentication method. The scopes from the API Product and Plan are associated with that client in the IdP.
As part of the same process, the Portal retrieves the JWKS URI from the IdP and writes it, together with the scope-to-policy mappings, into Tyk. With `EnableIDPRegistry = true`, these are written to the Identity Provider Registry. Otherwise, they are written into the API definition.
As an API Owner, navigate to **Access Requests**, select the request, and click **Approve**.
 ### Obtain an Access Token
Once the request is approved, the API Consumer can retrieve their OAuth 2.0 credentials from **My Dashboard**. Navigate to the Developer App and copy the **client ID** and **secret**.
### Obtain an Access Token
Once the request is approved, the API Consumer can retrieve their OAuth 2.0 credentials from **My Dashboard**. Navigate to the Developer App and copy the **client ID** and **secret**.
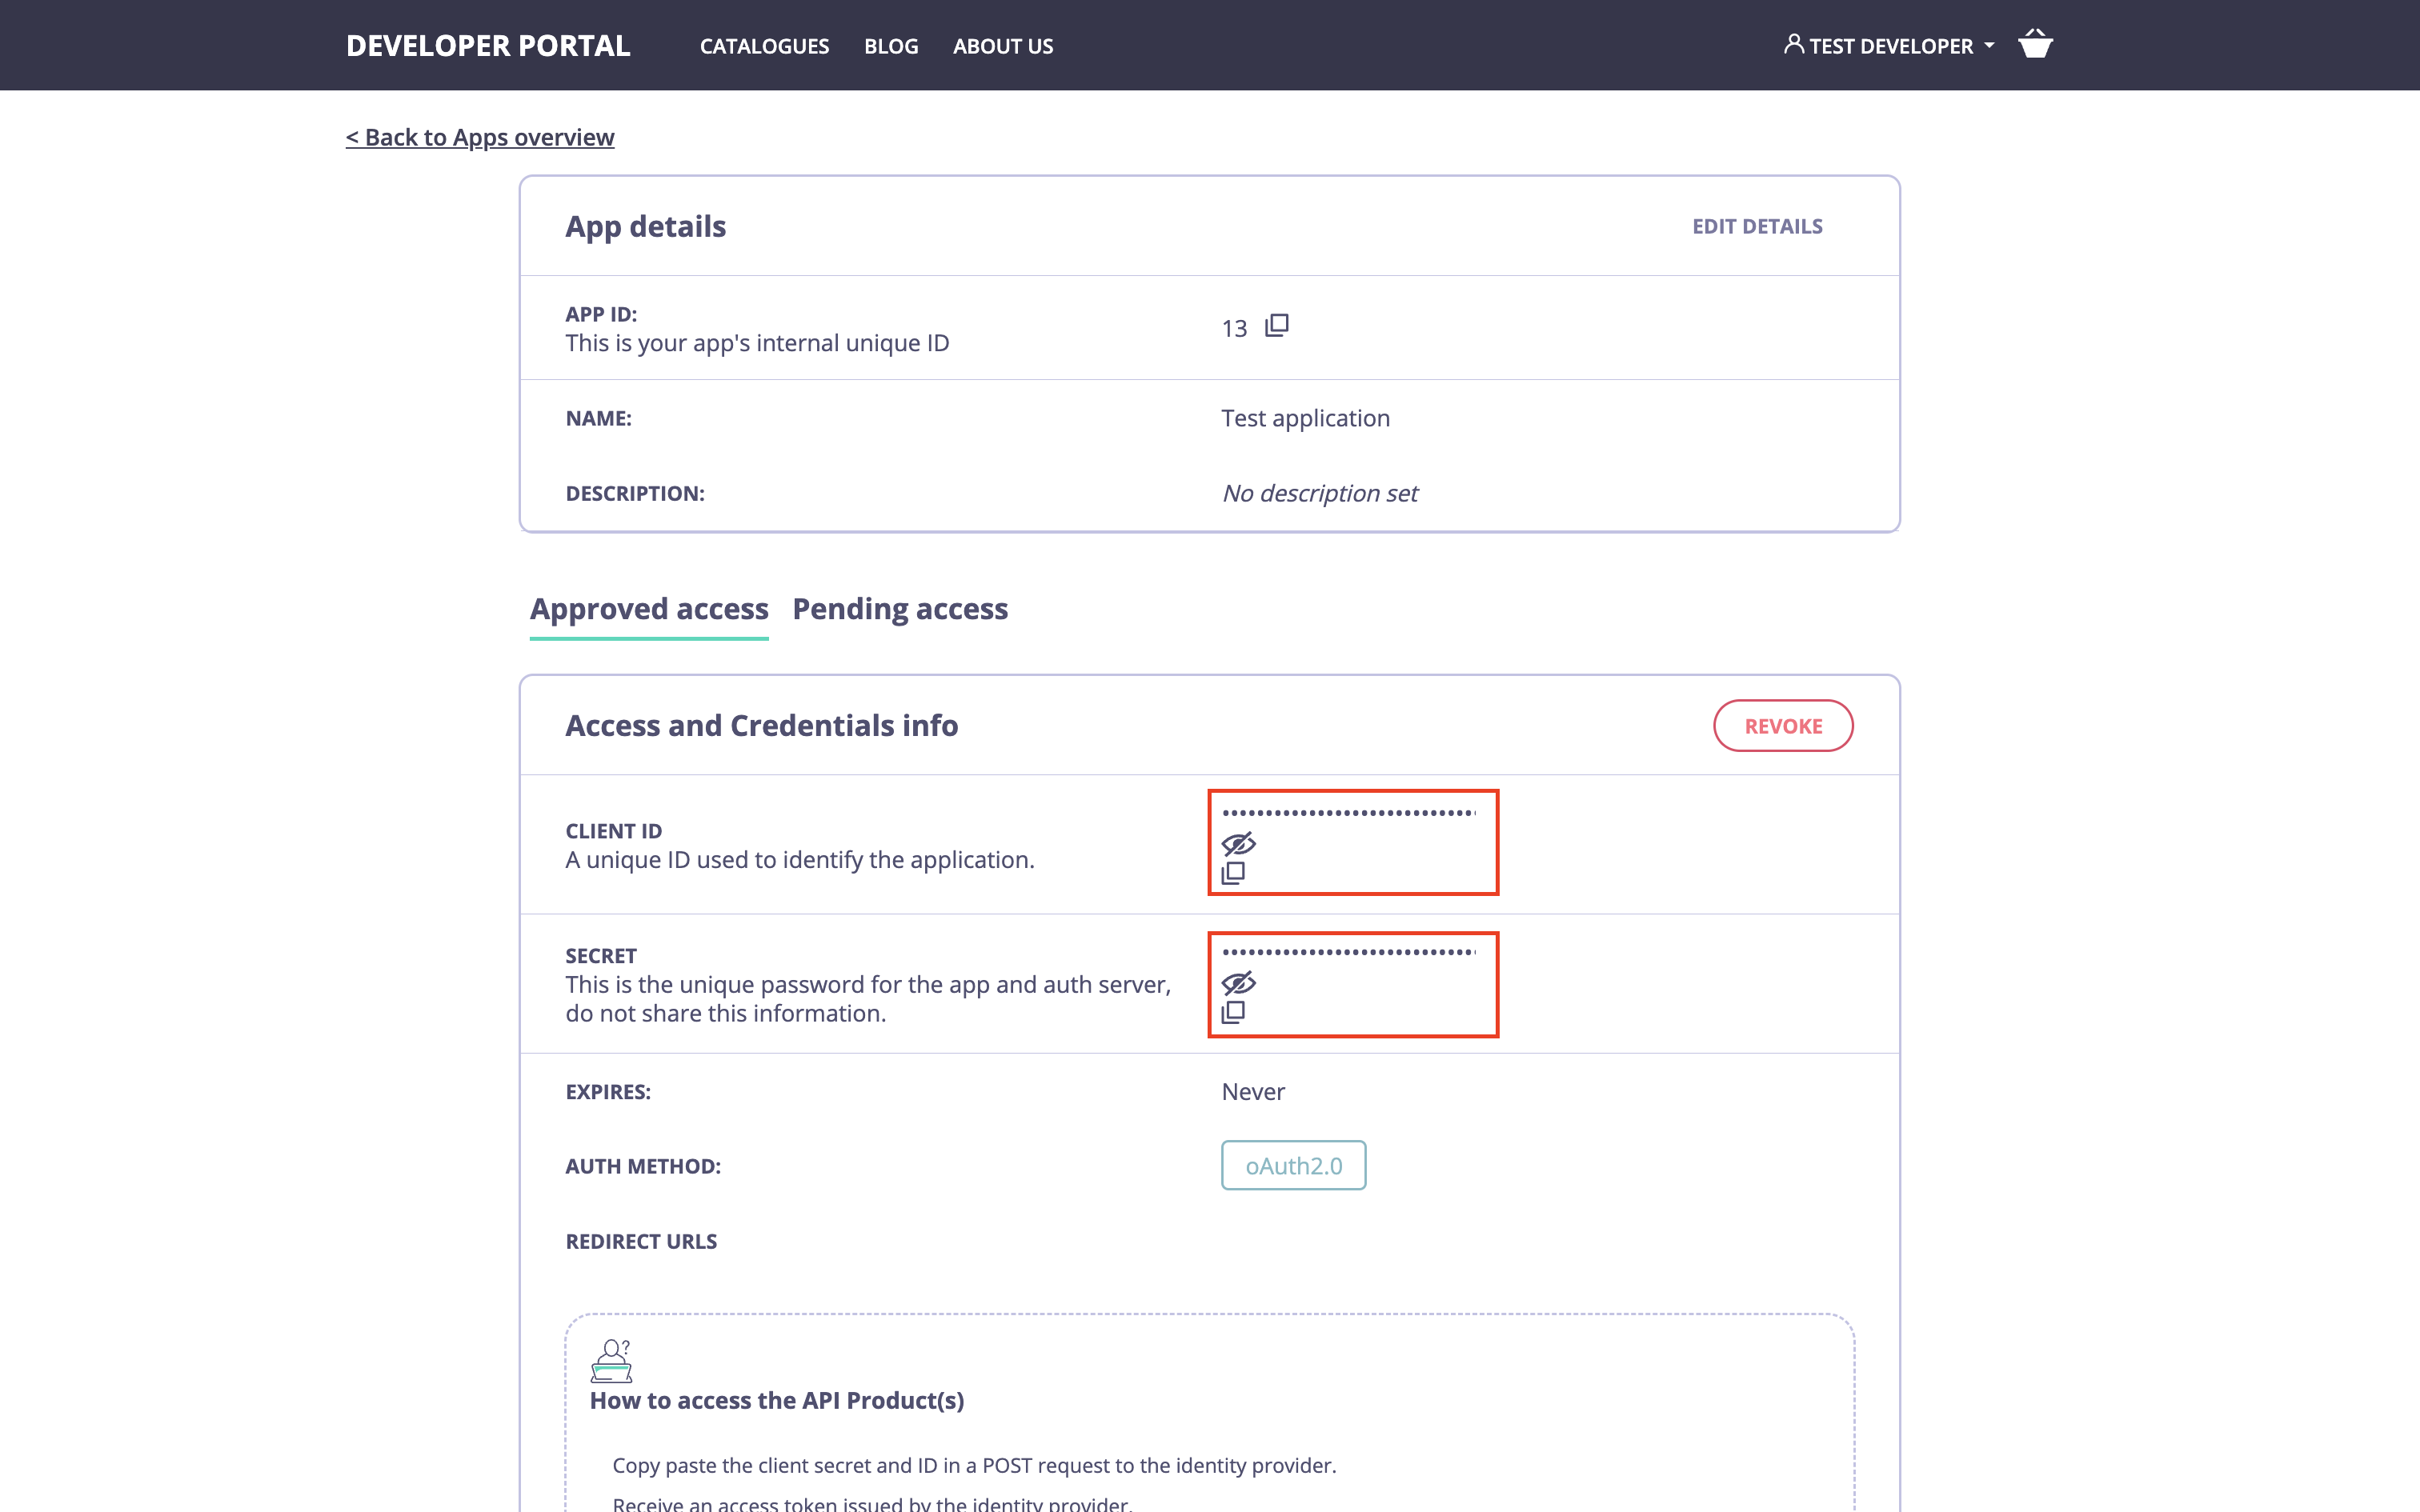 Use these credentials to request an access token from the IdP's token endpoint. You must include the scopes for the API Product and Plan in the request. Tyk Gateway uses these to identify which policies to apply, and will reject requests where the token does not contain the expected scopes.
The example below uses the `client_credentials` grant with the `client_secret_basic` authentication method, where credentials are passed as a Base64-encoded `{client_id}:{client_secret}` string in the `Authorization` header.
```bash theme={null}
curl --location --request POST '' \
--header 'Authorization: Basic N2M2NGM2ZTQtM2I0Ny00NTMyLWFlMWEtODM1ZTMyMWY2ZjlkOjNwZGlJSXVxd004Ykp0M0toV0tLZHFIRkZMWkN3THQ0' \
--header 'Content-Type: application/x-www-form-urlencoded' \
--data-urlencode 'scope=product_payments free_plan' \
--data-urlencode 'grant_type=client_credentials'
```
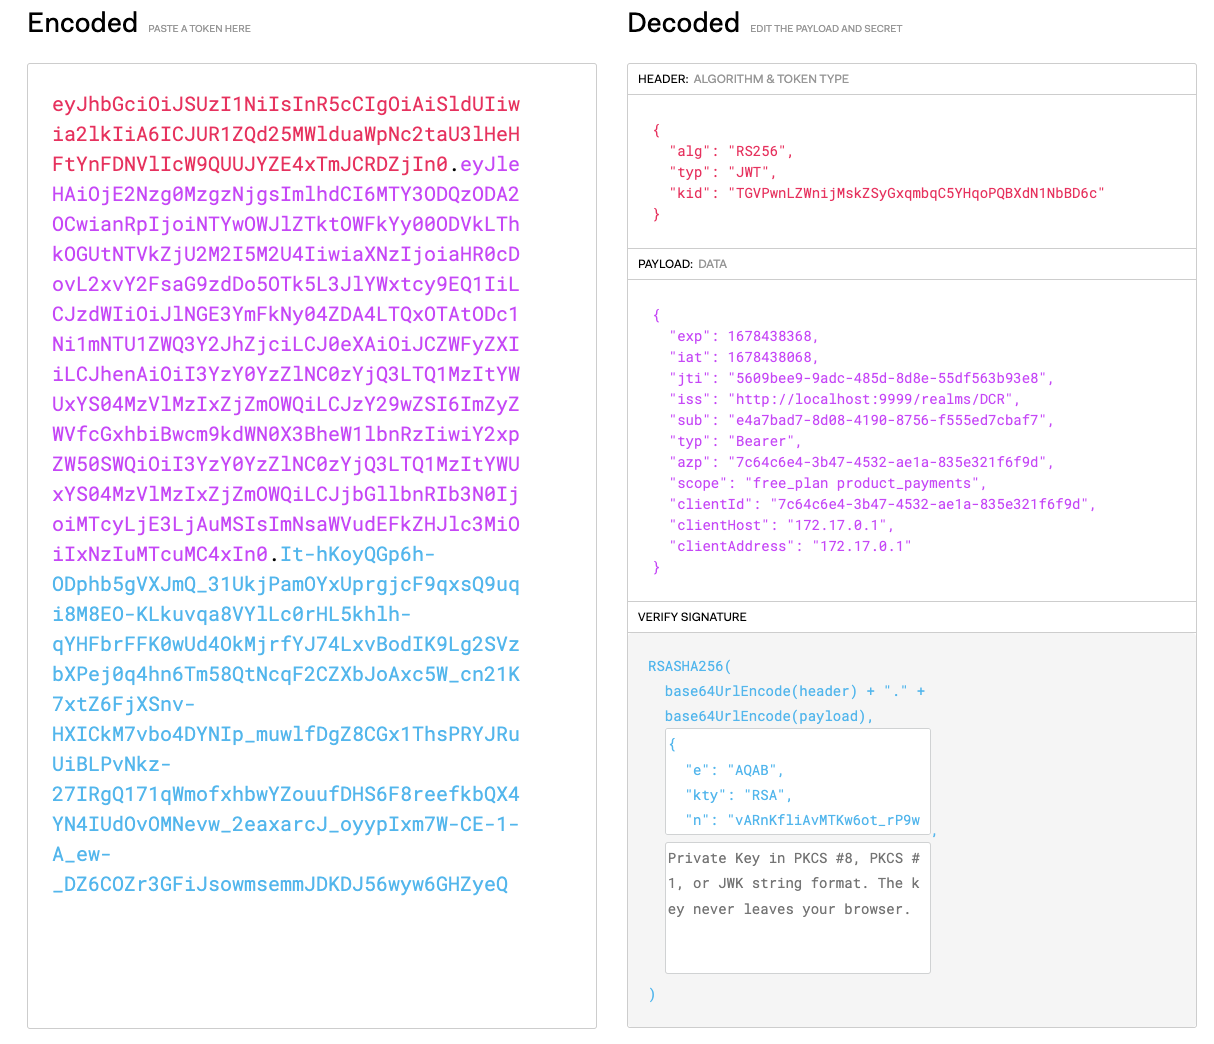
A successful response includes a JWT access token. Decode it to confirm it contains the expected scopes before making an API call.
Use these credentials to request an access token from the IdP's token endpoint. You must include the scopes for the API Product and Plan in the request. Tyk Gateway uses these to identify which policies to apply, and will reject requests where the token does not contain the expected scopes.
The example below uses the `client_credentials` grant with the `client_secret_basic` authentication method, where credentials are passed as a Base64-encoded `{client_id}:{client_secret}` string in the `Authorization` header.
```bash theme={null}
curl --location --request POST '' \
--header 'Authorization: Basic N2M2NGM2ZTQtM2I0Ny00NTMyLWFlMWEtODM1ZTMyMWY2ZjlkOjNwZGlJSXVxd004Ykp0M0toV0tLZHFIRkZMWkN3THQ0' \
--header 'Content-Type: application/x-www-form-urlencoded' \
--data-urlencode 'scope=product_payments free_plan' \
--data-urlencode 'grant_type=client_credentials'
```
A successful response includes a JWT access token. Decode it to confirm it contains the expected scopes before making an API call.
 ### Make an API Call
With a valid JWT access token, the API Consumer can call the API. Tyk Gateway validates the token signature and maps the scopes to policies before forwarding the request.
Use the access token to call the API:
```bash theme={null}
curl --location --request GET '/payment-api/get' \
--header 'Authorization: Bearer '
```
## Migrating to the Identity Provider Registry
DCR support in Tyk Developer Portal has evolved across three eras. The table below summarizes each to help you identify your current state before migrating.
| Era | Portal Version | How IdP Config Is Stored | Limitations |
| :------------------------- | :--------------- | :------------------------------------------- | :-------------------------------------------------------------------------------------------------------------------------- |
| Legacy | Before 1.13.0 | Manually in each API definition | No Portal management of IdP configuration; scope mappings require manual setup per API in Tyk Dashboard |
| API Definition | 1.13.0 to 1.17.x | Portal writes to API definitions at approval | Write conflicts possible between Portal and Tyk Dashboard; configuration not updated automatically when API Products change |
| Identity Provider Registry | 1.18.0+ | Centralized Registry in Tyk Dashboard | Recommended for all deployments |
### Legacy Setup (Before Portal 1.13.0)
Before Portal 1.13.0, DCR required fully manual configuration of scope-to-policy mappings in each Tyk Dashboard API definition. The Portal did not write anything into API definitions when an access request was approved. For each JWT-authenticated API, this involved:
* Creating Tyk policies for the API Product and Plan
* Creating a No Operation API and policy to satisfy the default policy requirement without granting real access. On Gateway versions prior to 5.11.0, Tyk required a default policy on APIs using scope-to-policy mapping; the No Operation API satisfied this without overriding the Product and Plan policies. From Gateway 5.11.0 onwards this workaround is no longer needed.
* Manually enabling scope-to-policy mapping on each API definition and configuring the JWKS URI, scope-to-policy mappings, and default policy directly
To migrate to the Identity Provider Registry, first upgrade to Portal 1.18.0, then follow the [Migration Steps](#migration-steps) below. Note that the automatic backfill does not cover manually configured API definitions. You will need to create OAuth 2.0 Providers in the Portal for each IdP, then populate the Registry manually via `POST /api/clientidps`.
### API Definition Era (Portal 1.13.0 to 1.17.x)
From Portal 1.13.0, the Portal began managing IdP configuration directly. OAuth 2.0 Providers and Client Profiles are configured in the Portal, and when an access request is approved, the Portal automatically writes the JWKS URI and scope-to-policy mappings into the relevant API definitions.
For each JWT-authenticated API, the setup required leaving the **Public key** and **default policy** fields blank. The Portal populated these when an access request was approved. On Gateway versions prior to 5.11.0, a No Operation API and policy were also required to satisfy the default policy requirement; from Gateway 5.11.0 this is no longer needed.
The limitation of this approach is that API definition configuration takes precedence over any changes made in Tyk Dashboard, and write conflicts can occur if the Portal and Tyk Dashboard both manage the same API definition. Configuration is also not updated automatically when API Products change outside of an approval event.
To migrate to the Identity Provider Registry, first upgrade to Portal 1.18.0, then follow the [Migration Steps](#migration-steps) below.
### Migration Steps
1. Set [`TYK_PORTAL_ENABLEIDPREGISTRY=true`](/product-stack/tyk-enterprise-developer-portal/deploy/configuration#tyk-portal-enableidpregistry) (or `EnableIDPRegistry = true` in the config file) and restart the Portal.
On startup, the Portal runs a backfill that creates Registry entries in Tyk Dashboard for any existing OAuth 2.0 Providers. Any new, or changes to existing, OAuth 2.0 Providers and API Products will be stored in the Registry going forward.
If moving from a [legacy version](#legacy-setup-before-portal-1-13-0) there will be nothing for the backfill to process.
2. **Audit your API definitions.**
Call `GET /api/clientidps` against the Tyk Dashboard API to inspect the Registry entries created by the backfill.
For each JWT-authenticated API, compare the JWKS URI and scope-to-policy mappings in the API definition against what the Registry now contains.
Pay particular attention to any IdP configuration that was added directly in Tyk Dashboard rather than through the Portal. The backfill only covers OAuth 2.0 Providers managed by the Portal; configuration added manually outside the Portal will not appear in the Registry after the backfill. Any such configuration must be added to the Registry manually via `POST /api/clientidps` before proceeding to the next step.
There is no Tyk Dashboard UI for the Identity Provider Registry. All inspection and manual management must be done via the [Tyk Dashboard API](/tyk-dashboard-api).
3. **Remove IdP configuration from API definitions.**
Once the Registry is verified as complete and correct, you can remove the JWKS URIs and scope-to-policy mappings from each API definition. The configuration in the API definition [takes precedence over the Registry](/api-management/client-idp-registry#what-is-the-identity-provider-registry)) so if an issuer and scope match is found in the API definition, this will be used rather than the configuration in the Registry.
Do not remove configuration from an API definition until you have confirmed that the corresponding Registry entry exists and is correct. Removing configuration that has no Registry counterpart will break JWT validation for that API.
### Make an API Call
With a valid JWT access token, the API Consumer can call the API. Tyk Gateway validates the token signature and maps the scopes to policies before forwarding the request.
Use the access token to call the API:
```bash theme={null}
curl --location --request GET '/payment-api/get' \
--header 'Authorization: Bearer '
```
## Migrating to the Identity Provider Registry
DCR support in Tyk Developer Portal has evolved across three eras. The table below summarizes each to help you identify your current state before migrating.
| Era | Portal Version | How IdP Config Is Stored | Limitations |
| :------------------------- | :--------------- | :------------------------------------------- | :-------------------------------------------------------------------------------------------------------------------------- |
| Legacy | Before 1.13.0 | Manually in each API definition | No Portal management of IdP configuration; scope mappings require manual setup per API in Tyk Dashboard |
| API Definition | 1.13.0 to 1.17.x | Portal writes to API definitions at approval | Write conflicts possible between Portal and Tyk Dashboard; configuration not updated automatically when API Products change |
| Identity Provider Registry | 1.18.0+ | Centralized Registry in Tyk Dashboard | Recommended for all deployments |
### Legacy Setup (Before Portal 1.13.0)
Before Portal 1.13.0, DCR required fully manual configuration of scope-to-policy mappings in each Tyk Dashboard API definition. The Portal did not write anything into API definitions when an access request was approved. For each JWT-authenticated API, this involved:
* Creating Tyk policies for the API Product and Plan
* Creating a No Operation API and policy to satisfy the default policy requirement without granting real access. On Gateway versions prior to 5.11.0, Tyk required a default policy on APIs using scope-to-policy mapping; the No Operation API satisfied this without overriding the Product and Plan policies. From Gateway 5.11.0 onwards this workaround is no longer needed.
* Manually enabling scope-to-policy mapping on each API definition and configuring the JWKS URI, scope-to-policy mappings, and default policy directly
To migrate to the Identity Provider Registry, first upgrade to Portal 1.18.0, then follow the [Migration Steps](#migration-steps) below. Note that the automatic backfill does not cover manually configured API definitions. You will need to create OAuth 2.0 Providers in the Portal for each IdP, then populate the Registry manually via `POST /api/clientidps`.
### API Definition Era (Portal 1.13.0 to 1.17.x)
From Portal 1.13.0, the Portal began managing IdP configuration directly. OAuth 2.0 Providers and Client Profiles are configured in the Portal, and when an access request is approved, the Portal automatically writes the JWKS URI and scope-to-policy mappings into the relevant API definitions.
For each JWT-authenticated API, the setup required leaving the **Public key** and **default policy** fields blank. The Portal populated these when an access request was approved. On Gateway versions prior to 5.11.0, a No Operation API and policy were also required to satisfy the default policy requirement; from Gateway 5.11.0 this is no longer needed.
The limitation of this approach is that API definition configuration takes precedence over any changes made in Tyk Dashboard, and write conflicts can occur if the Portal and Tyk Dashboard both manage the same API definition. Configuration is also not updated automatically when API Products change outside of an approval event.
To migrate to the Identity Provider Registry, first upgrade to Portal 1.18.0, then follow the [Migration Steps](#migration-steps) below.
### Migration Steps
1. Set [`TYK_PORTAL_ENABLEIDPREGISTRY=true`](/product-stack/tyk-enterprise-developer-portal/deploy/configuration#tyk-portal-enableidpregistry) (or `EnableIDPRegistry = true` in the config file) and restart the Portal.
On startup, the Portal runs a backfill that creates Registry entries in Tyk Dashboard for any existing OAuth 2.0 Providers. Any new, or changes to existing, OAuth 2.0 Providers and API Products will be stored in the Registry going forward.
If moving from a [legacy version](#legacy-setup-before-portal-1-13-0) there will be nothing for the backfill to process.
2. **Audit your API definitions.**
Call `GET /api/clientidps` against the Tyk Dashboard API to inspect the Registry entries created by the backfill.
For each JWT-authenticated API, compare the JWKS URI and scope-to-policy mappings in the API definition against what the Registry now contains.
Pay particular attention to any IdP configuration that was added directly in Tyk Dashboard rather than through the Portal. The backfill only covers OAuth 2.0 Providers managed by the Portal; configuration added manually outside the Portal will not appear in the Registry after the backfill. Any such configuration must be added to the Registry manually via `POST /api/clientidps` before proceeding to the next step.
There is no Tyk Dashboard UI for the Identity Provider Registry. All inspection and manual management must be done via the [Tyk Dashboard API](/tyk-dashboard-api).
3. **Remove IdP configuration from API definitions.**
Once the Registry is verified as complete and correct, you can remove the JWKS URIs and scope-to-policy mappings from each API definition. The configuration in the API definition [takes precedence over the Registry](/api-management/client-idp-registry#what-is-the-identity-provider-registry)) so if an issuer and scope match is found in the API definition, this will be used rather than the configuration in the Registry.
Do not remove configuration from an API definition until you have confirmed that the corresponding Registry entry exists and is correct. Removing configuration that has no Registry counterpart will break JWT validation for that API.