> ## Documentation Index
> Fetch the complete documentation index at: https://tyk.io/docs/llms.txt
> Use this file to discover all available pages before exploring further.
# Step by step guide using Okta
**Legacy: Tyk Classic Portal**
You're viewing documentation for the **Tyk Classic Portal**, which is no longer actively maintained.
If you're looking for the latest API documentation for the **new Tyk Developer Portal**, please refer to the
[Postman collection](/product-stack/tyk-enterprise-developer-portal/api-documentation/tyk-edp-api) or visit the
[Tyk Developer Portal](/portal/overview/intro) section.
The Classic Portal is in maintenance mode and will be deprecated soon. For questions or support, contact us at
[support@tyk.io]().
## Introduction
We are going walk you through a basic integration of Tyk with Okta using the [OpenID Connect Dynamic Client Registration protocol](https://tools.ietf.org/html/rfc7591). Our current implementation provides support for the client credentials flow with support for JWT.
The user journey is as follow:
1. A developer signs up and creates a Dynamic Client Registration provider using the Developer Portal.
2. Tyk sends the Dynamic Client Registration call to your IDP. The IDP replies with the client ID and secret.
3. Using that information, the developer (or the application) triggers a call to the token endpoint of the IDP.
4. The developer (or the application) then triggers a call to Tyk, using the token that was generated by the IDP. Tyk validates this token using the JWKS provided by the IDP.
### Requirements
* An OKTA account (a [trial account](https://www.okta.com/free-trial/) should be enough).
* A [Tyk Self Managed installation](/tyk-self-managed/install) (Gateway + Dashboard).
### Getting started with OKTA
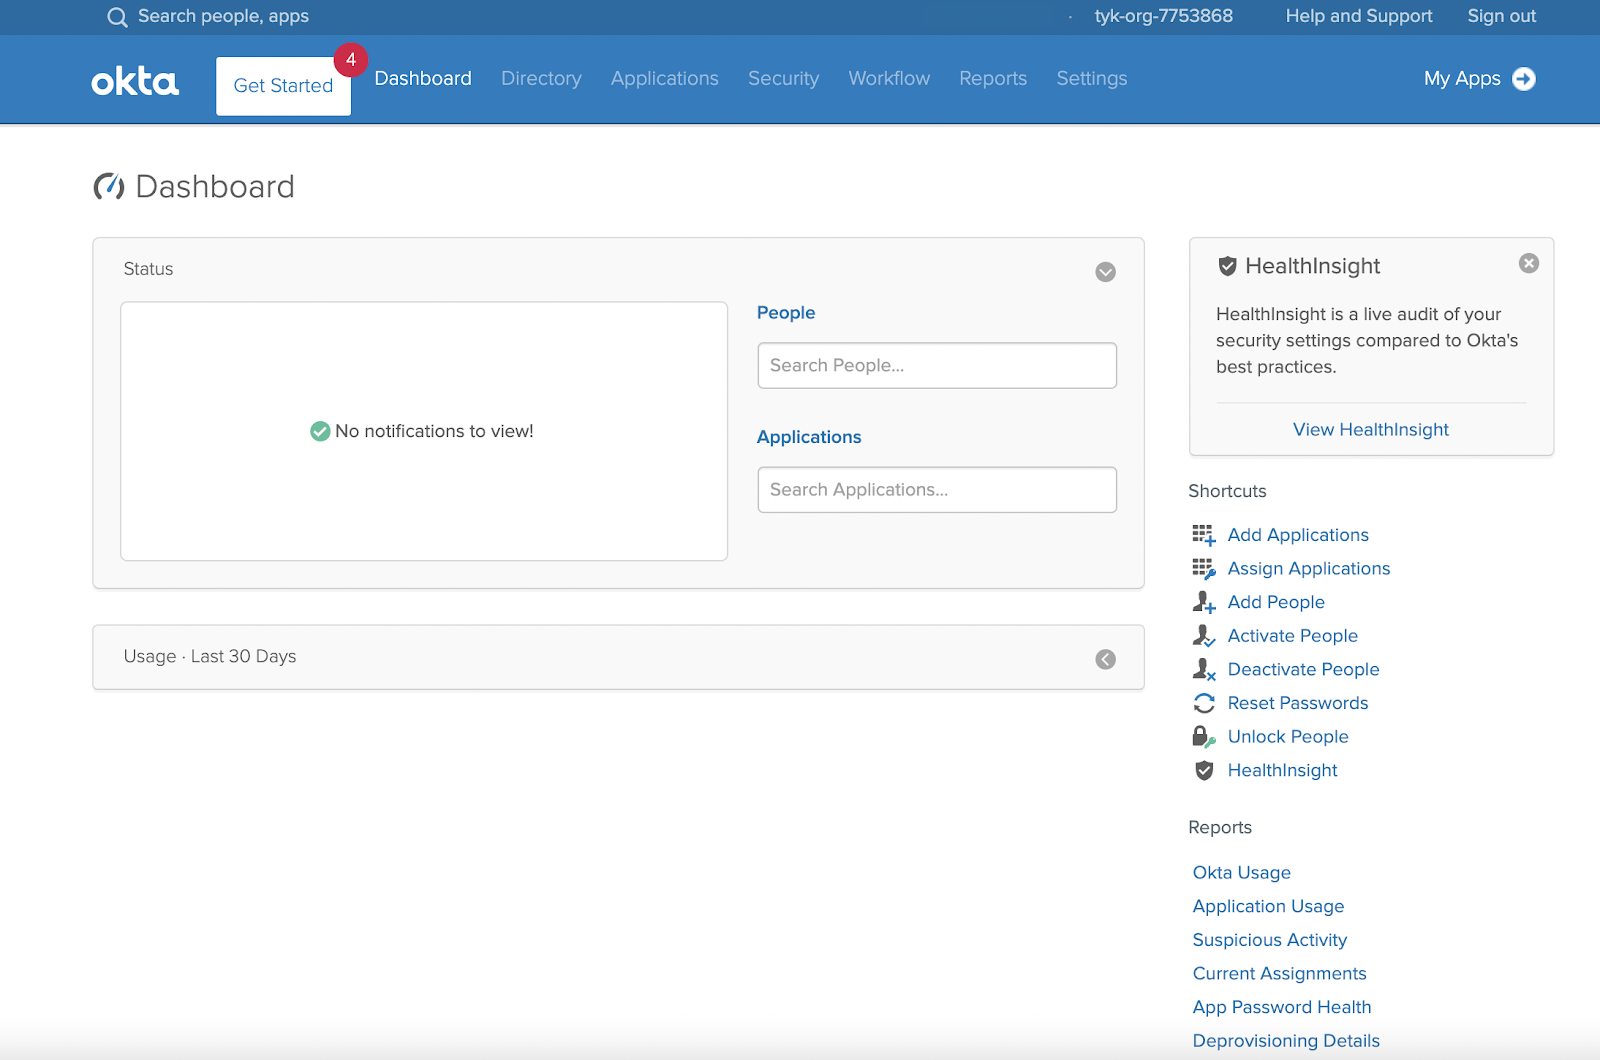
First signup to OKTA, the initial screen looks like:
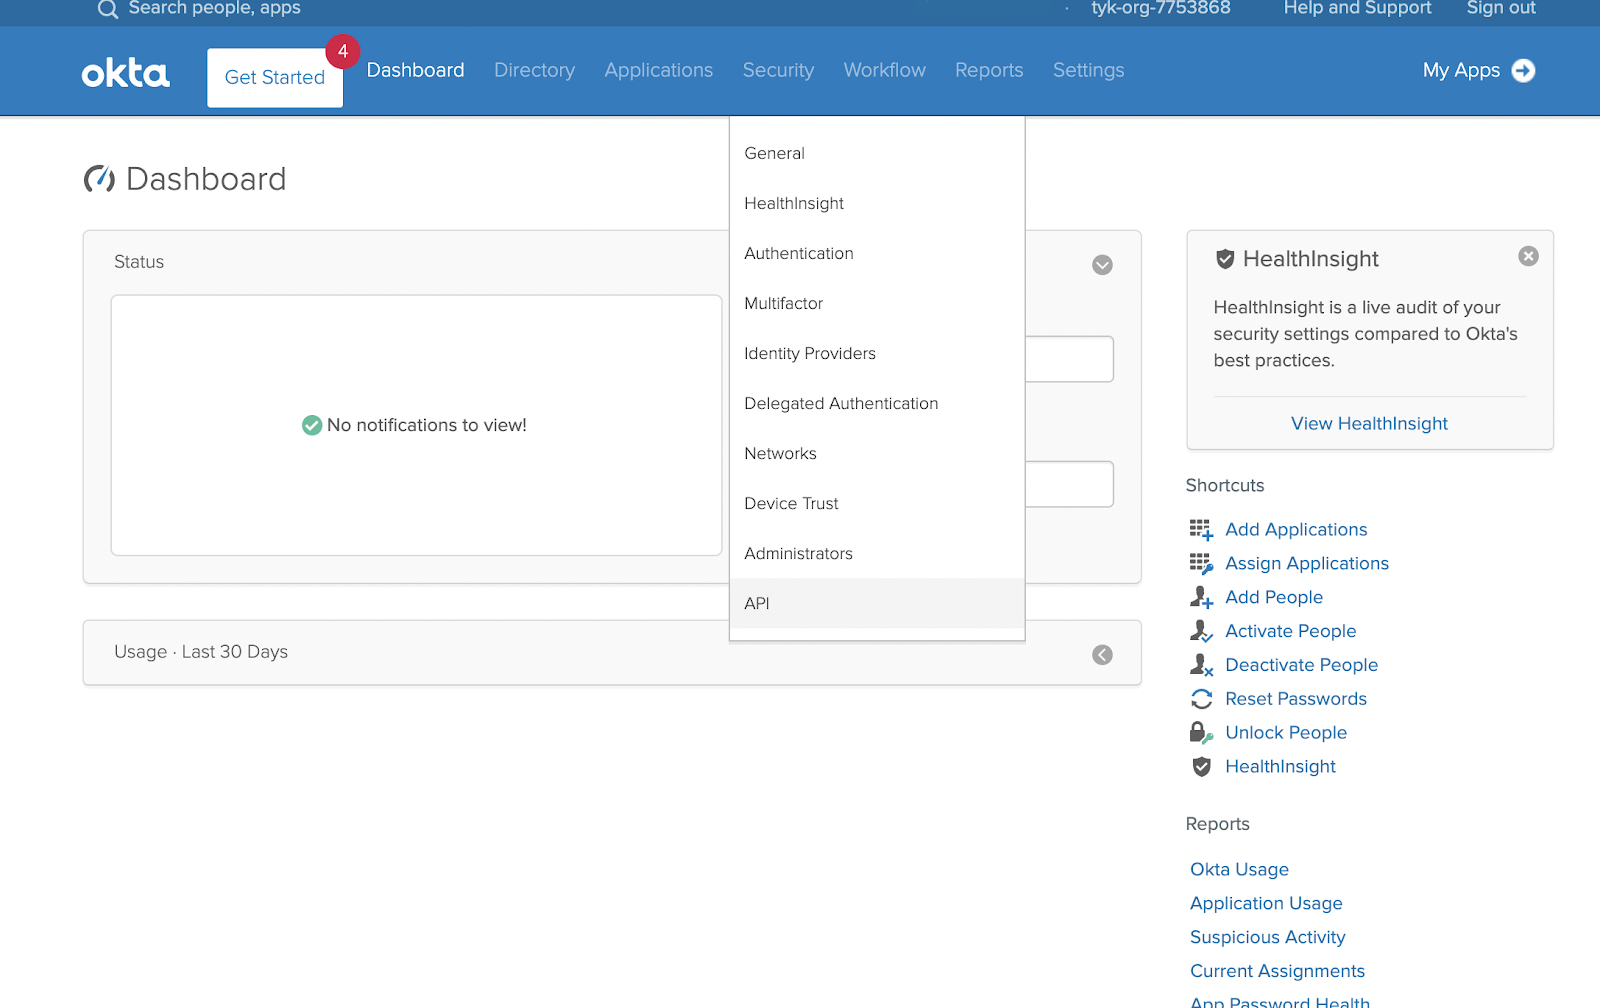
 The first thing you’ll need for our integration is an API token from OKTA, the OpenID specification also calls this an [Initial Access Token](https://openid.net/specs/openid-connect-registration-1_0.html#Terminology) to differentiate it from other tokens that are used with this protocol. To create this token, click **API** option from the **Security** menu on the navigation bar:
 From the API section, select the **Tokens** tab and click **Create Token** and enter a name for the token. For this guide we’re calling it "Tyk Integration":
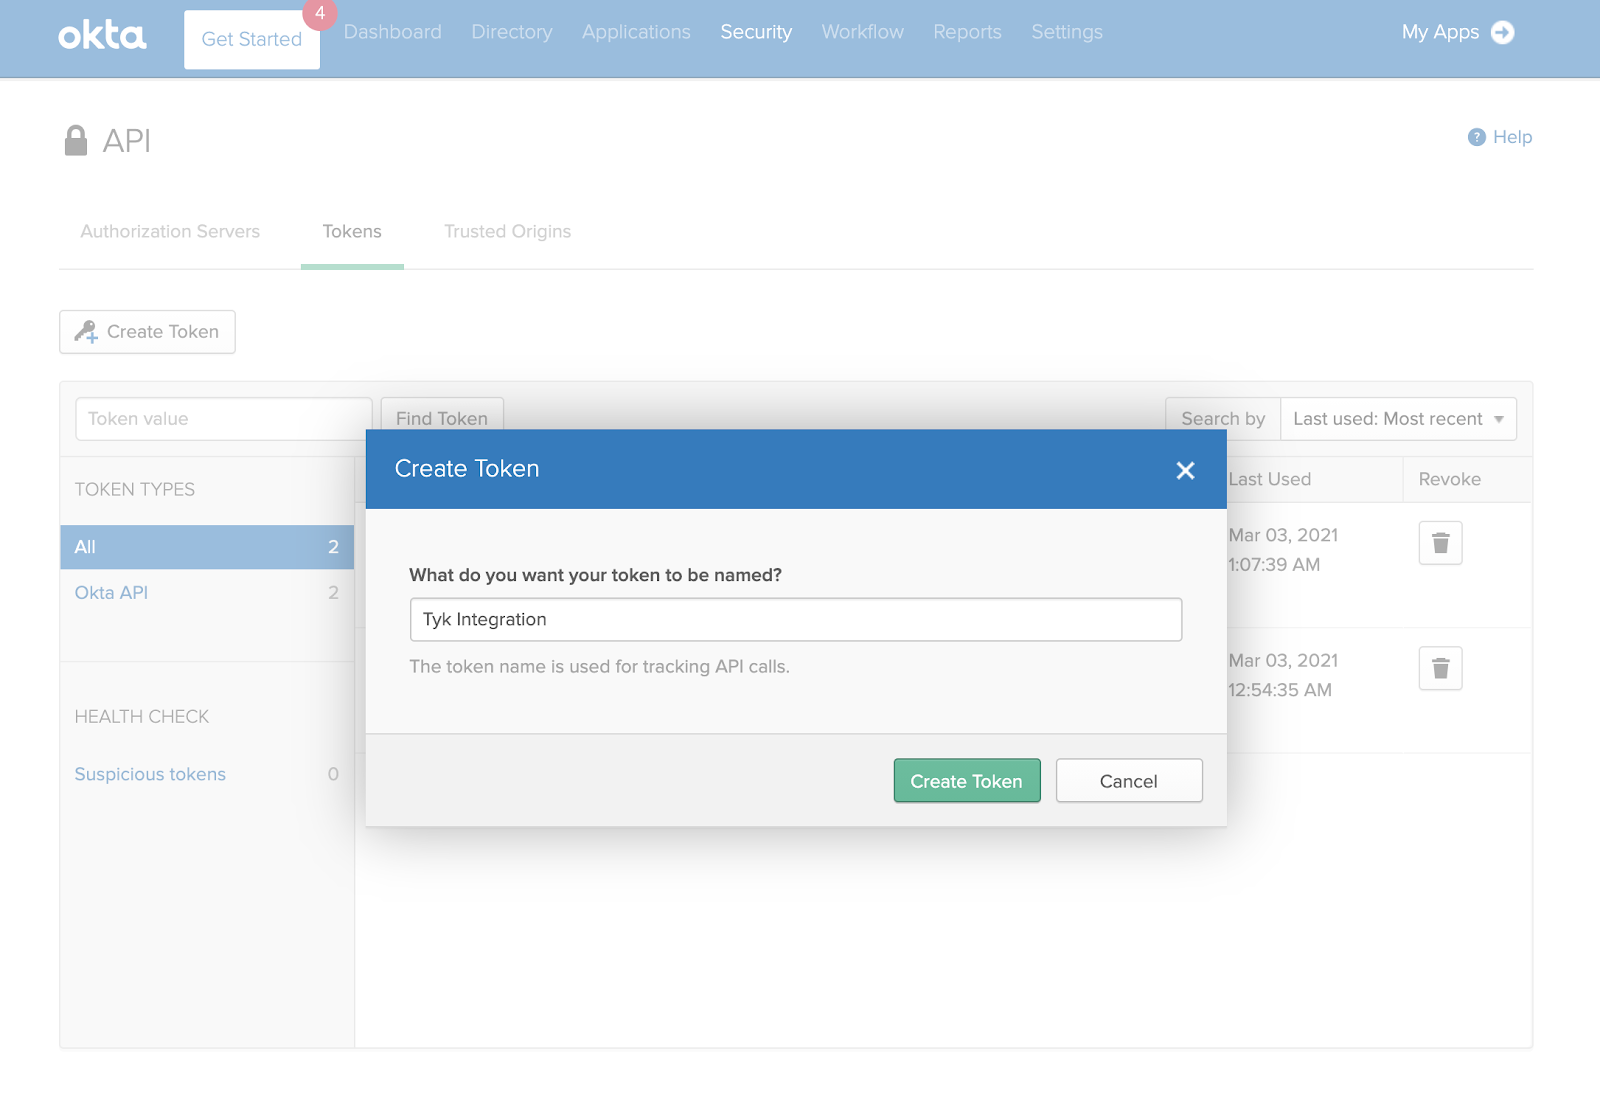 Click **Create Token**. Keep it safe as you'll use this token to configure Tyk.
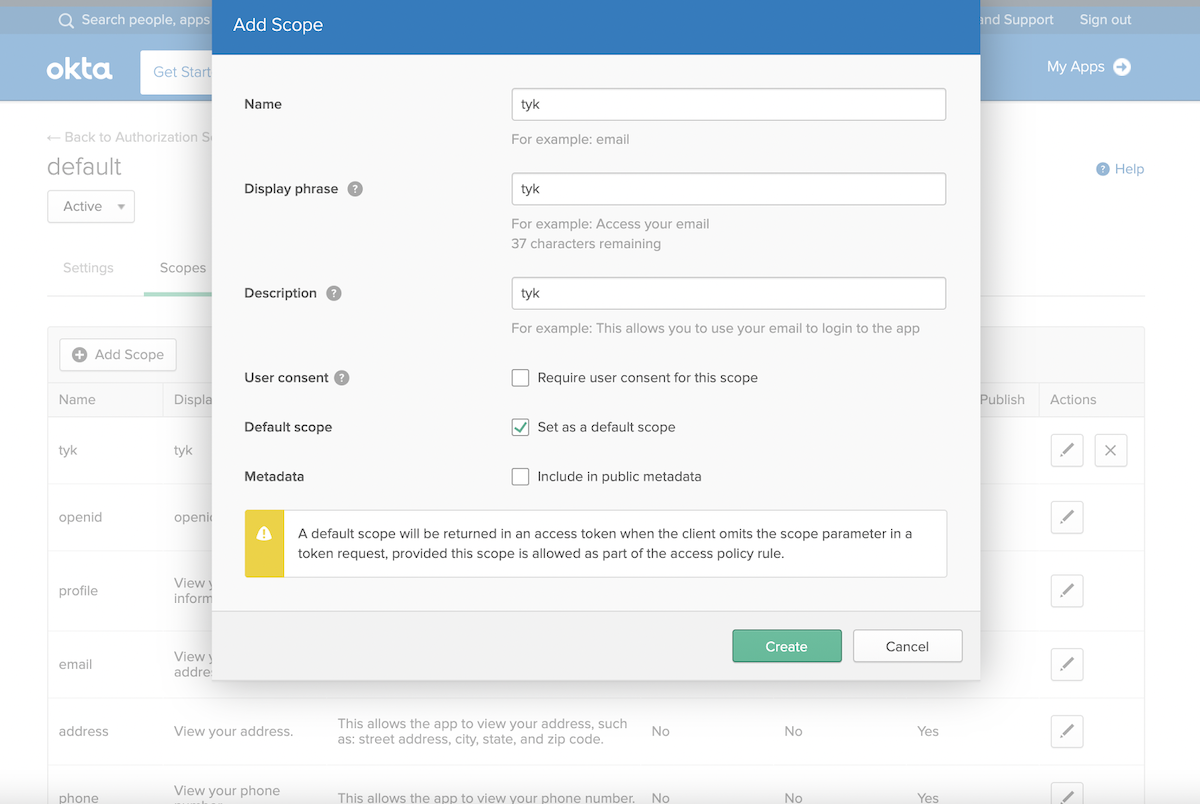
Next you need to create a scope, from the **Authorization servers** tab in the API section, click **Add Scope**. You need to select the **Set as default scope** option:
Click **Create Token**. Keep it safe as you'll use this token to configure Tyk.
Next you need to create a scope, from the **Authorization servers** tab in the API section, click **Add Scope**. You need to select the **Set as default scope** option:
 ### Setting up Tyk
Now you're ready to set up Tyk. For compatibility reasons, check your `tyk_analytics.conf` and make sure that a proper `oauth_redirect_uri_separator` parameter is set. You may use the following value:
```json theme={null}
"oauth_redirect_uri_separator": ";",
```
Remember to restart the service after applying the above change.
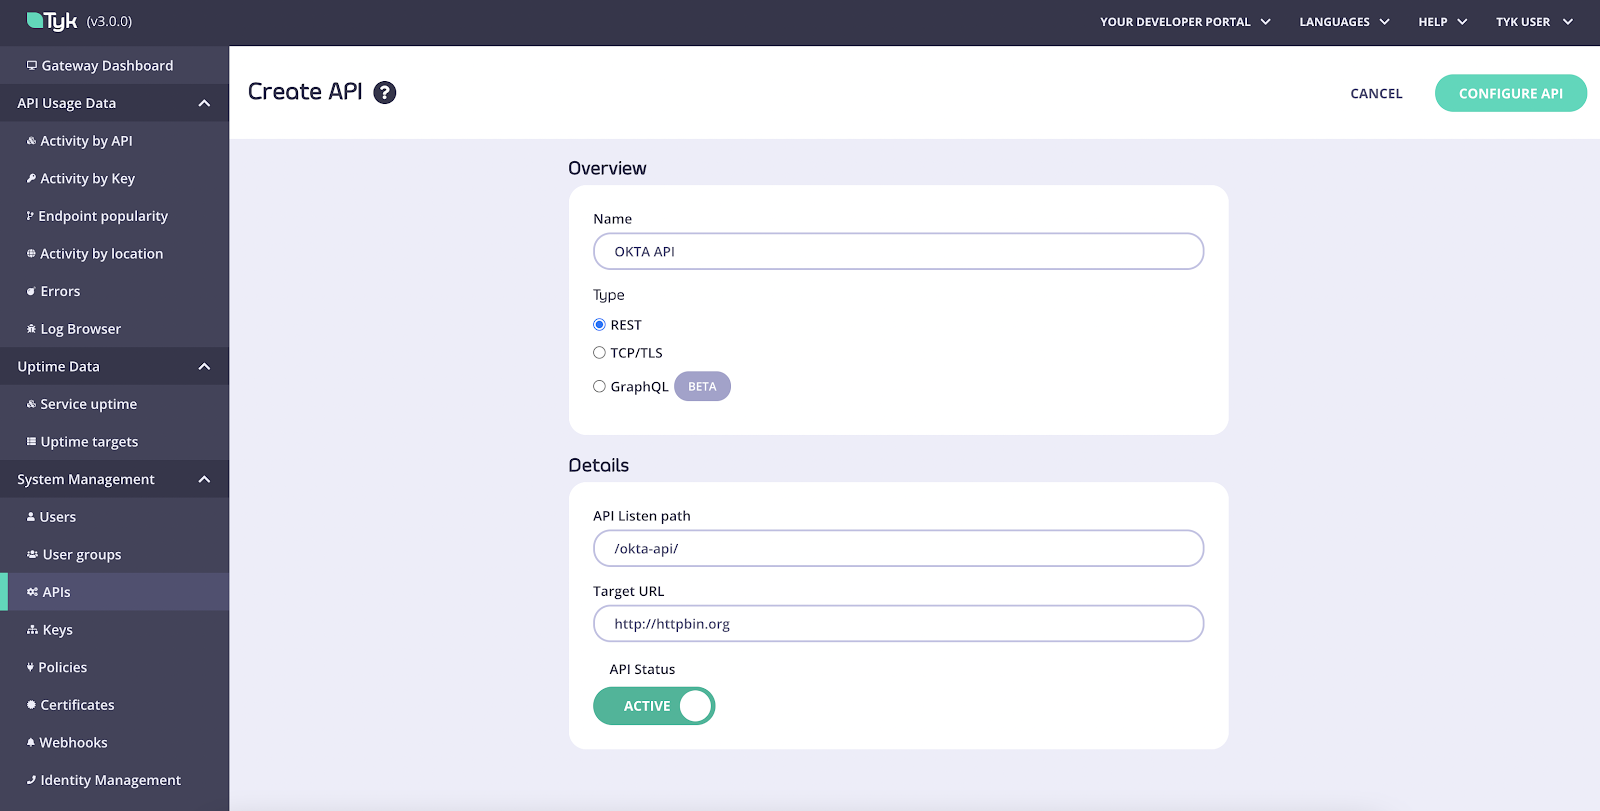
Now open the Tyk Dashboard and click **APIs** under **System Management**. Create a new API called "OKTA API":
### Setting up Tyk
Now you're ready to set up Tyk. For compatibility reasons, check your `tyk_analytics.conf` and make sure that a proper `oauth_redirect_uri_separator` parameter is set. You may use the following value:
```json theme={null}
"oauth_redirect_uri_separator": ";",
```
Remember to restart the service after applying the above change.
Now open the Tyk Dashboard and click **APIs** under **System Management**. Create a new API called "OKTA API":
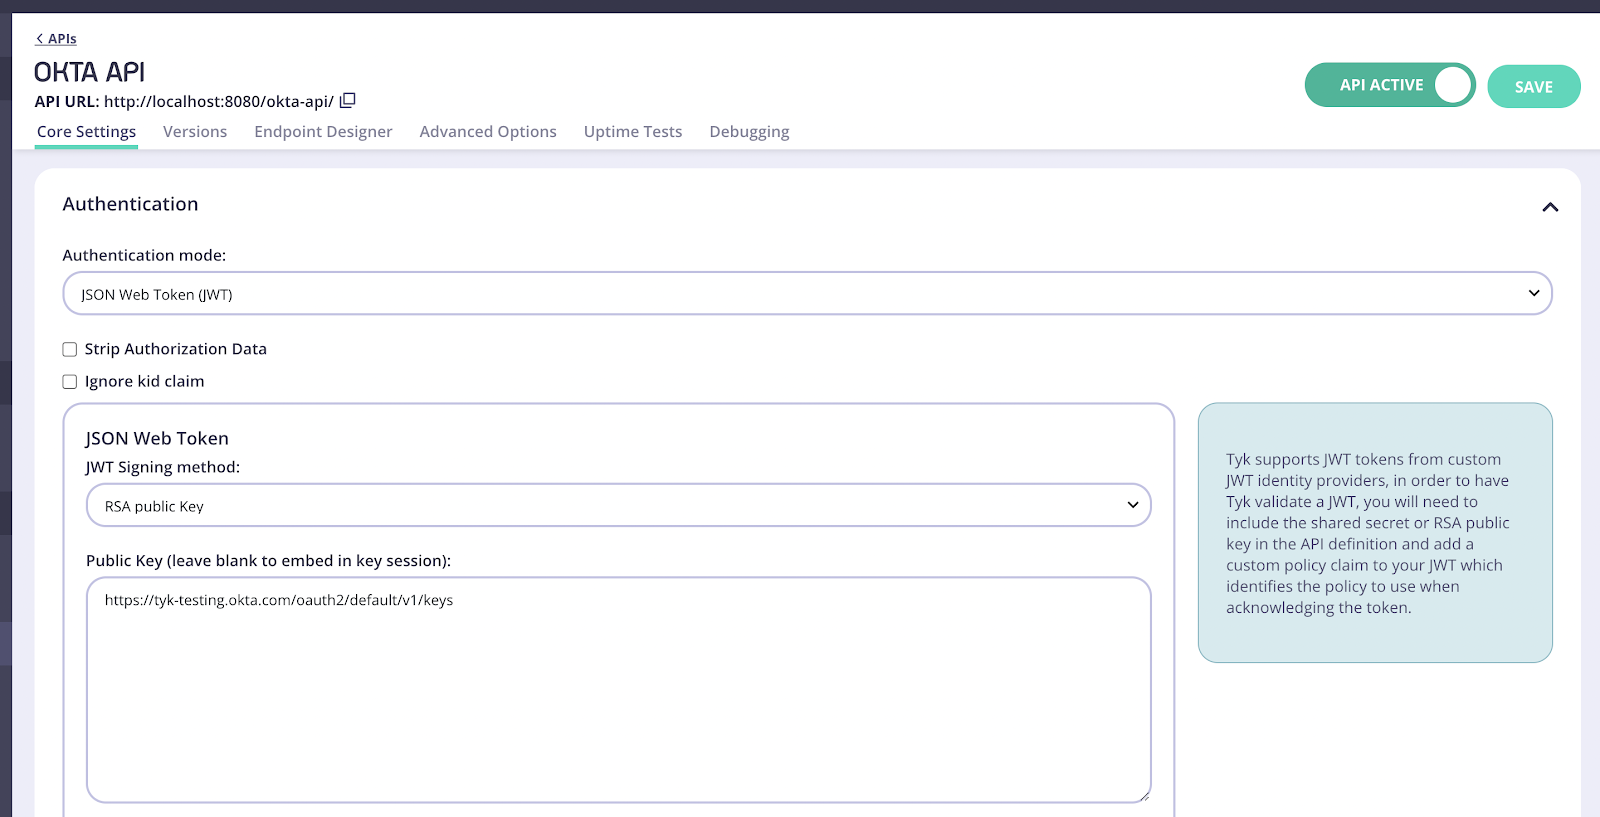
 Complete first part of the API creation form, then click **Configure API** and set the Authentication mode as in the image below:
 Where do I get the proper JWKS URI for my Keycloak environment?
From the OKTA Dashboard, open the **API** section under **Security**, take the base URL from the default Authorization Server and append the `/v1/keys` suffix, e.g. `https://tyk-testing.okta.com/oauth2/default/v1/keys`.
For the **Identity Source** field use `"sub"` and for **Policy Field Name** use `"pol"`.
1. Click **Save**
2. Select **Policies** under **System Management**
3. Click **Create a Policy** and call it **OKTA Policy**. Use the default values for this policy.
4. In the **Access rights** section, select your previously created **OKTA API**. You will also need to enter an expiration setting for your keys.
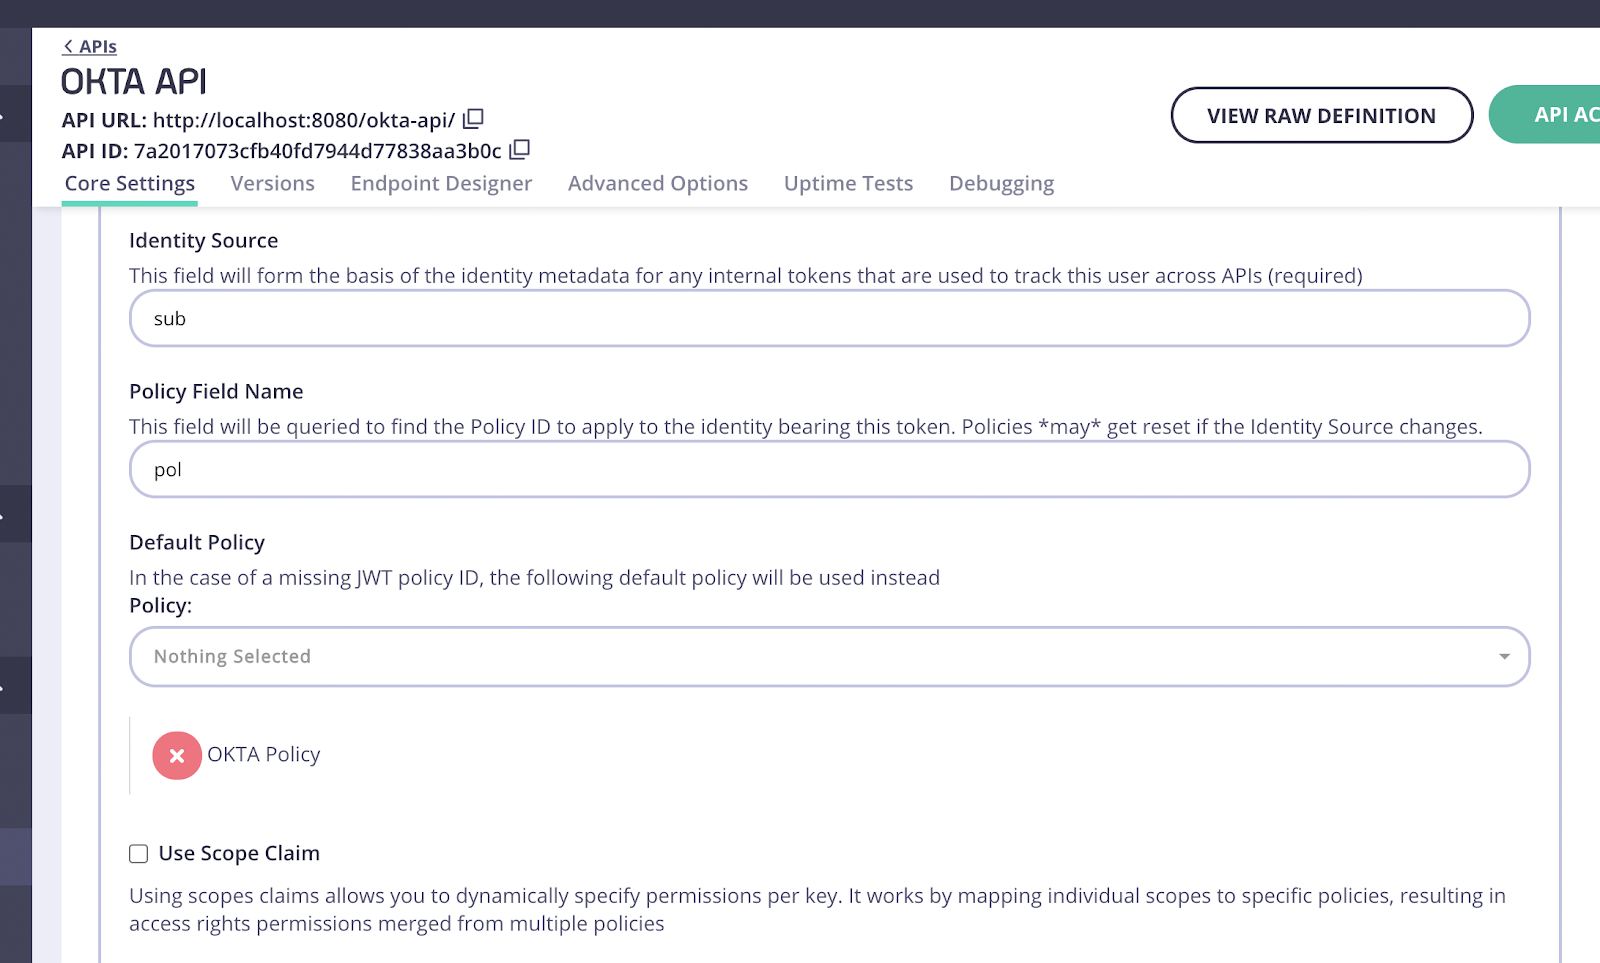
After the policy is created, switch back to the API settings and make sure that the API is using your **OKTA Policy** policy:
Where do I get the proper JWKS URI for my Keycloak environment?
From the OKTA Dashboard, open the **API** section under **Security**, take the base URL from the default Authorization Server and append the `/v1/keys` suffix, e.g. `https://tyk-testing.okta.com/oauth2/default/v1/keys`.
For the **Identity Source** field use `"sub"` and for **Policy Field Name** use `"pol"`.
1. Click **Save**
2. Select **Policies** under **System Management**
3. Click **Create a Policy** and call it **OKTA Policy**. Use the default values for this policy.
4. In the **Access rights** section, select your previously created **OKTA API**. You will also need to enter an expiration setting for your keys.
After the policy is created, switch back to the API settings and make sure that the API is using your **OKTA Policy** policy:
 Now you're ready to add this API to the Developer Portal.
1. Click **Catalog** under **Portal Management** on the navigation menu.
2. Click **Add New API**, enter a name for it and select the newly created policy. Again, you will use **OKTA API**:
Now you're ready to add this API to the Developer Portal.
1. Click **Catalog** under **Portal Management** on the navigation menu.
2. Click **Add New API**, enter a name for it and select the newly created policy. Again, you will use **OKTA API**:
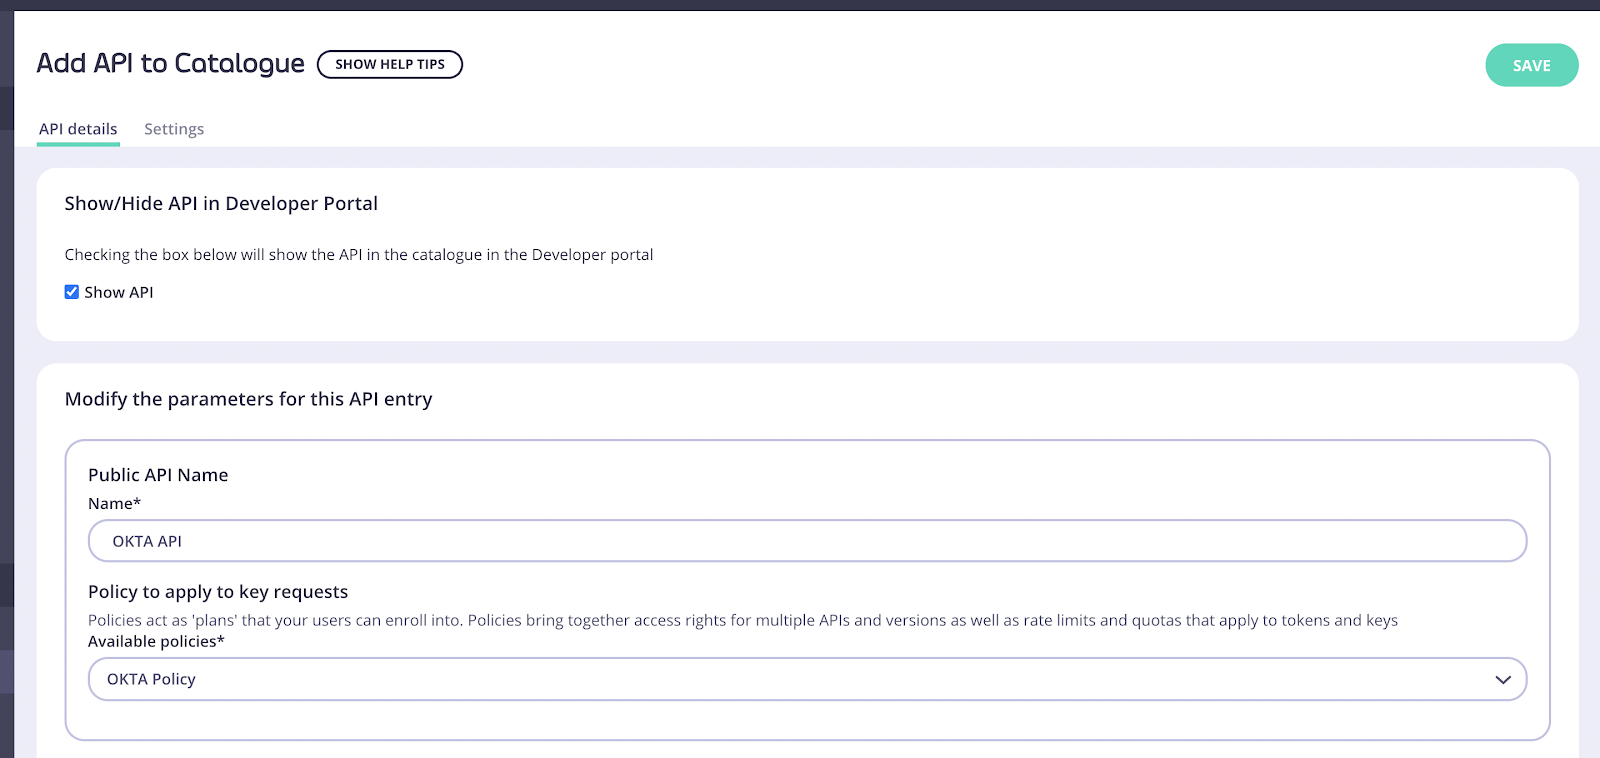 1. Click **Save** then open the API added again
2. Open the **Settings** tab.
3. In **API Details** select the **Override global settings** option.
Tyk lets you set global portal settings that apply to **all portal-listed APIs**, in this guide we assume you’re enabling and setting up DCR for a single API. In case you want to enable DCR for all the APIs, you should go to the **Settings** section under **Portal Management**, and in the **API Access** tab you can enter your DCR settings there.
4. Scroll down to the DCR section and enter the following settings:
1. Click **Save** then open the API added again
2. Open the **Settings** tab.
3. In **API Details** select the **Override global settings** option.
Tyk lets you set global portal settings that apply to **all portal-listed APIs**, in this guide we assume you’re enabling and setting up DCR for a single API. In case you want to enable DCR for all the APIs, you should go to the **Settings** section under **Portal Management**, and in the **API Access** tab you can enter your DCR settings there.
4. Scroll down to the DCR section and enter the following settings:
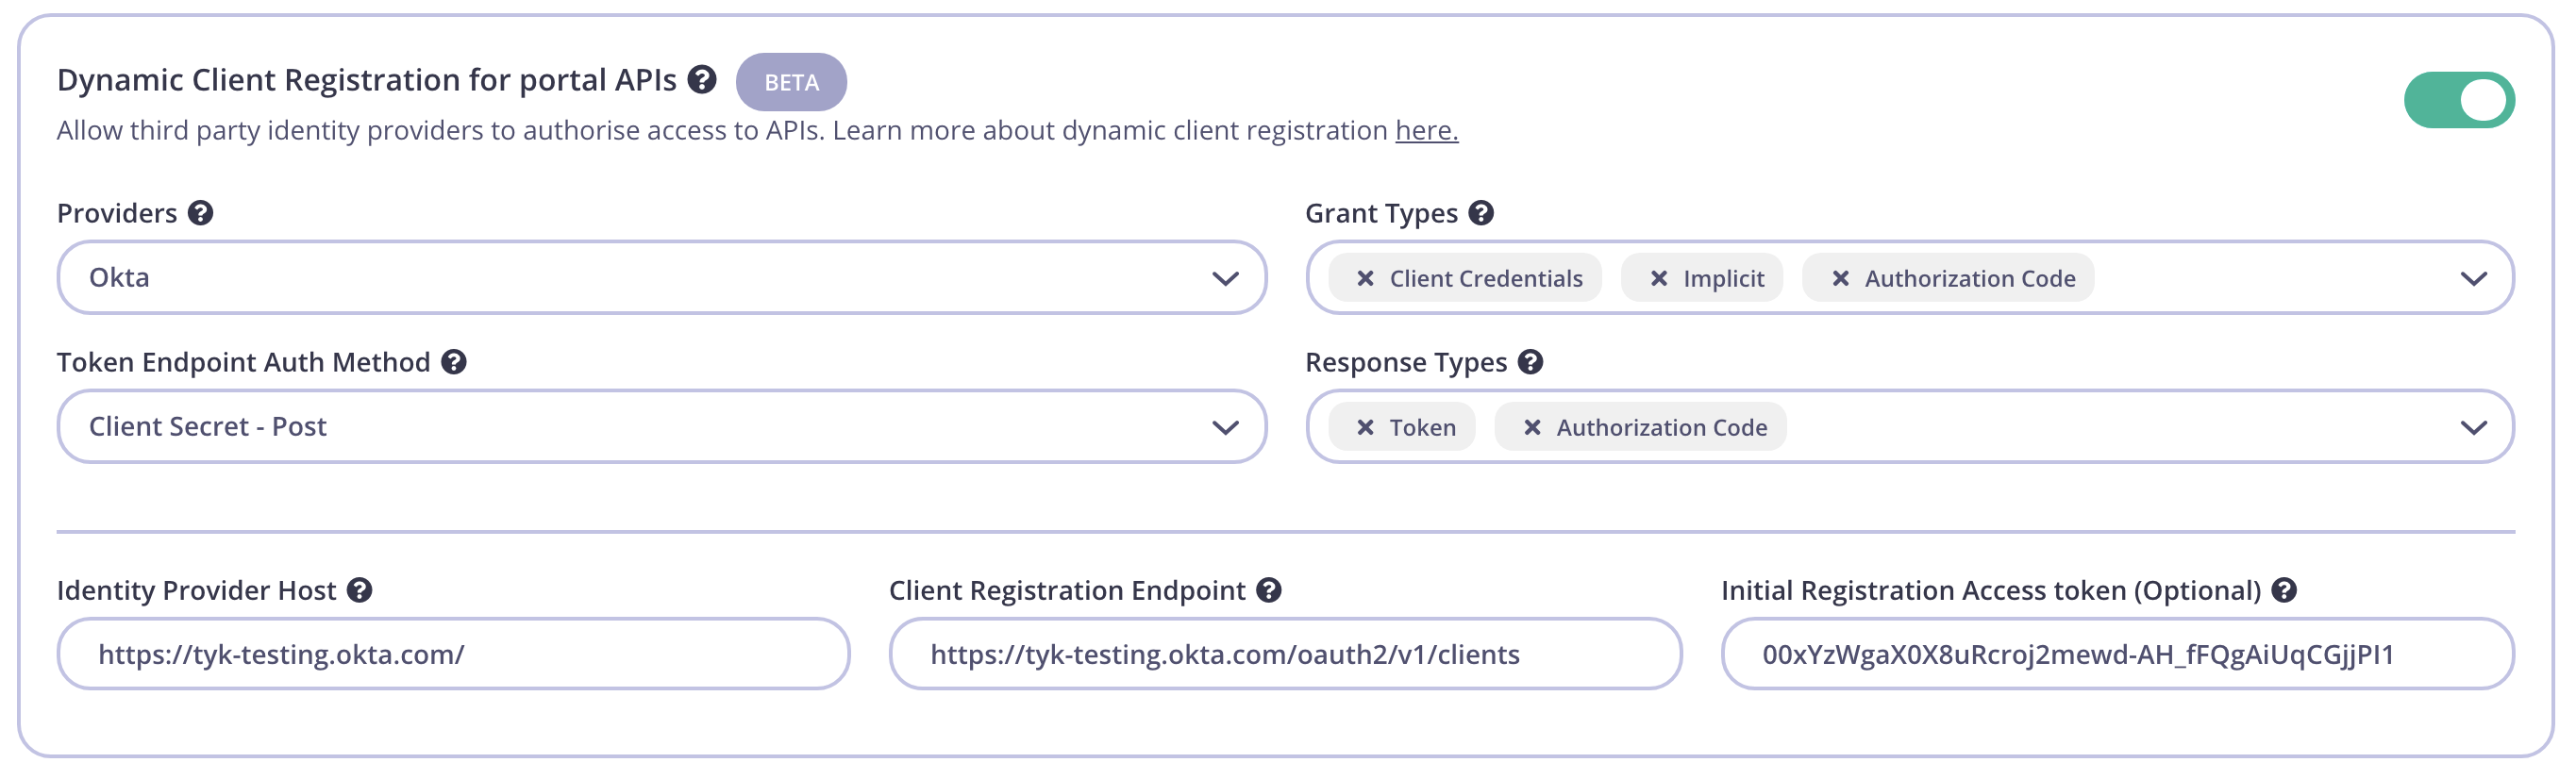 **Providers:** Different providers might implement the standard in slightly different ways, Tyk provides a specific driver for each one. For IDPs that aren’t on the list use the "Other" option. For this guide, pick "OKTA".
**Grant Types:** The grant types that will be used by the client. See the [specification](https://openid.net/specs/openid-connect-registration-1_0.html#rfc.section.2) for more details. You need to enter the following grant types:
* Client Credentials
* Implicit
* Authorization Code
**Token Endpoint Auth Method:** defines the way the client will authenticate against the token endpoint. Use "Client Secret - Post".
**Response Types:** OAuth 2.0 response types that will be used by the client. Set **Token**.
**Identity Provider Host:** Base IDP URL, e.g. `https://tyk-testing.okta.com/`
**Client Registration Endpoint:** OpenID Connect client registration endpoint. The value we use is `https://tyk-testing.okta.com/oauth2/v1/clients`
This value is found in your well-known discovery document as `registration_endpoint`. The well-known location URL is typically `https://tyk-testing.okta.com/.well-known/openid-configuration` (replace "tyk-testing" with your org.).
**Initial Registration Access Token:** the token that’s used to register new clients, this was generated in the early steps of the guide.
A note on grant types and response types in OKTA
It’s important to note that OKTA’s DCR endpoint supports a parameter called `"application_type"`, the application types aren’t standard across all IDPs, while the initial specification mentions `"native"` or `"web"` types, some IDPs implement their own. In the current implementation Tyk supports the usage of the `"web"` application type which is necessary in supporting the client credentials flow that’s described in this guide, as well as others, this is set automatically when OKTA is set as the provider. Currently, the ability to change the application type is available with the Enterprise Developer Portal.
### Testing the flow
Now that both Tyk and OKTA are ready we can test the complete flow.
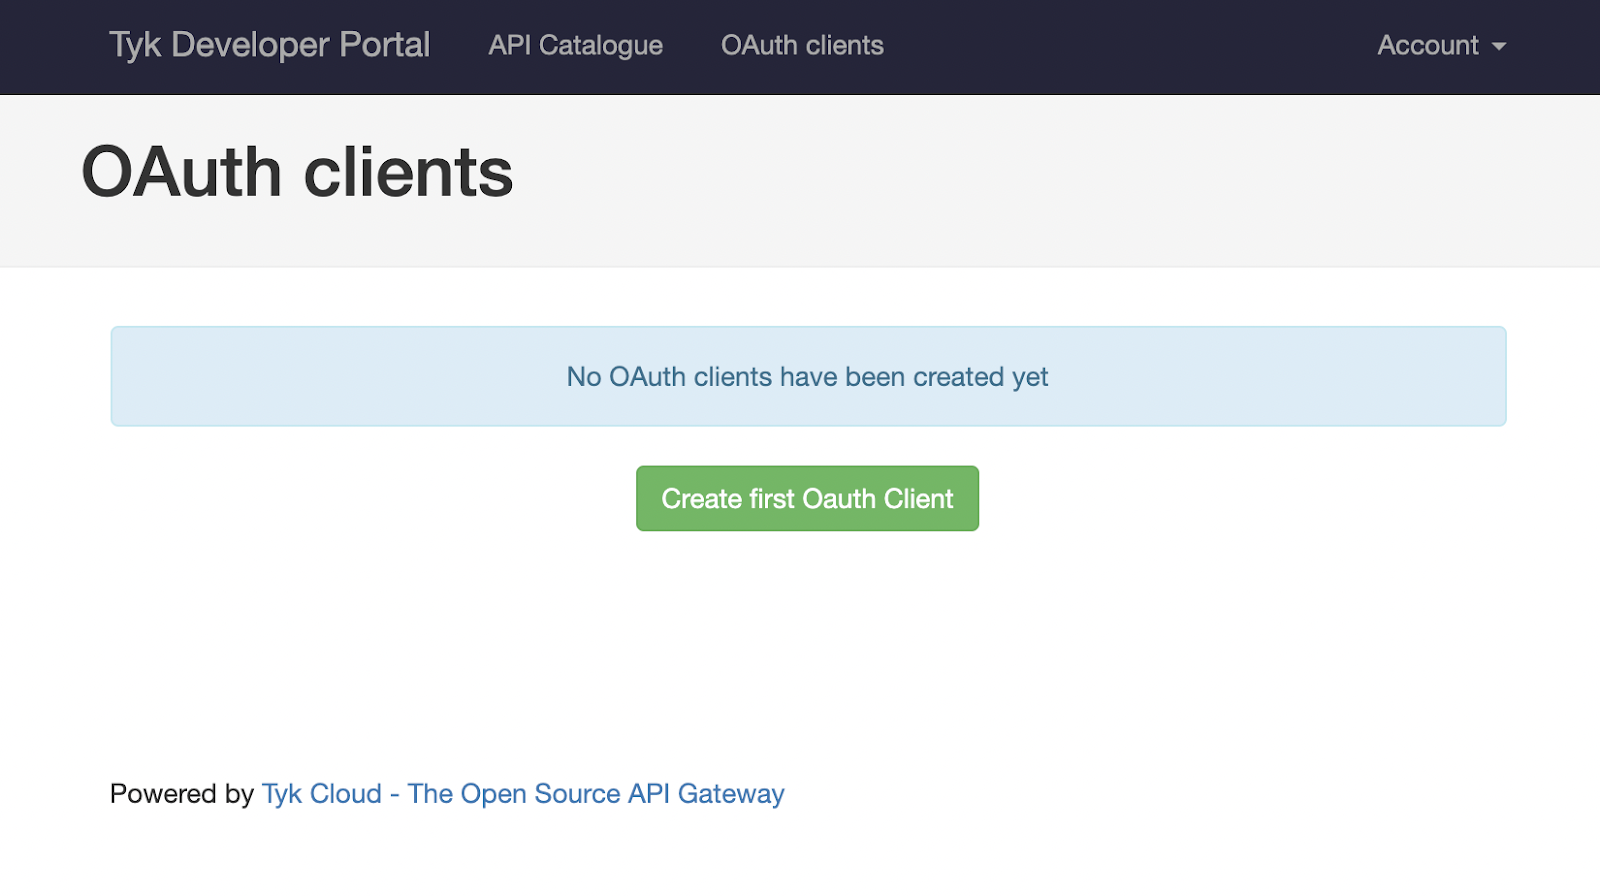
1. Click **Developers** under **Portal Management**
2. Click on **Add developer** and create a developer user.
After the developer is created, open your Developer Portal, click on the **OAuth Clients** navigation bar button and follow the wizard:
**Providers:** Different providers might implement the standard in slightly different ways, Tyk provides a specific driver for each one. For IDPs that aren’t on the list use the "Other" option. For this guide, pick "OKTA".
**Grant Types:** The grant types that will be used by the client. See the [specification](https://openid.net/specs/openid-connect-registration-1_0.html#rfc.section.2) for more details. You need to enter the following grant types:
* Client Credentials
* Implicit
* Authorization Code
**Token Endpoint Auth Method:** defines the way the client will authenticate against the token endpoint. Use "Client Secret - Post".
**Response Types:** OAuth 2.0 response types that will be used by the client. Set **Token**.
**Identity Provider Host:** Base IDP URL, e.g. `https://tyk-testing.okta.com/`
**Client Registration Endpoint:** OpenID Connect client registration endpoint. The value we use is `https://tyk-testing.okta.com/oauth2/v1/clients`
This value is found in your well-known discovery document as `registration_endpoint`. The well-known location URL is typically `https://tyk-testing.okta.com/.well-known/openid-configuration` (replace "tyk-testing" with your org.).
**Initial Registration Access Token:** the token that’s used to register new clients, this was generated in the early steps of the guide.
A note on grant types and response types in OKTA
It’s important to note that OKTA’s DCR endpoint supports a parameter called `"application_type"`, the application types aren’t standard across all IDPs, while the initial specification mentions `"native"` or `"web"` types, some IDPs implement their own. In the current implementation Tyk supports the usage of the `"web"` application type which is necessary in supporting the client credentials flow that’s described in this guide, as well as others, this is set automatically when OKTA is set as the provider. Currently, the ability to change the application type is available with the Enterprise Developer Portal.
### Testing the flow
Now that both Tyk and OKTA are ready we can test the complete flow.
1. Click **Developers** under **Portal Management**
2. Click on **Add developer** and create a developer user.
After the developer is created, open your Developer Portal, click on the **OAuth Clients** navigation bar button and follow the wizard:
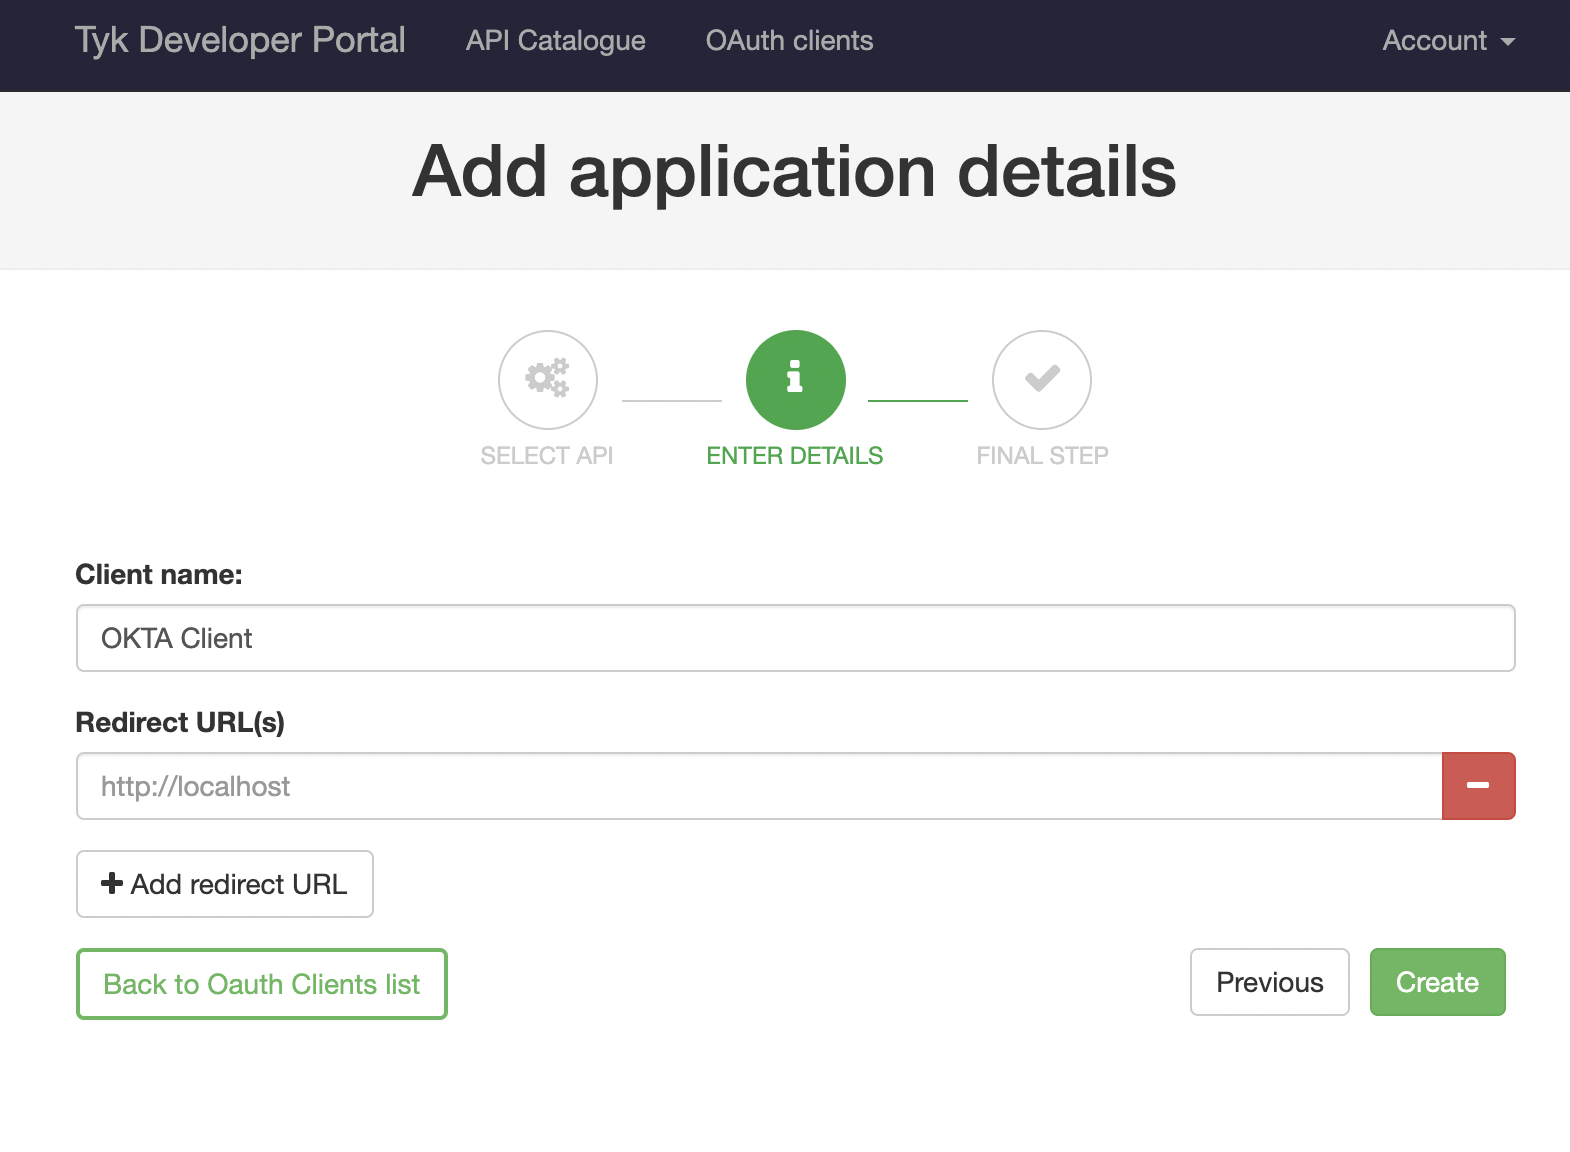
 Click **Create first OAuth Client**. You’ll see your previously created **OKTA API**, select it and click **Save and continue**. The following screen will require you to enter a client name. It’s also possible to set redirect URLs if you also plan to use this client for other flow types. This setting can be left blank for the purposes of this guide.
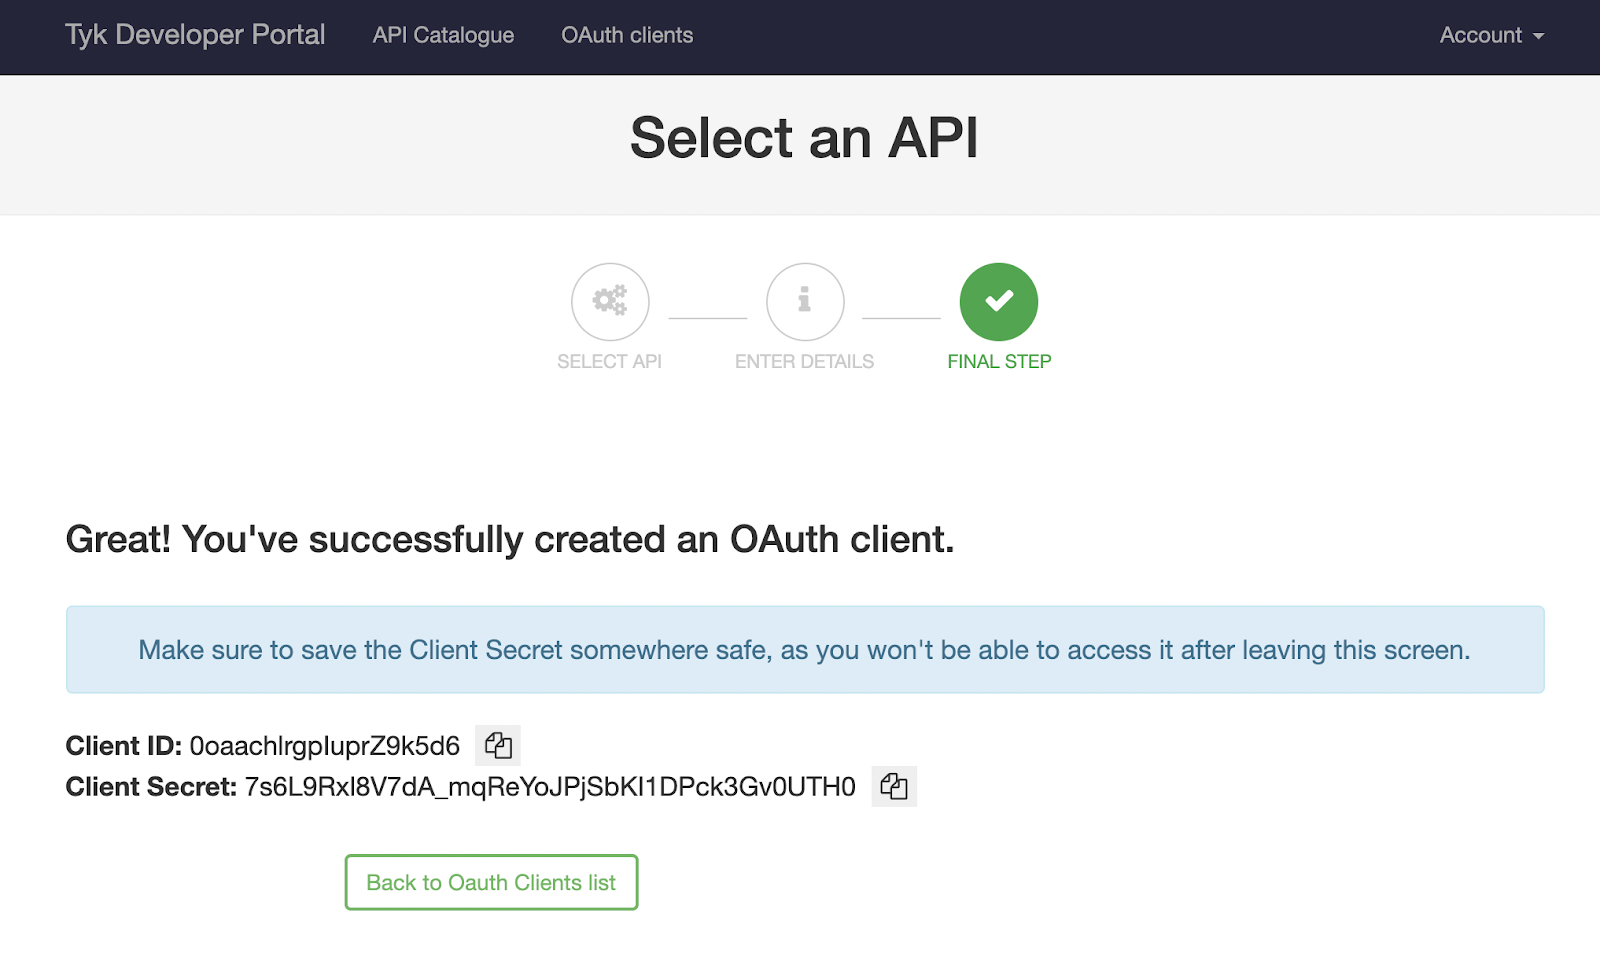
 Once you click **Create**, Tyk will trigger a registration on your IDP and the details of your client will be displayed:
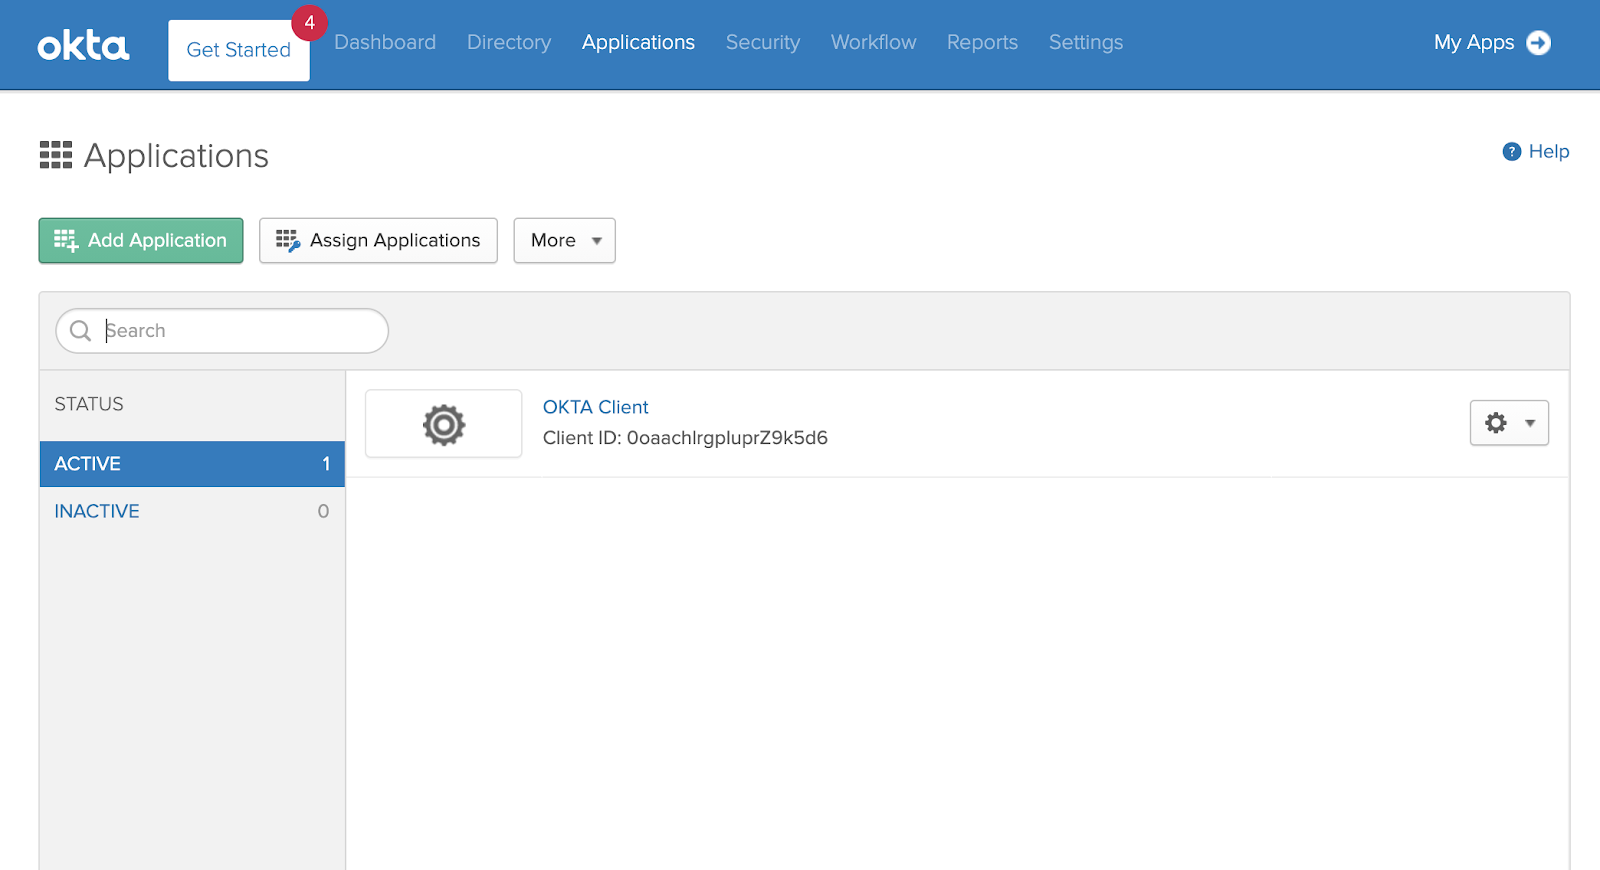
 If you check the OKTA dashboard you will see this client too:
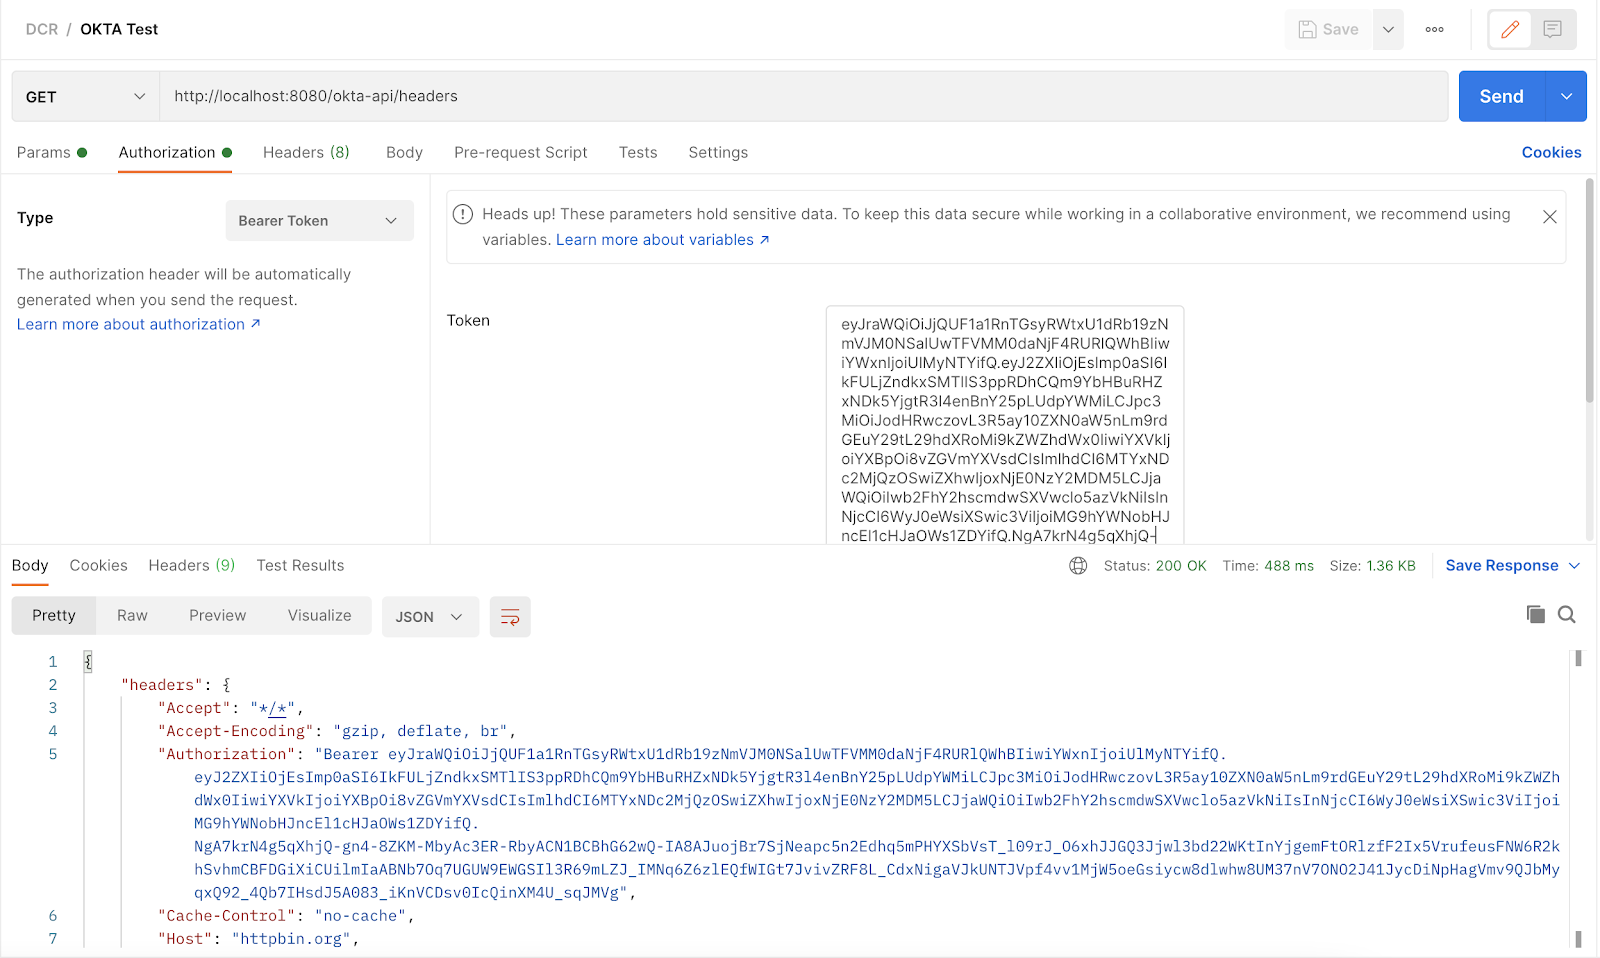
 The next step is to generate a token and use it for accessing our **OKTA API**. We'll use Postman for this. You will need your token URL which is also the well-known URL for your organization.
For this guide you'll use `https://[org].okta.com/oauth2/default/v1/token`
Your Postman request should contain the following body, where `"client_id"` and `"client_secret"` are the credentials you got from the developer portal:
The next step is to generate a token and use it for accessing our **OKTA API**. We'll use Postman for this. You will need your token URL which is also the well-known URL for your organization.
For this guide you'll use `https://[org].okta.com/oauth2/default/v1/token`
Your Postman request should contain the following body, where `"client_id"` and `"client_secret"` are the credentials you got from the developer portal:
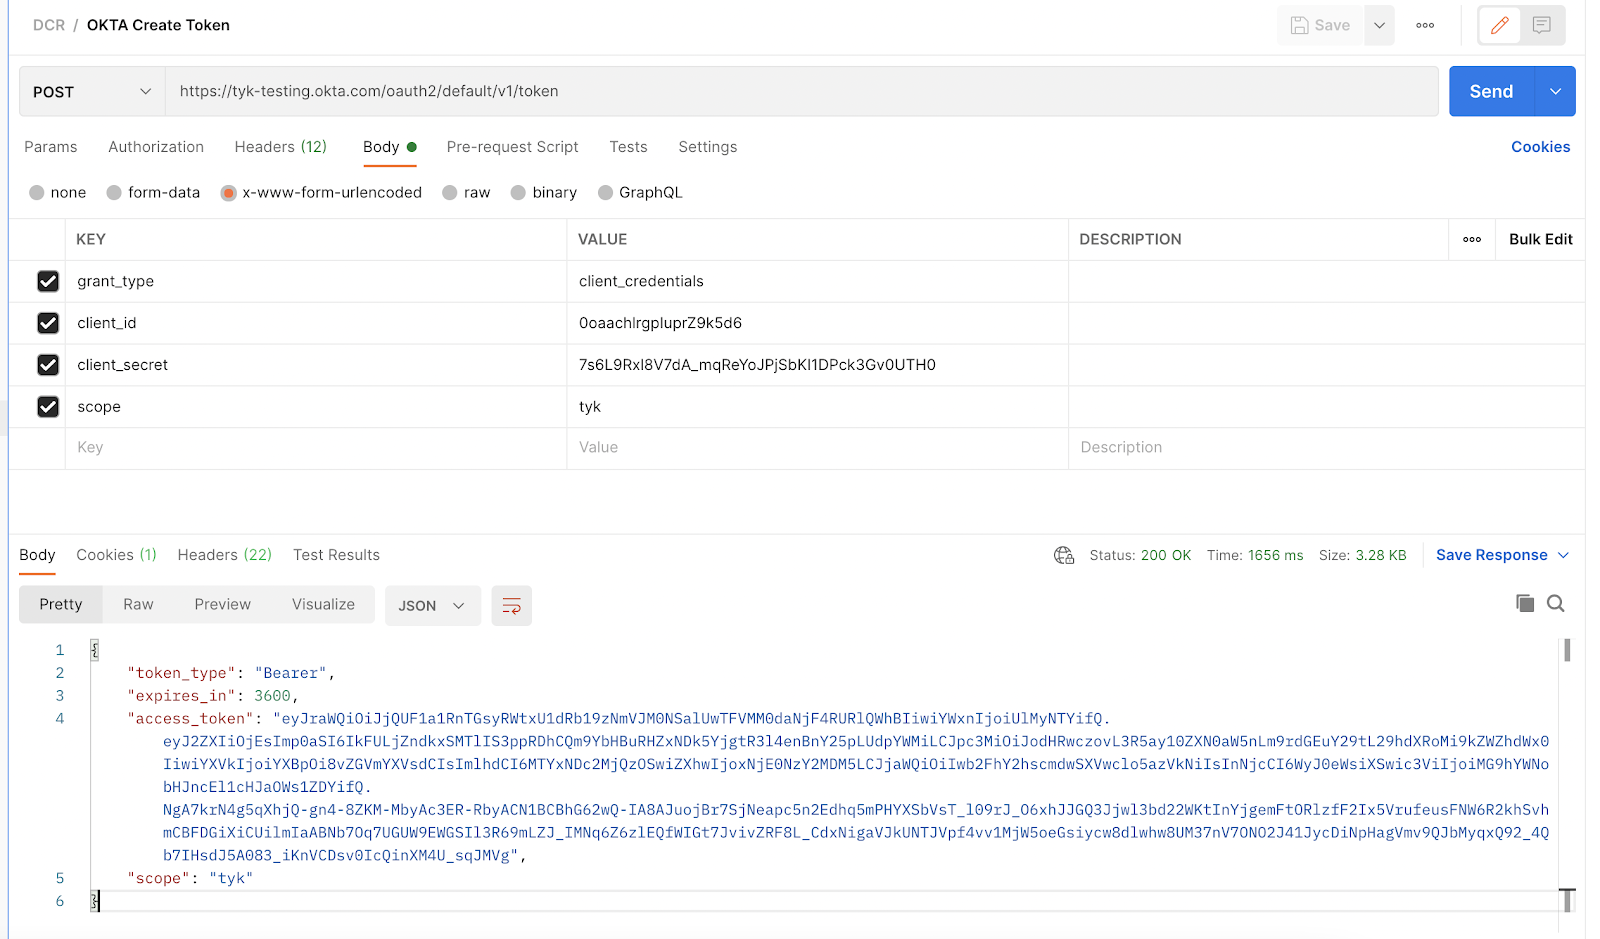 Note that we aren’t using any additional header for this request, the client credentials are enough. We’re also passing our previously created `"tyk"` scope as value.
Once we get a response from the IDP, we can copy the `"access_token"` and use it to access our **OKTA API**, this request will be proxied by Tyk:
Note that we aren’t using any additional header for this request, the client credentials are enough. We’re also passing our previously created `"tyk"` scope as value.
Once we get a response from the IDP, we can copy the `"access_token"` and use it to access our **OKTA API**, this request will be proxied by Tyk: