Overview
Tyk Streams is a feature of the Tyk API management platform that enables organizations to securely expose, manage and monetize real-time event streams and asynchronous APIs. With Tyk Streams, you can easily connect to event brokers and streaming platforms, such as Apache Kafka, and expose them as managed API endpoints for internal and external consumers.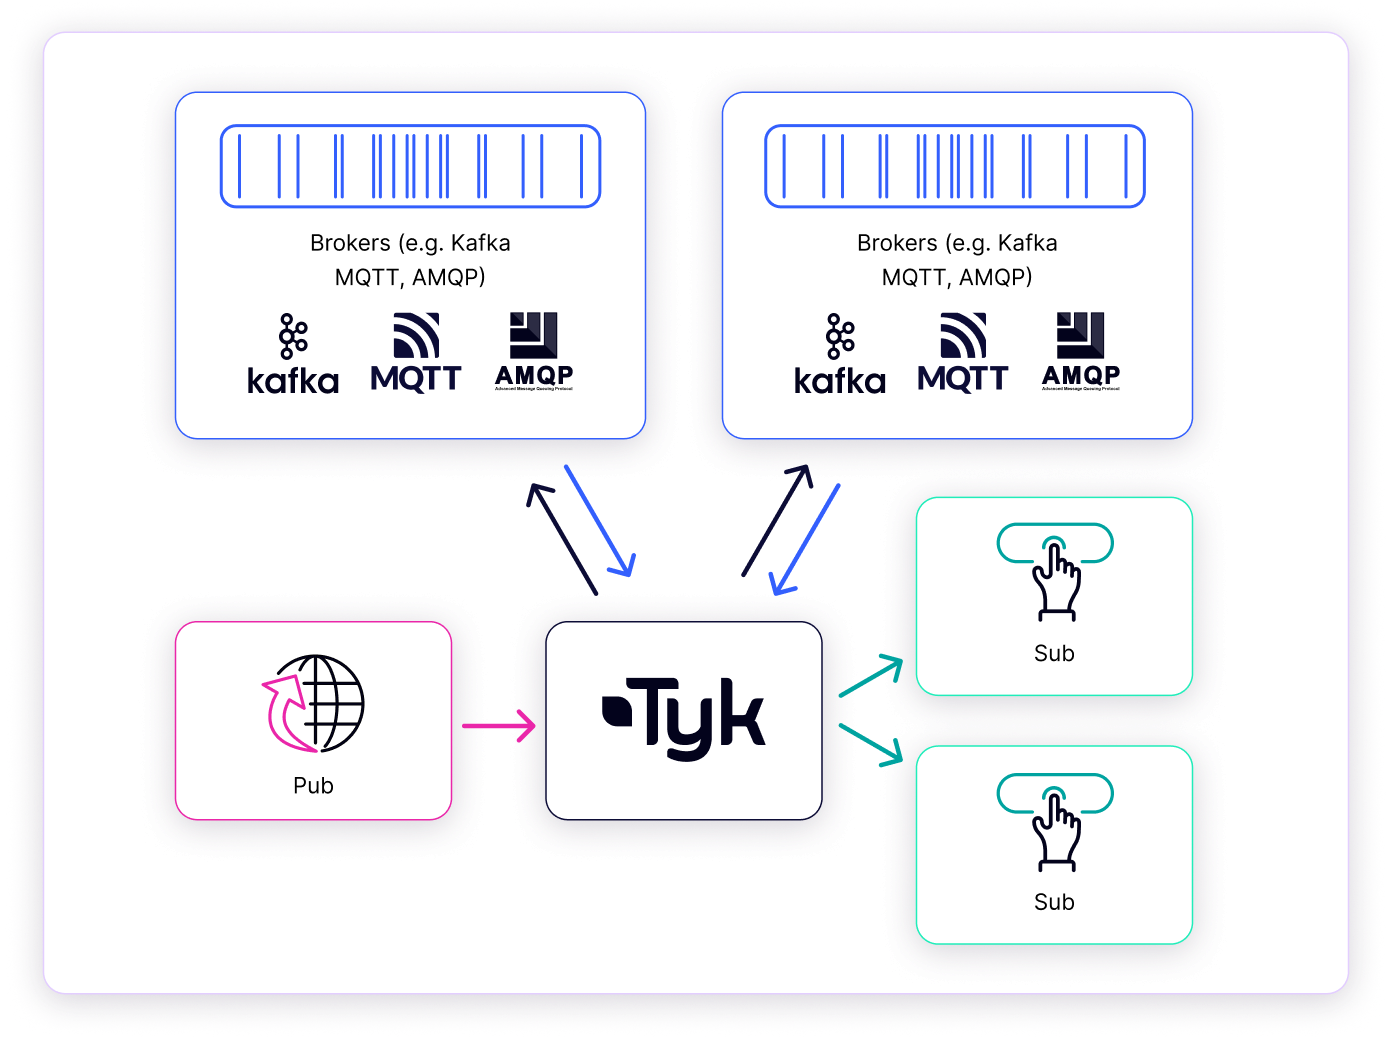
Why use Tyk Streams
Tyk Stream is a powerful stream processing engine integrated into the Tyk API Gateway, available as part of the Enterprise Edition. It allows you to manage asynchronous APIs and event streams as part of your API ecosystem. It provides a range of capabilities to support async API management, including:- Protocol Mediation: Tyk Streams can mediate between different asynchronous protocols and API styles, such as WebSocket, Server-Sent Events (SSE), and Webhooks. This allows you to expose your event streams in a format compatible with your consumers’ requirements.
- Security: Apply the same security policies and controls to your async APIs as you do to your synchronous APIs. This includes features like authentication and authorization.
- Transformations: Transform and enrich your event data on the fly using Tyk’s powerful middleware and plugin system. This allows you to adapt your event streams to meet the needs of different consumers.
- Analytics: Monitor the usage and performance of your async APIs with detailed analytics and reporting. Gain insights into consumer behavior and system health.
- Developer Portal: Publish your async APIs to the Tyk Developer Portal, which provides a centralised catalog for discovery, documentation, and subscription management.
Getting Started
This guide will help you implement your first event-driven API with Tyk in under 15 minutes. To illustrate the capabilities of Tyk Streams, let’s consider an example: building a basic asynchronous chat application, nicknamed Chat Jippity. In this scenario, a user sends a message (e.g., asking for a joke) via a simple web interface and receives an asynchronous response generated by a backend service. This application flow demonstrates two key patterns enabled by Tyk Streams: acting as an API Producer Gateway and an API Consumer Gateway. Let’s break down how Tyk Streams facilitates this, focusing on the distinct producer and consumer roles Tyk plays:Example Scenario
Tyk as an API Producer Gateway (Client to Stream)
- Goal: Allow a client (like a browser or a script) to easily send a message into our asynchronous system without needing direct access or knowledge of the backend message broker (Kafka in this case).
- Scenario: The user types “Tell me a joke” into the chat interface and hits send.
- Flow:
- The browser sends a standard HTTP
POSTrequest to an endpoint exposed by Tyk Gateway (e.g.,/chat). - Tyk Streams Role (Producer): Tyk Gateway receives this
POSTrequest. An API definition configured with Tyk Streams defines this endpoint as an input. Tyk takes the request payload and publishes it as a message onto a designated backend topic (e.g., thechattopic in Kafka). - A backend service (our “Joker Service”) listens to the
chattopic for incoming requests.
- The browser sends a standard HTTP
- Value Demonstrated:
- Protocol Bridging: Tyk translates a synchronous HTTP POST into an asynchronous Kafka message.
- Decoupling: The browser only needs to know the Tyk HTTP endpoint, not the Kafka details (brokers, topic name, protocol).
- API Management: Tyk can enforce authentication, rate limits, etc., on the
/chatendpoint before the message even enters the Kafka system.
Tyk as an API Consumer Gateway (Stream to Client)
- Goal: Deliver the asynchronous response (the joke) from the backend system to the client in real time.
- Scenario: The “Joker Service” has processed the request and generated a joke. It needs to send this back to the originating user’s browser session.
-
Flow:
- The Joker Service publishes the joke response as a message onto a different backend topic (e.g., the
discussiontopic in Kafka). - Tyk Streams Role (Consumer): Tyk Gateway is configured via another (or the same) API definition to subscribe to the
discussiontopic. - When Tyk receives a message from the
discussiontopic, it pushes the message content (the joke) to the appropriate client(s) (provided they have already established a connection) using a suitable real-time protocol like Server-Sent Events (SSE) or WebSockets. Note: In case of multiple clients, events would round-robin amongst the consumers.
- The Joker Service publishes the joke response as a message onto a different backend topic (e.g., the
-
Value Demonstrated:
- Protocol Bridging: Tyk translates Kafka messages into SSE messages suitable for web clients.
- Decoupling: The browser doesn’t need a Kafka client; it uses standard web protocols (SSE/WS) provided by Tyk. The Joker Service only needs to publish to Kafka, unaware of the final client protocol.
Prerequisites
- Docker: We will run the entire Tyk Stack on Docker. For installation, refer to this guide.
- Git: A CLI tool to work with git repositories. For installation, refer to this guide
- Dashboard License: We will configure Streams API using Dashboard. Contact our team to obtain a license or get self-managed trial license by completing the registration on our website
- Curl and JQ: These tools will be used for testing.
Instructions
-
Clone Git Repository:
The tyk-demo repository offers a docker-compose environment you can run locally to explore Tyk streams. Open your terminal and clone the git repository using the command below.
-
Enable Tyk Streams:
By default, Tyk Streams is disabled. To enable Tyk Streams in the Gateway and Dashboard, you need to configure the following settings:
Create an
.envfile and populate it with the values below:DASHBOARD_LICENCE: Add your license key. Contact our team to obtain a license.GATEWAY_IMAGE_REPO: Tyk Streams is available as part of the Enterprise Edition of the Gateway.TYK_DB_STREAMING_ENABLEDandTYK_GW_STREAMING_ENABLED: These must be set totrueto enable Tyk Streams in the Dashboard and Gateway, respectively. Refer to the configuration options for more details.
-
Start Tyk Streams
Execute the following command:
This process will take a few minutes to complete and will display some credentials upon completion. Copy the Dashboard username, password, and API key, and save them for later use.This script also starts
Kafkawithin a Docker container, which is necessary for this guide. - Verify Setup: Open Tyk Dashboard in your browser by visiting http://localhost:3000 or http://tyk-dashboard.localhost:3000 and login with the provided admin credentials.
-
Create Producer API:
Create a file
producer.jsonwith the below content: (Note:tyk-demo-kafka-1is the hostname used to access Kafka running in a container; alternatively, you can use the IP address assigned to your computer.) Create the API by executing the following command. Be sure to replace<your-api-key>with the API key you saved earlier:You should expect a response similar to the one shown below, indicating success. Note that the Meta and ID values will be different each time: -
Create Consumer API:
Create a file
consumer.jsonwith the below content: (Note:tyk-demo-kafka-1is the hostname used to access Kafka running in a container; alternatively, you can use the IP address assigned to your computer.) Create the API by executing the following command. Be sure to replace<your-api-key>with the API key you saved earlier:You should expect a response similar to the one shown below, indicating success. Note that the Meta and ID values will be different each time: -
Start Joker Service:
Create a file
joker-service.shwith the below content: Make the file executable and start the service. -
Test the API:
Open a terminal and execute the following command to start listening for messages from the Consumer API you created:
In a second terminal, execute the command below to send a message to the Producer API. You can run this command multiple times and modify the message to send different messages:Now, you will see the message appear in the terminal window where you are listening for messages.
How It Works
Tyk Streams seamlessly integrates with the Tyk API Gateway, extending its capabilities beyond traditional synchronous request/response patterns to natively support asynchronous APIs and event-driven architectures. This section details the architecture, components, and request processing flow of Tyk Streams.High-Level Architecture
At a high level, Tyk Streams operates within the Tyk ecosystem, interacting with several key elements:- Tyk API Gateway: The core API management platform. It is the entry point, handling initial request processing (like authentication and rate limiting) and routing requests.
- Tyk Streams Module: An integrated extension within the Gateway designed explicitly for asynchronous communication. It intercepts relevant requests and manages the streaming logic.
- Event Brokers / Sources: External systems that act as the origin or destination for data streams. Examples include Apache Kafka, NATS, MQTT brokers, or WebSocket servers. Tyk Streams connects to these systems based on API configuration.
- Upstream Services / APIs: The backend systems, microservices, or APIs that ultimately produce or consume the data being streamed or processed via Tyk Streams.
Internal Components of Tyk Streams
To manage these asynchronous interactions, the Tyk Streams module relies on several internal components operating within the Gateway:- Stream Middleware: This component plugs into the Tyk Gateway’s request processing chain. It runs after standard middleware like authentication and rate limiting but before the request would normally be proxied. Its job is to inspect incoming requests, identify if they match a configured stream path, and if so, divert them from the standard proxy flow into the stream handling logic.
- Stream Manager: Acts as the supervisor for streaming operations defined in an API. A given stream configuration is responsible for initializing, managing the lifecycle (starting/stopping), and coordinating the necessary
Stream Instances. It ensures the correct streaming infrastructure is ready based on the API definition. - Stream Instance: Represents a running, active instance of a specific stream processing task. Each instance executes the logic defined in its configuration – connecting to an event broker, processing messages, transforming data, handling connections, etc. There can be multiple instances depending on the configuration and workload.
- Stream Analytics: This component captures connection attempts and errors related to HTTP outputs. This data can be exported to popular analytics platforms like Prometheus, OpenTelemetry, and StatsD.
Request Processing Flow
Understanding how these components work together is key. Here’s the typical flow when a request interacts with a Tyk Streams-enabled API endpoint:- Request Arrival & Gateway Pre-processing: A client sends a request to an API endpoint managed by Tyk Gateway. The request passes through the initial middleware, such as authentication, key validation, and rate limiting.
- Streaming Middleware Interception: The request reaches the
Stream Middleware. It checks the request path against the stream routes defined in the API configuration. - Path Matching:
- If No Match: The
Stream Middlewarewill respond with a404 Not Foundstatus code. - If Match: The request is intended for a stream. The
Stream Middlewaretakes control of the request handling.
- If No Match: The
- Stream Manager Coordination: The middleware interacts with the
Stream Managerassociated with the API’s stream configuration. TheStream Managerensures the requiredStream Instance(s) are initialized and running based on the loaded configuration. This might involve creating a new instance or reusing a cached one. - Stream Instance Execution: The instance then executes its defined logic, interacting with the configured
Upstream Service / Event Broker(e.g., publishing a message to Kafka, subscribing to an MQTT topic, forwarding data over a WebSocket). - Analytics Capture: The
Stream Analyticscomponent captures relevant metrics throughout the stream handling process. - Final Gateway Response: The response or data stream generated by the streaming components is relayed back through the Gateway to the originating client.
Scaling and Availability
The beauty of Tyk Streams is that it’s baked into the Tyk Gateway, so it scales naturally as your API traffic ramps up—no extra setup or separate systems required. It’s efficient too, reusing the same resources as the Gateway to keep things lean.Configuration Options
Configuring Tyk Streams involves two distinct levels:- System-Level Configuration: Enabling the Streams functionality globally within your Tyk Gateway and Tyk Dashboard instances. This activates the necessary components but doesn’t define any specific streams.
- API-Level Configuration: Defining the actual stream behaviors (inputs, outputs, processing logic) within a specific Tyk OAS API Definition using the
x-tyk-streamingextension. This is where you specify how data flows for a particular asynchronous API.
System-Level Configuration
Before you can define streams in your APIs, you must enable the core Streams feature in both the Tyk Gateway and, if you’re using it for management, the Tyk Dashboard.Tyk Gateway
Enable the Streams processing engine within the Gateway by settingenabled to true in the streaming section of your tyk.conf file or via environment variables.
- Config File
- Environment Variable
Tyk Dashboard
If you manage your APIs via the Tyk Dashboard, you must also enable Streams support within the Dashboard configuration (tyk_analytics.conf) to expose Streams-related UI elements and functionality.
- Config File
- Environment Variable
API-Level Configuration
Once Streams is enabled at the system level, you define the specific behavior for each asynchronous API within its Tyk Open API Specification (OAS) definition. This is done using thex-tyk-streaming vendor extension.
The core structure under x-tyk-streaming is the streams object, which contains one or more named stream configurations. Each named stream defines:
input: Specifies how data enters this stream (e.g., via an HTTP request, by consuming from Kafka, connecting via WebSocket).output: Specifies where the data goes after processing (e.g., published to Kafka, sent over WebSocket, delivered via webhook).
input and output. The specific types available (like http_server, kafka, http_client, etc.) and their respective configuration parameters are detailed in the Tyk Streams Configuration Reference. Please consult this reference page for the full list of options and how to configure each one.
Example Configuration:
- Tyk OAS API Definition
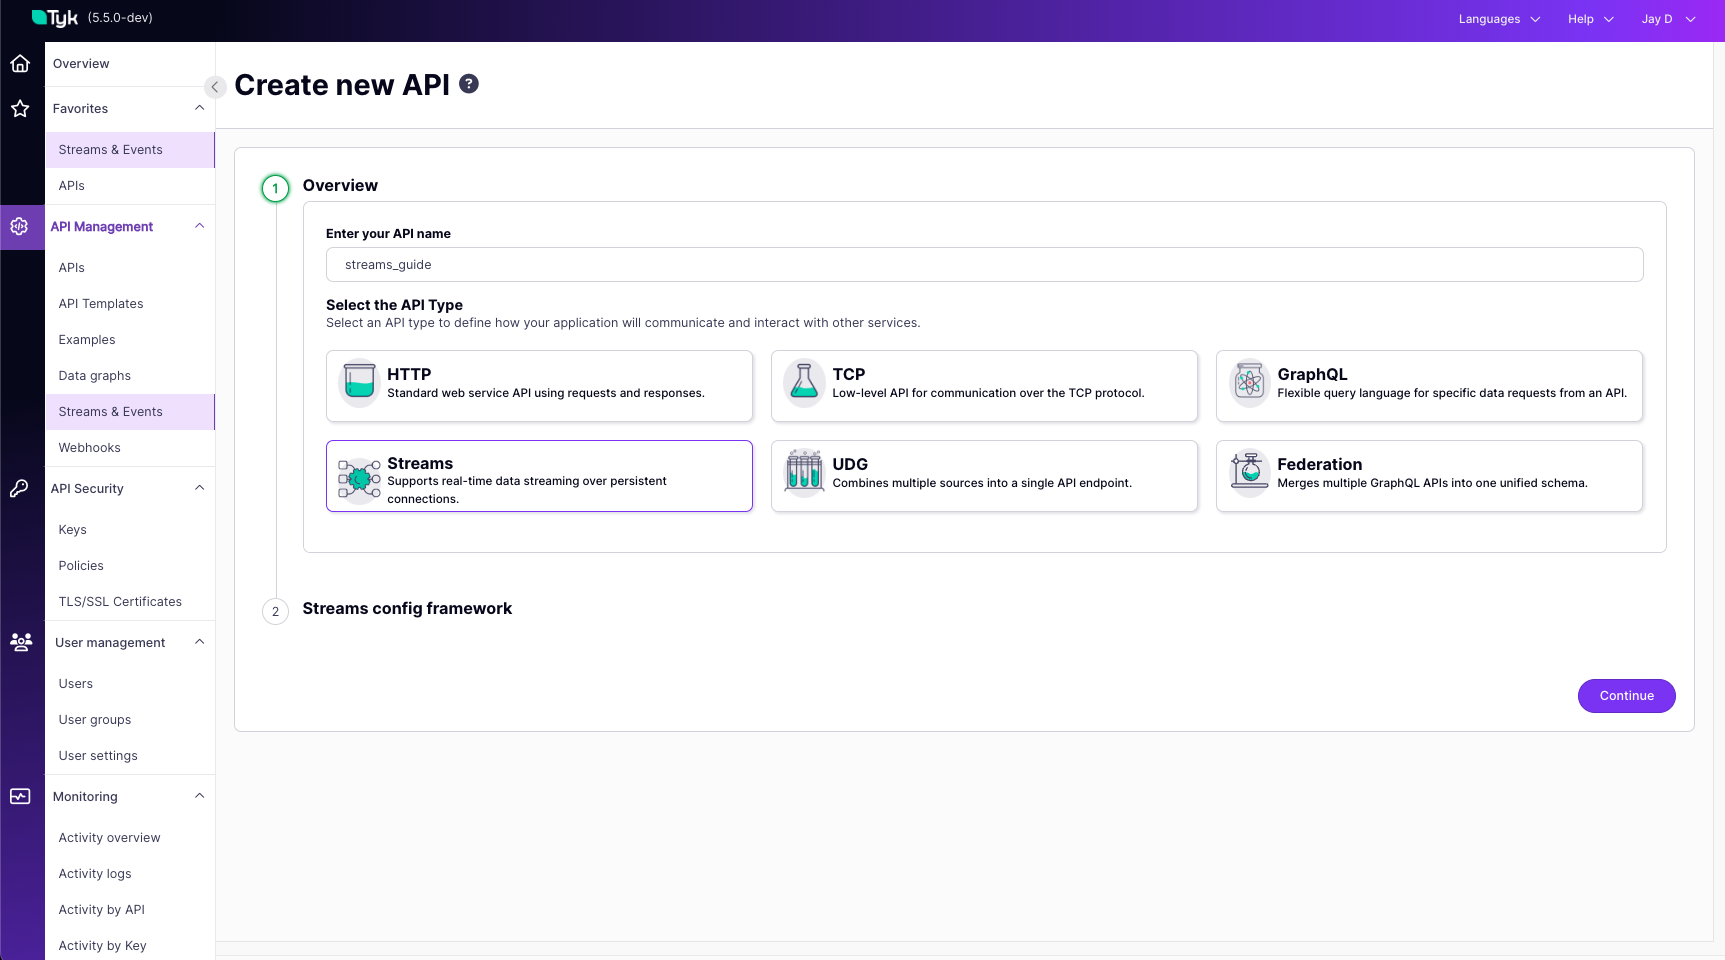
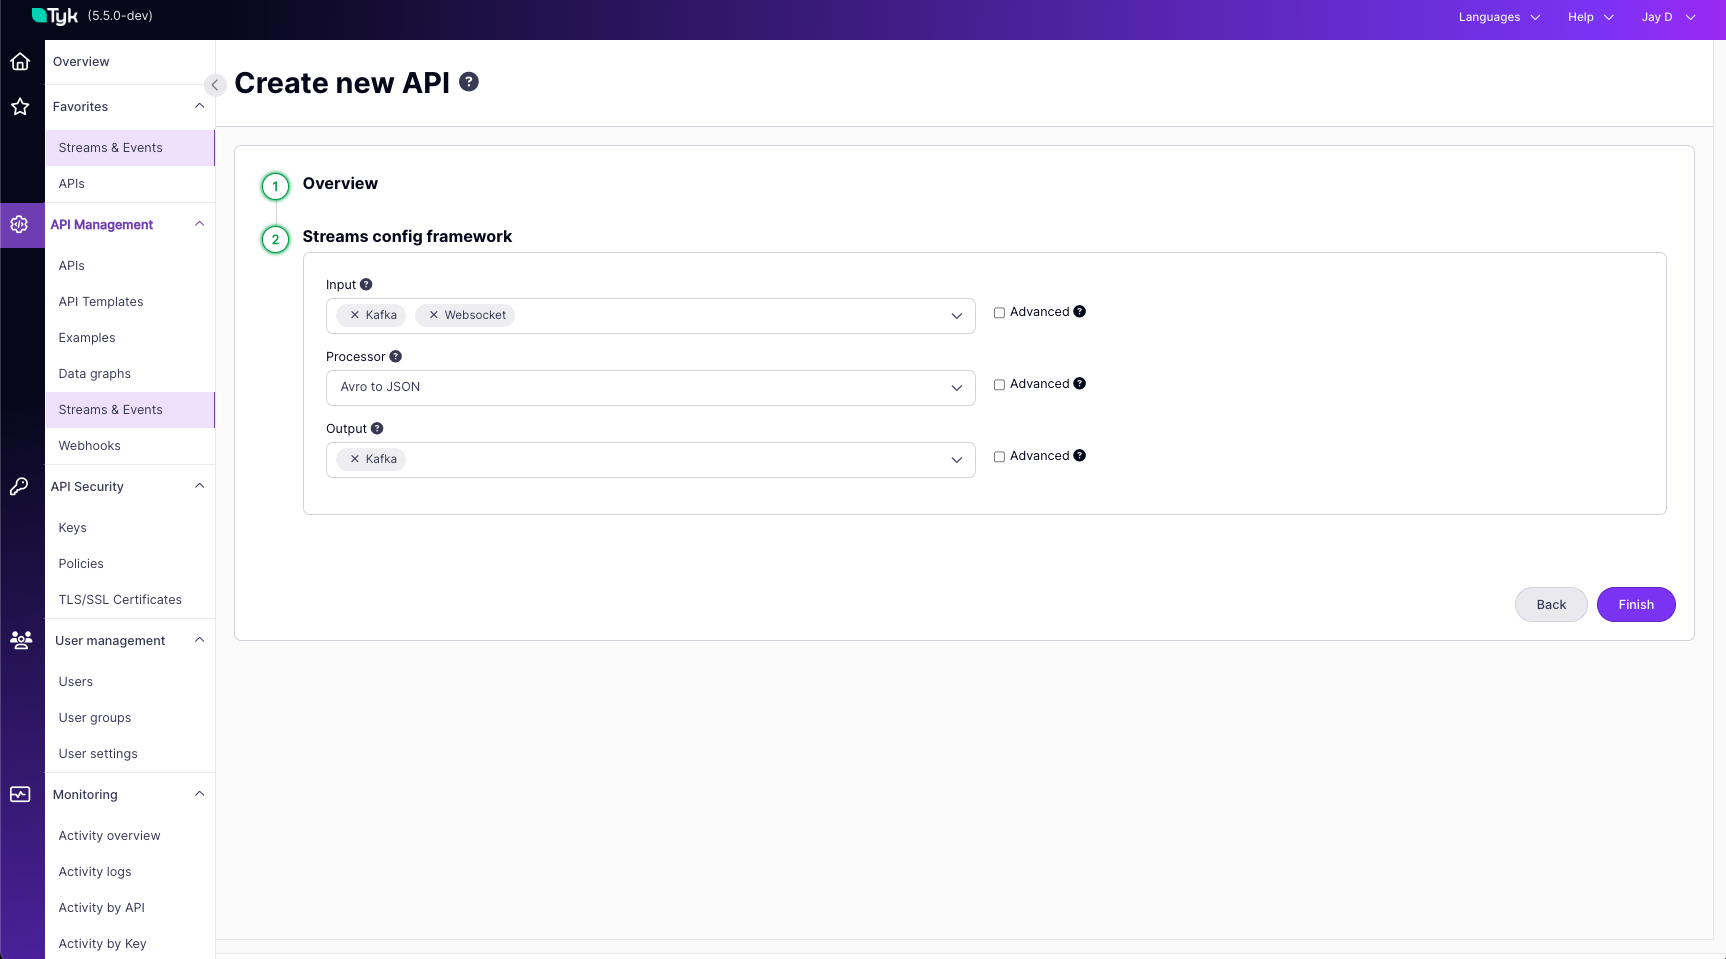
- Dashboard UI
- Tyk Classic API Definition
x-tyk-streaming, see the Tyk OAS Extension documentation.Supported Connectors and Protocols
Tyk Streams provides out-of-the-box connectors for popular event brokers and async protocols, including:Use Cases
Tyk Streams brings full lifecycle API management to asynchronous APIs and event-driven architectures. It provides a comprehensive set of capabilities to secure, transform, monitor and monetize your async APIs.Security
Tyk Streams supports all the authentication and authorization options available for traditional synchronous APIs. This ensures that your async APIs are protected with the same level of security as your REST, GraphQL, and other API types. Refer this docs, to know more about Authentication and Authorization in Tyk.Transformations and Enrichment
Tyk Streams allows you to transform and enrich the messages flowing through your async APIs. You can modify message payloads, filter events, combine data from multiple sources and more.- Transformation: Use Tyk’s powerful middleware and plugin system to transform message payloads on the fly. You can convert between different data formats (e.g., JSON to XML), filter fields, or apply custom logic.
- Enrichment: Enrich your async API messages with additional data from external sources. For example, you can lookup customer information from a database and append it to the message payload.
Monetization
Tyk Streams enables you to monetize your async APIs by exposing them through the Developer Portal. Developers can discover, subscribe to and consume your async APIs using webhooks or streaming subscriptions.- Developer Portal Integration: Async APIs can be published to the Tyk Developer Portal, allowing developers to browse, subscribe, and access documentation. Developers can manage their async API subscriptions just like traditional APIs.
- Webhooks: Tyk supports exposing async APIs as webhooks, enabling developers to receive event notifications via HTTP callbacks. Developers can configure their webhook endpoints and subscribe to specific events or topics.
Complex Event Processing
Tyk Streams allows you to perform complex event processing on streams of events in real-time. You can define custom processing logic to:- Filter events based on specific criteria
- Aggregate and correlate events from multiple streams
- Enrich events with additional data from other sources
- Detect patterns and sequences of events
- Trigger actions or notifications based on event conditions
- Tyk Streams Setup: Consumes events from a Kafka topic called orders.
- Processor Block Configuration: Utilizes a custom
Mappingscript that performs the following operations:- Filters orders, only processing those with a value greater than 1000.
- Enriches the high-value orders by retrieving the customer ID and email from a separate data source.
- Adds a new high_value_order flag to each qualifying event.
- Output Handling: Processed high-value order events are exposed via a WebSocket stream at the endpoint /high-value-orders.
Legacy Modernization
Tyk Streams can help you modernise legacy applications and systems by exposing their functionality as async APIs. This allows you to:- Decouple legacy systems from modern consumers
- Enable real-time, event-driven communication with legacy apps
- Gradually migrate away from legacy infrastructure
- Tyk Streams periodically polls the legacy /orders REST endpoint every 60 seconds
- The processor transforms the legacy response format into a simplified event structure
- The transformed events are published to a Kafka topic called orders, which can be consumed by modern applications
Async API Orchestration
Tyk Streams enables you to orchestrate multiple async APIs and services into composite event-driven flows. You can:- Combine events from various streams and sources
- Implement complex routing and mediation logic between async APIs
- Create reactive flows triggered by event conditions
- Fanout events to multiple downstream consumers
- Input Configuration
- Uses a broker to combine events from two different Kafka topics, stream1 and stream2, allowing for the integration of events from various streams.
- Complex Routing and Processing
- A switch processor directs messages based on their origin (differentiated by Kafka topic metadata).
- Each stream’s messages are processed and conditionally sent to different APIs.
- Responses from these APIs are captured and used to decide on message processing further.
- Reactive Flows
- Conditions based on API responses determine if messages are forwarded or discarded, creating a flow reactive to the content and success of API interactions.
- Fanout to Multiple Consumers:
- The broker output with a fan-out pattern sends processed messages to multiple destinations: two different Kafka topics and an HTTP endpoint, demonstrating the capability to distribute events to various downstream consumers.
Monetize APIs using Developer Portal
Tyk Streams seamlessly integrates with the Tyk Developer Portal, enabling developers to easily discover, subscribe to, and consume async APIs and event streams. This section covers how to publish async APIs to the developer portal, provide documentation, and enable developers to subscribe to events and streams.Publishing Async APIs to the Developer Portal
Publishing async APIs to the Tyk Developer Portal follows a similar process to publishing traditional synchronous APIs. API publishers can create API products that include async APIs and make them available to developers through the portal. To publish an async API:- In the Tyk Dashboard, create a new API and define the async API endpoints and configuration.
- Associate the async API with an API product.
- Publish the API product to the Developer Portal.
- Copy code
Async API Documentation
Providing clear and comprehensive documentation is crucial for developers to understand and effectively use async APIs. While Tyk Streams does not currently support the AsyncAPI specification format, it allows API publishers to include detailed documentation for each async API. When publishing an async API to the Developer Portal, consider including the following information in the documentation:- Overview and purpose of the async API
- Supported protocols and endpoints (e.g., WebSocket, Webhook)
- Event types and payloads
- Subscription and connection details
- Example code snippets for consuming the async API
- Error handling and troubleshooting guidelines
Enabling Developers to Subscribe to Events and Streams
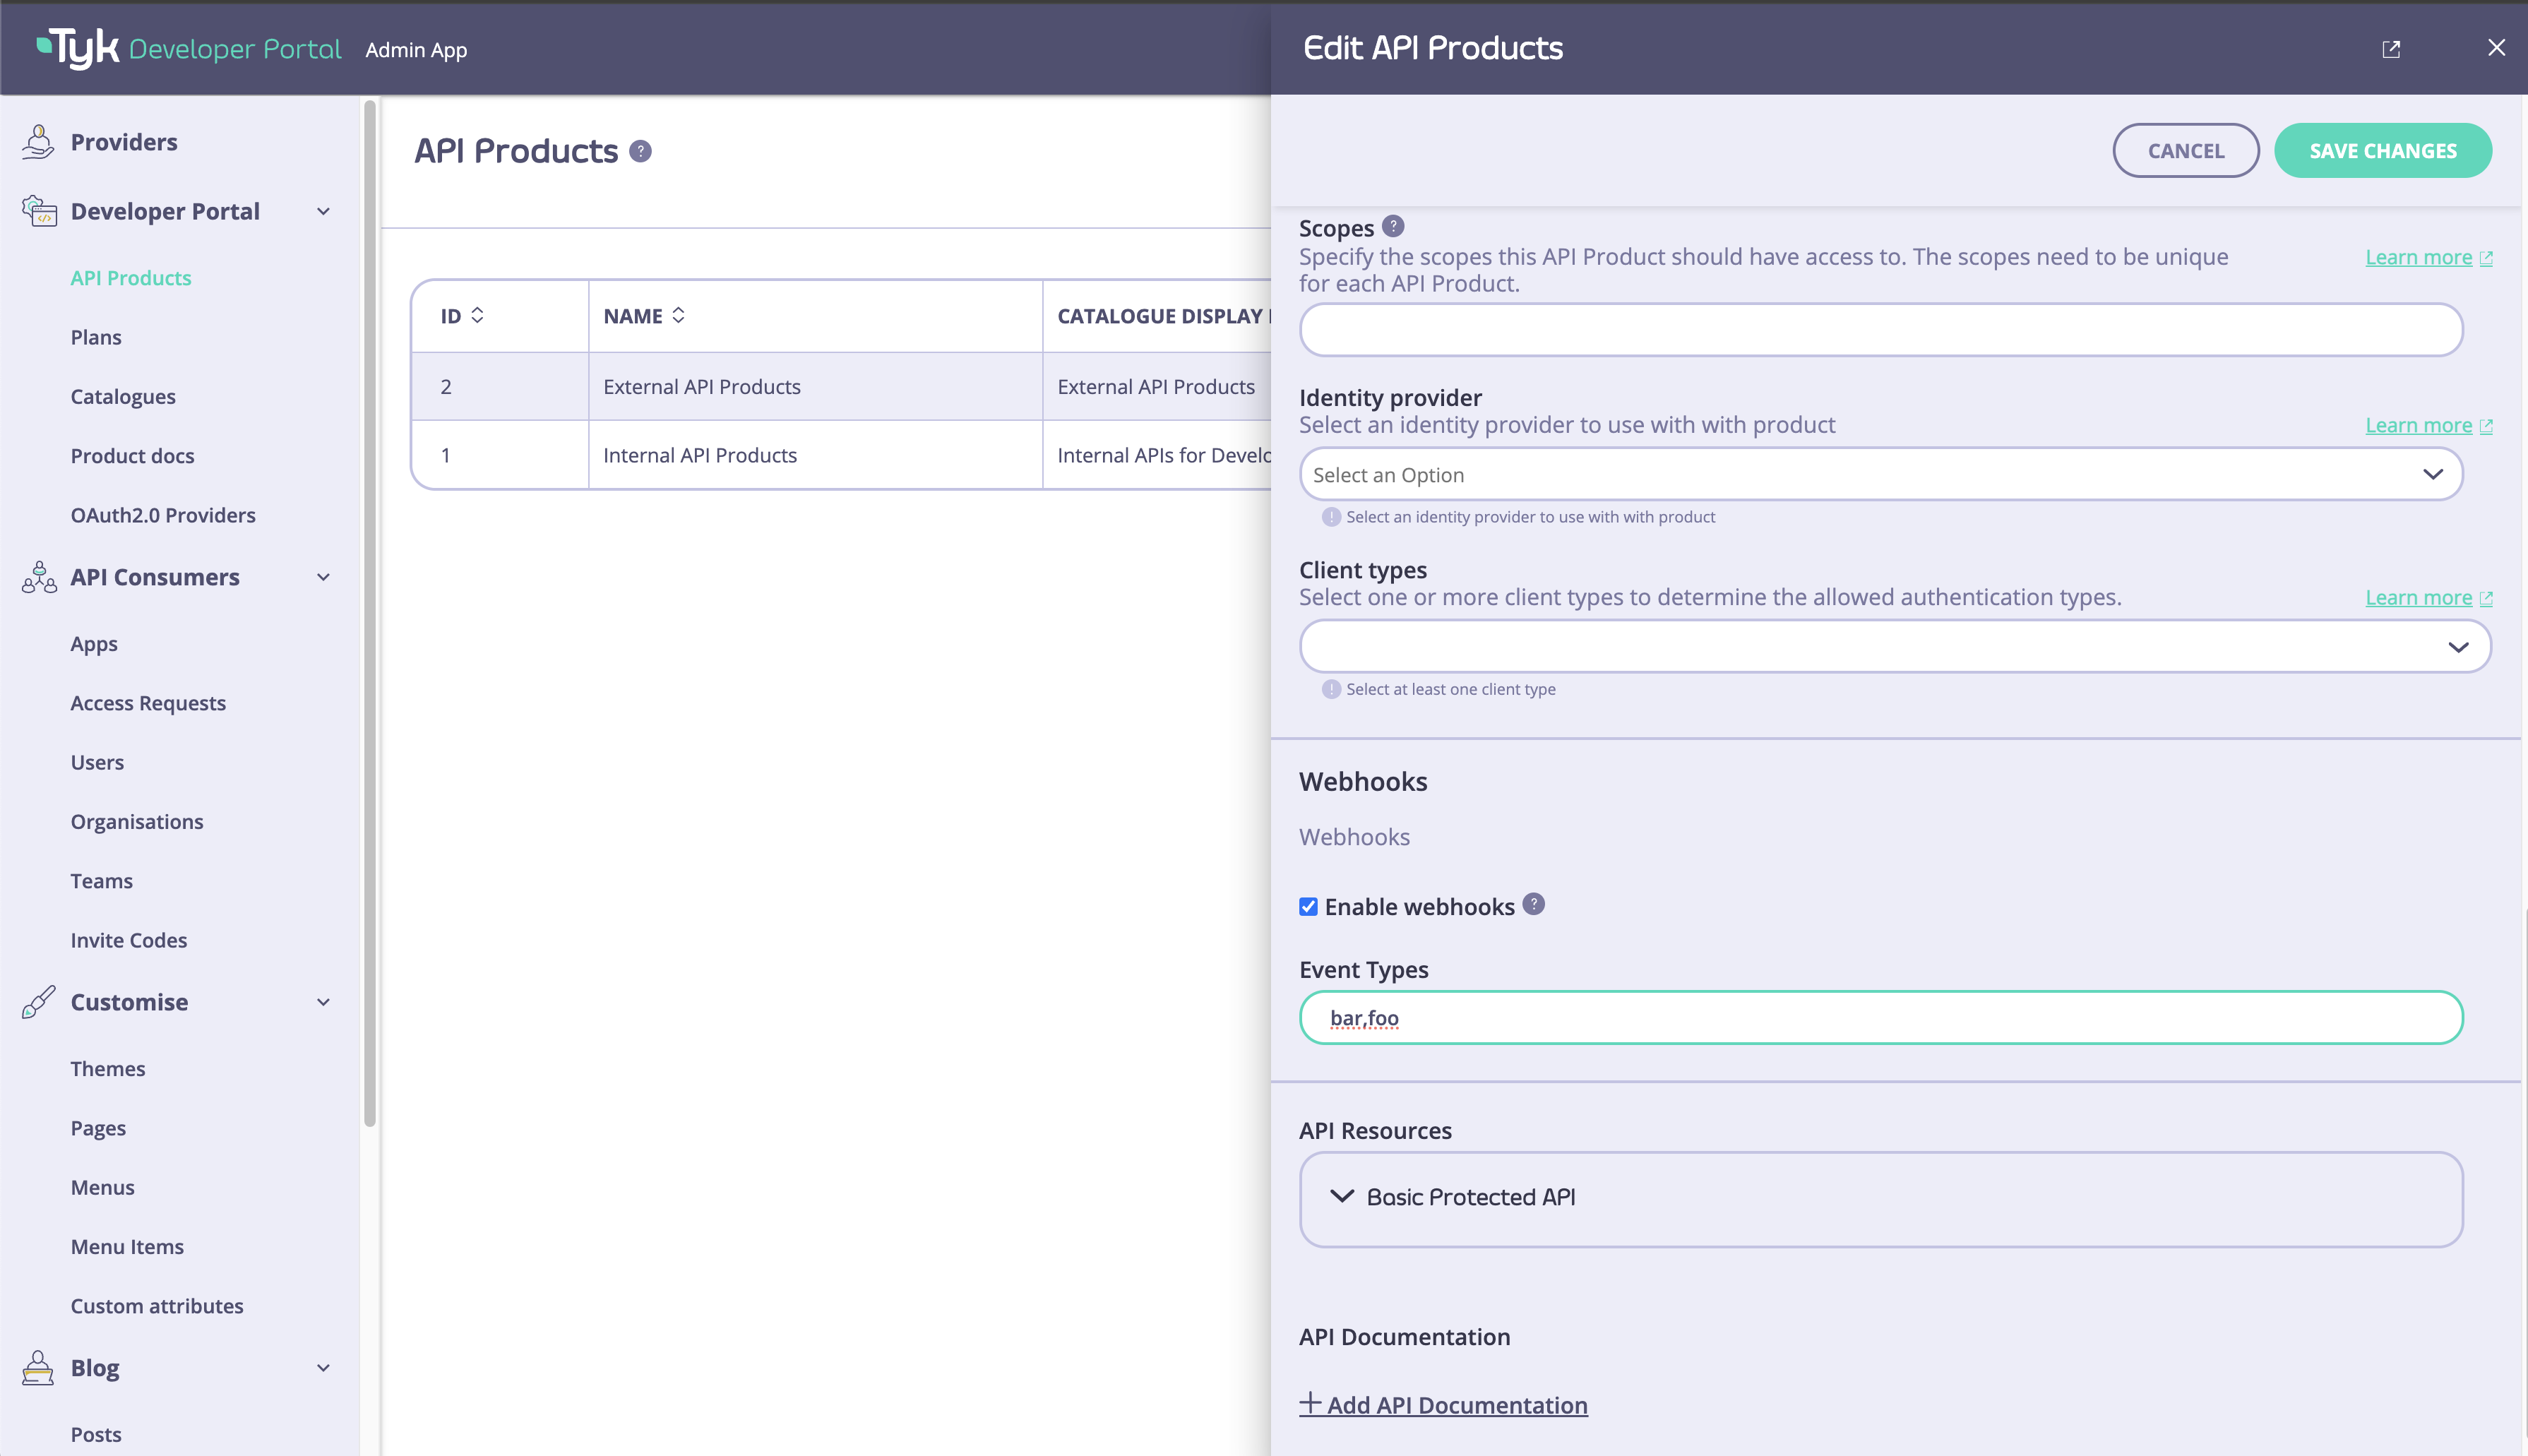
Tyk Streams provides a seamless way for developers to subscribe to events and streams directly from the Developer Portal. API publishers can enable webhook subscriptions for specific API products, allowing developers to receive real-time updates and notifications. To enable webhook subscriptions for an API product:- In the Tyk Developer Portal, navigate to the API product settings.
- Enable the “Webhooks” option and specify the available events for subscription.
- Save the API product settings.
- In the Developer Portal, navigate to the My Apps page.
- Select the desired app.
- In the “Webhooks” section, click on “Subscribe”.
- Provide the necessary details:
- Webhook URL: The URL where the event notifications will be sent.
- HMAC Secret: Provide a secret key used to sign the webhook messages for authentication.
- Events: Select the specific events to subscribe to.
- Save the subscription settings.
- Copy code
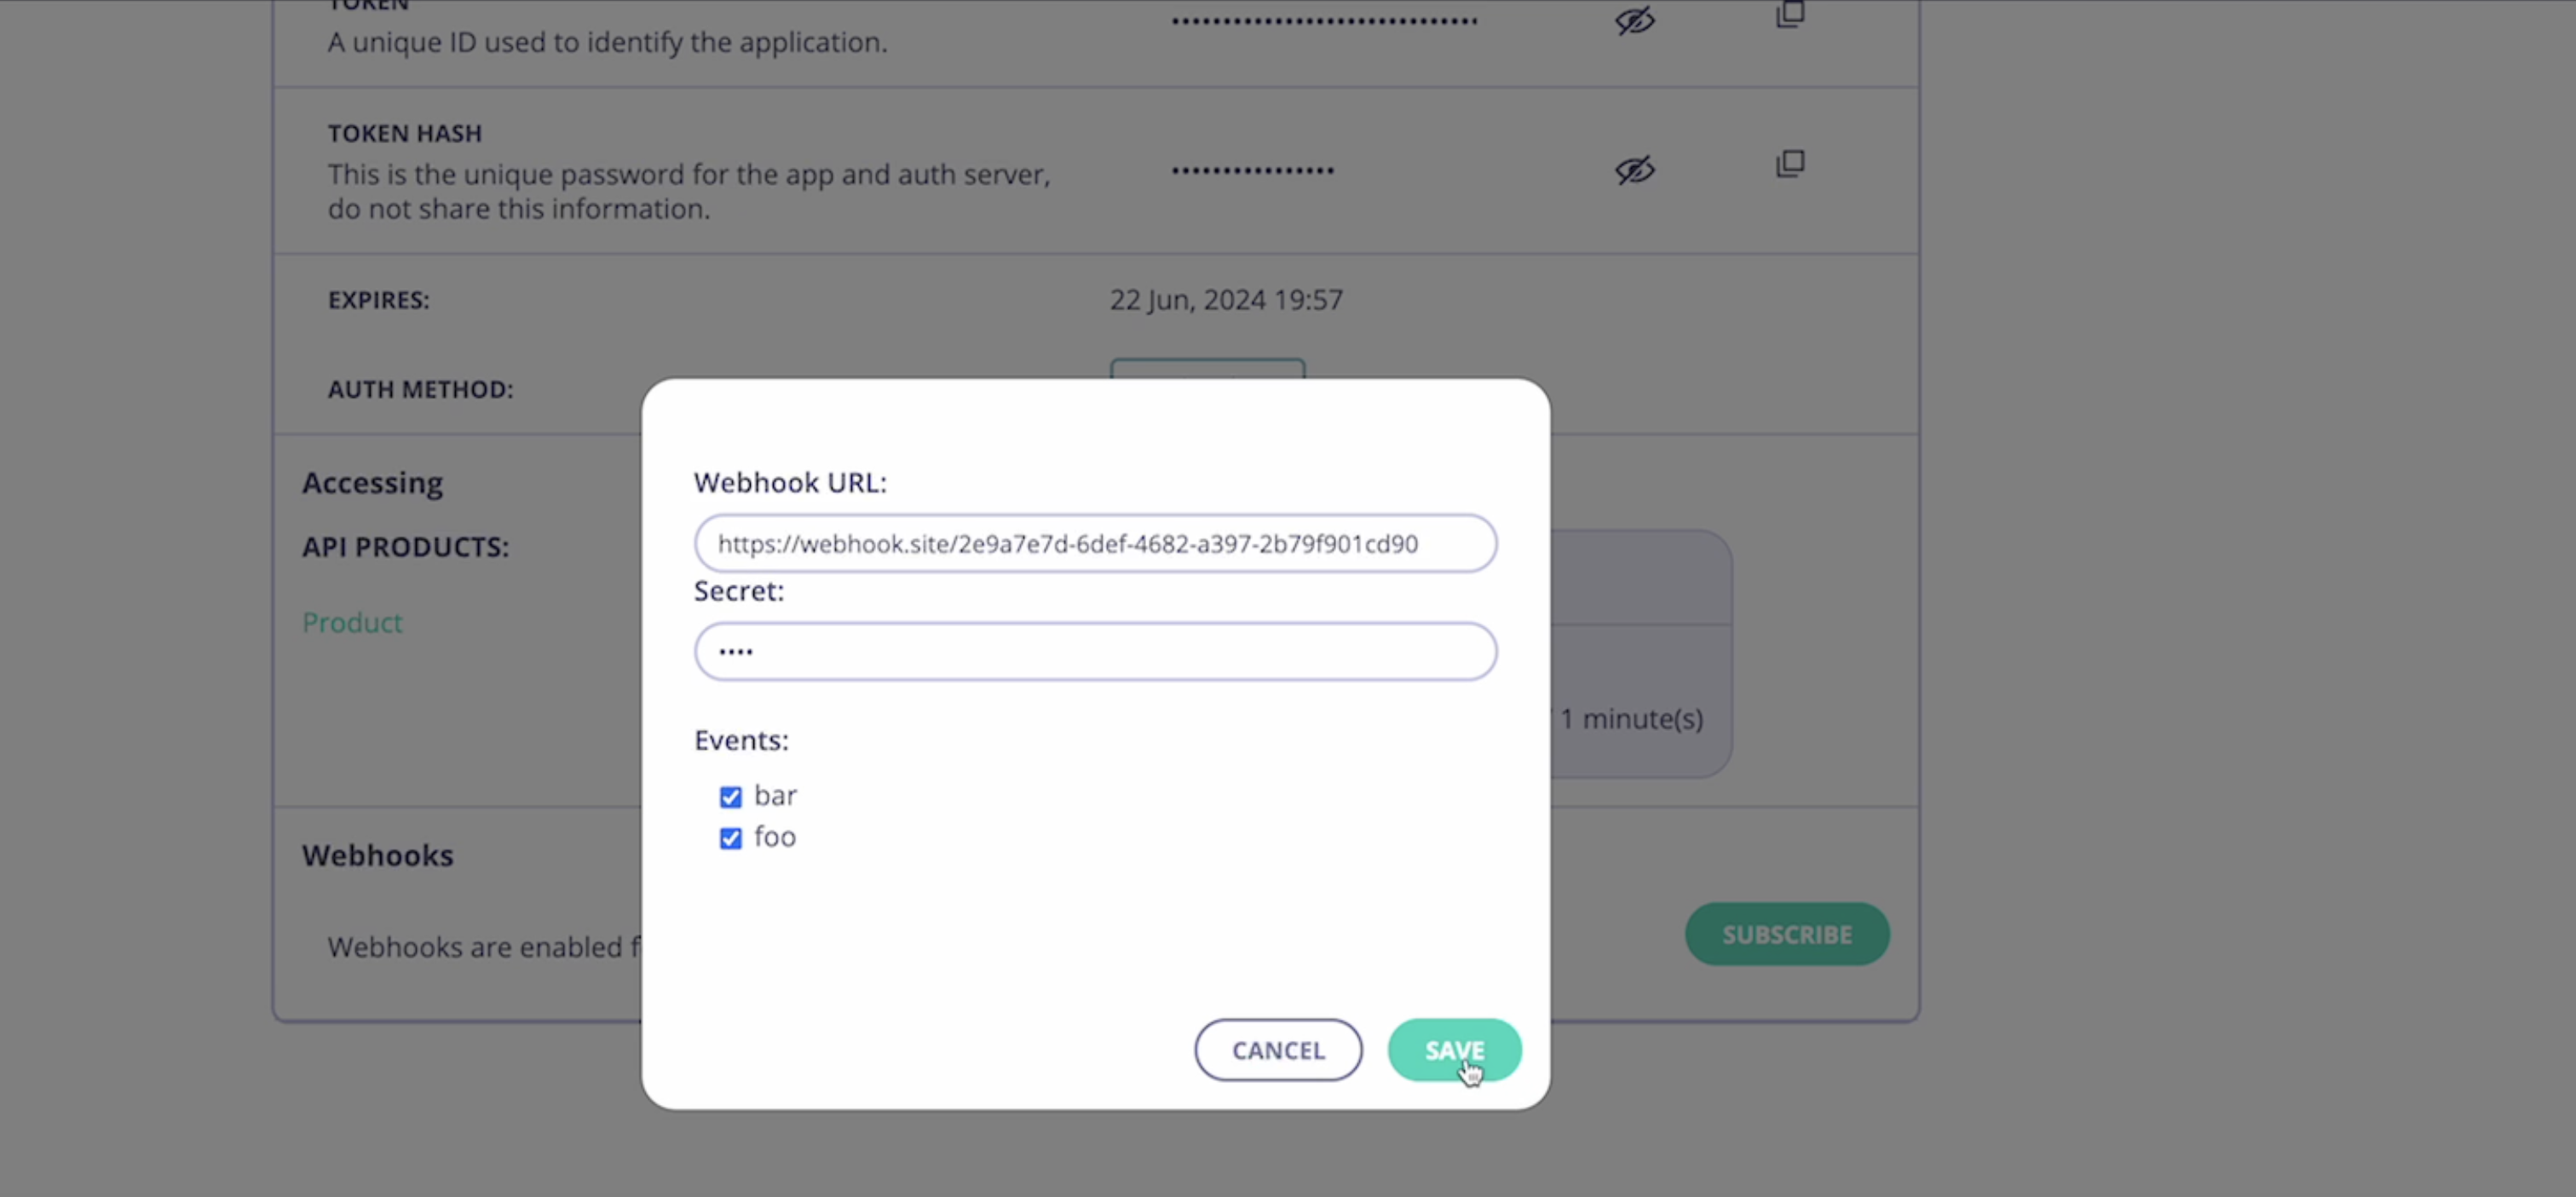
<portal-api-secret> with the secret key for signing the webhook messages.
Enabling webhook subscriptions allows developers to easily integrate real-time updates and notifications from async APIs into their applications, enhancing the overall developer experience and facilitating seamless communication between systems.
With Tyk Streams and the Developer Portal integration, API publishers can effectively manage and expose async APIs, while developers can discover, subscribe to, and consume event streams effortlessly, enabling powerful real-time functionality in their applications.
Glossary
Event
An event represents a significant change or occurrence within a system, such as a user action, a sensor reading, or a data update. Events are typically lightweight and contain minimal data, often just a unique identifier and a timestamp.Stream
A stream is a continuous flow of events ordered by time. Streams allow for efficient, real-time processing and distribution of events to multiple consumers.Publisher (or Producer)
A publisher is an application or system that generates events and sends them to a broker or event store for distribution to interested parties.Subscriber (or Consumer)
A subscriber is an application or system that expresses interest in receiving events from one or more streams. Subscribers can process events in real-time or store them for later consumption.Broker
A broker is an intermediary system that receives events from publishers, stores them, and forwards them to subscribers. Brokers decouple publishers from subscribers, allowing for scalable and flexible event-driven architectures.Topic (or Channel)
A topic is a named destination within a broker where events are published. Subscribers can subscribe to specific topics to receive relevant events.FAQ
What is Tyk Streams and what problem does it solve?
What is Tyk Streams and what problem does it solve?
Tyk Streams is an extension to the Tyk API Gateway that supports asynchronous APIs and event-driven architectures. It solves the challenge of managing both synchronous and asynchronous APIs in a unified platform, allowing organizations to handle real-time event streams alongside traditional REST APIs.
Which event brokers and protocols does Tyk Streams support?
Which event brokers and protocols does Tyk Streams support?
Refer this documentation.
How can I enable Tyk Streams on Tyk Cloud?
How can I enable Tyk Streams on Tyk Cloud?
Currently, Tyk Streams is only available for hybrid customers on Tyk Cloud. To enable it, contact support.
Can I publish Tyk Streams APIs to the Developer Portal?
Can I publish Tyk Streams APIs to the Developer Portal?
Yes, as of Tyk v5.7.0, you can publish Tyk Streams APIs to the Tyk Developer Portal. The process is similar to publishing traditional APIs: create a Tyk Streams API, create a Policy to protect it, and publish it to the Developer Portal Catalog.
What deployment considerations should I keep in mind for Tyk Streams?
What deployment considerations should I keep in mind for Tyk Streams?
Tyk Streams is embedded within the Tyk Gateway and scales with your existing Tyk infrastructure. No additional infrastructure is required.
Is Tyk Streams available in all Tyk editions?
Is Tyk Streams available in all Tyk editions?
Tyk Streams is available exclusively in the
enterprise edition. Currently, it is only accessible for hybrid customers using Tyk Cloud. Please refer to the latest documentation or reach out to Tyk support for specific availability in your edition.