Developer Portal Settings
Last updated:
Tyk Enterprise Developer Portal
If you are interested in getting access contact us at [email protected]
Email Configuration
Configuring the emailing settings is necessary for the portal to send notifications to admin users and API consumers. Once the configuration is finished, the portal will send emails upon the following events:
- Password reset;
- New access request;
- Access request approved;
- Access request rejected;
- Pending user registration request;
- Invitation to a user to register in the portal;
- User account is activated;
- User account is deactivated;
- New organization registration request is created;
- Organization registration request is accepted;
- Organization registration request is rejected.
Prerequisites
Before setting up the emailing configuration, you need your email server up and running. To complete the email setup, you will need the following information about your SMTP server:
- Address of your SMTP server;
- A port on which it accepts connections;
- Username and password to connect to your SMTP server.
Portal Admin User Notifications
To start with, you need to configure an email address where the portal will send notifications for admin users: new API Product access requests, new organization registration requests, and so on. For that, you need to navigate to the General section in the Setting menu, scroll down to the Portal admin notification address, and specify the admin email address in the Portal admin email field.
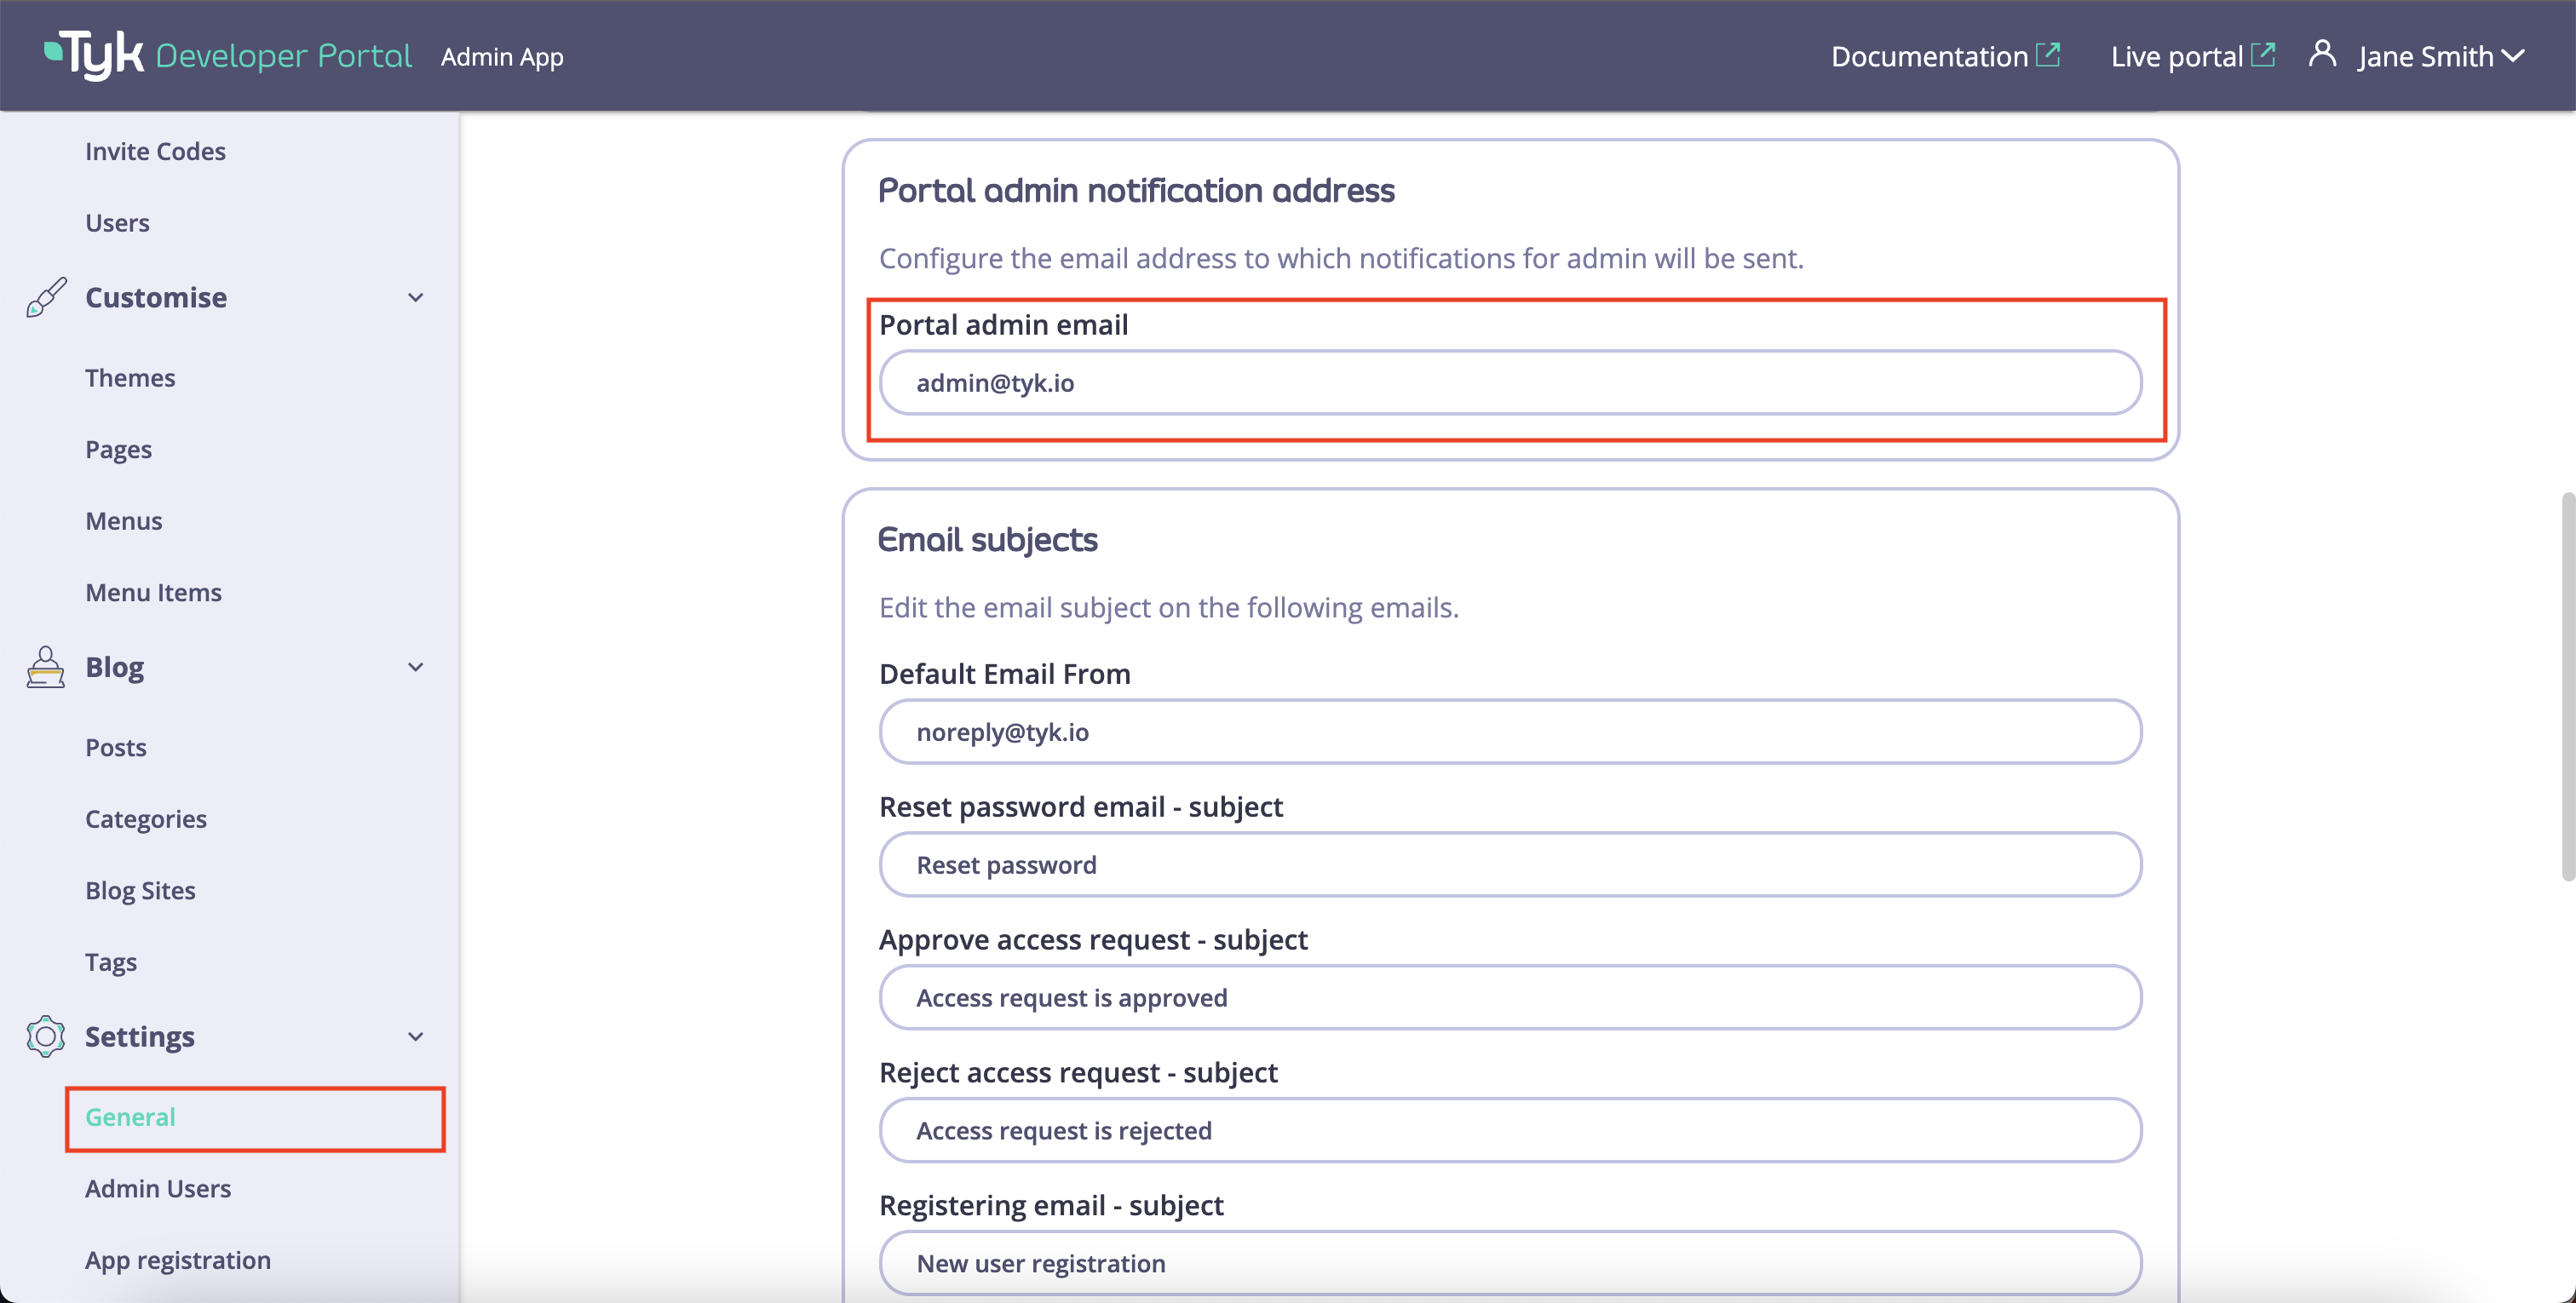
Outbound Mailing
The default from email
To enable the portal to send notifications to admin users and API Consumers, you need to specify the outbound email address in the Default Email From field. No notifications will be sent until the Default Email From field is specified.
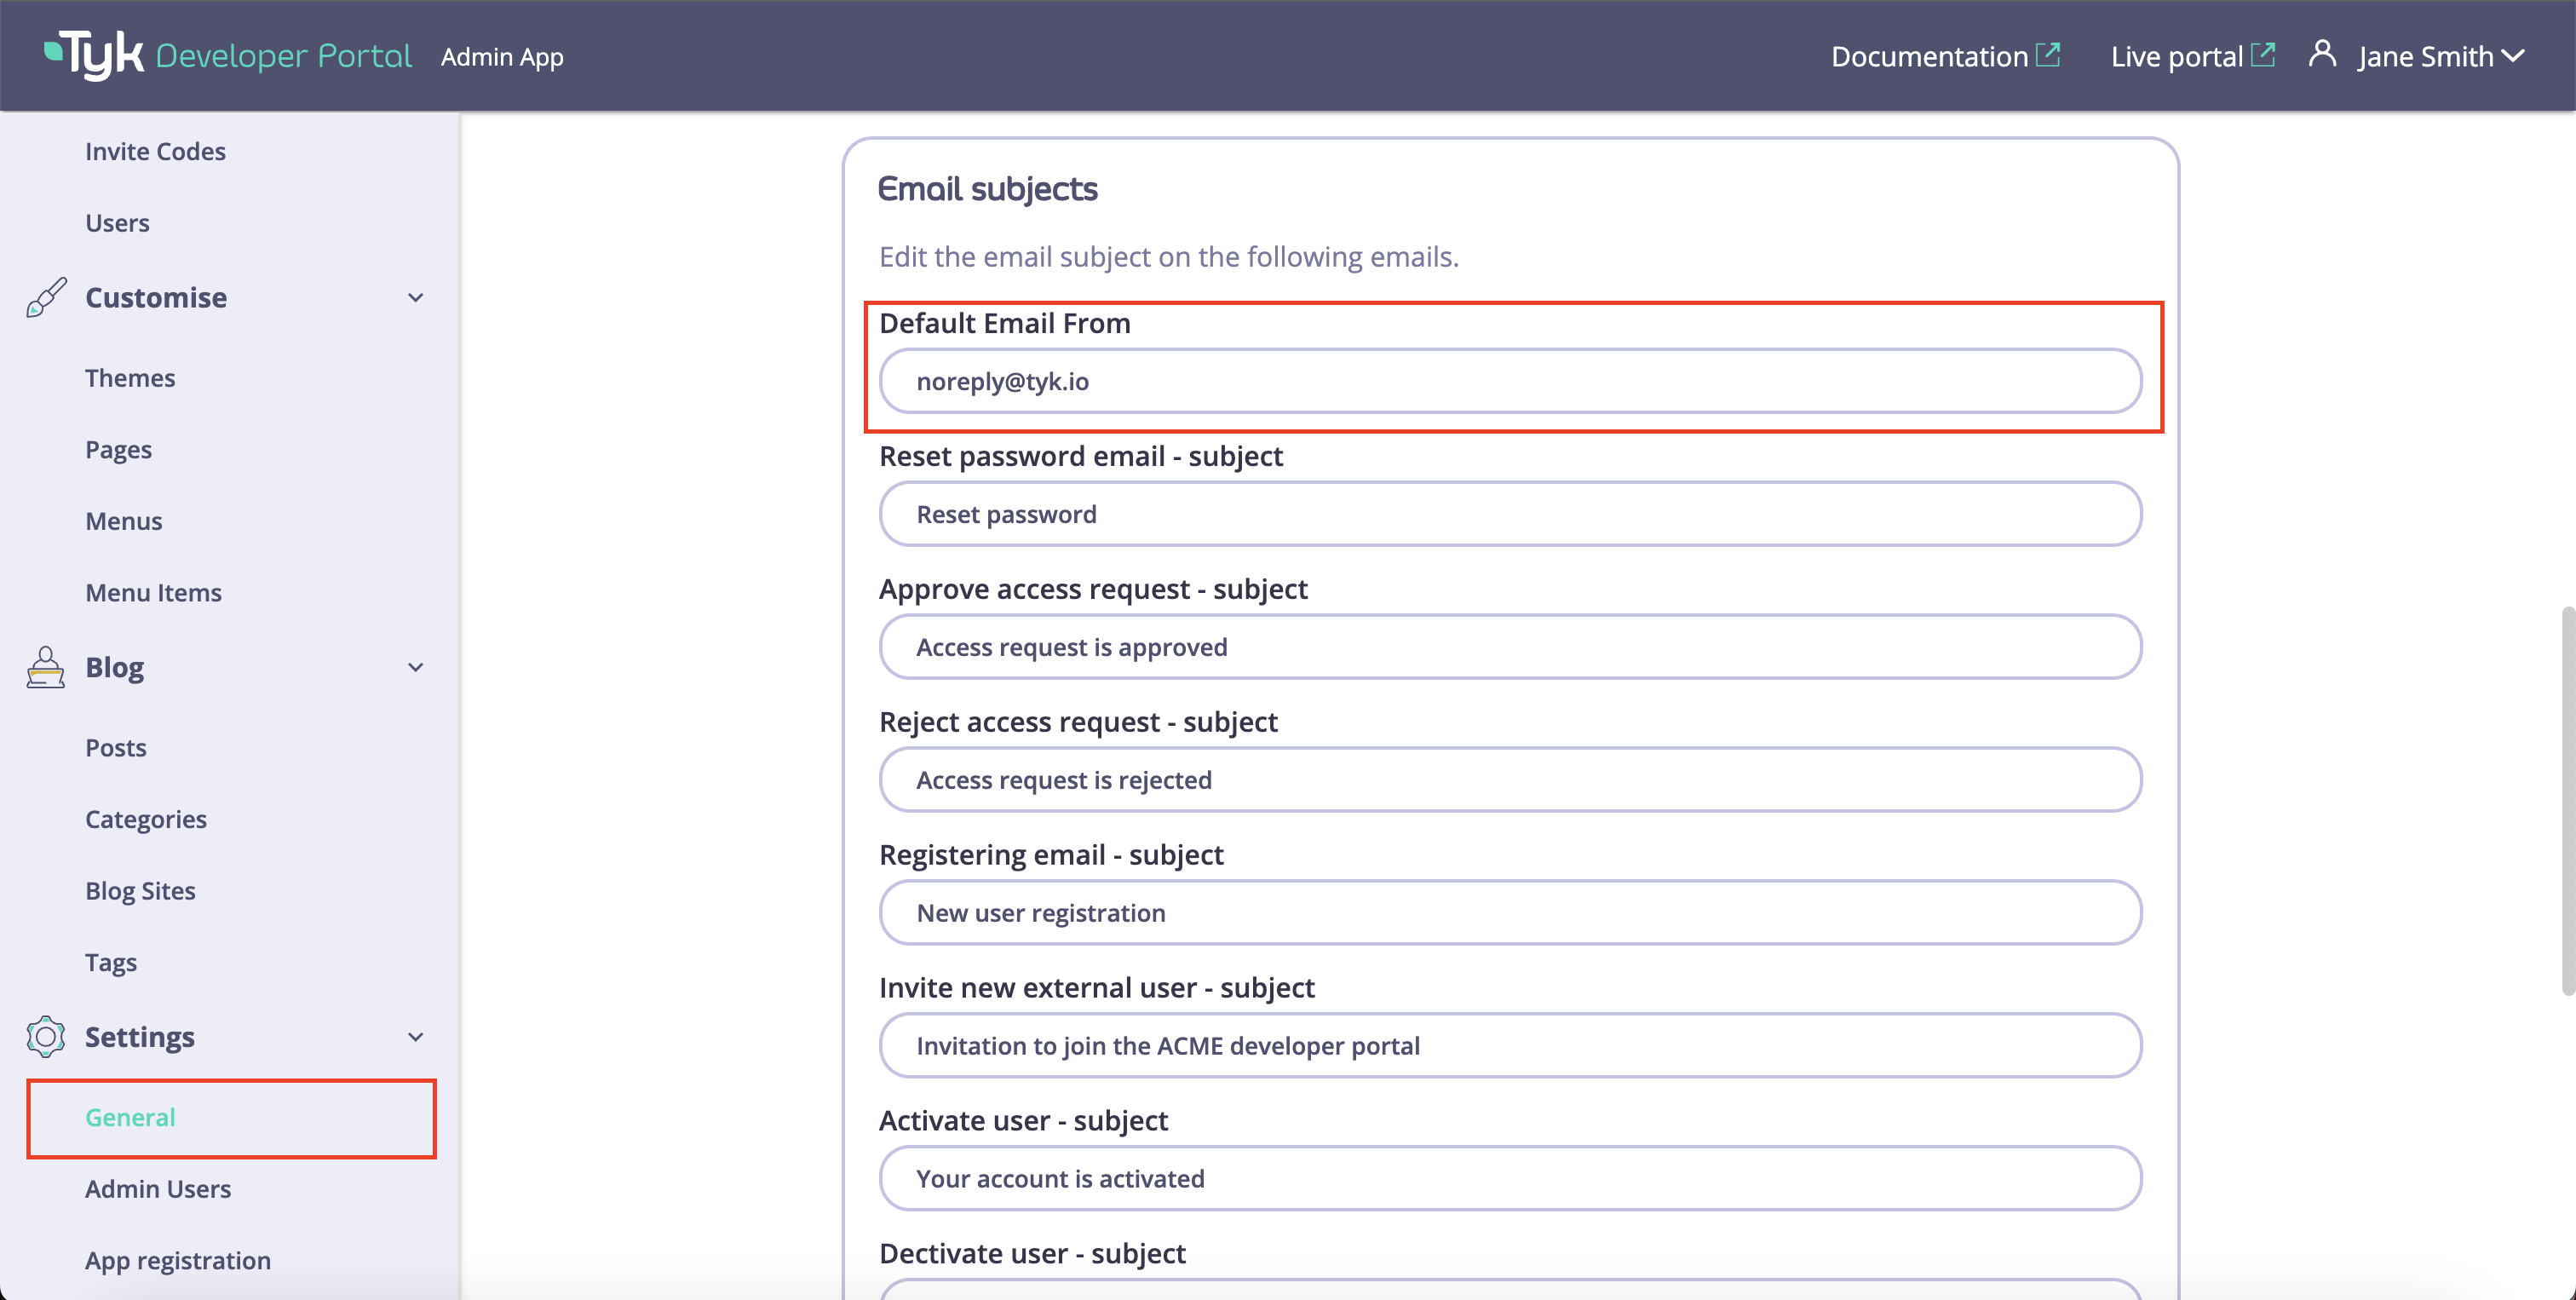
Email Subjects
Once the default from email is configured, you can specify subjects for notifications. If you don’t, the default subjects will be used for email notifications.
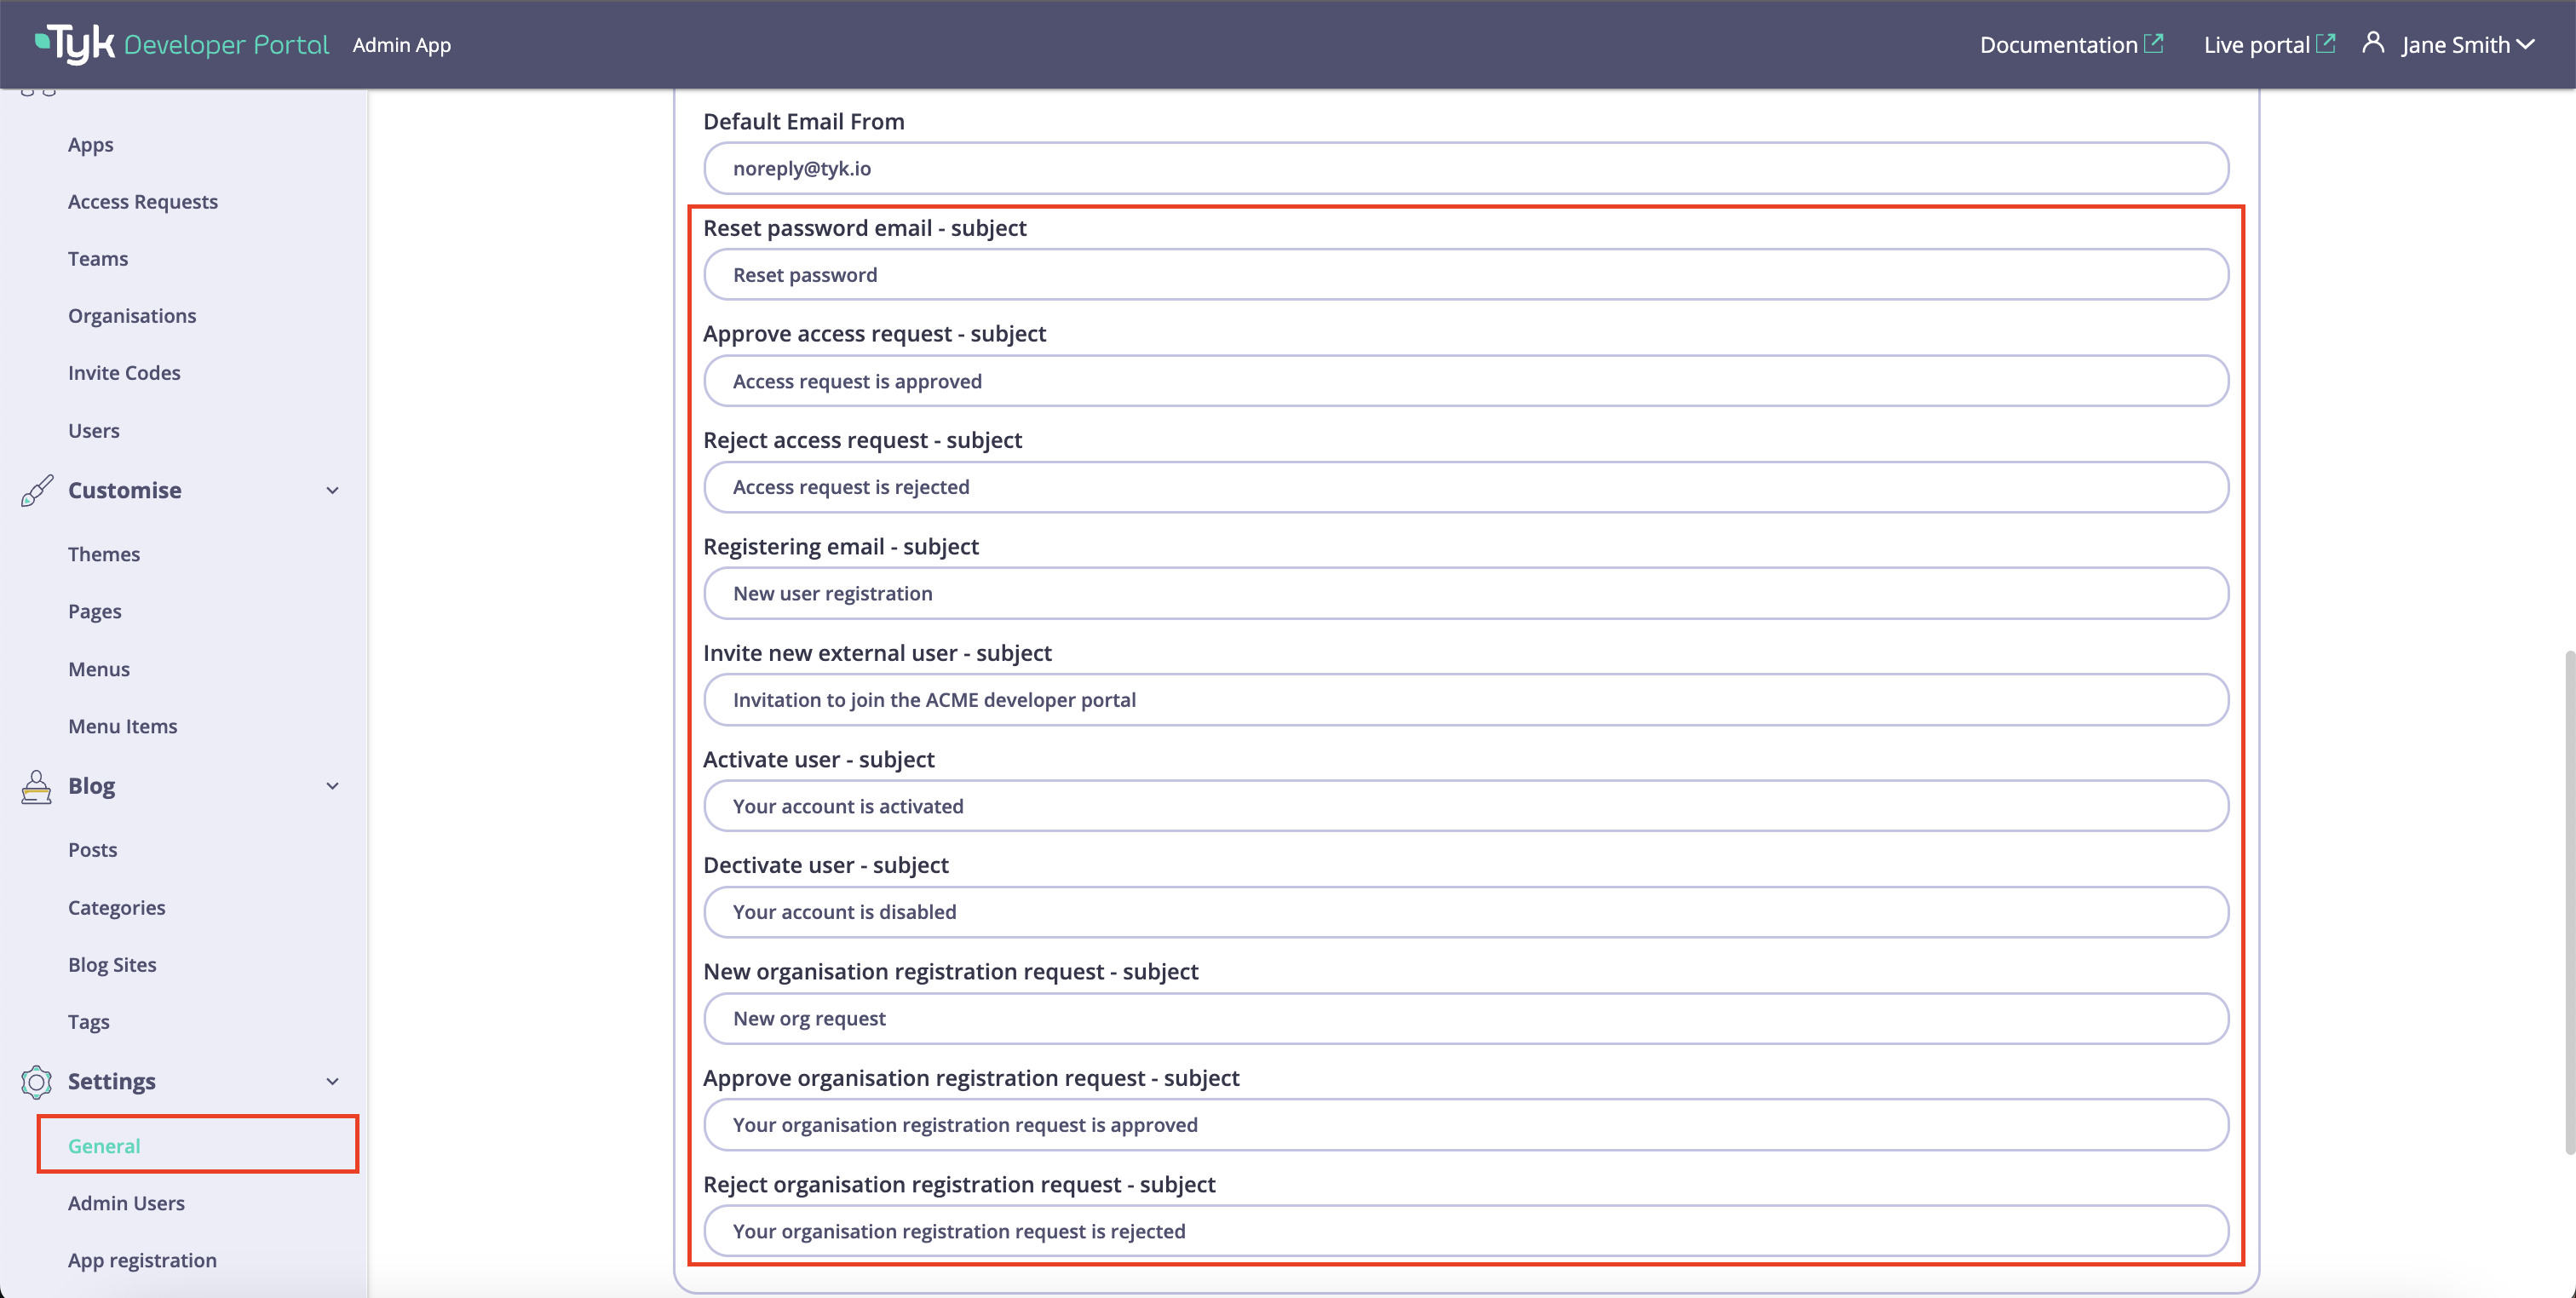
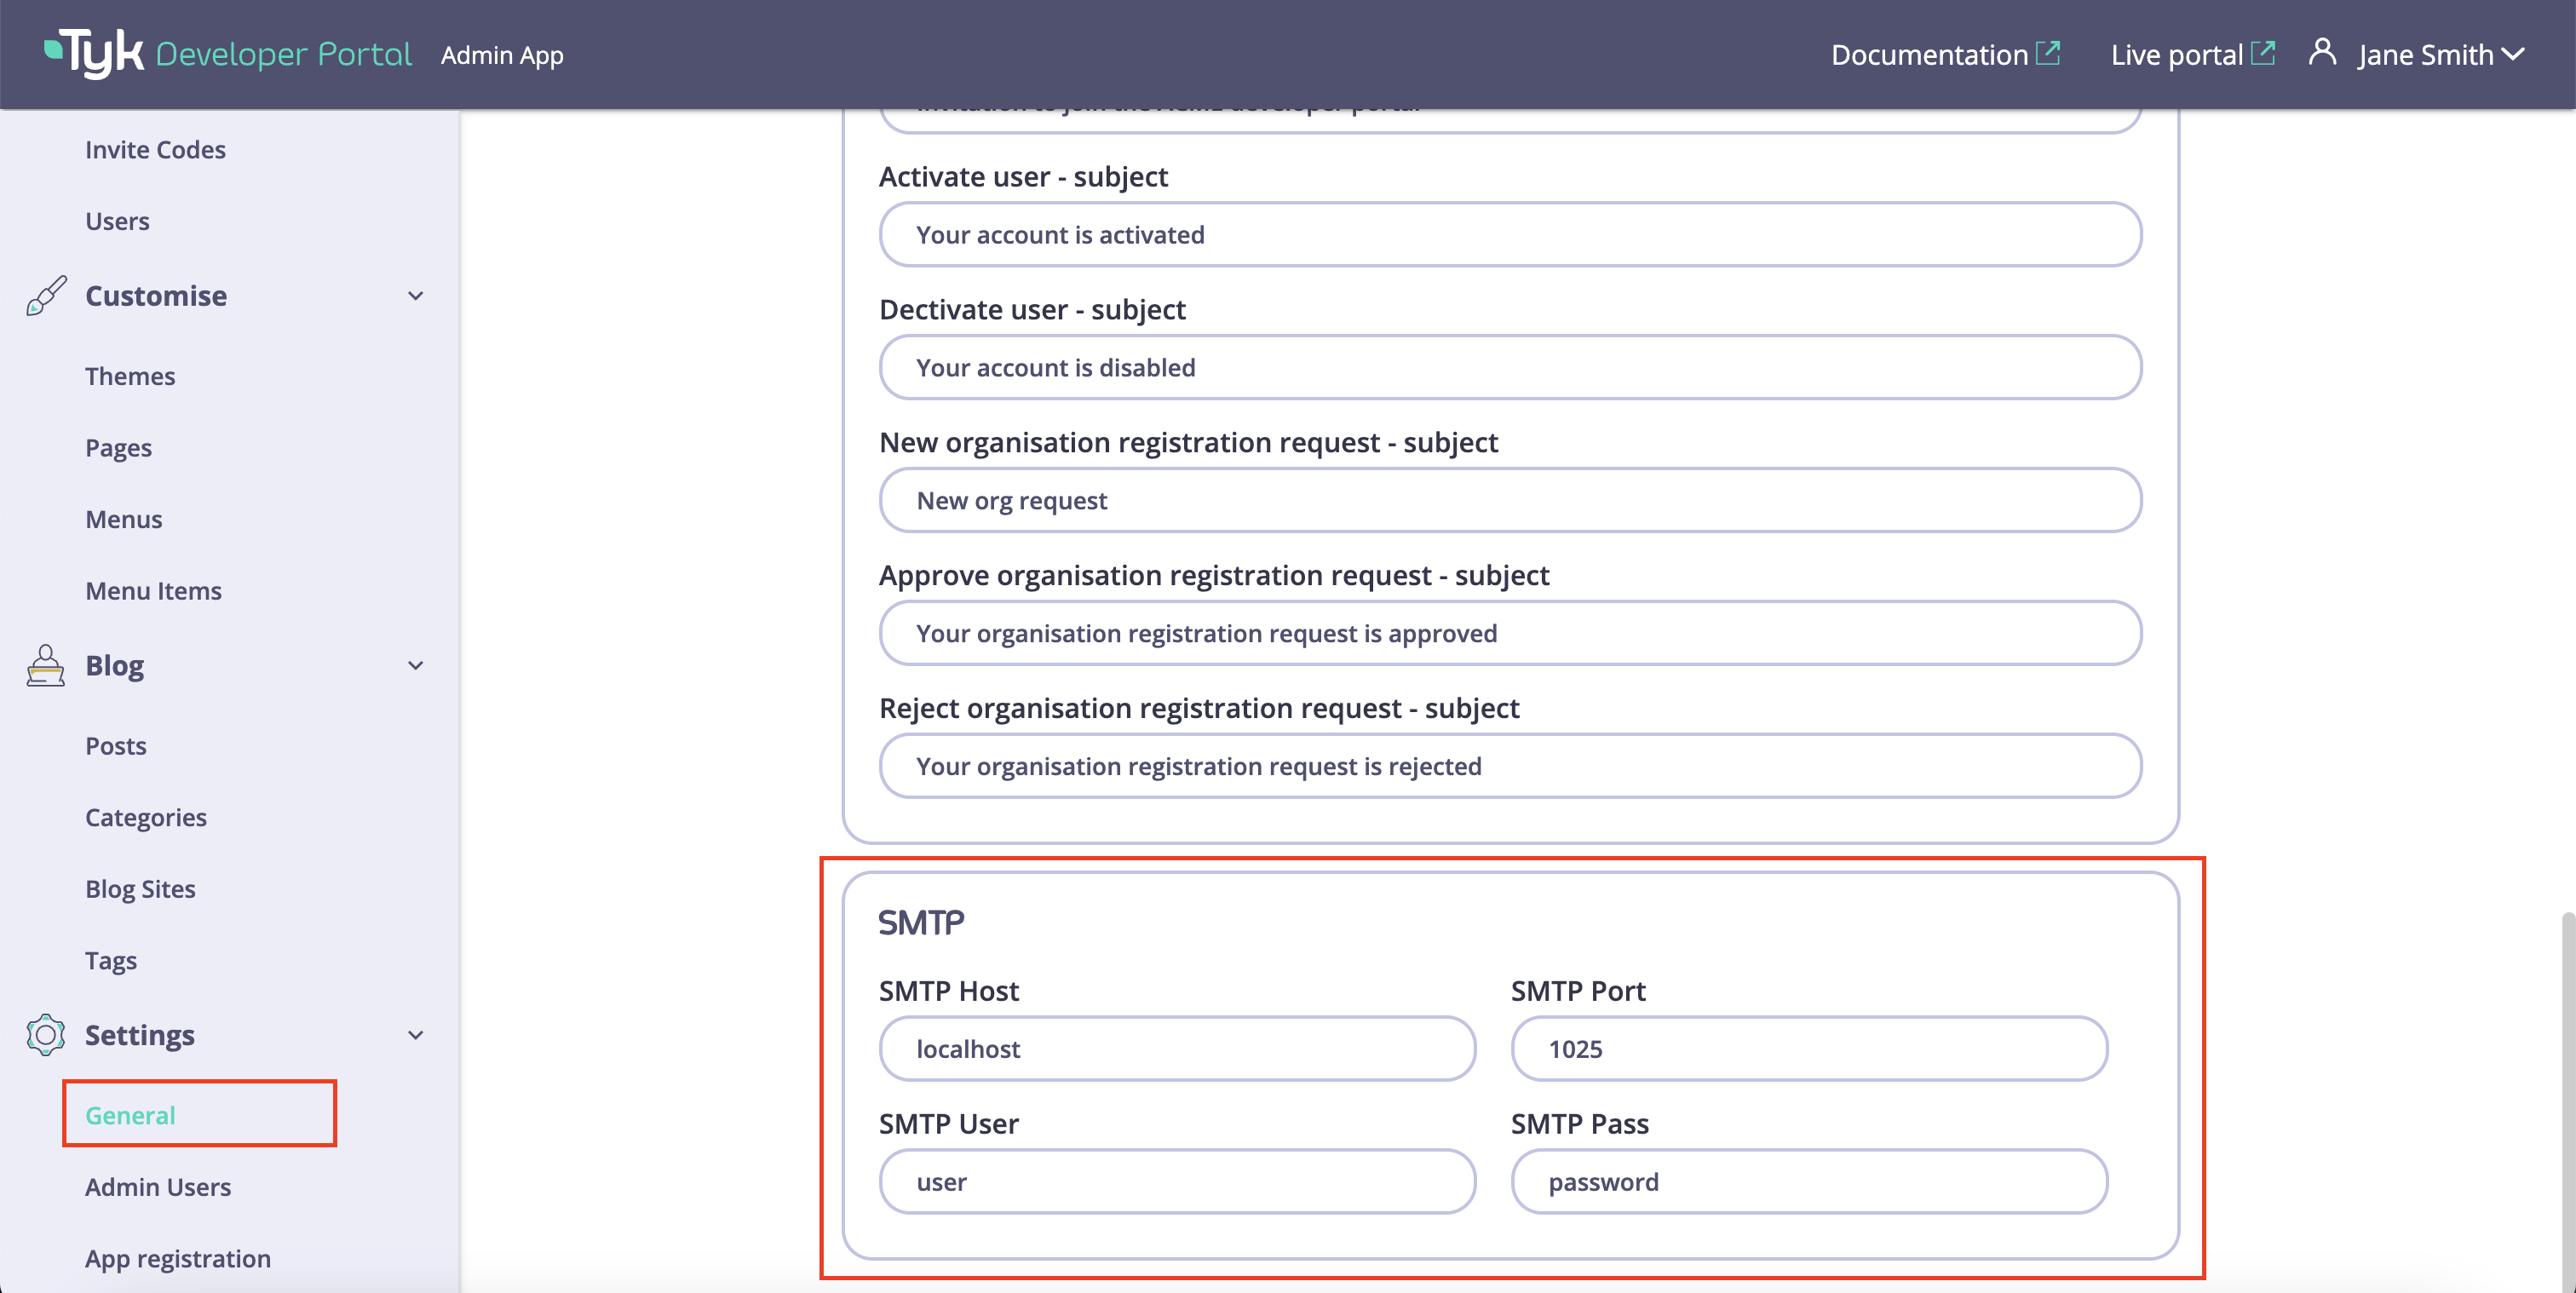
SMTP Server Settings
Once the default from email, the admin notification email, and the subjects for outbound emails are configured, you need to configure settings for the SMTP server. To do so, navigate to the SMTP setting section in the Settings/General menu and specify:
- Your SMTP server host and port;
- The SMTP username and password if authentication is configured for your SMTP server.
Configure Developer Portal SSO
Single sign-on (SSO) enables users to access multiple applications using one set of login credentials, reducing the burden of password management and improving security. SSO is relevant for businesses of all sizes, streamlining access control and improving user experience. Regardless of your organization’s size, implementing SSO can enhance security, simplify access to enterprise resources, and strengthen user satisfaction.
In this section, you’ll learn how to enable single sign-on for admin users and developers in the Tyk Enterprise Developer portal with 3rd party identity providers (IDPs).
Prerequisites
- A Tyk Enterprise portal installation
- Supported 3rd party identity provider up and running
Portal SSO Configuration Options
Tyk Enterprise Developer Portal uses the Tyk Identity Broker (TIB) to integrate Tyk authentication with 3rd party identity providers (IDPs).
From portal version 1.12.0, TIB is embedded in the portal. With this, you have two options to configure SSO in the portal:
- Using Embedded TIB: No need to install it separately.
- Using External TIB: If you are using a previous version of the portal, you can still use SSO with TIB installed as a separate application.
Configuring SSO with Embedded TIB
Configuring SSO with Embedded TIB is a four-step process:
Enabling Embedded TIB
To enable Embedded TIB in the portal, add the PORTAL_TIB_ENABLED
variable to the portal .env file:
PORTAL_TIB_ENABLED=true
Note
The Tyk Enterprise Developer Portal embedded TIB only supports OIDC, LDAP or Social SSO providers.
Understanding UserGroup Mapping
The Tyk Enterprise Developer portal has two audiences:
-
Developers:
Developers created by the sso flow are portal users that belong to an organization and team/s, if a user group mapping is not specified, they are assigned to the default organization and default team. Developers created by the sso flow are always assinged the Consumer Super Admin role. If part of an organization and a team, this means that the developer is a super admin for that organization. Read more about managing api consumer organizations here.
-
Admins:
Admins created by the SSO flow are portal users who do not belong to any organization (OrgID is 0) and are assigned the Provider Admin role.
TIB uses user group mapping to map the user groups from the identity provider to the portal teams within an organization.
To define the user group mapping for your developer audience, you need to add the UserGroupMapping object to the corresponding TIB profile:
"UserGroupMapping": {
"{IDP groupA ID}": "{portal teamA ID}",
"{IDP groupB ID}": "{portal teamB ID}",
...
}
Default behaviour of UserGroup Mapping
The UserGroupMapping
object contains keys that refer to group IDs in your IDP, and the corresponding values are team IDs in the portal.
When the Tyk Identity Broker authorizes a user, it searches for a key that matches the user’s group ID in the IDP.
If TIB can’t find a matching group ID, it logs the user in to the team with an ID equal to DefaultUserGroupID
in the portal (if DefaultUserGroupID
is defined).
We recommend always defining DefaultUserGroupID
and ensuring it refers to a valid team ID in your portal instance. The portal will refuse login attempts if DefaultUserGroupID
is defined but refers to an invalid team ID.
If no matching group ID is found in the UserGroupMapping
object and DefaultUserGroupID
isn’t defined, the portal logs in the user to the “Default organization | All users” team with an ID of 1.
Login Evaluation Algorithm
To determine whether a developer should be allowed to log in and which team they should be logged into, the portal uses the following algorithm:
Creating TIB Profile
In the following sections you will learn how to configure the SSO profiles for admins and developers and map developers to the teams.
You can configure the SSO profiles for admins in the Tyk Developer Portal application. Under Settings > SSO Profiles > Add new SSO Profile.
There are two ways of creating SSO profiles:
- Wizard Form: Create a profile using the wizard guided form.
- Raw JSON Editor: Create a profile using JSON editor where you can specify your tib raw JSON profile.
Using the Wizard Form
You can access the wizard form by switching to the Wizard view.
- Complete the Profile action step. Here you can choose a name (this name will generate the profile ID), the profile type (select Profile for admin users) and the redirect url on failure.
- Select a supported Provider type.
- Complete the Profile configuration step. Here you can specify the access to your idp. And Advanced settings if needed.
- Don’t add any group mapping since we are creating a profile for admins and will be ignored if added. Click on Continue to create the profile.
Create a profile for developers:
-
Complete the Profile action step. Here, you can choose a name (this name will generate the profile ID), the profile type (select Profile for developers), and the redirect URL on failure.
-
Select a supported Provider type.
-
Complete the Profile configuration step. Here you can specify the access to your idp. And Advanced settings if needed.
-
Add the group mapping for the developers. Custom user group claim name must equal the JWT claim name that refers to the user group in your IDP.
-
Click on Continue to create the profile.
Using the JSON Raw Editor
The Tyk Identity Broker (TIB) uses profiles to define details related to the identity provider such as its type and access credentials, and instructs TIB on how to treat users that try log in with that provider. You can access the raw editor by switching to the Raw editor view, which displays a JSON editor with an empty TIB profile for guidance.
GenerateOrLoginUserProfile
and the OrgID is equal to “0.”
In the above example, you need to specify the following parameters:
OrgID
must be"0"
for being accepted as a provider-adminActionType
must be equal to"GenerateOrLoginUserProfile"
- Replace the
host
andport
in the fieldsCallbackBaseURL
,FailureRedirect
andReturnURL
with the actual host and port on which your portal instance is running. Also, replacehttp
withhttps
for the respective fields if you use https for your portal instance - Replace the
host
andport
in the fieldDiscoverURL
with the actual host and port on which your IDP instance is running. Also, replacehttp
withhttps
accordingly - In the
"ID"
field, specify an ID of this TIB profile. You can select any value for this field that consists of digits, letters, and special signs, no spaces allowed. It is better to pick a human-readable ID for your profile for better maintainability of the configuration
In the above example, you need to specify the following parameters:
OrgID
could be anything as its value is ignored;ActionType
must be equal to"GenerateOrLoginDeveloperProfile"
- Replace the
host
andport
in the fieldsCallbackBaseURL
,FailureRedirect
andReturnURL
with the actual host and port on which your portal instance is running. Also, replacehttp
withhttps
for the respective fields if you use HTTPS for your portal instance - Replace the
host
andport
in the fieldDiscoverURL
with the actual host and port on which your IDP instance is running. Also, replacehttp
withhttps
accordingly - In the
"ID"
field, specify an ID of this TIB profile. You can select any value for this field that consists of digits, letters, and special signs; no spaces are allowed. It is better to pick a human-readable ID for your profile for better maintainability of the configuration CustomUserGroupField
must be equal to the JWT claim name that refers to the user group in your IDPUserGroupMapping
is an object that defines the relationship between user groups in the IDP and teams in the portal. If not specified, the optional parameter will cause the portal to rely on theDefaultUserGroupID
field to determine which team a developer should log in to. Please refer to the User group mapping section for guidanceDefaultUserGroupID
is the default organization that the portal will use to determine which team a developer should be logged in to if it is not able to find a UserGroupMapping for that developer
Nuances of OIDC configuration
To ensure that the portal can log in a user with your OIDC Identity provider, you may need to either explicitly specify the email scopes in a profile configuration or configure your IDP to include the email claim in the JWT. Failure to include the email scope in the JWT would result in the portal not having access to the user’s email.
As an example, for Okta, you can use the following configuration:
"UseProviders": [
{
"Name": "openid-connect",
"Key": "{oAuth2.0 key}",
"Secret": "{oAuth2.0 secret}",
"Scopes": ["openid", "email"],
"DiscoverURL": "{OIDC well-known endpoint}"
}
]
Testing SSO
You can access the login URL in your SSO Profile details Provider configuration section.
Tyk Enterprise Developer Portal doesn’t supply a login page for Single Sign-On out of the box, so you might need to create one. Here is an example of such a page that works with a profile for the LDAP identity management system:
<html>
<head>
<title>Tyk Developer portal login</title>
</head>
<body>
<b> Login to the Developer portal</b>
<form method="post" action="http://{Tyk Developer Portal host}:{Tyk Developer Portal port}/tib/auth/{profile ID}/ldap">
username: <input type="text" name="username"/> <br/>
password: <input type="text" name="password"/> <br/>
<button type="submit">Login</button>
</form>
</body>
</html>
Configuration on the portal side is quite straightforward. You need to specify the portal SSO API secret that acts as a credential for the APIs that are used by TIB for communication with the portal within Single Sign-On flow. You can use any value for the portal SSO API secret, but it should be consistent with TIB configuration.
To specify the portal SSO API secret, add the PORTAL_API_SECRET
variable to the portal .env file:
PORTAL_API_SECRET=your-portal-api-secret
If you use the Tyk helm chart, it is required to add the PORTAL_API_SECRET
to extraEnvs:
extraEnvs:
- name: PORTAL_API_SECRET
value: "your-portal-api-secret"
Configuring SSO with External TIB
Configure Tyk Identity Broker to work with Tyk Enterprise Developer Portal
The Tyk Enterprise Developer portal uses the Tyk Identity Broker to work with various Identity Management Systems, such as LDAP, Social OAuth (e.g., GPlus, Twitter, GitHub), or Basic Authentication providers. Therefore, to configure Single Sign-On for the portal, you need to install and configure Tyk Identity Broker first. Follow these steps to achieve this:
Install Tyk Identity Broker
Please refer to the TIB installation guide documentation for different installation options:
Specify TIB settings to work with the Tyk Enterprise Developer portal
Docker or packages
Create tib.conf file for the Docker installation or if you use packages to deploy TIB:
{
"Secret":"test-secret",
"HttpServerOptions":{
"UseSSL":false,
"CertFile":"./certs/server.pem",
"KeyFile":"./certs/server.key"
},
"SSLInsecureSkipVerify": true,
"BackEnd": {
"Name": "in_memory",
"IdentityBackendSettings": {
"Hosts" : {
"localhost": "6379"
},
"Password": "",
"Database": 0,
"EnableCluster": false,
"MaxIdle": 1000,
"MaxActive": 2000
}
},
"TykAPISettings":{
"DashboardConfig":{
"Endpoint":"https://{your portal host}",
"Port":"{your portal port}",
"AdminSecret":"{portal-api-secret}"
}
}
}
Setting reference:
- TykAPISettings.DashboardConfig.Endpoint is the Developer portal url. Pay attention if any of the elements (TIB or Portal) is running on containers.
- TykAPISettings.DashboardConfig.Port is the Developer portal port.
- TykAPISettings.DashboardConfig.AdminSecret is
PortalAPISecret
in the configuration file of the Developer portal.
The full reference for the configuration file is in the TIB section of the documentation.
Helm charts
If you wish ot deploy TIB in Kubernetes via Tyk helm chart, you need to specify TIB config as extraVars:
extraEnvs:
- name: TYK_IB_HTTPSERVEROPTIONS_CERTFILE
value: "./certs/server.pem"
- name: TYK_IB_HTTPSERVEROPTIONS_KEYFILE
value: "./certs/server.key"
- name: TYK_IB_SSLINSECURESKIPVERIFY
value: "true"
- name: TYK_IB_BACKEND_NAME
value: "in_memory"
- name: TYK_IB_BACKEND_IDENTITYBACKENDSETTINGS_HOSTS
value: "redis.tyk-cp:6379"
- name: TYK_IB_BACKEND_IDENTITYBACKENDSETTINGS_PASSWORD
value: ""
- name: TYK_IB_BACKEND_IDENTITYBACKENDSETTINGS_DATABASE
value: "0"
- name: TYK_IB_BACKEND_IDENTITYBACKENDSETTINGS_ENABLECLUSTER
value: "false"
- name: TYK_IB_BACKEND_IDENTITYBACKENDSETTINGS_MAXIDLE
value: "1000"
- name: TYK_IB_BACKEND_IDENTITYBACKENDSETTINGS_MAXACTIVE
value: "2000"
- name: TYK_IB_TYKAPISETTINGS_DASHBOARDCONFIG_ENDPOINT
value: "https://{your portal host}"
- name: TYK_IB_TYKAPISETTINGS_DASHBOARDCONFIG_PORT
value: "{your portal port}"
- name: TYK_IB_TYKAPISETTINGS_DASHBOARDCONFIG_ADMINSECRET
value: "{portal-api-secret}"
The full reference for the configuration file is in the TIB section of the documentation.
Configure Single Sign-On for admin users and developers
What is the Tyk Identity Broker profile
The Tyk Identity Broker (TIB) uses profiles to define details related to the identity provider such as its type and access credentials, and instructs TIB on how to treat users that try log in with that provider. In this guide, you will create two TIB profiles for admins users and developers. This allows you to have different identity providers for admins and developers as well as for internal and external users.
Depending on your installation options for TIB, you need to specify profiles via a json file (for Docker or packages) or via a ConfigMap (for Tyk Helm Chart).
profiles.json for Docker or packages installation
Here is an example of profiles.json file for Docker or packages installation:
[
{
"ActionType": "GenerateOrLoginUserProfile",
"ID": "{ID of your TIB profile}",
"OrgID": "0",
"IdentityHandlerConfig": {
"DashboardCredential": "{portal API secret}"
},
"ProviderConfig": {
"CallbackBaseURL": "http://{TIB host}:{TIB port}",
"FailureRedirect": "http://{portal host}:{portal port}/?fail=true",
"UseProviders": [
{
"Name": "openid-connect",
"Key": "{oAuth2.0 key}",
"Secret": "{oAuth2.0 secret}",
"DiscoverURL": "OIDC well-known endpoint"
}
]
},
"ProviderName": "SocialProvider",
"ReturnURL": "http://{portal host}:{portal port}/sso",
"Type": "redirect"
},
{
"ActionType": "GenerateOrLoginDeveloperProfile",
"ID": "{ID of your TIB profile}",
"OrgID": "0",
"IdentityHandlerConfig": {
"DashboardCredential": "{portal API secret}"
},
"ProviderConfig": {
"CallbackBaseURL": "http://{TIB host}:{TIB port}",
"FailureRedirect": "http://{portal host}:{portal port}/?fail=true",
"UseProviders": [
{
"Name": "openid-connect",
"Key": "{oAuth2.0 key}",
"Secret": "{oAuth2.0 secret}",
"DiscoverURL": "OIDC well-known endpoint"
}
]
},
"ProviderName": "SocialProvider",
"ReturnURL": "http://{portal host}:{portal port}/sso",
"Type": "redirect",
"DefaultUserGroupID": "1"
}
]
ConfigMap for Tyk Helm chart installation
Here is an example of ConfigMap for the Tyk Helm chart installation:
apiVersion: v1
kind: ConfigMap
metadata:
name: tyk-tib-profiles-conf
data:
profiles.json: |
[{
"ActionType": "GenerateOrLoginUserProfile",
"ID": "{ID of your TIB profile}",
"OrgID": "0",
"IdentityHandlerConfig": {
"DashboardCredential": "{portal API secret}"
},
"ProviderConfig": {
"CallbackBaseURL": "http://{TIB host}:{TIB port}",
"FailureRedirect": "http://{portal host}:{portal port}/?fail=true",
"UseProviders": [
{
"Name": "openid-connect",
"Key": "{oAuth2.0 key}",
"Secret": "{oAuth2.0 secret}",
"DiscoverURL": "OIDC well-known endpoint"
}
]
},
"ProviderName": "SocialProvider",
"ReturnURL": "http://{portal host}:{portal port}/sso",
"Type": "redirect"
},
{
"ActionType": "GenerateOrLoginDeveloperProfile",
"ID": "{ID of your TIB profile}",
"OrgID": "0",
"IdentityHandlerConfig": {
"DashboardCredential": "{portal API secret}"
},
"ProviderConfig": {
"CallbackBaseURL": "http://{TIB host}:{TIB port}",
"FailureRedirect": "http://{portal host}:{portal port}/?fail=true",
"UseProviders": [
{
"Name": "openid-connect",
"Key": "{oAuth2.0 key}",
"Secret": "{oAuth2.0 secret}",
"DiscoverURL": "OIDC well-known endpoint"
}
]
},
"ProviderName": "SocialProvider",
"ReturnURL": "http://{portal host}:{portal port}/sso",
"Type": "redirect",
"DefaultUserGroupID": "1"
}]
Configure Single Sign-On for admin users
The Tyk Enterprise Developer portal has two audiences: developers and admins. This section provides guidance on implementing Single Sign-On for admin users. The configuration is rather straightforward, and you need to take these three steps to enable Single Sign-On for admin users in your portal instance:
- Create a profile for the Tyk Identity Broker (TIB) to work on your identity provider. Make sure the ActionType is equal to “GenerateOrLoginUserProfile”, and OrgID is equal to “0”:
[{
"ActionType": "GenerateOrLoginUserProfile",
"ID": "{ID of your TIB profile}",
"OrgID": "0",
"IdentityHandlerConfig": {
"DashboardCredential": "{portal API secret}"
},
"ProviderConfig": {
"CallbackBaseURL": "http://{TIB host}:{TIB port}",
"FailureRedirect": "http://{portal host}:{portal port}/?fail=true",
"UseProviders": [
{
"Name": "openid-connect",
"Key": "{oAuth2.0 key}",
"Secret": "{oAuth2.0 secret}",
"DiscoverURL": "{OIDC well-known endpoint}"
}
]
},
"ProviderName": "SocialProvider",
"ReturnURL": "http://{portal host}:{portal port}/sso",
"Type": "redirect"
}]
In the above example, you need to specify the following parameters:
OrgID
must be"0"
for being accepted as a provider-admin or super-adminActionType
must be equal to"GenerateOrLoginUserProfile"
IdentityHandlerConfig.DashboardCredential
must be equal to thePortalAPISecret
field in the configuration file of the portal- Replace
{portal host}
and{portal port}
with the actual host and port on which your portal instance is running. Also, replacehttp
withhttps
for the respective fields if you use https for your portal instance - Replace
{TIB host}
and{TIB port}
with the actual host and port on which your TIB instance is running. Also, replacehttp
withhttps
for the respective fields if you use https for your TIB instance - In the
"ID"
field, specify an ID of this TIB profile. You can select any value for this field that consists of digits, letters, and special signs, no spaces allowed. It is better to pick a human-readable ID for your profile for better maintainability of the configuration
Nuances of OIDC configuration
To ensure that the portal can log in a user with your OIDC Identity provider, you may need to either explicitly specify the email scopes in a profile configuration or configure your IDP to include the email claim in the JWT. Failure to include the email scope in the JWT would result in the portal not having access to the user’s email.
As an example, for Okta, you can use the following configuration:
"UseProviders": [
{
"Name": "openid-connect",
"Key": "{oAuth2.0 key}",
"Secret": "{oAuth2.0 secret}",
"Scopes": ["openid", "email"],
"DiscoverURL": "{OIDC well-known endpoint}"
}
]
Please refer to the TIB configuration section for step-by-step instructions for setting up the UseProviders section. Any changes to the TIB profile will be effective after restarting your TIB instance.
- Create a login page for admin users. We don’t supply a login page for Single Sign-On out of the box, so you need to create one. Here is an example of such page that works with a profile for LDAP identity management system:
<html>
<head>
<title>Tyk Developer portal login</title>
</head>
<body>
<b> Login to the Developer portal</b>
<form method="post" action="http://{Tyk Identity Broker host}:{Tyk Identity Broker port}/auth/{profile ID}/ldap">
username: <input type="text" name="username"/> <br/>
password: <input type="text" name="password"/> <br/>
<button type="submit">Login</button>
</form>
</body>
</html>
- Now you should be able to log in to the portal with your identity provider as an admin user
Configure Single Sign-On for developers
This section relates to configuration and settings required to set up Single Sign-On for developers. Configuration for developers is also straight forward. However, for developers there is one additional.
User group mapping
In order to land a developer into the right API Consumer organization, it is necessary to configure the UserGroupMapping in the TIB profile that creates a binding between user groups in your IDP and developer teams in the portal.
To define the user group mapping for your developer audience, you need to add the UserGroupMapping object to the corresponding TIB profile:
"UserGroupMapping": {
"{IDP groupA ID}": "{portal teamA ID}",
"{IDP groupB ID}": "{portal teamB ID}",
...
}
The UserGroupMapping
object contains keys that refer to group IDs in your IDP, and the corresponding values are team IDs in the portal.
When the Tyk Identity Broker authorizes a user, it searches for a key that matches the user’s group ID in the IDP.
If TIB can’t find a matching group ID, it logs the user in to the team with an ID equal to DefaultUserGroupID
in the portal (if DefaultUserGroupID
is defined).
We recommend always defining DefaultUserGroupID
and ensuring that it refers to a valid team ID in your portal instance. If DefaultUserGroupID
is defined but refers to an invalid team ID, the portal will refuse login attempts.
If no matching group ID is found in the UserGroupMapping
object and DefaultUserGroupID
isn’t defined, the portal logs in the user to the “Default organization | All users” team with an ID of 1.
To determine whether a developer should be allowed to log in and which team they should be logged into, the portal uses the following algorithm:
Configure profile to enable Single Sign-On for developers
Follow these steps to enable Single Sign-On for developers:
- Create a profile for the Tyk Identity Broker (TIB) to work on your identity provider. Make sure the ActionType is equal to “GenerateOrLoginUserProfile”, and OrgID is equal to “0”:
[{
"ActionType": "GenerateOrLoginDeveloperProfile",
"ID": "{ID of your TIB profile}",
"OrgID": "0",
"IdentityHandlerConfig": {
"DashboardCredential": "{ID of your TIB profile}"
},
"ProviderConfig": {
"CallbackBaseURL": "http://{TIB host}:{TIB port}",
"FailureRedirect": "http://{portal host}:{portal port}/?fail=true",
"UseProviders": [
{
"Name": "openid-connect",
"Key": "{oAuth2.0 key}",
"Secret": "{oAuth2.0 secret}",
"DiscoverURL": "{OIDC well-known endpoint}"
}
]
},
"ProviderName": "SocialProvider",
"ReturnURL": "http://{portal host}:{portal port}/sso",
"Type": "redirect",
"CustomUserGroupField": "{your group ID field}",
"UserGroupMapping": {
"{IDP group ID}": "{portal team ID}"
},
"DefaultUserGroupID": "{portal team ID}"
}]
In the above example, you need to specify the following parameters:
OrgID
could be anything as its value is ignored;ActionType
must be equal to"GenerateOrLoginDeveloperProfile"
IdentityHandlerConfig.DashboardCredential
must be equal to thePortalAPISecret
field in the configuration file of the portal- Replace
{portal host}
and{portal port}
with the actual host and port on which your portal instance is running. Also, replacehttp
withhttps
for the respective fields if you use https for your portal instance - Replace
{TIB host}
and{TIB port}
with the actual host and port on which your TIB instance is running. Also, replacehttp
withhttps
for the respective fields if you use https for your TIB instance - In the
"ID"
field, specify an ID of this TIB profile. You can select any value for this field that consists of digits, letters, and special signs, no spaces allowed. It is better to pick a human-readable ID for your profile for better maintainability of the configuration CustomUserGroupField
must be equal to the JWT claim name that refers to the user group in your IDPUserGroupMapping
an object that defines relationship between user groups in the IDP and teams in the portal. The optional parameter, if not specified, will cause the portal to rely on theDefaultUserGroupID
field to determine which team a developer should log in to. Please refer to the User group mapping section for guidanceDefaultUserGroupID
is the default organization that the portal will use to determine which team a developer should be logged in to if it is not able to find a UserGroupMapping for that developer
Nuances of OIDC configuration
To ensure that the portal can log in a user with your OIDC Identity provider, you may need to either explicitly specify the email scopes in a profile configuration or configure your IDP to include the email claim in the JWT. Failure to include the email scope in the JWT would result in the portal not having access to the user’s email.
As an example, for Okta, you can use the following configuration:
"UseProviders": [
{
"Name": "openid-connect",
"Key": "{oAuth2.0 key}",
"Secret": "{oAuth2.0 secret}",
"Scopes": ["openid", "email"],
"DiscoverURL": "{OIDC well-known endpoint}"
}
]
- Create a login page for developers. We don’t supply a login page for Single Sign-On out of the box, so you need to create one. Here is an example of such page that works with a profile for LDAP identity management system:
<html>
<head>
<title>Tyk Developer portal login</title>
</head>
<body>
<b> Login to the Developer portal</b>
<form method="post" action="http://{Tyk Identity Broker host}:{Tyk Identity Broker port}/auth/{profile ID}/ldap">
username: <input type="text" name="username"/> <br/>
password: <input type="text" name="password"/> <br/>
<button type="submit">Login</button>
</form>
</body>
</html>
- Now you should be able to log in to the portal with your identity provider as a developer
Migrate Resources Between Environments
This guide explains how to migrate Developer Portal resources (API Products, Plans, Tutorials etc.) between different portal environments.
This capability was made possible with introduction of Custom IDs (more on this later) in v1.13.
Prerequisites
Before you begin, make sure the following are true:
- Your Tyk Developer Portal version is 1.13 or later.
- All resources in your source environment have Custom IDs (CIDs) assigned. Resources created after version 1.13 automatically include a CID, while resources from earlier versions receive CIDs through the portal’s startup process.
- You have admin access to both the source and target environments.
Custom IDs in Developer Portal
Starting with Portal 1.13, we introduced Custom IDs (CIDs) - additional persistent identifiers that work alongside database IDs to provide stable references across environments and recreations. While database IDs remain the primary internal identifiers, CIDs provide a reliable way to track and maintain relationships between resources across different environments.
The Role of Database IDs and CIDs
Resources in the Tyk Developer Portal use both types of identifiers:
- Database IDs: Primary internal identifiers that are automatically generated and managed by the database.
- Custom IDs (CIDs): Additional stable identifiers that remain consistent across environments.
The Problem with Database-Generated IDs
Before Portal 1.13, resources were identified solely by database-generated IDs. While this worked for single-environment setups, it caused challenges when:
- Migrating resources between environments.
- Recreating or restoring resources.
- Maintaining relationships between connected resources.
For example, if you recreated an API product that was linked to a plan, the product would receive a new database ID. This would break the connection between the product and plan, requiring manual intervention to fix the relationship.
Benefits of Custom IDs (CIDs)
Custom IDs solve these problems by providing:
- Persistent identification across environments.
- Stable reference points for resource relationships.
- Reliable migration and synchronization capabilities.
Resources that now support CIDs include:
- OAuth Providers and Client Types
- Products, Plans, Tutorials, and OAS Documents
- Organisations and Teams
- Pages and Content Blocks
These resources are now easily transferable between environments, with their relationships preserved via CIDs, ensuring smooth migrations and consistent management.
Automatic CID Assignment
When upgrading to Tyk Portal 1.13 from an earlier version, the portal automatically runs a background process to assign CIDs to resources created in previous versions. This process also runs every time the portal starts, ensuring any new resources without CIDs are retroactively assigned one, whether after an upgrade or a fresh installation.
You can fetch a specific organisation using either its database ID or CID. For example, to fetch the “foo” organisation:
Using database ID:
curl -X GET 'http://localhost:3001/portal-api/organisations/27' \
-H "Authorization: ${TOKEN}" \
-H 'Content-Type: application/json' \
-H 'Accept: application/json'
Using CID (recommended):
curl -X GET 'http://localhost:3001/portal-api/organisations/2sG5umt8rGHMiwjcgaHXxwExt8O' \
-H "Authorization: ${TOKEN}" \
-H 'Content-Type: application/json' \
-H 'Accept: application/json'
While both methods work, using CIDs is recommended as they remain consistent across environments.
Step-by-Step Instructions
In this guide, we’ll walk through the process of migrating selected organisations and their teams from one environment (Environment A) to another (Environment B). This involves exporting data from the source environment and importing it into the target environment.
Note
This guide only migrates the Organization
and Teams
resources from the developer portal; the same process must be repeated for other resources.
Example Scenario
- Source: Environment A at
https://portal-env-a.example.com
- Target: Environment B at
https://portal-env-b.example.com
- Goal: Migrate organisations and their associated teams
Setting Up Environment Variables
Before running the migration scripts, you’ll need to set up authentication tokens for both environments. You can find these tokens in the Developer Portal UI:
- Log in to the Developer Portal as an admin
- Click on your user profile in the top right corner
- Copy API credential
# For Environment A (source)
export ENV_A_TOKEN="your-source-environment-token"
# For Environment B (target)
export ENV_B_TOKEN="your-target-environment-token"
Export Organisations from Environment A
To start, you’ll want to gather the relevant data from Environment A. This ensures you have everything you need for a smooth migration. The data is saved into a JSON file, making it easy to handle during the import process.
Here’s an example of how you can export organisations from Environment A:
# Fetch organisations from Environment A
response=$(curl -s -H "Authorization: ${ENV_A_TOKEN}" \
-H "Content-Type: application/json" \
-H "Accept: application/json" \
"https://portal-env-a.example.com/organisations?page=1&per_page=50")
# Process each organisation
echo "$response" | jq -c '.[] | select(.Name != "Default Organisation") | del(.ID, .CreatedAt, .UpdatedAt, .Teams)' > data/organisations.json
Export Teams from Environment A
After exporting organisations, the next step is to export the teams associated with each organisation. We exclude default teams since these are created automatically by the portal, and dealing with them could lead to conflicts. The data is saved into JSON files for structured storage and easy access during the import process.
Here’s an example of how you can export teams from Environment A:
# Read each organisation and fetch its teams
while IFS= read -r org; do
org_cid=$(echo "$org" | jq -r '.CID')
echo "Fetching teams for organisation CID: $org_cid..."
# Fetch teams for the organisation
teams_response=$(curl -s -H "Authorization: ${ENV_A_TOKEN}" \
-H "Content-Type: application/json" \
-H "Accept: application/json" \
"https://portal-env-a.example.com/organisations/$org_cid/teams?page=1&per_page=50")
# Process each team
echo "$teams_response" | jq -c '.[] | select(.Name | endswith("All users") | not) | del(.Users)' > "data/teams_${org_cid}.json"
done < data/organisations.json
Import Organisations to Environment B
Now, let’s move those organisations into Environment B, one by one. The goal here is to recreate the organisational structure in Environment B accurately. By using the JSON files, you ensure that each organisation is imported correctly, keeping the relationships intact from Environment A.
Here’s an example of how you can import organisations into Environment B:
# Read each organisation and import it
while IFS= read -r org; do
org_cid=$(echo "$org" | jq -r '.CID')
echo "Importing organisation CID: $org_cid..."
# Import the organisation
curl -s -o /dev/null -w "%{http_code}" -X POST \
-H "Authorization: ${ENV_B_TOKEN}" \
-H "Content-Type: application/json" \
-H "Accept: application/json" \
-d "$org" "https://portal-env-b.example.com/organisations"
done < data/organisations.json
Import Teams to Environment B
After importing organisations, the next step is to import the teams associated with each organisation. This ensures that the organisational structure is accurately recreated in Environment B.
Here’s an example of how you can import teams into Environment B:
# Read each team file and import the teams
for file in data/teams_*.json; do
[[ -e "$file" ]] || continue
while IFS= read -r team; do
org_cid=$(basename "$file" | sed 's/teams_\(.*\)\.json/\1/')
team_cid=$(echo "$team" | jq -r '.CID')
echo "Importing team CID: $team_cid for organisation CID: $org_cid..."
# Import the team
curl -s -o /dev/null -w "%{http_code}" -X POST \
-H "Authorization: ${ENV_B_TOKEN}" \
-H "Content-Type: application/json" \
-H "Accept: application/json" \
-d "$team" "https://portal-env-b.example.com/organisations/$org_cid/teams"
done < "$file"
done
Verify the Migration
After completing the migration, follow these steps to verify that everything was imported correctly:
-
Compare Organisation Counts
- Check that the number of organisations in Environment B matches what you exported from Environment A
- Verify that each organisation’s details (name, status, etc.) are correct
-
Verify Team Structure
- Ensure all teams were created under their correct organisations
- Check that team configurations (permissions, settings) were preserved
Example of verification script:
#!/bin/bash
# Track total number of mismatches found
errors=0
echo "Starting verification..."
# === Organisation Verification ===
echo "Checking organisations..."
# Get organisations from source data file
# Format: "CID Name" for each organisation, sorted for comparison
source_orgs=$(jq -r '.[] | .CID + " " + .Name' data/organisations.json | sort)
# Get organisations from target environment via API
# Exclude default organisation and format same as source
target_orgs=$(curl -s -H "Authorization: ${ENV_B_TOKEN}" \
-H "Accept: application/json" \
"https://portal-env-b.example.com/organisations" | \
jq -r '.[] | select(.Name != "Default Organisation") | .CID + " " + .Name' | sort)
# Compare organisation lists
# diff will show: < for missing in target, > for extra in target
if [ "$source_orgs" != "$target_orgs" ]; then
echo "❌ Organisation mismatch!"
diff <(echo "$source_orgs") <(echo "$target_orgs") || true
((errors++))
else
echo "✅ Organisations match"
fi
# === Team Verification ===
echo -e "\nChecking teams..."
# Iterate through each organisation to check its teams
while IFS= read -r org; do
# Split organisation line into CID and Name
org_cid=$(echo "$org" | cut -d' ' -f1)
org_name=$(echo "$org" | cut -d' ' -f2-)
# Get teams from source data file for this organisation
source_teams=$(jq -r '.[] | .Name' "data/teams_${org_cid}.json" | sort)
# Get teams from target environment for this organisation
# Exclude auto-generated "All users" teams
target_teams=$(curl -s -H "Authorization: ${ENV_B_TOKEN}" \
-H "Accept: application/json" \
"https://portal-env-b.example.com/organisations/$org_cid/teams" | \
jq -r '.[] | select(.Name | endswith("All users") | not) | .Name' | sort)
# Compare team lists for this organisation
if [ "$source_teams" != "$target_teams" ]; then
echo "❌ Team mismatch in '$org_name'"
diff <(echo "$source_teams") <(echo "$target_teams") || true
((errors++))
else
echo "✅ Teams match in '$org_name'"
fi
done <<< "$source_orgs"
# === Final Status ===
# Exit with appropriate code: 0 for success, 1 for any errors
if [ $errors -eq 0 ]; then
echo -e "\n✅ SUCCESS: Migration verified"
exit 0
else
echo -e "\n❌ FAILURE: Found $errors error(s)"
exit 1
fi
If you find any discrepancies, you may need to:
- Review the migration logs
- Re-run the import for specific resources