> ## Documentation Index
> Fetch the complete documentation index at: https://tyk.io/docs/llms.txt
> Use this file to discover all available pages before exploring further.
# How to Configure PRM for an MCP Proxy and Test It with the Inspector
> Configure Protected Resource Metadata (PRM) on an MCP proxy, register your Identity Provider in the Developer Portal, and validate the end-to-end OAuth 2.1 flow with the embedded MCP Inspector. Worked example uses Keycloak.
Protected Resource Metadata (PRM) lets an MCP client discover which authorization server issues tokens for an MCP proxy, without the platform team explaining it out of band. This page walks through the full chain: configuring an Identity Provider (IdP) as the authorization server, enabling PRM on the MCP proxy's API definition in Tyk Gateway, registering the IdP in the Developer Portal, and validating the whole flow by calling a tool through the embedded MCP Inspector.
The worked example throughout uses [Keycloak](https://www.keycloak.org), since it is straightforward to run locally for testing. The same steps apply to any Identity Provider Dynamic Client Registration supports - see [Provider-Specific Instructions](/docs/tyk-stack/tyk-developer-portal/enterprise-developer-portal/api-access/dynamic-client-registration#provider-specific-instructions) for the equivalent steps in Okta, Auth0, Curity, and Gluu.
## Prerequisites
* Tyk Gateway and Tyk Dashboard, both v5.14.0 or later
* Tyk Developer Portal v1.19.0 or later
* A running instance of your Identity Provider (a local `docker run quay.io/keycloak/keycloak start-dev` instance is sufficient for testing with Keycloak)
* An MCP proxy already configured and published as a Product in the Portal. See [Creating a New Product](/docs/portal/api-products#creating-a-new-product)
## Configure Your Identity Provider
1. **Create a realm (or equivalent tenant/organization boundary in your IdP)**
With Keycloak, create a dedicated realm for this MCP proxy (or reuse an existing one). All the steps below happen inside that realm.
2. **Create a Client Scope for the Product/Plan**
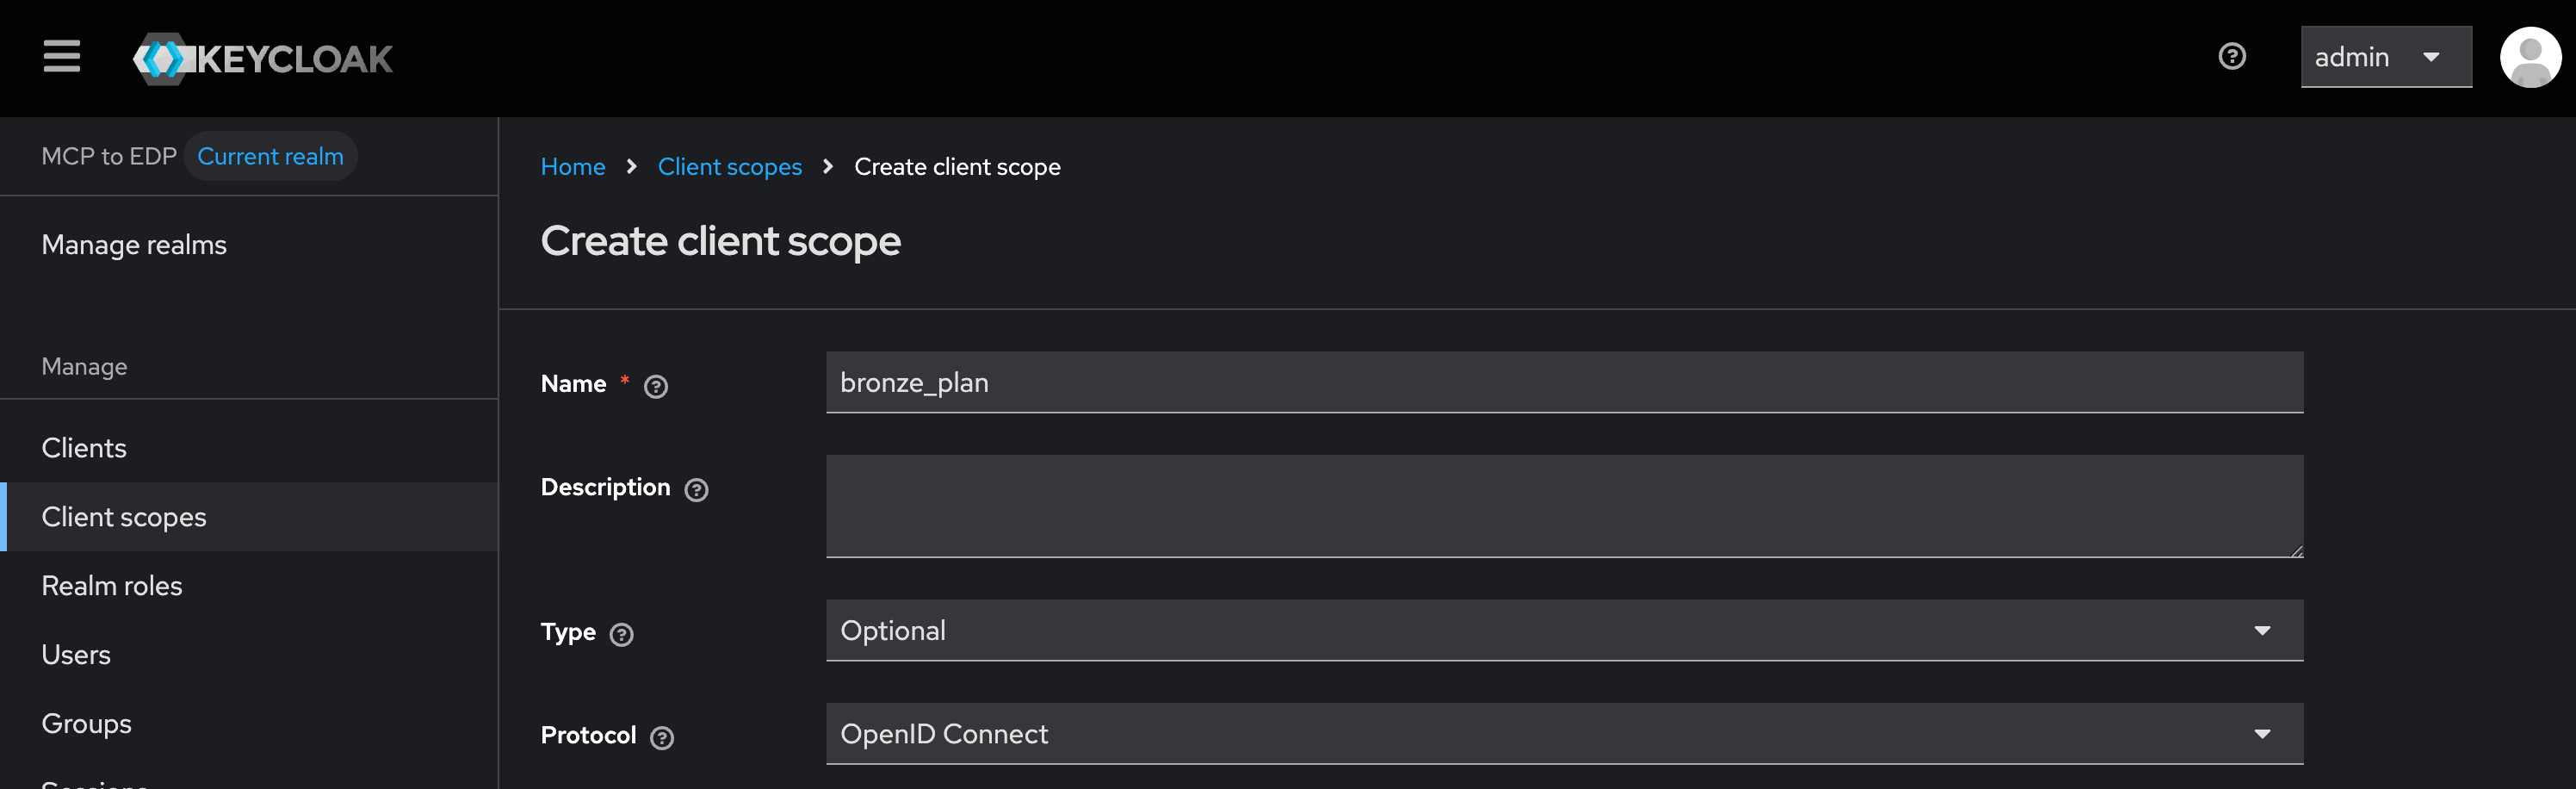
Create a scope whose name matches the OAuth 2.0 scope you will assign to the Product and Plan in the Portal. Its type must be **Optional** - this ensures the scope is only issued when the Portal explicitly requests it during Dynamic Client Registration, rather than being attached to every client by default.
This page uses a Product named "MCP Bronze" as a worked example, with two scopes: `product_mcp_bronze` for the Product itself and `bronze_plan` for its Plan. Create both now - substitute your own Product and Plan names throughout.
In Keycloak:
1. In the left navigation, select **Client scopes**.
2. Select **Create client scope** (top right).
3. Set **Name** to `product_mcp_bronze`.
4. Leave **Description** empty.
5. Set **Type** to **Optional**.
6. Leave **Protocol** as **OpenID Connect**.
7. Select **Save**.
8. Repeat steps 2-7 for a second scope named `bronze_plan`.
9. On the **Client scopes** list page, select the checkboxes for `product_mcp_bronze` and `bronze_plan`, then select **Assign type > Optional**.
 Both scopes now appear on the **Client scopes** page with type **Optional**, and are assigned to the realm as optional scopes. Both steps (creating the scope and assigning it to the realm) are required for Dynamic Client Registration to work; skipping the assignment fails registration with `403 Forbidden` ("Client scopes not allowed").
3. **Obtain an initial access token**
Most IdPs use an initial access token to authorize the Portal to register OAuth 2.0 clients on a Consumer's behalf. Some IdPs use a different mechanism instead - see [Authorize the Portal](/docs/tyk-stack/tyk-developer-portal/enterprise-developer-portal/api-access/dynamic-client-registration#authorize-the-portal) for the exceptions (Gluu, Auth0).
This step is IdP-side only - the token you generate here is pasted into the Portal's **OAuth 2.0 Providers** screen in [Register Your Identity Provider in the Portal](#register-your-identity-provider-in-the-portal) below, in the **Registration access token** field.
In Keycloak:
1. In the left navigation, select **Clients**.
2. Select the **Initial access token** tab.
3. Select **Create**.
4. Set **Expiration** to `1` **Days** and **Count** to `5` (how many clients this token may register - a small headroom for retries while testing). Leave **Web origins** empty.
5. Select **Save**.
6. Copy the token value shown. Keycloak displays it only once - if you lose it, generate a new one.
Keep this token; you need it in the next section.
## Configure PRM on the Gateway
This step is done in Tyk Dashboard's API Designer, on the MCP proxy's Tyk OAS definition, and is identical regardless of which IdP you use. See [MCP Gateway: OAuth 2.1 Authentication](/docs/ai-management/mcp-gateway/oauth-2-1) for the MCP-specific overview, or [OAuth 2.0 with an External IdP](/docs/api-management/authentication/oauth2-authentication) for the full `oauth2` scheme field reference.
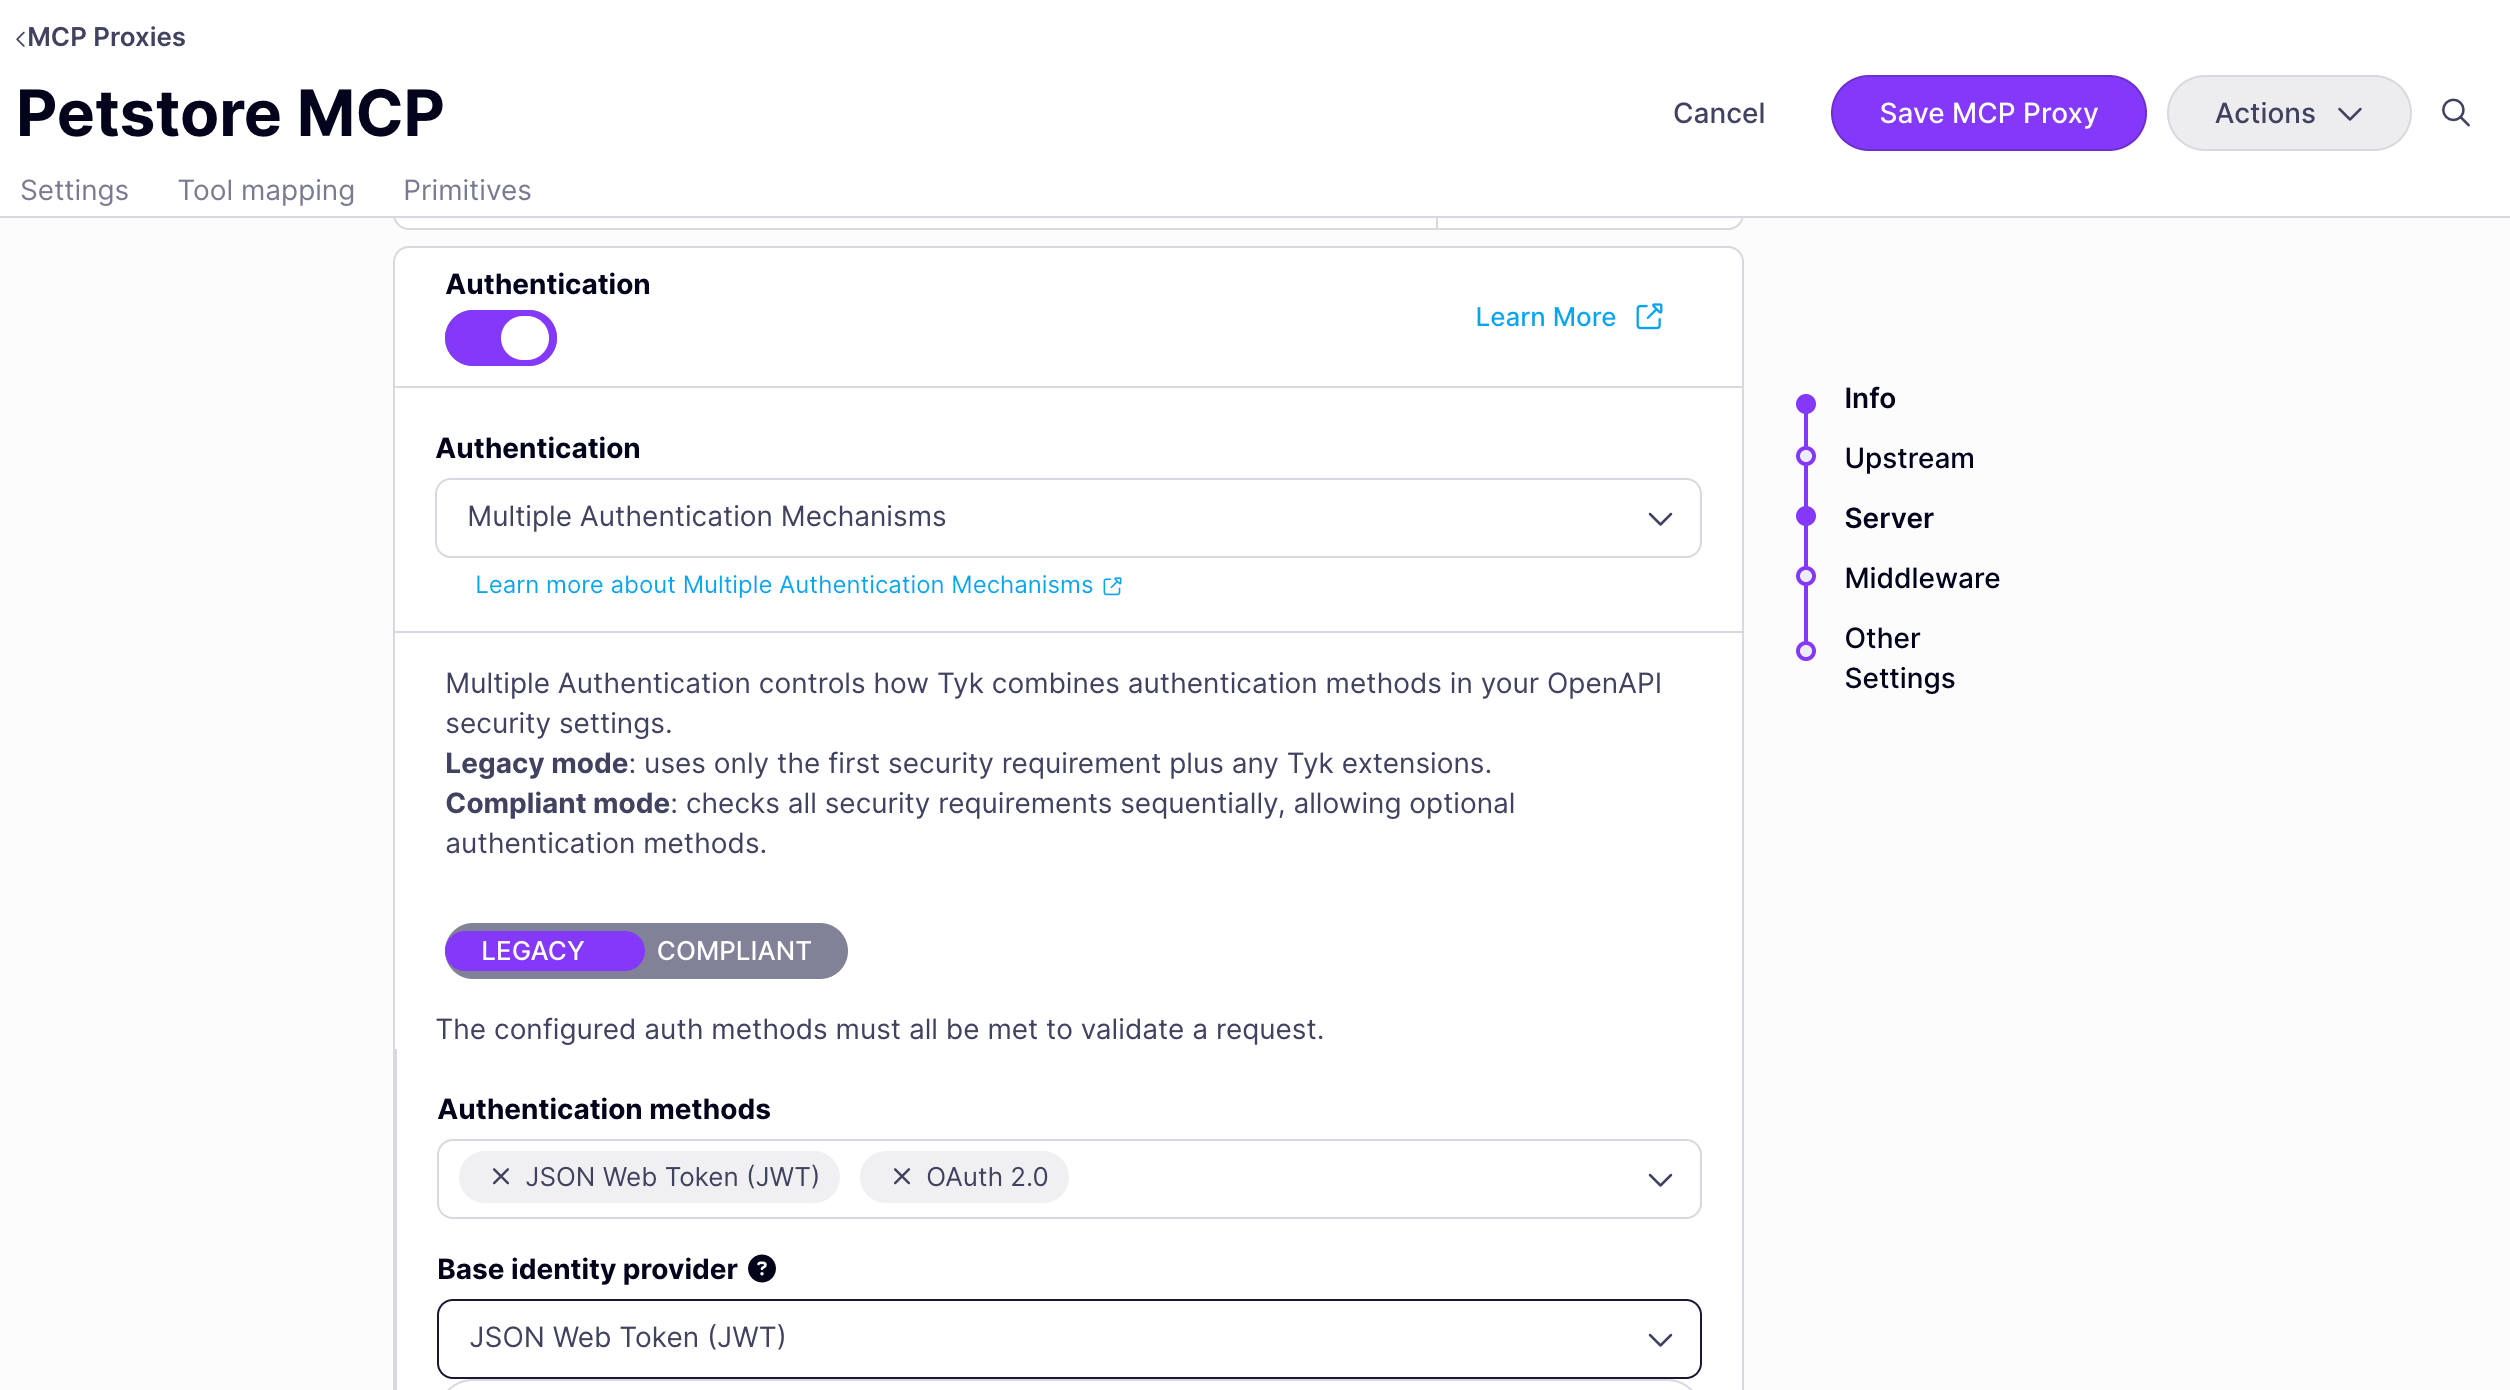
The `oauth2` security scheme does not validate a token's JWT signature itself - it only handles scope enforcement, PRM publishing, and token exchange. **JWT authentication must also be configured on the same API**, or Tyk's auth chain rejects the request before the `oauth2` scheme is ever reached. The Dashboard enforces this: selecting **OAuth 2.0** as the only authentication method shows the warning "OAuth 2.0 requires JWT authentication. Add JSON Web Token (JWT) to Authentication Methods to continue." The steps below configure both together, via **Multiple Authentication Mechanisms**.
1. **Open the Authentication settings**
In Tyk Dashboard, open the MCP proxy's OAS definition and go to its **Authentication** settings.
2. **Enable Multiple Authentication Mechanisms**
On the **Server** step of the API Designer, set **Authentication** to **Multiple Authentication Mechanisms**. Under **Authentication methods**, select both **JSON Web Token (JWT)** and **OAuth 2.0**. Both are required together - see the note above. Set **Base identity provider** to **JSON Web Token (JWT)** - this is the method whose identity Tyk uses when Legacy mode is active.
Both scopes now appear on the **Client scopes** page with type **Optional**, and are assigned to the realm as optional scopes. Both steps (creating the scope and assigning it to the realm) are required for Dynamic Client Registration to work; skipping the assignment fails registration with `403 Forbidden` ("Client scopes not allowed").
3. **Obtain an initial access token**
Most IdPs use an initial access token to authorize the Portal to register OAuth 2.0 clients on a Consumer's behalf. Some IdPs use a different mechanism instead - see [Authorize the Portal](/docs/tyk-stack/tyk-developer-portal/enterprise-developer-portal/api-access/dynamic-client-registration#authorize-the-portal) for the exceptions (Gluu, Auth0).
This step is IdP-side only - the token you generate here is pasted into the Portal's **OAuth 2.0 Providers** screen in [Register Your Identity Provider in the Portal](#register-your-identity-provider-in-the-portal) below, in the **Registration access token** field.
In Keycloak:
1. In the left navigation, select **Clients**.
2. Select the **Initial access token** tab.
3. Select **Create**.
4. Set **Expiration** to `1` **Days** and **Count** to `5` (how many clients this token may register - a small headroom for retries while testing). Leave **Web origins** empty.
5. Select **Save**.
6. Copy the token value shown. Keycloak displays it only once - if you lose it, generate a new one.
Keep this token; you need it in the next section.
## Configure PRM on the Gateway
This step is done in Tyk Dashboard's API Designer, on the MCP proxy's Tyk OAS definition, and is identical regardless of which IdP you use. See [MCP Gateway: OAuth 2.1 Authentication](/docs/ai-management/mcp-gateway/oauth-2-1) for the MCP-specific overview, or [OAuth 2.0 with an External IdP](/docs/api-management/authentication/oauth2-authentication) for the full `oauth2` scheme field reference.
The `oauth2` security scheme does not validate a token's JWT signature itself - it only handles scope enforcement, PRM publishing, and token exchange. **JWT authentication must also be configured on the same API**, or Tyk's auth chain rejects the request before the `oauth2` scheme is ever reached. The Dashboard enforces this: selecting **OAuth 2.0** as the only authentication method shows the warning "OAuth 2.0 requires JWT authentication. Add JSON Web Token (JWT) to Authentication Methods to continue." The steps below configure both together, via **Multiple Authentication Mechanisms**.
1. **Open the Authentication settings**
In Tyk Dashboard, open the MCP proxy's OAS definition and go to its **Authentication** settings.
2. **Enable Multiple Authentication Mechanisms**
On the **Server** step of the API Designer, set **Authentication** to **Multiple Authentication Mechanisms**. Under **Authentication methods**, select both **JSON Web Token (JWT)** and **OAuth 2.0**. Both are required together - see the note above. Set **Base identity provider** to **JSON Web Token (JWT)** - this is the method whose identity Tyk uses when Legacy mode is active.
 3. **Configure the JWT method**
Within the **JSON Web Token (JWT)** method, set:
| Field | Value |
| ---------------------- | -------------------------------------------------------------------------------------------------------------------------------------------------------------------------------------------------- |
| Token signing method | **RSA Public key** for Keycloak (or your IdP's key type) |
| Subject identity claim | The claim identifying the caller, most commonly `sub` |
| JWT Validation Source | Leave blank - this embeds a secret directly rather than validating against JWKS |
| JWKS Endpoints | Select **Add Endpoint**, then set **URL** to your IdP's JWKS endpoint - for Keycloak, `/realms//protocol/openid-connect/certs`. **Cache Timeout (Seconds)** is optional |
| Default Policies | A fallback Tyk policy, selected from your organisation's existing policies |
3. **Configure the JWT method**
Within the **JSON Web Token (JWT)** method, set:
| Field | Value |
| ---------------------- | -------------------------------------------------------------------------------------------------------------------------------------------------------------------------------------------------- |
| Token signing method | **RSA Public key** for Keycloak (or your IdP's key type) |
| Subject identity claim | The claim identifying the caller, most commonly `sub` |
| JWT Validation Source | Leave blank - this embeds a secret directly rather than validating against JWKS |
| JWKS Endpoints | Select **Add Endpoint**, then set **URL** to your IdP's JWKS endpoint - for Keycloak, `/realms//protocol/openid-connect/certs`. **Cache Timeout (Seconds)** is optional |
| Default Policies | A fallback Tyk policy, selected from your organisation's existing policies |
 It's recommended to configure the JWKS URI centrally via the [Identity Provider Registry](/docs/api-management/client-idp-registry) instead of directly on this method, particularly since the Portal also manages this IdP through Dynamic Client Registration. Configuring it here means the JWKS URI is embedded in this API's OAS definition - if the Portal and Dashboard ever write to the same definition concurrently, one can silently overwrite the other's change. Deleting a DCR-registered Product from the Portal also doesn't reliably clean up JWKS/scope config left directly on an API definition, leaving it orphaned. The Identity Provider Registry avoids both problems by keeping IdP configuration as its own resource, decoupled from any single API definition - see [What Is the Identity Provider Registry](/docs/api-management/client-idp-registry#what-is-the-identity-provider-registry) for the full reasoning.
4. **Configure the OAuth 2.0 method's Protected Resource Metadata panel**
Within the **OAuth 2.0** method, open the **Protected Resource Metadata** panel and set:
| Field | Value |
| ------------------------------------ | --------------------------------------------------------------------------------- |
| Protected Resource Metadata (toggle) | On |
| Resource URL | The MCP proxy's own listen path, e.g. `https://gateway.example.com/petstore-mcp/` |
| Authorization servers | Your IdP's issuer URL - for Keycloak, `/realms/` |
| Auto-derive scopes from operations | On (default) |
It's recommended to configure the JWKS URI centrally via the [Identity Provider Registry](/docs/api-management/client-idp-registry) instead of directly on this method, particularly since the Portal also manages this IdP through Dynamic Client Registration. Configuring it here means the JWKS URI is embedded in this API's OAS definition - if the Portal and Dashboard ever write to the same definition concurrently, one can silently overwrite the other's change. Deleting a DCR-registered Product from the Portal also doesn't reliably clean up JWKS/scope config left directly on an API definition, leaving it orphaned. The Identity Provider Registry avoids both problems by keeping IdP configuration as its own resource, decoupled from any single API definition - see [What Is the Identity Provider Registry](/docs/api-management/client-idp-registry#what-is-the-identity-provider-registry) for the full reasoning.
4. **Configure the OAuth 2.0 method's Protected Resource Metadata panel**
Within the **OAuth 2.0** method, open the **Protected Resource Metadata** panel and set:
| Field | Value |
| ------------------------------------ | --------------------------------------------------------------------------------- |
| Protected Resource Metadata (toggle) | On |
| Resource URL | The MCP proxy's own listen path, e.g. `https://gateway.example.com/petstore-mcp/` |
| Authorization servers | Your IdP's issuer URL - for Keycloak, `/realms/` |
| Auto-derive scopes from operations | On (default) |
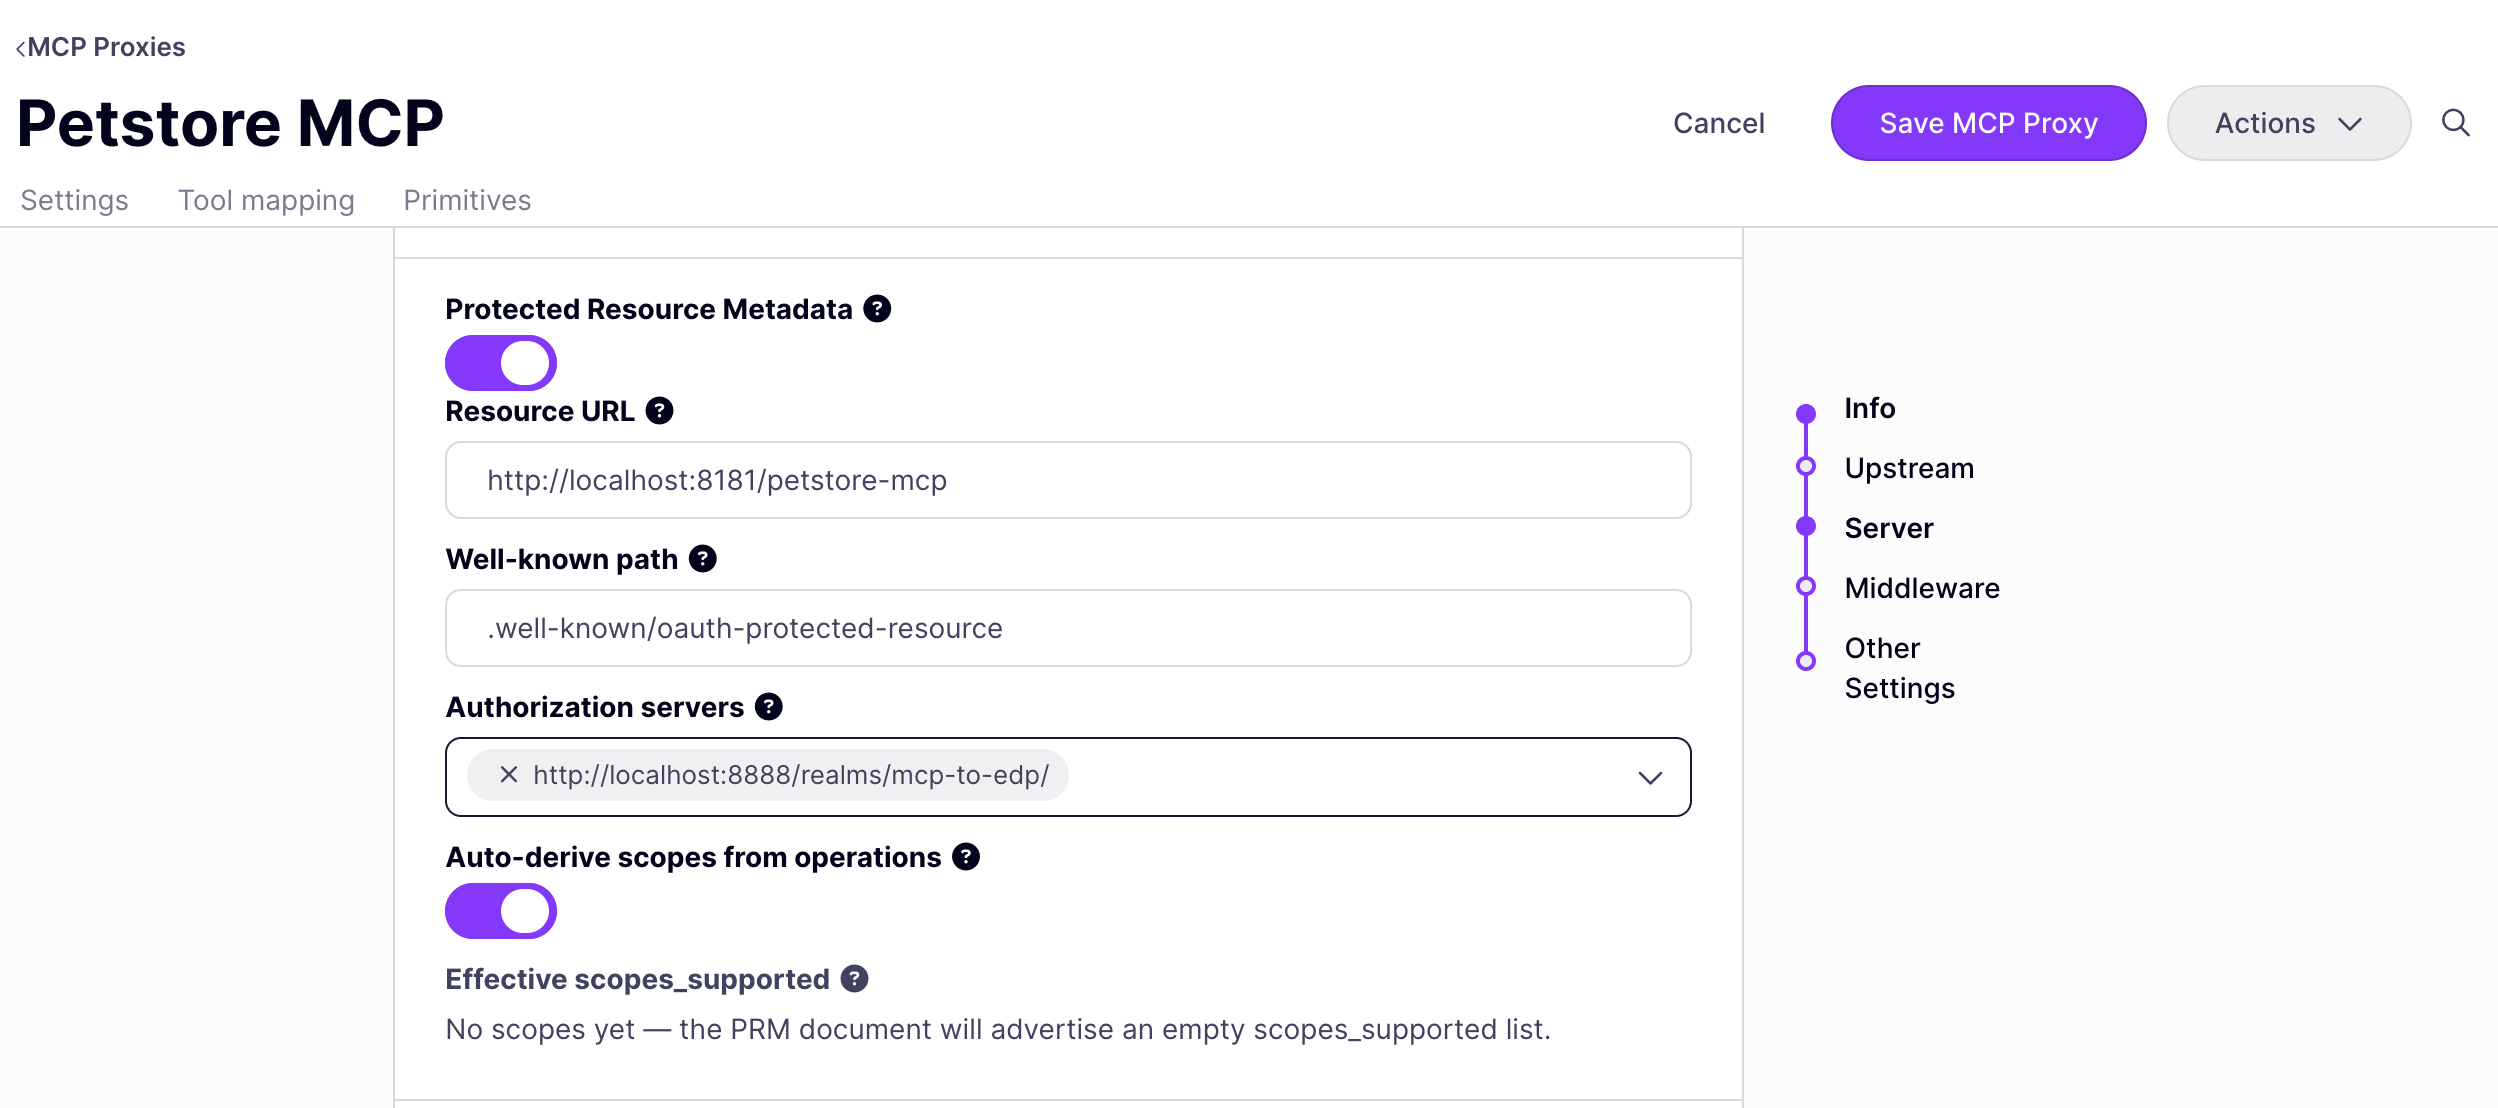 This is static mode - the Portal will show this authorization server directly to Consumers, rather than runtime-discovery guidance. See [Mirror and Static PRM](/docs/portal/mcp-oauth-access#mirror-and-static-prm) for the difference. A read-only **Effective scopes\_supported** preview below the panel shows exactly what the published PRM document will advertise - it stays empty until scopes exist in the OAS flows catalog, Required scopes policy, or a per-operation/per-primitive override, none of which this walkthrough configures.
5. **Leave Required scopes and Token Exchange as-is for this walkthrough**
The OAuth 2.0 method also has **Scope Check** (a **Required scopes** policy enforced independently of DCR) and **Token Exchange** panels. Neither is required for this walkthrough - leave **Enforce scope check** off unless you also want API-level scope enforcement beyond what DCR already provides.
The `oauth2` scheme's **Required scopes** policy (`scopeCheck`) is configured entirely in Tyk Dashboard - the Developer Portal does not yet surface or manage it. This is on the immediate roadmap. This does not affect the DCR scope assignment on Products and Plans covered later in this page, which the Portal already manages via [Dynamic Client Registration](/docs/tyk-stack/tyk-developer-portal/enterprise-developer-portal/api-access/dynamic-client-registration) - that is a separate, existing mechanism.
6. **Select Save MCP Proxy**
## Register Your Identity Provider in the Portal
1. **Enable the Identity Provider Registry**
If not already enabled, set [`TYK_PORTAL_ENABLEIDPREGISTRY=true`](/docs/product-stack/tyk-enterprise-developer-portal/deploy/configuration#tyk_portal_enableidpregistry) and restart the Portal. See [Identity Provider Registry](/docs/api-management/client-idp-registry) for why this is the recommended approach.
2. **Create the OAuth 2.0 Provider**
In the Admin Portal, navigate to **OAuth 2.0 Providers** and select **Add provider** (or equivalent). Under **Identity provider details**, set:
| Field | Value |
| -------------------------------------------- | ------------------------------------------------------------------------------------ |
| Name | A label of your choice, e.g. `Keycloak` |
| Identity provider type | **Keycloak** for this worked example - select **Other** if your IdP isn't listed |
| OIDC well-known configuration URL (required) | For Keycloak: `/realms//.well-known/openid-configuration` |
| Registration access token (optional) | The initial access token from the previous section |
| Scope claim name (optional) | Leave blank - defaults to `scope` |
| SSL insecure skip verify | Leave unchecked unless your IdP uses a self-signed certificate |
This is static mode - the Portal will show this authorization server directly to Consumers, rather than runtime-discovery guidance. See [Mirror and Static PRM](/docs/portal/mcp-oauth-access#mirror-and-static-prm) for the difference. A read-only **Effective scopes\_supported** preview below the panel shows exactly what the published PRM document will advertise - it stays empty until scopes exist in the OAS flows catalog, Required scopes policy, or a per-operation/per-primitive override, none of which this walkthrough configures.
5. **Leave Required scopes and Token Exchange as-is for this walkthrough**
The OAuth 2.0 method also has **Scope Check** (a **Required scopes** policy enforced independently of DCR) and **Token Exchange** panels. Neither is required for this walkthrough - leave **Enforce scope check** off unless you also want API-level scope enforcement beyond what DCR already provides.
The `oauth2` scheme's **Required scopes** policy (`scopeCheck`) is configured entirely in Tyk Dashboard - the Developer Portal does not yet surface or manage it. This is on the immediate roadmap. This does not affect the DCR scope assignment on Products and Plans covered later in this page, which the Portal already manages via [Dynamic Client Registration](/docs/tyk-stack/tyk-developer-portal/enterprise-developer-portal/api-access/dynamic-client-registration) - that is a separate, existing mechanism.
6. **Select Save MCP Proxy**
## Register Your Identity Provider in the Portal
1. **Enable the Identity Provider Registry**
If not already enabled, set [`TYK_PORTAL_ENABLEIDPREGISTRY=true`](/docs/product-stack/tyk-enterprise-developer-portal/deploy/configuration#tyk_portal_enableidpregistry) and restart the Portal. See [Identity Provider Registry](/docs/api-management/client-idp-registry) for why this is the recommended approach.
2. **Create the OAuth 2.0 Provider**
In the Admin Portal, navigate to **OAuth 2.0 Providers** and select **Add provider** (or equivalent). Under **Identity provider details**, set:
| Field | Value |
| -------------------------------------------- | ------------------------------------------------------------------------------------ |
| Name | A label of your choice, e.g. `Keycloak` |
| Identity provider type | **Keycloak** for this worked example - select **Other** if your IdP isn't listed |
| OIDC well-known configuration URL (required) | For Keycloak: `/realms//.well-known/openid-configuration` |
| Registration access token (optional) | The initial access token from the previous section |
| Scope claim name (optional) | Leave blank - defaults to `scope` |
| SSL insecure skip verify | Leave unchecked unless your IdP uses a self-signed certificate |
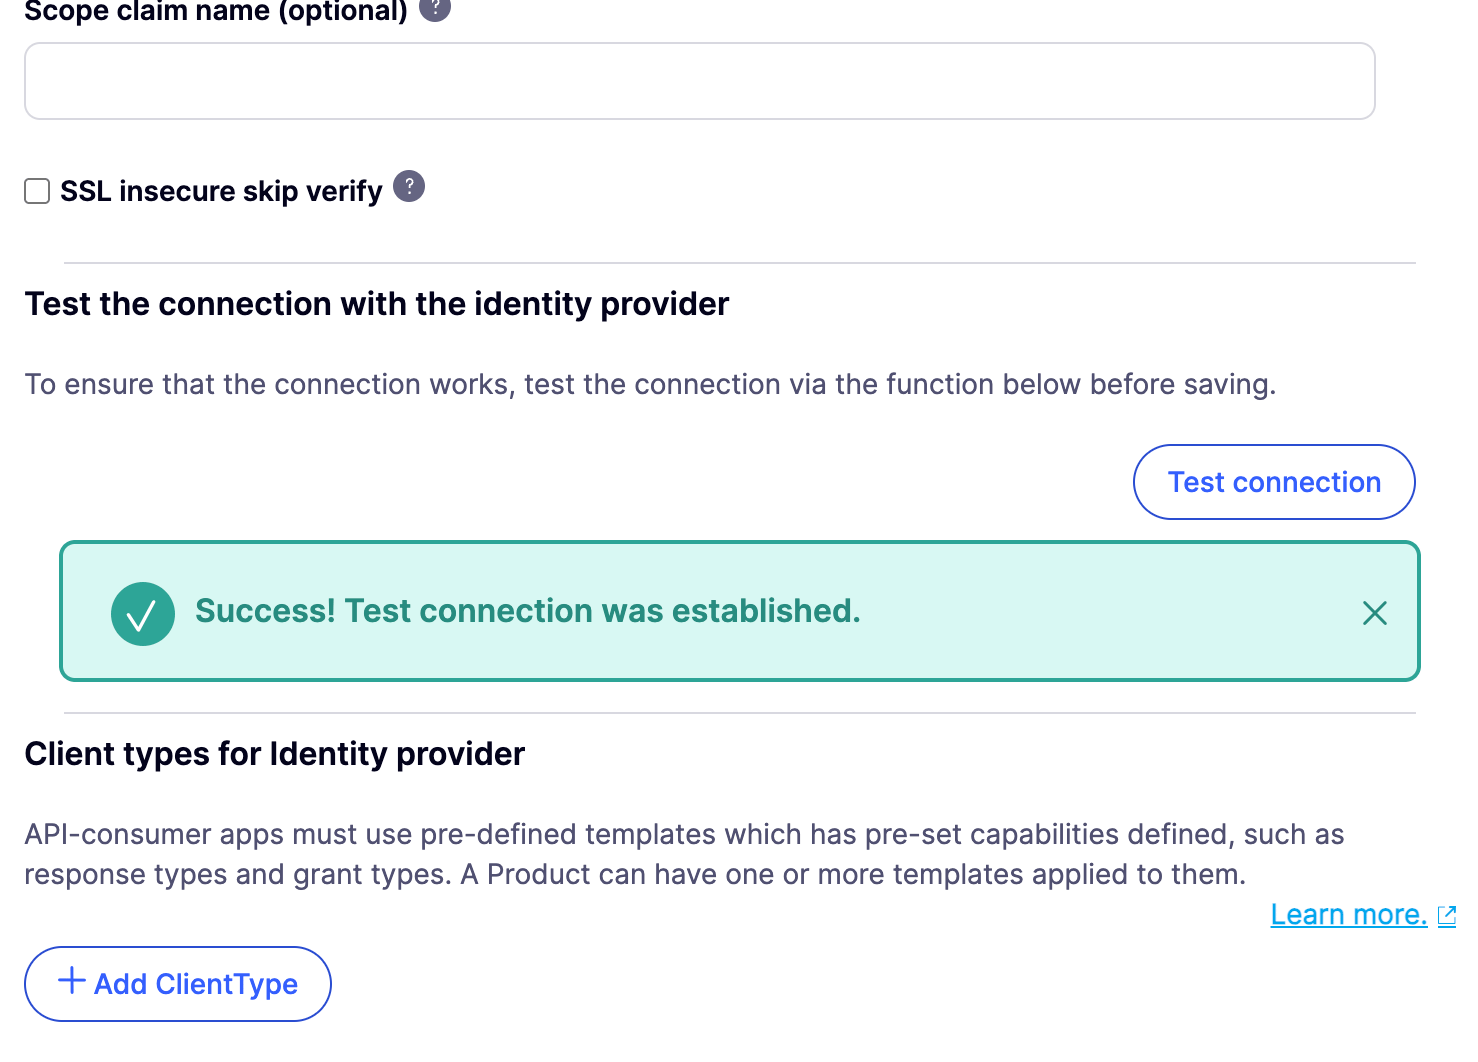
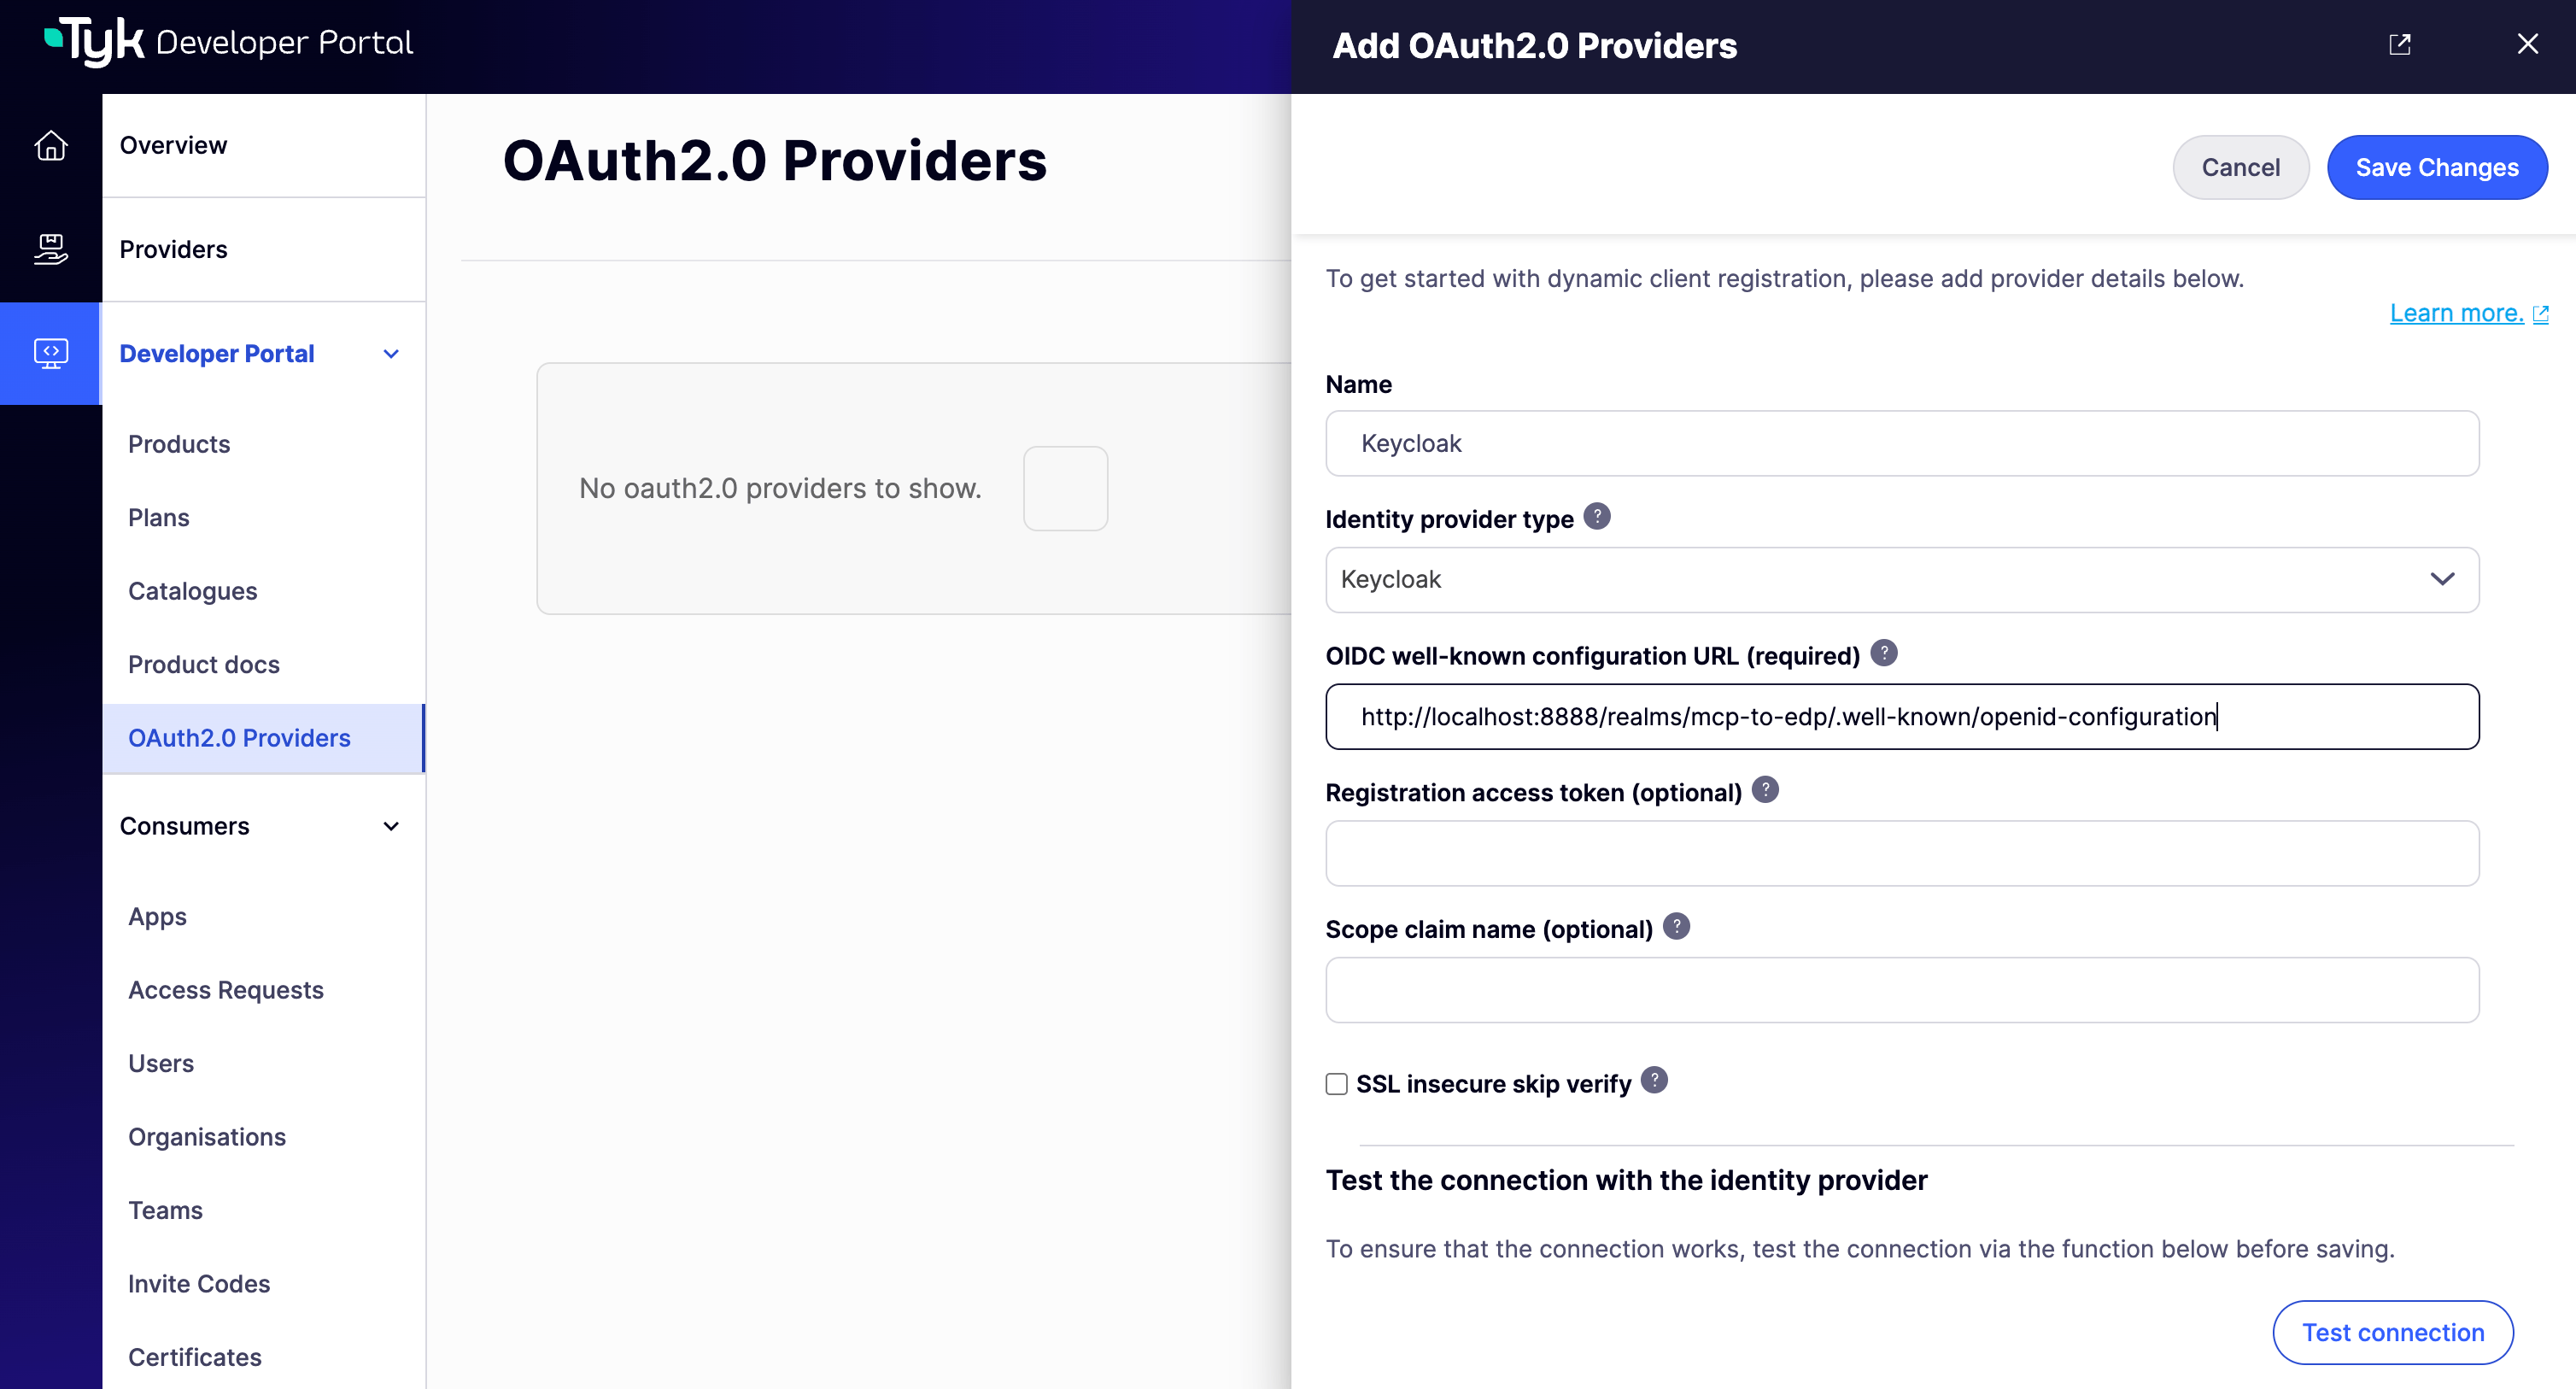 Before saving, select **Test the connection with the identity provider** to confirm the Portal can reach your IdP. Full field reference: [Connection Settings](/docs/tyk-stack/tyk-developer-portal/enterprise-developer-portal/api-access/dynamic-client-registration#connection-settings).
3. **Add a Client Type**
Under **Client types for Identity provider**, select **Add ClientType**. Add at least one - for a first test, `client_credentials` grant with `client_secret_basic` token endpoint authentication is the simplest to validate manually.
Before saving, select **Test the connection with the identity provider** to confirm the Portal can reach your IdP. Full field reference: [Connection Settings](/docs/tyk-stack/tyk-developer-portal/enterprise-developer-portal/api-access/dynamic-client-registration#connection-settings).
3. **Add a Client Type**
Under **Client types for Identity provider**, select **Add ClientType**. Add at least one - for a first test, `client_credentials` grant with `client_secret_basic` token endpoint authentication is the simplest to validate manually.
 This section is referred to as **Client Profiles** elsewhere in the documentation - see [Client Profiles](/docs/tyk-stack/tyk-developer-portal/enterprise-developer-portal/api-access/dynamic-client-registration#client-profiles) for the full field reference.
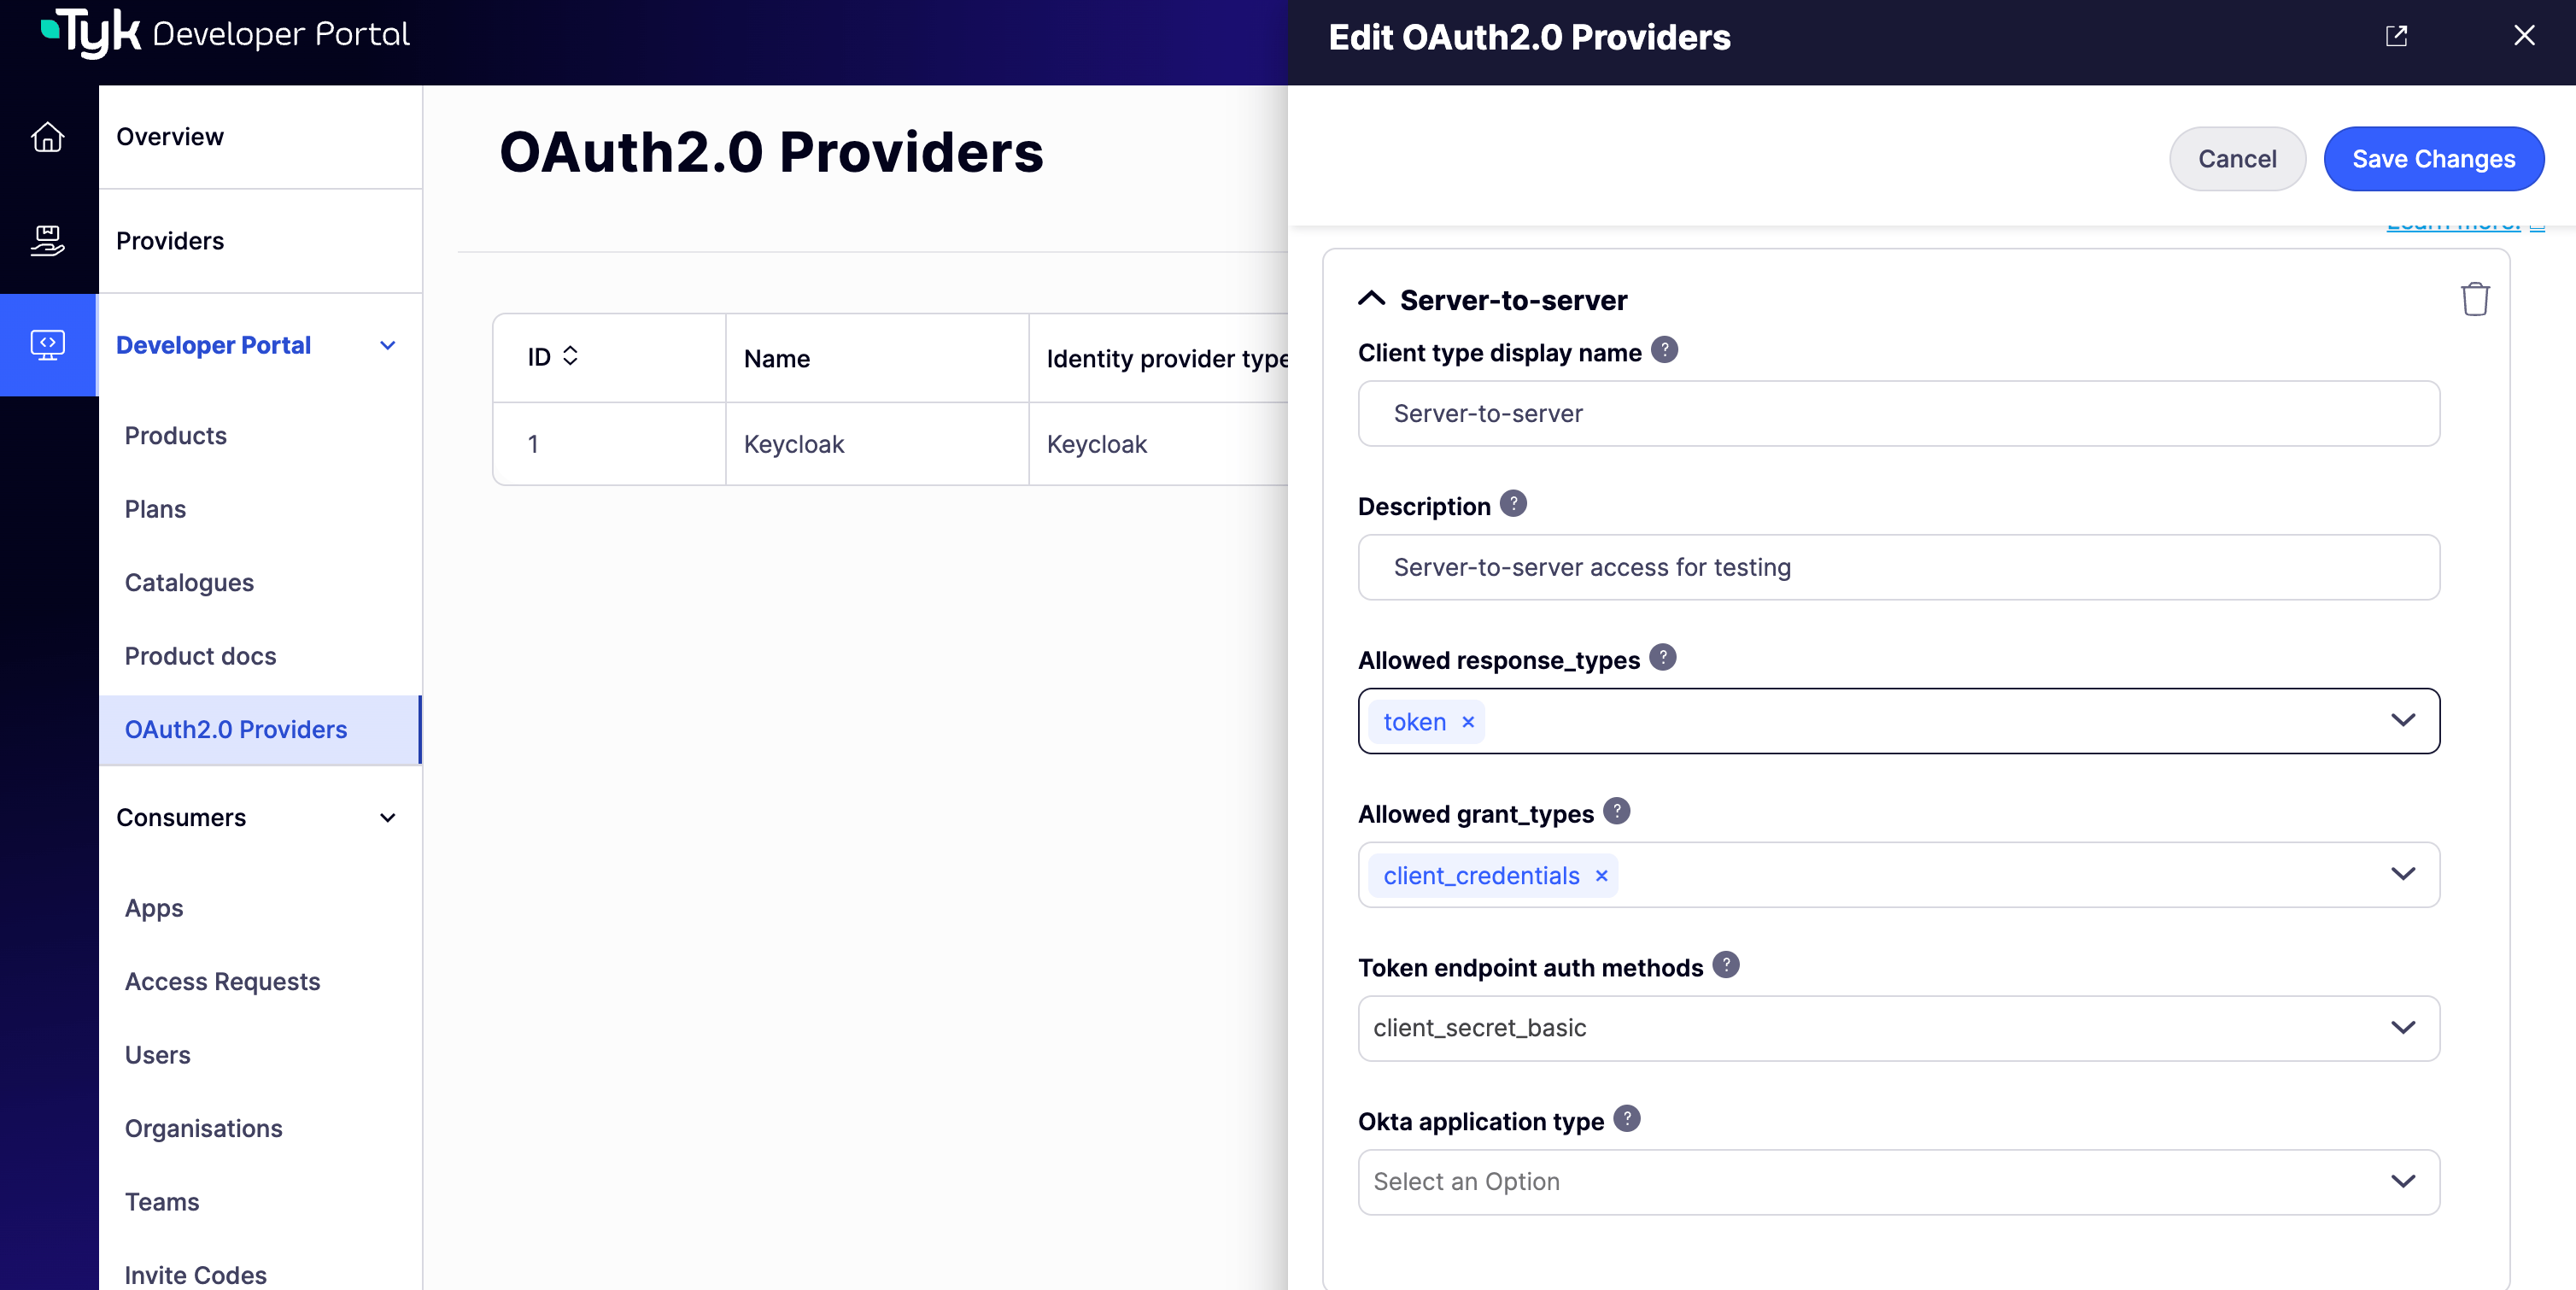
Selecting **Add ClientType** opens a form:
| Field | Value |
| --------------------------- | ------------------------------------- |
| Client type display name | `Server-to-server` |
| Description | `Server-to-server access for testing` |
| Allowed response\_types | `token` |
| Allowed grant\_types | `client_credentials` |
| Token endpoint auth methods | `client_secret_basic` |
| Okta application type | Leave unset - Okta-only |
This section is referred to as **Client Profiles** elsewhere in the documentation - see [Client Profiles](/docs/tyk-stack/tyk-developer-portal/enterprise-developer-portal/api-access/dynamic-client-registration#client-profiles) for the full field reference.
Selecting **Add ClientType** opens a form:
| Field | Value |
| --------------------------- | ------------------------------------- |
| Client type display name | `Server-to-server` |
| Description | `Server-to-server access for testing` |
| Allowed response\_types | `token` |
| Allowed grant\_types | `client_credentials` |
| Token endpoint auth methods | `client_secret_basic` |
| Okta application type | Leave unset - Okta-only |
 4. **Assign the scope to the Product and Plan**
Both scopes must already exist in your IdP before the Product or Plan is published - see [OAuth 2.0 Scopes](/docs/tyk-stack/tyk-developer-portal/enterprise-developer-portal/api-access/dynamic-client-registration#oauth-2-0-scopes).
The Scopes field only registers a value once it's committed as a tag - press **Enter** after typing each scope name. Clicking **Save Changes** immediately after typing, without pressing Enter first, saves the record but silently drops whatever you typed, leaving Scopes empty with no error shown. This applies on both the Product and the Plan.
On the Product:
1. Navigate to **Products** and open your MCP Product.
2. Select the **Dynamic Client Registration** tab.
3. Select **Enable dynamic client registration**.
4. Enter `product_mcp_bronze` in the **Scopes** field.
5. Set **Identity provider** to the OAuth 2.0 Provider you created earlier (**Keycloak** for this worked example).
6. Under **Specify client types**, select the Client Type you created in the previous step.
7. Select **Save Changes**.
4. **Assign the scope to the Product and Plan**
Both scopes must already exist in your IdP before the Product or Plan is published - see [OAuth 2.0 Scopes](/docs/tyk-stack/tyk-developer-portal/enterprise-developer-portal/api-access/dynamic-client-registration#oauth-2-0-scopes).
The Scopes field only registers a value once it's committed as a tag - press **Enter** after typing each scope name. Clicking **Save Changes** immediately after typing, without pressing Enter first, saves the record but silently drops whatever you typed, leaving Scopes empty with no error shown. This applies on both the Product and the Plan.
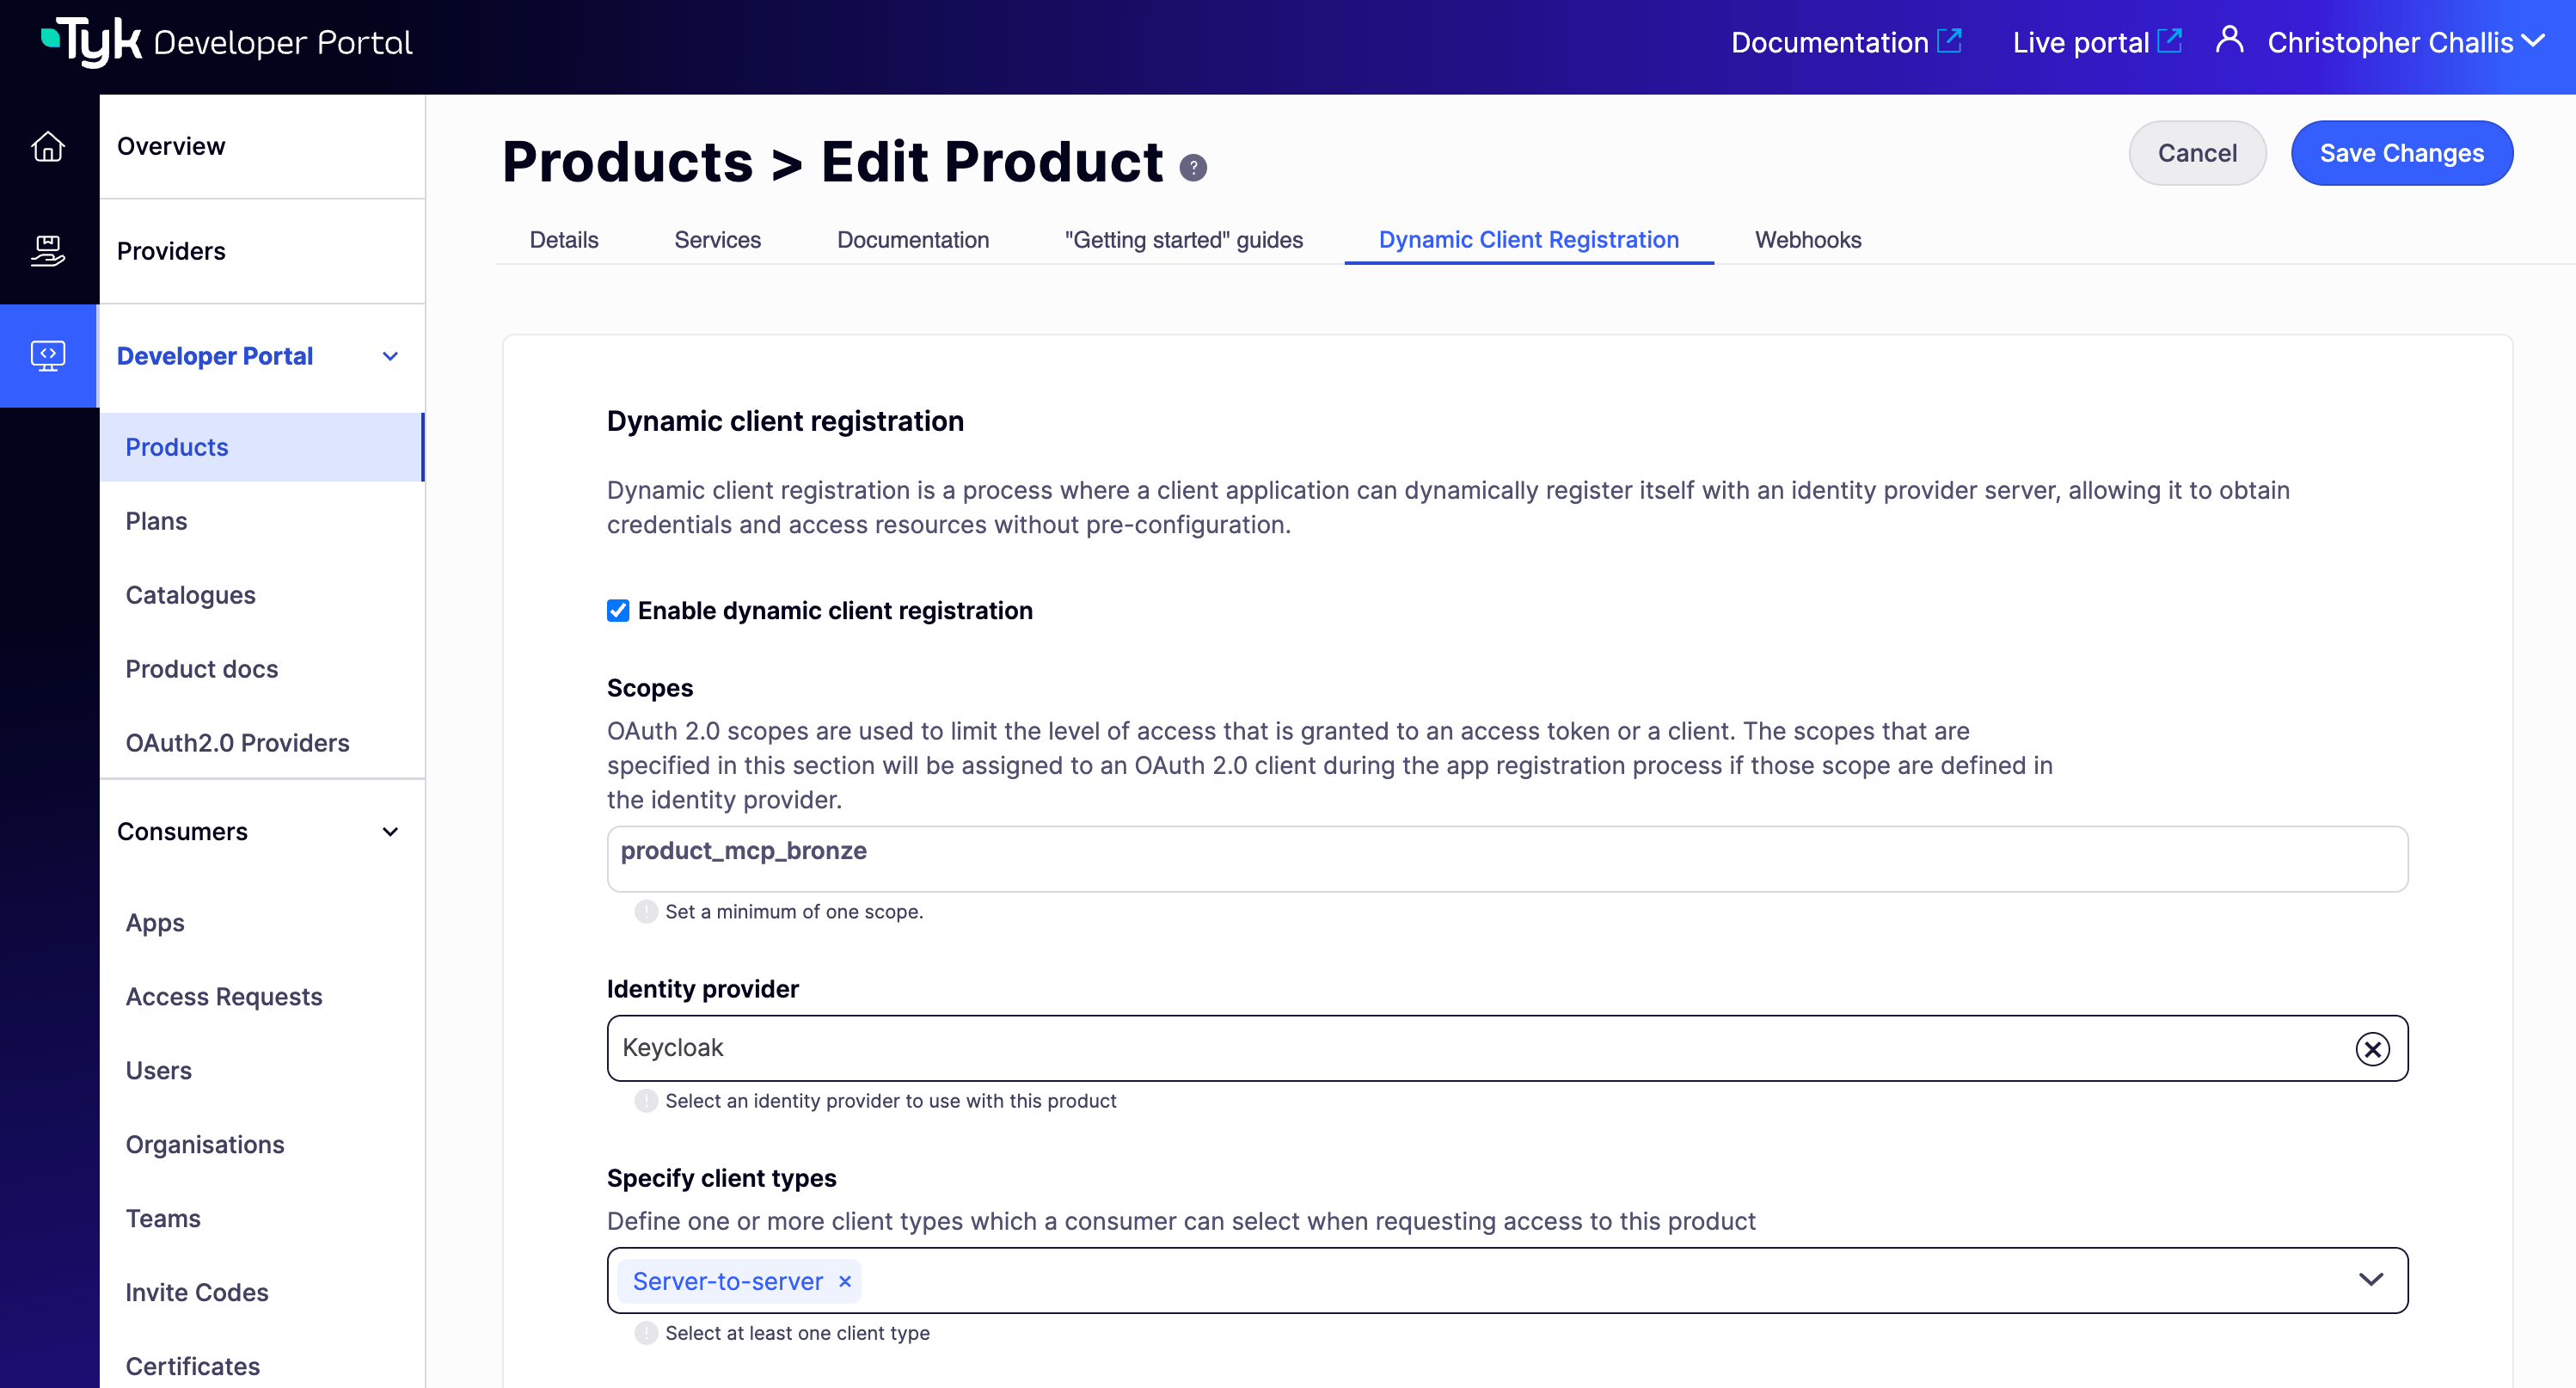
On the Product:
1. Navigate to **Products** and open your MCP Product.
2. Select the **Dynamic Client Registration** tab.
3. Select **Enable dynamic client registration**.
4. Enter `product_mcp_bronze` in the **Scopes** field.
5. Set **Identity provider** to the OAuth 2.0 Provider you created earlier (**Keycloak** for this worked example).
6. Under **Specify client types**, select the Client Type you created in the previous step.
7. Select **Save Changes**.
 On the Plan:
1. Navigate to **Plans** and open the Plan.
2. Select **Advanced Settings**.
3. In the **Scopes** field, enter `bronze_plan`.
4. Select **Save Changes**.
## Approve a Test Access Request
1. As a Consumer, submit an access request for the Product, selecting the Client Profile you created.
2. As an Owner, approve the request. The Portal registers a real OAuth 2.0 client in your IdP at this point, using the initial access token from earlier.
3. Retrieve the issued credential from the Developer App. See [Where Developers Find Token Information](/docs/portal/mcp-oauth-access#where-developers-find-token-information) for what the credential card shows.
## Test the End-to-End Flow with the Inspector
1. Open the MCP proxy's Product detail page and open the Inspector. See [Test MCP Tools with the Embedded MCP Inspector](/docs/portal/mcp-inspector-playground) if you haven't used it before.
2. Request a token from your IdP directly, using the Client ID and Secret from the credential in the previous step, and requesting both the `product_mcp_bronze` and `bronze_plan` scopes. The credential card tells you which authorization server to use, but does not provide a runnable command - for Keycloak, request a token with `client_credentials` like this:
```bash theme={null}
curl -X POST https:///realms/mcp-to-edp/protocol/openid-connect/token \
-d grant_type=client_credentials \
-d client_id= \
-d client_secret= \
-d "scope=product_mcp_bronze bronze_plan"
```
Take the `access_token` value from the JSON response and enter it into the Inspector's connection form as `Bearer ` in the Authorization header field.
3. Call a tool. A successful response confirms PRM discovery, IdP token issuance, and Gateway-side token validation are all working together correctly.
On the Plan:
1. Navigate to **Plans** and open the Plan.
2. Select **Advanced Settings**.
3. In the **Scopes** field, enter `bronze_plan`.
4. Select **Save Changes**.
## Approve a Test Access Request
1. As a Consumer, submit an access request for the Product, selecting the Client Profile you created.
2. As an Owner, approve the request. The Portal registers a real OAuth 2.0 client in your IdP at this point, using the initial access token from earlier.
3. Retrieve the issued credential from the Developer App. See [Where Developers Find Token Information](/docs/portal/mcp-oauth-access#where-developers-find-token-information) for what the credential card shows.
## Test the End-to-End Flow with the Inspector
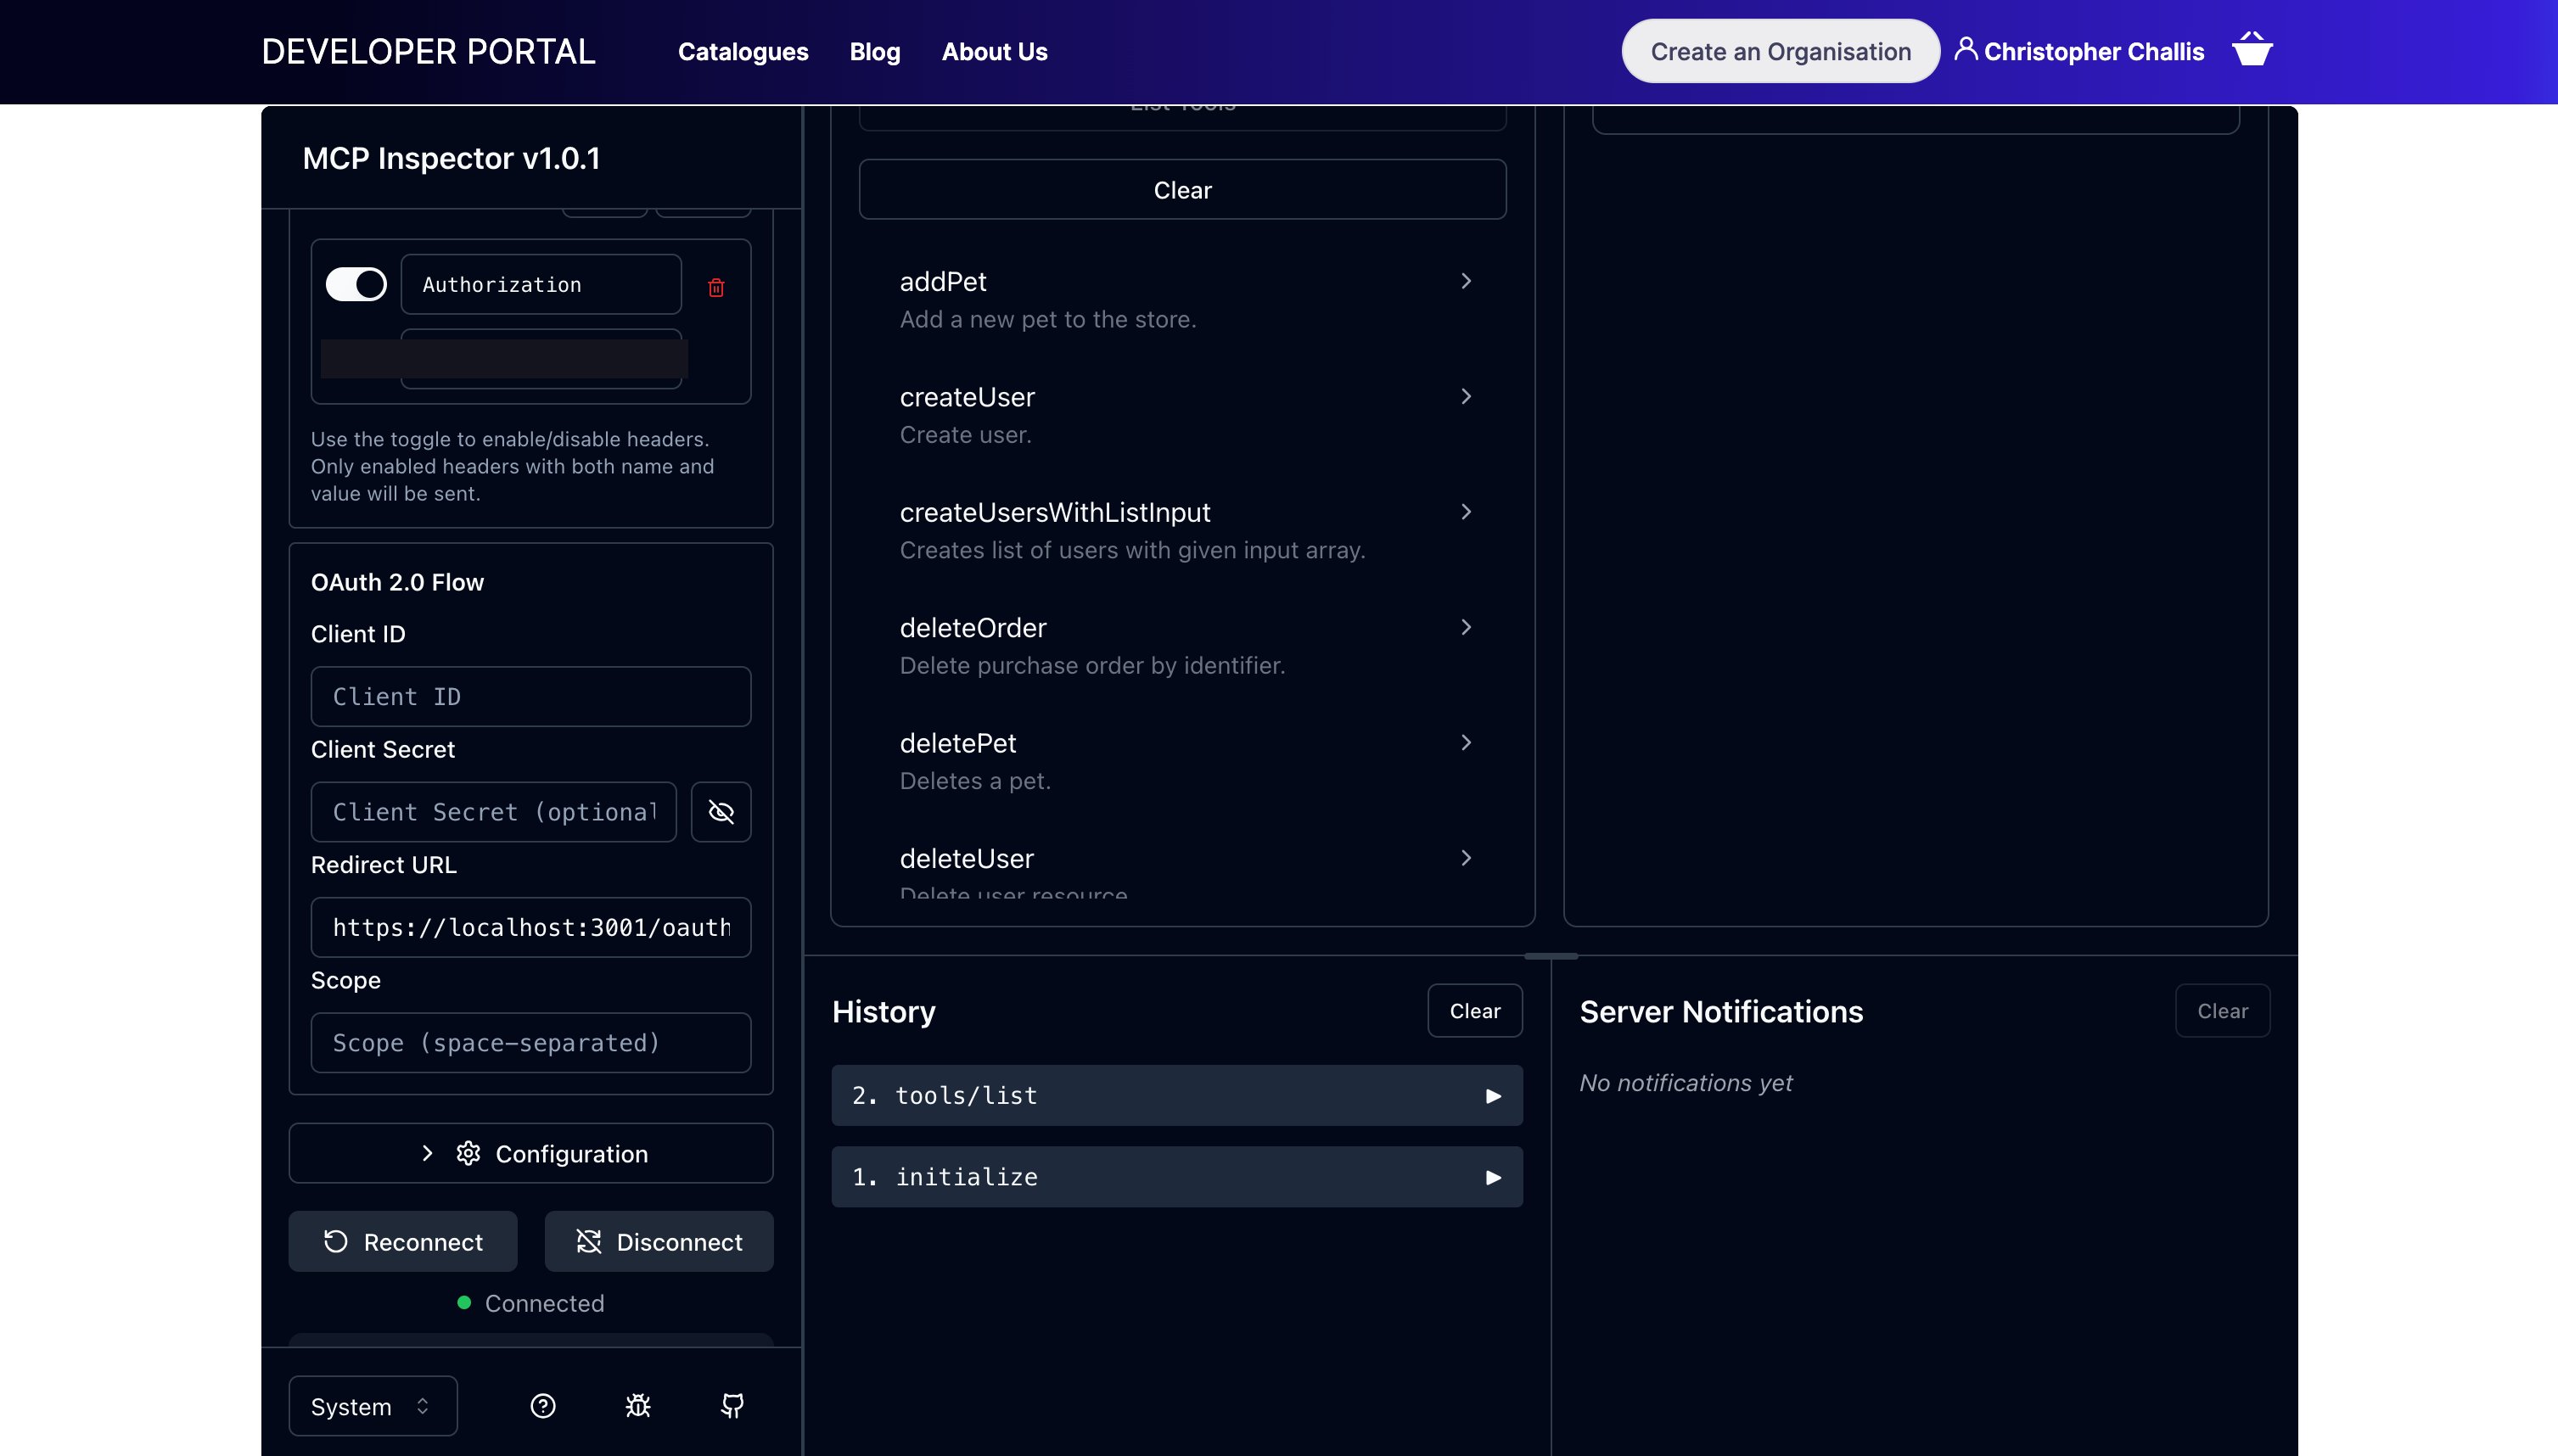
1. Open the MCP proxy's Product detail page and open the Inspector. See [Test MCP Tools with the Embedded MCP Inspector](/docs/portal/mcp-inspector-playground) if you haven't used it before.
2. Request a token from your IdP directly, using the Client ID and Secret from the credential in the previous step, and requesting both the `product_mcp_bronze` and `bronze_plan` scopes. The credential card tells you which authorization server to use, but does not provide a runnable command - for Keycloak, request a token with `client_credentials` like this:
```bash theme={null}
curl -X POST https:///realms/mcp-to-edp/protocol/openid-connect/token \
-d grant_type=client_credentials \
-d client_id= \
-d client_secret= \
-d "scope=product_mcp_bronze bronze_plan"
```
Take the `access_token` value from the JSON response and enter it into the Inspector's connection form as `Bearer ` in the Authorization header field.
3. Call a tool. A successful response confirms PRM discovery, IdP token issuance, and Gateway-side token validation are all working together correctly.
 ## Related
* [MCP Gateway: OAuth 2.1 Authentication](/docs/ai-management/mcp-gateway/oauth-2-1) - MCP-specific PRM and token exchange overview
* [OAuth 2.0 with an External IdP](/docs/api-management/authentication/oauth2-authentication) - full `oauth2` security scheme field reference, including scope enforcement and its JWT dependency
* [Identity Provider Registry](/docs/api-management/client-idp-registry) - how IdP configuration is centrally managed
* [Dynamic Client Registration](/docs/tyk-stack/tyk-developer-portal/enterprise-developer-portal/api-access/dynamic-client-registration) - full DCR setup reference, including provider-specific instructions for Keycloak, Okta, Auth0, Curity, and Gluu
* [Access Protected MCP Proxies with OAuth 2.1](/docs/portal/mcp-oauth-access) - what the Consumer sees once access is approved
* [Test MCP Tools with the Embedded MCP Inspector](/docs/portal/mcp-inspector-playground) - using the Inspector generally
## Related
* [MCP Gateway: OAuth 2.1 Authentication](/docs/ai-management/mcp-gateway/oauth-2-1) - MCP-specific PRM and token exchange overview
* [OAuth 2.0 with an External IdP](/docs/api-management/authentication/oauth2-authentication) - full `oauth2` security scheme field reference, including scope enforcement and its JWT dependency
* [Identity Provider Registry](/docs/api-management/client-idp-registry) - how IdP configuration is centrally managed
* [Dynamic Client Registration](/docs/tyk-stack/tyk-developer-portal/enterprise-developer-portal/api-access/dynamic-client-registration) - full DCR setup reference, including provider-specific instructions for Keycloak, Okta, Auth0, Curity, and Gluu
* [Access Protected MCP Proxies with OAuth 2.1](/docs/portal/mcp-oauth-access) - what the Consumer sees once access is approved
* [Test MCP Tools with the Embedded MCP Inspector](/docs/portal/mcp-inspector-playground) - using the Inspector generally