Overview
Tyk’s support for the OpenAPI Specification is designed to fit in with your existing workflows as seamlessly as possible, whether you have one of our paid offerings, or are using our free open-source Gateway. You should be able to do a huge amount in the editor of your choice. The Tyk Dashboard’s API Designer will support you whether you want to create a new API from a blank slate, or just to dip into if you want a bit of help with configuring Tyk’s powerful transformation middleware. One of the great things about working with Tyk is that the OpenAPI document containing the OAS compliant description of your service is a single file (or group of files) that you deploy throughout your workflow. You can iterate on that document within your source control system until you are totally happy. At this point, you can publish the OpenAPI description to your Developer Portal to document what a Developer needs to use the API (and nothing they don’t need to know). As the OpenAPI description is the source of truth for the Tyk OAS API definition and can be updated without impacting the Tyk Vendor Extension, you can automate deployment of updates to your API on Tyk whenever a new version is committed into your source control. This model is very popular in GitOps and CI/CD environments.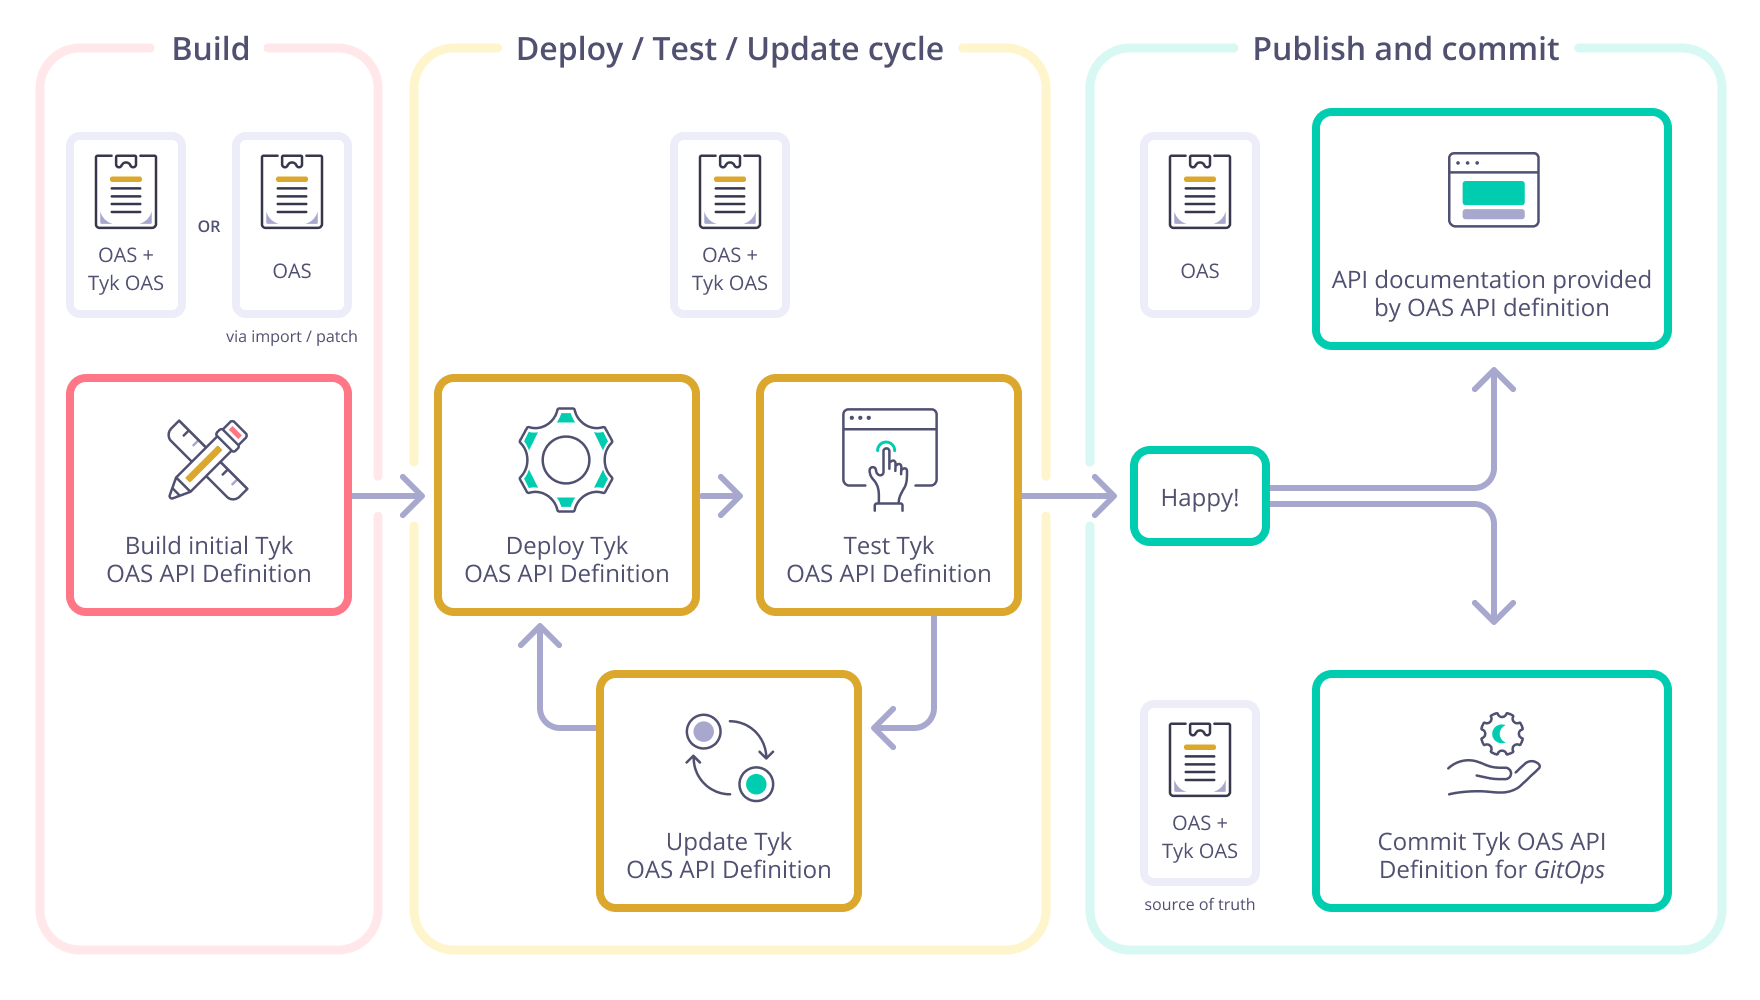
API Definition Management with Tyk
There are three methods by which API definitions can be deployed to Tyk: using the Tyk Dashboard API Designer, using the Tyk Dashboard API and using the Tyk Gateway API. The first two options provide access to the powerful licensed features of Tyk, whilst the third is used for open source deployments. Tyk provides additional tools to assist with automation when using the Tyk Dashboard API - namely Tyk Operator(for Kubernetes deployments) and Tyk Sync (for gitops).Creating an API
Tyk is designed to fit into your workflow, so has full support for you to import your existing OpenAPI descriptions as the starting point for a Tyk OAS API. Tyk can automatically configure aspects of the Gateway’s API security and management functions based upon the content of the OpenAPI description, for example using the security settings to configure client authentication or the endpoint examples and schemas to configure request validation and mock response middleware. Alternatively, if you don’t have an existing OpenAPI description, you can use the API Designer to bootstrap one for you: build your API in Tyk and then export an OAS compliant description that you can use elsewhere, for example as documentation for your new API.Using Tyk Dashboard API Designer to create an API
In this tutorial we guide you through the steps to create a new Tyk OAS API using the GUI.-
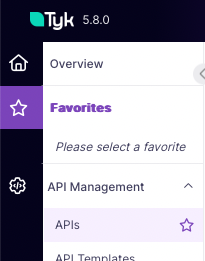
Start by selecting APIs from the API Management section
-
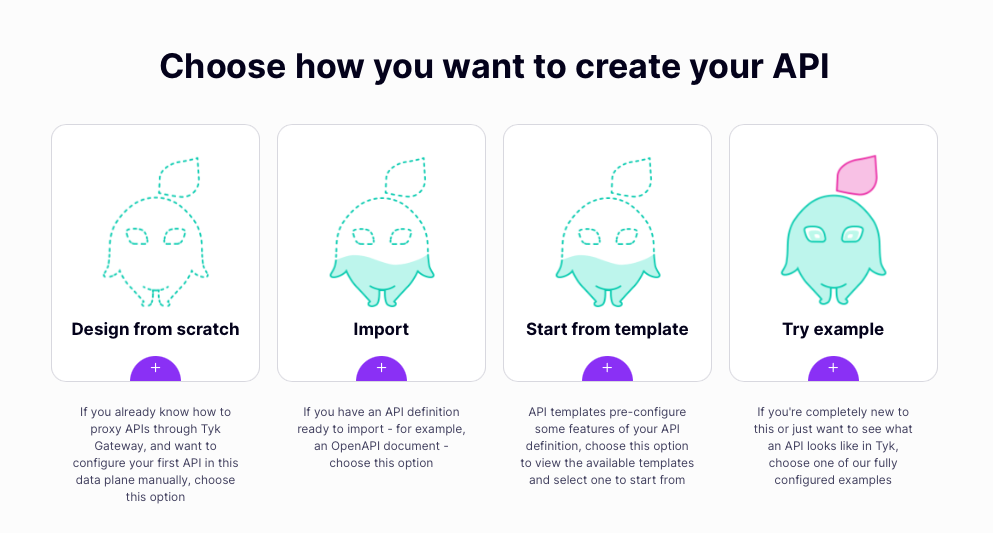
Now select Add New API and then, choose Design from scratch
-
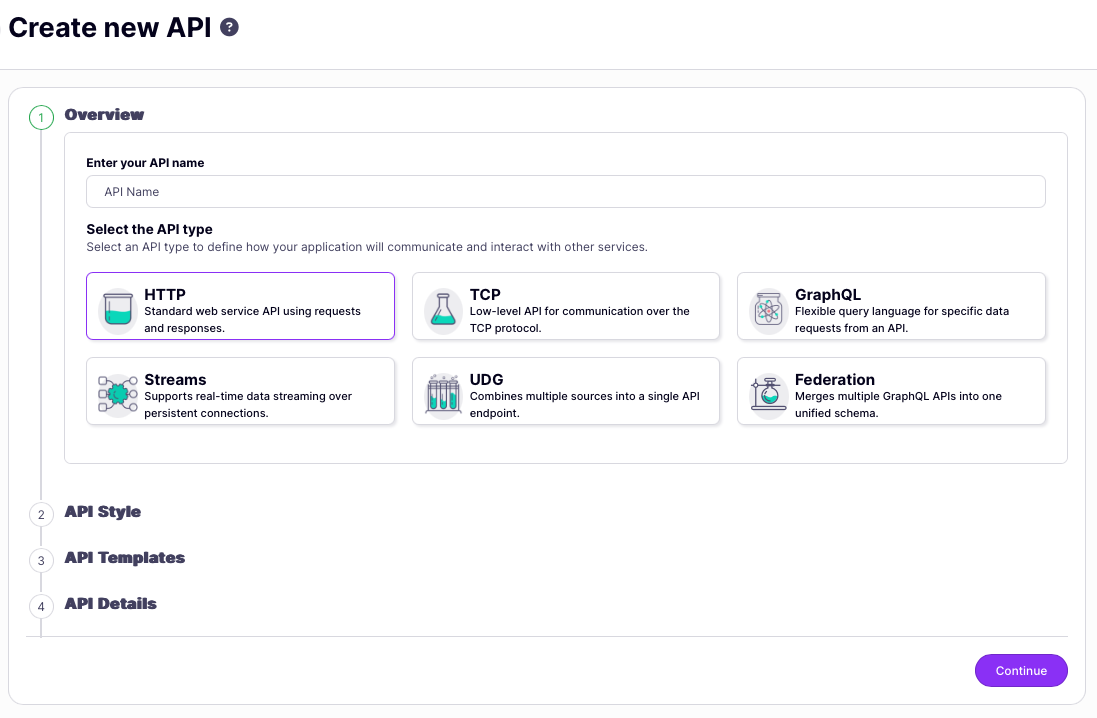
Now complete the basic configuration for your new API following the guided steps providing:
- API name
- API type (HTTP)
- API style (OpenAPI)
- API template (optional)
- Upstream URL
-
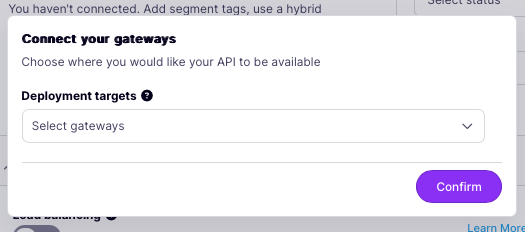
Deploy the API to your Gateway
- If you are using Tyk Cloud or a sharded deployment you will be prompted to select on which Gateways the API should be deployed
- You need to set the API status (if you set this to Active, Tyk will accept requests to the API)
- You need to set the Access (set this to External to expose your API outside Tyk so that your clients can consume it)
- When creating a new API you will probably want to set API status to Inactive while you configure the rest of the API definition
 You can see the URL given to your API, in the Info section displayed at the top of the page (API URL).
 -
Secure your API by configuring client authentication
From the API page:
- Click Edit
- Scroll down to the Server section and enable Authentication
- Select Auth Token from the drop-down list
- For Authentication token location select Use header value
- Note that the default Auth key header name is Authorization
- Save your API
-
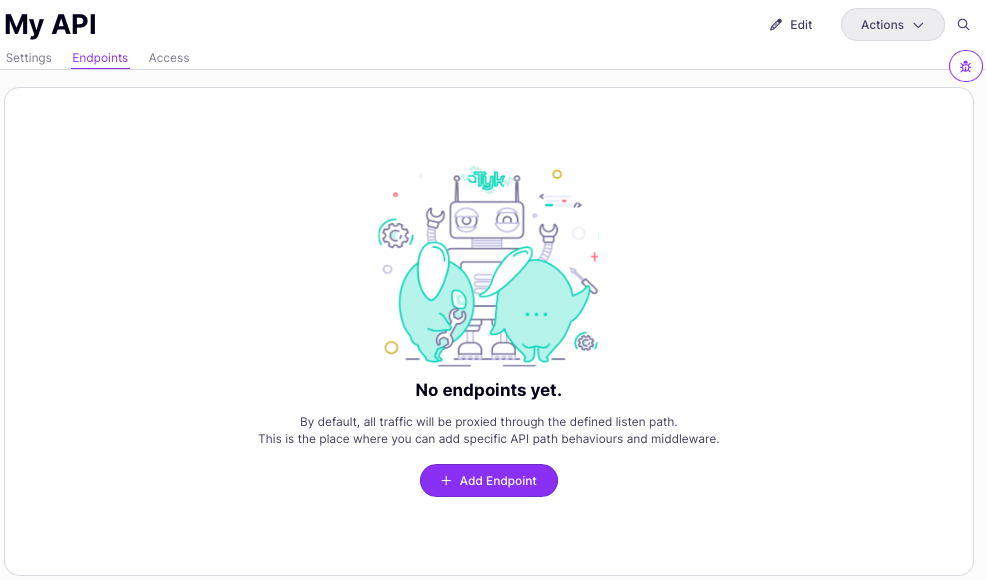
Declare endpoints for your API
- After selecting Edit, move to the Endpoints tab.
-
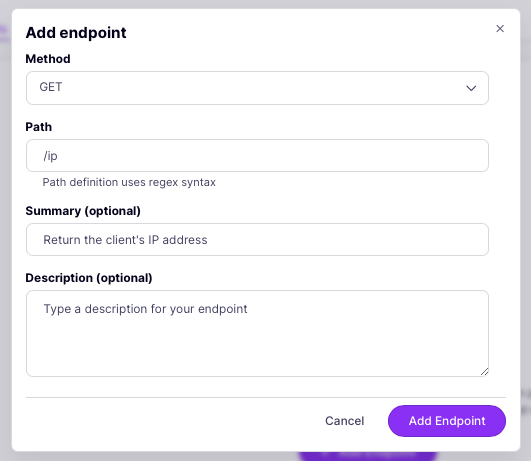
Click Add Endpoint then complete the requested details for the new endpoint:
- Select a method from the drop-down list
- Add a path for your endpoint
- Add an optional summary and description
- select Add Endpoint
- Your new endpoint will now be listed in the Endpoints tab
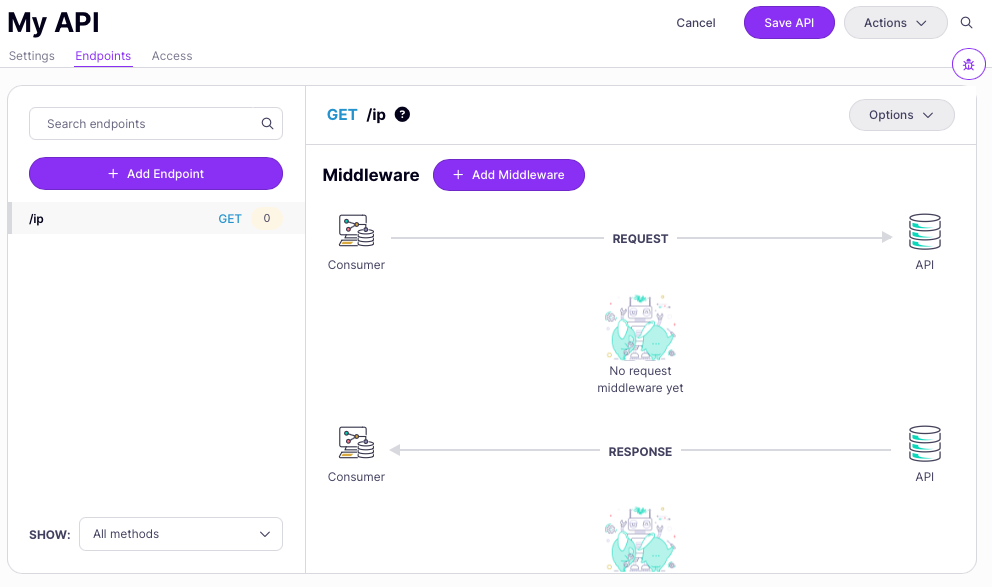
- You can now add middleware to your endpoint via the Add Middleware button.
- Click Save API to apply the changes to your API.
-
Test your API
From the Info section, copy the API base path and send a request to the API without providing an authorization token:
Note that the Gateway will respond with the following error message, confirming that authentication is required:
Using your own code editor to create Tyk OAS API definitions
The API definition is often generated either from the codebase or using API design tools (such as Swagger Editor, Postman and Stoplight). To enjoy writing a Tyk OAS API definition as if it is a native programming language, you can add the Tyk OAS API definition schema to your favorite IDE or editor. We have published a Tyk VS Code extension that provides Tyk API schema validation and auto-completion (both OAS and other schemas) in the VS Code marketplace. You can use it to create Tyk objects in your IDE (Tyk API definitions, Key and Tyk config file).Loading the API definition into Tyk
- API Designer
- Dashboard API
- Gateway API
Armed with a Tyk OAS API definition, in YAML or JSON format, you can use this to create an API in Tyk Dashboard with only a few clicks.
-
Start by selecting APIs from the API Management section
-
Now select Add New API and then, choose Import.
-
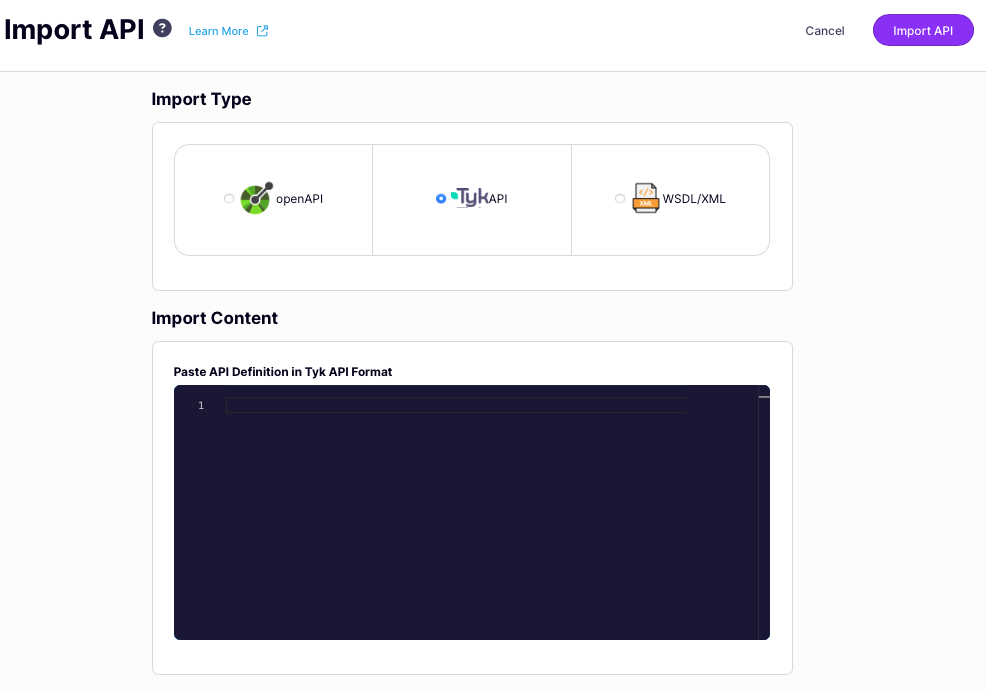
From the Import API screen, select Tyk API because the object you want to import to Tyk is a complete API definition.
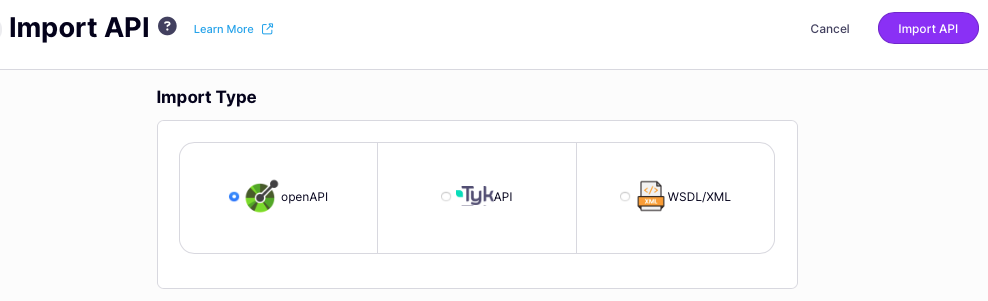 On the Import API screen, there are three options for Import Type, it is important to select the correct one for the object that you want to load into Tyk:
- openAPI is used only for OpenAPI descriptions (without the Tyk Vendor Extension)
- TykAPI is used for a full Tyk OAS API definition (comprising OpenAPI description plus Tyk Vendor Extension) or Tyk Classic API definition
- WSDL/XML is used for WSDL/XML content and will result in a Tyk Classic API
-
Now you can paste the entire Tyk OAS API definition into the text editor.
- Select Import API to complete the import and create the API based on your API definition.
Importing an OpenAPI description to create an API
Tyk will automatically update theservers section in the imported OpenAPI description, adding the base path URL to which requests should be sent to access the new API. It will take the existing entry and use this to generate the upstream (target) URL if none is provided.
- API Designer
- Dashboard API
- Gateway API
If you have a valid OAS 3.0 or OAS 3.1 compliant OpenAPI description, in YAML or JSON format, you can use this to create an API in Tyk Dashboard with only a few clicks.
-
Start by selecting APIs from the API Management section
-
Now select Add New API and then, choose Import.
-
From the Import API screen, select openAPI because the object you want to import to Tyk is an OpenAPI description.
On the Import API screen, there are three options for Import Type, it is important to select the correct one for the object that you want to load into Tyk:
- openAPI is used only for OpenAPI descriptions (without the Tyk Vendor Extension)
- TykAPI is used for a full Tyk OAS API definition (comprising OpenAPI description plus Tyk Vendor Extension) or Tyk Classic API definition
- WSDL/XML is used for WSDL/XML content and will result in a Tyk Classic API
-
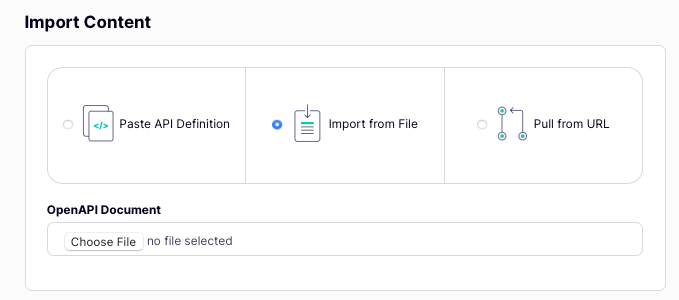
Now you can choose the location of the OpenAPI description, which can be:
- pasted into the text editor
- uploaded using a file picker
- retrieved from a file server
-
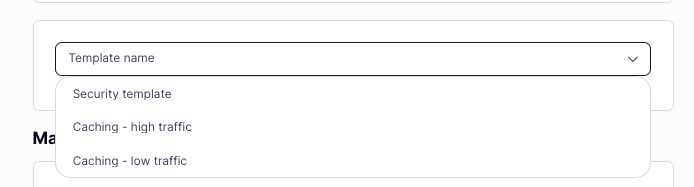
You can optionally apply an API template from the drop-down.
-
You can configure the listen path and upstream (target) URL in the Manual configuration options section. Note that if you do not provide a listen path, Tyk will default to
/and if you do not provide an upstream URL, Tyk will use the first value provided in the servers.url section in the OpenAPI description.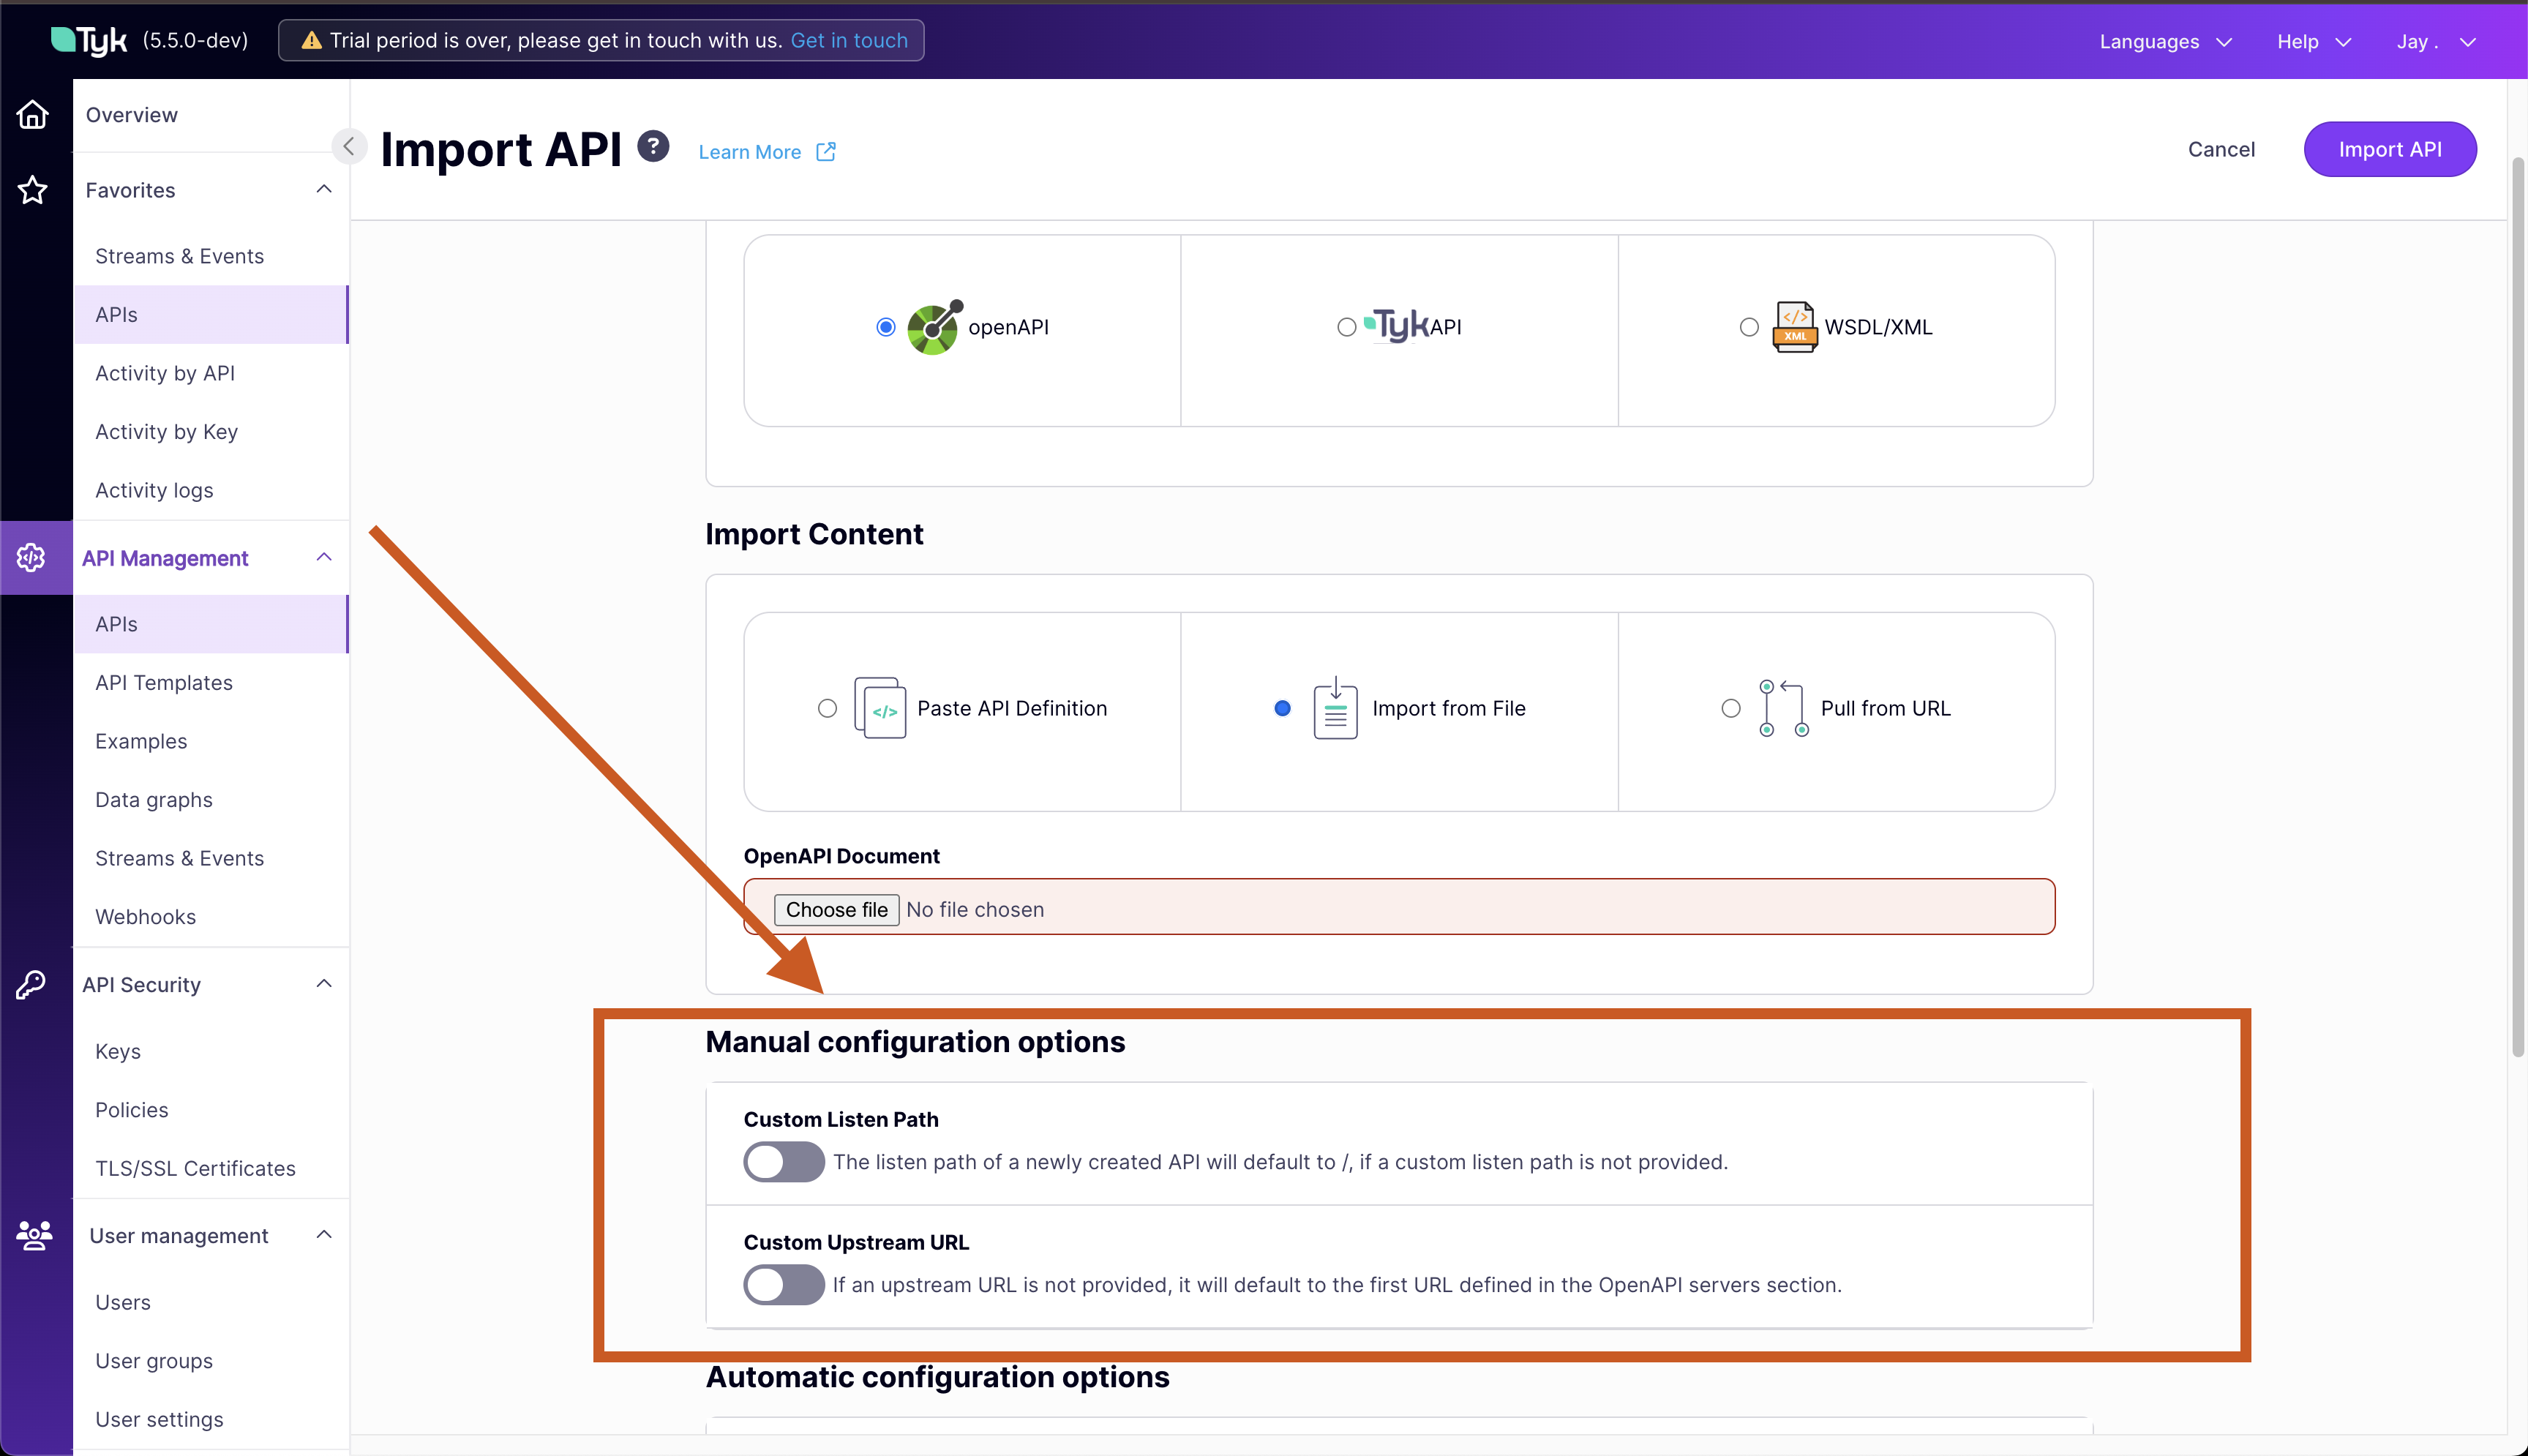
-
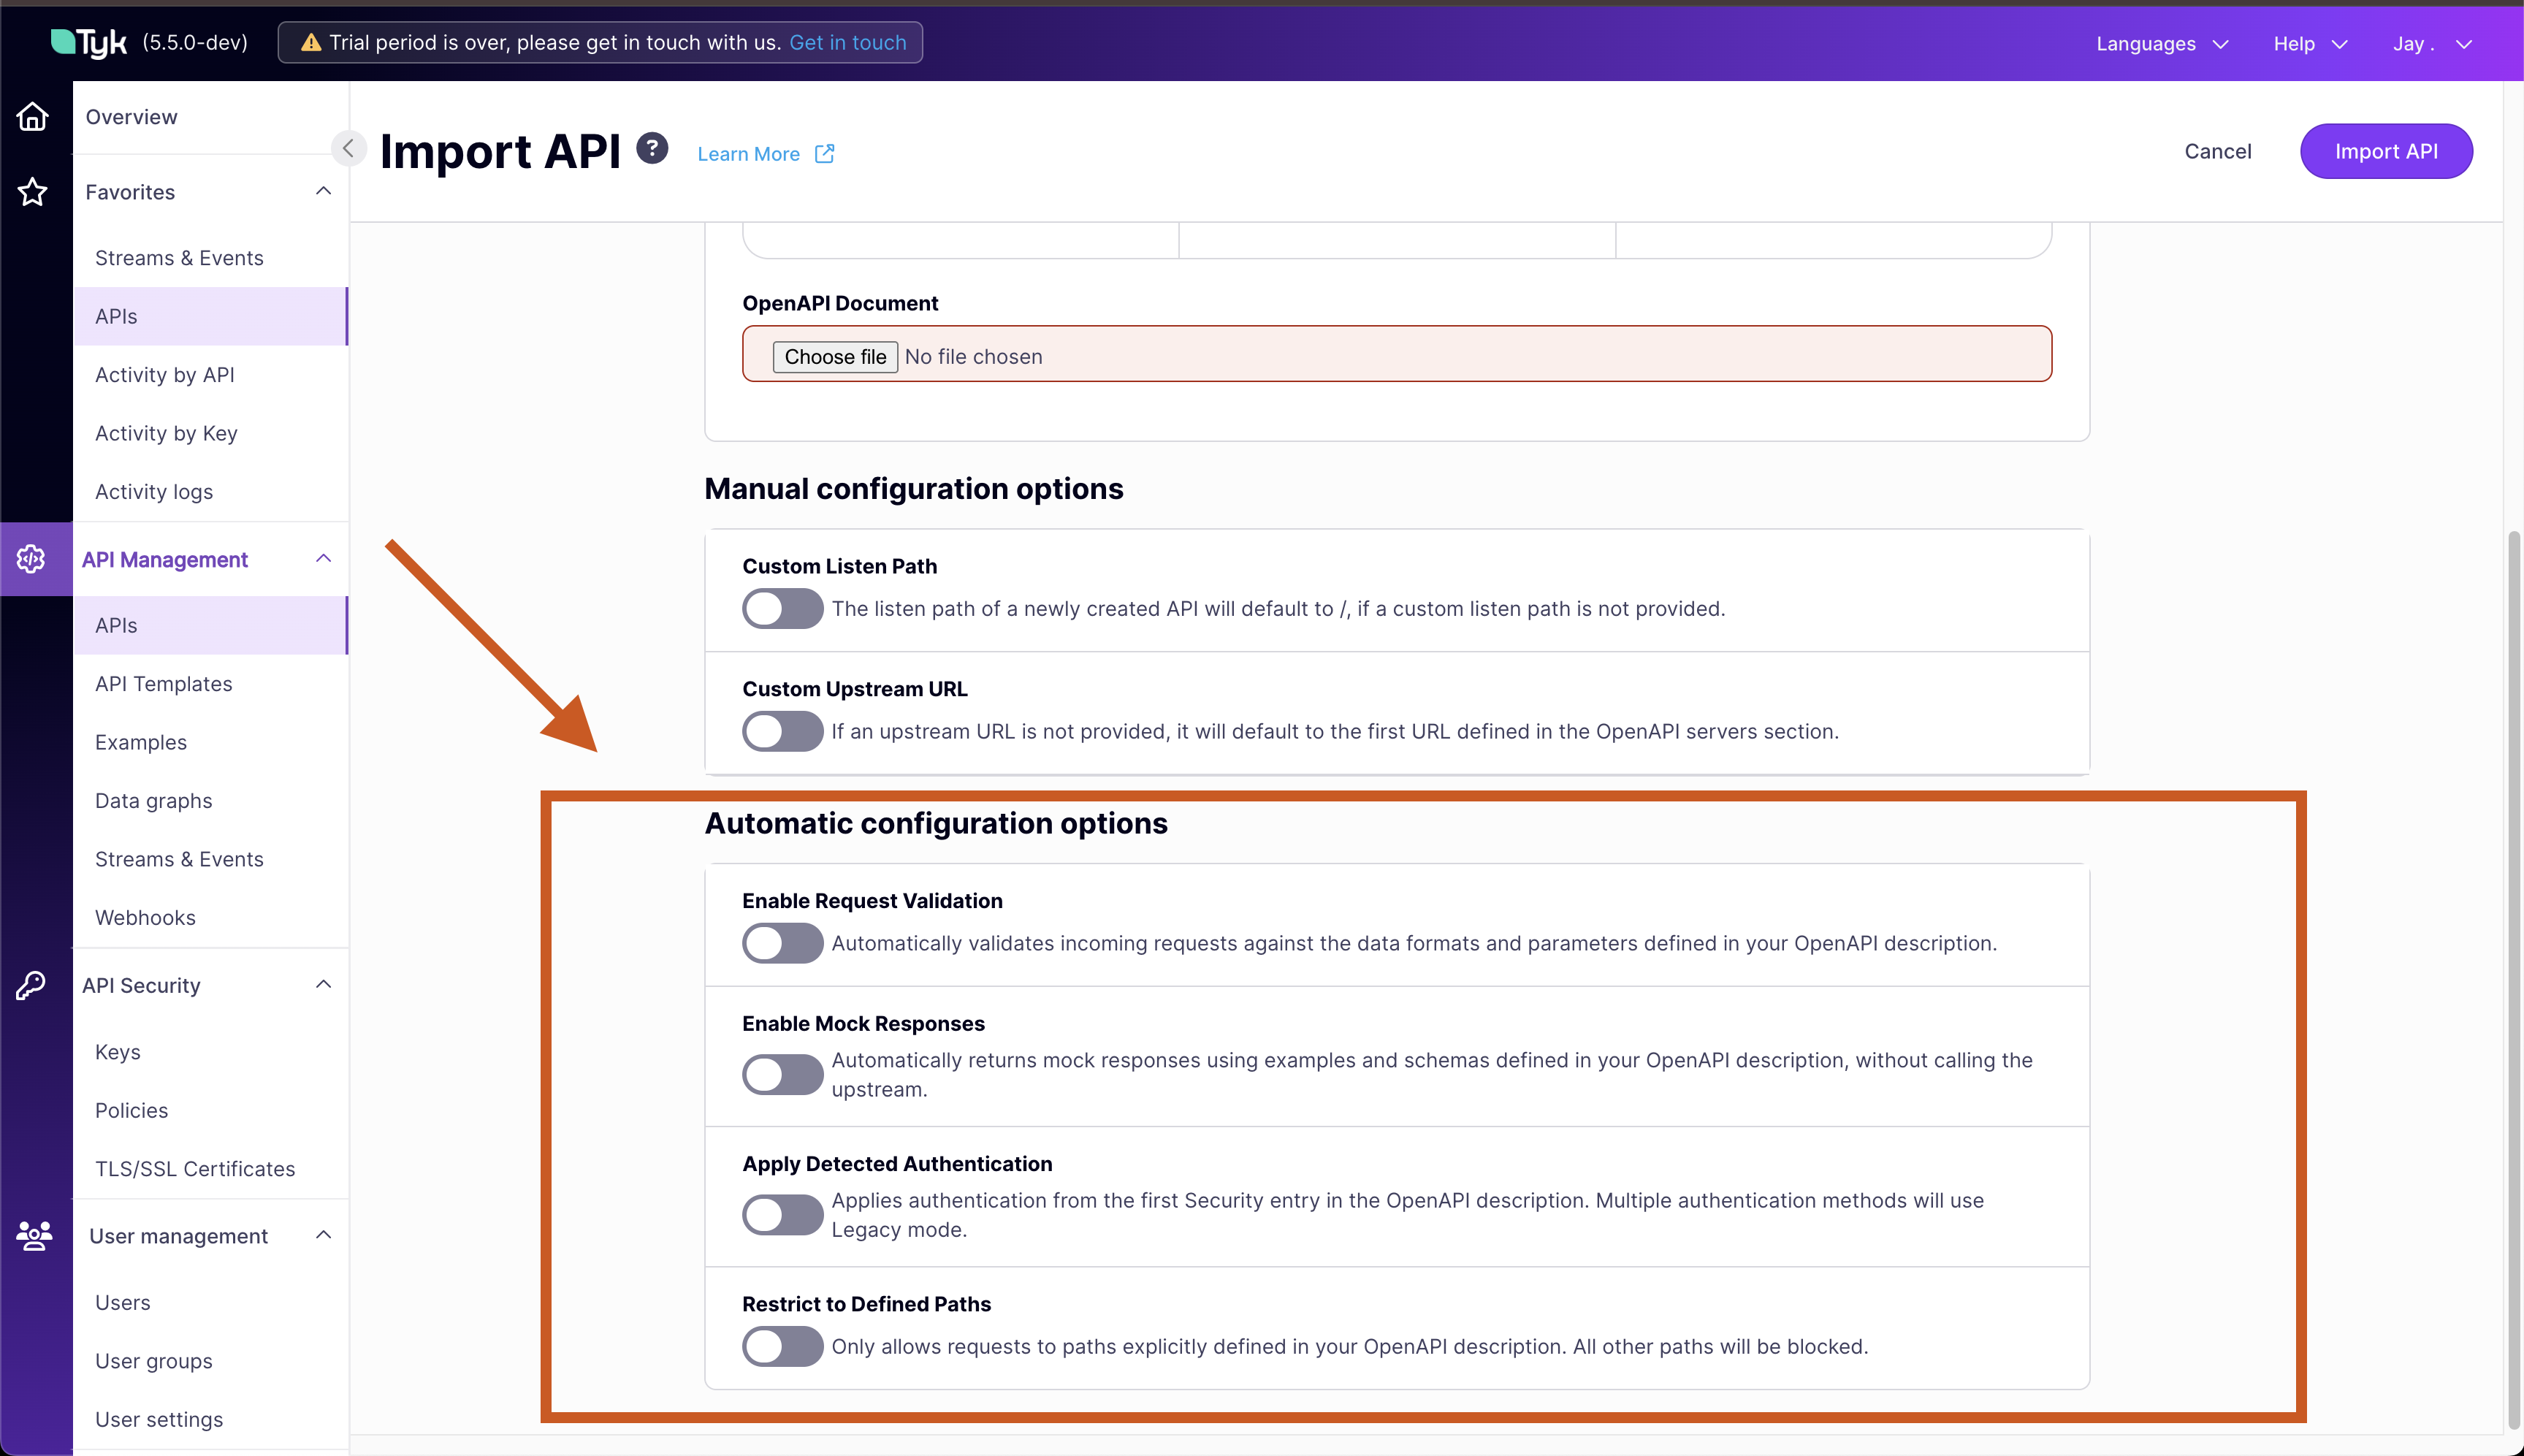
Tyk can automatically configure the request processing middleware chain based upon configuration defined by the OpenAPI Specification. If your OpenAPI desription contains the relevant data then select the characteristics you would like to configure.
- Select Import API to complete the import and create the API based on your API definition.
API base path
The API base path is the URL that a client should use when consuming (sending requests to) the API deployed on Tyk. This will comprise the address of the Tyk Gateway plus the API’s listen path. Detecting an Existing API Base Path When creating an API, Tyk analyzes theservers.url section of the OpenAPI description to determine if it already contains a valid API base path.
- If the first entry in
servers.urlis an address on the Tyk Gateway, then this is considered a valid API base path. - If there is not a valid API base path, then Tyk will assume that the first value in
servers.urlis the address of the upstream service - and so will use this as the upstream (target) URL for the API proxy. If there are multiple entries inservers.urlTyk will only consider the first entry and ignore all others.
servers entry contains a parameterised URL, Tyk will fill in the parameters with the values provided in the variables associated with that entry.
Setting the API Base Path
If the servers.url section did not contain a valid API base path then Tyk will insert a new entry in the first location in servers.url with a valid API base path comprising the Tyk Gateway address plus the listen path for the API.
For example, given the following fragment of the OpenAPI description and importing to a Tyk Gateway at https://my-gateway.com specifying a listen path of my-api:
This can introduce a change to the “source of truth” (OpenAPI description) for the API (the addition of the API base path). We recommend that you export the modified OpenAPI description and apply this to your documentation, as it provides the address to which clients should direct their traffic.
servers section of the OpenAPI description.
Tyk does not support relative URLs
If the first entry is a relative URL, or another format that Tyk cannot process, the import will fail with an error.
For example attempting to import an OpenAPI description containing this configuration:
Multi-part OpenAPI documents
The OpenAPI Specification allows an OpenAPI description to be split across multiple files by use of the$ref keyword.
This allows you to share snippets of the API definition across multiple APIs, or to have specific ownership of elements of the API configuration owned by different teams.
Tyk Dashboard supports the creation of Tyk OAS APIs from these multi-part OpenAPI documents.
We consider two different types of file containing these OpenAPI descriptions:
- the main fragment, which contains the
infosection - the secondary fragments, which contain snippets of the OpenAPI description that are referred to using external references (
$ref)
- local, by providing a ZIP archive containing all fragments
- remote, by providing resolvable paths to the secondary fragments (this is particularly used if the main fragment is provided via URL, as all fragments can then exist on the same file server).
The main fragment must be in a file named
openapi.json or openapi.yaml (depending on the format used).Creating the ZIP Archive
When creating ZIP archives for the multi-part OpenAPI import feature, it’s important to exclude operating system metadata files that could interfere with the import process.-
MacOS Users
When using the
zipcommand on MacOS, include the-Xflag to exclude extended attributes and hidden files:zip -X -r archive.zip directory/ -
Linux Users
When using the
zipcommand on Linux, you can exclude hidden files using:zip -r archive.zip directory/ -x "*/\.*"To exclude specific metadata files:zip -r archive.zip directory/ -x "*/\.*" "*/Thumbs.db" "*/.DS_Store" -
Windows Users
When using PowerShell to create ZIP archives on Windows, you can exclude hidden and system files with:
Compress-Archive -Path "directory\*" -DestinationPath "archive.zip" -CompressionLevel OptimalTo exclude specific metadata files (like Thumbs.db or .DS_Store) you can use:Get-ChildItem "directory" -Recurse -File | Where-Object { $_.Name -notmatch '(^\.DS_Store$|^Thumbs\.db$)' } | Compress-Archive -DestinationPath "archive.zip" -
Using GUI Tools
If using GUI tools like WinZip, WinRAR, or the built-in archive utilities:
- Ensure options to include hidden/system files are disabled
- Look for options like “Store Mac OS X resource forks/special files” and disable them
- Some tools have specific options to exclude .DS_Store files and other metadata
Maintaining your APIs
Once a Tyk OAS API has been created in Tyk the Gateway will manage traffic to the exposed endpoints and proxy requests to the upstream service. Your service might evolve over time, with new features and endpoints being added and others retired. Tyk’s flexible API versioning and update options provide you with choice for how to reflect this evolution in the APIs you expose to your clients. Your OpenAPI description is a living document that describes your upstream service. When this changes (for example, due to the addition of a new endpoint) you can use Tyk’s update API feature to seamlessly apply the updated OpenAPI description, instantly extending the API proxy to handle traffic as your upstream evolves. Alternatively, and especially when you need to make breaking changes as your services and APIs evolve, you can create new versions of your API and use configurable version identifiers to route traffic to the appropriate target.Updating an API
As developers working on services it can be necessary to regularly update the API when, for example, we add endpoints or support new methods. One of the most powerful features of working with Tyk OAS is that you can make changes to the OpenAPI description outside Tyk and then update your API with the updated details. You can simply update the OpenAPI part of the Tyk OAS API definition without having to make any changes to the Tyk Vendor Extension (x-tyk-api-gateway).
You can alternatively work on the full Tyk OAS API definition outside Tyk and update your existing API proxy with the new configuration, without having to create a new version of the API.
- API Designer
- Dashboard API
- Gateway API
If you have an updated OpenAPI description or Tyk OAS API definition, in YAML or JSON format, you can use this to modify your existing API in Tyk Dashboard with only a few clicks.
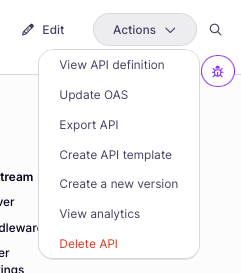
- Start by selecting your API from the list on the APIs page in the API Management section.
-
Now select Update OAS from the Actions dropdown.
-
Now you can choose the location of the file that you want to use to update your API, which can be:
- pasted into the text editor
- uploaded using a file picker
- retrieved from a file server
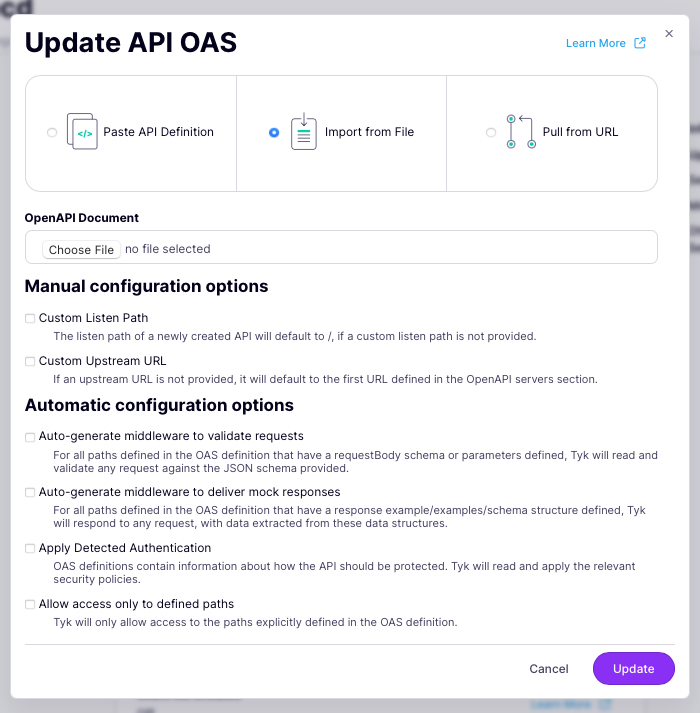
- You can re-configure the listen path and upstream (target) URL in the Manual configuration options section, but if you do not provide these then Tyk will leave them unchanged.
-
Tyk must select the options to automatically configure the request processing middleware chain based upon configuration defined by the OpenAPI Specification for any new endpoints added in the update. If your OpenAPI desription contains the relevant data then select the characteristics you would like to configure.
- Select Import API to complete the update.
Exporting an API asset
Each API on Tyk has an API definition comprising the OpenAPI description and the Tyk Vendor Extension. We offer the facility for you to export (download) two assets for an API - just the OpenAPI description, or the full Tyk OAS API definition. When using Tyk Dashboard these can be exported in either JSON or YAML format; for Tyk Gateway API users the assets can only be exported in JSON format.- API Designer
- Dashboard API
- Gateway API
- Start by selecting your API from the list on the APIs page in the API Management section.
-
Select Export API from the Actions dropdown.
-
Now you can choose what you want to export, the filename (a default is offered which is based on the API Id) and the file format (JSON or YAML).
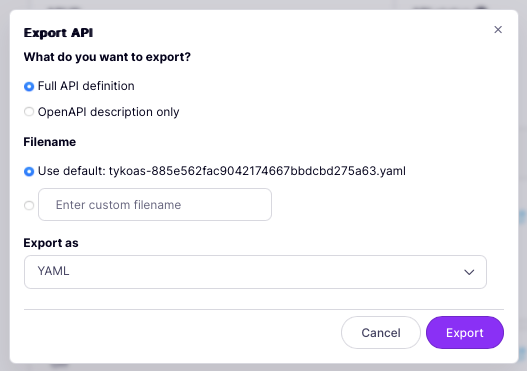
- Finally select Export to save the file to your local machine.