Create an API
What does it mean to create an API in Tyk
You have a running service with an API that you want your users to consume; you want to protect and manage access to that API using Tyk Gateway - how do you do that?For Tyk Gateway to protect and reverse proxy calls to your upstream service, you need to configure an API on Tyk Gateway. The minimum information that Tyk requires is the listen path (which is a path on the Tyk Gateway URL that you want your consumers to call) and your API URL (which is the URL of your service to which Tyk should forward requests).
This information and other configuration values are stored in an object called a Tyk API Definition. Once you have created your Tyk API Definition and deployed it in the Gateway, Tyk can start serving your consumers, forwarding their requests to your upstream service’s API. To reach a detailed guide to creating Tyk API Definitions, please choose the tab for the product you are using:
Tyk Cloud
Tyk Cloud is a fully managed service that makes it easy for API teams to create, secure, publish and maintain APIs at any scale, anywhere in the world. Tyk Cloud includes everything you need to manage your global API ecosystem: Tyk Gateways, Tyk Dashboard, Tyk Developer Portal and Universal Data Graph.To embark on your API journey with Tyk Cloud, we recommend going to our Quick Start guide. This guide will walk you through the process of creating your very first API in Tyk Cloud. For an advanced step by step guide we recommend visiting our Getting Started guide. This will explain advanced configuration steps relating to how to distribute your API across nodes, in addition to adding and testing your API.
Tyk Self-Managed
Note: Integration with your OpenAPI documentationIn Tyk v4.1 we introduced support for APIs defined according to the OpenAPI Specification v3.0.3 (OAS).
This introduces a standard way to describe the vendor-agnostic elements of an API (the OpenAPI Definition, stored as an OpenAPI Document); we take this and add Tyk-specific configuration options to create the Tyk OAS API Definition. You can import your own OpenAPI document and Tyk will use this to generate the Tyk OAS API Definition.
For a detailed tutorial on using OAS with Tyk Gateway, check out our guide to creating a Tyk OAS API Definition.
Create an API with the Dashboard
We have a video walkthrough for creating an API and testing an endpoint via Postman.
We will use the Tyk Dashboard to create a very simple API that has no special elements set up.
-
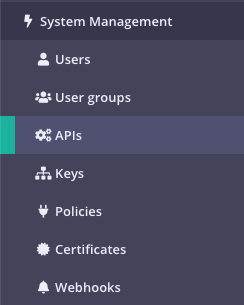
Select “APIs” from the “System Management” section
-
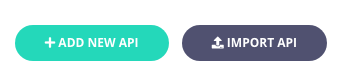
Click “ADD NEW API”
-
Set up the basic configuration of your API
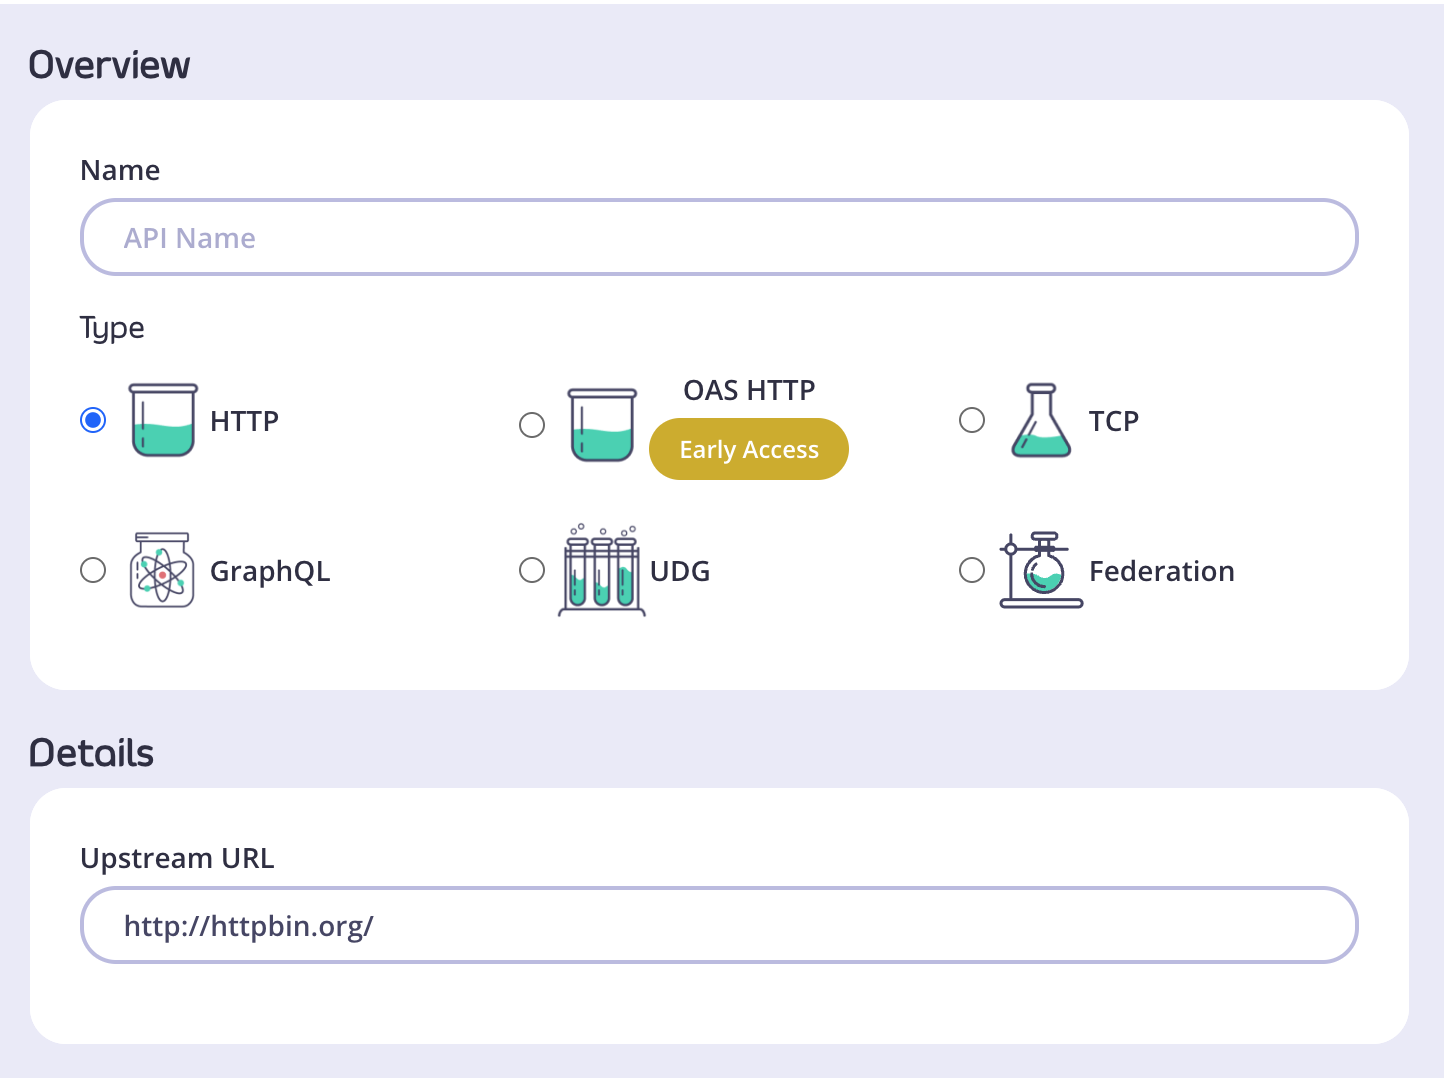
- In the Overview section, add a Name for your API and select the Type of API you wish to create. We will use HTTP for this tutorial.
- In the Details section, add the Upstream URL. This is the Target URL that hosts the service to which you want to proxy incoming requests. You can configure Tyk to perform round-robin load balancing between multiple upstream servers (Target URLs) by selecting Enable round-robin load balancing; see Load Balancing for more details. For this tutorial, we will use a single upstream target: http://httpbin.org.
- Click Configure API when you have finished.
-
Set up authentication for your API
Take a look at the Authentication section:
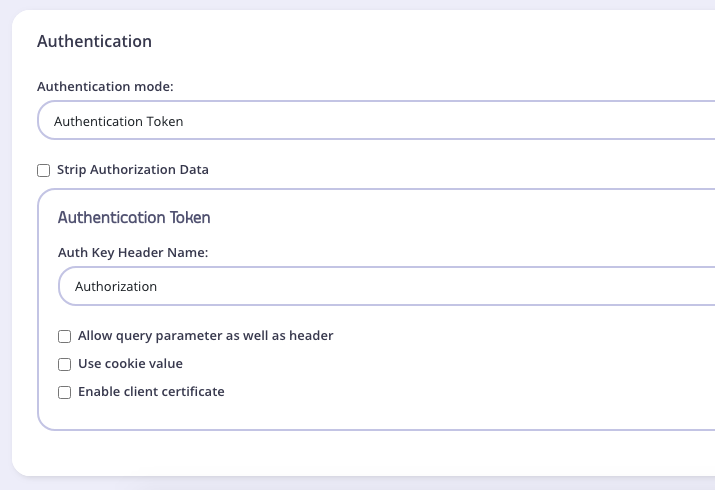
- Authentication mode: This is the method that Tyk should use to authenticate requests to call your API. Tyk supports several different authentication modes - see Client Authentication for more details on securing your API. For this tutorial, you should select
Open (Keyless). - Strip Authorization Data: Select this option to ensure that any security (authentication) tokens provided to authorize requests to your API on Tyk are not leaked to the upstream. You can leave this unchecked for this tutorial.
- Auth Key Header Name: The header parameter that will hold the authentication token (or key) for requests to this API; the default for this is
Authorization. - Allow query parameter as well as header: This option allows the authentication token to be set in the query parameter, not just in the Request Header. For this tutorial, leave this unchecked.
- Use Cookie Value: Tyk also supports the use of a cookie value as an alternative authentication token location. For this tutorial, leave this unchecked.
- Enable client certificate: Tyk supports the use of Mutual TLS to authenticate requests to your API; you would use this checkbox to enable this mode. See Mutual TLS for details on implementing this feature. For this tutorial, leave this unchecked.
- Authentication mode: This is the method that Tyk should use to authenticate requests to call your API. Tyk supports several different authentication modes - see Client Authentication for more details on securing your API. For this tutorial, you should select
-
Save the API
Click SAVE

Create an API with the Dashboard API
It is easy to create APIs using Tyk Dashboard’s own REST API.You will need an API key for your organization (to authenticate with the Dashboard API) and issue a request using these credentials to create your new API and make it live.
-
Obtain your Tyk Dashboard API access credentials key & Dashboard URL
- From the Tyk Dashboard, select “Users” in the “System Management” section.
- Click Edit for your username, then scroll to the bottom of the page.
- Your personal API key, granting you access to the Dashboard API, is labeled Tyk Dashboard API Access Credentials key
- Store your Dashboard Key, Dashboard URL & Gateway URL as environment variables so you don’t need to keep typing them in
As you’ve got a fresh install, you will see that no APIs currently exist -
Create your first API
We’ve created a simple Tyk Classic API definition that configures the Tyk Gateway to reverse proxy to the http://httpbin.org
request/response service. The API definition object is stored here: https://bit.ly/2PdEHuv.
To load the API definition to the Gateway via the Dashboard API you issue this command:
Important Take note of the API ID returned in the
Metafield - you will need it later as this is the Tyk Gateway’s internal identifier for the new API. -
Test your new API
You can now make a call to your new API as follows:
We sent a request to the gateway on the listen path
/httpbin. Using this path-based-routing, the gateway was able to identify the API the client intended to target. The gateway stripped the listen path and reverse proxied the request to http://httpbin.org/get -
Protect your API
Let’s grab the API definition we created before and store the output to a file locally.
We can now edit the
api.httpbin.jsonfile we just created, and modify a couple of fields to enable authentication. Changeuse_keylessfromtruetofalse. Changeauth_configs.authToken.auth_header_nametoapikey. Note Prior to ** Tyk v2.9.2**auth_configs.authToken.auth_header_namewas calledauth.auth_header_nameThen send aPUTrequest back to Tyk Dashboard to update its configuration. -
Test your protected API
First try sending a request without any credentials, as before:
As you can see, you received an
HTTP 401 Unauthorizedresponse. Now send a request with incorrect credentials:As you can see, you received anHTTP 403 Forbiddenresponse. Try sending another request, this time with a valid API key. Congratulations - You have just created your first keyless API, then protected it using Tyk!
/apis endpoint. See API definition objects for details of all the available objects. These objects encapsulate all of the settings for an API within Tyk.
Want to learn more from one of our team of engineers?
Tyk Open Source
Note: Integration with your OpenAPI documentationIn Tyk v4.1 we introduced support for APIs defined according to the OpenAPI Specification v3.0.3 (OAS).
This introduces a standard way to describe the vendor-agnostic elements of an API (the OpenAPI Definition, stored as an OpenAPI Document); we take this and add Tyk-specific configuration options to create the Tyk OAS API Definition. You can import your own OpenAPI document and Tyk will use this to generate the Tyk OAS API Definition.
For details on using Tyk OAS with Tyk Gateway, check out our guide to working with Tyk OAS APIs.
Creating an API on Tyk Gateway
There are two ways to configure Tyk Gateway with an API definition:- Create an API with the Tyk Gateway API - Tyk Gateway has its own APIs which provides various services including the registering of Tyk API Definitions on the Gateway.
- Create an API in File-based Mode - alternatively you can create a Tyk API Definition in a file and then load it to the Gateway.
Using Tyk Gateway API
Watch our video to learn how to add an API to Tyk’s Open Source Gateway using Postman.
In order to use the Gateway API to create a Tyk API Definition you will need the API key for your deployment’s Gateway API and then issue just one command to create the API and make it live.
-
Make sure you know your API secret
The API key to access your Tyk Gateway API is stored in your
tyk.conffile; the property is calledsecret. You will need to provide this value in a header calledx-tyk-authorizationwhen making calls to the Gateway API. -
Create an API
To create the API, let’s send a Tyk API definition to the
/apisendpoint on your Tyk Gateway. Remember to change thex-tyk-authorizationvalue (API key) in the header of your API call and set the domain name and port to target your Tyk Gateway in thecurlcommand.If the command succeeds, you will see:
All APIs deployed on Tyk Gateway are given a unique
API ID; if you don’t provide one in the Tyk API Definition when creating the API, then an API ID will be generated automatically./apis endpoint.Tyk API definitions encapsulate all of the settings for an API within Tyk Gateway and are discussed in detail in the API section of this documentation. Restart or hot reload Once you have created the file, you will need to either restart the Tyk Gateway, or issue a hot reload command, lets do the latter:
/hello-world/.
Create an API in File-based Mode
APIs created without API ID in file based mode are invalid.
api1.json and place it in the /apps folder of your Tyk Gateway installation (usually in /var/tyk-gateway), then add the following:
/test-api/.
Your API is now ready to use via the Gateway.
Secure an API
A security policy encapsulates several options that can be applied to a key. It acts as a template that can override individual sections of an API key (or identity) in Tyk. See What is a Security Policy? for more details.Tyk Cloud
A Policy encapsulates several options that can be applied to a key. It acts as a template that can override individual sections of an API key (or identity) in Tyk.Create a Policy with the Dashboard
We have a video walkthrough for creating a Policy with the Dashboard.
To create a security policy with the Dashboard, follow these steps:
-
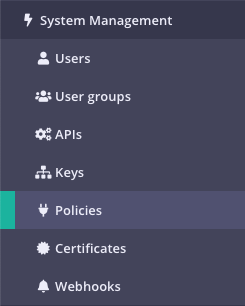
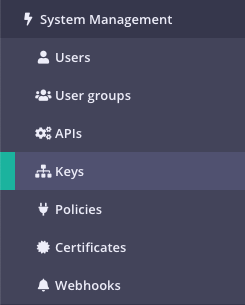
Select “Policies” from the “System Management” section

-
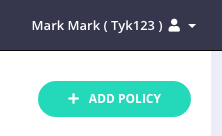
Click ADD POLICY
-
Select an API to apply the policy Access Rights to
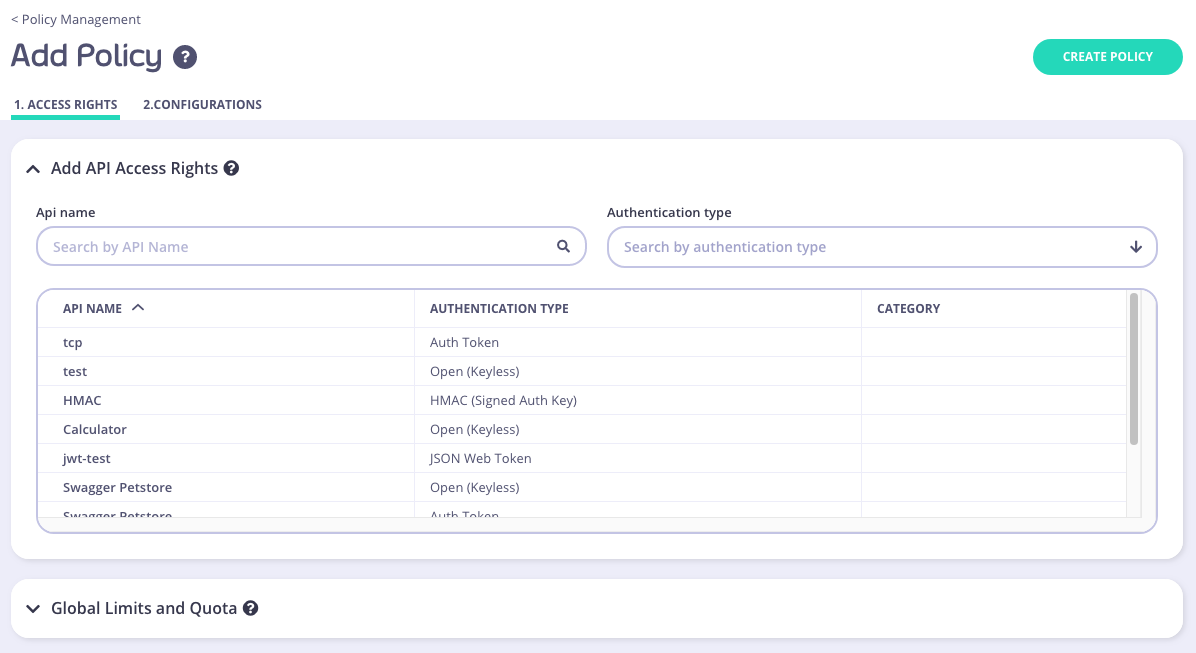
- Scroll through your API Name list
- Use the Search field
- You can also Group by Authentication Type to filter your APIs
- You can also Group by Category
-
Setting Global Rate Limits and Quota
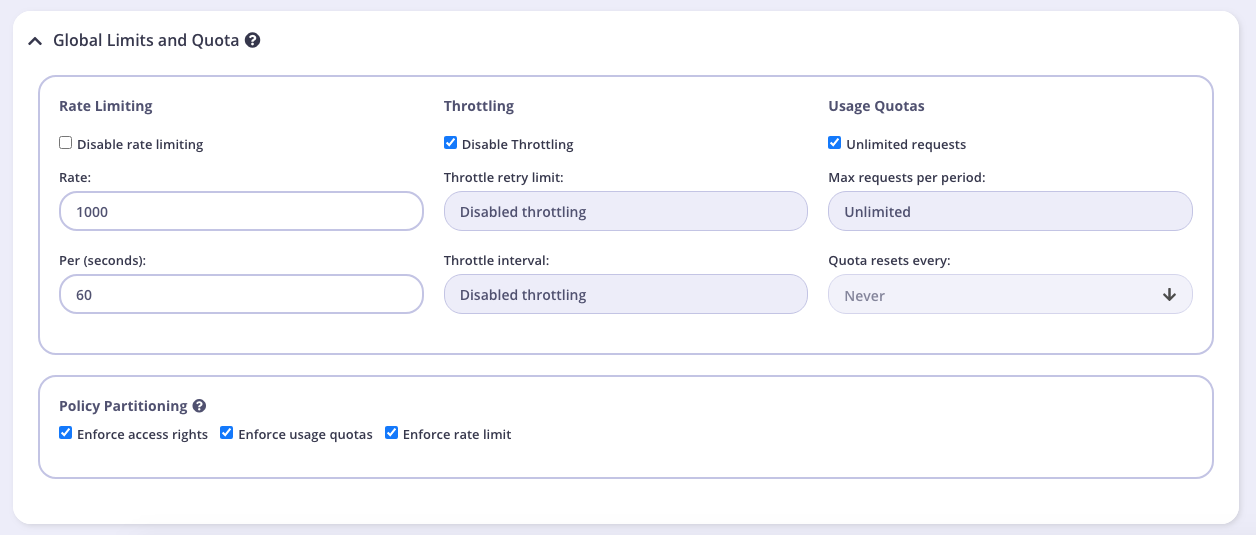
Path Based Permissions
You can also use a security policy to apply restrictions on a particular path and method. Granular path control allows you to define which methods and paths a key is allowed to access on a per API-version basis. See the Granular Endpoint Access documentation for more details
-
Add Configuration Details
You use the Configuration section to set the following:
- Give your policy a name. This is a required setting
- Set the policy state. You can set your policy to one of the following states:
- Active (the default)
- Draft
- Access Denied
- Set a time after which any Keys subscribed to your policy expire. Select a value from the drop-down list. This is a required setting. See Session Lifecycle for more details.
- Add Tags to your policy. Any tags you add can be used when filtering Analytics Data. Tags are case sensitive.
- Add Metadata to your policy. Adding metadata such as User IDs can be used by middleware components. See Session Metadata for more details.
- Save the policy Click CREATE . Once the policy is saved, you will be able to use it when creating keys, OAuth clients and custom JWT tokens.
Create a security policy with the API
Security Policies can be created with a single call to the API. It is very similar to the token creation process. To generate a simple security policy using the Tyk Dashboard API you can use the following curl command:{API-TOKEN}: Your API Token for the Dashboard API.{API-ID}: The API ID you wish this policy to grant access to, there can be more than one of these entries.{API-NAME}: The name of the API that is being granted access to (this is not required, but helps when debugging or auditing).POLICY NAME: The name of this security policy.
-
access_rights: A list of objects representing which APIs that you have configured to grant access to. -
rateandper: The number of requests to allow per period. -
quota_max: The maximum number of allowed requests over a quota period. -
quota_renewal_rate: how often the quota resets, in seconds. In this case we have set it to renew every hour. -
state: New from v3.0, this can be used instead ofactiveandis_inactive. You can use the following values:active- all keys connected to the policy are active and new keys can be createddraft- all keys connected to the policy are active but new keys cannot be createddeny- all keys are deactivated and no keys can be created.
Setting astatevalue will automatically override theactiveoris_inactivesetting.
apply_policy_id field of an API token. Please see the relevant documentation on session objects for more information about how tokens are attached to policies.
apply_policy_id is supported, but has now been deprecated. apply_policies is now used to list your policy IDs as an array. This supports the Multiple Policy feature introduced in the v2.4/1.4 release.Tyk Self Manged
A Policy encapsulates several options that can be applied to a key. It acts as a template that can override individual sections of an API key (or identity) in Tyk.Create a Policy with the Dashboard
We have a video walkthrough for creating a Policy with the Dashboard.
To create a security policy with the Dashboard, follow these steps:
-
Select “Policies” from the “System Management” section
-
Click ADD POLICY
-
Select an API to apply the policy Access Rights to
- Scroll through your API Name list
- Use the Search field
- You can also Group by Authentication Type to filter your APIs
- You can also Group by Category
-
Setting Global Rate Limits and Quota
Path Based Permissions
You can also use a security policy to apply restrictions on a particular path and method. Granular path control allows you to define which methods and paths a key is allowed to access on a per API-version basis. See the Granular Endpoint Access documentation for more details -
Add Configuration Details
You use the Configuration section to set the following:
- Give your policy a name. This is a required setting
- Set the policy state. You can set your policy to one of the following states:
- Active (the default)
- Draft
- Access Denied
- Set a time after which any Keys subscribed to your policy expire. Select a value from the drop-down list. This is a required setting. See Session Lifecycle for more details.
- Add Tags to your policy. Any tags you add can be used when filtering Analytics Data. Tags are case sensitive.
- Add Metadata to your policy. Adding metadata such as User IDs can be used by middleware components. See Session Metadata for more details.
- Save the policy Click CREATE . Once the policy is saved, you will be able to use it when creating keys, OAuth clients and custom JWT tokens.
Create a security policy with the API
Security Policies can be created with a single call to the API. It is very similar to the token creation process. To generate a simple security policy using the Tyk Dashboard API you can use the following curl command:{API-TOKEN}: Your API Token for the Dashboard API.{API-ID}: The API ID you wish this policy to grant access to, there can be more than one of these entries.{API-NAME}: The name of the API that is being granted access to (this is not required, but helps when debugging or auditing).POLICY NAME: The name of this security policy.
-
access_rights: A list of objects representing which APIs that you have configured to grant access to. -
rateandper: The number of requests to allow per period. -
quota_max: The maximum number of allowed requests over a quota period. -
quota_renewal_rate: how often the quota resets, in seconds. In this case we have set it to renew every hour. -
state: New from v3.0, this can be used instead ofactiveandis_inactive. You can use the following values:active- all keys connected to the policy are active and new keys can be createddraft- all keys connected to the policy are active but new keys cannot be createddeny- all keys are deactivated and no keys can be created.
Setting astatevalue will automatically override theactiveoris_inactivesetting.
apply_policy_id field of an API token. Please see the relevant documentation on session objects for more information about how tokens are attached to policies.
apply_policy_id is supported, but has now been deprecated. apply_policies is now used to list your policy IDs as an array. This supports the Multiple Policy feature introduced in the v2.4/1.4 release.Tyk Open Source
Create a Policy with the Gateway
Adding a policy to the Tyk Gateway is very easy. Polices are loaded into memory on load and so need to be specified in advanced in a file calledpolicies.json. To add a policy, simply create or edit the /policies/policies.json file and add the policy object to the object array:
access_rights section.
{API-ID}: The API ID you wish this policy to grant access to, there can be more than one of these entries.{API-NAME}: The name of the API that is being granted access to (this is not required, but helps when debugging or auditing).POLICY NAME: The name of this security policy.
access_rights: A list of objects representing which APIs that you have configured to grant access to.rateandper: The number of requests to allow per period.quota_max: The maximum number of allowed requests over a quota period.quota_renewal_rate: how often the quota resets, in seconds. In this case we have set it to renew every hour.
Access an API
Tyk Cloud
Create an API Key with the Dashboard
The Tyk Dashboard is the simplest way to generate a new Key. We have a video walkthrough for creating an API Key.-
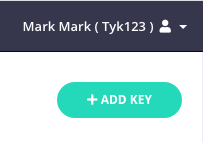
Select “Keys” from the “System Management” section
-
Click CREATE
-
Add a Policy or API to your Key
You have the option to add your new key to either an existing Policy or an existing individual API. For this Tutorial we are going to use an API.
Add an API to your Key
To select an API, you can either:
- Scroll through your API Name list
- Use the Search field
- You can also Group by Authentication Type to filter your APIs
- You can also Group by Category
-
Add Configuration Details
You use the Configuration section to set the following:
- Enable Detailed Logging. This is disabled by default and isn’t required for this tutorial
- Give your Key an Alias. This makes your key easier
- Set an Expiry time after which the key will expire. Select a value from the drop-down list. This is a required setting. See Key Expiry for more details.
- Add Tags to your policy. Any tags you add can be used when filtering Analytics Data. Tags are case sensitive.
- Add Metadata to your policy. Adding metadata such as User IDs can be used by middleware components. See Session Metadata for more details.
-
Click CREATE
Create an API Key with the API
To create an API key, you will need the API ID that we wish to grant the key access to. Creating the token is then an API call to the endpoint. You will also need your own API Key, to get these values:- Select Users from the System Management section.
- In the users list, click Edit for your user.
-
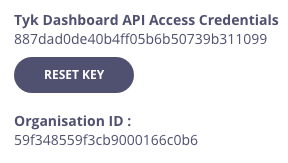
The API key is the Tyk Dashboard API Access Credentials, copy this somewhere you can reference it.
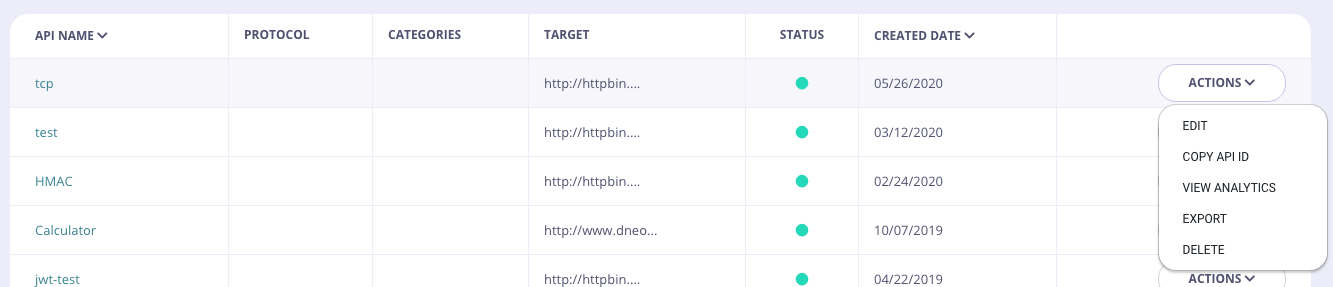
- Select APIs from the System Management section.
-
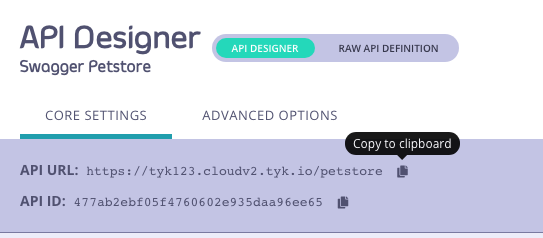
From the Actions menu for your API, select Copy API ID
curlcommand will generate a key for one of your APIs:- Replace the
authorizationheader value with your Tyk Dashboard API Access Credentials - Replace the API ID (
ad5004d961a147d4649fd3216694ebe2) with your API ID - It’s recommended to validate the JSON using JSON validator to avoid any
malformed inputerror
- Replace the
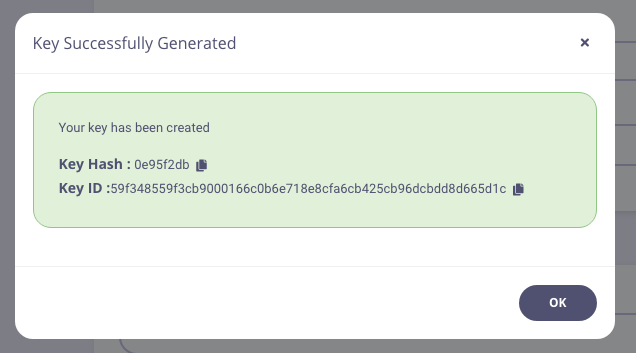
key_id parameter of the response is the access key you can now use to access the API that was specified in the access_rights section of the call.
Tyk Self Managed
Create an API Key with the Dashboard
The Tyk Dashboard is the simplest way to generate a new Key. We have a video walkthrough for creating an API Key.-
Select “Keys” from the “System Management” section
-
Click CREATE
-
Add a Policy or API to your Key
You have the option to add your new key to either an existing Policy or an existing individual API. For this Tutorial we are going to use an API.
Add an API to your Key
To select an API, you can either:
- Scroll through your API Name list
- Use the Search field
- You can also Group by Authentication Type to filter your APIs
- You can also Group by Category
-
Add Configuration Details
You use the Configuration section to set the following:
- Enable Detailed Logging. This is disabled by default and isn’t required for this tutorial
- Give your Key an Alias. This makes your key easier
- Set an Expiry time after which the key will expire. Select a value from the drop-down list. This is a required setting. See Key Expiry for more details.
- Add Tags to your policy. Any tags you add can be used when filtering Analytics Data. Tags are case sensitive.
- Add Metadata to your policy. Adding metadata such as User IDs can be used by middleware components. See Session Metadata for more details.
-
Click CREATE
Create an API Key with the API
To create an API key, you will need the API ID that we wish to grant the key access to. Creating the token is then an API call to the endpoint. You will also need your own API Key, to get these values:- Select Users from the System Management section.
- In the users list, click Edit for your user.
-
The API key is the Tyk Dashboard API Access Credentials, copy this somewhere you can reference it.
- Select APIs from the System Management section.
-
From the Actions menu for your API, select Copy API ID
curlcommand will generate a key for one of your APIs:- Replace the
authorizationheader value with your Tyk Dashboard API Access Credentials - Replace the API ID (
ad5004d961a147d4649fd3216694ebe2) with your API ID - It’s recommended to validate the JSON using JSON validator to avoid any
malformed inputerror
- Replace the
key parameter of the response is the access key you can now use to access the API that was specified in the access_rights section of the call.
Tyk Open Source
To create an API Key, you will need the API ID that we wish to grant the key access to, then creating the key is an API call to the endpoint. Prerequisite- You will need your API secret, this is the
secretproperty of thetyk.conffile.
curl command will generate a key for one of your APIs, remember to replace {API-SECRET}, {API-ID} and {API-NAME} with the real values as well as the curl domain name and port to be the correct values for your environment.
access_rights section.
{API-ID}: The API ID you wish this policy to grant access to, there can be more than one of these entries.{API-NAME}: The name of the API being granted access to (this is not required, but helps when debugging or auditing).
access_rights: A list of objects representing which APIs you have configured to grant access to.rateandper: The number of allowed requests per period.quota_max: The maximum number of allowed requests over a quota period.quota_renewal_rate: how often the quota resets, in seconds. In this case, we have set it to renew every hour.
key parameter of the response is the access key you can now use to access the API that was specified in the access_rights section of the call.
Import an API
Tyk supports importing both API Blueprint and Swagger (OpenAPI) JSON definitions from either the Gateway or the Dashboard. Tyk will output the converted file to tostdout. Below are the commands you can use to get Tyk to switch to command mode and generate the respective API definitions for both API Blueprint and Swagger files.
API Blueprint is being deprecated
Our support for API Blueprint is being deprecated. We have been packaging aglio in our Docker images for the Dashboard which enables rendering API Blueprint Format in the portal. This module is no longer maintained and is not compatible with newer NodeJS. If you wish to continue using this feature, you can do so by installing the module yourself in your Dockerfile. The imapct of this change is that our Docker images will no longer contain this functionality. As a work around, you can do the following:- Create API Blueprint in JSON format using the Apiary Drafter tool
- Convert API Blueprint to OpenAPI (Swagger) using the Apiary API Elements CLI tool.
Using API Blueprint
See note above regarding deprecation of support for API Blueprint.
stdout, so redirecting the output to a file is advised in order to generate new definitions to use in a real configuration.
Importing a Blueprint as a new API:
Create a new definition from the Blueprint:Importing a definition as a version in an existing API:
Add a version to a definition:Creating your API versions as a mock
As the API Blueprint definition allows for example responses to be embedded, these examples can be imported as forced replies, in effect mocking out the API. To enable this mode, when generating a new API or importing as a version, simply add the--as-mock parameter.
Using Swagger (OpenAPI)
Tyk supports importing Swagger documents to create API definitions and API versions. Swagger imports do not support mocking though, so sample data and replies will need to be added manually later.Importing a Swagger document as a new API
Create a new definition from Swagger:When creating a new definition from an OAS 3.0 spec, you will have to manually add the listen path after the API is created.
Importing a Swagger document as a version into an existing API
Add a version to a definition:Mocks
Tyk supports API mocking using our versioninguse_extended_paths setup, adding mocked URL data to one of the three list types (white_list, black_list or ignored). In order to handle a mocked path, use an entry that has action set to reply:
Import APIs via the Dashboard API
Import API - Swagger
Sample Request
insert_into_api: If set totruethe import will replace an existing API. Setting tofalsewill import into a new API.api_id: The internal MongoDB object id for your API.version_name: Your versioning convention name for the imported API.upstream_url: The URL the API is served by.
Sample Response
Import API - Blueprint
Sample Request
insert_into_api: If set totruethe import will replace an existing API. Setting tofalsewill import into a new API.api_id: The internal MongoDB object id for your API.as_mock: If set to true, enables our mocking support for Blueprint imported API. See Mocks above for more details.version_name: Your versioning convention name for the imported API.upstream_url: The URL the API is served by.
Sample Response
Import APIs via the Dashboard UI
-
Select “APIs” from the “System Management” section
-
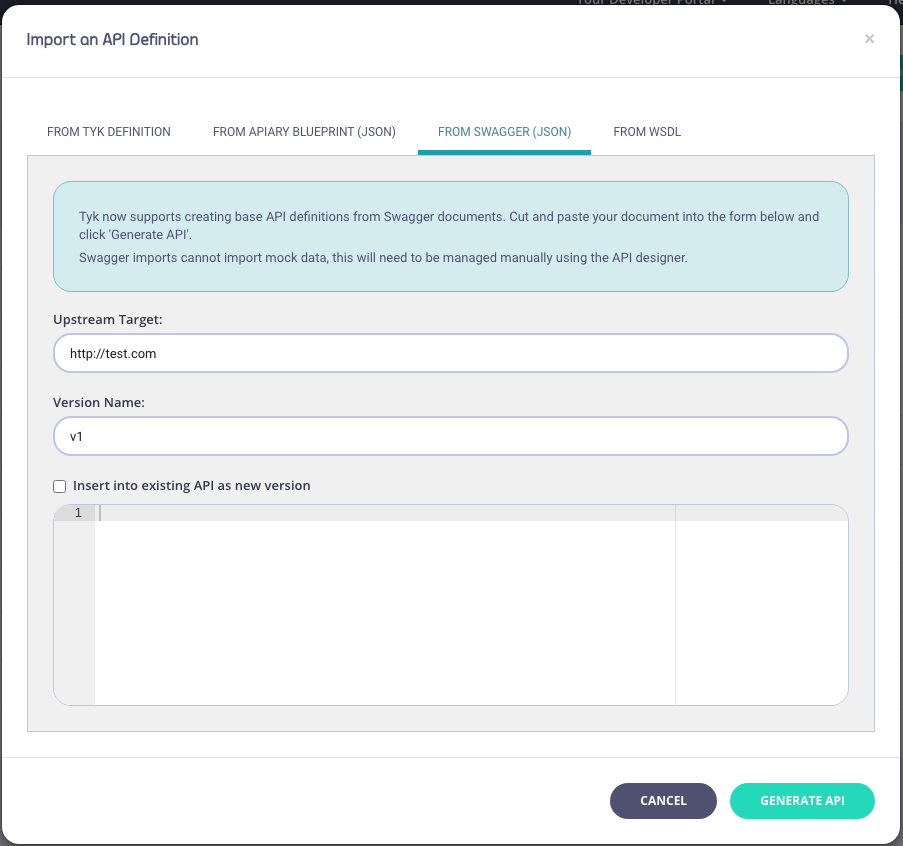
Click “IMPORT API”

- From an Existing Tyk API definition
- From a Apiary Blueprint (JSON) file
- From a Swagger/OpenAPI (JSON only) file
- From a SOAP WSDL definition file (new from v1.9)
-
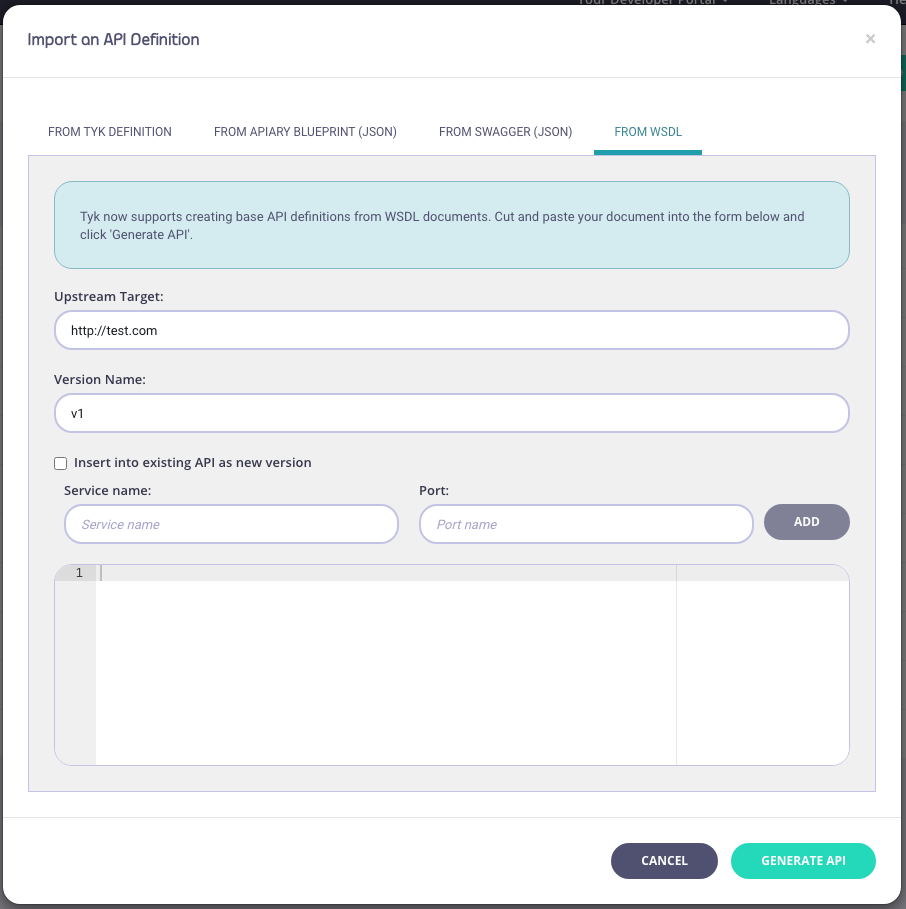
Enter API Information
You need to enter the following information:
- Your Upstream Target
- A Version Name (optional)
- An optional Service Name and Port (WSDL only)
- Copy code into the editor
- Click “Generate API” Your API will appear in your APIs list. If you select EDIT from the ACTIONS drop-down list, you can see the endpoints (from the Endpoint Designer) that have been created as part of the import process.
Creating a new API Version by importing an API Definition using Tyk Dashboard
As well as importing new APIs, with Tyk, you can also use import to create a new version of an existing Tyk Classic API.-
Open the API Designer page and select Import Version from the Options drop-down.

- Select either OpenAPI (v2.0 or 3.0) or WSDL/XML as your source API
-
You need to add a new API Version Name. Upstream URL is optional.
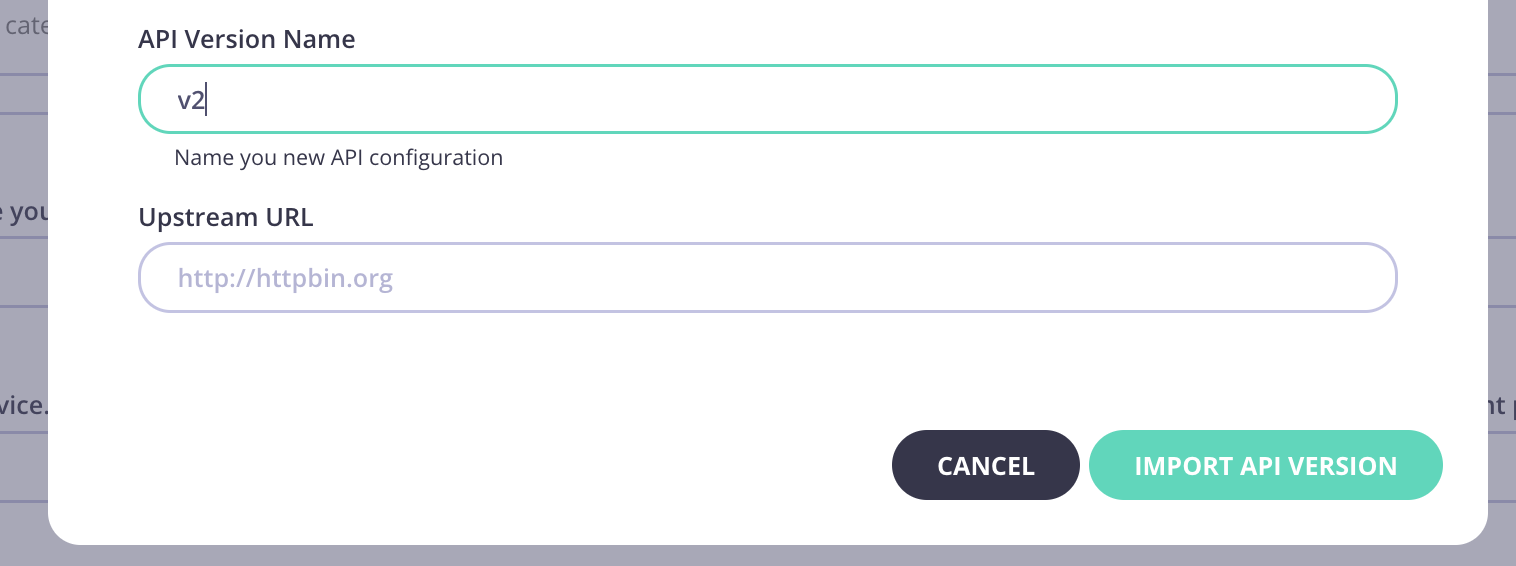
-
Click Import API.
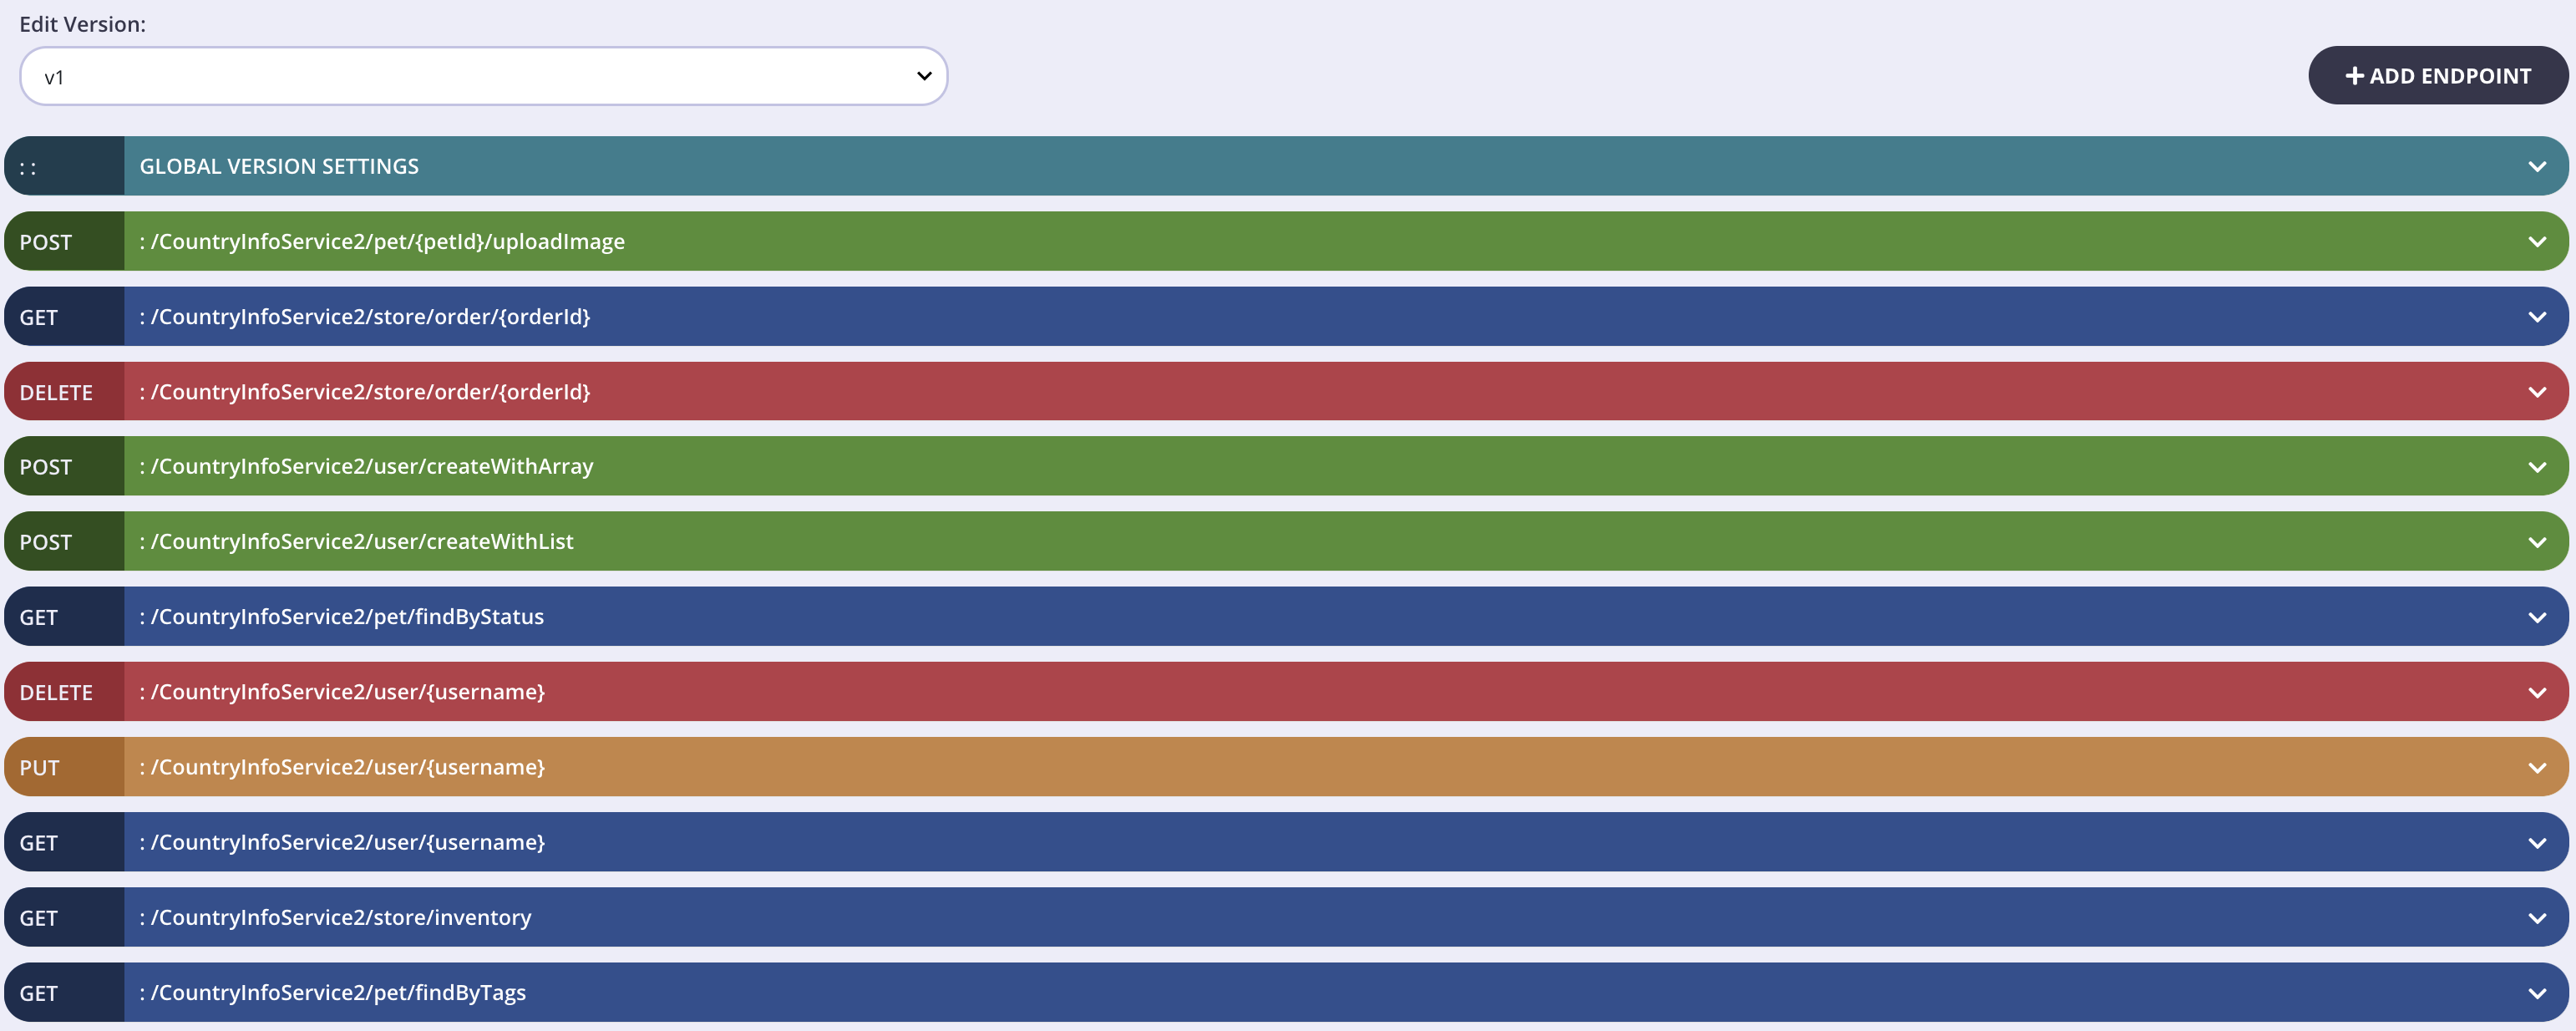
- Select the Versions tab and your new version will be available.
- Open the Endpoint Designer for your API and select your new version from Edit Version.
- You will see all the endpoints are saved for your new version.
Import from an OpenAPI v2.0 Document
-
From the Import API screen, select OpenAPI.
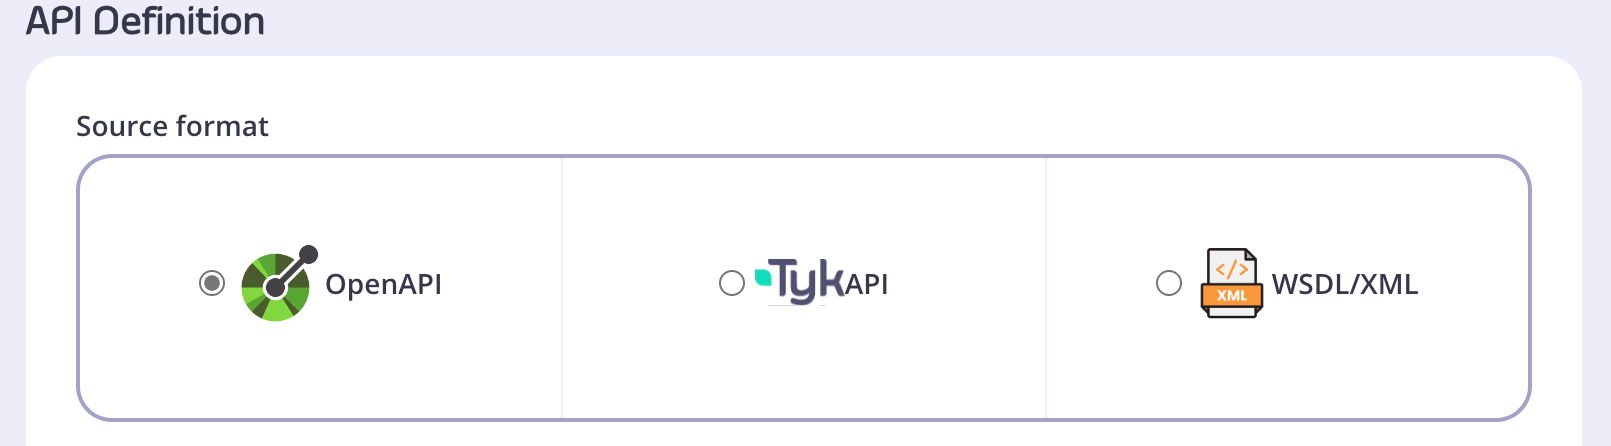
-
Paste your OAS v2.0 compliant definition into the code editor.
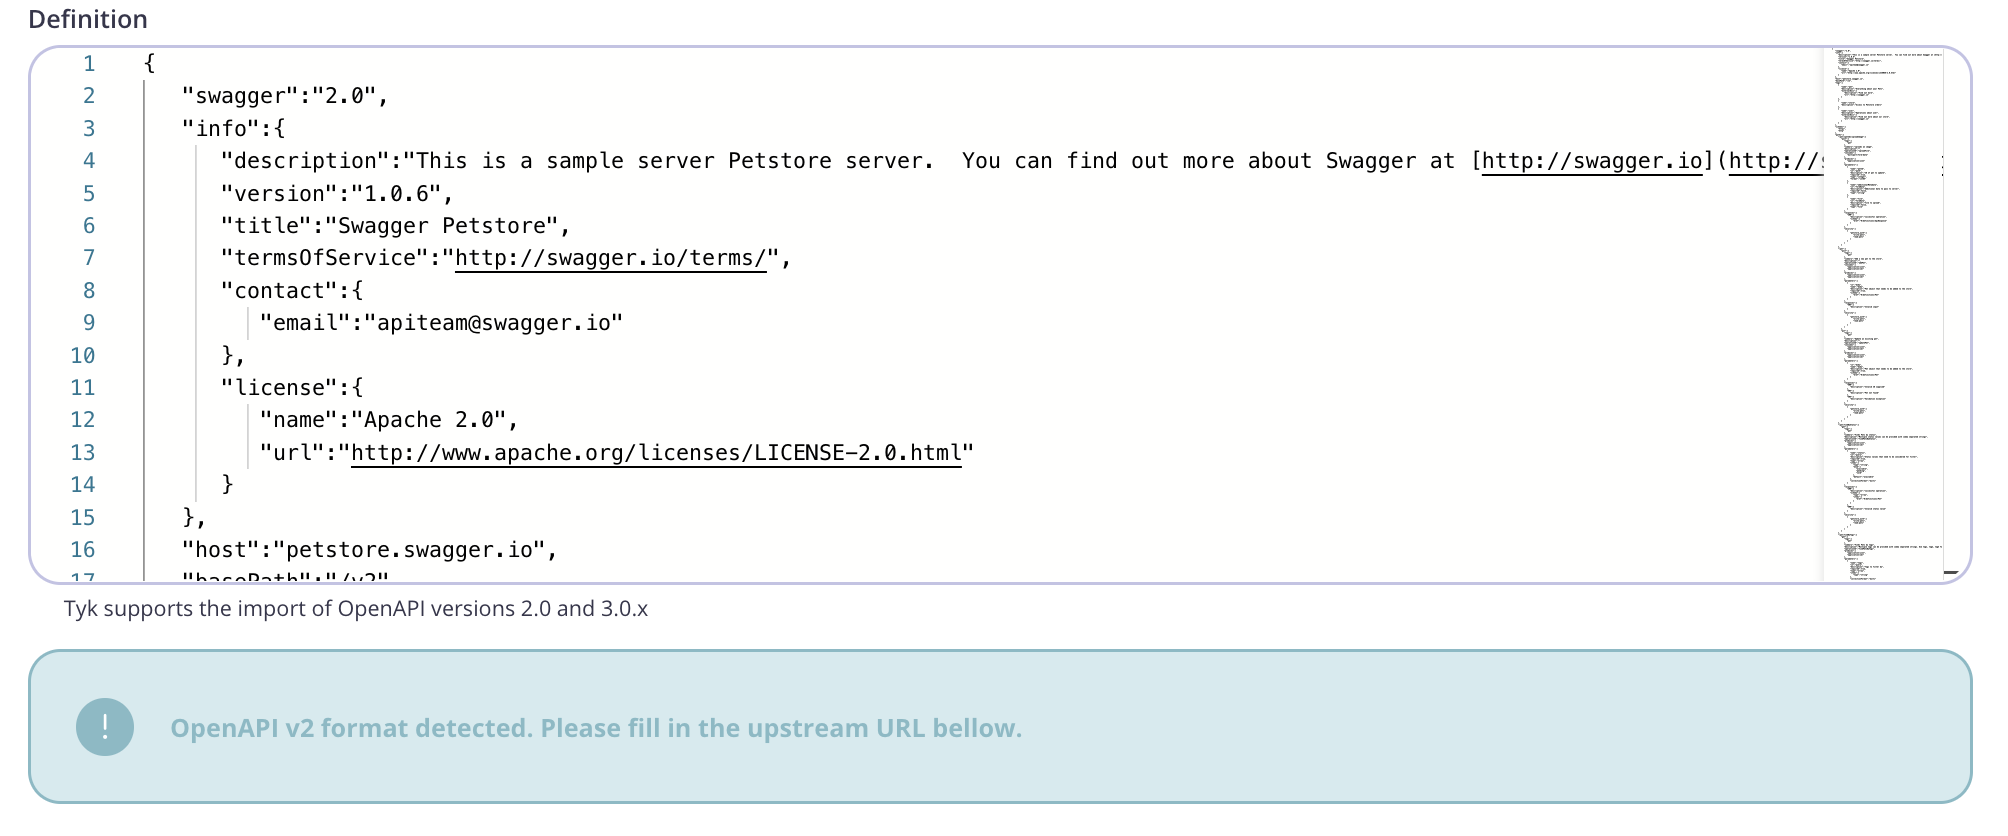
-
Note that the Dashboard has detected that an OAS v2.0 definition has been imported and you need to specify an upstream URL field to proceed.

-
Click Import API.