> ## Documentation Index
> Fetch the complete documentation index at: https://tyk.io/docs/llms.txt
> Use this file to discover all available pages before exploring further.
# Getting Started with Developer Portal
> Get started quickly with setting up and using the Tyk Developer Portal.
To get started with the Enterprise Developer portal, you need to accomplish four steps:
1. [Connect to a provider (Tyk Self Managed)](/5.8/portal/overview/getting-started#connect-to-a-provider)
2. [Create and import API Products and Plans in your Tyk Self Managed Instance](/5.8/portal/overview/getting-started#create-api-products-and-plans)
3. [Create catalogs and developer audiences](/5.8/portal/overview/getting-started#organization-and-catalog)
4. [Publish API Products and Plans to the Developer portal so that API consumers can access them](/5.8/portal/overview/getting-started#optional-customize-visual-appearance-of-api-products-and-plans)
After the last step, you can start serving APIs to your developer audience.
## Install Developer Portal
Refer the [install guide](/5.8/portal/install#installation-options-for-enterprise-developer-portal).
## Connect to a Provider
The first step in getting started with the developer portal is to connect the portal to a provider. Currently, the Tyk Enterprise Developer Portal supports only the Tyk Dashboard as an API Provider, with the ability to connect multiple instances of the Tyk Dashboard to the portal.
When the connection is established, the portal will import policies as API Products to the portal. The [Getting started guide](/5.8/portal/overview/getting-started#connect-to-a-provider) explains how to set up a policy and import it to the portal.
**Prerequisites**
* A Tyk Self-Managed [installation](/5.8/tyk-self-managed/install)
* The Enterprise portal installed.
* A login for the portal admin app.
**Steps for Configuration**
1. Go to the provider section in the portal admin dashboard
2. Click **Add provider**
3. Add your provider details
| Field | Description |
| :----------------------- | :---------------------------------------------------------------------------------------------------------------------------------------------------------------------------------------------------------------------------------------------------------------------------------------------------------------------------------------------------------------------------------------------------------------------------------------------------------------------------------------------------------------------------------------------------------------------------------------------------------------------------------------------------------- |
| Name | This is an internal reference to the provider. |
| Provider type (disabled) | This refers to the type of provider; however, the only supported provider at this stage is Tyk Self-Managed. |
| URL | The URL refers to the provider host URL for your Tyk Self-Managed installation. Within the Tyk instance, the URL can be simply copied. |
| Gateway URL | The gateway URL refers to the URL that the portal developers will use for requesting queries and accessing credentials. |
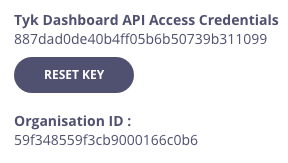
| Secret | The Secret can be fetched from the Tyk Self-Managed / Tyk analytics dashboard. The procedure is as follows: Go to the Tyk Dashboard. Navigate to *Users*. Select a user with the permissions you want to bring on to the portal. You can find the secret under *API Access Credentials. (Optional)*. You can find the organization id listed under *Organization ID* if your use case requires this. Please note that the Portal will share the same permissions that the user selected to provide the secret. |
| Organization ID | The org id is required in order to connect to your installation as a provider. It can be found in the user profile within the Tyk Dashboard. |
| Policy tags | This is an optional field that can be used to define which policies from Tyk will be imported to the portal. If a tag is defined here, it needs to also be defined in the Policy section in the [Tyk Dashboard](/5.8/portal/overview/getting-started#create-and-import-an-api-product-from-tyk). If this field is left empty in both this provider section and in the policies within Tyk, then all policies will be imported from the Tyk instance. How to include the label in the policy section inside Tyk, is explained in [Publish API Products and plans](/5.8/portal/overview/getting-started#publish-an-api-product) for the public-facing portal. |
4. Save your changes
##### How to find the Secret and Org ID inside your Tyk Dashboard?
1. Select **Users** from the **System Management** section.
2. In the users list, click **Edit** for your user.
3. The Secret is the **Tyk Dashboard API Access Credentials**. The **Organization ID** is underneath **Reset key**.
4. Select **APIs** from the **System Management** section.
5. From the **Actions** menu for your API, select **Copy API ID**.
## Create API Products and Plans
There are two ways of creating API Products and Plans in the Developer Portal:
1. [Automatically create an API Product or Plan](/5.8/#import-api-product-and-plan) in the Developer Portal by importing it from Tyk when synchronising the provider.
2. [Manually create an API Product or Plan](/5.8/#manually-create-api-product-and-plan) in the Developer Portal. (Only from version 1.13.0)
**Prerequisites**
* A Tyk Self-Managed [installation](/5.8/tyk-self-managed/install)
* Tyk Self-Managed [added as a provider](/5.8/portal/overview/getting-started#connect-to-a-provider)
* Have APIs [created in your Tyk installation](/5.8/api-management/gateway-config-managing-classic#create-an-api).
### Import API Product and Plan
When integrating with Tyk, the Tyk policies will be imported into the Developer Portal. Depending on the configuration that’s been set in the policy section, the policy will either be imported as an API Product or a Plan. For further details check the [portal key concepts](/5.8/portal/overview/concepts) document.
#### Create and Import an API Product from Tyk
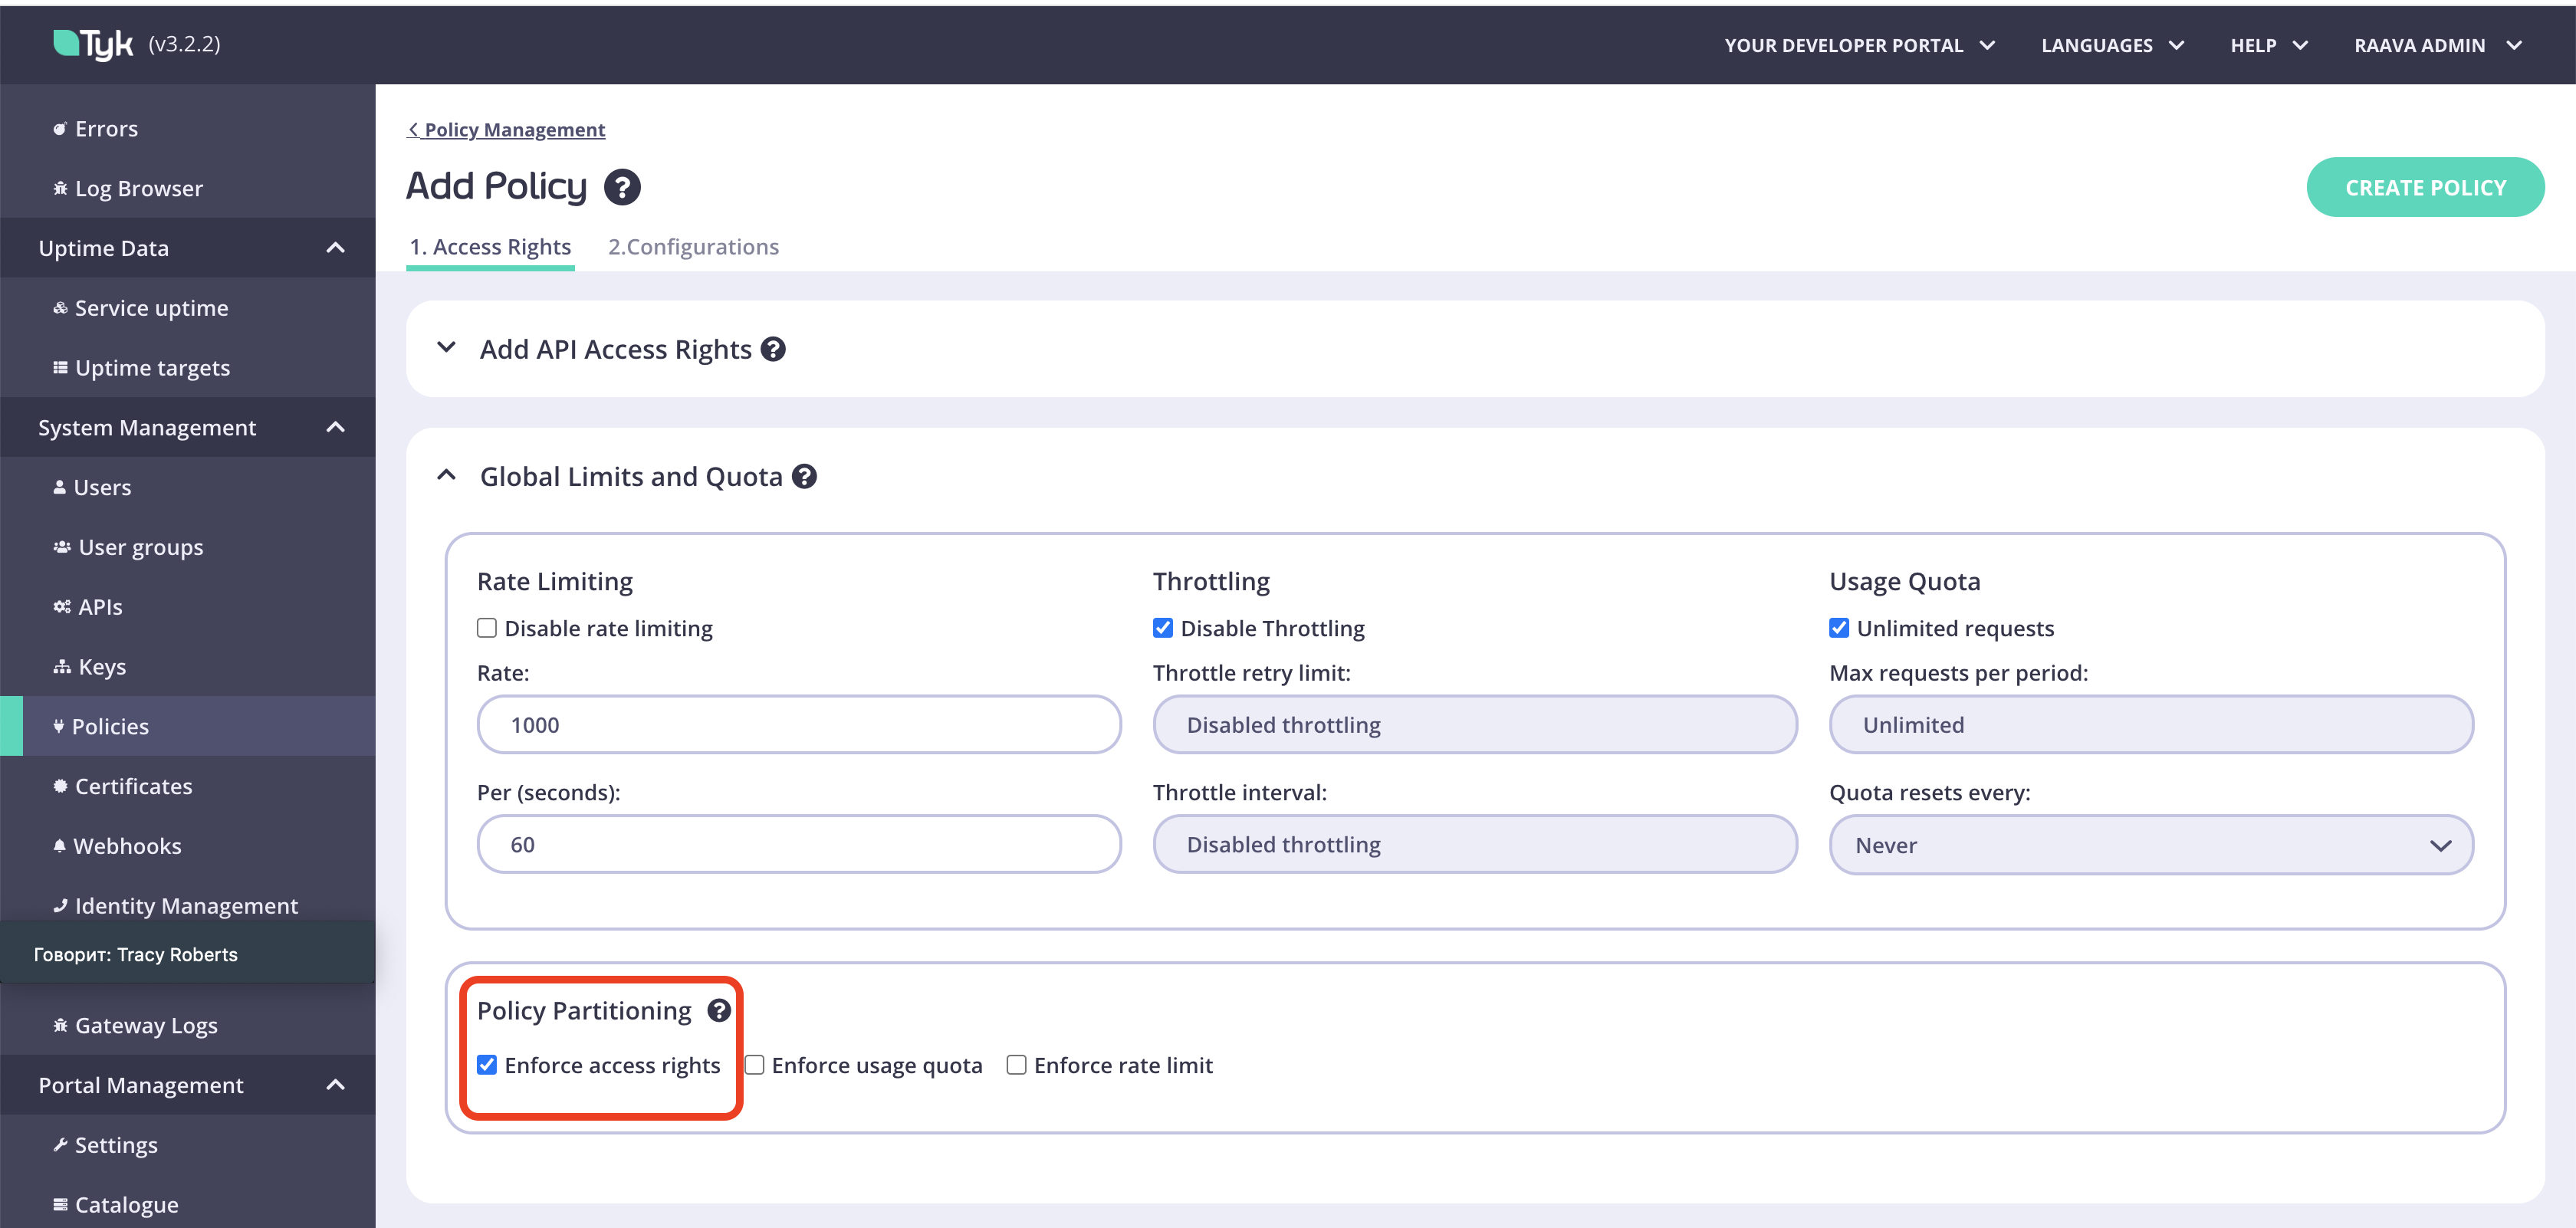
API Products are partitioned policies that provide an ACL but not quota/rate limits.
The following steps explain how to create and import an API product from Tyk, assuming you have one or more APIs already created:
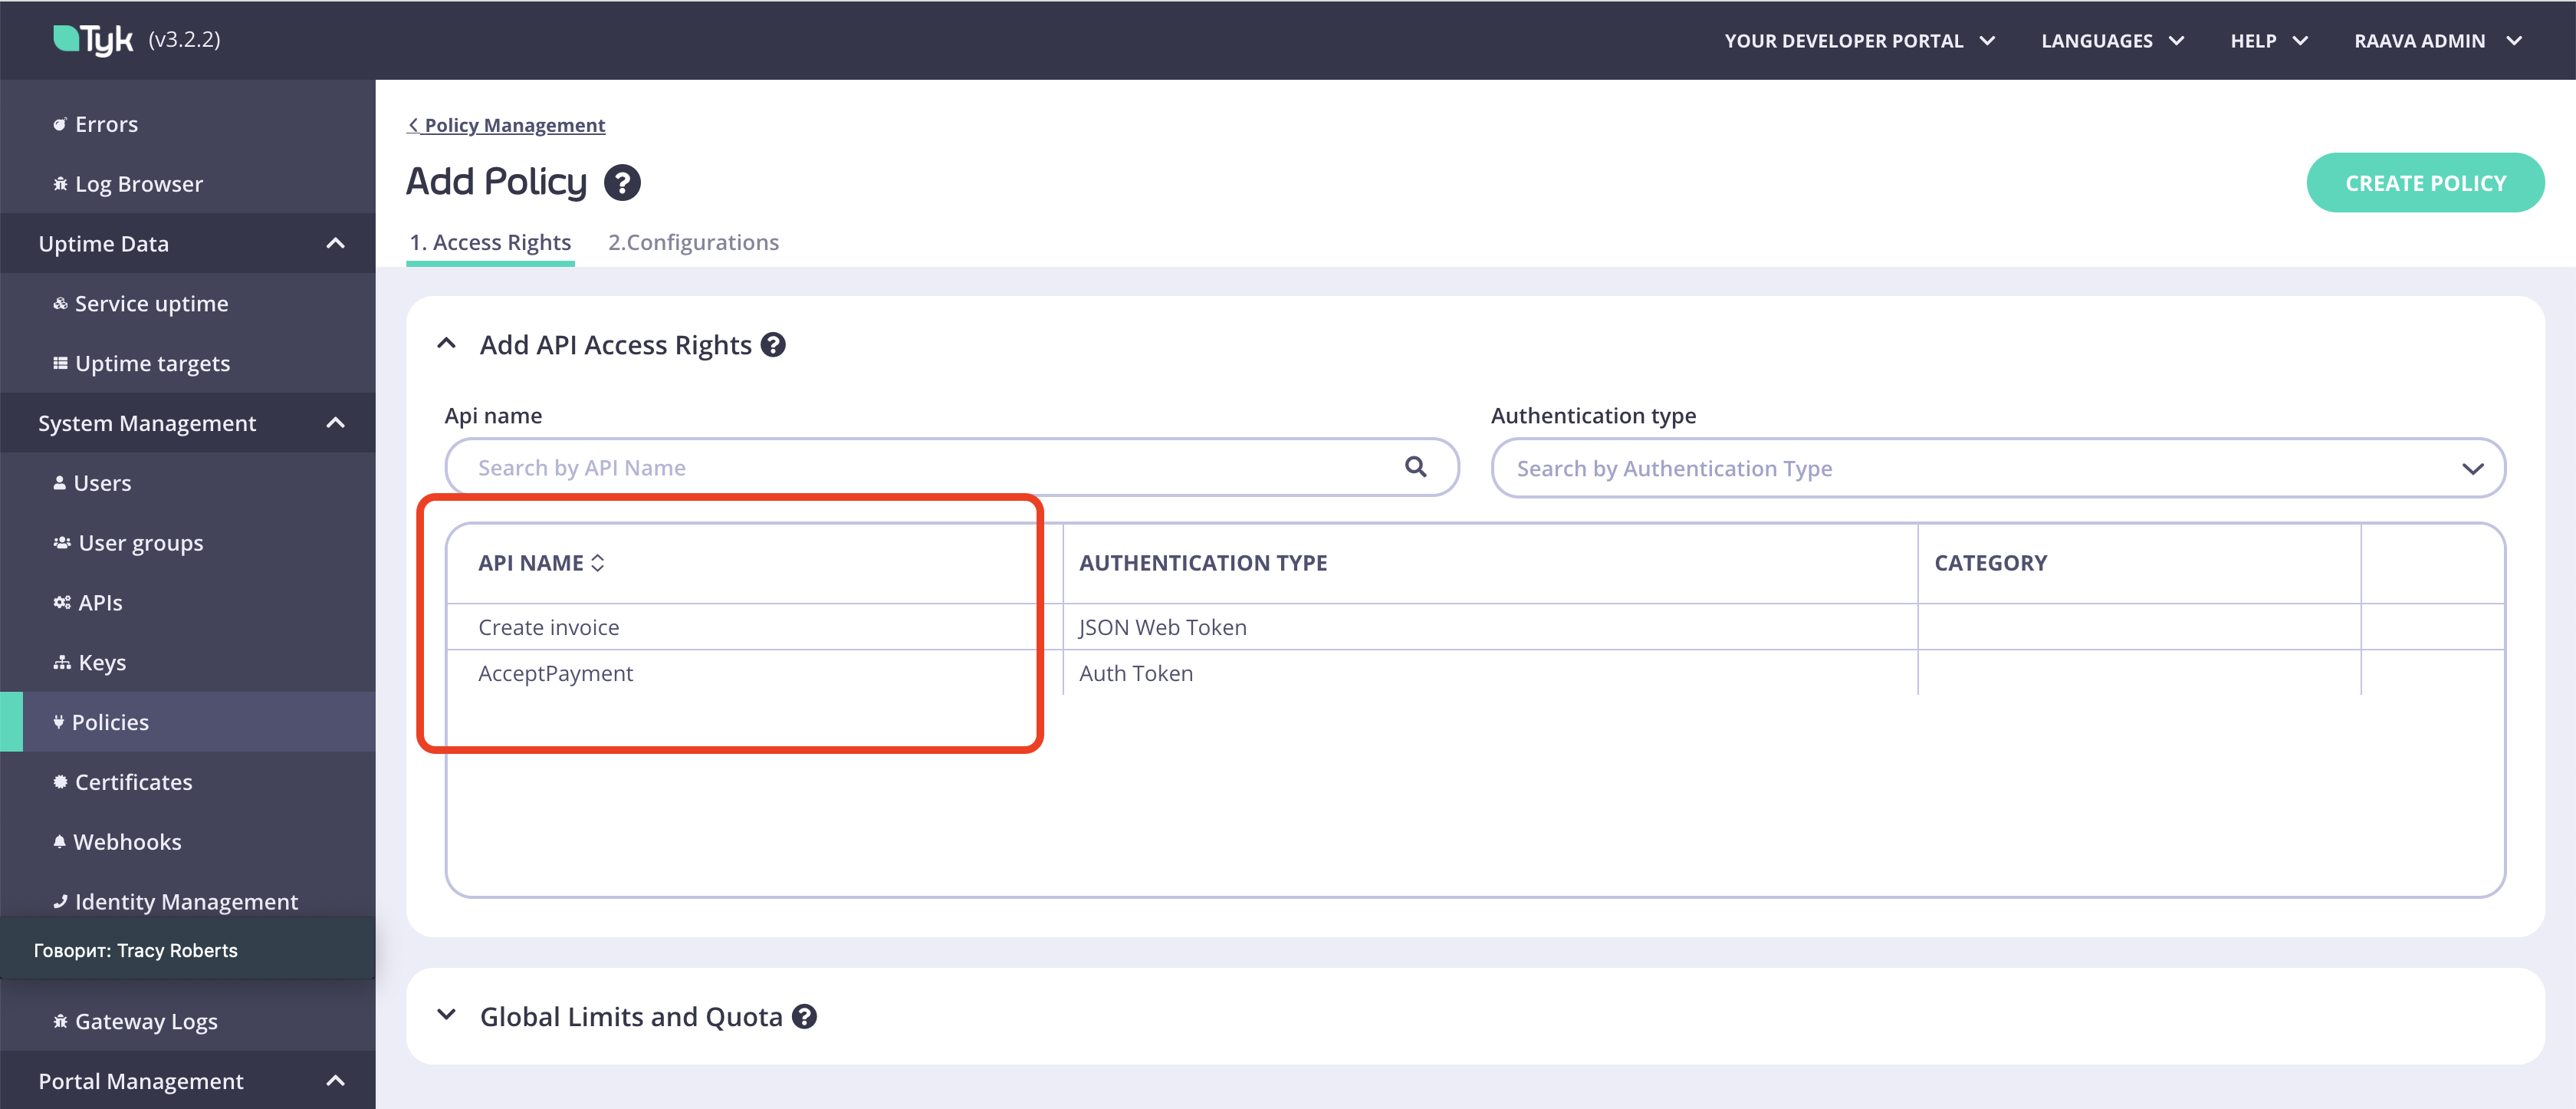
1. From your Tyk Self-Managed installation, go to **Policies** and click **Add policy**.
2. Select which APIs you want to add to your API product.
3. From the **Access Rights** drop-down list, select one or more APIs to include in your policy.
4. Under **Global limits and Quota**, select **Enforce access rights**. Ensure **Enforce usage quota** and **Enforce rate limit** are **not** selected.
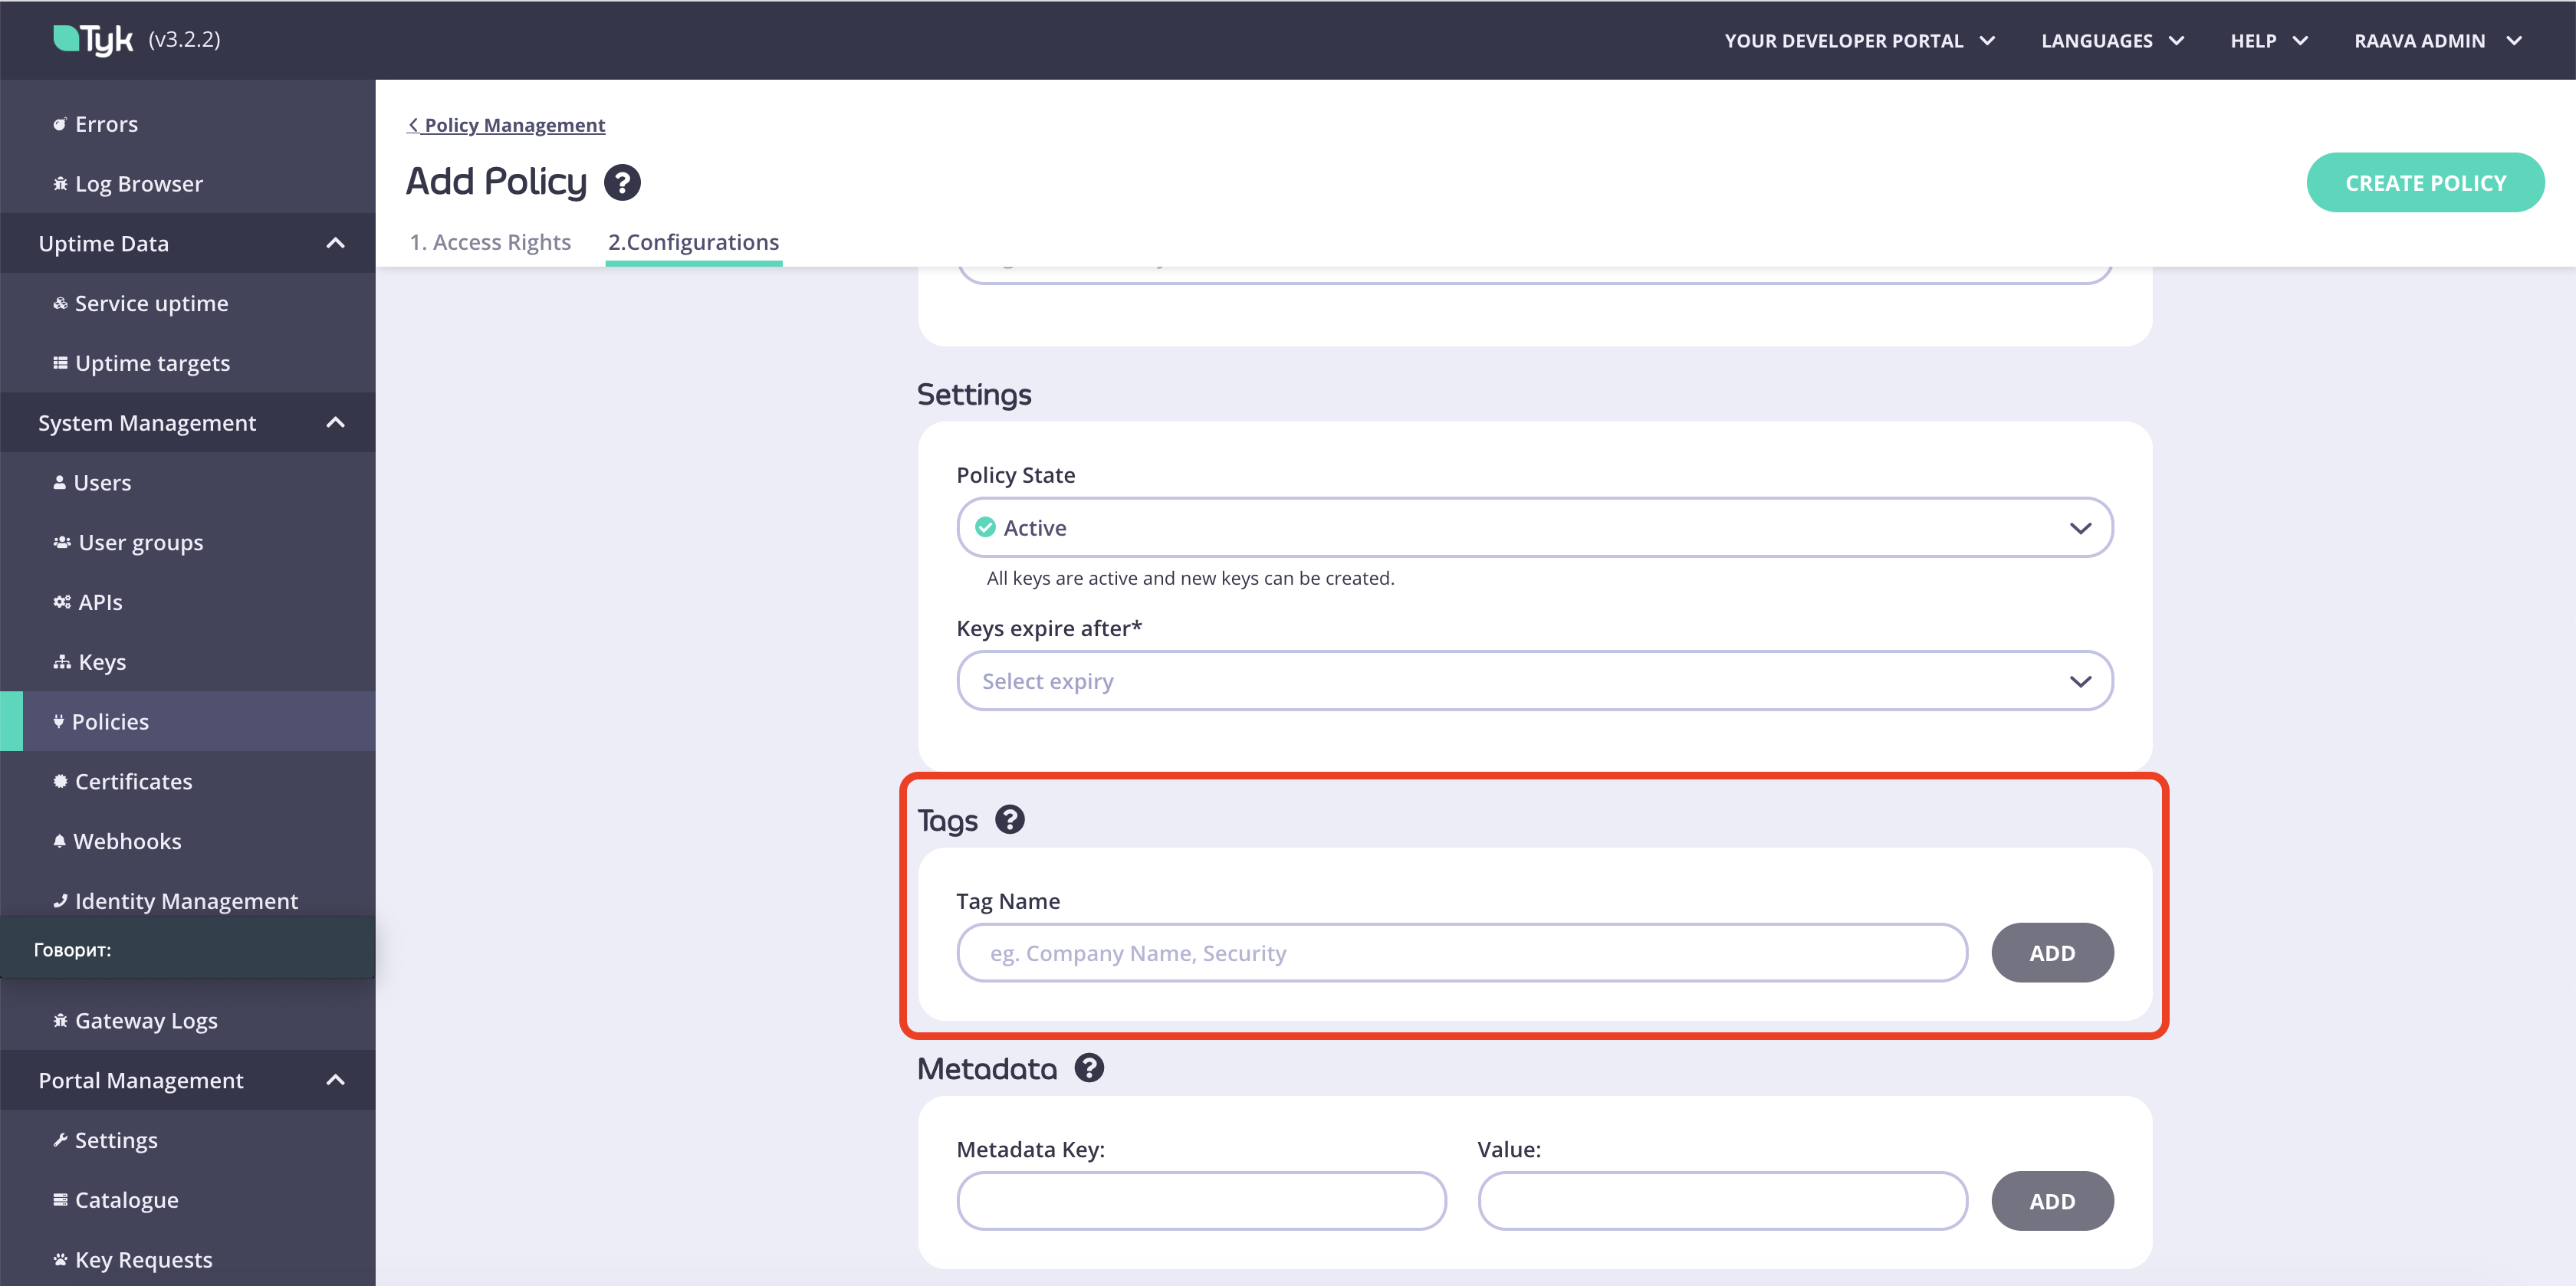
5. From the **Configurations** tab, add the information needed under name and settings.
6. From the **Tags** tab, a tag can be added to tell the portal this should be imported. If you have specified a specific label in the Provider section within the Developer portal when adding Tyk, the way the portal would know which Policies to import can be specified here.
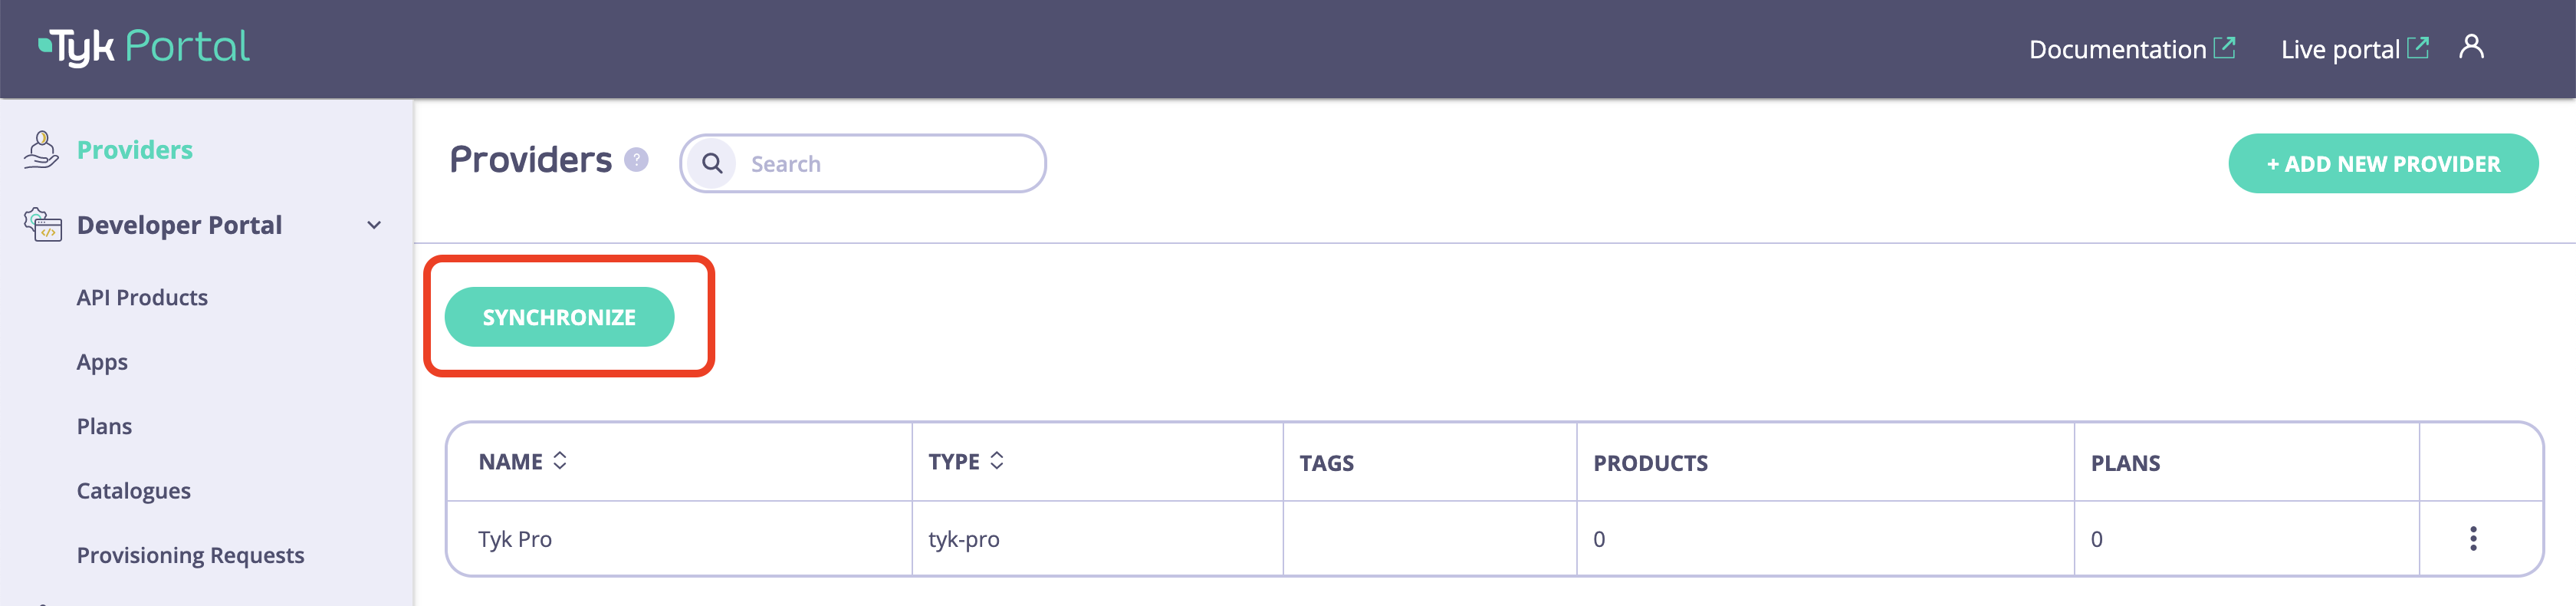
7. To import the API Products into the Developer portal, from the Tyk Portal admin app, click **Synchronise**.
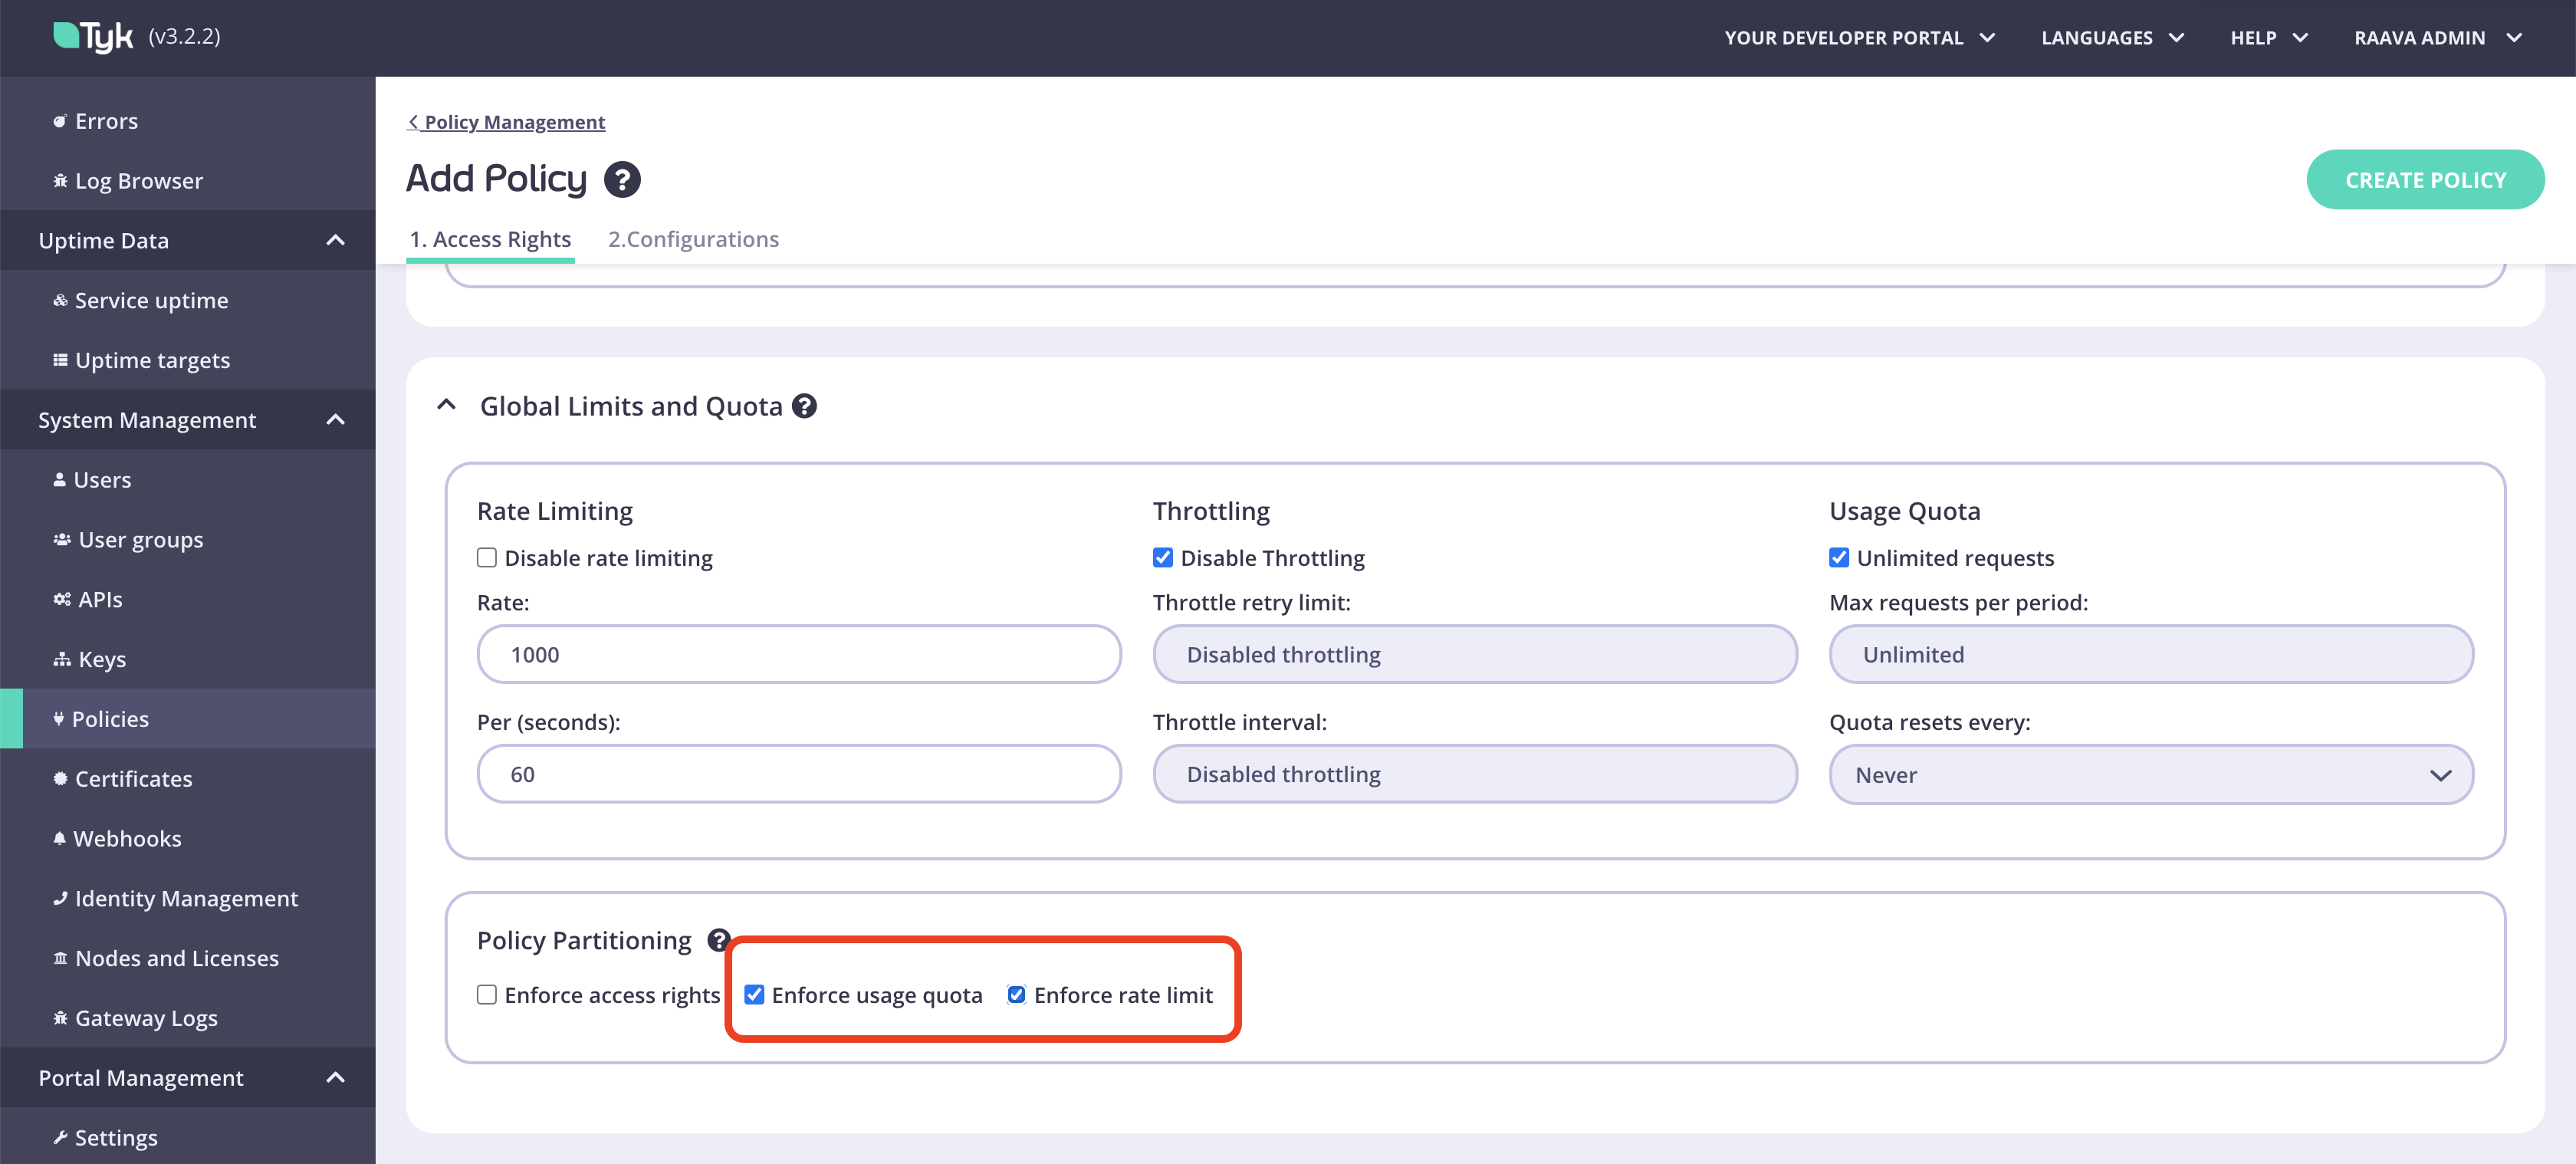
#### Create and Import Plans from Tyk
Plans are policies that implement rate limit or quota, or both, but do **NOT** include the ACL.
To create a Plan for the developer portal, follow the same steps as for creating an API Product. However, within the Global limits and quota in the Policies, configure the policy as follows:
1. From your Tyk Self-Managed installation, go to **Policies** and click **Add policy**.
2. Select an API. Please note that this a required field. The purpose of the policy explained in this guide is to control allowance, so you can select any API here.
3. Under **Global limits and Quota**, select **Enforce usage quota** and **Enforce rate limit**. Ensure **Disable rate-limiting** and **Unlimited requests** are **not** selected so you can set these limits.
4. Click **Synchronise** to import the plans into the Developer portal, from the Tyk Portal admin app.
### Manually Create API Product and Plan
From version 1.13.0, the Developer Portal allows you to create API Products and Plans from the portal dashboard for admins. When manually creating an API Product or Plan, the corresponding policy will be created in the Tyk Self-Managed selected provider.
#### Create API Product
When creating an API Product in the Developer Portal, a partitioned policy that provides an ACL but not quota/rate limits will be created in the Tyk Self-Managed selected provider. The following steps explain how to create an API Product in the Developer Portal:
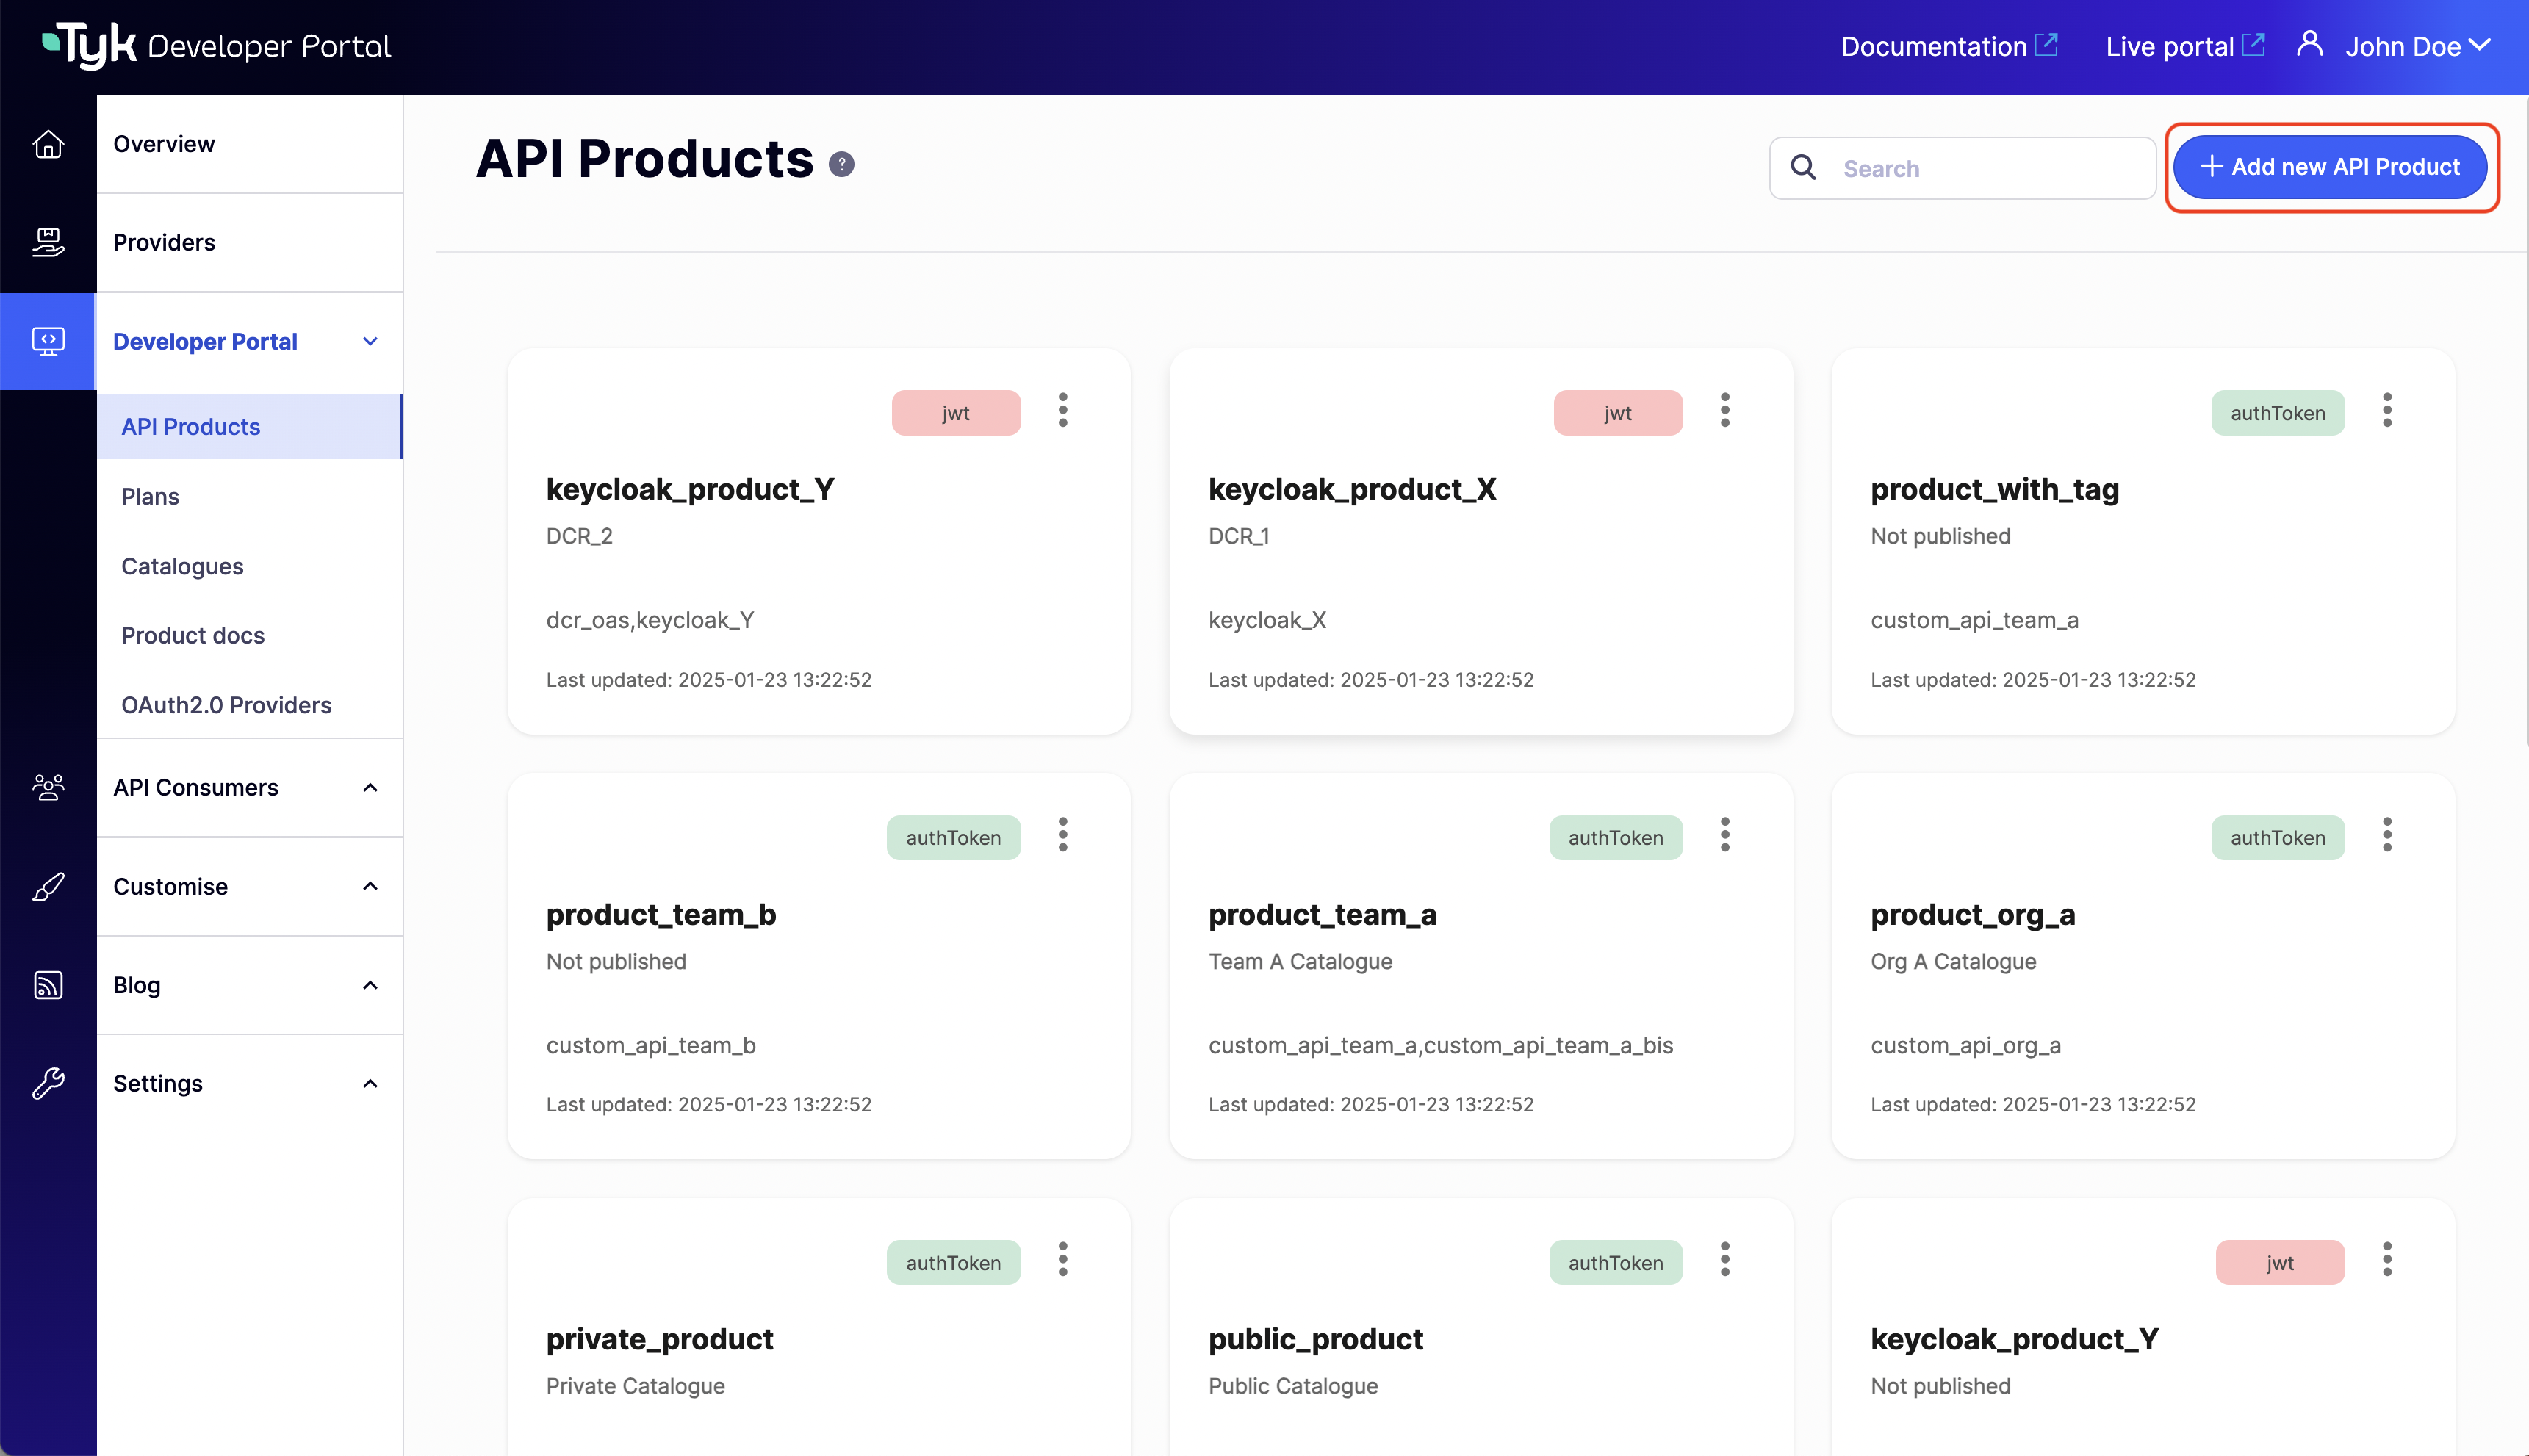
1. From the Tyk Portal admin app, go to **API Products** and click **Add new API Product**.
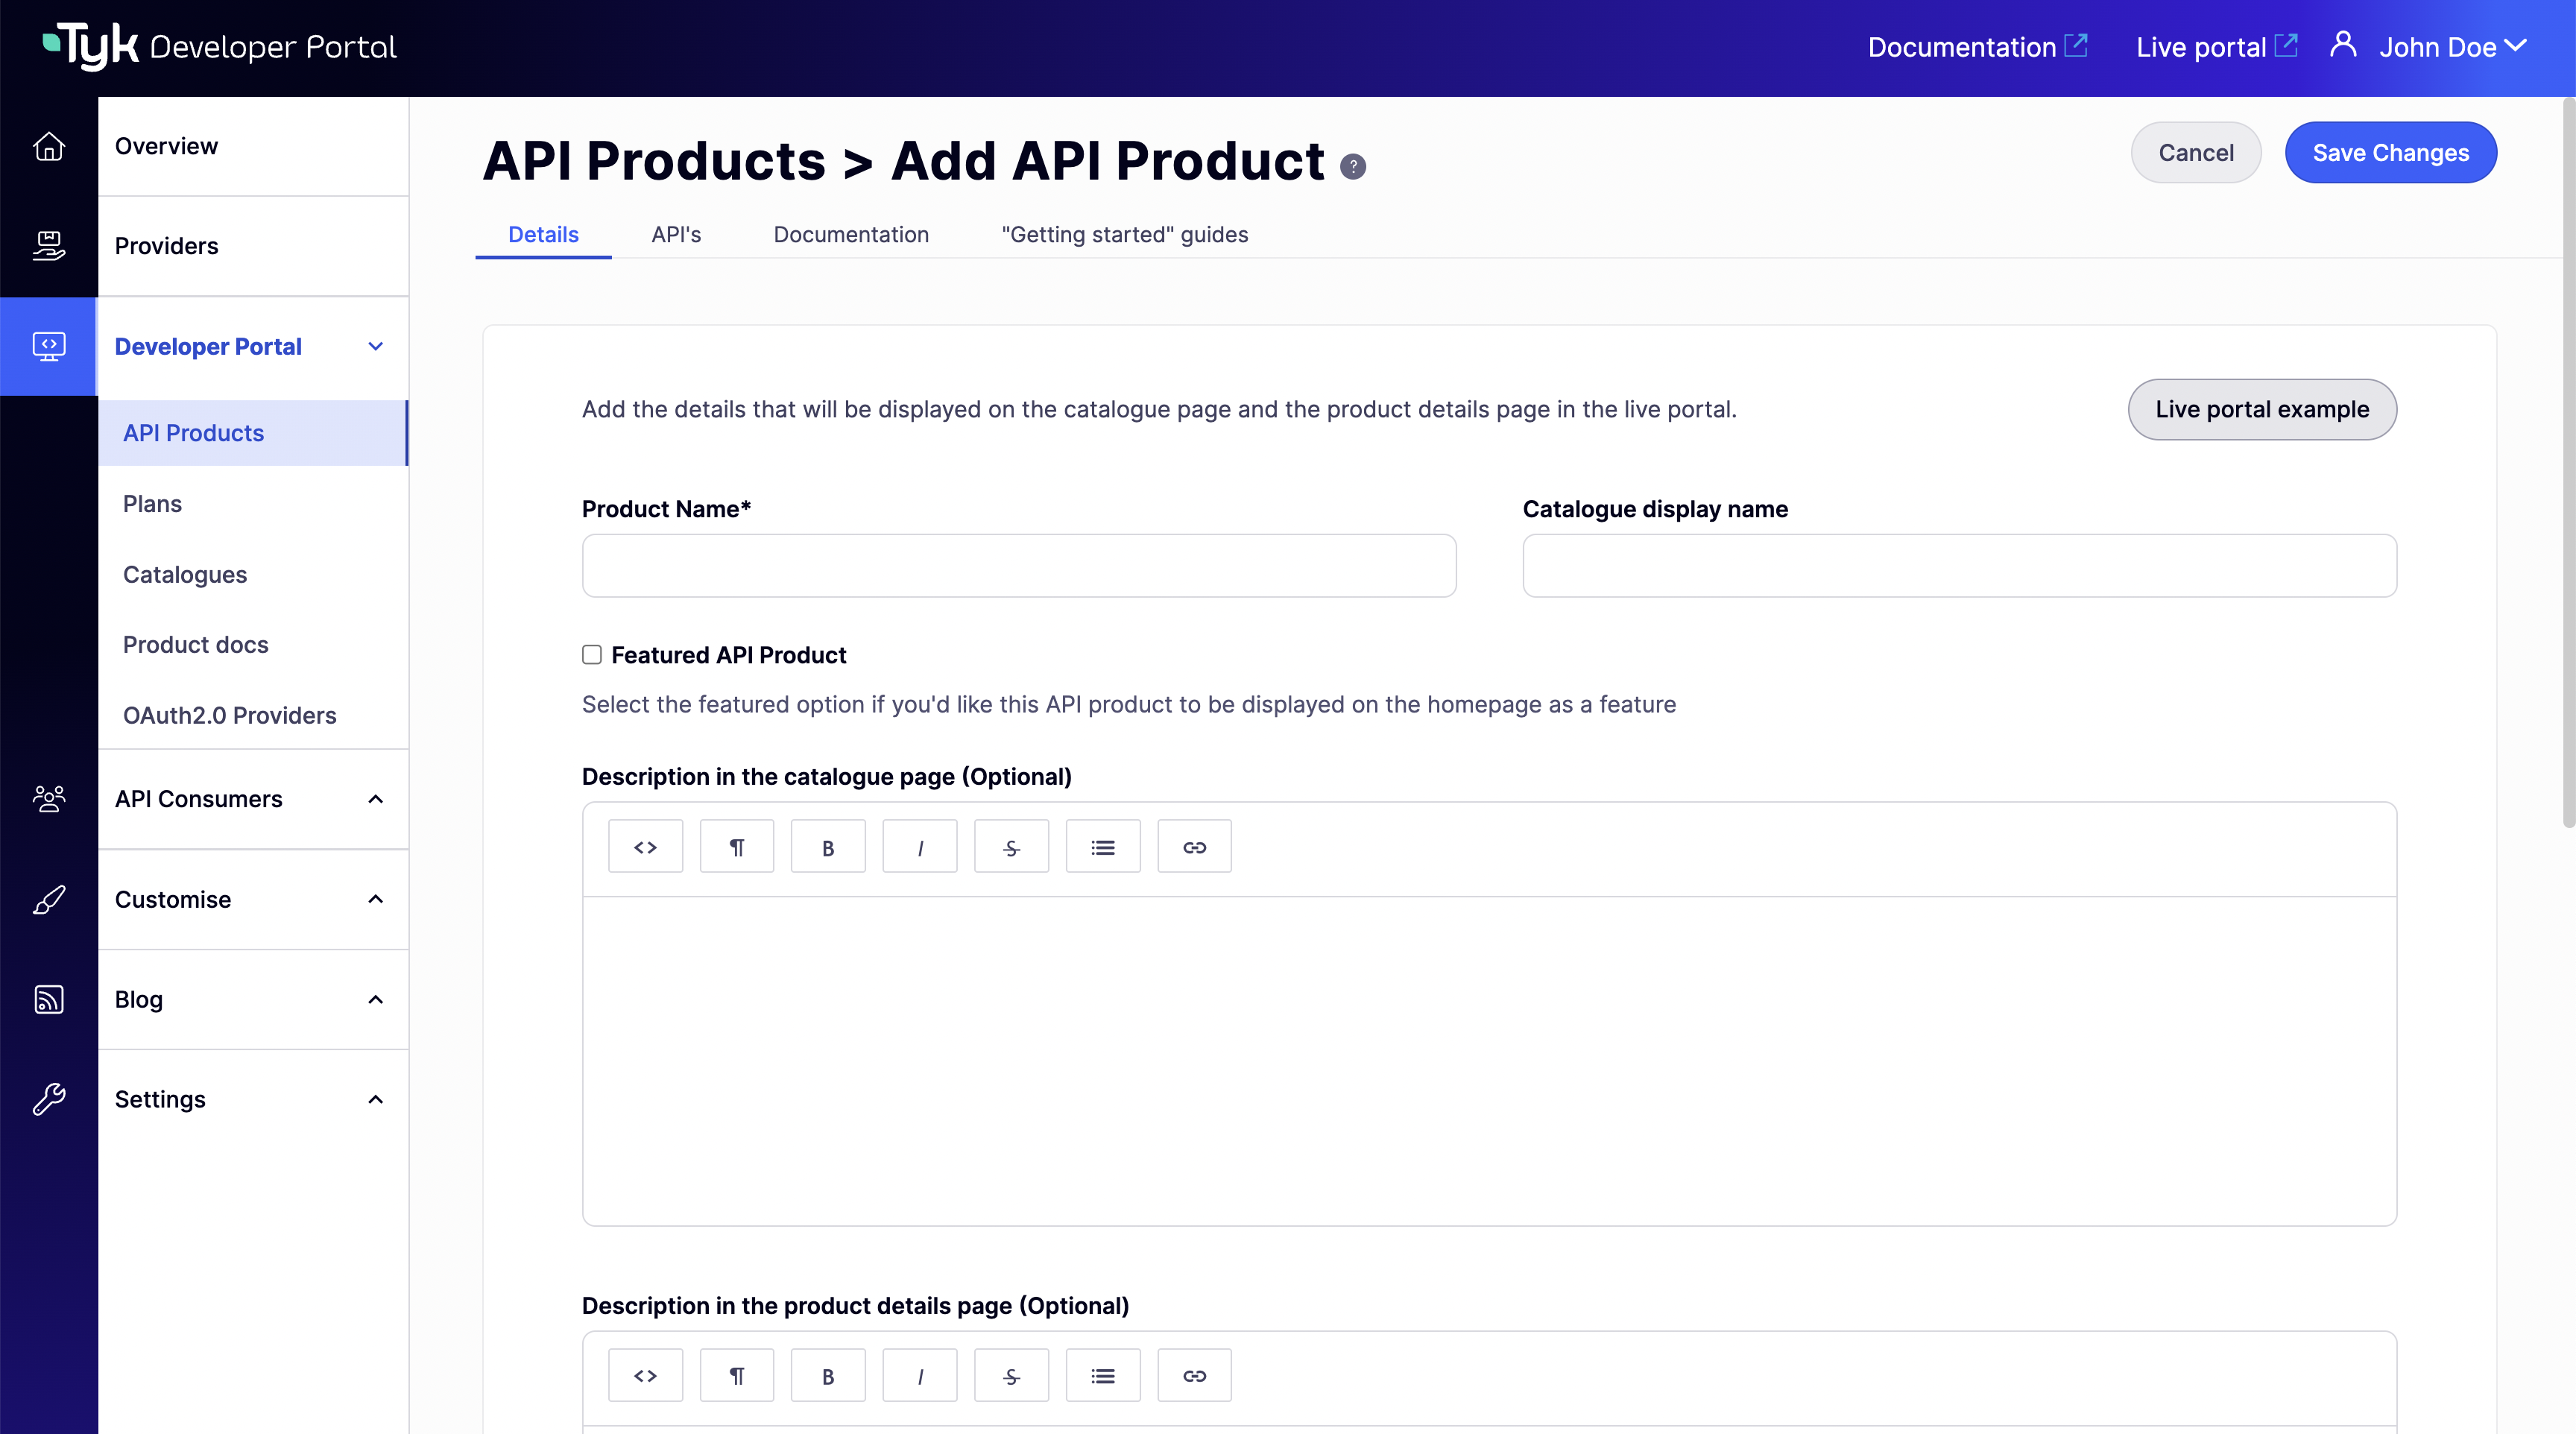
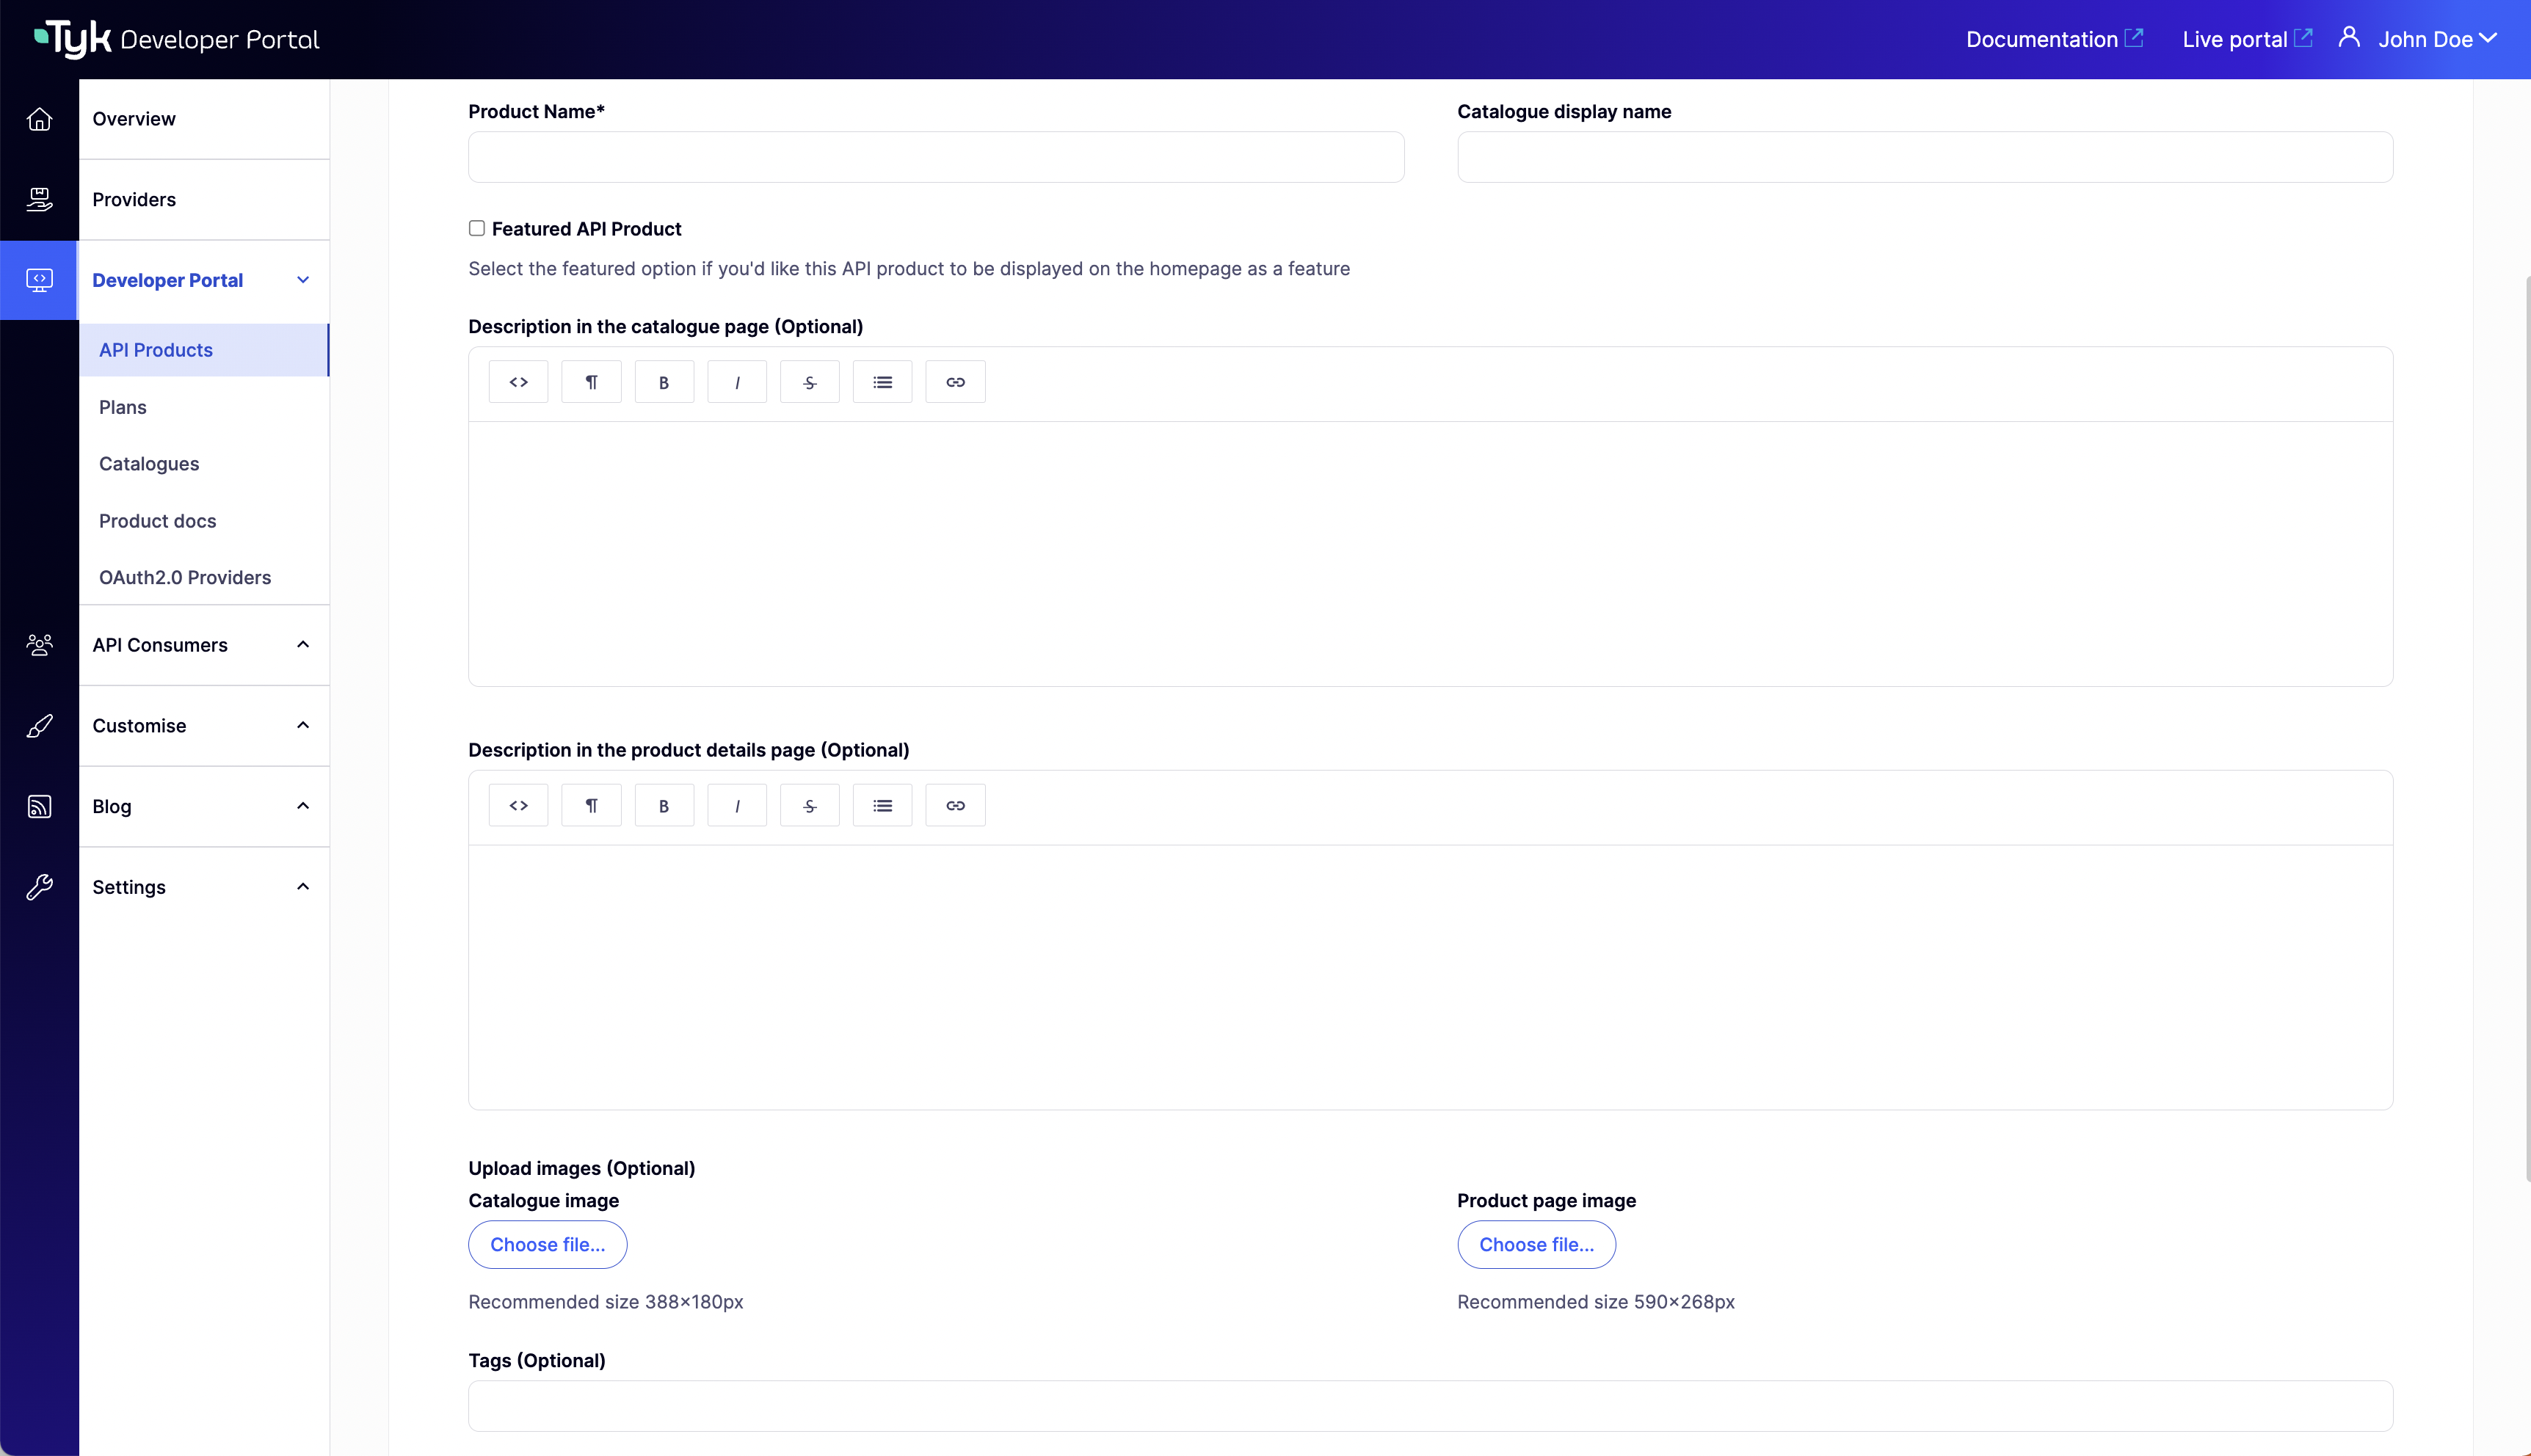
2. Select a unique name for the API Product and complete the [product details for customization](/5.8/portal/overview/getting-started#optional-customize-visual-appearance-of-api-products-and-plans) in the **Details** tab. The product name will be the name assigned to the created policy in the Tyk Self-Managed selected provider
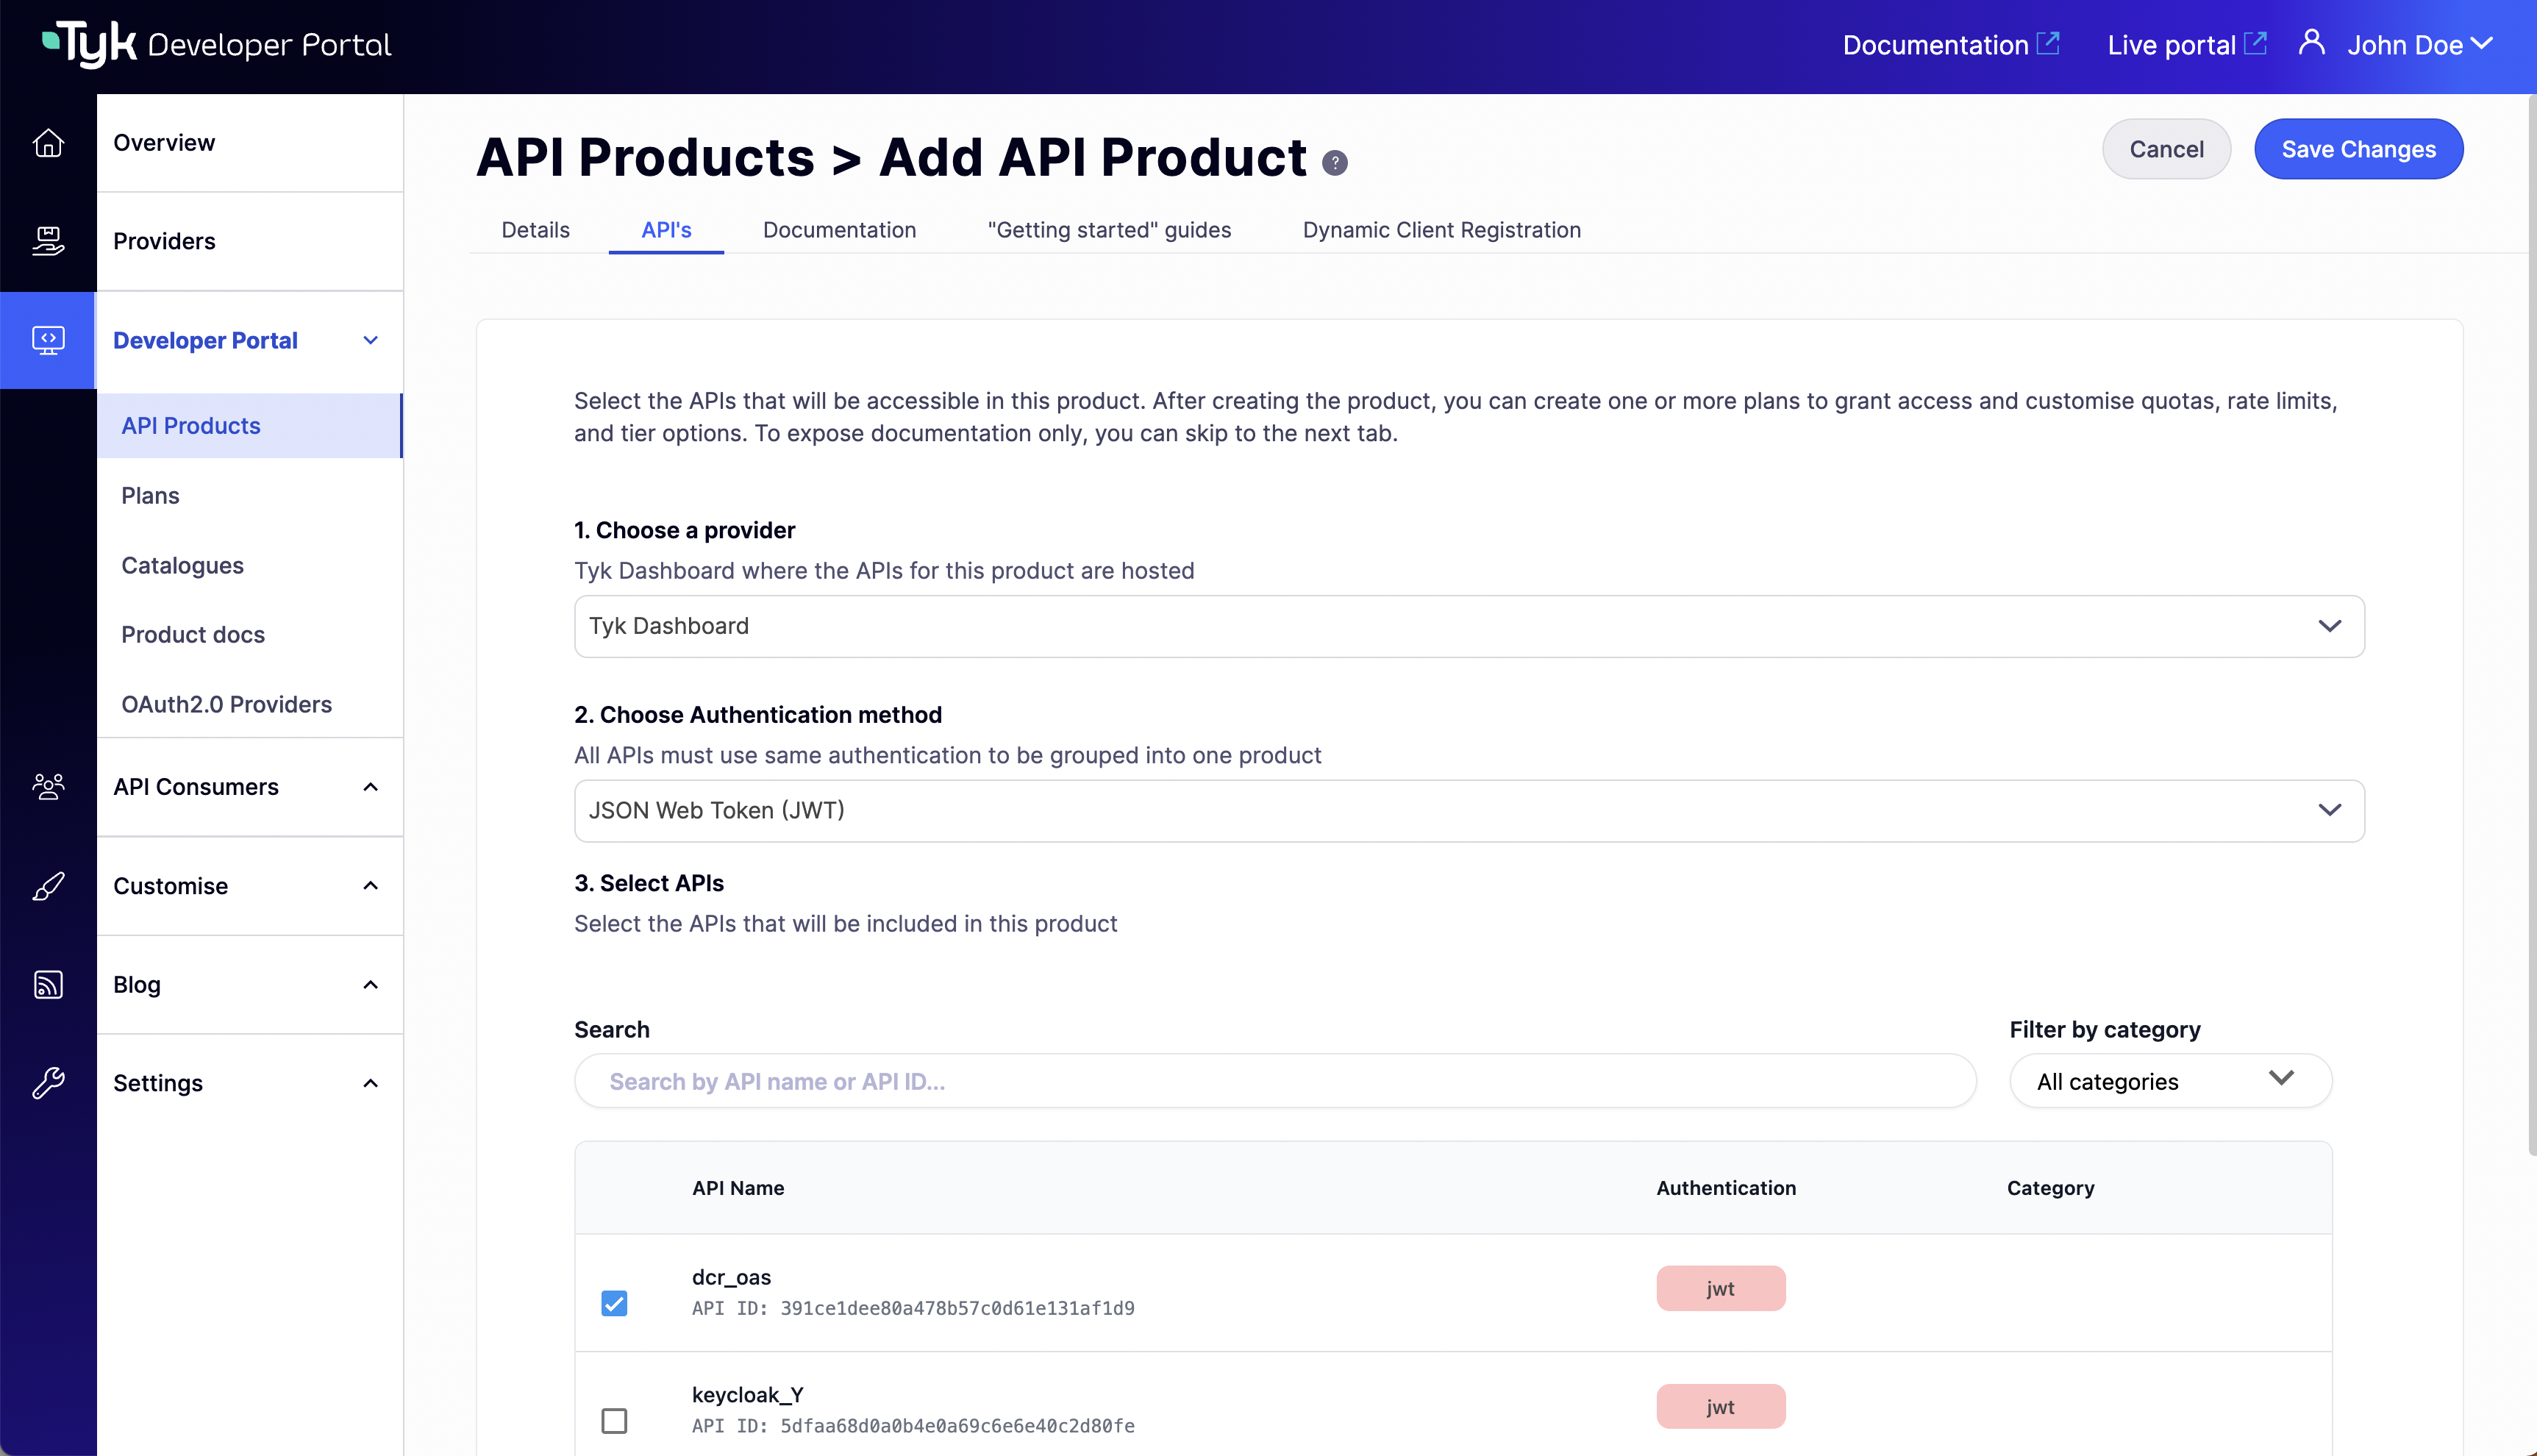
3. Select **Provider**, **Authentication**, and **APIS** in the **API's** tab.
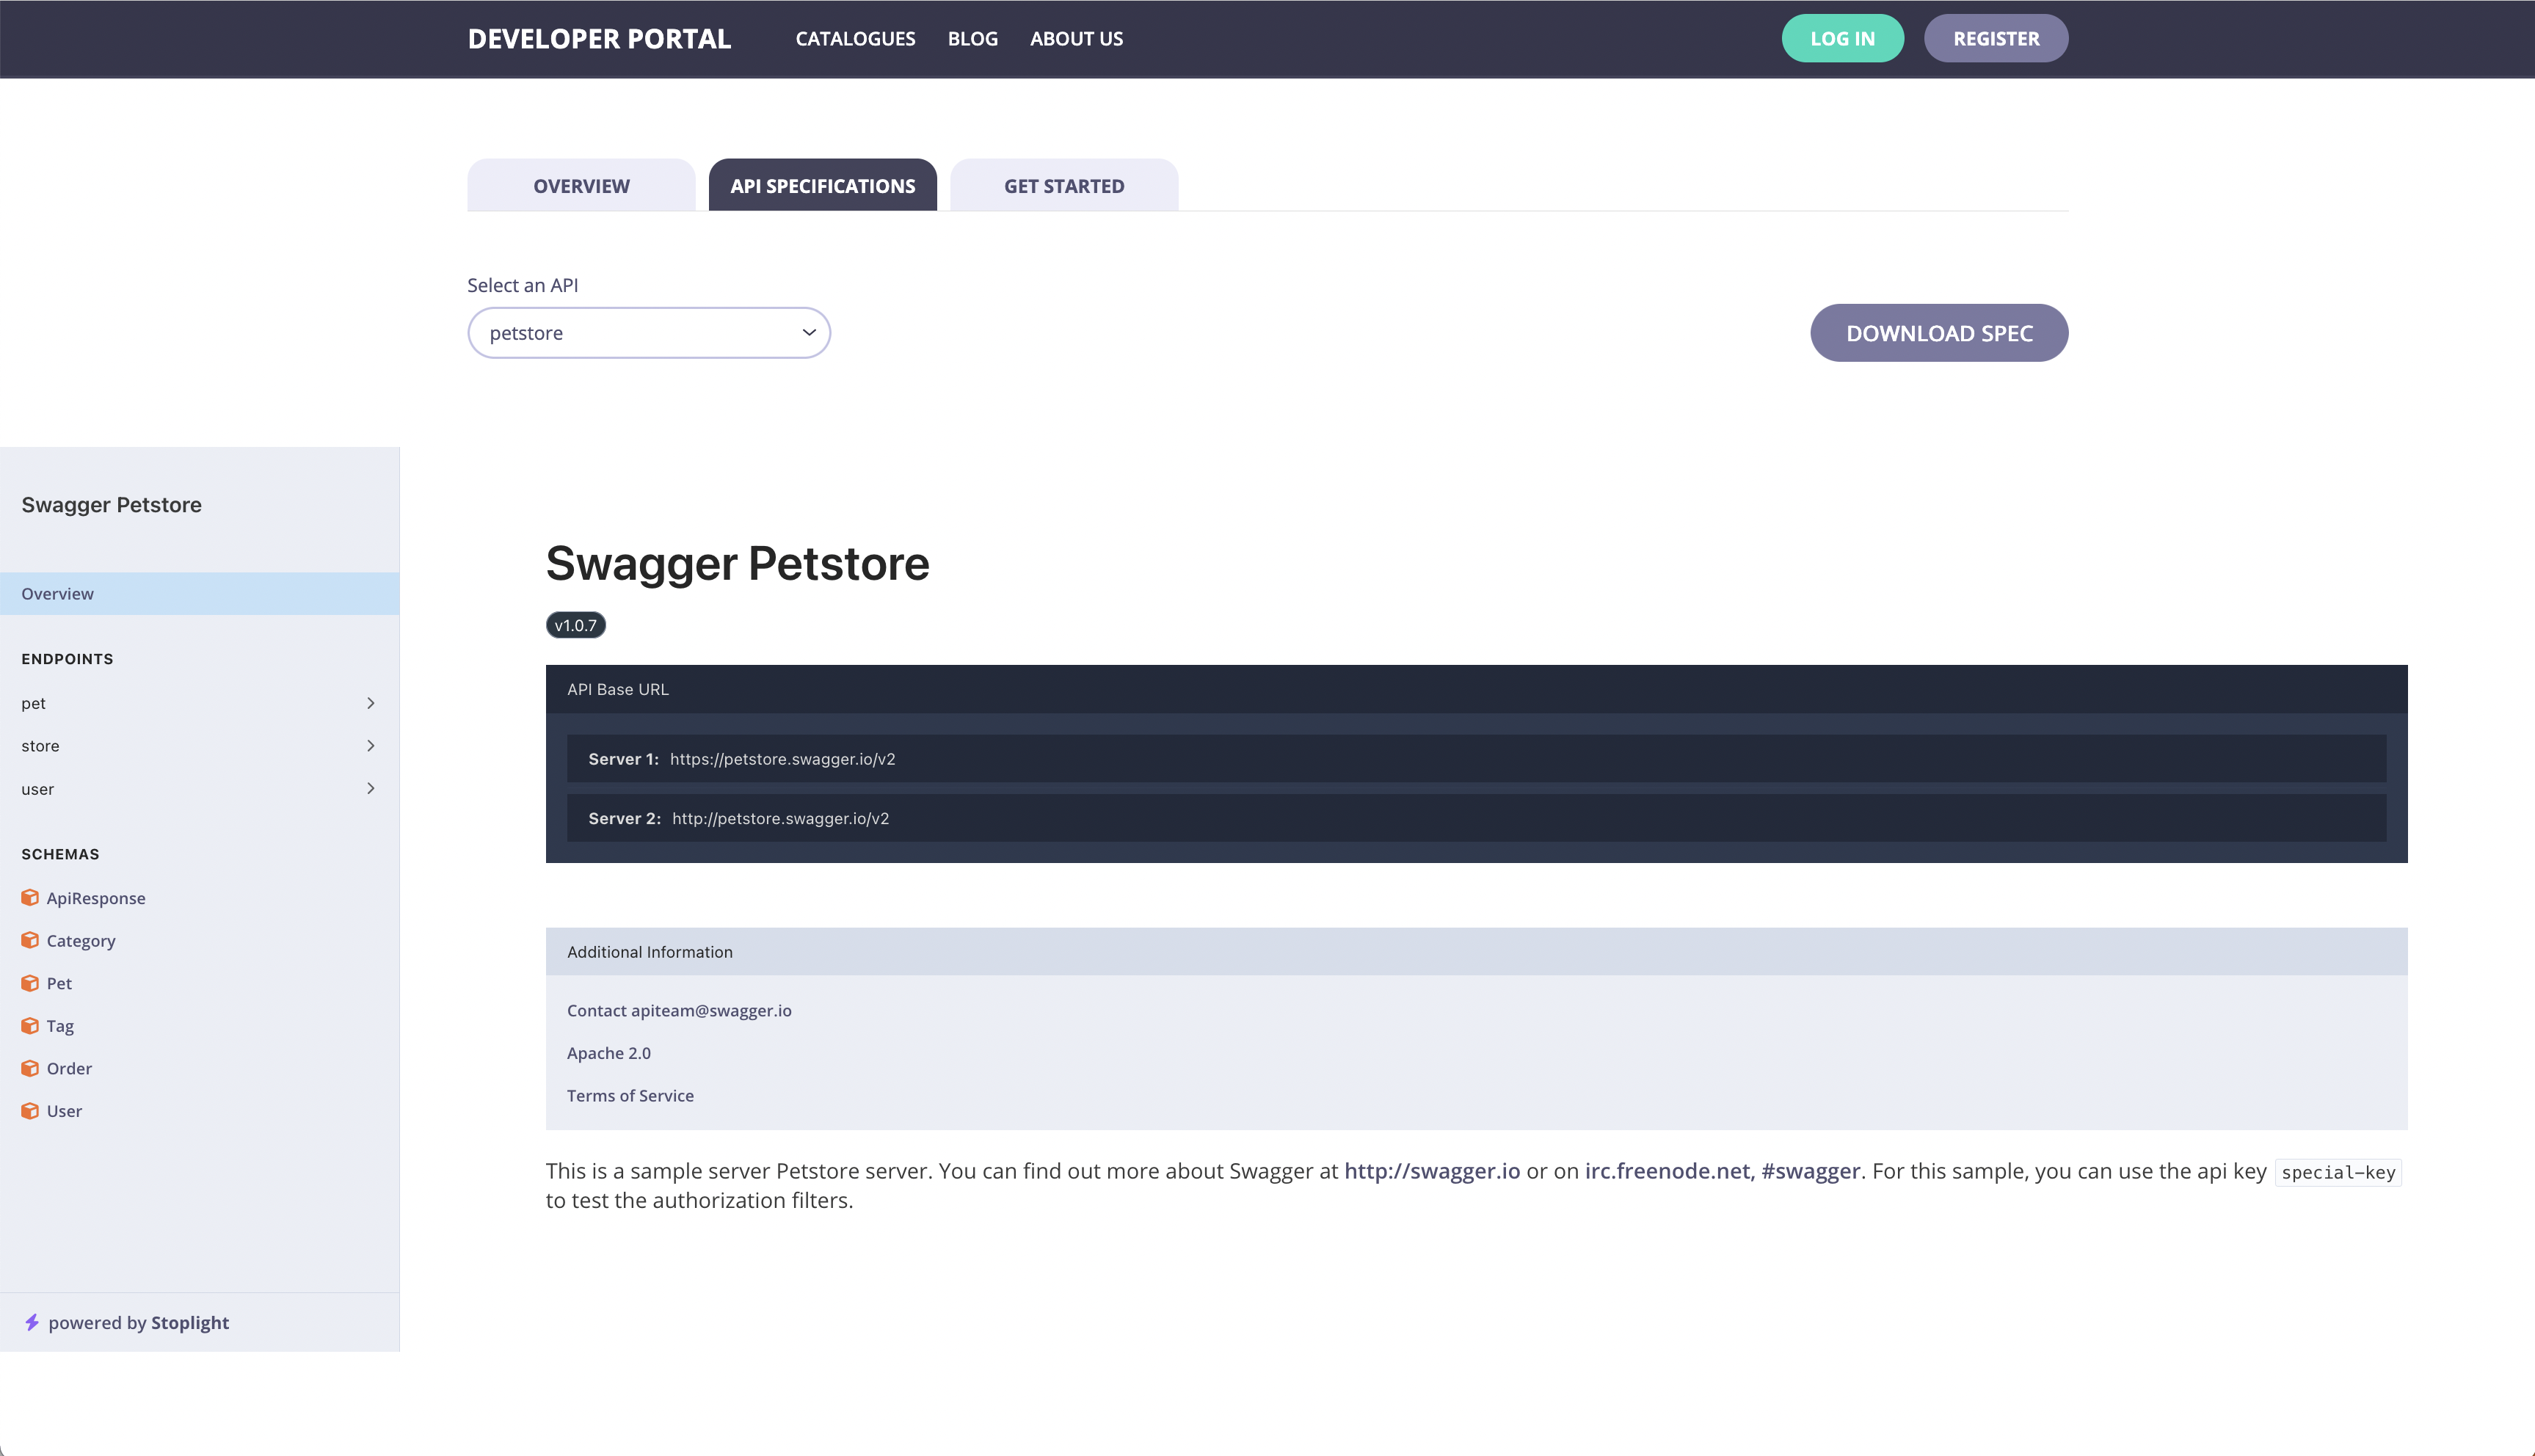
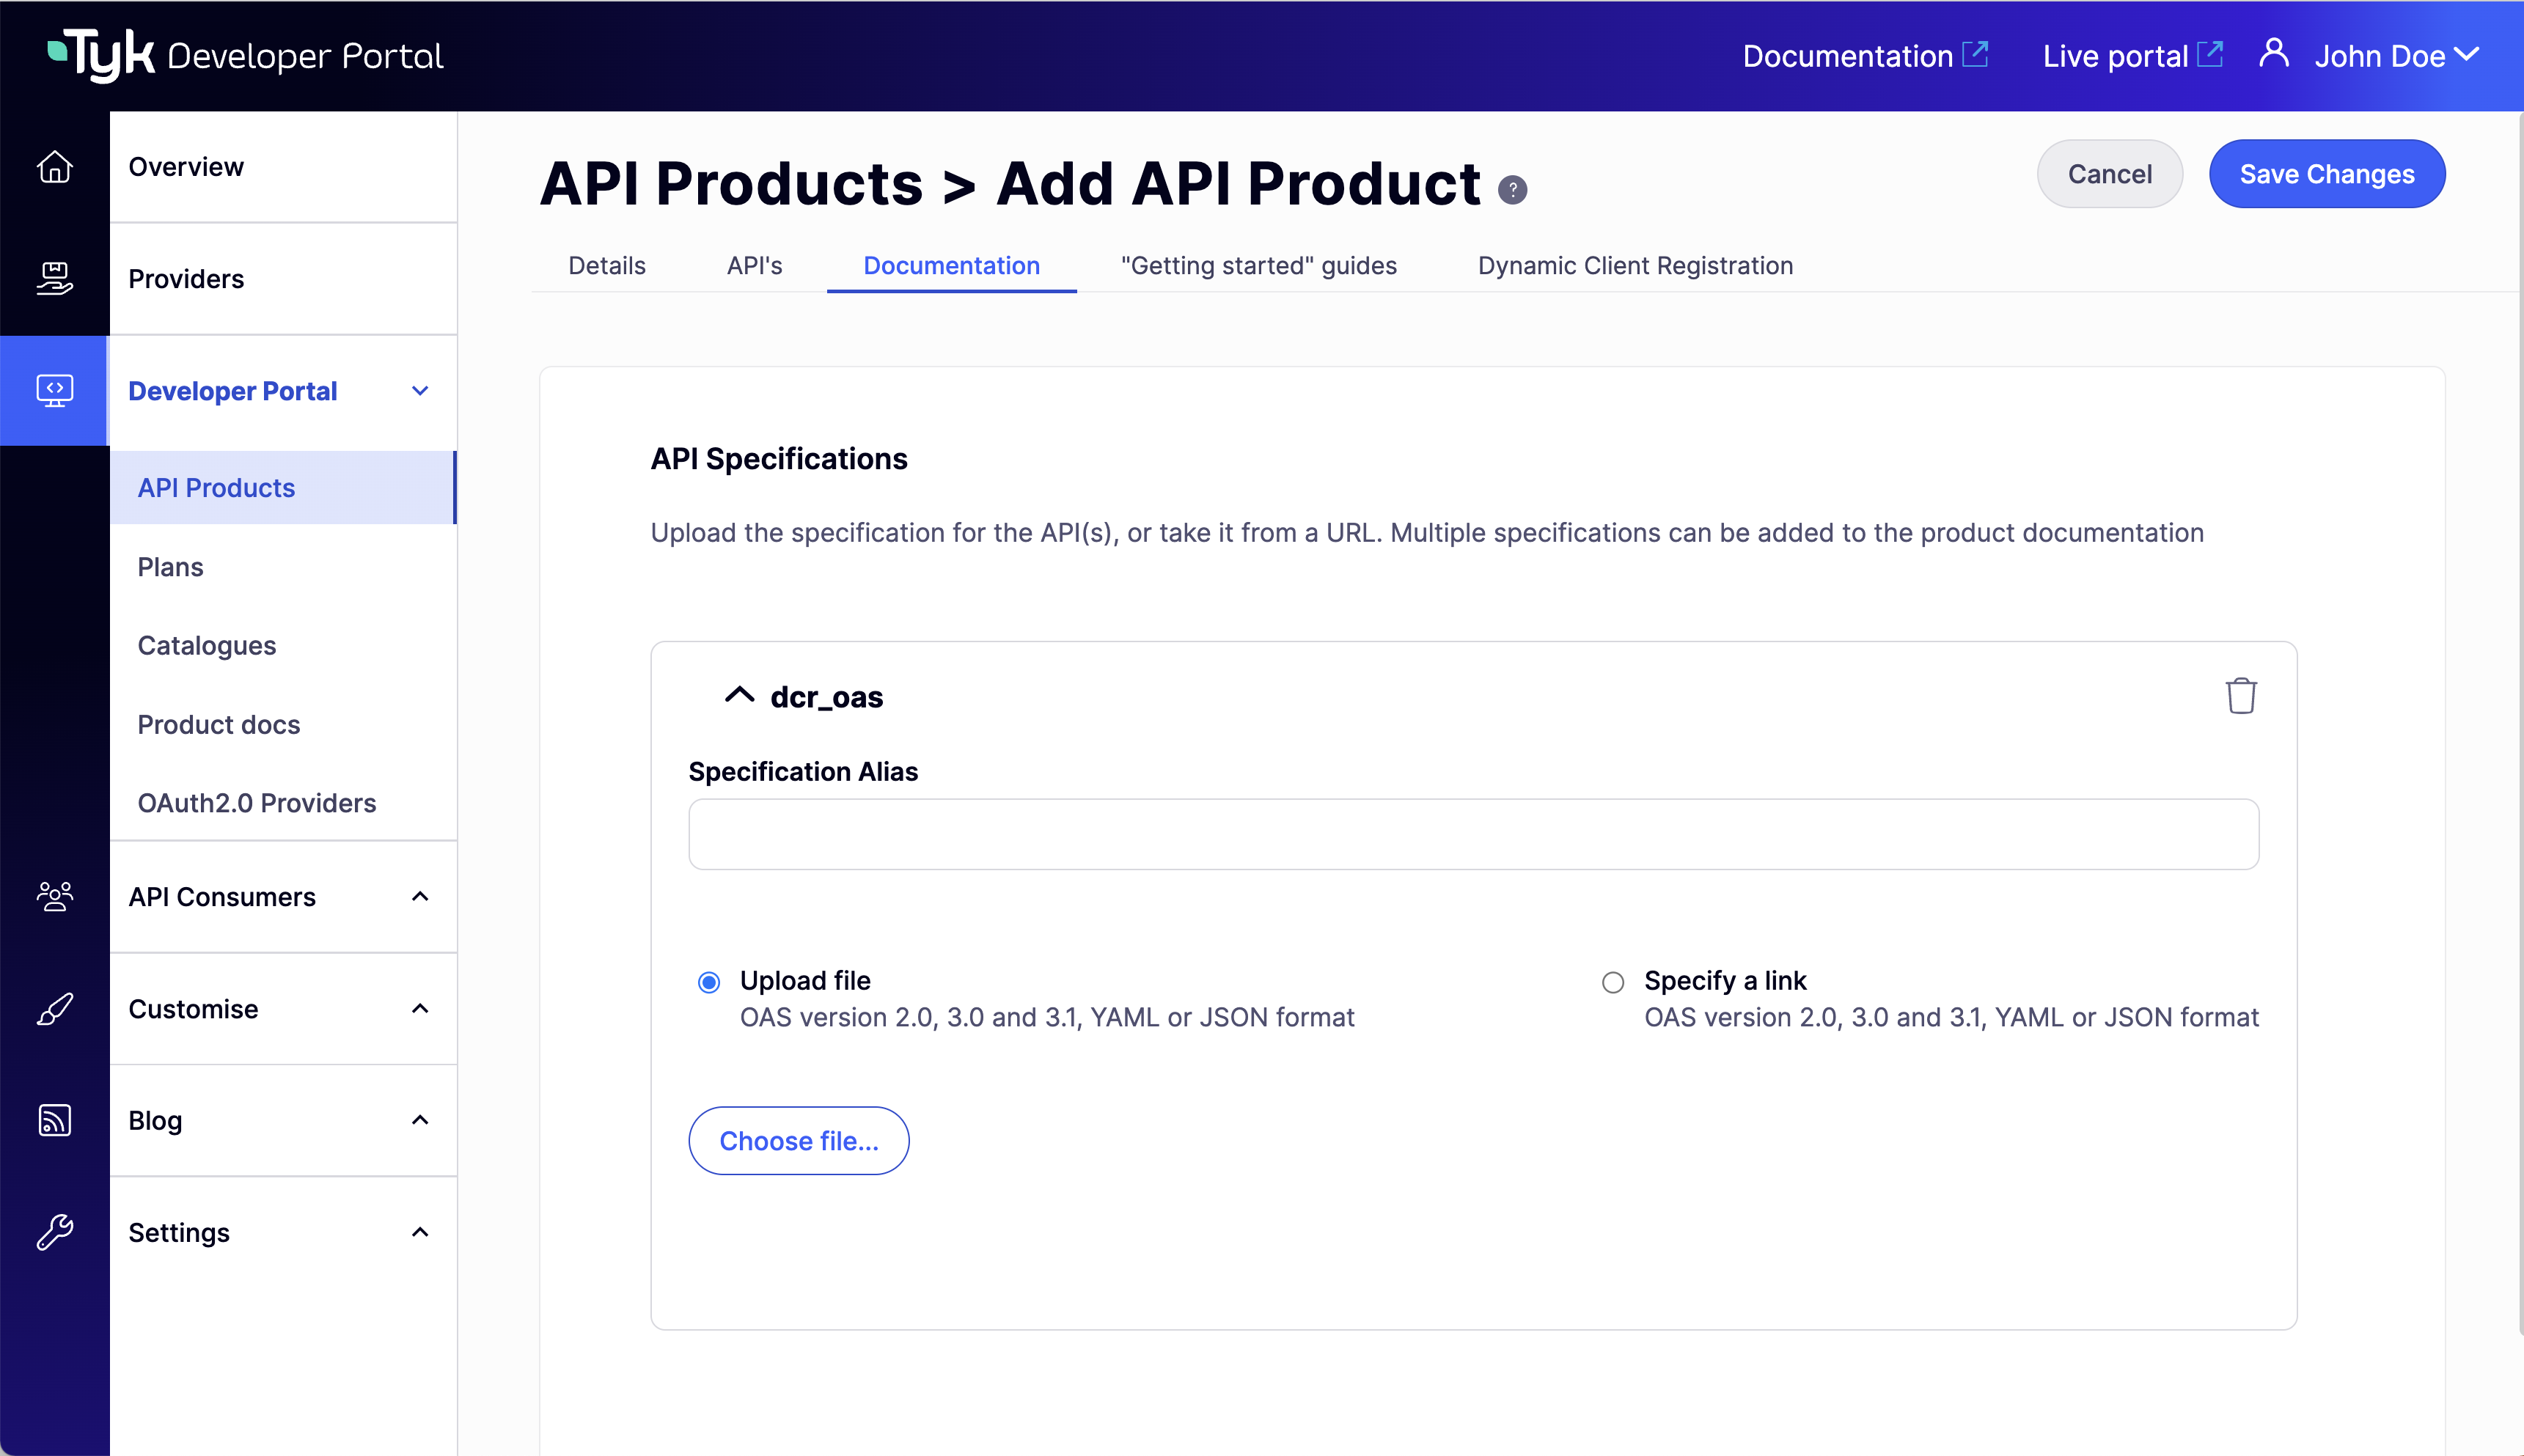
4. Add API specifications in the **Documentation** tab.
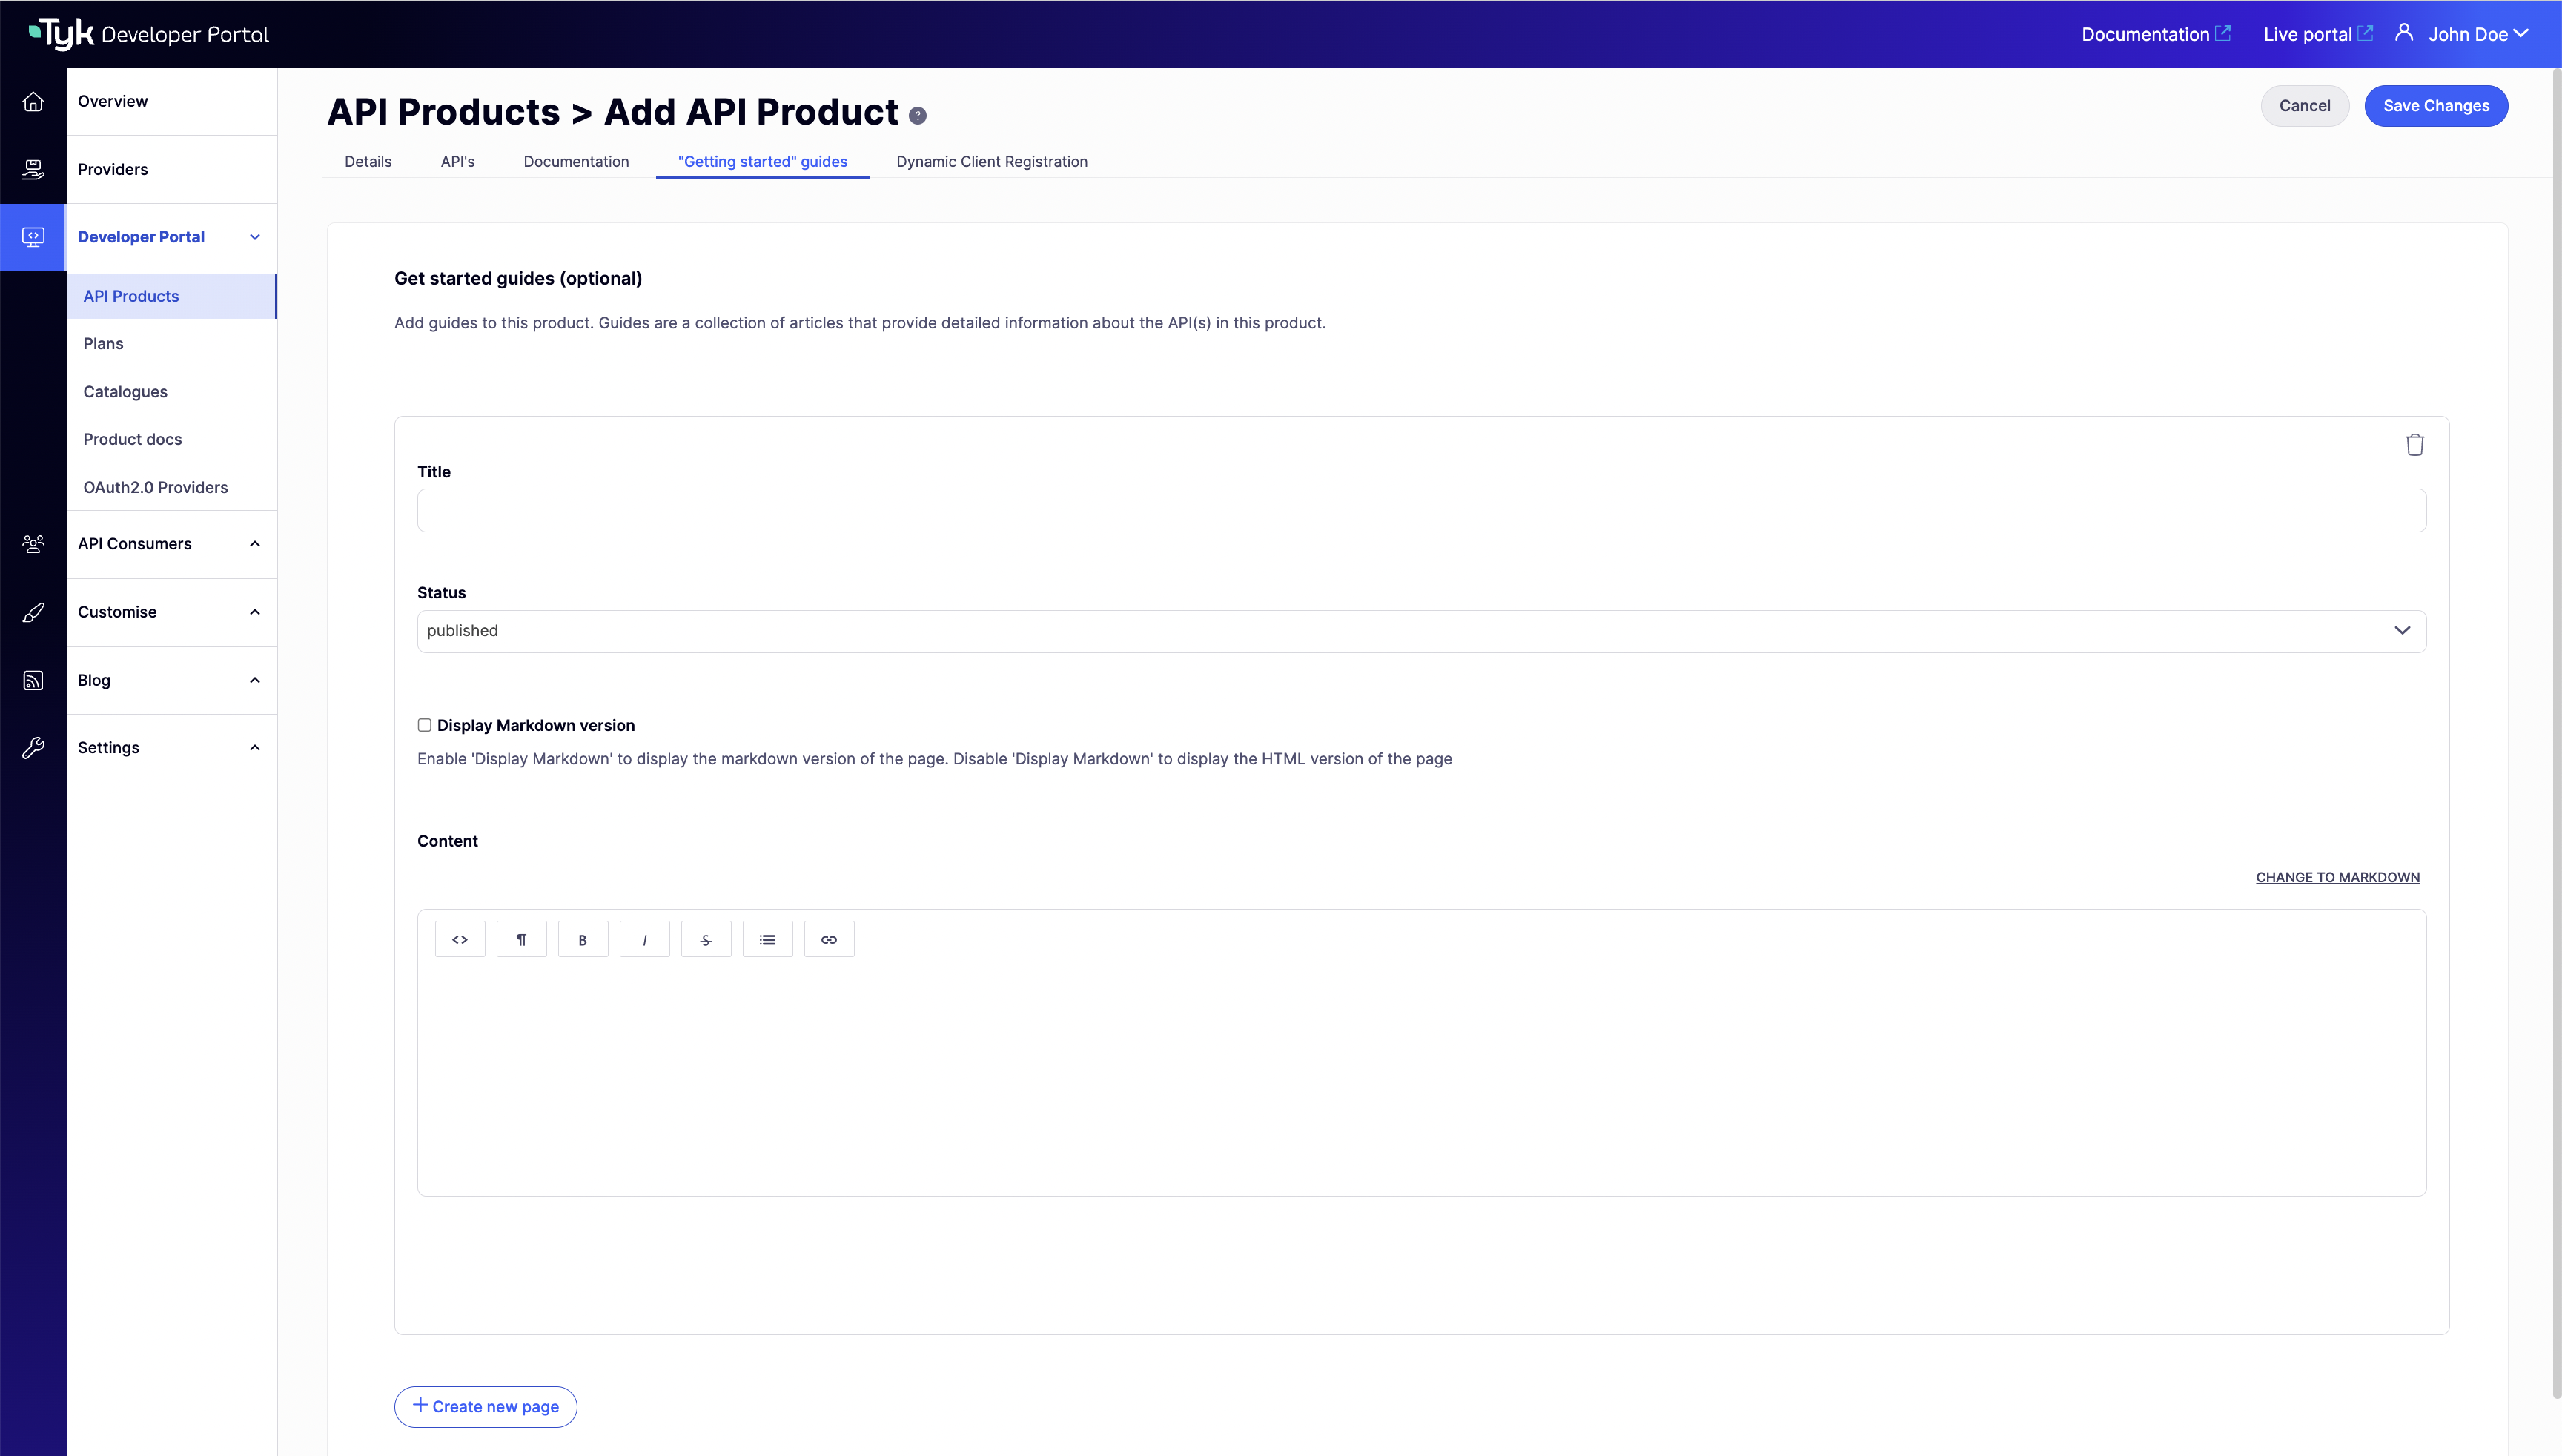
5. Add Product Guides in the **"Getting Started" guides** tab.
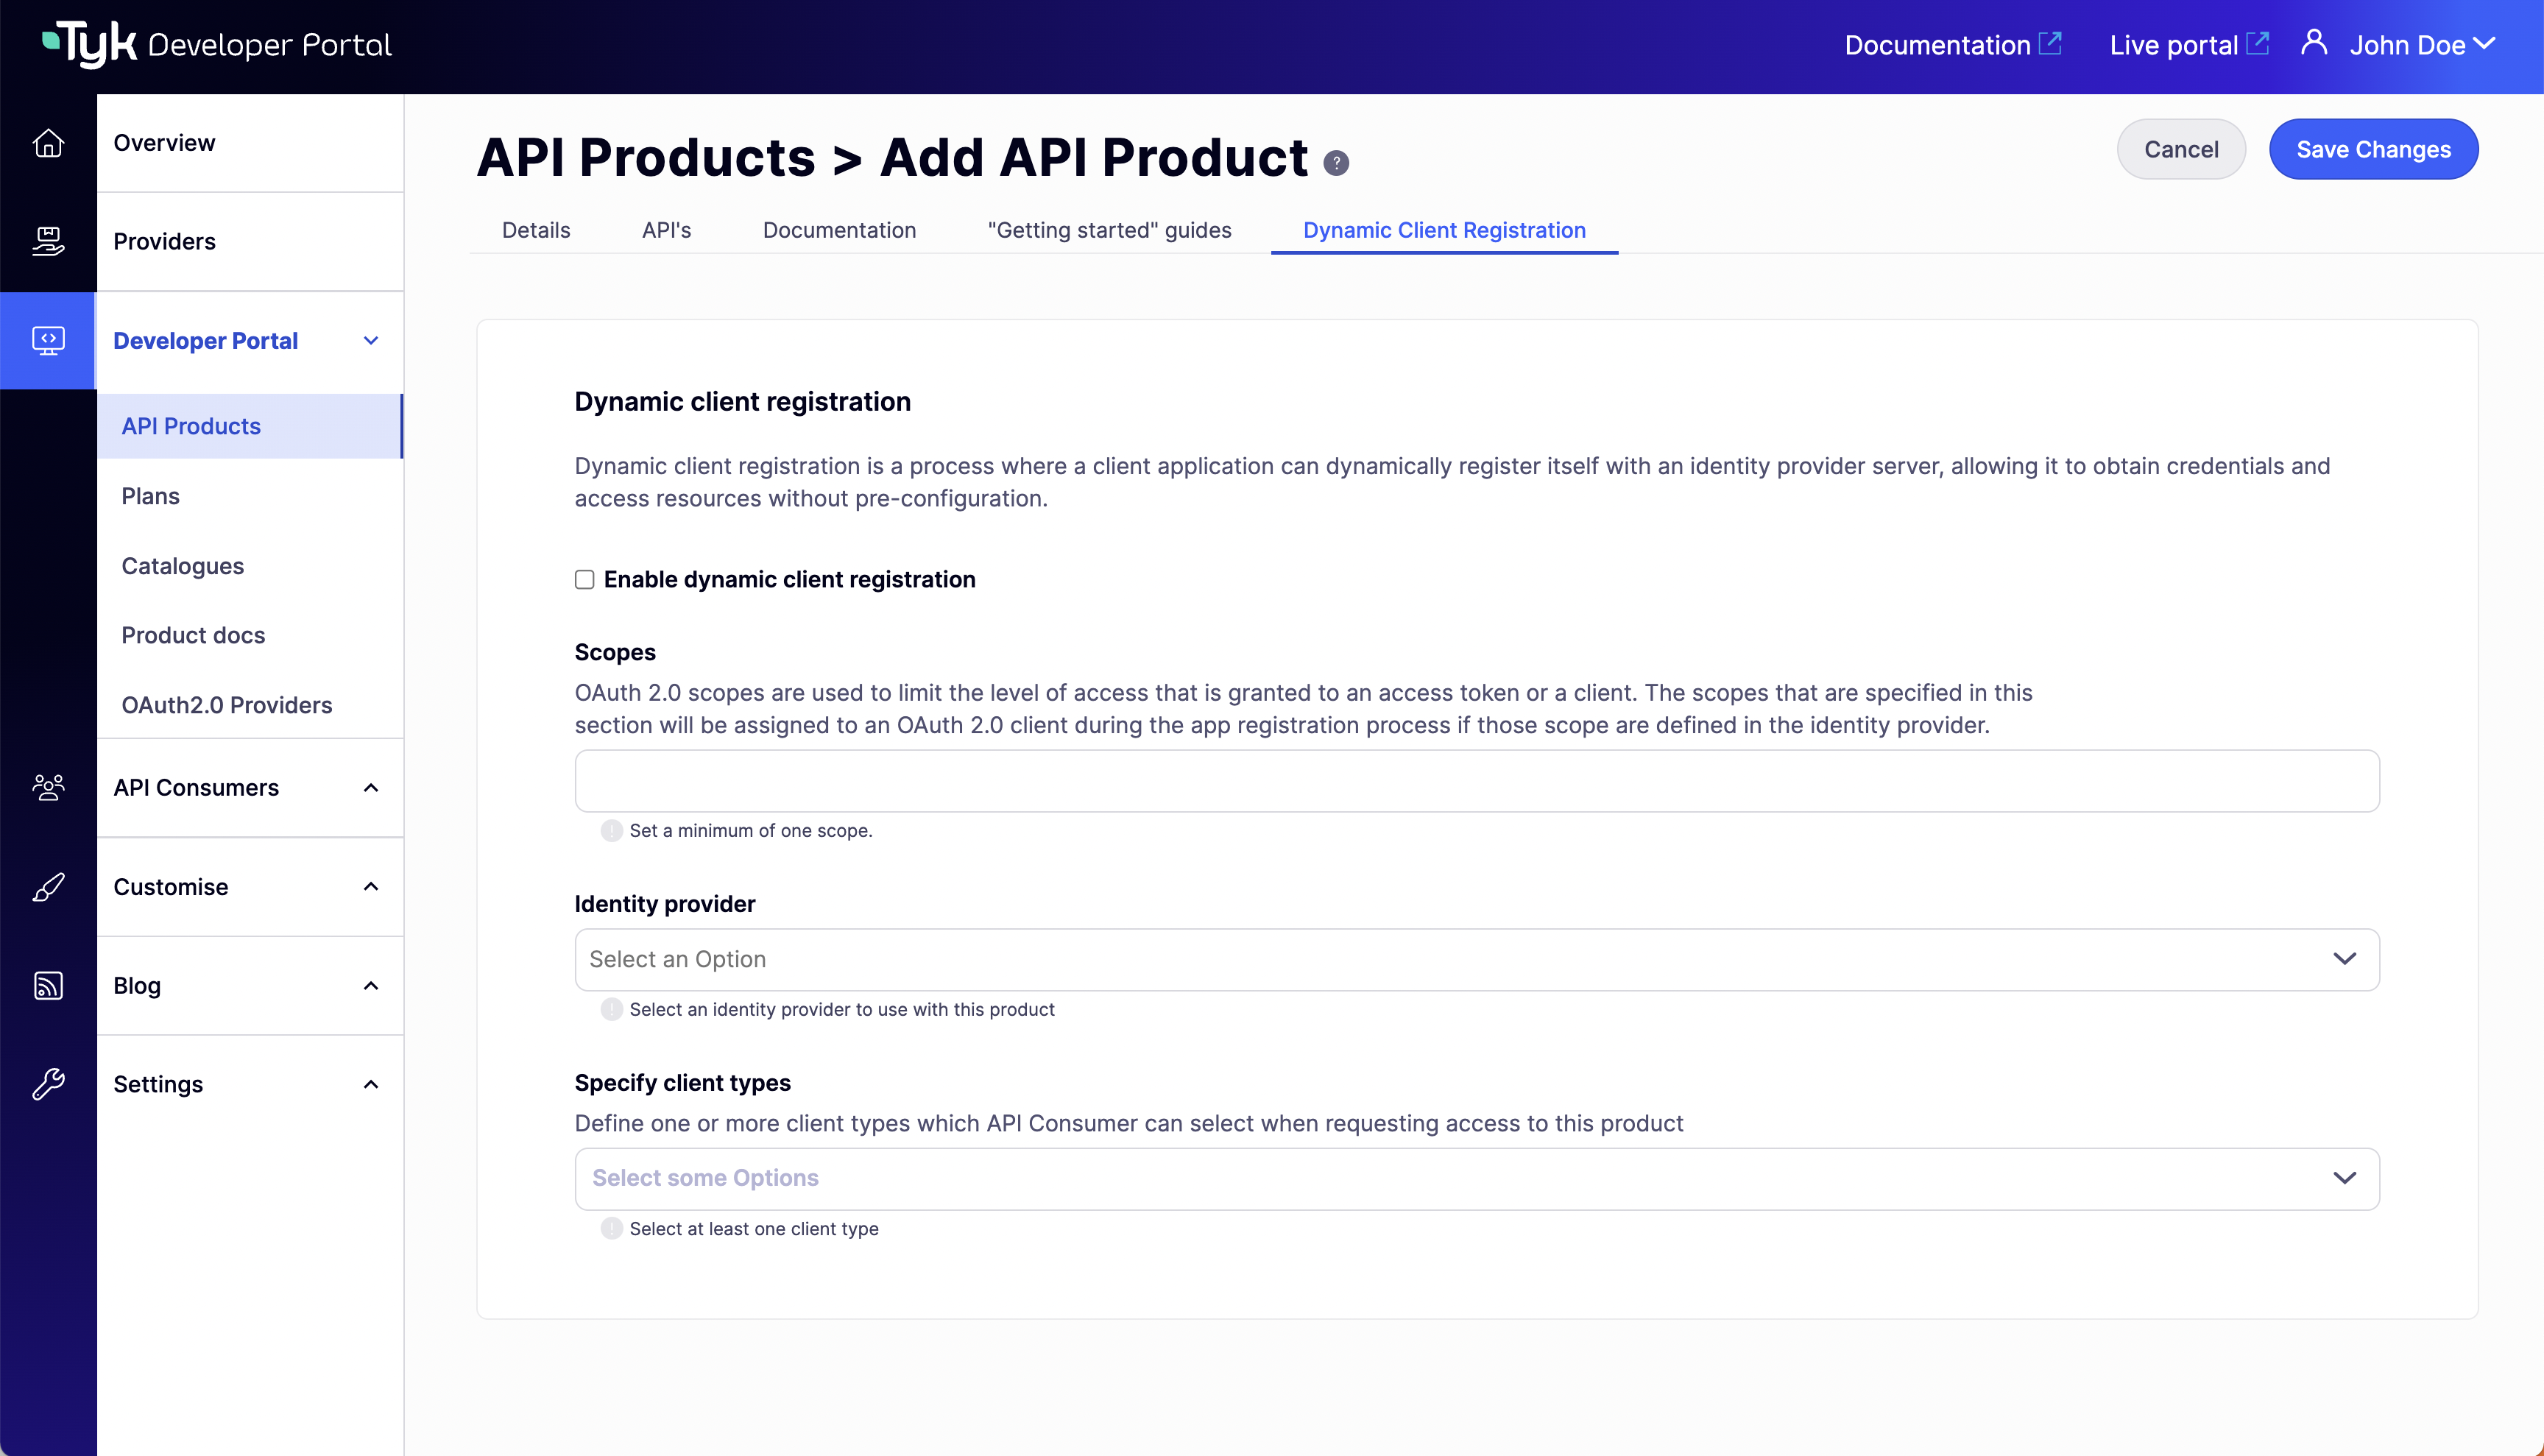
6. Complete DCR settings in the **Dynamic Client Registration** tab (Only for JWT selected APIs).
7. Save changes.
**Note:**
If no APIs are selected, you can still add api specifications, and guides creating a documentation only product. Documentation only products are Developer Portal products that do not have any APIs associated with them and thus no policies will be created in the Tyk Self-Managed selected provider. Documentation only products are useful for creating documentation for APIs that are not yet created or published. Specs and guides will be shown in the external portal as a regular product and the selected `Specification Alias` will be used as the reference for each spec.
#### Create Plan
When creating a Plan in the Developer Portal, a partitioned policy that implements rate limit or quota, or both, but do **NOT** include the ACL will be created in the Tyk Self-Managed selected provider. The following steps explain how to create a Plan in the Developer Portal:
1. From the Tyk Portal admin app, go to **Plans** and click **Add new Plan**.
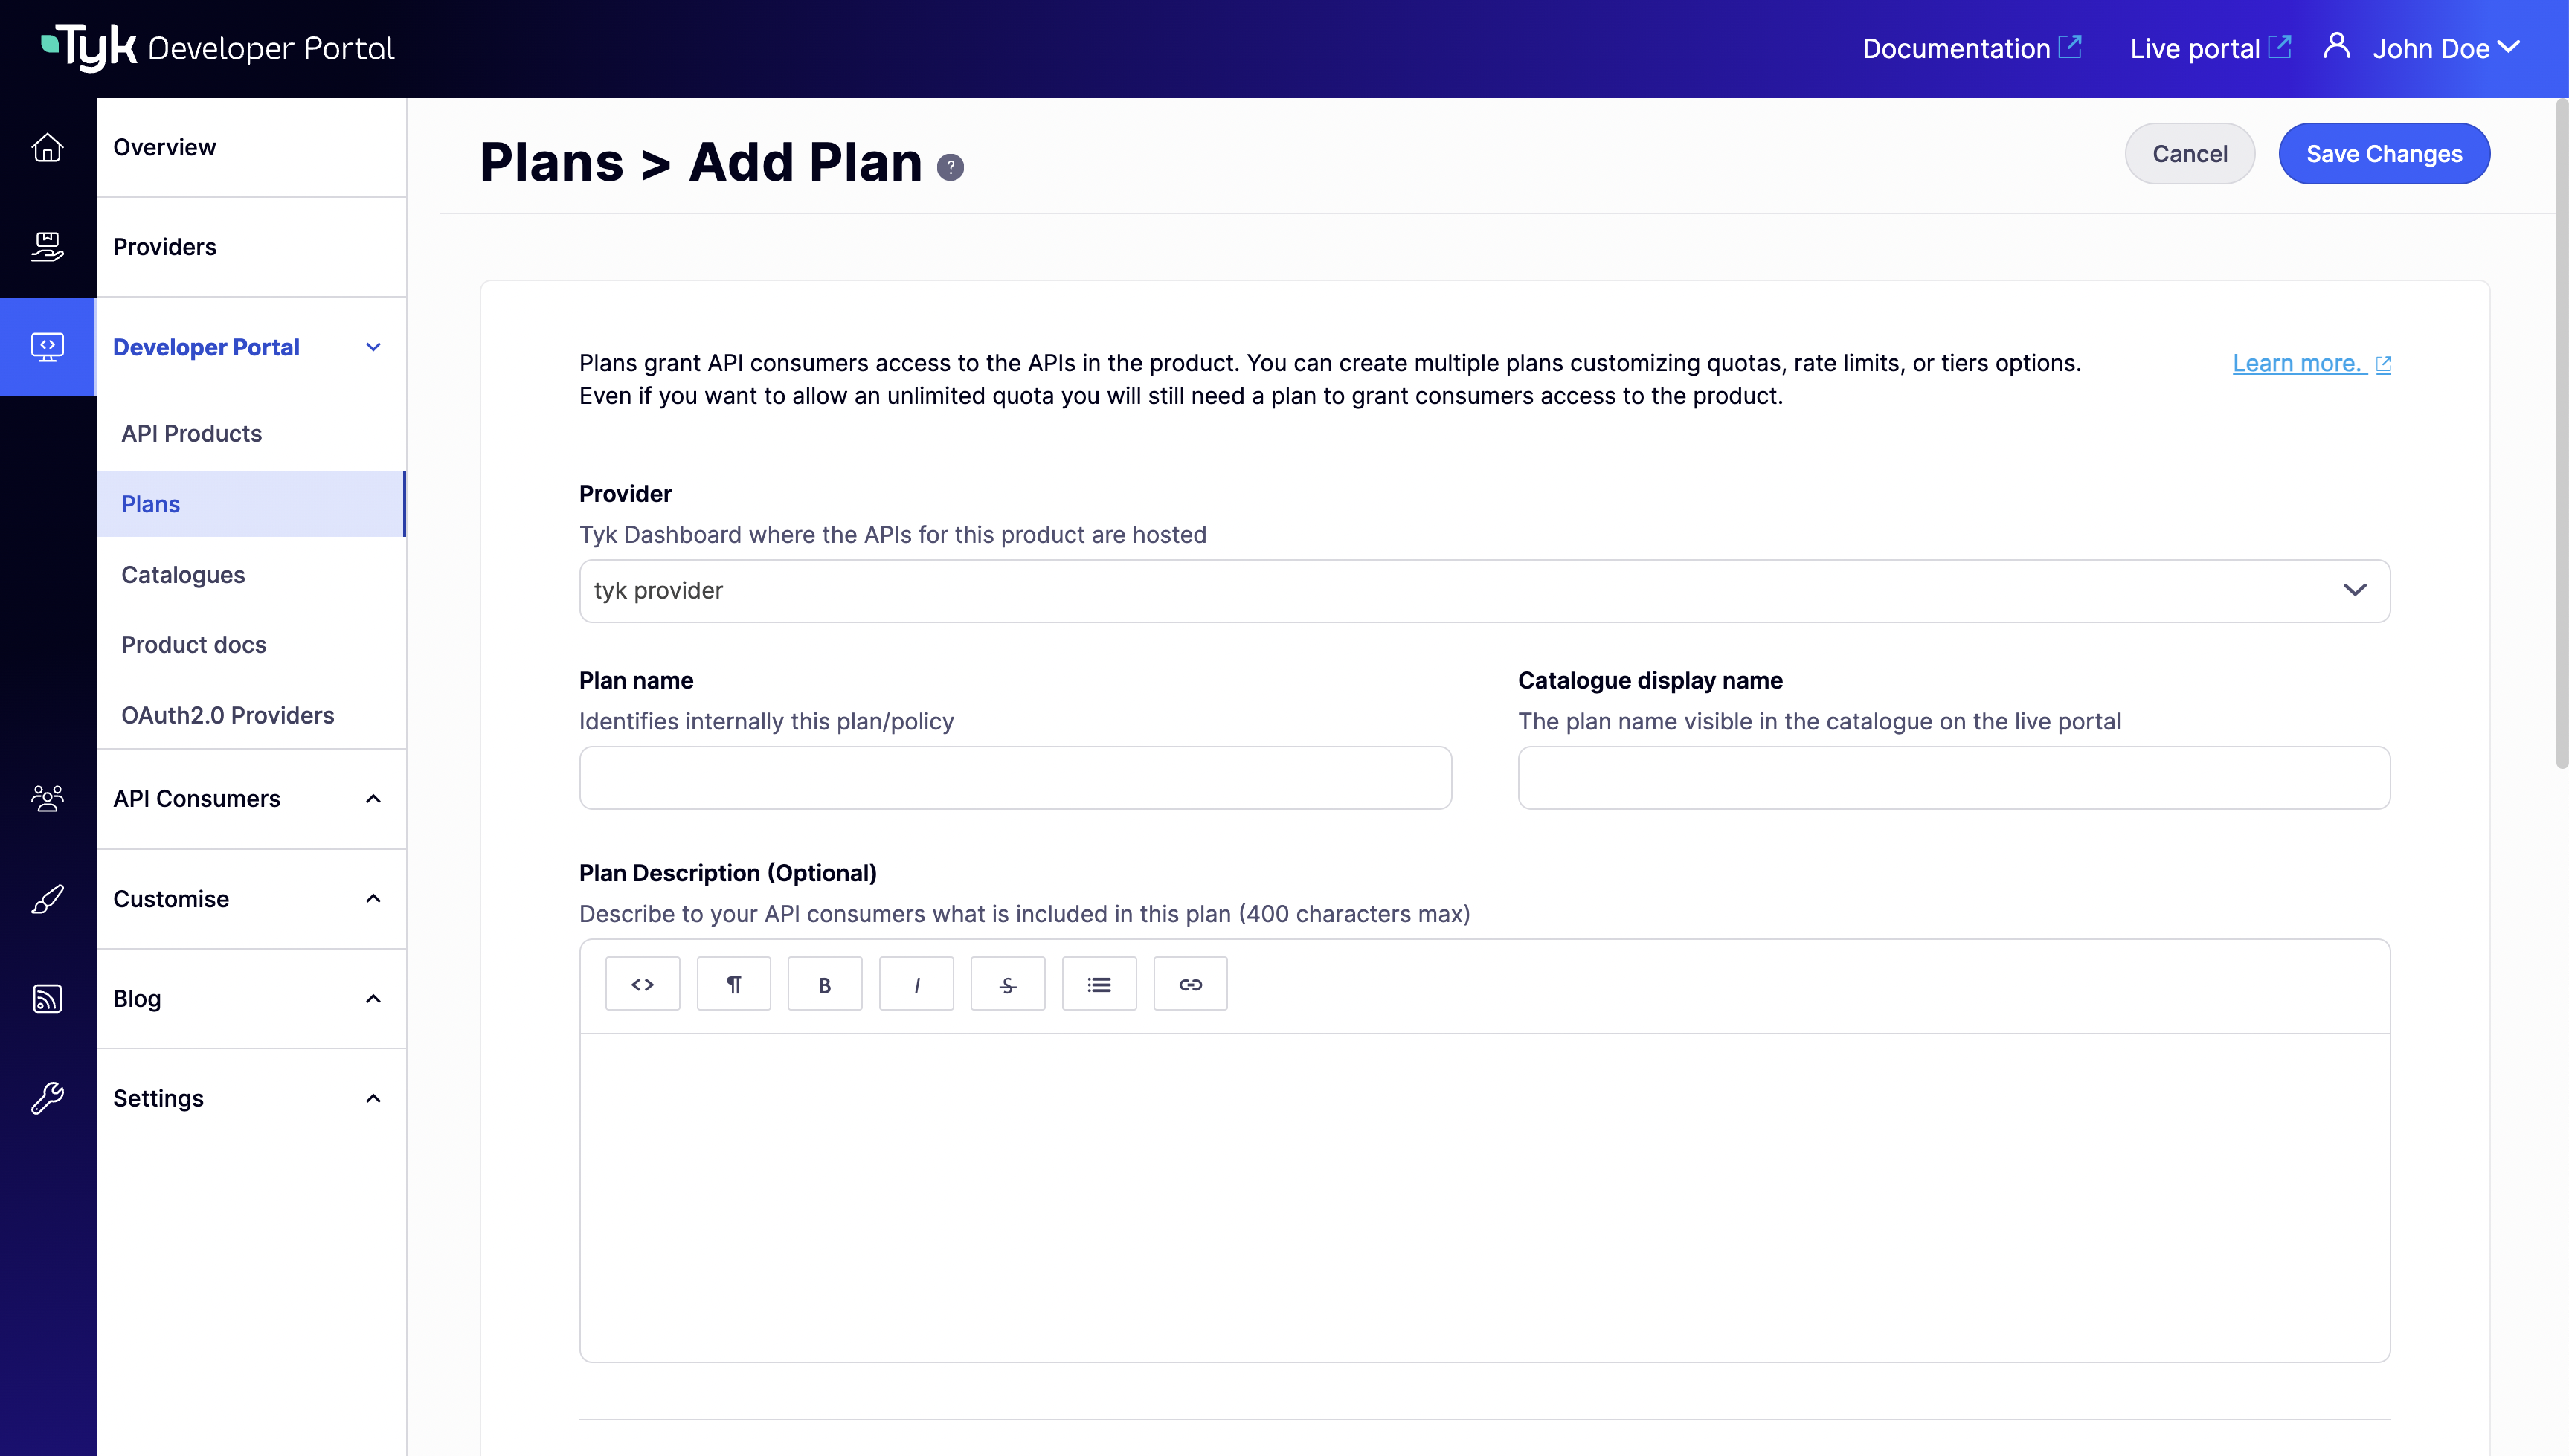
2. Choose a **Provider** and a unique **Name** for the plan. The plan name will be the name assigned to the created policy in the Tyk Self-Managed selected provider.
3. Complete Plan limits. Select **Usage quota**, **Rate limit**, and **Key expiration** for the plan.
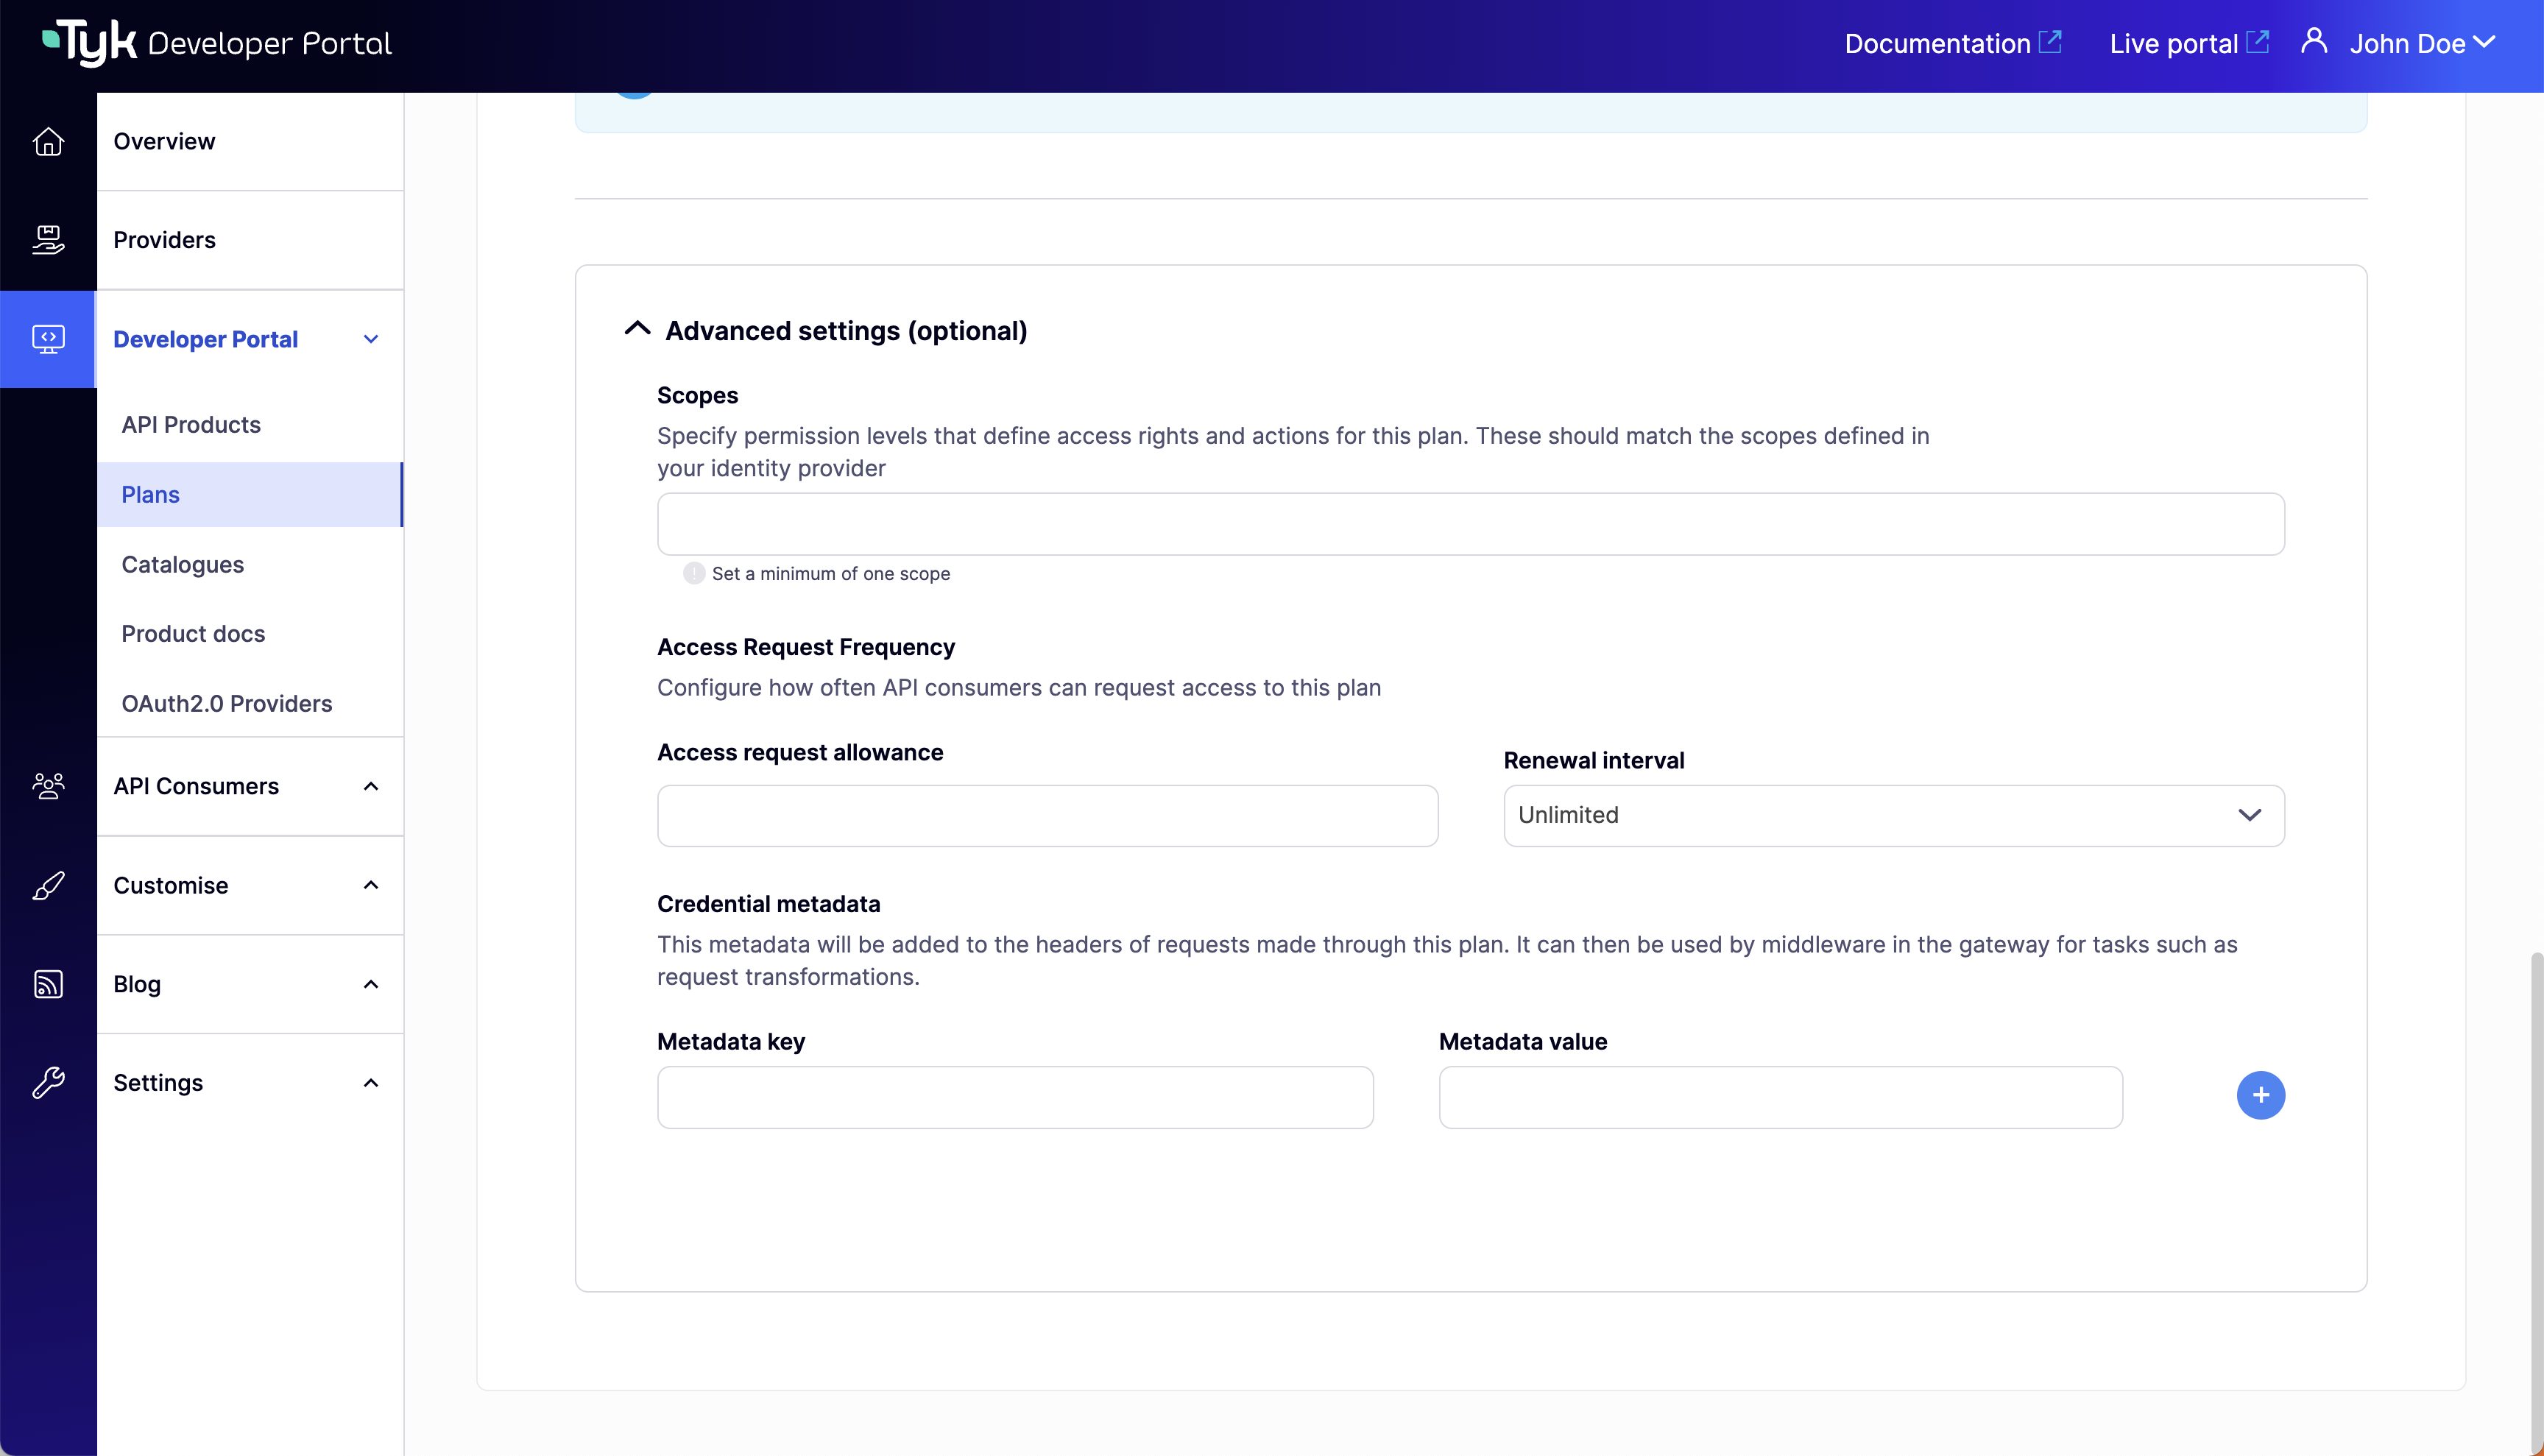
4. Complete Advanced settings (optional). Set **Scopes** (for DCR), **Access Request Frequency**, and **Credential metadata** for the plan.
5. Save changes.
## Publish API Products and Plans
In this section, you will learn how to publish the API products and plans to the public-facing portal so that API Consumers can access them.
**Prerequisites**
* A Tyk Self-Managed [installation](/5.8/tyk-self-managed/install)
* Tyk Self-Managed [added as a provider](/5.8/portal/overview/getting-started#connect-to-a-provider)
* [Created and imported API Products and Plans from Tyk](/5.8/portal/overview/getting-started#create-api-products-and-plans)
### Publish an API product
Follow these steps below how to publish an API Product to a catalog:
1. From the **API Product** section, Click an API product to open the details.
2. Edit the metadata as needed.
| Field | Description |
| :----------------------- | :------------------------------------------------------------------------------------------------------------------------------------------------------------------- |
| Catalog display name | This is the name that will be displayed in the external catalog. |
| Featured API Product | Tick this option if you want the API Product to appear on the homepage under “Featured products”. |
| Description | Short description about what this API Product is. |
| Content | This section appears on the API Product overview page, the rich text editor enables you to add more information about the API Product e.g. use cases, features, etc. |
| Image | An image can be added to the API Product. Supported formats are JPG and PNG. |
| Organization ID | The org id is required in order to connect to Tyk as a provider. It can be found in the user profile within the Tyk Dashboard. |
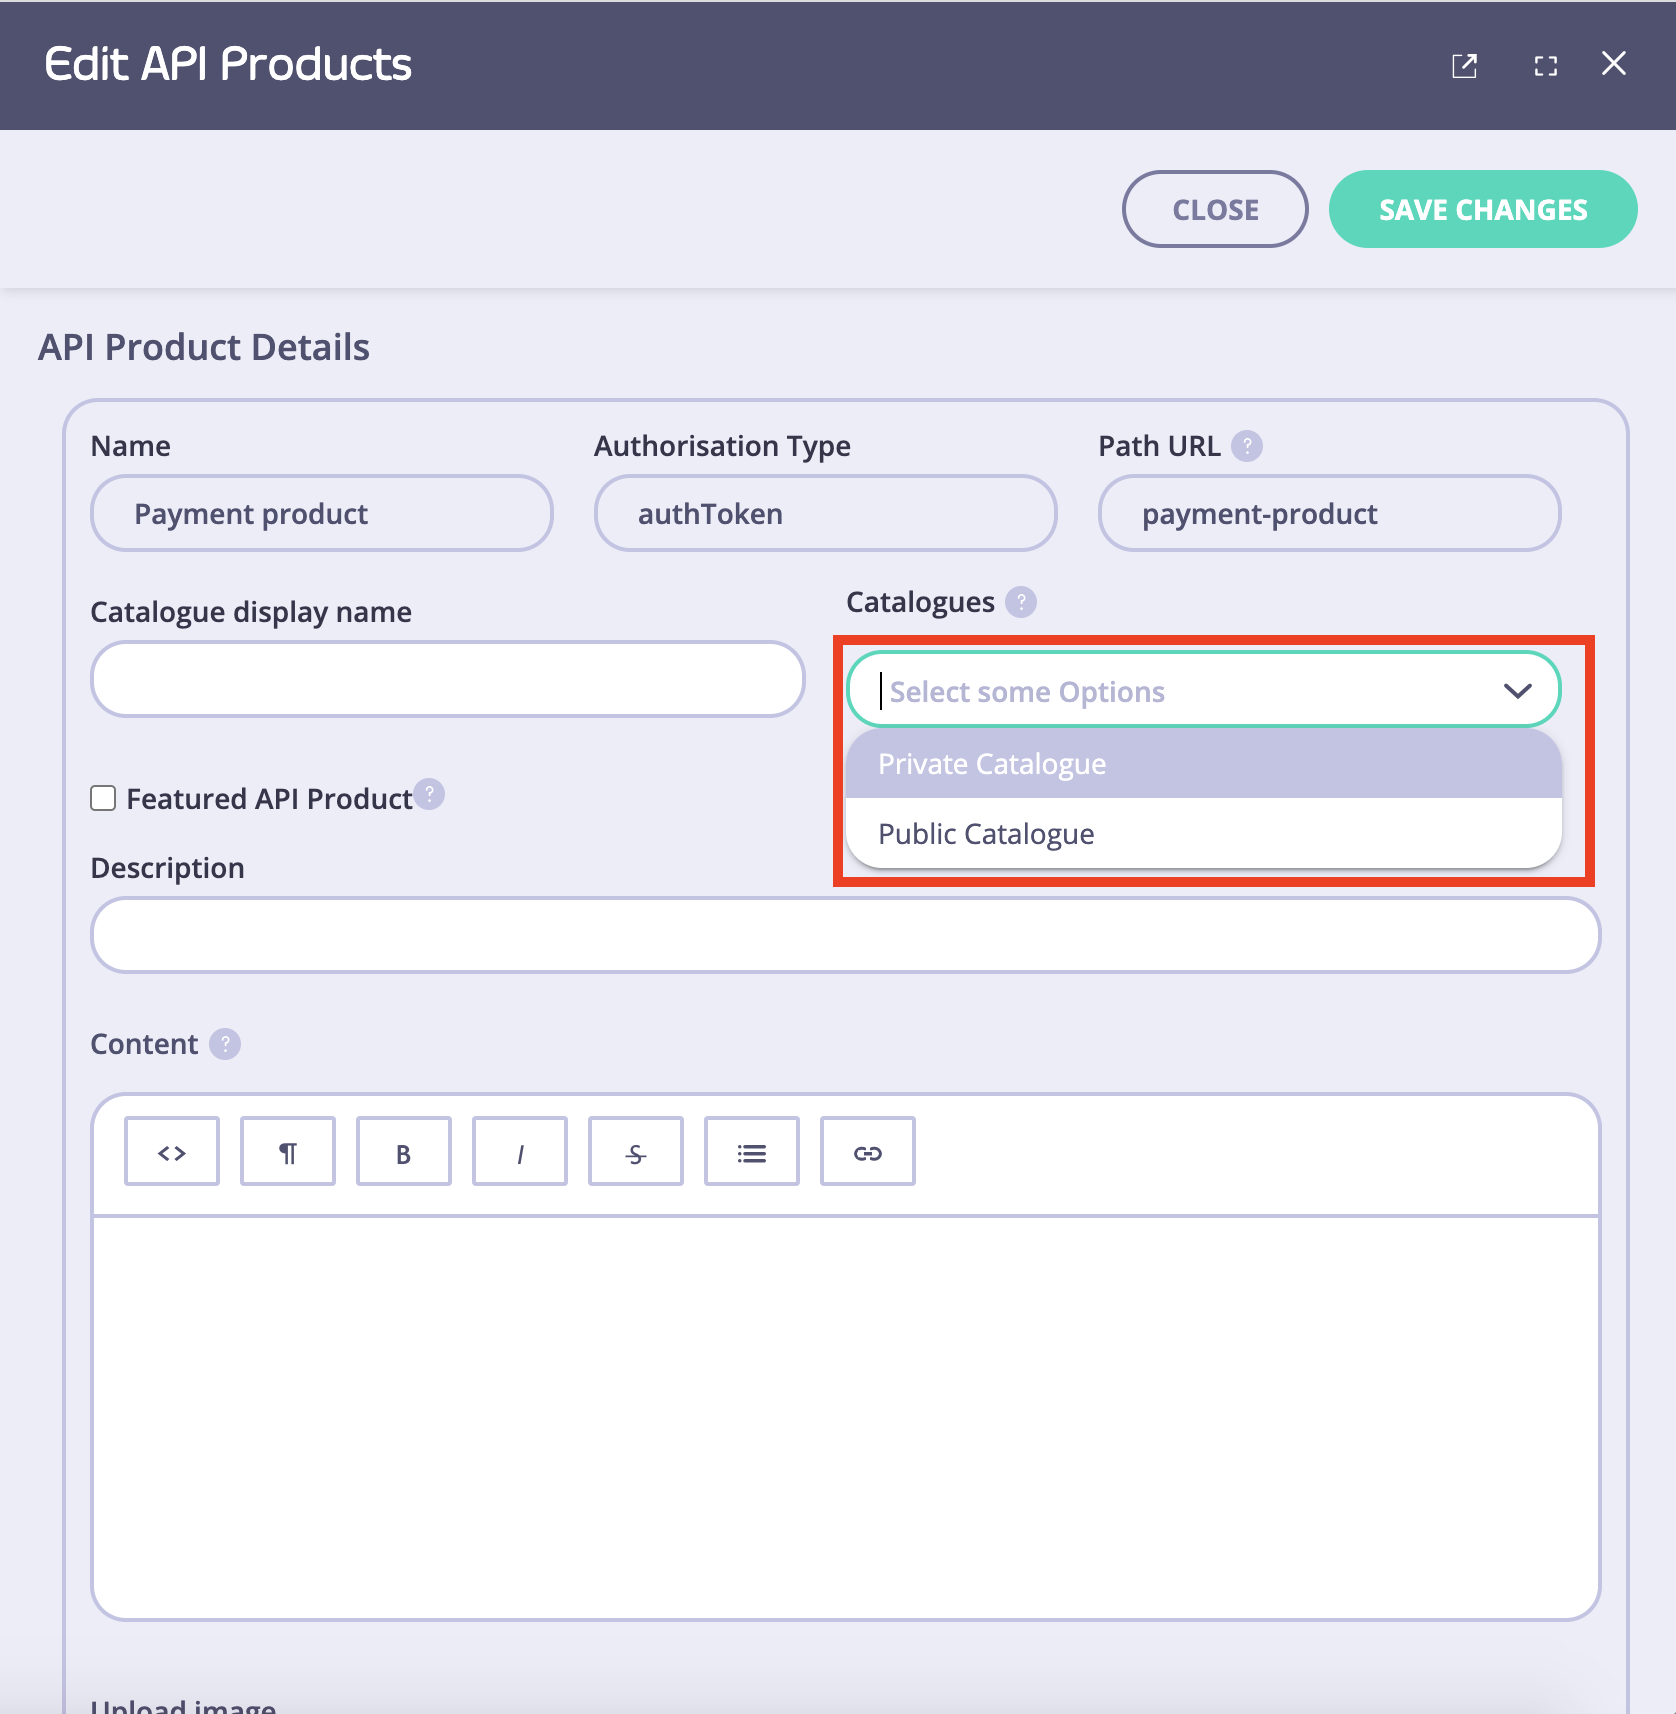
| Catalogs | Select an existing catalog that this product should be available from. |
| App registration configs | An experimental feature, it works only for oAuth2.0-enabled APIs |
| API resources | This section lists all APIs available within this product, you can add OAS documentation for each API. |
3. Select a catalog to publish the API product. If you want to create a custom catalog.
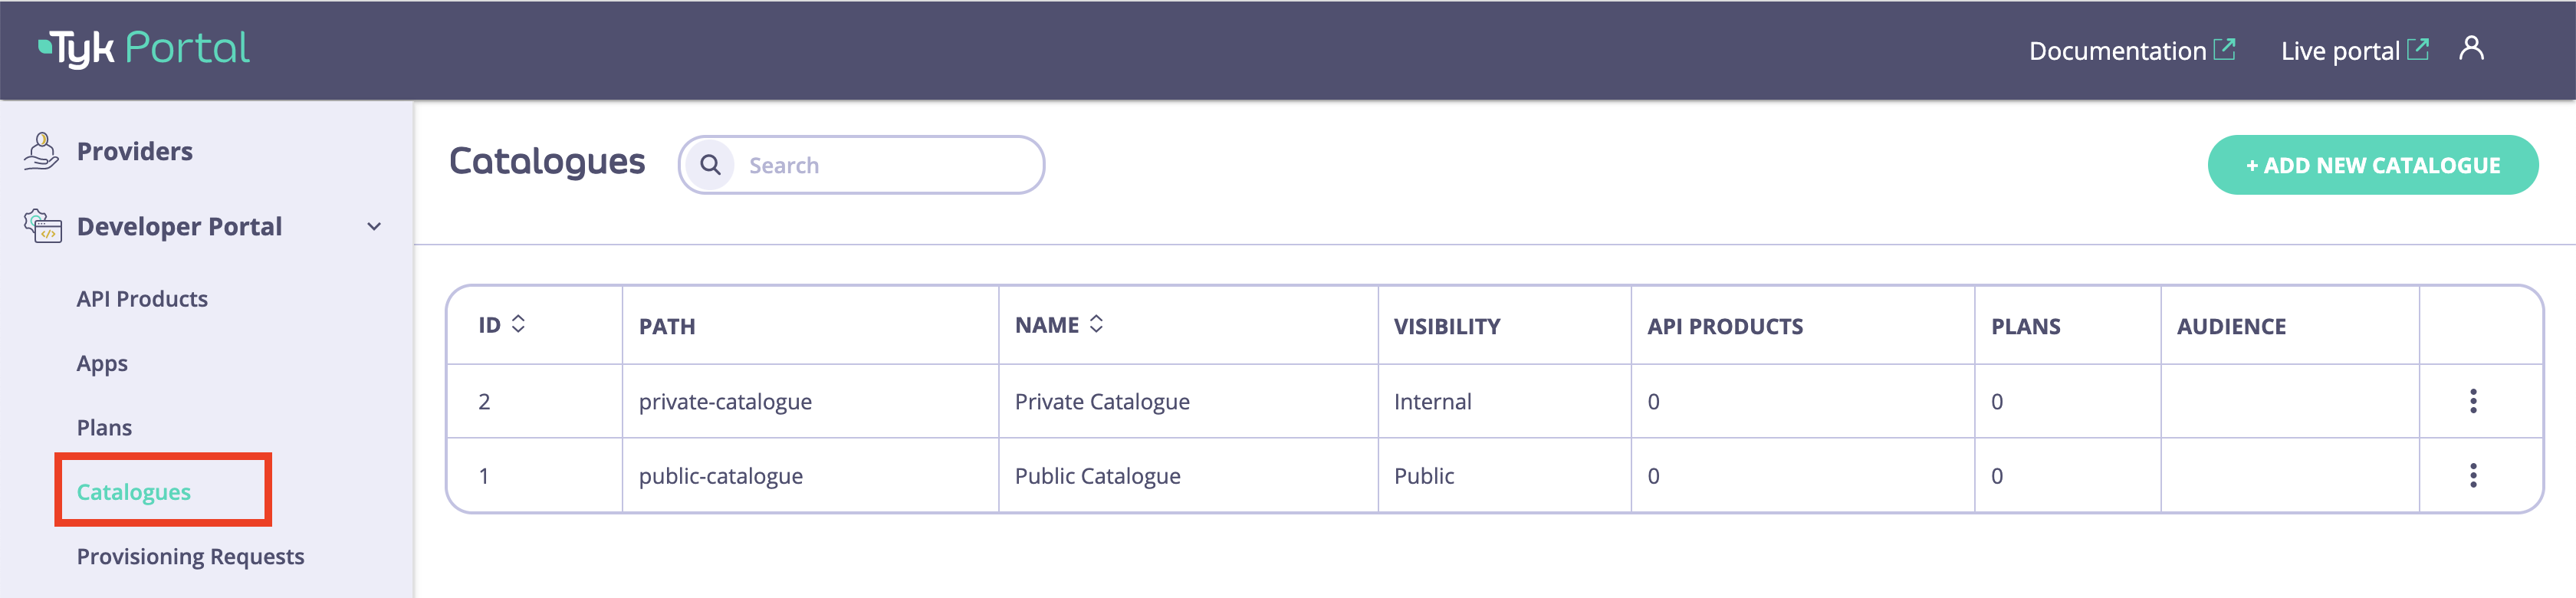
4. Navigate to **Catalogs** to view the available catalog.
s
### Publish a Plan
In order for developers to be able to request access to an API Product and retrieve credentials, a minimum of one plan needs to be available within the same catalog as the API Product.
Follow these steps below to knowhow to publish a plan:
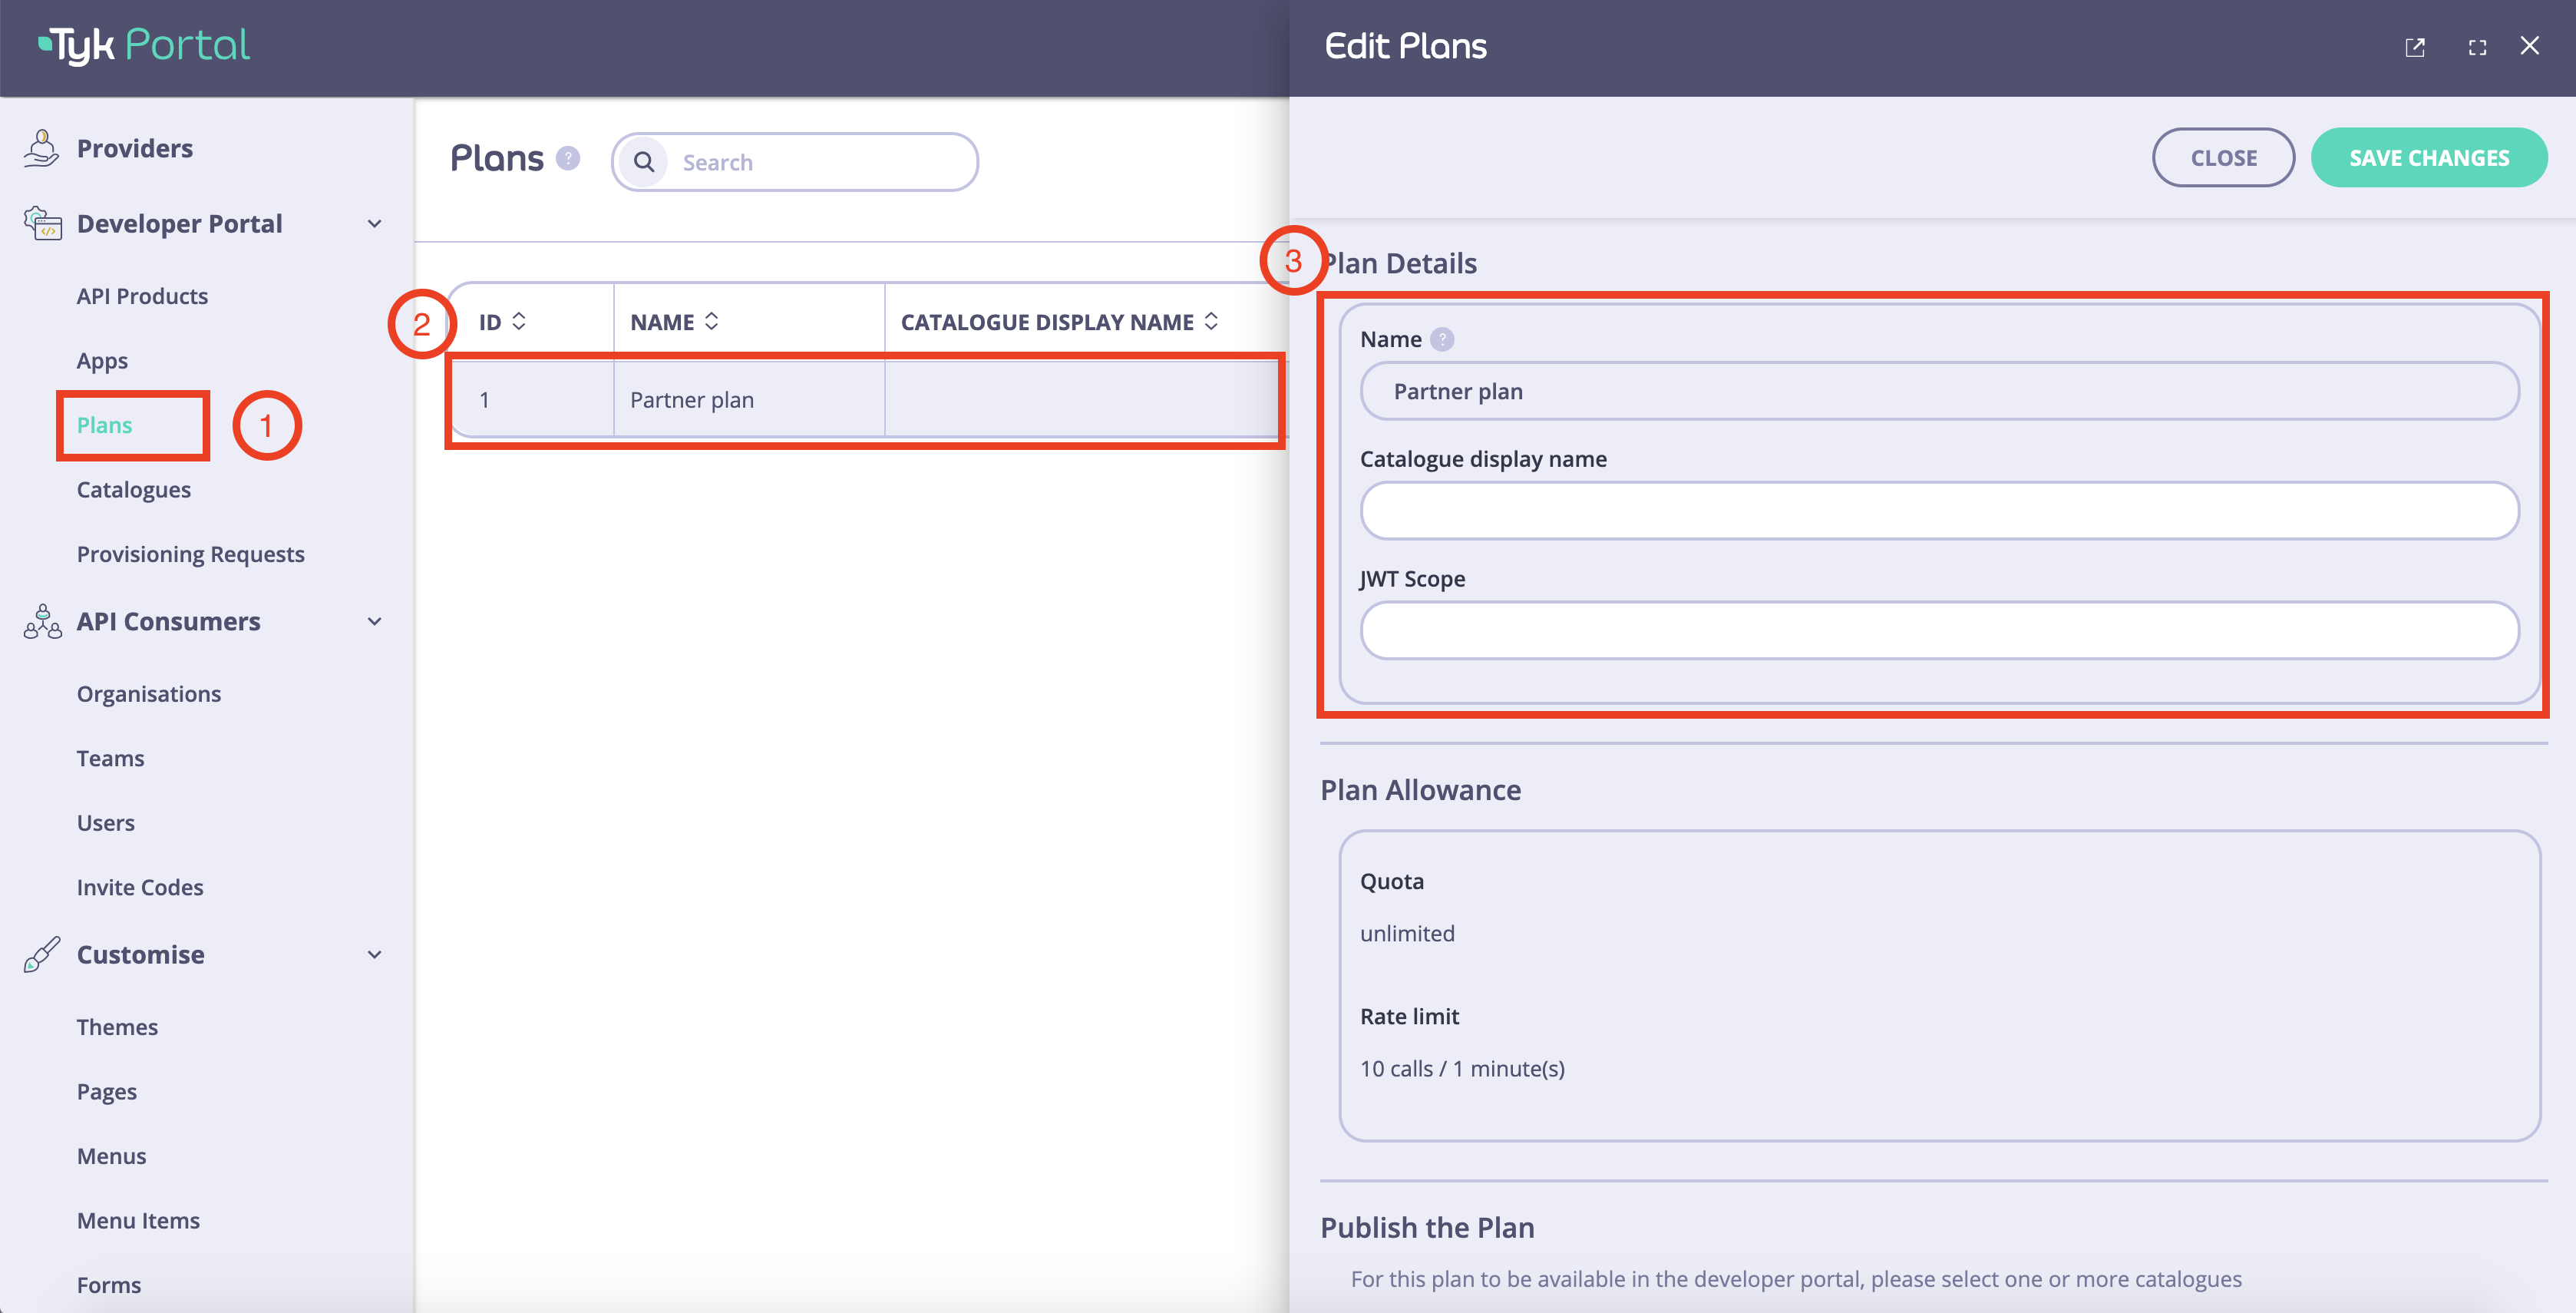
1. From the **Plans** section, select a plan to open the details.
2. Edit the metadata as needed
| Field | Description |
| :-------------------------------- | :-------------------------------------------------------------------------------------------------------------------------------------------------------------------------------------- |
| Catalog display name | This is the name that will be displayed in the external catalog. |
| Plan allowance | This section describes what quota and limit is set for this plan. These values can be updated within the ‘policy section’ in the Tyk dashboard. |
| Catalogs | Select an existing catalog that this product should be available from. |
| Auto-approve provisioning request | Under plan settings, you can choose to select this option which means whenever an API-consumer requests access to an API product(s) using this plan, it will be approved automatically. |
| JWT Scope | An experimental feature, it works only for oAuth2.0 enabled APIs |
3. Click **Save changes**. The plan will now be available within selected catalog(s).
## Organization and Catalog
In the Tyk Enterprise Developer Portal, Organizations and Catalogs are used to segment the user base and make different APIs available to different user audiences according to the business model.
For example, assume the following scenario:
* Account Management API is available only to trusted partners
* Payment API is available to all developers
Subsequently, two catalogs can be created for these two APIs.
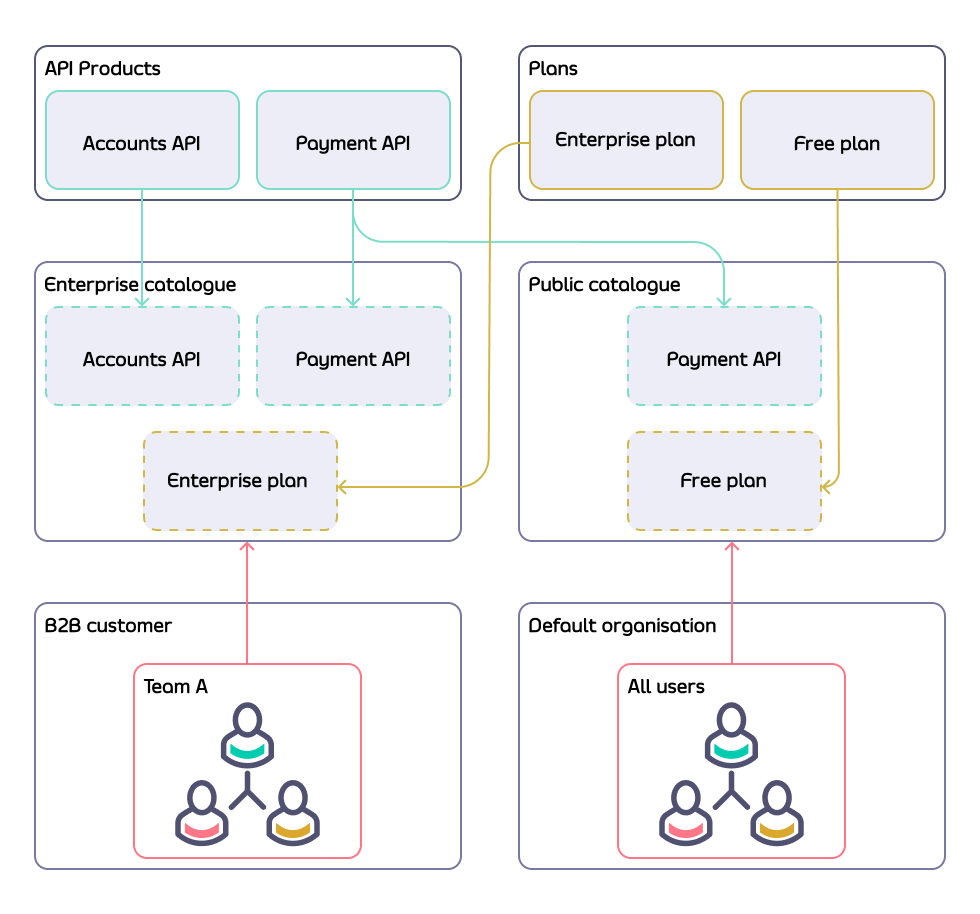
In the below example, an API Provider offers two API Products (the Accounts API and Payment API) with two plans (the Free plan and Enterprise plan) to their customers.
Customers subscribed to the enterprise plan can use both APIs, offering a higher user limit. Conversely, customers subscribed to the Free plan (individual developers or hobbyists) only have visibility of the Payment API.
To achieve that, the API Provider uses two catalogs to implement their business model so that they can offer different experiences for different customer audiences. This section explains how to achieve that using the Tyk Enterprise Developer Portal.
### Create Organization and Team
The Tyk Enterprise Developer Portal uses Organization and Catalogs to segment access to APIs and plans. Therefore, the first thing is to create an organization for your customers. If you don't want to provision organizations manually, you can leverage the [Admin APIs](/5.8/product-stack/tyk-enterprise-developer-portal/api-documentation/tyk-edp-api) or enable the [self-service organization registration](/5.8/tyk-stack/tyk-developer-portal/enterprise-developer-portal/managing-access/manage-api-consumer-organisations).
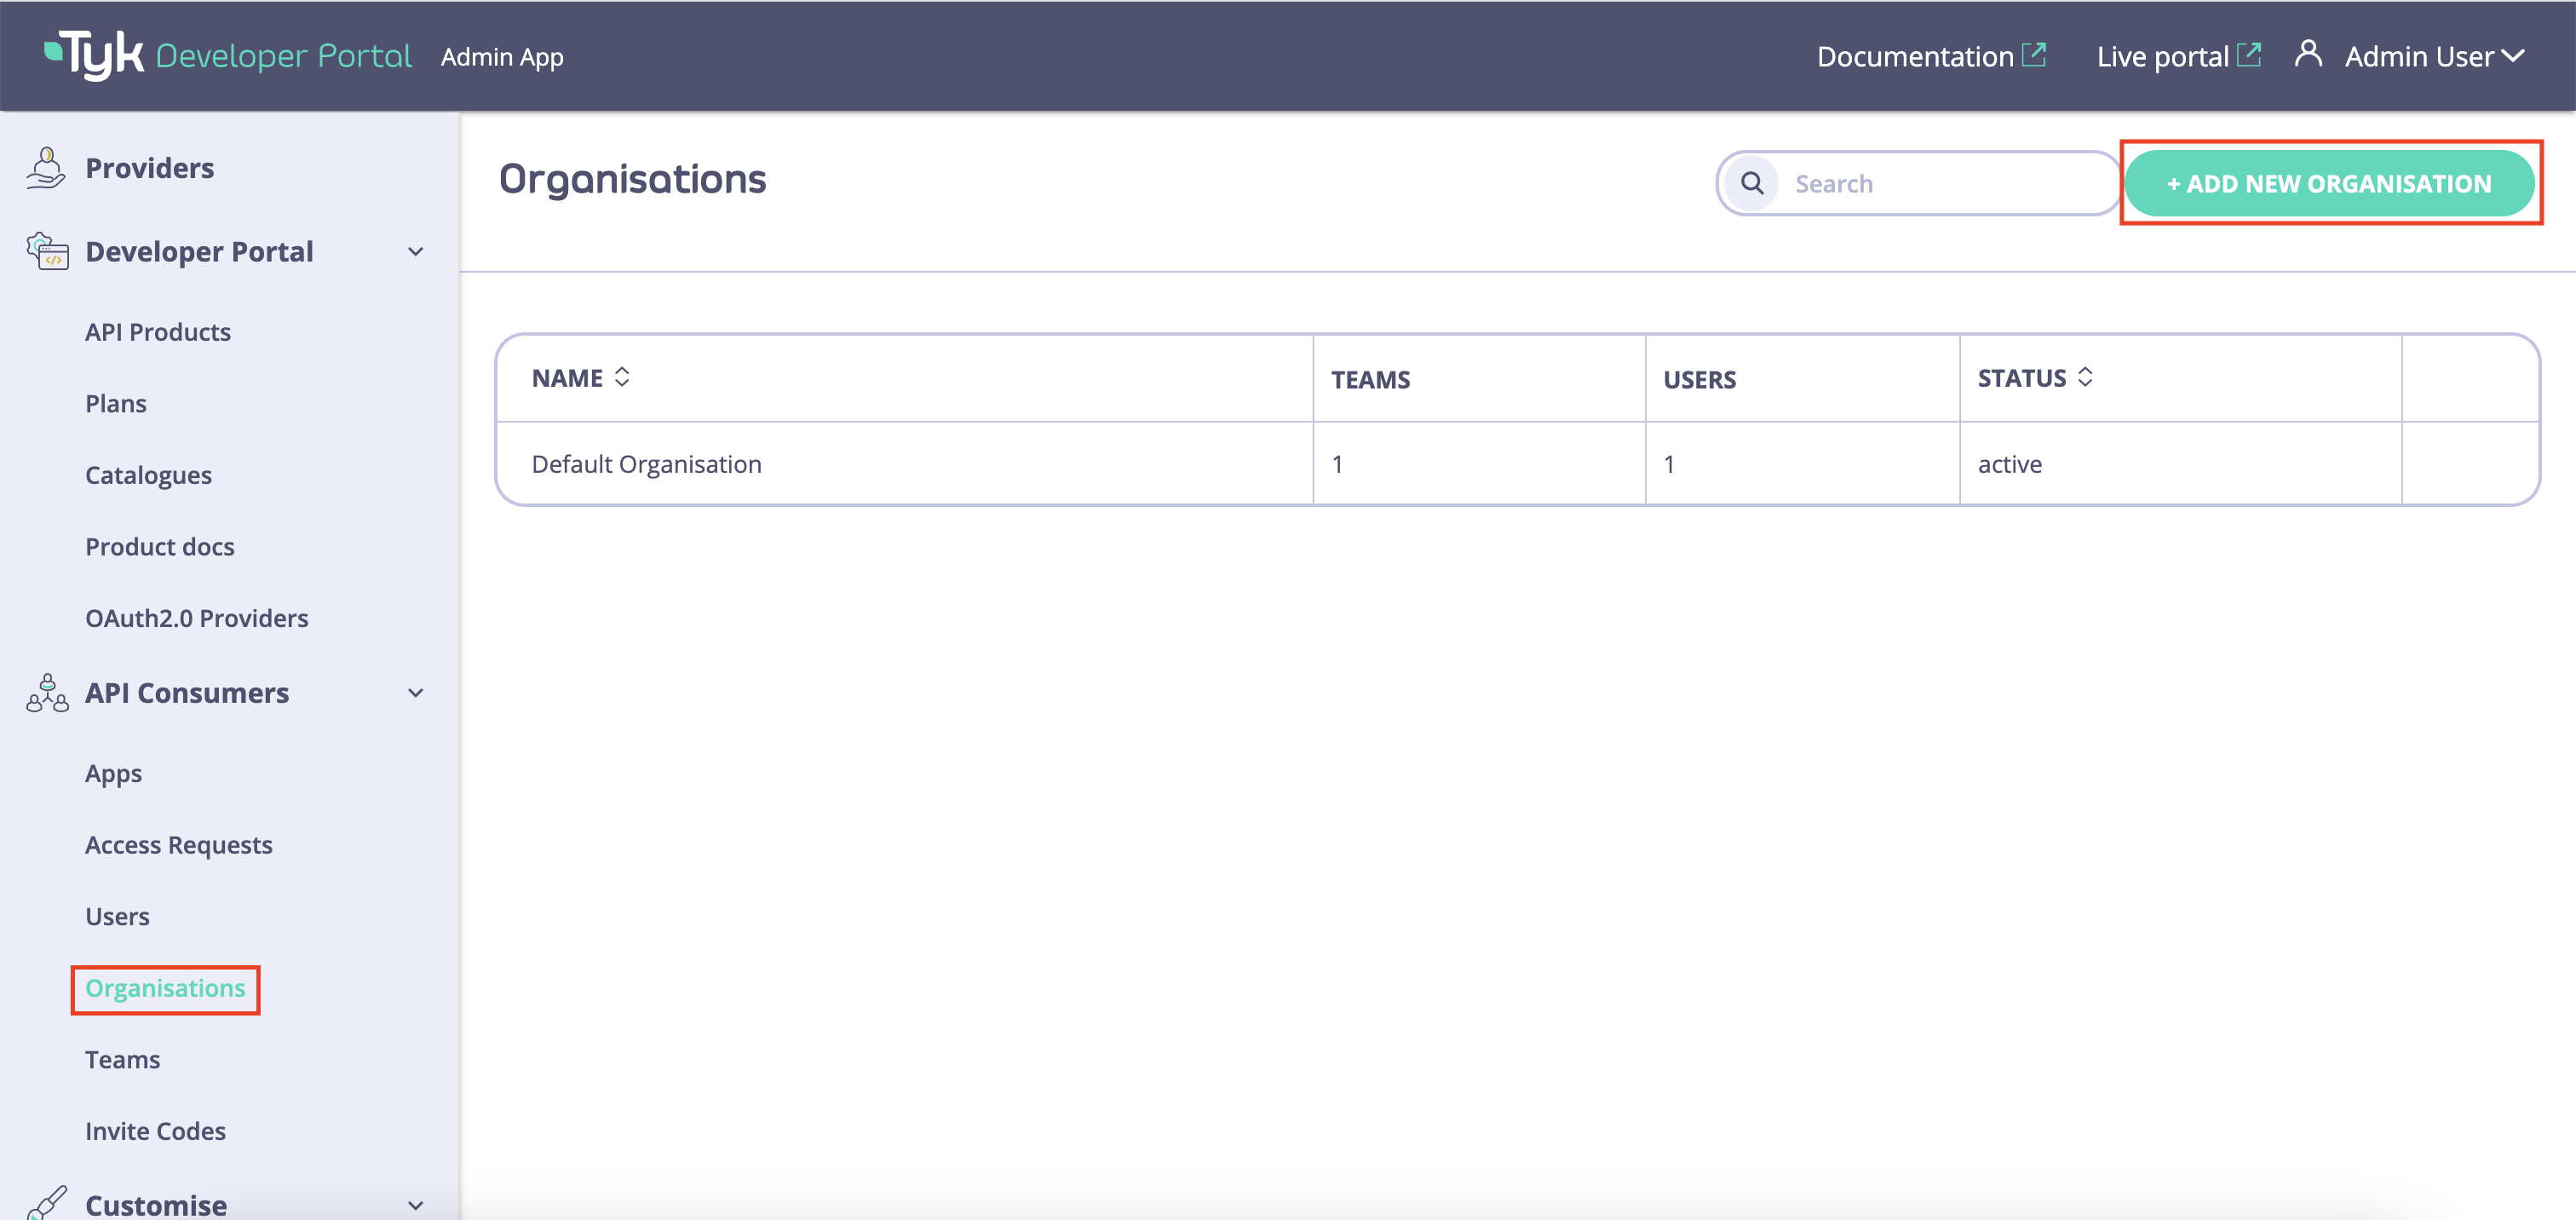
In this guide, we will create the **B2B customer** organization to fulfill the above business model:
1. To create an organization for the **B2B customer**, navigate to the **Organizations** menu and click on the **Add new organization** button.
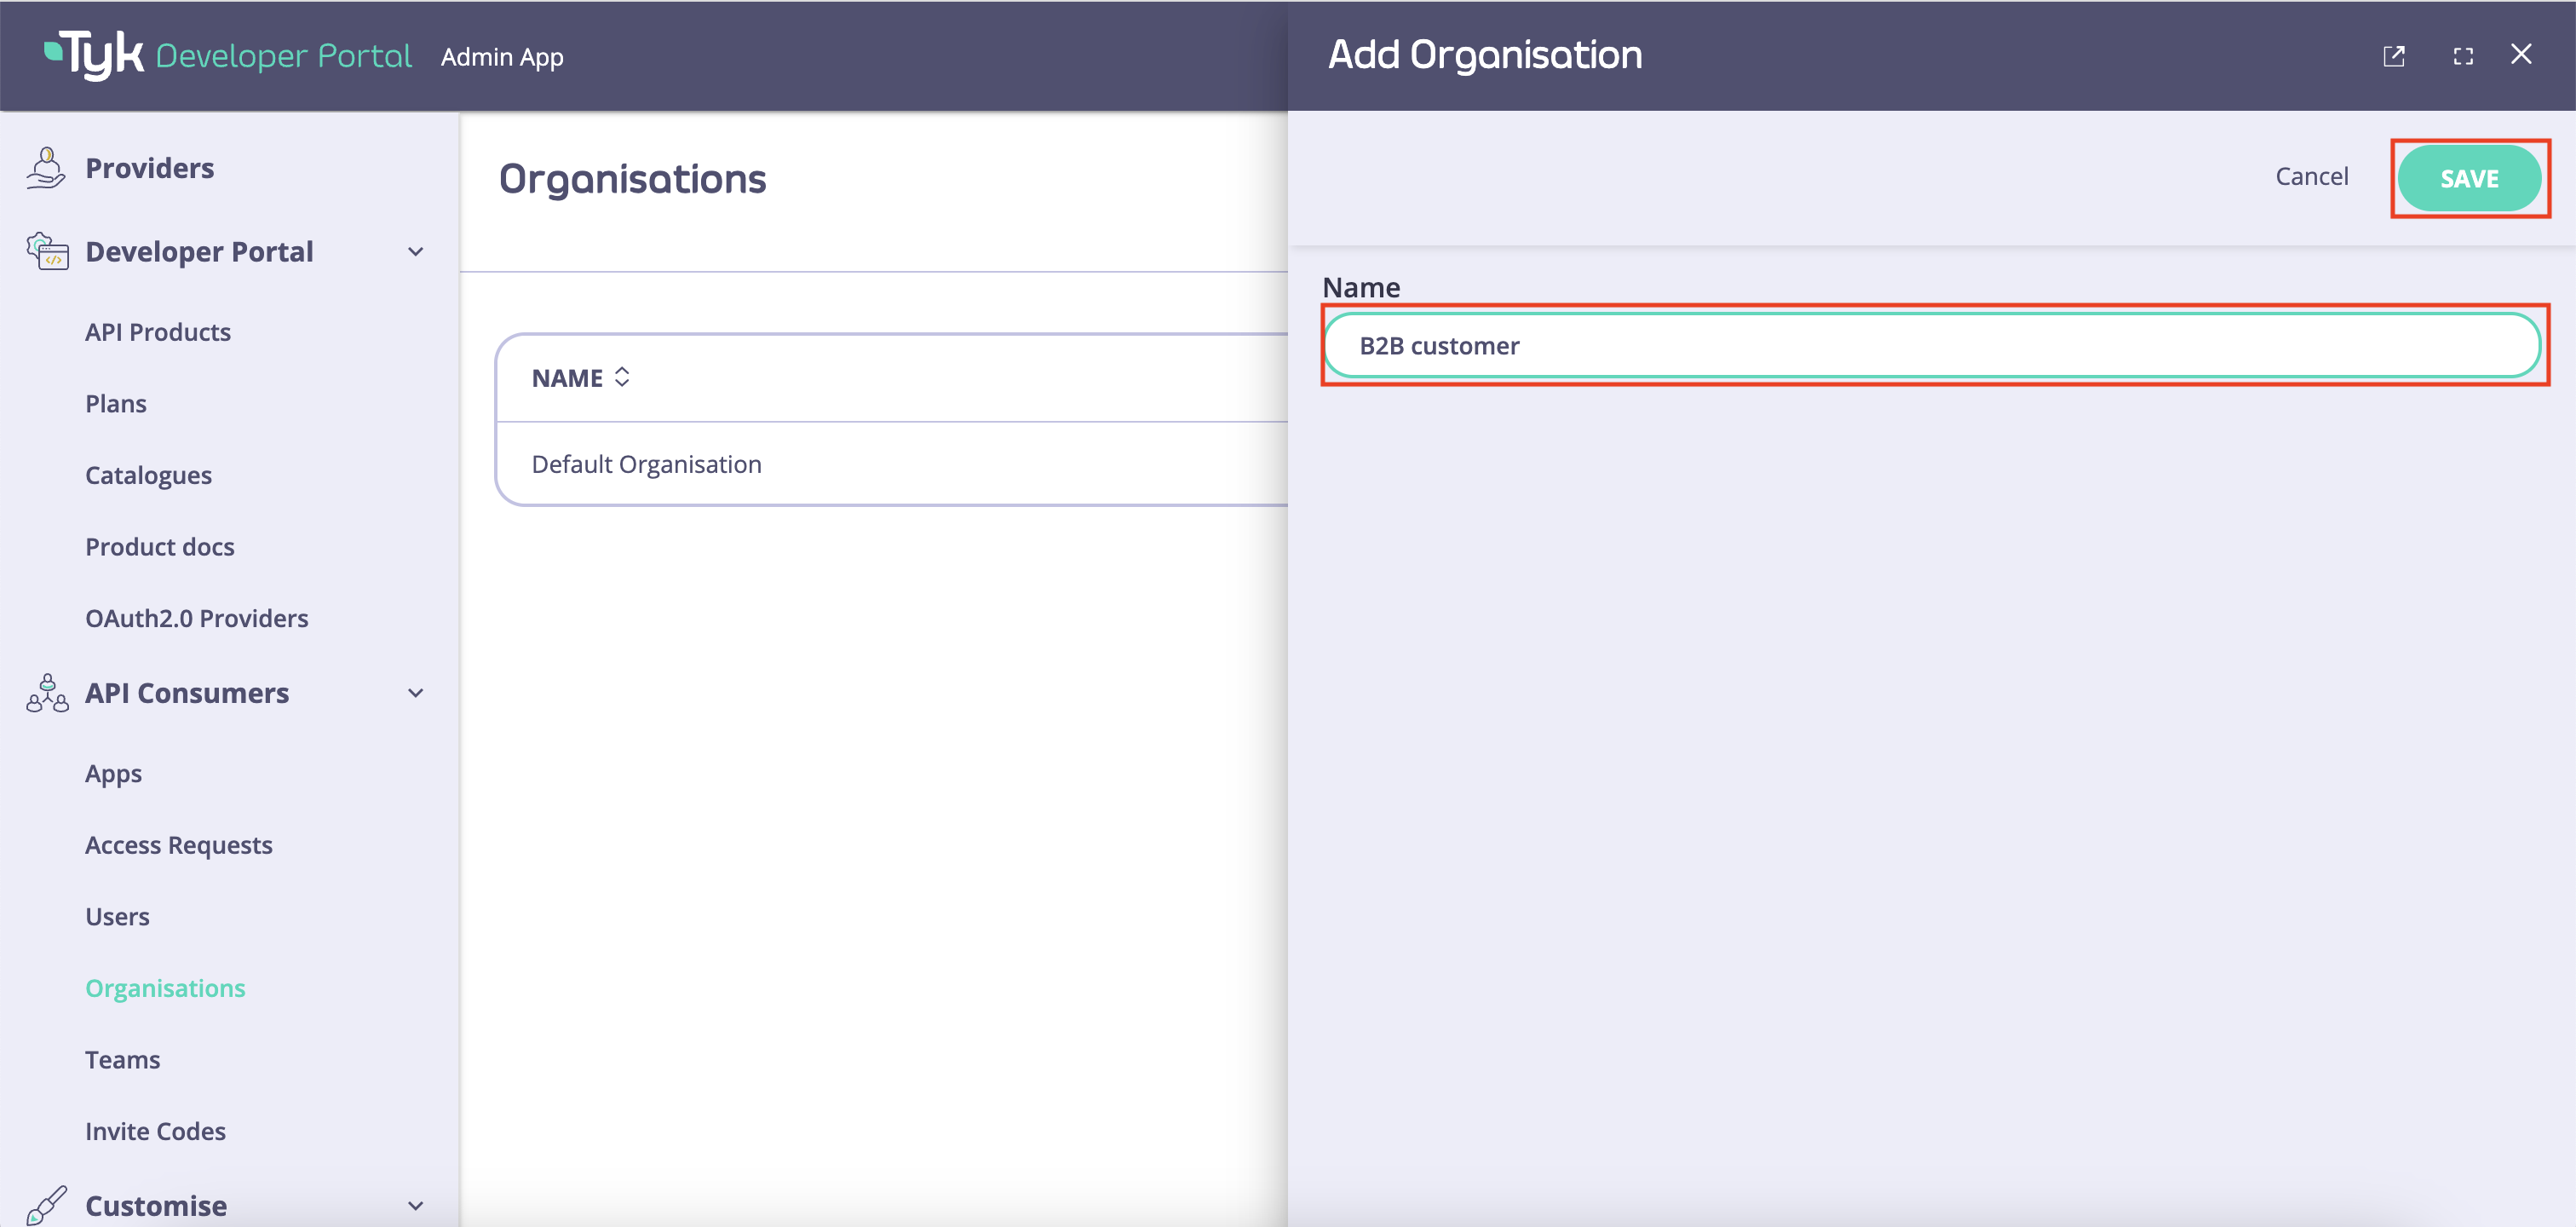
2. Enter the name of your new organization and click on the **Save** button. A new default-team will be automatically created and associated with your new organization.
You can edit the default team name by navigating to **Teams** and opening up the team associated with the organization you created. This will allow you to edit the team name as required.
### Create Catalogs
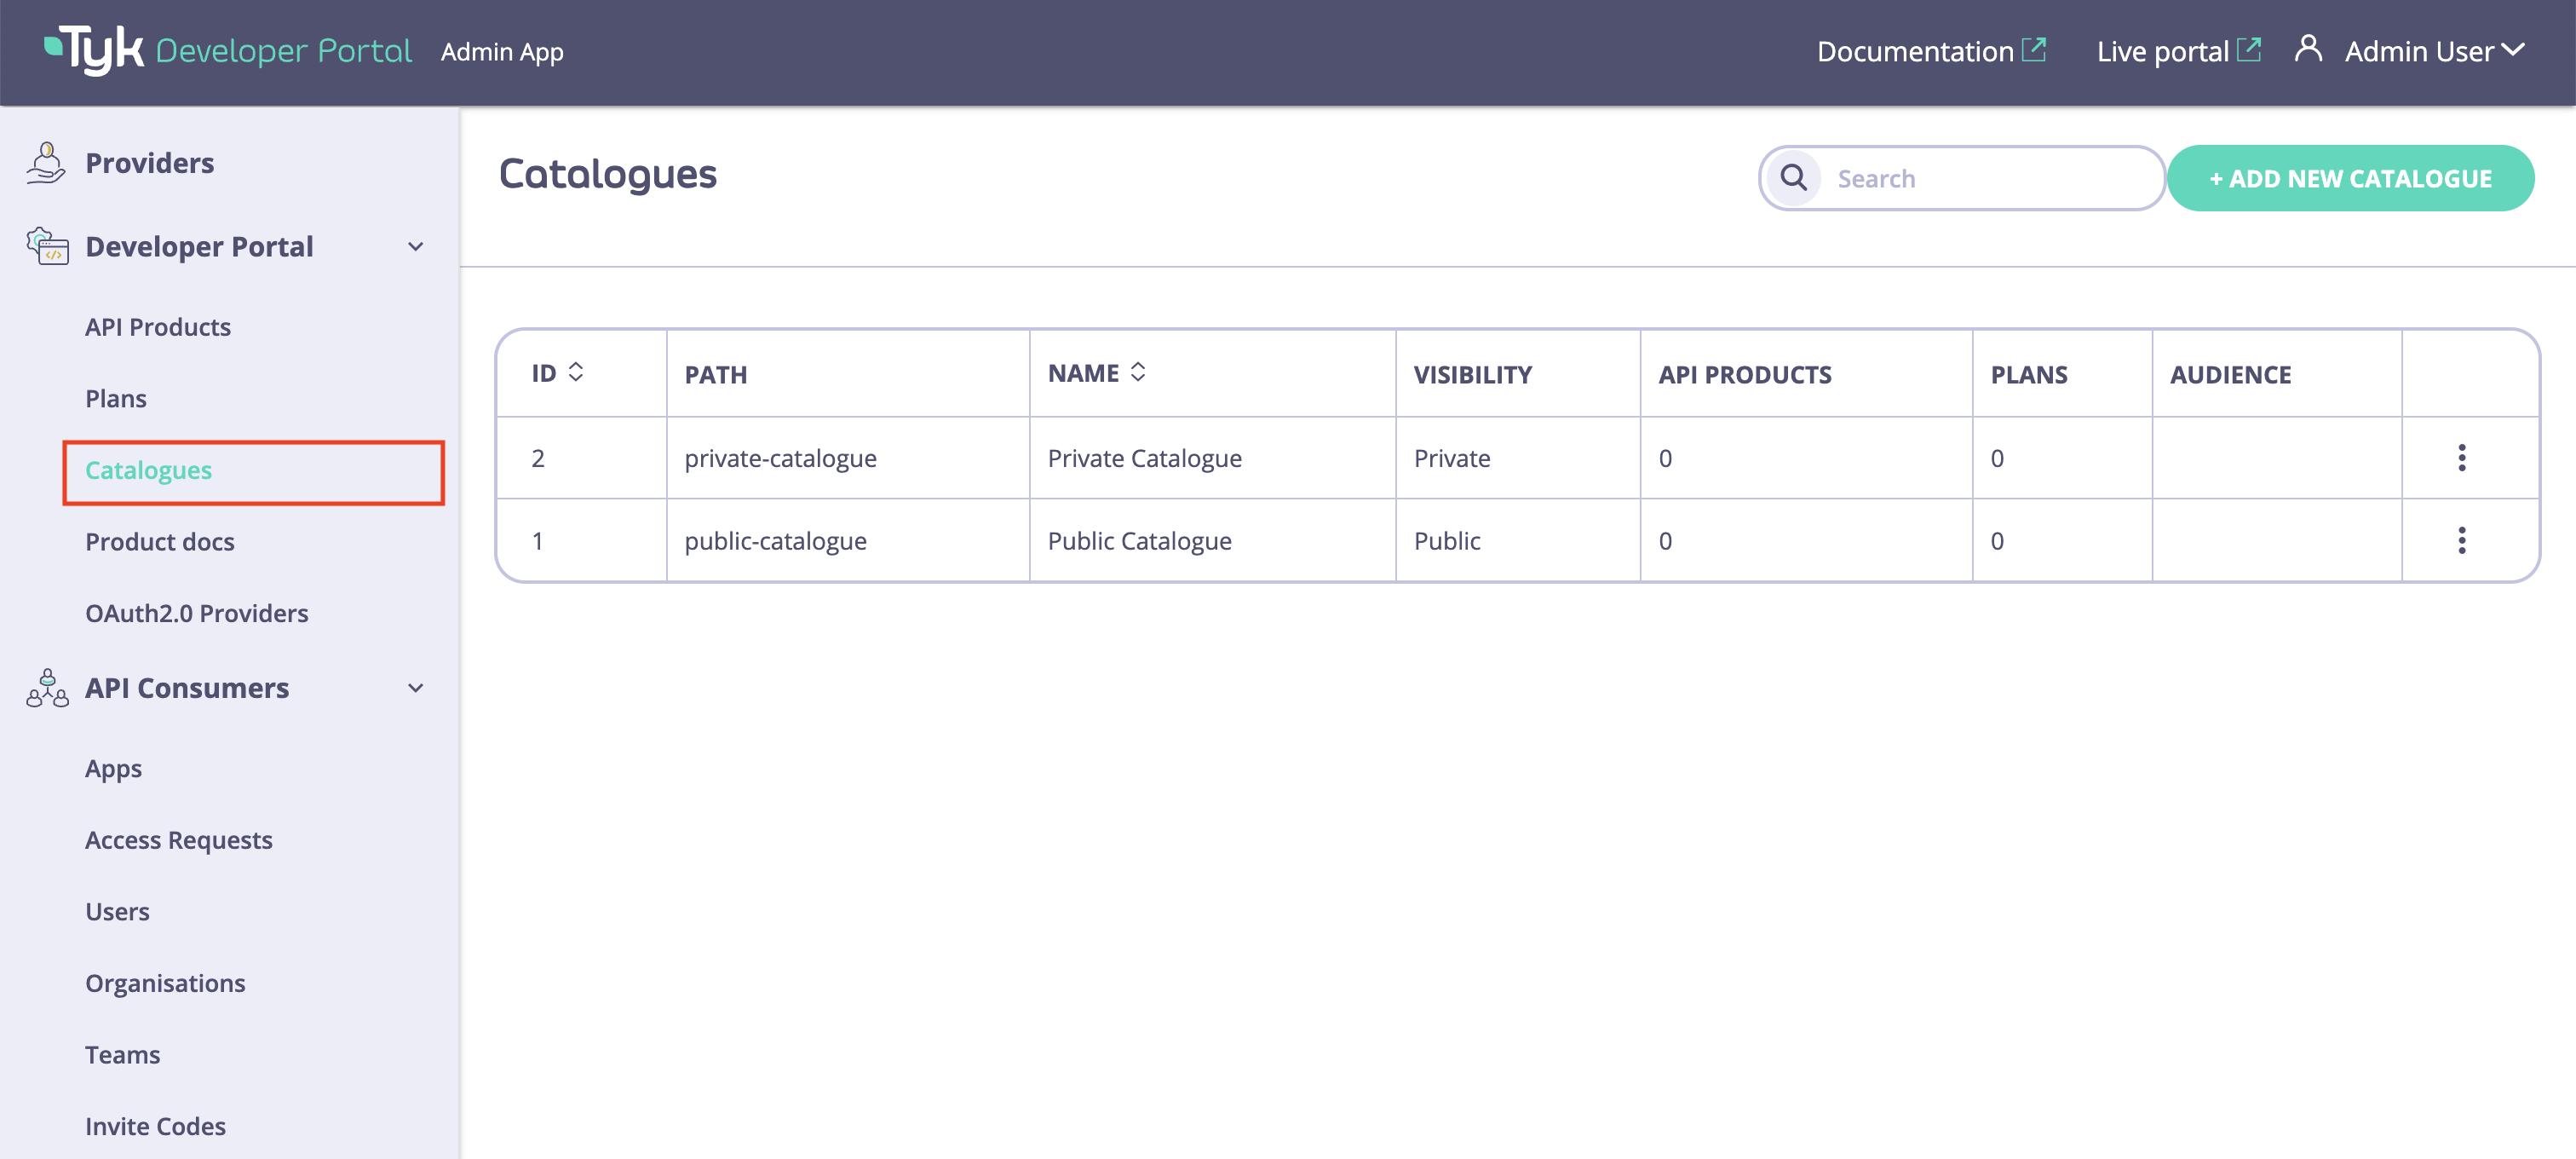
1. To create catalogs, navigate to the catalogs menu in the Tyk Enterprise Developer Portal.
The default catalogs that are featured when the portal is [bootstrapped](/5.8/portal/install#bootstrapping-enterprise-developer-portal) are:
* **Public** catalogs are available to all developers.
* **Private** catalogs are available only to logged in developers who have been assigned with access.
You can create new catalogs by clicking on the **Add new catalog** button or use the default catalogs.
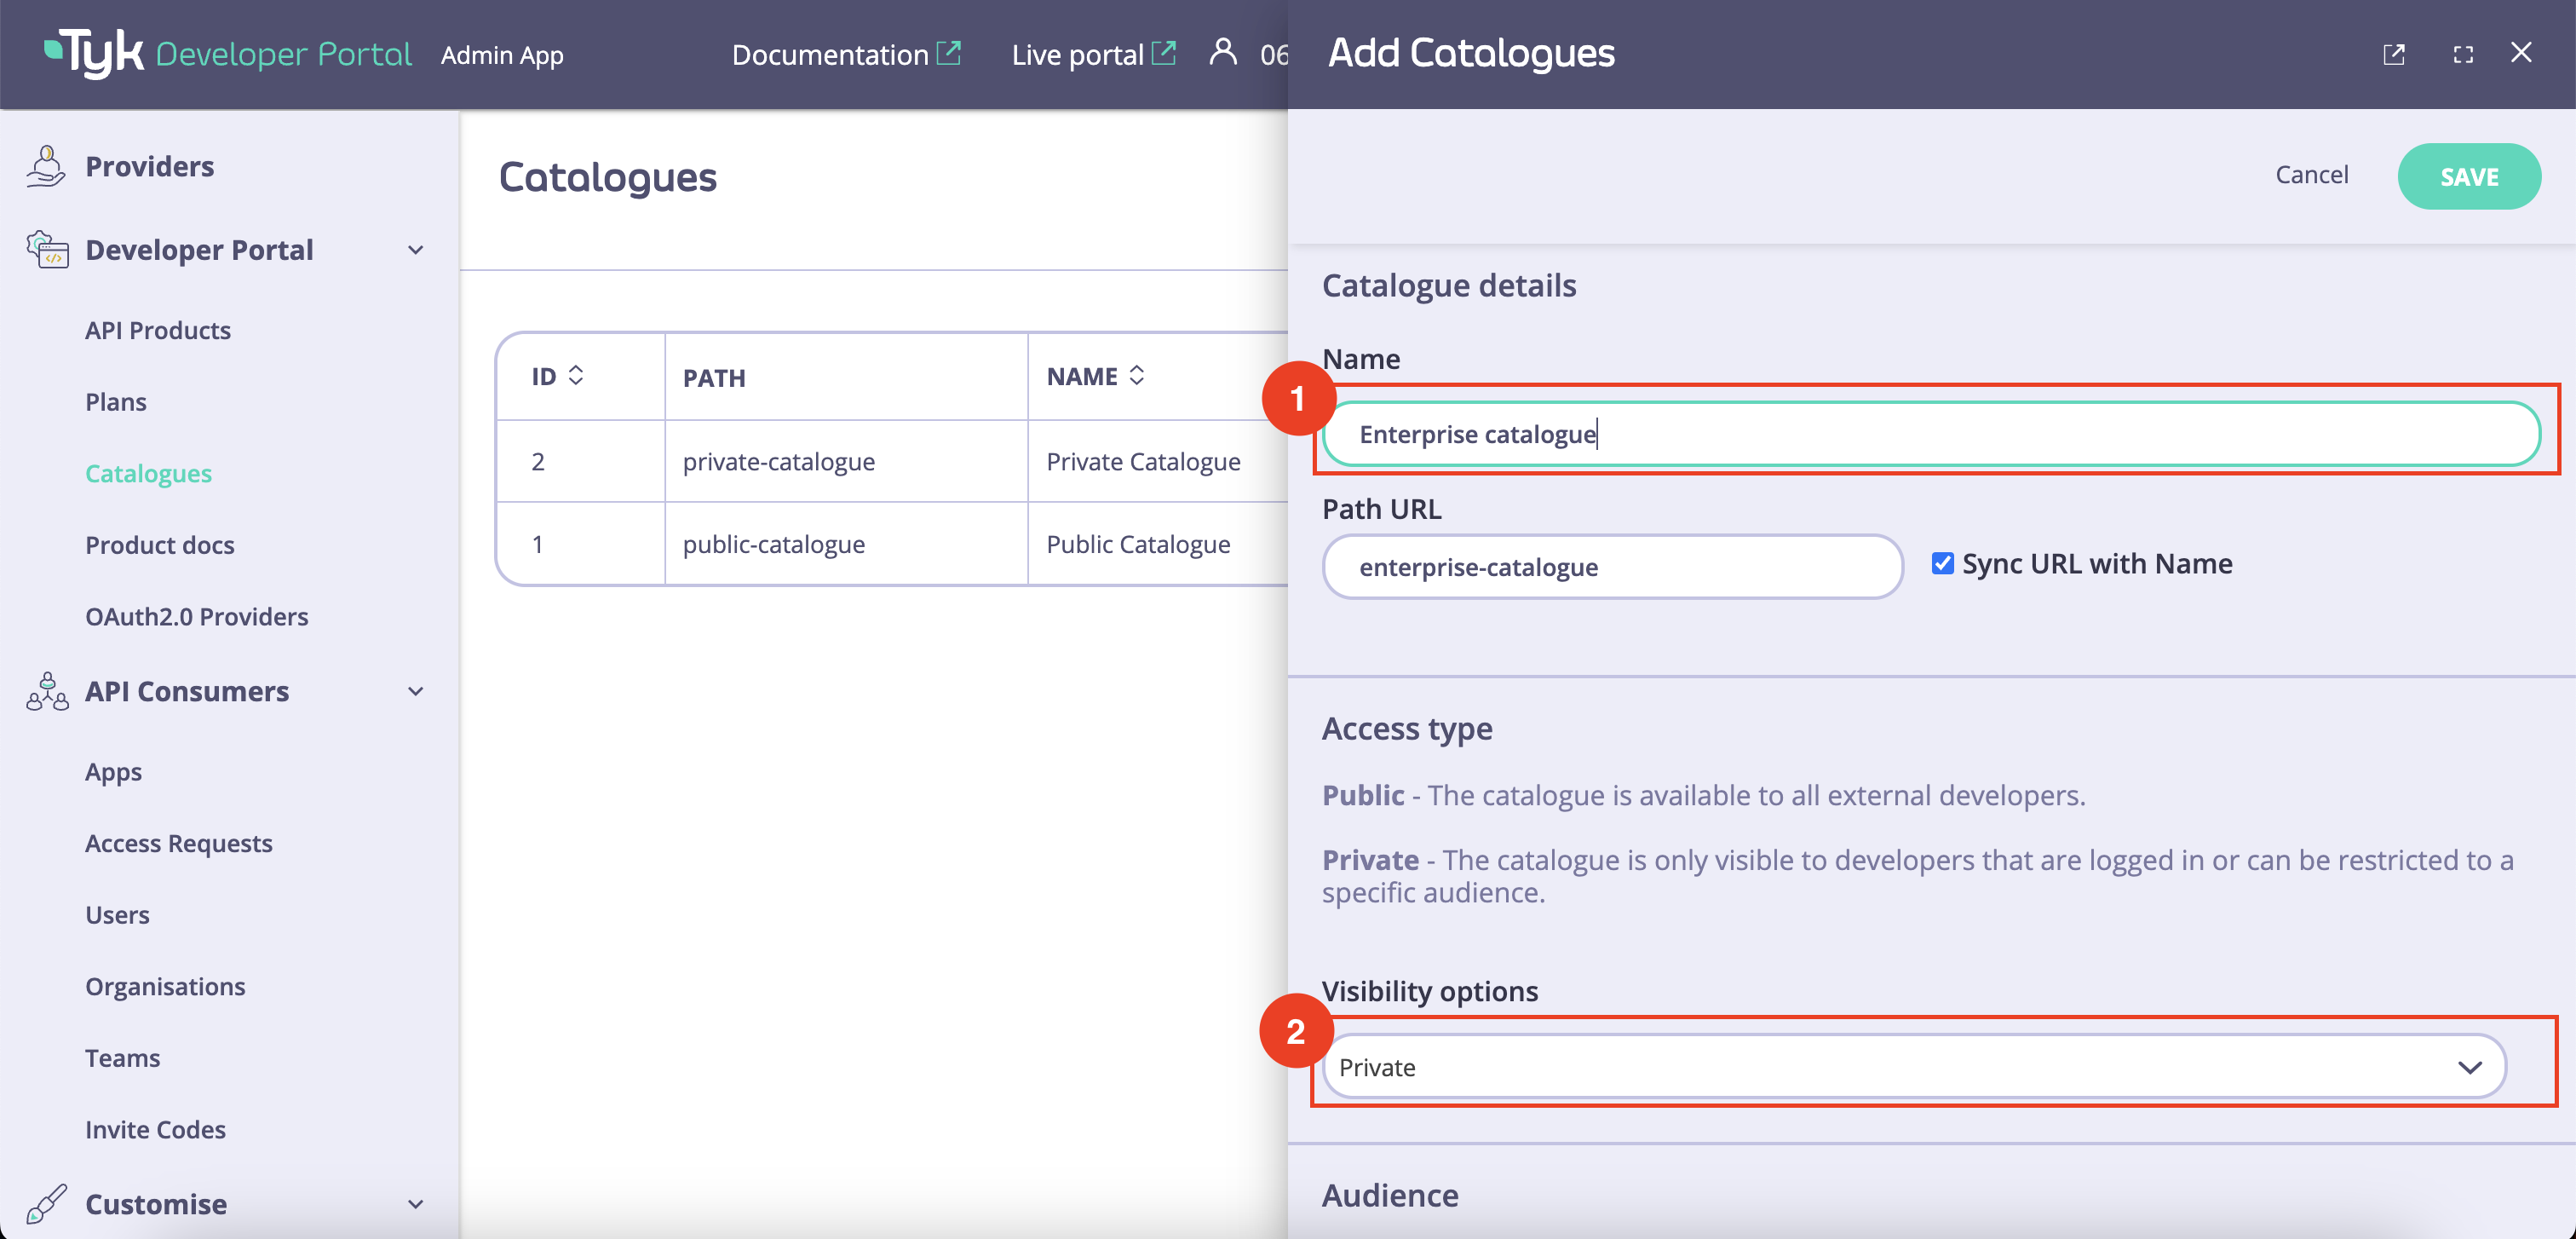
2. To add a new catalog, click on the **Add new catalog** button. Then specify the name of the catalog and select its type: **Private** or **Public**.
Since the public catalog already exists, in this guide you need to create only an additional private catalog called **Enterprise catalog** for the **B2B customer** who will have extended access rights compared to other developers.
While it is possible to create multiple public catalogs, we do not advise doing so. This is because multiple public catalogs will share the same level of access.
3. Once the catalog is created, add a developer audience to it by clicking on the **Add Team** button and selecting an appropriate developer team (**B2B customer All users** in this example).
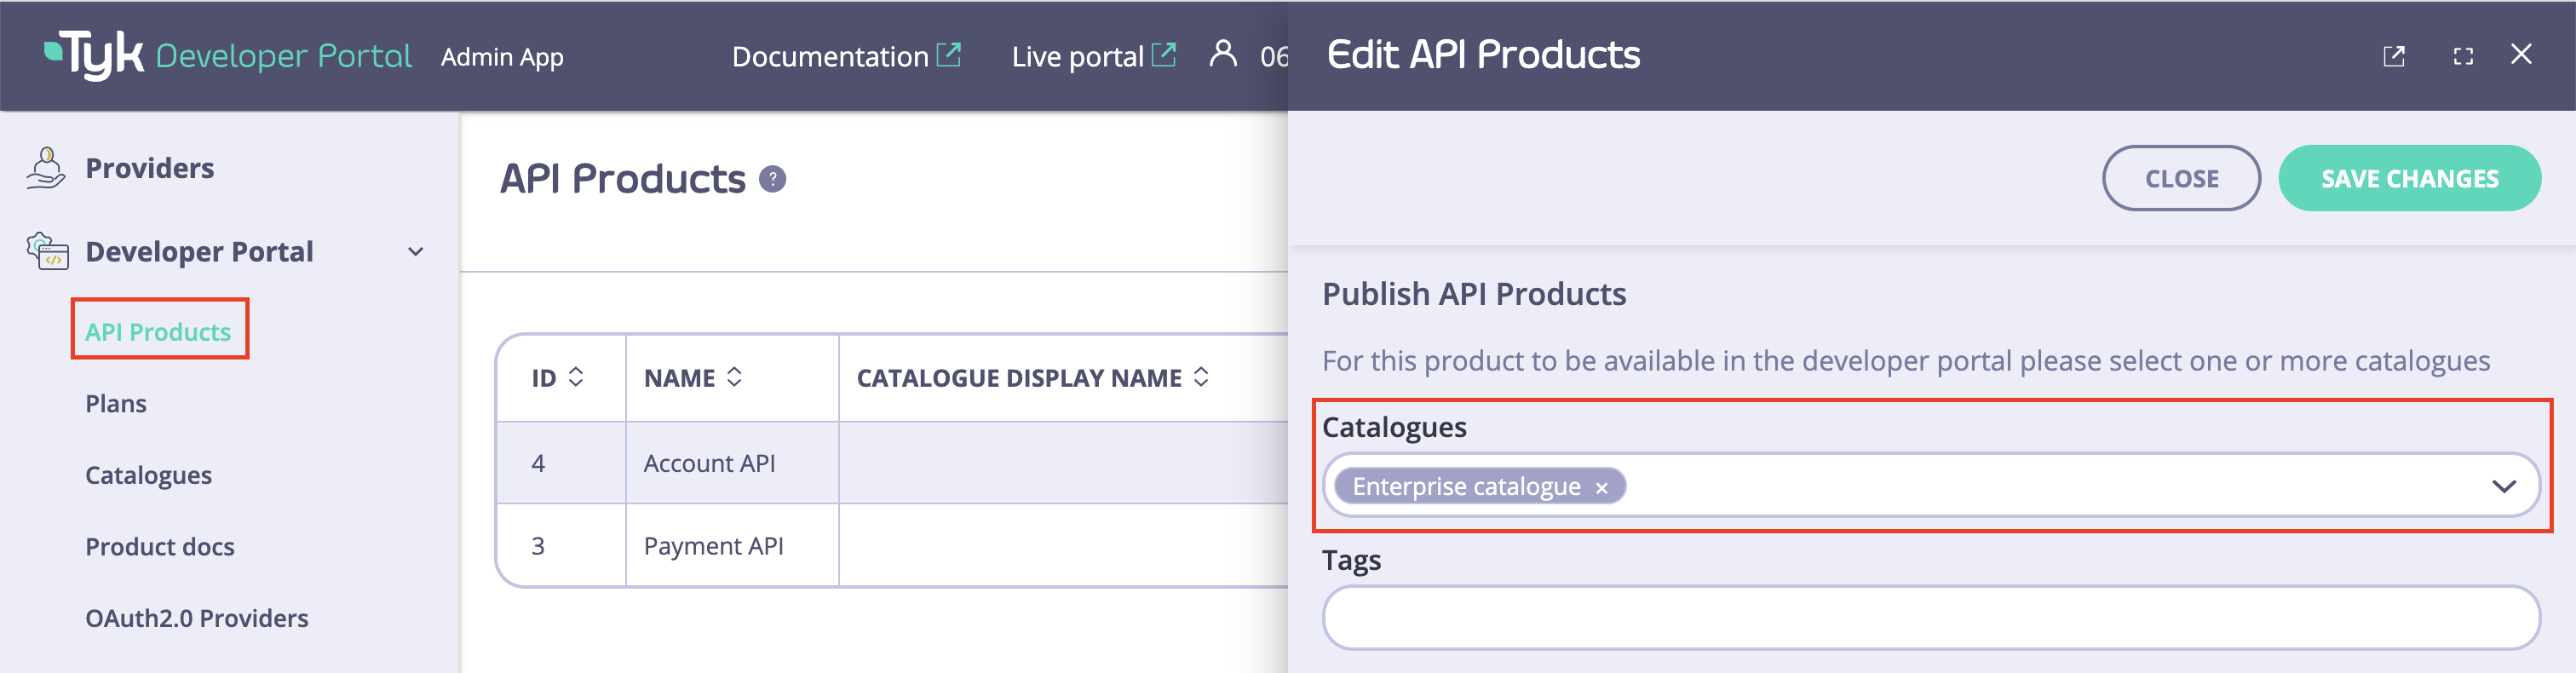
Finally, add plans and API Products to the created catalog so that the selected developer teams can view them.
You can achieve the same result by navigating to the **API Products** menu. Adding an API Product to a catalog through the **Catalogs** and the **API Products** menus will produce the same result.
**Congratulations**
You have successfully added a catalog and associated a team with it. Furthermore, you have allocated plans and API products to this catalog.
## (Optional) Customize Visual Appearance of API Products and Plans
In this section, you will learn how to customize the visual appearance of API Products and plans with the Tyk Enterprise Developer Portal. That includes:
* The display name for API Products and plans.
* The description and logo of API Products that will be displayed on the API Product catalog page.
* Tags for API Products to match them with related blog posts.
### Customize API Products
To customize the visual appearance of API Products:
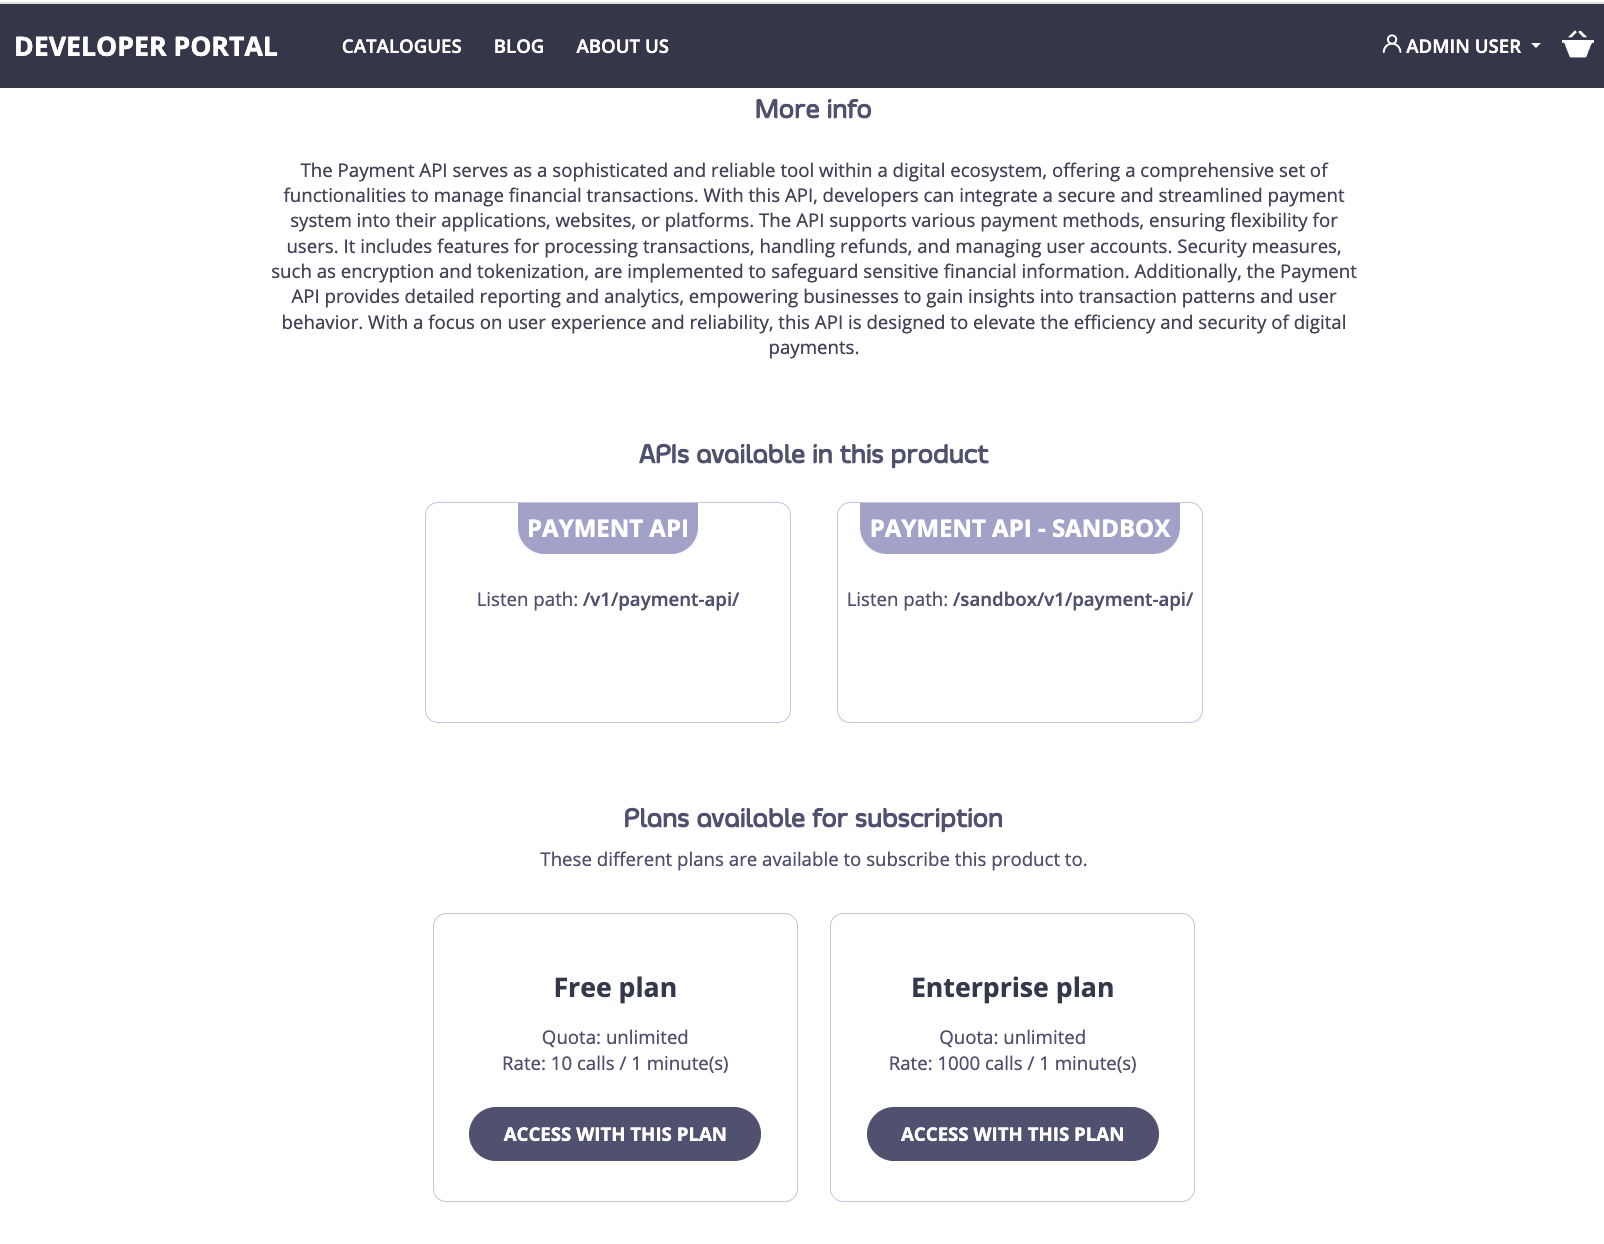
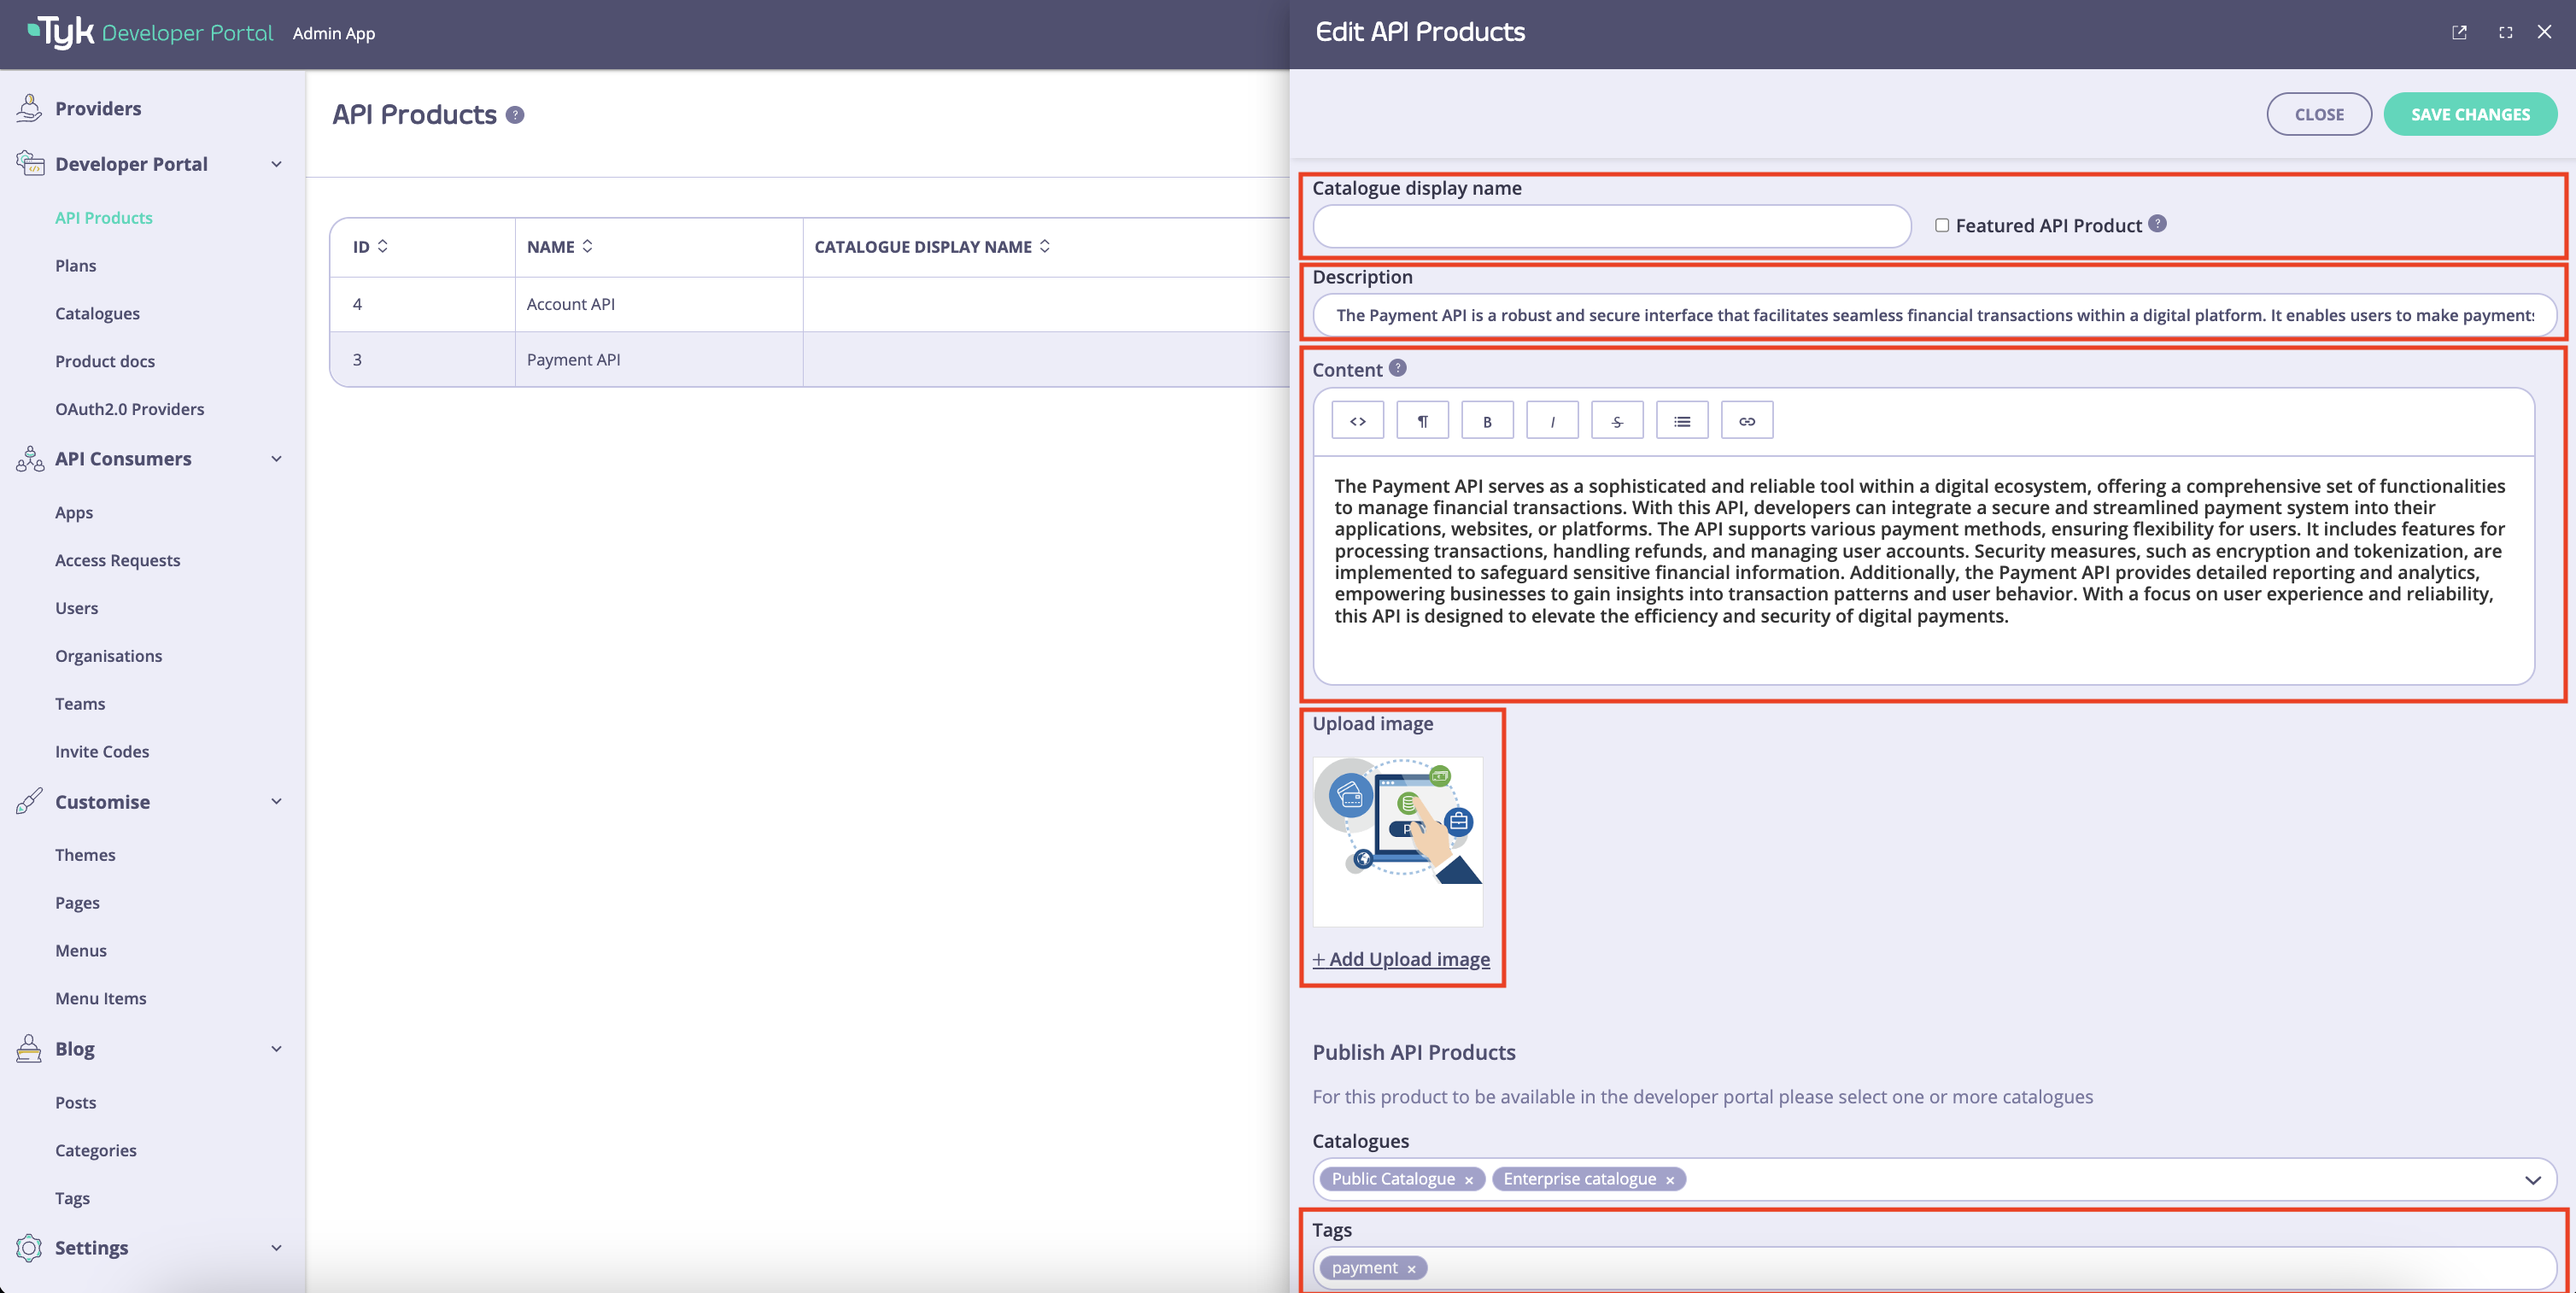
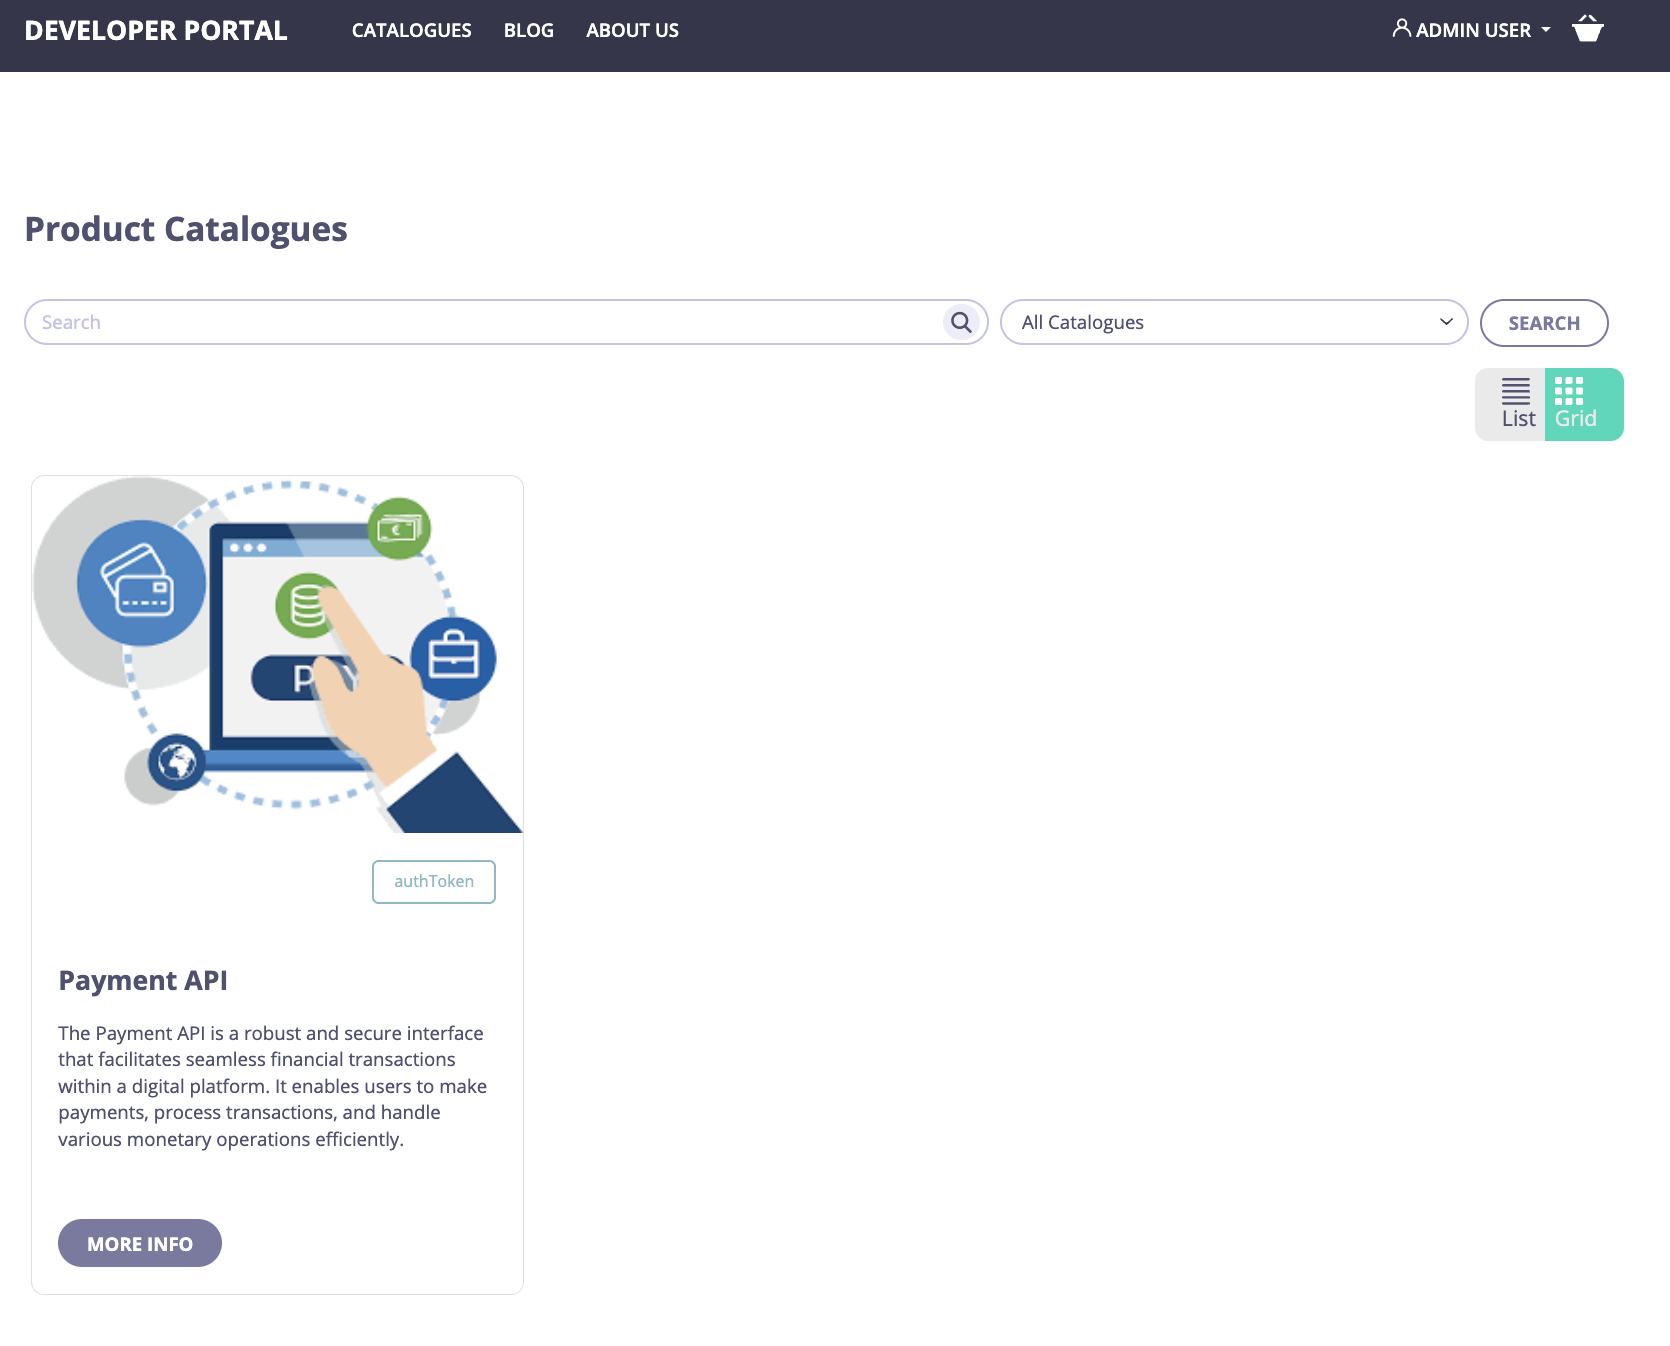
1. Navigate to the **API Products** menu, select the product that you want to customize (the Payment API in example below). In this menu you can customize the following aspects of API Products:
* **Catalog display name**: This is the name that will be displayed in the external catalog.
* **Featured API Product**: Tick this option for the API Product to appear on the home page under the **Featured products** section.
* **Description/Description in the catalogue page**: A short description about what this API Product is. It is displayed in the catalog and on the API Product page.
* **Content/Description in the product details page**: A long text description that appears on the API Product overview page, the rich text editor enables you to add more information about the API Product e.g. use cases, features, etc.
* **Image**: An API Product logo that is displayed on the catalog and on the API Product pages. From version 1.13.0 you can also upload a preview image for the calalogue page.
* **Tags**: The tags are used to match the API Product with the related blog posts that have the same tags in common.
From that page you can also manage [OAuth2.0 settings](/5.8/tyk-stack/tyk-developer-portal/enterprise-developer-portal/api-access/dynamic-client-registration) and add [Get started guides](/5.8/tyk-stack/tyk-developer-portal/enterprise-developer-portal/getting-started-with-enterprise-portal/manage-get-started-guides-for-api-products) to your API Products, which is covered in the relevant sections.
2. Save changes by clicking on the **Save** button. You should now be able to preview how the API Product will be displayed in the catalog:
From version 1.13.0 you can customize the api product in the `Details` tab section of a product.
### Customize Plans
1. To customize visual appearance of plans, open the **Plans** menu and select the plan you want to customize. You can customize the following settings:
* **Catalog display name**: The name of the catalog that will be displayed in the API Product page.
* **Scope**: Scope for the [OAuth2.0 settings](/5.8/tyk-stack/tyk-developer-portal/enterprise-developer-portal/api-access/dynamic-client-registration). Please refer to the [OAuth2.0 documentation](/5.8/tyk-stack/tyk-developer-portal/enterprise-developer-portal/api-access/dynamic-client-registration) for further guidance.
* **Catalogs**: The catalogs in which this plan is available. Catalogs and organization are [covered](/5.8/portal/overview/getting-started#organization-and-catalog) later within this getting started guide.
* **Auto-approve settings for access requests**: Determines if access requests for this plan should be approved automatically.
* **Access request frequency**: Defines how often developers can request access to a specific plan. This way the admins can prevent developers from creating too many keys and abusing their automatically approved plans.
Scope and Access request frequency settings are located under Plan's view Advanced settings from version 1.13.0.
2. Customize the plan's visual appearance as required and then click on the **Save** button. Now you can view the plan in the API Product page:
**Congratulations**
You have now customized the visual appearance of your API Product and plan. By following the above steps you can customize visual appearance of your other API Products and plans.
 4. Select **APIs** from the **System Management** section.
5. From the **Actions** menu for your API, select **Copy API ID**.
## Create API Products and Plans
There are two ways of creating API Products and Plans in the Developer Portal:
1. [Automatically create an API Product or Plan](/5.8/#import-api-product-and-plan) in the Developer Portal by importing it from Tyk when synchronising the provider.
2. [Manually create an API Product or Plan](/5.8/#manually-create-api-product-and-plan) in the Developer Portal. (Only from version 1.13.0)
**Prerequisites**
* A Tyk Self-Managed [installation](/5.8/tyk-self-managed/install)
* Tyk Self-Managed [added as a provider](/5.8/portal/overview/getting-started#connect-to-a-provider)
* Have APIs [created in your Tyk installation](/5.8/api-management/gateway-config-managing-classic#create-an-api).
### Import API Product and Plan
When integrating with Tyk, the Tyk policies will be imported into the Developer Portal. Depending on the configuration that’s been set in the policy section, the policy will either be imported as an API Product or a Plan. For further details check the [portal key concepts](/5.8/portal/overview/concepts) document.
#### Create and Import an API Product from Tyk
API Products are partitioned policies that provide an ACL but not quota/rate limits.
The following steps explain how to create and import an API product from Tyk, assuming you have one or more APIs already created:
1. From your Tyk Self-Managed installation, go to **Policies** and click **Add policy**.
2. Select which APIs you want to add to your API product.
4. Select **APIs** from the **System Management** section.
5. From the **Actions** menu for your API, select **Copy API ID**.
## Create API Products and Plans
There are two ways of creating API Products and Plans in the Developer Portal:
1. [Automatically create an API Product or Plan](/5.8/#import-api-product-and-plan) in the Developer Portal by importing it from Tyk when synchronising the provider.
2. [Manually create an API Product or Plan](/5.8/#manually-create-api-product-and-plan) in the Developer Portal. (Only from version 1.13.0)
**Prerequisites**
* A Tyk Self-Managed [installation](/5.8/tyk-self-managed/install)
* Tyk Self-Managed [added as a provider](/5.8/portal/overview/getting-started#connect-to-a-provider)
* Have APIs [created in your Tyk installation](/5.8/api-management/gateway-config-managing-classic#create-an-api).
### Import API Product and Plan
When integrating with Tyk, the Tyk policies will be imported into the Developer Portal. Depending on the configuration that’s been set in the policy section, the policy will either be imported as an API Product or a Plan. For further details check the [portal key concepts](/5.8/portal/overview/concepts) document.
#### Create and Import an API Product from Tyk
API Products are partitioned policies that provide an ACL but not quota/rate limits.
The following steps explain how to create and import an API product from Tyk, assuming you have one or more APIs already created:
1. From your Tyk Self-Managed installation, go to **Policies** and click **Add policy**.
2. Select which APIs you want to add to your API product.
 3. From the **Access Rights** drop-down list, select one or more APIs to include in your policy.
 4. Under **Global limits and Quota**, select **Enforce access rights**. Ensure **Enforce usage quota** and **Enforce rate limit** are **not** selected.
 5. From the **Configurations** tab, add the information needed under name and settings.
6. From the **Tags** tab, a tag can be added to tell the portal this should be imported. If you have specified a specific label in the Provider section within the Developer portal when adding Tyk, the way the portal would know which Policies to import can be specified here.
5. From the **Configurations** tab, add the information needed under name and settings.
6. From the **Tags** tab, a tag can be added to tell the portal this should be imported. If you have specified a specific label in the Provider section within the Developer portal when adding Tyk, the way the portal would know which Policies to import can be specified here.
 7. To import the API Products into the Developer portal, from the Tyk Portal admin app, click **Synchronise**.
 #### Create and Import Plans from Tyk
Plans are policies that implement rate limit or quota, or both, but do **NOT** include the ACL.
To create a Plan for the developer portal, follow the same steps as for creating an API Product. However, within the Global limits and quota in the Policies, configure the policy as follows:
1. From your Tyk Self-Managed installation, go to **Policies** and click **Add policy**.
#### Create and Import Plans from Tyk
Plans are policies that implement rate limit or quota, or both, but do **NOT** include the ACL.
To create a Plan for the developer portal, follow the same steps as for creating an API Product. However, within the Global limits and quota in the Policies, configure the policy as follows:
1. From your Tyk Self-Managed installation, go to **Policies** and click **Add policy**.
 4. Click **Synchronise** to import the plans into the Developer portal, from the Tyk Portal admin app.
 2. Select a unique name for the API Product and complete the [product details for customization](/5.8/portal/overview/getting-started#optional-customize-visual-appearance-of-api-products-and-plans) in the **Details** tab. The product name will be the name assigned to the created policy in the Tyk Self-Managed selected provider
 3. Select **Provider**, **Authentication**, and **APIS** in the **API's** tab.
 4. Add API specifications in the **Documentation** tab.
 5. Add Product Guides in the **"Getting Started" guides** tab.
 6. Complete DCR settings in the **Dynamic Client Registration** tab (Only for JWT selected APIs).
 7. Save changes.
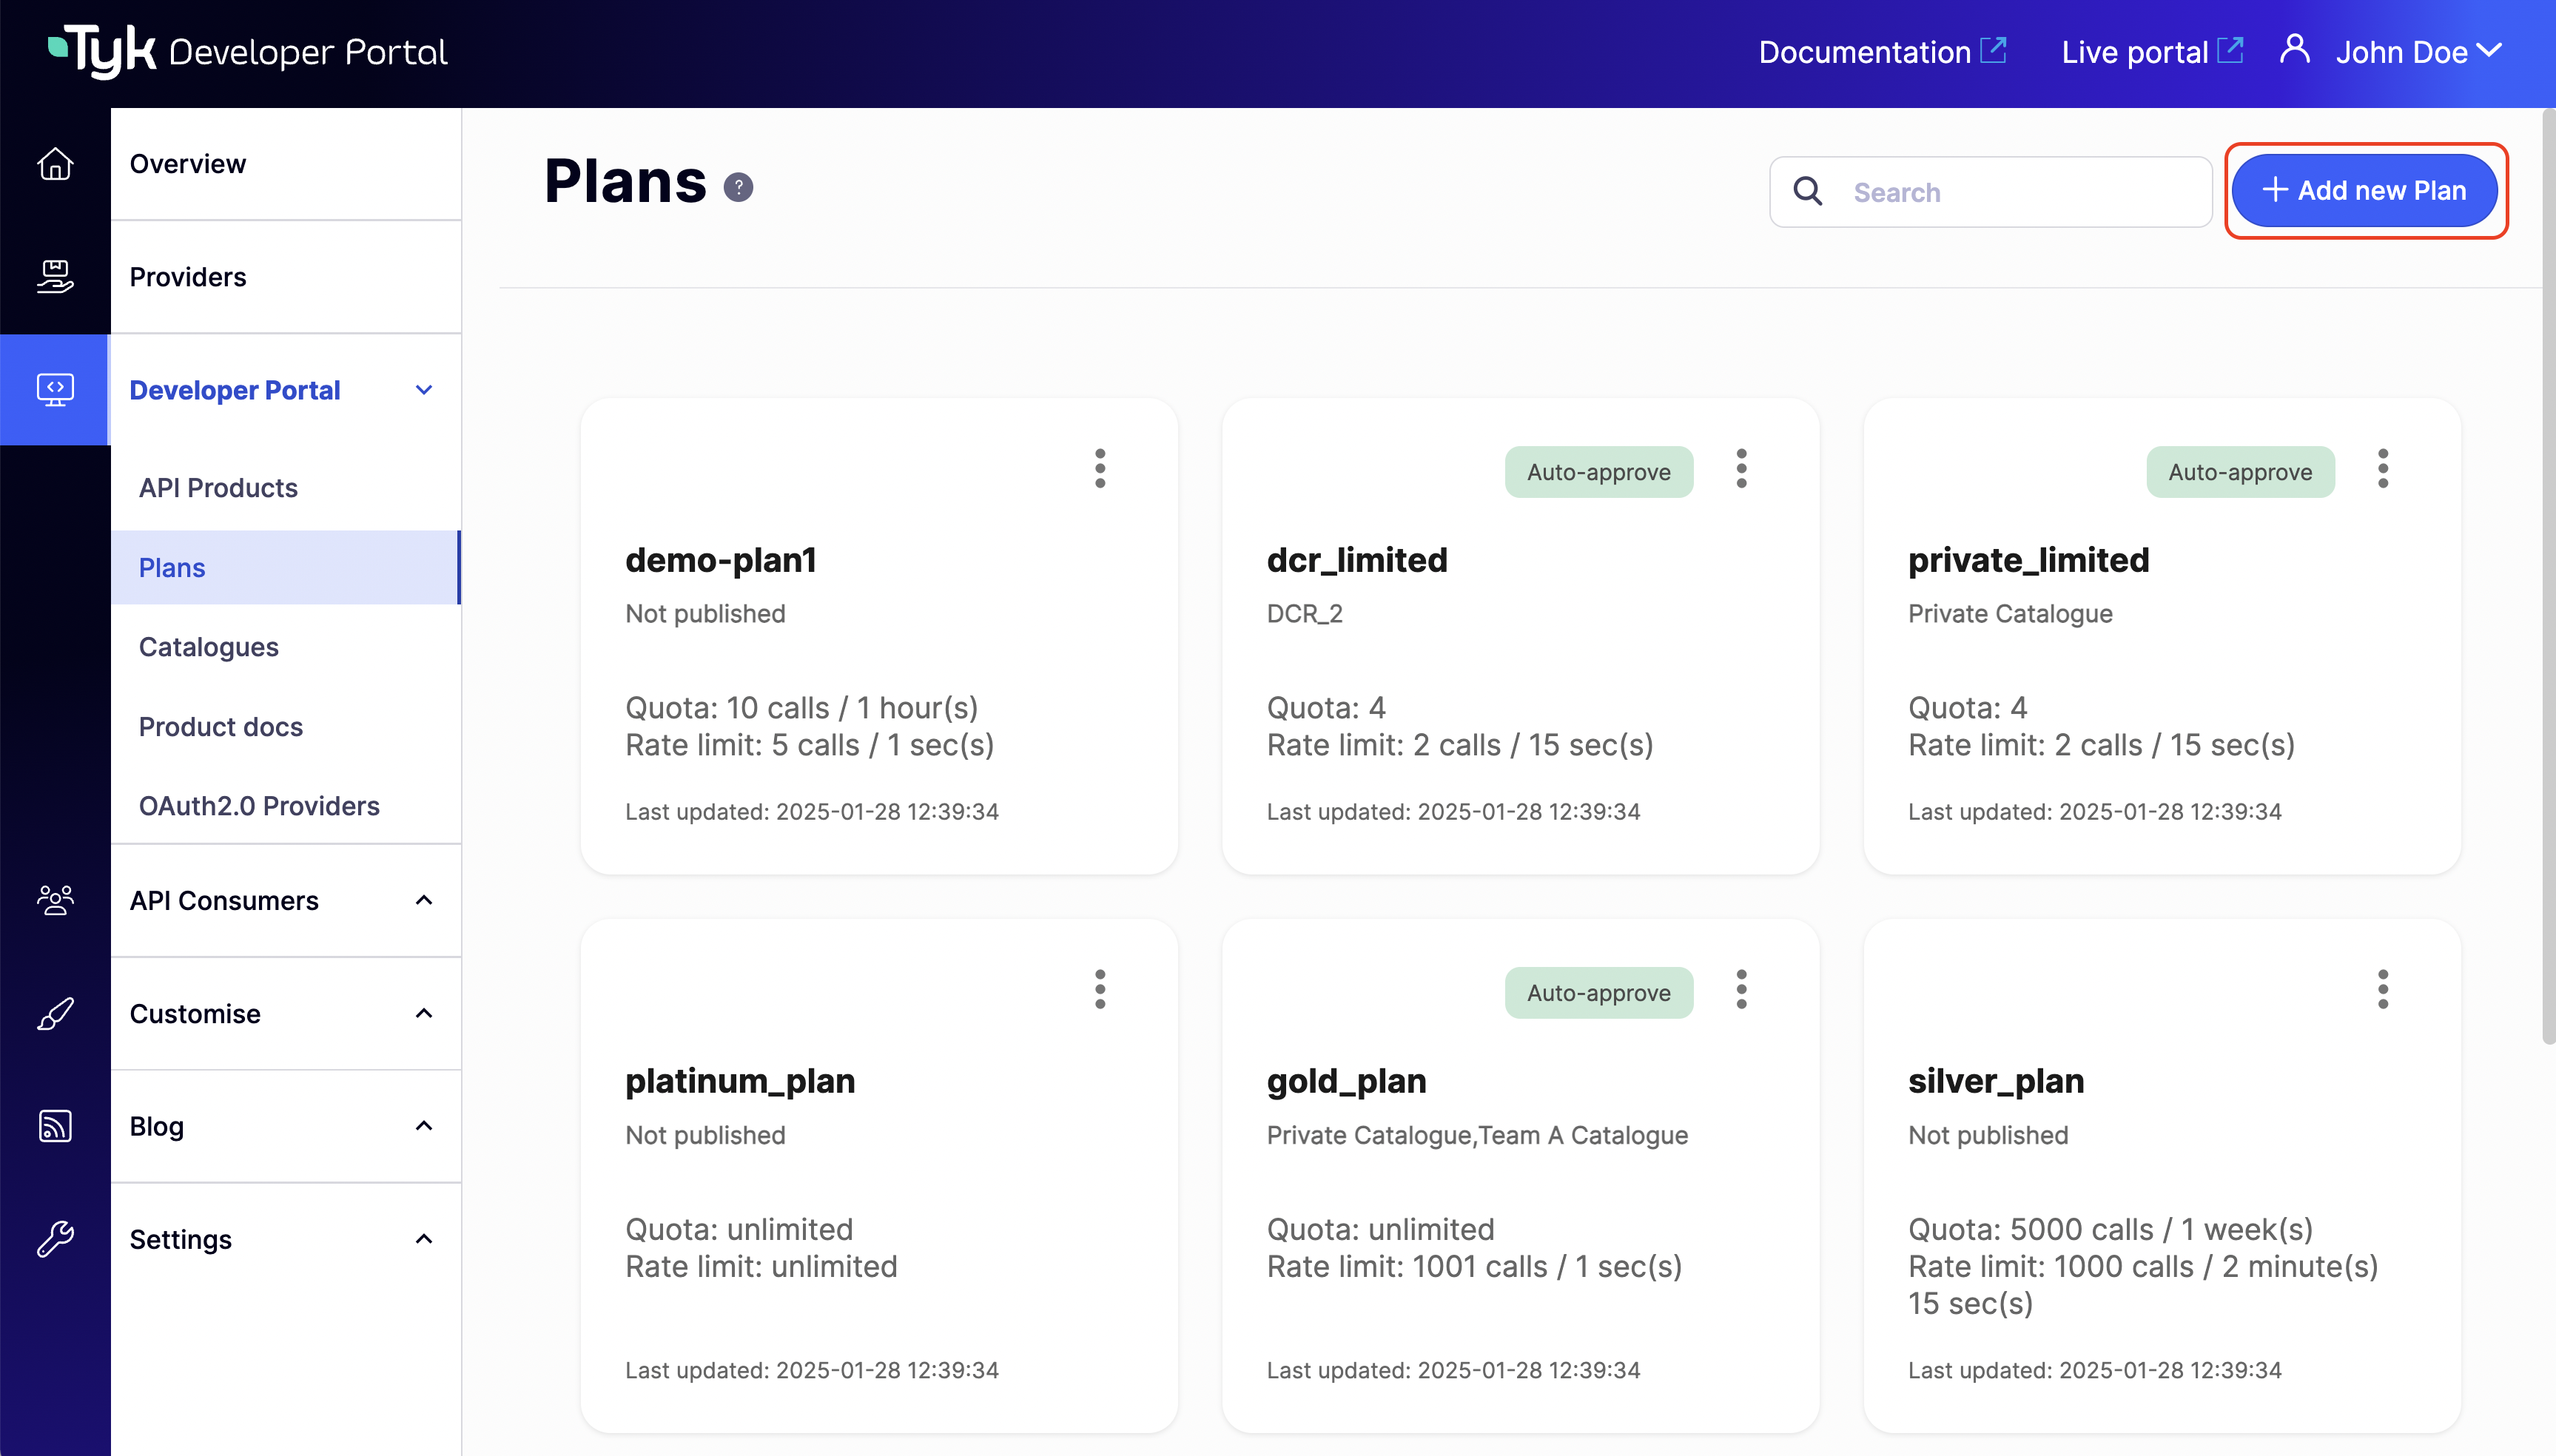 2. Choose a **Provider** and a unique **Name** for the plan. The plan name will be the name assigned to the created policy in the Tyk Self-Managed selected provider.
 3. Complete Plan limits. Select **Usage quota**, **Rate limit**, and **Key expiration** for the plan.
 4. Complete Advanced settings (optional). Set **Scopes** (for DCR), **Access Request Frequency**, and **Credential metadata** for the plan.
 5. Save changes.
## Publish API Products and Plans
In this section, you will learn how to publish the API products and plans to the public-facing portal so that API Consumers can access them.
**Prerequisites**
* A Tyk Self-Managed [installation](/5.8/tyk-self-managed/install)
* Tyk Self-Managed [added as a provider](/5.8/portal/overview/getting-started#connect-to-a-provider)
* [Created and imported API Products and Plans from Tyk](/5.8/portal/overview/getting-started#create-api-products-and-plans)
### Publish an API product
Follow these steps below how to publish an API Product to a catalog:
1. From the **API Product** section, Click an API product to open the details.
5. Save changes.
## Publish API Products and Plans
In this section, you will learn how to publish the API products and plans to the public-facing portal so that API Consumers can access them.
**Prerequisites**
* A Tyk Self-Managed [installation](/5.8/tyk-self-managed/install)
* Tyk Self-Managed [added as a provider](/5.8/portal/overview/getting-started#connect-to-a-provider)
* [Created and imported API Products and Plans from Tyk](/5.8/portal/overview/getting-started#create-api-products-and-plans)
### Publish an API product
Follow these steps below how to publish an API Product to a catalog:
1. From the **API Product** section, Click an API product to open the details.
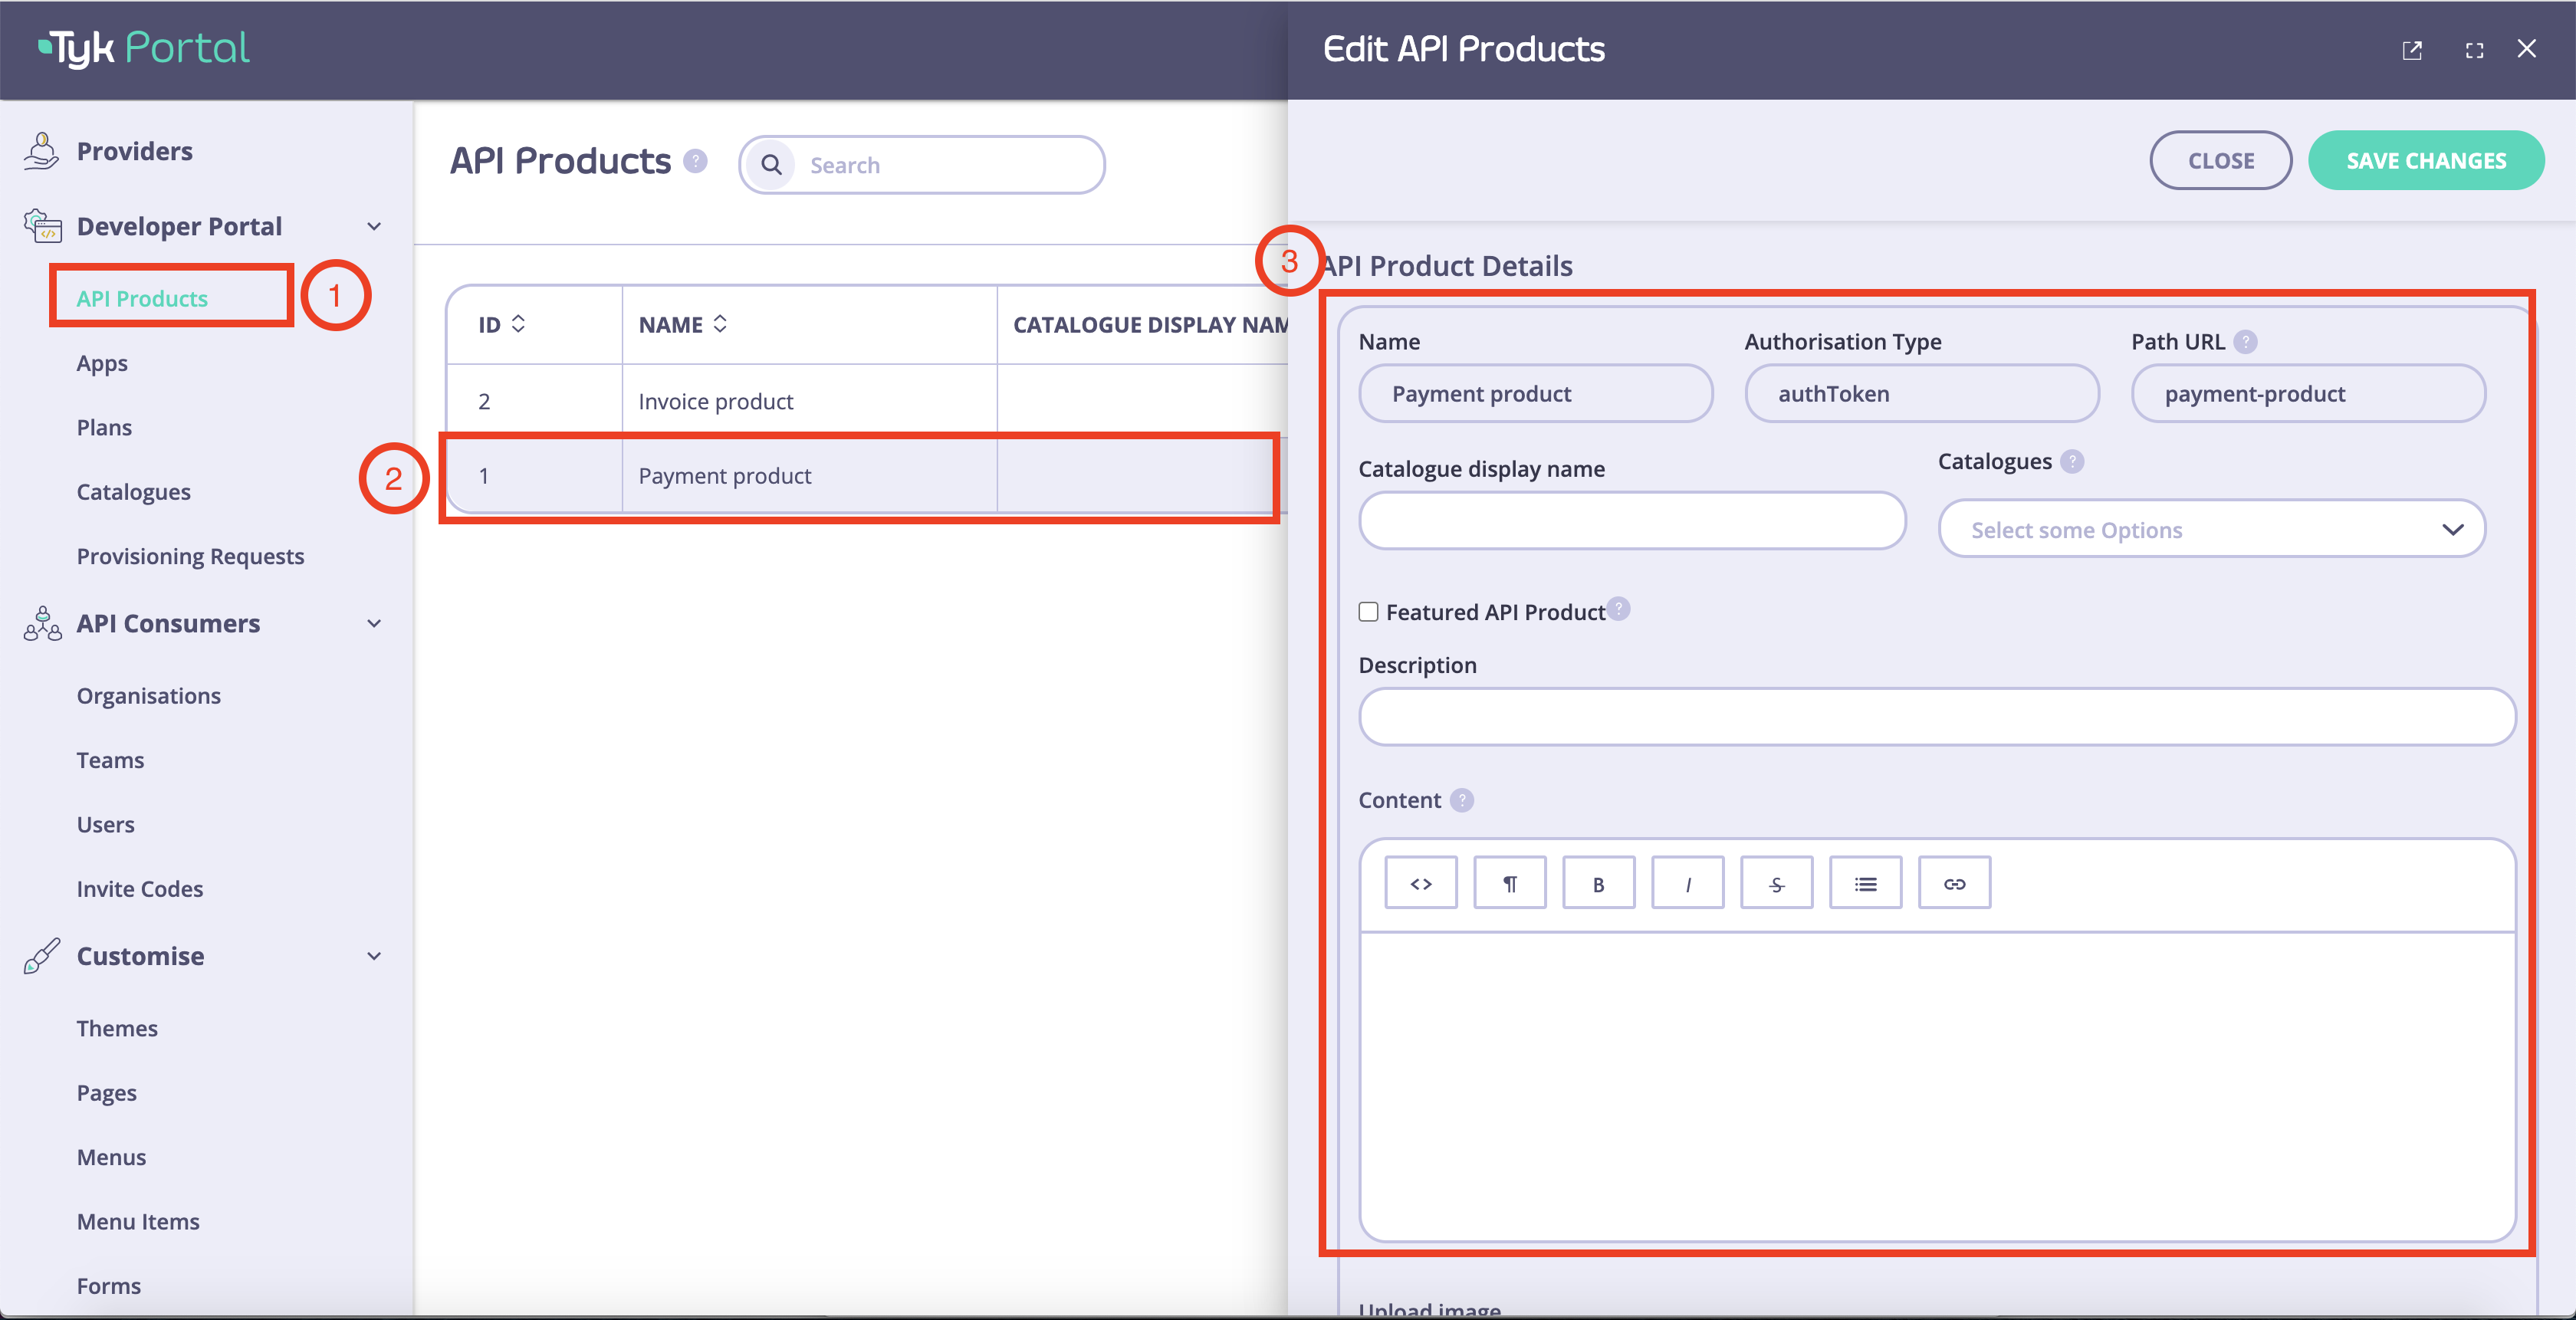 2. Edit the metadata as needed.
| Field | Description |
| :----------------------- | :------------------------------------------------------------------------------------------------------------------------------------------------------------------- |
| Catalog display name | This is the name that will be displayed in the external catalog. |
| Featured API Product | Tick this option if you want the API Product to appear on the homepage under “Featured products”. |
| Description | Short description about what this API Product is. |
| Content | This section appears on the API Product overview page, the rich text editor enables you to add more information about the API Product e.g. use cases, features, etc. |
| Image | An image can be added to the API Product. Supported formats are JPG and PNG. |
| Organization ID | The org id is required in order to connect to Tyk as a provider. It can be found in the user profile within the Tyk Dashboard. |
| Catalogs | Select an existing catalog that this product should be available from. |
| App registration configs | An experimental feature, it works only for oAuth2.0-enabled APIs |
| API resources | This section lists all APIs available within this product, you can add OAS documentation for each API. |
3. Select a catalog to publish the API product. If you want to create a custom catalog.
2. Edit the metadata as needed.
| Field | Description |
| :----------------------- | :------------------------------------------------------------------------------------------------------------------------------------------------------------------- |
| Catalog display name | This is the name that will be displayed in the external catalog. |
| Featured API Product | Tick this option if you want the API Product to appear on the homepage under “Featured products”. |
| Description | Short description about what this API Product is. |
| Content | This section appears on the API Product overview page, the rich text editor enables you to add more information about the API Product e.g. use cases, features, etc. |
| Image | An image can be added to the API Product. Supported formats are JPG and PNG. |
| Organization ID | The org id is required in order to connect to Tyk as a provider. It can be found in the user profile within the Tyk Dashboard. |
| Catalogs | Select an existing catalog that this product should be available from. |
| App registration configs | An experimental feature, it works only for oAuth2.0-enabled APIs |
| API resources | This section lists all APIs available within this product, you can add OAS documentation for each API. |
3. Select a catalog to publish the API product. If you want to create a custom catalog.
 4. Navigate to **Catalogs** to view the available catalog.
 s
### Publish a Plan
In order for developers to be able to request access to an API Product and retrieve credentials, a minimum of one plan needs to be available within the same catalog as the API Product.
Follow these steps below to knowhow to publish a plan:
1. From the **Plans** section, select a plan to open the details.
s
### Publish a Plan
In order for developers to be able to request access to an API Product and retrieve credentials, a minimum of one plan needs to be available within the same catalog as the API Product.
Follow these steps below to knowhow to publish a plan:
1. From the **Plans** section, select a plan to open the details.
 2. Edit the metadata as needed
| Field | Description |
| :-------------------------------- | :-------------------------------------------------------------------------------------------------------------------------------------------------------------------------------------- |
| Catalog display name | This is the name that will be displayed in the external catalog. |
| Plan allowance | This section describes what quota and limit is set for this plan. These values can be updated within the ‘policy section’ in the Tyk dashboard. |
| Catalogs | Select an existing catalog that this product should be available from. |
| Auto-approve provisioning request | Under plan settings, you can choose to select this option which means whenever an API-consumer requests access to an API product(s) using this plan, it will be approved automatically. |
| JWT Scope | An experimental feature, it works only for oAuth2.0 enabled APIs |
3. Click **Save changes**. The plan will now be available within selected catalog(s).
## Organization and Catalog
In the Tyk Enterprise Developer Portal, Organizations and Catalogs are used to segment the user base and make different APIs available to different user audiences according to the business model.
For example, assume the following scenario:
* Account Management API is available only to trusted partners
* Payment API is available to all developers
Subsequently, two catalogs can be created for these two APIs.
In the below example, an API Provider offers two API Products (the Accounts API and Payment API) with two plans (the Free plan and Enterprise plan) to their customers.
Customers subscribed to the enterprise plan can use both APIs, offering a higher user limit. Conversely, customers subscribed to the Free plan (individual developers or hobbyists) only have visibility of the Payment API.
To achieve that, the API Provider uses two catalogs to implement their business model so that they can offer different experiences for different customer audiences. This section explains how to achieve that using the Tyk Enterprise Developer Portal.
2. Edit the metadata as needed
| Field | Description |
| :-------------------------------- | :-------------------------------------------------------------------------------------------------------------------------------------------------------------------------------------- |
| Catalog display name | This is the name that will be displayed in the external catalog. |
| Plan allowance | This section describes what quota and limit is set for this plan. These values can be updated within the ‘policy section’ in the Tyk dashboard. |
| Catalogs | Select an existing catalog that this product should be available from. |
| Auto-approve provisioning request | Under plan settings, you can choose to select this option which means whenever an API-consumer requests access to an API product(s) using this plan, it will be approved automatically. |
| JWT Scope | An experimental feature, it works only for oAuth2.0 enabled APIs |
3. Click **Save changes**. The plan will now be available within selected catalog(s).
## Organization and Catalog
In the Tyk Enterprise Developer Portal, Organizations and Catalogs are used to segment the user base and make different APIs available to different user audiences according to the business model.
For example, assume the following scenario:
* Account Management API is available only to trusted partners
* Payment API is available to all developers
Subsequently, two catalogs can be created for these two APIs.
In the below example, an API Provider offers two API Products (the Accounts API and Payment API) with two plans (the Free plan and Enterprise plan) to their customers.
Customers subscribed to the enterprise plan can use both APIs, offering a higher user limit. Conversely, customers subscribed to the Free plan (individual developers or hobbyists) only have visibility of the Payment API.
To achieve that, the API Provider uses two catalogs to implement their business model so that they can offer different experiences for different customer audiences. This section explains how to achieve that using the Tyk Enterprise Developer Portal.
 ### Create Organization and Team
The Tyk Enterprise Developer Portal uses Organization and Catalogs to segment access to APIs and plans. Therefore, the first thing is to create an organization for your customers. If you don't want to provision organizations manually, you can leverage the [Admin APIs](/5.8/product-stack/tyk-enterprise-developer-portal/api-documentation/tyk-edp-api) or enable the [self-service organization registration](/5.8/tyk-stack/tyk-developer-portal/enterprise-developer-portal/managing-access/manage-api-consumer-organisations).
In this guide, we will create the **B2B customer** organization to fulfill the above business model:
1. To create an organization for the **B2B customer**, navigate to the **Organizations** menu and click on the **Add new organization** button.
### Create Organization and Team
The Tyk Enterprise Developer Portal uses Organization and Catalogs to segment access to APIs and plans. Therefore, the first thing is to create an organization for your customers. If you don't want to provision organizations manually, you can leverage the [Admin APIs](/5.8/product-stack/tyk-enterprise-developer-portal/api-documentation/tyk-edp-api) or enable the [self-service organization registration](/5.8/tyk-stack/tyk-developer-portal/enterprise-developer-portal/managing-access/manage-api-consumer-organisations).
In this guide, we will create the **B2B customer** organization to fulfill the above business model:
1. To create an organization for the **B2B customer**, navigate to the **Organizations** menu and click on the **Add new organization** button.
 2. Enter the name of your new organization and click on the **Save** button. A new default-team will be automatically created and associated with your new organization.
 2. To add a new catalog, click on the **Add new catalog** button. Then specify the name of the catalog and select its type: **Private** or **Public**.
Since the public catalog already exists, in this guide you need to create only an additional private catalog called **Enterprise catalog** for the **B2B customer** who will have extended access rights compared to other developers.
2. To add a new catalog, click on the **Add new catalog** button. Then specify the name of the catalog and select its type: **Private** or **Public**.
Since the public catalog already exists, in this guide you need to create only an additional private catalog called **Enterprise catalog** for the **B2B customer** who will have extended access rights compared to other developers.
 You can achieve the same result by navigating to the **API Products** menu. Adding an API Product to a catalog through the **Catalogs** and the **API Products** menus will produce the same result.
 2. Save changes by clicking on the **Save** button. You should now be able to preview how the API Product will be displayed in the catalog:
 2. Customize the plan's visual appearance as required and then click on the **Save** button. Now you can view the plan in the API Product page: