> ## Documentation Index
> Fetch the complete documentation index at: https://tyk.io/docs/llms.txt
> Use this file to discover all available pages before exploring further.
# SSO with Microsoft Entra ID
> Learn how to configure Single Sign-On (SSO) for Tyk Dashboard or Tyk Developer Portal using Microsoft Entra ID, via OpenID Connect or SAML.
## Introduction
[Microsoft Entra ID](https://www.microsoft.com/en-us/security/business/identity-access/microsoft-entra-id) (formerly Azure AD) supports both [OpenID Connect (OIDC)](/5.13/#sso-with-openid-connect) and [SAML 2.0](/5.13/#sso-with-saml).
* For most new deployments, OIDC is recommended as it is simpler to configure and is Microsoft's preferred modern authentication protocol.
* Use SAML if your organization requires it for policy or compatibility reasons.
Before configuring your IdP and TIB profile, read [Dashboard SSO](/5.13/tyk-identity-broker/dashboard-sso) or [Portal SSO](/5.13/tyk-stack/tyk-developer-portal/enterprise-developer-portal/managing-access/enable-sso) to understand the `ActionType`, `ReturnURL`, and `IdentityHandlerConfig` fields required for your use case.
This page covers the Entra ID-specific configuration only.
## SSO with OpenID Connect
### Configure Entra ID
1. In the Azure Portal, navigate to **Microsoft Entra ID** and select **App registrations**.
2. Select **New registration**. Give the application a name and register it.
3. From the app's **Overview** page, note the **Application (client) ID** and **Directory (tenant) ID**. You will need both for the TIB profile.
4. Navigate to **Certificates and secrets** and create a new **Client secret**. Copy the secret **Value** (not the Secret ID) immediately as it will not be shown again.
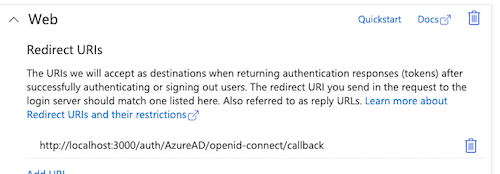
 5. Navigate to **Authentication** and add a **Redirect URI** of type **Web**. Set it to:
```
http://{tib-host}/auth/{profile-id}/openid-connect/callback
```
Replace `{tib-host}` with the hostname of your TIB instance and `{profile-id}` with the ID you will assign to the TIB profile.
5. Navigate to **Authentication** and add a **Redirect URI** of type **Web**. Set it to:
```
http://{tib-host}/auth/{profile-id}/openid-connect/callback
```
Replace `{tib-host}` with the hostname of your TIB instance and `{profile-id}` with the ID you will assign to the TIB profile.
 The Entra ID OIDC discovery URL for your tenant is:
```
https://login.microsoftonline.com/{tenant-id}/v2.0/.well-known/openid-configuration
```
### TIB Profile
The Entra ID-specific configuration goes in the `ProviderConfig` block of the TIB profile. Set `ProviderName` to `SocialProvider` and `Type` to `redirect`.
```json expandable theme={null}
{
"ProviderName": "SocialProvider",
"Type": "redirect",
"ProviderConfig": {
"CallbackBaseURL": "http://{tib-host}",
"FailureRedirect": "http://{failure-redirect-url}",
"UseProviders": [
{
"Name": "openid-connect",
"Key": "{entra-client-id}",
"Secret": "{entra-client-secret}",
"Scopes": ["openid", "email", "profile"],
"DiscoverURL": "https://login.microsoftonline.com/{tenant-id}/v2.0/.well-known/openid-configuration"
}
]
}
}
```
The Entra ID-specific `ProviderConfig` fields are:
| Field | Description |
| -------------------------- | ---------------------------------------------------------------------------------------------- |
| `CallbackBaseURL` | The base URL of your TIB instance. TIB appends the callback path automatically. |
| `FailureRedirect` | URL to redirect the user to on authentication failure. |
| `UseProviders.Name` | Must be `openid-connect`. This value routes TIB to the OpenID Connect provider implementation. |
| `UseProviders.Key` | The Entra ID Application (client) ID. |
| `UseProviders.Secret` | The Entra ID client secret value. |
| `UseProviders.Scopes` | OAuth scopes to request. `openid` and `email` are required. |
| `UseProviders.DiscoverURL` | The Entra ID OIDC discovery URL for your tenant. |
#### JSON Web Encryption (JWE)
If Entra ID is configured to encrypt ID tokens, TIB can decrypt them using JWE. Add a `JWE` block to `ProviderConfig` to enable this:
```json theme={null}
{
"ProviderConfig": {
"UseProviders": [...],
"JWE": {
"Enabled": true,
"PrivateKeyLocation": "{certificate-id-or-path}"
}
}
}
```
For embedded TIB in Tyk Dashboard, set `PrivateKeyLocation` to the certificate ID from the Tyk Dashboard certificate manager. For standalone TIB, set it to the file path of a PEM file containing the private key. The key must correspond to the public key registered with Entra ID for token encryption.
Requires Tyk Identity Broker v1.6.1+ and Tyk Dashboard v5.7.0+.
### Worked Examples (OIDC)
These examples use embedded TIB, so the `CallbackBaseURL` is the same as the Dashboard or Portal respectively; TIB handles requests on the same host and port.
In this example, Tyk Dashboard is running at `http://dashboard.example.com` on port `3000`; replace the example values with your own.
**Tyk Dashboard configuration**
```json theme={null}
{
"sso_enable_user_lookup": true,
"sso_permission_defaults": {
"apis": "write",
"keys": "write",
"policies": "write"
},
"sso_default_group_id": "{tyk-user-group-id}"
}
```
With this configuration, registered users (with a Tyk Dashboard user account) get their own permissions; unregistered users fall back to the group specified in `sso_default_group_id`. See [Dashboard SSO](/5.13/tyk-identity-broker/dashboard-sso) for full details.
**TIB profile**
The TIB profile is created via the [Tyk Identity Broker API](/5.13/tyk-identity-broker/tib-rest-api) or the [Tyk Dashboard UI](/5.13/tyk-identity-broker/dashboard-sso#create-a-tib-profile-using-dashboard-ui).
```json expandable theme={null}
{
"ID": "entra-dashboard-oidc",
"Name": "Entra ID Dashboard SSO (OIDC)",
"OrgID": "{tyk-org-id}",
"ActionType": "GenerateOrLoginUserProfile",
"Type": "redirect",
"ProviderName": "SocialProvider",
"ReturnURL": "http://dashboard.example.com:3000/tap",
"IdentityHandlerConfig": {
"DashboardCredential": "{tib-service-user-api-key}"
},
"ProviderConfig": {
"CallbackBaseURL": "http://dashboard.example.com:3000",
"FailureRedirect": "http://dashboard.example.com:3000/?fail=true",
"UseProviders": [
{
"Name": "openid-connect",
"Key": "{entra-client-id}",
"Secret": "{entra-client-secret}",
"Scopes": ["openid", "email", "profile"],
"DiscoverURL": "https://login.microsoftonline.com/{tenant-id}/v2.0/.well-known/openid-configuration"
}
]
}
}
```
* set `Key` to the Entra ID **Application (client) ID**
* set `Secret` to the Entra ID client secret **Value**
* set `DashboardCredential` to the [TIB service account's](/5.13/tyk-identity-broker/dashboard-sso#tib-service-account) Dashboard credentials
**Entra ID redirect URI**
Ensure the following URL is listed in your Entra ID app registration under **Authentication > Redirect URIs**. The `ID` in the registered URL must exactly match the `ID` in your TIB profile; a mismatch will result in a `400 Bad Request` error:
```
http://dashboard.example.com:3000/auth/entra-dashboard-oidc/openid-connect/callback
```
**Login URL**
This URL initiates the SSO login flow:
```
http://dashboard.example.com:3000/auth/entra-dashboard-oidc/openid-connect
```
In production, present this as a "Log in with Entra ID" button or link on a custom login page, rather than expecting users to navigate to it directly.
See [Dashboard SSO](/5.13/tyk-identity-broker/dashboard-sso) for details on session behavior, permissions, and user group mapping.
In this example, Tyk Developer Portal is running at `http://portal.example.com` on port `3001`; replace the example values with your own.
**Tyk Developer Portal configuration**
Enable embedded TIB in the Portal configuration:
```json theme={null}
{
"TIB": {
"Enable": true
}
}
```
**TIB profile**
The TIB profile is created via the Tyk Developer Portal UI under **Settings > SSO Profiles**.
```json expandable theme={null}
{
"ID": "entra-portal-oidc",
"Name": "Entra ID Portal SSO (OIDC)",
"OrgID": "{tyk-org-id}",
"ActionType": "GenerateOrLoginDeveloperProfile",
"Type": "redirect",
"ProviderName": "SocialProvider",
"ReturnURL": "http://portal.example.com:3001/sso",
"IdentityHandlerConfig": {
"DashboardCredential": "{portal-api-secret}"
},
"ProviderConfig": {
"CallbackBaseURL": "http://portal.example.com:3001",
"FailureRedirect": "http://portal.example.com:3001/?fail=true",
"UseProviders": [
{
"Name": "openid-connect",
"Key": "{entra-client-id}",
"Secret": "{entra-client-secret}",
"Scopes": ["openid", "email", "profile"],
"DiscoverURL": "https://login.microsoftonline.com/{tenant-id}/v2.0/.well-known/openid-configuration"
}
]
}
}
```
* set `ActionType` and `OrgID` based on the audience:
* Admin Portal (API owners): `ActionType: "GenerateOrLoginUserProfile"`, `OrgID: "0"`
* Live Portal (API consumers): `ActionType: "GenerateOrLoginDeveloperProfile"`, `OrgID` is not required
* set `Key` to the Entra ID **Application (client) ID**
* set `Secret` to the Entra ID client secret **Value**
* set `DashboardCredential` to the [PORTAL\_API\_SECRET](/5.13/product-stack/tyk-enterprise-developer-portal/deploy/configuration#portal_api_secret) used to authenticate with the Portal's management API
**Entra ID redirect URI**
Ensure the following URL is listed in your Entra ID app registration under **Authentication > Redirect URIs**. The `ID` in the registered URL must exactly match the `ID` in your TIB profile; a mismatch will result in a `400 Bad Request` error:
```
http://portal.example.com:3001/auth/entra-portal-oidc/openid-connect/callback
```
**Login URL**
This URL initiates the SSO login flow:
```
http://portal.example.com:3001/auth/entra-portal-oidc/openid-connect
```
In production, present this as a "Log in with Entra ID" button or link on the Portal login page.
For details on user group mapping and admin vs developer profiles, see [Portal SSO](/5.13/tyk-stack/tyk-developer-portal/enterprise-developer-portal/managing-access/enable-sso).
## SSO with SAML
### Configure Entra ID
1. In the Azure Portal, navigate to **Microsoft Entra ID** and select **Enterprise applications**.
2. Select **New application** and then **Create your own application**. Give it a name and select **Integrate any other application you don't find in the gallery**.
3. Navigate to **Single sign-on** and select **SAML**.
4. TIB exposes a SAML Service Provider (SP) metadata endpoint for each profile. For embedded TIB, this is on the same host as the Tyk Dashboard (or Developer Portal), for example:
```
http://dashboard.example.com:3000/auth/{profile-id}/saml/metadata
```
You can use this URL to configure Entra ID automatically, or manually set the **Entity ID** and **Reply URL (ACS URL)**. The ACS URL is:
```
http://dashboard.example.com:3000/auth/{profile-id}/saml/callback
```
5. From the **SAML Certificates** section, copy the **App Federation Metadata URL**. You will need this for the TIB profile `IDPMetadataURL` field.
6. Under **Attributes and Claims**, ensure the email claim is mapped. By default Entra ID maps email to `http://schemas.xmlsoap.org/ws/2005/05/identity/claims/emailaddress`.
### TIB Profile
The Entra ID-specific configuration goes in the `ProviderConfig` block of the TIB profile. Set `ProviderName` to `SAMLProvider` and `Type` to `redirect`.
```json expandable theme={null}
{
"ProviderName": "SAMLProvider",
"Type": "redirect",
"ProviderConfig": {
"SAMLBaseURL": "http://{tib-host}",
"IDPMetadataURL": "https://login.microsoftonline.com/{tenant-id}/federationmetadata/2007-06/federationmetadata.xml",
"CertLocation": "/path/to/sp-cert-and-key.pem",
"FailureRedirect": "http://{failure-redirect-url}",
"SAMLEmailClaim": "http://schemas.xmlsoap.org/ws/2005/05/identity/claims/emailaddress",
"SAMLForenameClaim": "http://schemas.xmlsoap.org/ws/2005/05/identity/claims/givenname",
"SAMLSurnameClaim": "http://schemas.xmlsoap.org/ws/2005/05/identity/claims/surname",
"ForceAuthentication": false
}
}
```
The Entra ID-specific `ProviderConfig` fields are:
| Field | Description |
| --------------------- | --------------------------------------------------------------------------------------------------------------------------------------------------------------------------------------- |
| `SAMLBaseURL` | The base URL of your TIB instance. Used to construct the SP metadata and ACS URLs. |
| `IDPMetadataURL` | The Entra ID federation metadata URL for your tenant. |
| `CertLocation` | Path to a PEM file containing the SP certificate and private key concatenated. When using Tyk Dashboard with embedded TIB, this can be a certificate ID from the Tyk Certificate Store. |
| `SAMLEmailClaim` | The SAML claim name for the user's email address. |
| `SAMLForenameClaim` | The SAML claim name for the user's first name. |
| `SAMLSurnameClaim` | The SAML claim name for the user's last name. |
| `ForceAuthentication` | Set to `true` to force Entra ID to re-authenticate the user on every request, ignoring any existing session. |
### Worked Examples (SAML)
These examples use embedded TIB, so `SAMLBaseURL` is the same as the Dashboard or Portal respectively. TIB handles requests on the same host and port.
In this example, Tyk Dashboard is running at `http://dashboard.example.com` on port `3000`; replace the example values with your own.
**Tyk Dashboard configuration**
```json theme={null}
{
"sso_enable_user_lookup": true,
"sso_permission_defaults": {
"apis": "write",
"keys": "write",
"policies": "write"
},
"sso_default_group_id": "{tyk-user-group-id}"
}
```
With this configuration, registered users (with a Tyk Dashboard user account) get their own permissions; unregistered users fall back to the group specified in `sso_default_group_id`. See [Dashboard SSO](/5.13/tyk-identity-broker/dashboard-sso) for full details.
**Certificate**
Upload the Service Provider certificate pair that will be used to sign SAML requests to the Tyk Certificate Store (**API Security > TLS/SSL Certificates**), noting the assigned certificate ID to be used in the TIB profile.
**TIB profile**
The TIB profile is created via the [Tyk Identity Broker API](/5.13/tyk-identity-broker/tib-rest-api) or the [Tyk Dashboard UI](/5.13/tyk-identity-broker/dashboard-sso#create-a-tib-profile-using-dashboard-ui).
```json expandable theme={null}
{
"ID": "entra-dashboard-saml",
"Name": "Entra ID Dashboard SSO (SAML)",
"OrgID": "{tyk-org-id}",
"ActionType": "GenerateOrLoginUserProfile",
"Type": "redirect",
"ProviderName": "SAMLProvider",
"ReturnURL": "http://dashboard.example.com:3000/tap",
"IdentityHandlerConfig": {
"DashboardCredential": "{tib-service-user-api-key}"
},
"ProviderConfig": {
"SAMLBaseURL": "http://dashboard.example.com:3000",
"IDPMetadataURL": "https://login.microsoftonline.com/{tenant-id}/federationmetadata/2007-06/federationmetadata.xml",
"CertLocation": "{certificate-id-from-dashboard}",
"FailureRedirect": "http://dashboard.example.com:3000/?fail=true",
"SAMLEmailClaim": "http://schemas.xmlsoap.org/ws/2005/05/identity/claims/emailaddress",
"SAMLForenameClaim": "http://schemas.xmlsoap.org/ws/2005/05/identity/claims/givenname",
"SAMLSurnameClaim": "http://schemas.xmlsoap.org/ws/2005/05/identity/claims/surname",
"ForceAuthentication": false
}
}
```
* set `DashboardCredential` to the [TIB service account's](/5.13/tyk-identity-broker/dashboard-sso#tib-service-account) Dashboard credentials
* set `CertLocation` to the certificate ID for the SAML SP certificate
**Login URL**
This URL initiates the SSO login flow:
```
http://dashboard.example.com:3000/auth/entra-dashboard-saml/saml
```
In production, present this as a "Log in with Entra ID" button or link on a custom login page, rather than expecting users to navigate to it directly.
See [Dashboard SSO](/5.13/tyk-identity-broker/dashboard-sso) for details on session behavior, permissions, and user group mapping.
In this example, Tyk Developer Portal is running at `http://portal.example.com` on port `3001`; replace the example values with your own.
**Tyk Developer Portal configuration**
Enable embedded TIB in the Portal configuration:
```json theme={null}
{
"TIB": {
"Enable": true
}
}
```
**Certificate**
Unlike the Dashboard, the Portal's embedded TIB loads certificates from the filesystem rather than from a certificate store. Set `CertLocation` to the file path of a PEM file containing the SP certificate and private key concatenated, accessible on the server running the Portal.
**TIB profile**
The TIB profile is created via the Tyk Developer Portal UI under **Settings > SSO Profiles**.
```json expandable theme={null}
{
"ID": "entra-portal-saml",
"Name": "Entra ID Portal SSO (SAML)",
"OrgID": "{tyk-org-id}",
"ActionType": "GenerateOrLoginDeveloperProfile",
"Type": "redirect",
"ProviderName": "SAMLProvider",
"ReturnURL": "http://portal.example.com:3001/sso",
"IdentityHandlerConfig": {
"DashboardCredential": "{portal-api-secret}"
},
"ProviderConfig": {
"SAMLBaseURL": "http://portal.example.com:3001",
"IDPMetadataURL": "https://login.microsoftonline.com/{tenant-id}/federationmetadata/2007-06/federationmetadata.xml",
"CertLocation": "/path/to/sp-cert-and-key.pem",
"FailureRedirect": "http://portal.example.com:3001/?fail=true",
"SAMLEmailClaim": "http://schemas.xmlsoap.org/ws/2005/05/identity/claims/emailaddress",
"SAMLForenameClaim": "http://schemas.xmlsoap.org/ws/2005/05/identity/claims/givenname",
"SAMLSurnameClaim": "http://schemas.xmlsoap.org/ws/2005/05/identity/claims/surname",
"ForceAuthentication": false
}
}
```
* set `ActionType` and `OrgID` based on the audience:
* Admin Portal (API owners): `ActionType: "GenerateOrLoginUserProfile"`, `OrgID: "0"`
* Live Portal (API consumers): `ActionType: "GenerateOrLoginDeveloperProfile"`, `OrgID` is not required
* set `CertLocation` to the file path of the SP certificate PEM file on the Portal server
* set `DashboardCredential` to the [PORTAL\_API\_SECRET](/5.13/product-stack/tyk-enterprise-developer-portal/deploy/configuration#portal_api_secret) used to authenticate with the Portal's management API
**Login URL**
This URL initiates the SSO login flow:
```
http://portal.example.com:3001/auth/entra-portal-saml/saml
```
In production, present this as a "Log in with Entra ID" button or link on the Portal login page.
For details on user group mapping and admin vs developer profiles, see [Portal SSO](/5.13/tyk-stack/tyk-developer-portal/enterprise-developer-portal/managing-access/enable-sso).
## Active Directory Federation Services (ADFS)
Active Directory Federation Services (ADFS) is Microsoft's on-premises federation service. It uses the same SAML 2.0 protocol as Entra ID. Follow the [SSO with SAML](/5.13/#sso-with-saml) instructions above, with the following differences:
**Configure ADFS (replaces "Configure Entra ID")**
Instead of configuring an Enterprise Application in the Azure Portal, configure a Relying Party Trust in the ADFS management console. Provide the TIB SP metadata URL to configure the trust automatically:
```
http://{tib-host}/auth/{profile-id}/saml/metadata
```
**TIB profile differences**
* `IDPMetadataURL` - use the ADFS federation metadata endpoint instead:
```
https://{adfs-host}/FederationMetadata/2007-06/FederationMetadata.xml
```
* `SAMLEmailClaim`, `SAMLForenameClaim`, `SAMLSurnameClaim` - ADFS claim URIs depend on your claim issuance policy and may differ from the Entra ID defaults. Check the claims configured in your ADFS Relying Party Trust and update these values accordingly.
All other profile fields, worked examples, and login URL patterns are identical to the SAML section above.
The Entra ID OIDC discovery URL for your tenant is:
```
https://login.microsoftonline.com/{tenant-id}/v2.0/.well-known/openid-configuration
```
### TIB Profile
The Entra ID-specific configuration goes in the `ProviderConfig` block of the TIB profile. Set `ProviderName` to `SocialProvider` and `Type` to `redirect`.
```json expandable theme={null}
{
"ProviderName": "SocialProvider",
"Type": "redirect",
"ProviderConfig": {
"CallbackBaseURL": "http://{tib-host}",
"FailureRedirect": "http://{failure-redirect-url}",
"UseProviders": [
{
"Name": "openid-connect",
"Key": "{entra-client-id}",
"Secret": "{entra-client-secret}",
"Scopes": ["openid", "email", "profile"],
"DiscoverURL": "https://login.microsoftonline.com/{tenant-id}/v2.0/.well-known/openid-configuration"
}
]
}
}
```
The Entra ID-specific `ProviderConfig` fields are:
| Field | Description |
| -------------------------- | ---------------------------------------------------------------------------------------------- |
| `CallbackBaseURL` | The base URL of your TIB instance. TIB appends the callback path automatically. |
| `FailureRedirect` | URL to redirect the user to on authentication failure. |
| `UseProviders.Name` | Must be `openid-connect`. This value routes TIB to the OpenID Connect provider implementation. |
| `UseProviders.Key` | The Entra ID Application (client) ID. |
| `UseProviders.Secret` | The Entra ID client secret value. |
| `UseProviders.Scopes` | OAuth scopes to request. `openid` and `email` are required. |
| `UseProviders.DiscoverURL` | The Entra ID OIDC discovery URL for your tenant. |
#### JSON Web Encryption (JWE)
If Entra ID is configured to encrypt ID tokens, TIB can decrypt them using JWE. Add a `JWE` block to `ProviderConfig` to enable this:
```json theme={null}
{
"ProviderConfig": {
"UseProviders": [...],
"JWE": {
"Enabled": true,
"PrivateKeyLocation": "{certificate-id-or-path}"
}
}
}
```
For embedded TIB in Tyk Dashboard, set `PrivateKeyLocation` to the certificate ID from the Tyk Dashboard certificate manager. For standalone TIB, set it to the file path of a PEM file containing the private key. The key must correspond to the public key registered with Entra ID for token encryption.
Requires Tyk Identity Broker v1.6.1+ and Tyk Dashboard v5.7.0+.
### Worked Examples (OIDC)
These examples use embedded TIB, so the `CallbackBaseURL` is the same as the Dashboard or Portal respectively; TIB handles requests on the same host and port.
In this example, Tyk Dashboard is running at `http://dashboard.example.com` on port `3000`; replace the example values with your own.
**Tyk Dashboard configuration**
```json theme={null}
{
"sso_enable_user_lookup": true,
"sso_permission_defaults": {
"apis": "write",
"keys": "write",
"policies": "write"
},
"sso_default_group_id": "{tyk-user-group-id}"
}
```
With this configuration, registered users (with a Tyk Dashboard user account) get their own permissions; unregistered users fall back to the group specified in `sso_default_group_id`. See [Dashboard SSO](/5.13/tyk-identity-broker/dashboard-sso) for full details.
**TIB profile**
The TIB profile is created via the [Tyk Identity Broker API](/5.13/tyk-identity-broker/tib-rest-api) or the [Tyk Dashboard UI](/5.13/tyk-identity-broker/dashboard-sso#create-a-tib-profile-using-dashboard-ui).
```json expandable theme={null}
{
"ID": "entra-dashboard-oidc",
"Name": "Entra ID Dashboard SSO (OIDC)",
"OrgID": "{tyk-org-id}",
"ActionType": "GenerateOrLoginUserProfile",
"Type": "redirect",
"ProviderName": "SocialProvider",
"ReturnURL": "http://dashboard.example.com:3000/tap",
"IdentityHandlerConfig": {
"DashboardCredential": "{tib-service-user-api-key}"
},
"ProviderConfig": {
"CallbackBaseURL": "http://dashboard.example.com:3000",
"FailureRedirect": "http://dashboard.example.com:3000/?fail=true",
"UseProviders": [
{
"Name": "openid-connect",
"Key": "{entra-client-id}",
"Secret": "{entra-client-secret}",
"Scopes": ["openid", "email", "profile"],
"DiscoverURL": "https://login.microsoftonline.com/{tenant-id}/v2.0/.well-known/openid-configuration"
}
]
}
}
```
* set `Key` to the Entra ID **Application (client) ID**
* set `Secret` to the Entra ID client secret **Value**
* set `DashboardCredential` to the [TIB service account's](/5.13/tyk-identity-broker/dashboard-sso#tib-service-account) Dashboard credentials
**Entra ID redirect URI**
Ensure the following URL is listed in your Entra ID app registration under **Authentication > Redirect URIs**. The `ID` in the registered URL must exactly match the `ID` in your TIB profile; a mismatch will result in a `400 Bad Request` error:
```
http://dashboard.example.com:3000/auth/entra-dashboard-oidc/openid-connect/callback
```
**Login URL**
This URL initiates the SSO login flow:
```
http://dashboard.example.com:3000/auth/entra-dashboard-oidc/openid-connect
```
In production, present this as a "Log in with Entra ID" button or link on a custom login page, rather than expecting users to navigate to it directly.
See [Dashboard SSO](/5.13/tyk-identity-broker/dashboard-sso) for details on session behavior, permissions, and user group mapping.
In this example, Tyk Developer Portal is running at `http://portal.example.com` on port `3001`; replace the example values with your own.
**Tyk Developer Portal configuration**
Enable embedded TIB in the Portal configuration:
```json theme={null}
{
"TIB": {
"Enable": true
}
}
```
**TIB profile**
The TIB profile is created via the Tyk Developer Portal UI under **Settings > SSO Profiles**.
```json expandable theme={null}
{
"ID": "entra-portal-oidc",
"Name": "Entra ID Portal SSO (OIDC)",
"OrgID": "{tyk-org-id}",
"ActionType": "GenerateOrLoginDeveloperProfile",
"Type": "redirect",
"ProviderName": "SocialProvider",
"ReturnURL": "http://portal.example.com:3001/sso",
"IdentityHandlerConfig": {
"DashboardCredential": "{portal-api-secret}"
},
"ProviderConfig": {
"CallbackBaseURL": "http://portal.example.com:3001",
"FailureRedirect": "http://portal.example.com:3001/?fail=true",
"UseProviders": [
{
"Name": "openid-connect",
"Key": "{entra-client-id}",
"Secret": "{entra-client-secret}",
"Scopes": ["openid", "email", "profile"],
"DiscoverURL": "https://login.microsoftonline.com/{tenant-id}/v2.0/.well-known/openid-configuration"
}
]
}
}
```
* set `ActionType` and `OrgID` based on the audience:
* Admin Portal (API owners): `ActionType: "GenerateOrLoginUserProfile"`, `OrgID: "0"`
* Live Portal (API consumers): `ActionType: "GenerateOrLoginDeveloperProfile"`, `OrgID` is not required
* set `Key` to the Entra ID **Application (client) ID**
* set `Secret` to the Entra ID client secret **Value**
* set `DashboardCredential` to the [PORTAL\_API\_SECRET](/5.13/product-stack/tyk-enterprise-developer-portal/deploy/configuration#portal_api_secret) used to authenticate with the Portal's management API
**Entra ID redirect URI**
Ensure the following URL is listed in your Entra ID app registration under **Authentication > Redirect URIs**. The `ID` in the registered URL must exactly match the `ID` in your TIB profile; a mismatch will result in a `400 Bad Request` error:
```
http://portal.example.com:3001/auth/entra-portal-oidc/openid-connect/callback
```
**Login URL**
This URL initiates the SSO login flow:
```
http://portal.example.com:3001/auth/entra-portal-oidc/openid-connect
```
In production, present this as a "Log in with Entra ID" button or link on the Portal login page.
For details on user group mapping and admin vs developer profiles, see [Portal SSO](/5.13/tyk-stack/tyk-developer-portal/enterprise-developer-portal/managing-access/enable-sso).
## SSO with SAML
### Configure Entra ID
1. In the Azure Portal, navigate to **Microsoft Entra ID** and select **Enterprise applications**.
2. Select **New application** and then **Create your own application**. Give it a name and select **Integrate any other application you don't find in the gallery**.
3. Navigate to **Single sign-on** and select **SAML**.
4. TIB exposes a SAML Service Provider (SP) metadata endpoint for each profile. For embedded TIB, this is on the same host as the Tyk Dashboard (or Developer Portal), for example:
```
http://dashboard.example.com:3000/auth/{profile-id}/saml/metadata
```
You can use this URL to configure Entra ID automatically, or manually set the **Entity ID** and **Reply URL (ACS URL)**. The ACS URL is:
```
http://dashboard.example.com:3000/auth/{profile-id}/saml/callback
```
5. From the **SAML Certificates** section, copy the **App Federation Metadata URL**. You will need this for the TIB profile `IDPMetadataURL` field.
6. Under **Attributes and Claims**, ensure the email claim is mapped. By default Entra ID maps email to `http://schemas.xmlsoap.org/ws/2005/05/identity/claims/emailaddress`.
### TIB Profile
The Entra ID-specific configuration goes in the `ProviderConfig` block of the TIB profile. Set `ProviderName` to `SAMLProvider` and `Type` to `redirect`.
```json expandable theme={null}
{
"ProviderName": "SAMLProvider",
"Type": "redirect",
"ProviderConfig": {
"SAMLBaseURL": "http://{tib-host}",
"IDPMetadataURL": "https://login.microsoftonline.com/{tenant-id}/federationmetadata/2007-06/federationmetadata.xml",
"CertLocation": "/path/to/sp-cert-and-key.pem",
"FailureRedirect": "http://{failure-redirect-url}",
"SAMLEmailClaim": "http://schemas.xmlsoap.org/ws/2005/05/identity/claims/emailaddress",
"SAMLForenameClaim": "http://schemas.xmlsoap.org/ws/2005/05/identity/claims/givenname",
"SAMLSurnameClaim": "http://schemas.xmlsoap.org/ws/2005/05/identity/claims/surname",
"ForceAuthentication": false
}
}
```
The Entra ID-specific `ProviderConfig` fields are:
| Field | Description |
| --------------------- | --------------------------------------------------------------------------------------------------------------------------------------------------------------------------------------- |
| `SAMLBaseURL` | The base URL of your TIB instance. Used to construct the SP metadata and ACS URLs. |
| `IDPMetadataURL` | The Entra ID federation metadata URL for your tenant. |
| `CertLocation` | Path to a PEM file containing the SP certificate and private key concatenated. When using Tyk Dashboard with embedded TIB, this can be a certificate ID from the Tyk Certificate Store. |
| `SAMLEmailClaim` | The SAML claim name for the user's email address. |
| `SAMLForenameClaim` | The SAML claim name for the user's first name. |
| `SAMLSurnameClaim` | The SAML claim name for the user's last name. |
| `ForceAuthentication` | Set to `true` to force Entra ID to re-authenticate the user on every request, ignoring any existing session. |
### Worked Examples (SAML)
These examples use embedded TIB, so `SAMLBaseURL` is the same as the Dashboard or Portal respectively. TIB handles requests on the same host and port.
In this example, Tyk Dashboard is running at `http://dashboard.example.com` on port `3000`; replace the example values with your own.
**Tyk Dashboard configuration**
```json theme={null}
{
"sso_enable_user_lookup": true,
"sso_permission_defaults": {
"apis": "write",
"keys": "write",
"policies": "write"
},
"sso_default_group_id": "{tyk-user-group-id}"
}
```
With this configuration, registered users (with a Tyk Dashboard user account) get their own permissions; unregistered users fall back to the group specified in `sso_default_group_id`. See [Dashboard SSO](/5.13/tyk-identity-broker/dashboard-sso) for full details.
**Certificate**
Upload the Service Provider certificate pair that will be used to sign SAML requests to the Tyk Certificate Store (**API Security > TLS/SSL Certificates**), noting the assigned certificate ID to be used in the TIB profile.
**TIB profile**
The TIB profile is created via the [Tyk Identity Broker API](/5.13/tyk-identity-broker/tib-rest-api) or the [Tyk Dashboard UI](/5.13/tyk-identity-broker/dashboard-sso#create-a-tib-profile-using-dashboard-ui).
```json expandable theme={null}
{
"ID": "entra-dashboard-saml",
"Name": "Entra ID Dashboard SSO (SAML)",
"OrgID": "{tyk-org-id}",
"ActionType": "GenerateOrLoginUserProfile",
"Type": "redirect",
"ProviderName": "SAMLProvider",
"ReturnURL": "http://dashboard.example.com:3000/tap",
"IdentityHandlerConfig": {
"DashboardCredential": "{tib-service-user-api-key}"
},
"ProviderConfig": {
"SAMLBaseURL": "http://dashboard.example.com:3000",
"IDPMetadataURL": "https://login.microsoftonline.com/{tenant-id}/federationmetadata/2007-06/federationmetadata.xml",
"CertLocation": "{certificate-id-from-dashboard}",
"FailureRedirect": "http://dashboard.example.com:3000/?fail=true",
"SAMLEmailClaim": "http://schemas.xmlsoap.org/ws/2005/05/identity/claims/emailaddress",
"SAMLForenameClaim": "http://schemas.xmlsoap.org/ws/2005/05/identity/claims/givenname",
"SAMLSurnameClaim": "http://schemas.xmlsoap.org/ws/2005/05/identity/claims/surname",
"ForceAuthentication": false
}
}
```
* set `DashboardCredential` to the [TIB service account's](/5.13/tyk-identity-broker/dashboard-sso#tib-service-account) Dashboard credentials
* set `CertLocation` to the certificate ID for the SAML SP certificate
**Login URL**
This URL initiates the SSO login flow:
```
http://dashboard.example.com:3000/auth/entra-dashboard-saml/saml
```
In production, present this as a "Log in with Entra ID" button or link on a custom login page, rather than expecting users to navigate to it directly.
See [Dashboard SSO](/5.13/tyk-identity-broker/dashboard-sso) for details on session behavior, permissions, and user group mapping.
In this example, Tyk Developer Portal is running at `http://portal.example.com` on port `3001`; replace the example values with your own.
**Tyk Developer Portal configuration**
Enable embedded TIB in the Portal configuration:
```json theme={null}
{
"TIB": {
"Enable": true
}
}
```
**Certificate**
Unlike the Dashboard, the Portal's embedded TIB loads certificates from the filesystem rather than from a certificate store. Set `CertLocation` to the file path of a PEM file containing the SP certificate and private key concatenated, accessible on the server running the Portal.
**TIB profile**
The TIB profile is created via the Tyk Developer Portal UI under **Settings > SSO Profiles**.
```json expandable theme={null}
{
"ID": "entra-portal-saml",
"Name": "Entra ID Portal SSO (SAML)",
"OrgID": "{tyk-org-id}",
"ActionType": "GenerateOrLoginDeveloperProfile",
"Type": "redirect",
"ProviderName": "SAMLProvider",
"ReturnURL": "http://portal.example.com:3001/sso",
"IdentityHandlerConfig": {
"DashboardCredential": "{portal-api-secret}"
},
"ProviderConfig": {
"SAMLBaseURL": "http://portal.example.com:3001",
"IDPMetadataURL": "https://login.microsoftonline.com/{tenant-id}/federationmetadata/2007-06/federationmetadata.xml",
"CertLocation": "/path/to/sp-cert-and-key.pem",
"FailureRedirect": "http://portal.example.com:3001/?fail=true",
"SAMLEmailClaim": "http://schemas.xmlsoap.org/ws/2005/05/identity/claims/emailaddress",
"SAMLForenameClaim": "http://schemas.xmlsoap.org/ws/2005/05/identity/claims/givenname",
"SAMLSurnameClaim": "http://schemas.xmlsoap.org/ws/2005/05/identity/claims/surname",
"ForceAuthentication": false
}
}
```
* set `ActionType` and `OrgID` based on the audience:
* Admin Portal (API owners): `ActionType: "GenerateOrLoginUserProfile"`, `OrgID: "0"`
* Live Portal (API consumers): `ActionType: "GenerateOrLoginDeveloperProfile"`, `OrgID` is not required
* set `CertLocation` to the file path of the SP certificate PEM file on the Portal server
* set `DashboardCredential` to the [PORTAL\_API\_SECRET](/5.13/product-stack/tyk-enterprise-developer-portal/deploy/configuration#portal_api_secret) used to authenticate with the Portal's management API
**Login URL**
This URL initiates the SSO login flow:
```
http://portal.example.com:3001/auth/entra-portal-saml/saml
```
In production, present this as a "Log in with Entra ID" button or link on the Portal login page.
For details on user group mapping and admin vs developer profiles, see [Portal SSO](/5.13/tyk-stack/tyk-developer-portal/enterprise-developer-portal/managing-access/enable-sso).
## Active Directory Federation Services (ADFS)
Active Directory Federation Services (ADFS) is Microsoft's on-premises federation service. It uses the same SAML 2.0 protocol as Entra ID. Follow the [SSO with SAML](/5.13/#sso-with-saml) instructions above, with the following differences:
**Configure ADFS (replaces "Configure Entra ID")**
Instead of configuring an Enterprise Application in the Azure Portal, configure a Relying Party Trust in the ADFS management console. Provide the TIB SP metadata URL to configure the trust automatically:
```
http://{tib-host}/auth/{profile-id}/saml/metadata
```
**TIB profile differences**
* `IDPMetadataURL` - use the ADFS federation metadata endpoint instead:
```
https://{adfs-host}/FederationMetadata/2007-06/FederationMetadata.xml
```
* `SAMLEmailClaim`, `SAMLForenameClaim`, `SAMLSurnameClaim` - ADFS claim URIs depend on your claim issuance policy and may differ from the Entra ID defaults. Check the claims configured in your ADFS Relying Party Trust and update these values accordingly.
All other profile fields, worked examples, and login URL patterns are identical to the SAML section above.