> ## Documentation Index
> Fetch the complete documentation index at: https://tyk.io/docs/llms.txt
> Use this file to discover all available pages before exploring further.
# Enable single sign on for admin users and developers
> Learn how to enable single sign on for admin users and developers in the Developer Portal.
## Introduction
Single sign-on (SSO) enables users to access multiple applications using one set of login credentials,
reducing the burden of password management and improving security. SSO is relevant for businesses of all sizes,
streamlining access control and improving user experience. Regardless of your organization's size, implementing SSO can enhance security,
simplify access to enterprise resources, and strengthen user satisfaction.
In this section, you'll learn how to enable single sign-on for admin users and developers in the Tyk Enterprise Developer portal with 3rd party identity providers (IDPs).
**Prerequisites**
* A Tyk Enterprise portal installation
* [Supported](https://github.com/TykTechnologies/tyk-identity-broker#using-identity-providers) 3rd party identity provider up and running
## Portal SSO Configuration Options
Tyk Enterprise Developer Portal uses the [Tyk Identity Broker (TIB)](/5.12/api-management/external-service-integration#what-is-tyk-identity-broker-tib-) to integrate Tyk authentication with 3rd party identity providers (IDPs).
From portal version 1.12.0, TIB is embedded in the portal. With this, you have two options to configure SSO in the portal:
1. **[Using Embedded TIB](/5.12/#configuring-sso-with-embedded-tib)**: No need to install it separately.
2. **[Using External TIB](/5.12/#configuring-sso-with-external-tib)**: If you are using a previous version of the portal, you can still use SSO with TIB installed as a separate application.
## Configuring SSO with Embedded TIB
Configuring SSO with Embedded TIB is a four-step process:
1. **[Enabling Embedded TIB](/5.12/#enabling-embedded-tib)**
2. **[Understanding UserGroup Mapping](/5.12/#understanding-usergroup-mapping)**
3. **[Creating TIB Profile](/5.12/#creating-tib-profile)**
4. **[Testing SSO](/5.12/#testing-sso)**
### Enabling Embedded TIB
To enable Embedded TIB in the portal, add the `PORTAL_TIB_ENABLED` variable to [the portal .env file](/5.12/product-stack/tyk-enterprise-developer-portal/deploy/configuration#sample-env-file):
```.ini theme={null}
PORTAL_TIB_ENABLED=true
```
The Tyk Enterprise Developer Portal embedded TIB only supports OIDC, LDAP or Social SSO providers.
### Understanding UserGroup Mapping
The Tyk Enterprise Developer portal has two audiences:
1. **Developers**:
Developers created by the sso flow are portal users that belong to an organization and team/s, if a user group mapping is not specified, they are assigned to the default organization and default team. Developers created by the sso flow are always assinged the **Consumer Super Admin** role. If part of an organization and a team, this means that the developer is a super admin for that organization. Read more about managing api consumer organizations [here](/5.12/tyk-stack/tyk-developer-portal/enterprise-developer-portal/managing-access/manage-api-consumer-organisations).
2. **Admins**:
Admins created by the SSO flow are portal users who do not belong to any organization (OrgID is 0) and are assigned the **Provider Admin** role.
TIB uses **user group mapping** to map the user groups from the identity provider to the portal teams within an organization.
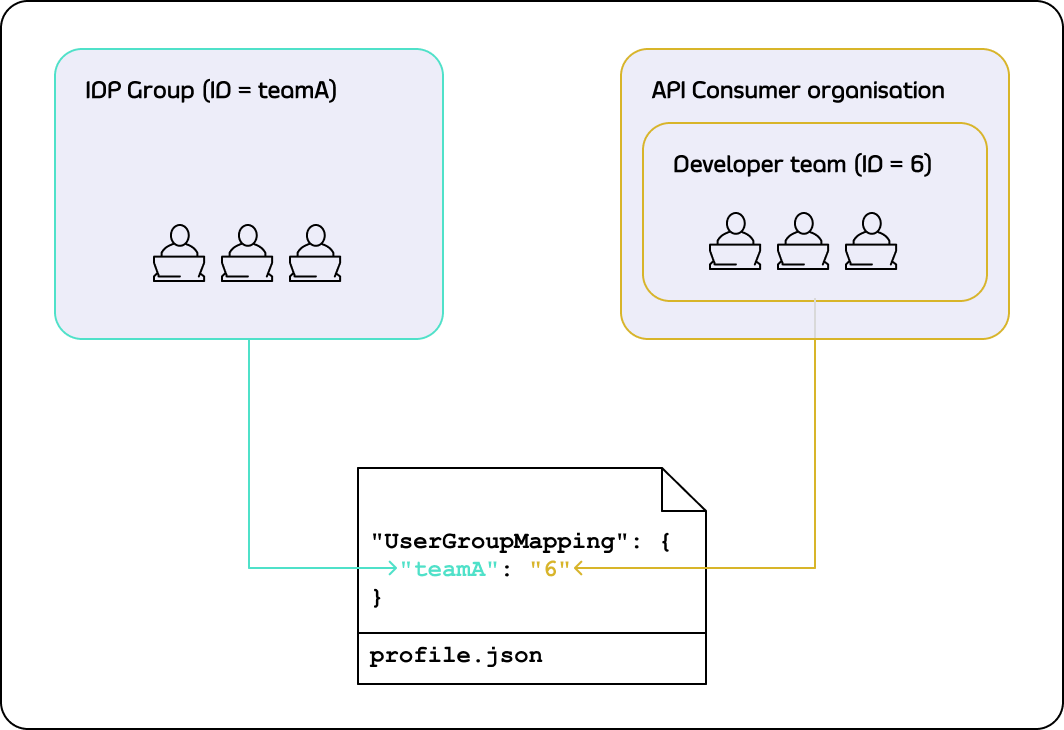 To define the user group mapping for your developer audience, you need to add the UserGroupMapping object to the corresponding [TIB profile](/5.12/api-management/external-service-integration#exploring-tib-profiles):
```yaml theme={null}
"UserGroupMapping": {
"{IDP groupA ID}": "{portal teamA ID}",
"{IDP groupB ID}": "{portal teamB ID}",
...
}
```
#### Default behaviour of UserGroup Mapping
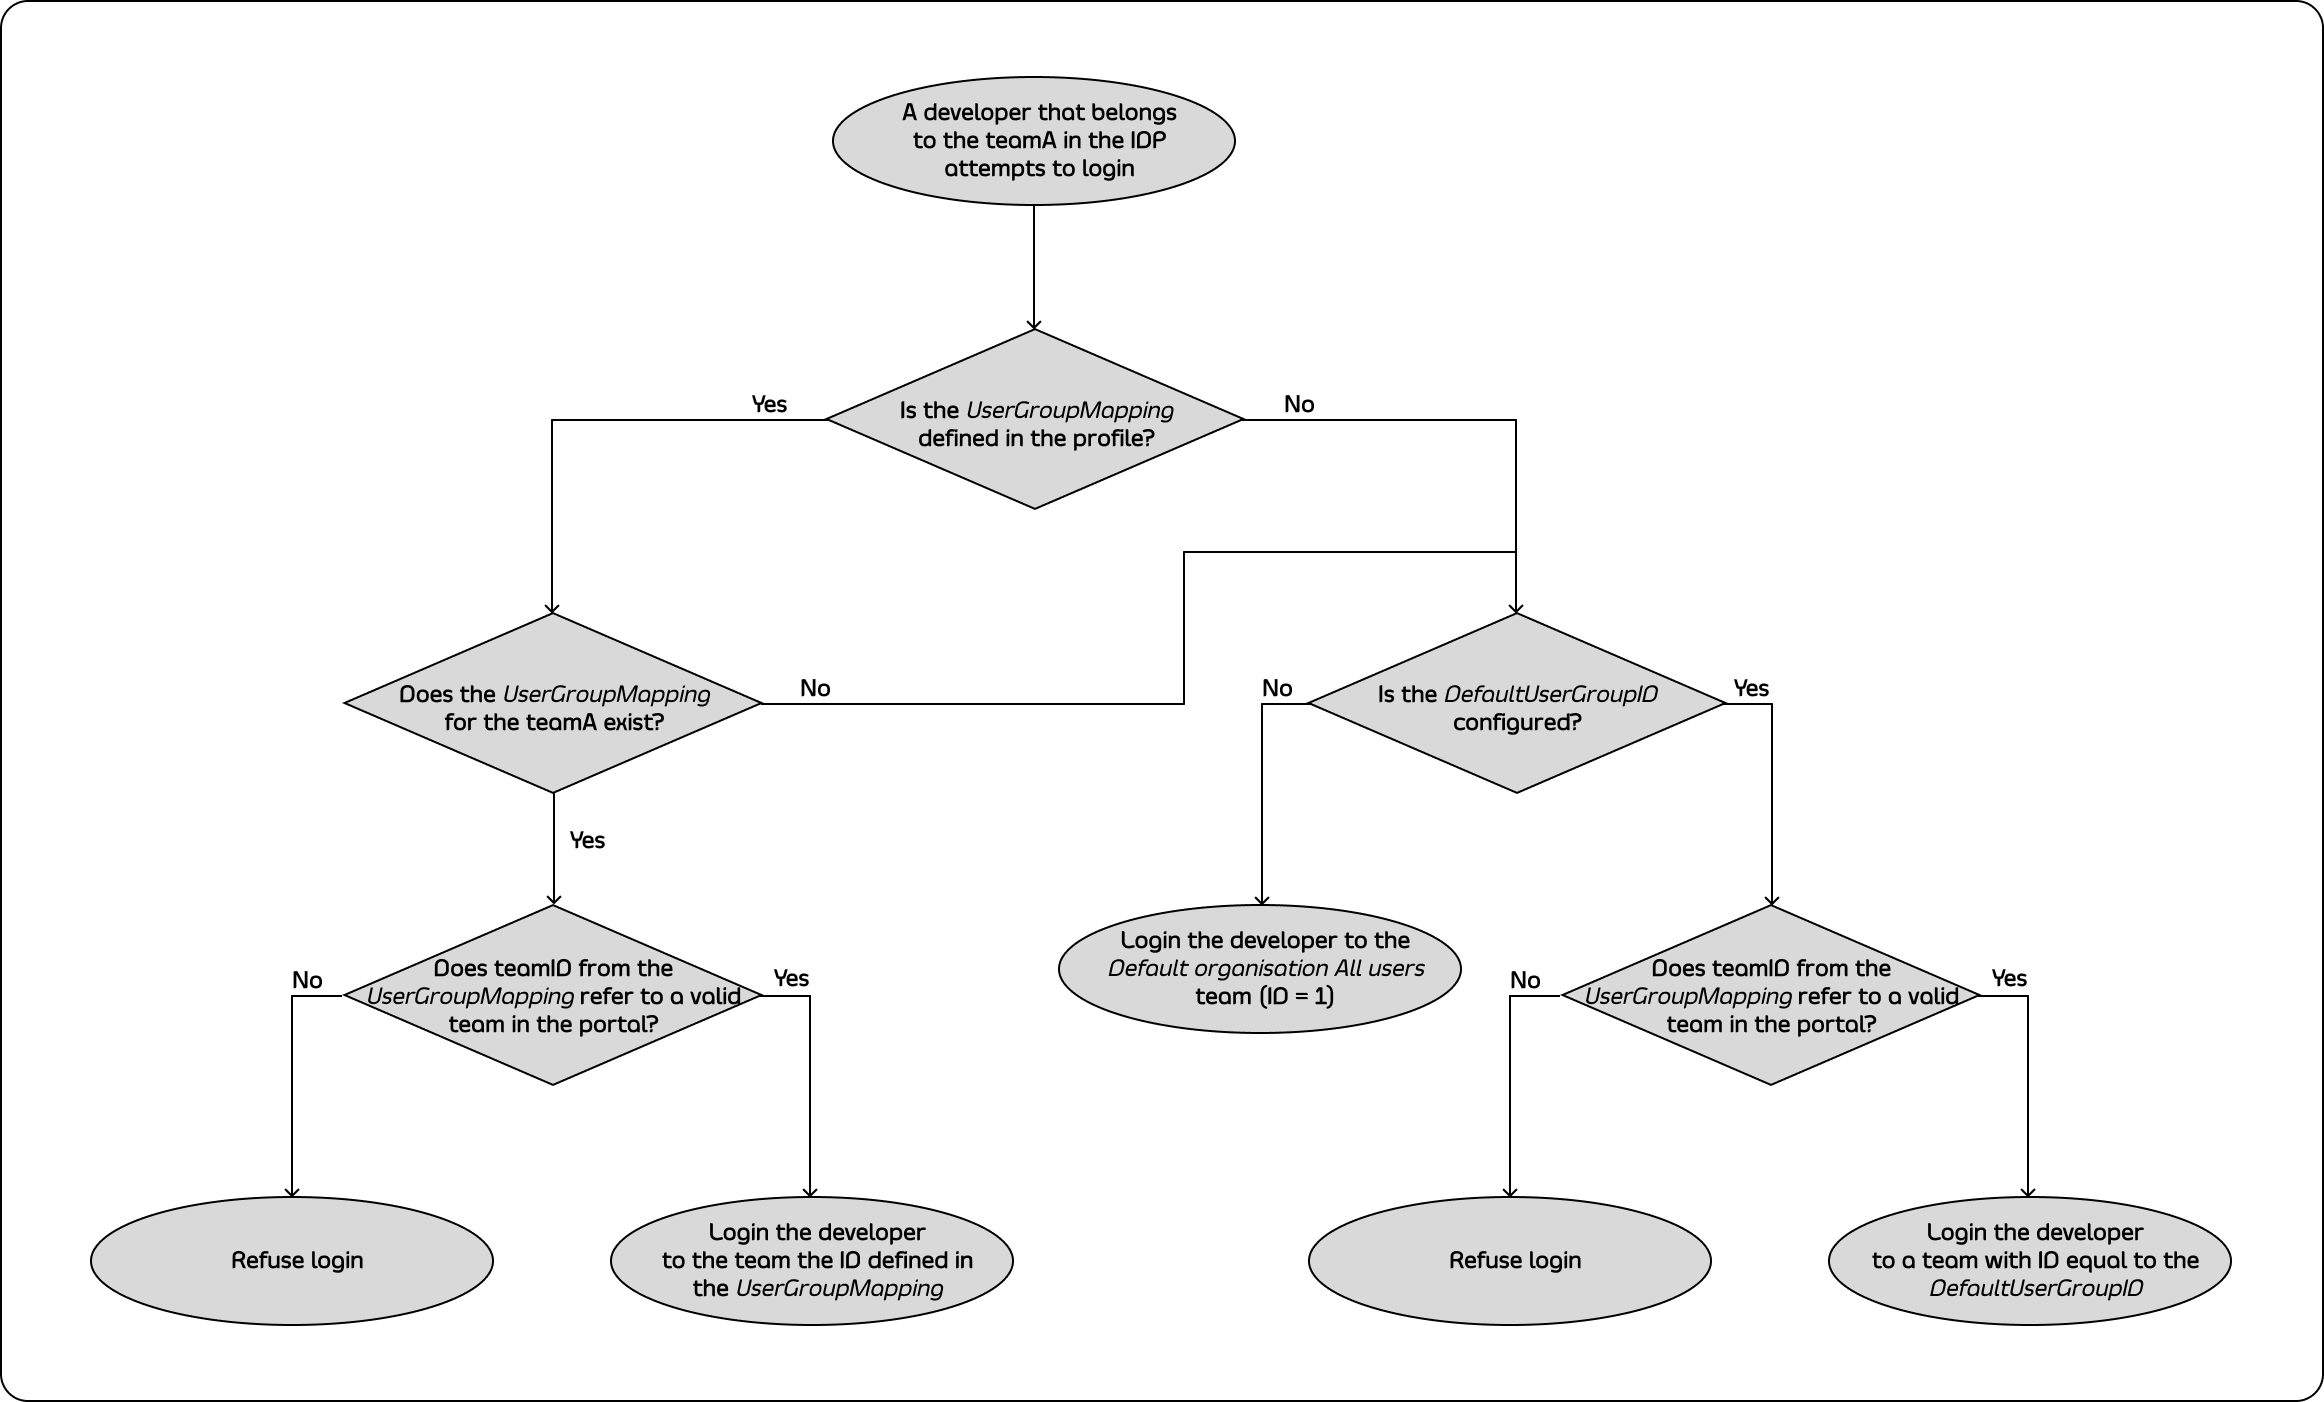
The `UserGroupMapping` object contains keys that refer to group IDs in your IDP, and the corresponding values are team IDs in the portal.
When the Tyk Identity Broker authorizes a user, it searches for a key that matches the user's group ID in the IDP.
If TIB can't find a matching group ID, it logs the user in to the team with an ID equal to `DefaultUserGroupID` in the portal (if `DefaultUserGroupID` is defined).
We recommend always defining `DefaultUserGroupID` and ensuring it refers to a valid team ID in your portal instance. The portal will refuse login attempts if `DefaultUserGroupID` is defined but refers to an invalid team ID.
If no matching group ID is found in the `UserGroupMapping` object and `DefaultUserGroupID` isn't defined, the portal logs in the user to the "Default organization | All users" team with an ID of 1.
#### Login Evaluation Algorithm
To determine whether a developer should be allowed to log in and which team they should be logged into, the portal uses the following algorithm:
To define the user group mapping for your developer audience, you need to add the UserGroupMapping object to the corresponding [TIB profile](/5.12/api-management/external-service-integration#exploring-tib-profiles):
```yaml theme={null}
"UserGroupMapping": {
"{IDP groupA ID}": "{portal teamA ID}",
"{IDP groupB ID}": "{portal teamB ID}",
...
}
```
#### Default behaviour of UserGroup Mapping
The `UserGroupMapping` object contains keys that refer to group IDs in your IDP, and the corresponding values are team IDs in the portal.
When the Tyk Identity Broker authorizes a user, it searches for a key that matches the user's group ID in the IDP.
If TIB can't find a matching group ID, it logs the user in to the team with an ID equal to `DefaultUserGroupID` in the portal (if `DefaultUserGroupID` is defined).
We recommend always defining `DefaultUserGroupID` and ensuring it refers to a valid team ID in your portal instance. The portal will refuse login attempts if `DefaultUserGroupID` is defined but refers to an invalid team ID.
If no matching group ID is found in the `UserGroupMapping` object and `DefaultUserGroupID` isn't defined, the portal logs in the user to the "Default organization | All users" team with an ID of 1.
#### Login Evaluation Algorithm
To determine whether a developer should be allowed to log in and which team they should be logged into, the portal uses the following algorithm:
 ### Creating TIB Profile
In the following sections you will learn how to configure the SSO profiles for admins and developers and map developers to the teams.
You can configure the SSO profiles for admins in the Tyk Developer Portal application. Under **Settings** > **SSO Profiles** > **Add new SSO Profile**.
There are two ways of creating SSO profiles:
1. **[Wizard Form](/5.12/#using-the-wizard-form)**: Create a profile using the wizard guided form.
2. **[Raw JSON Editor](/5.12/#using-the-json-raw-editor)**: Create a profile using JSON editor where you can specify your tib raw JSON profile.
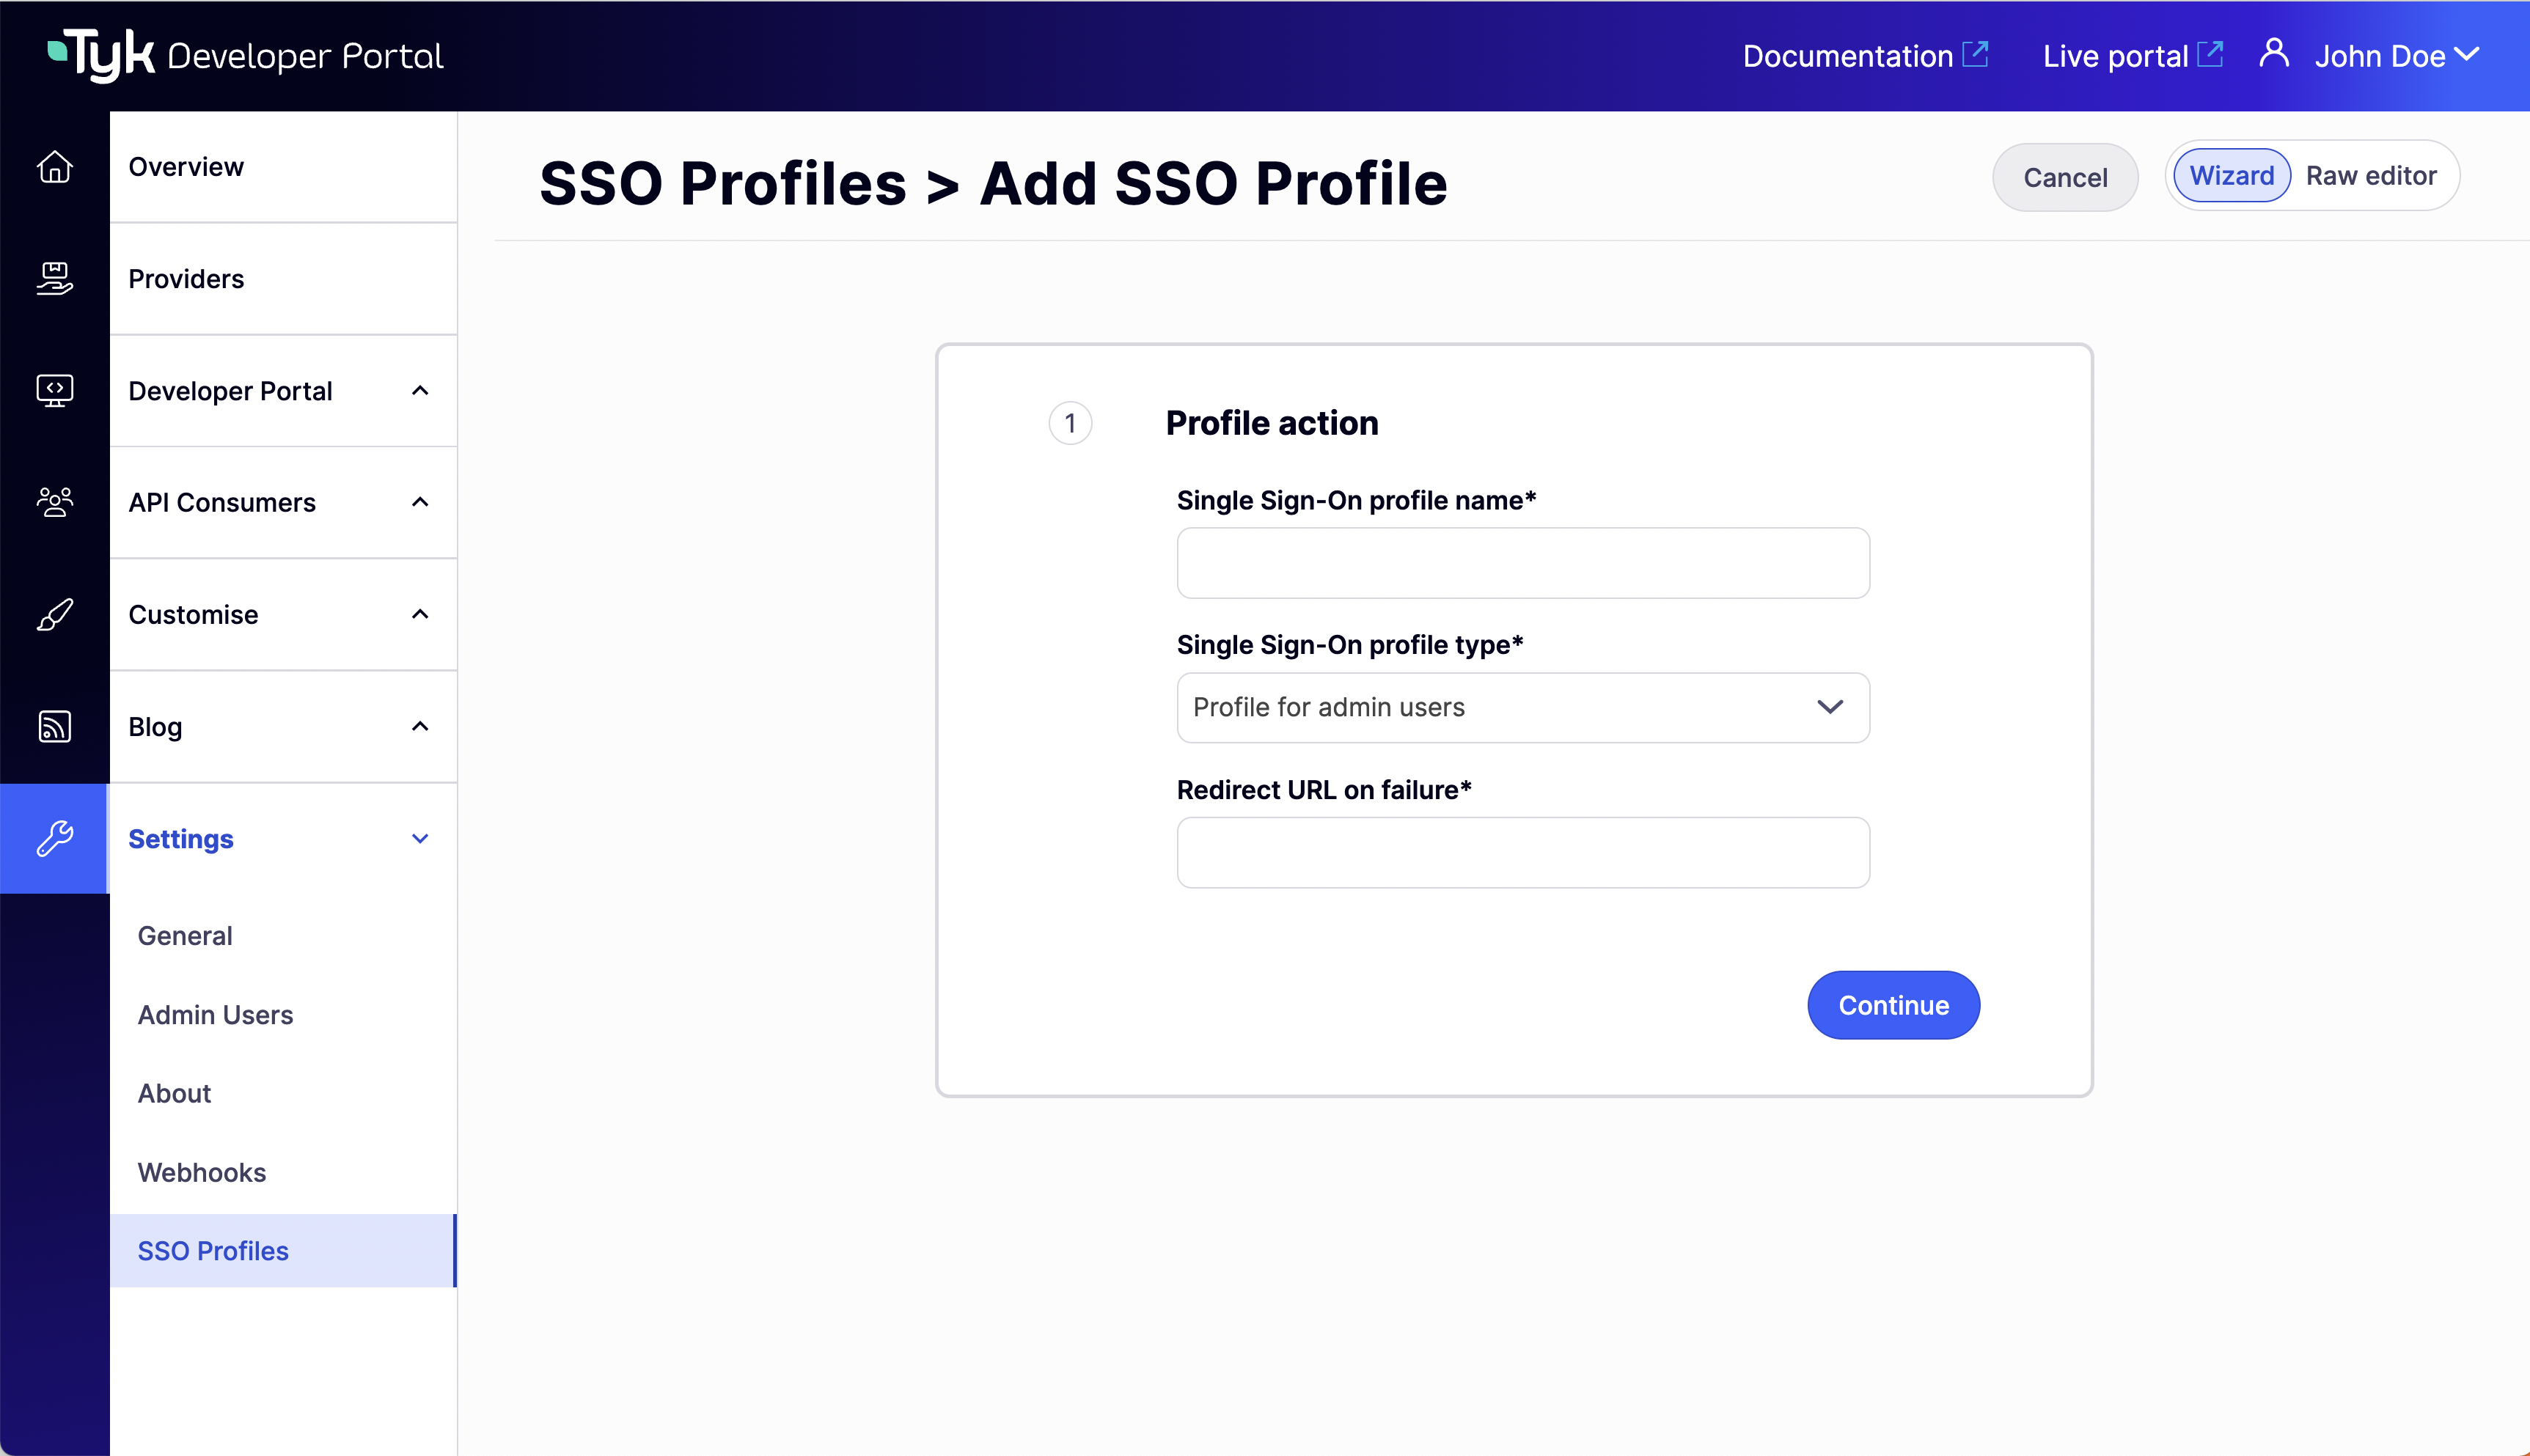
#### Using the Wizard Form
You can access the wizard form by switching to the **Wizard** view.
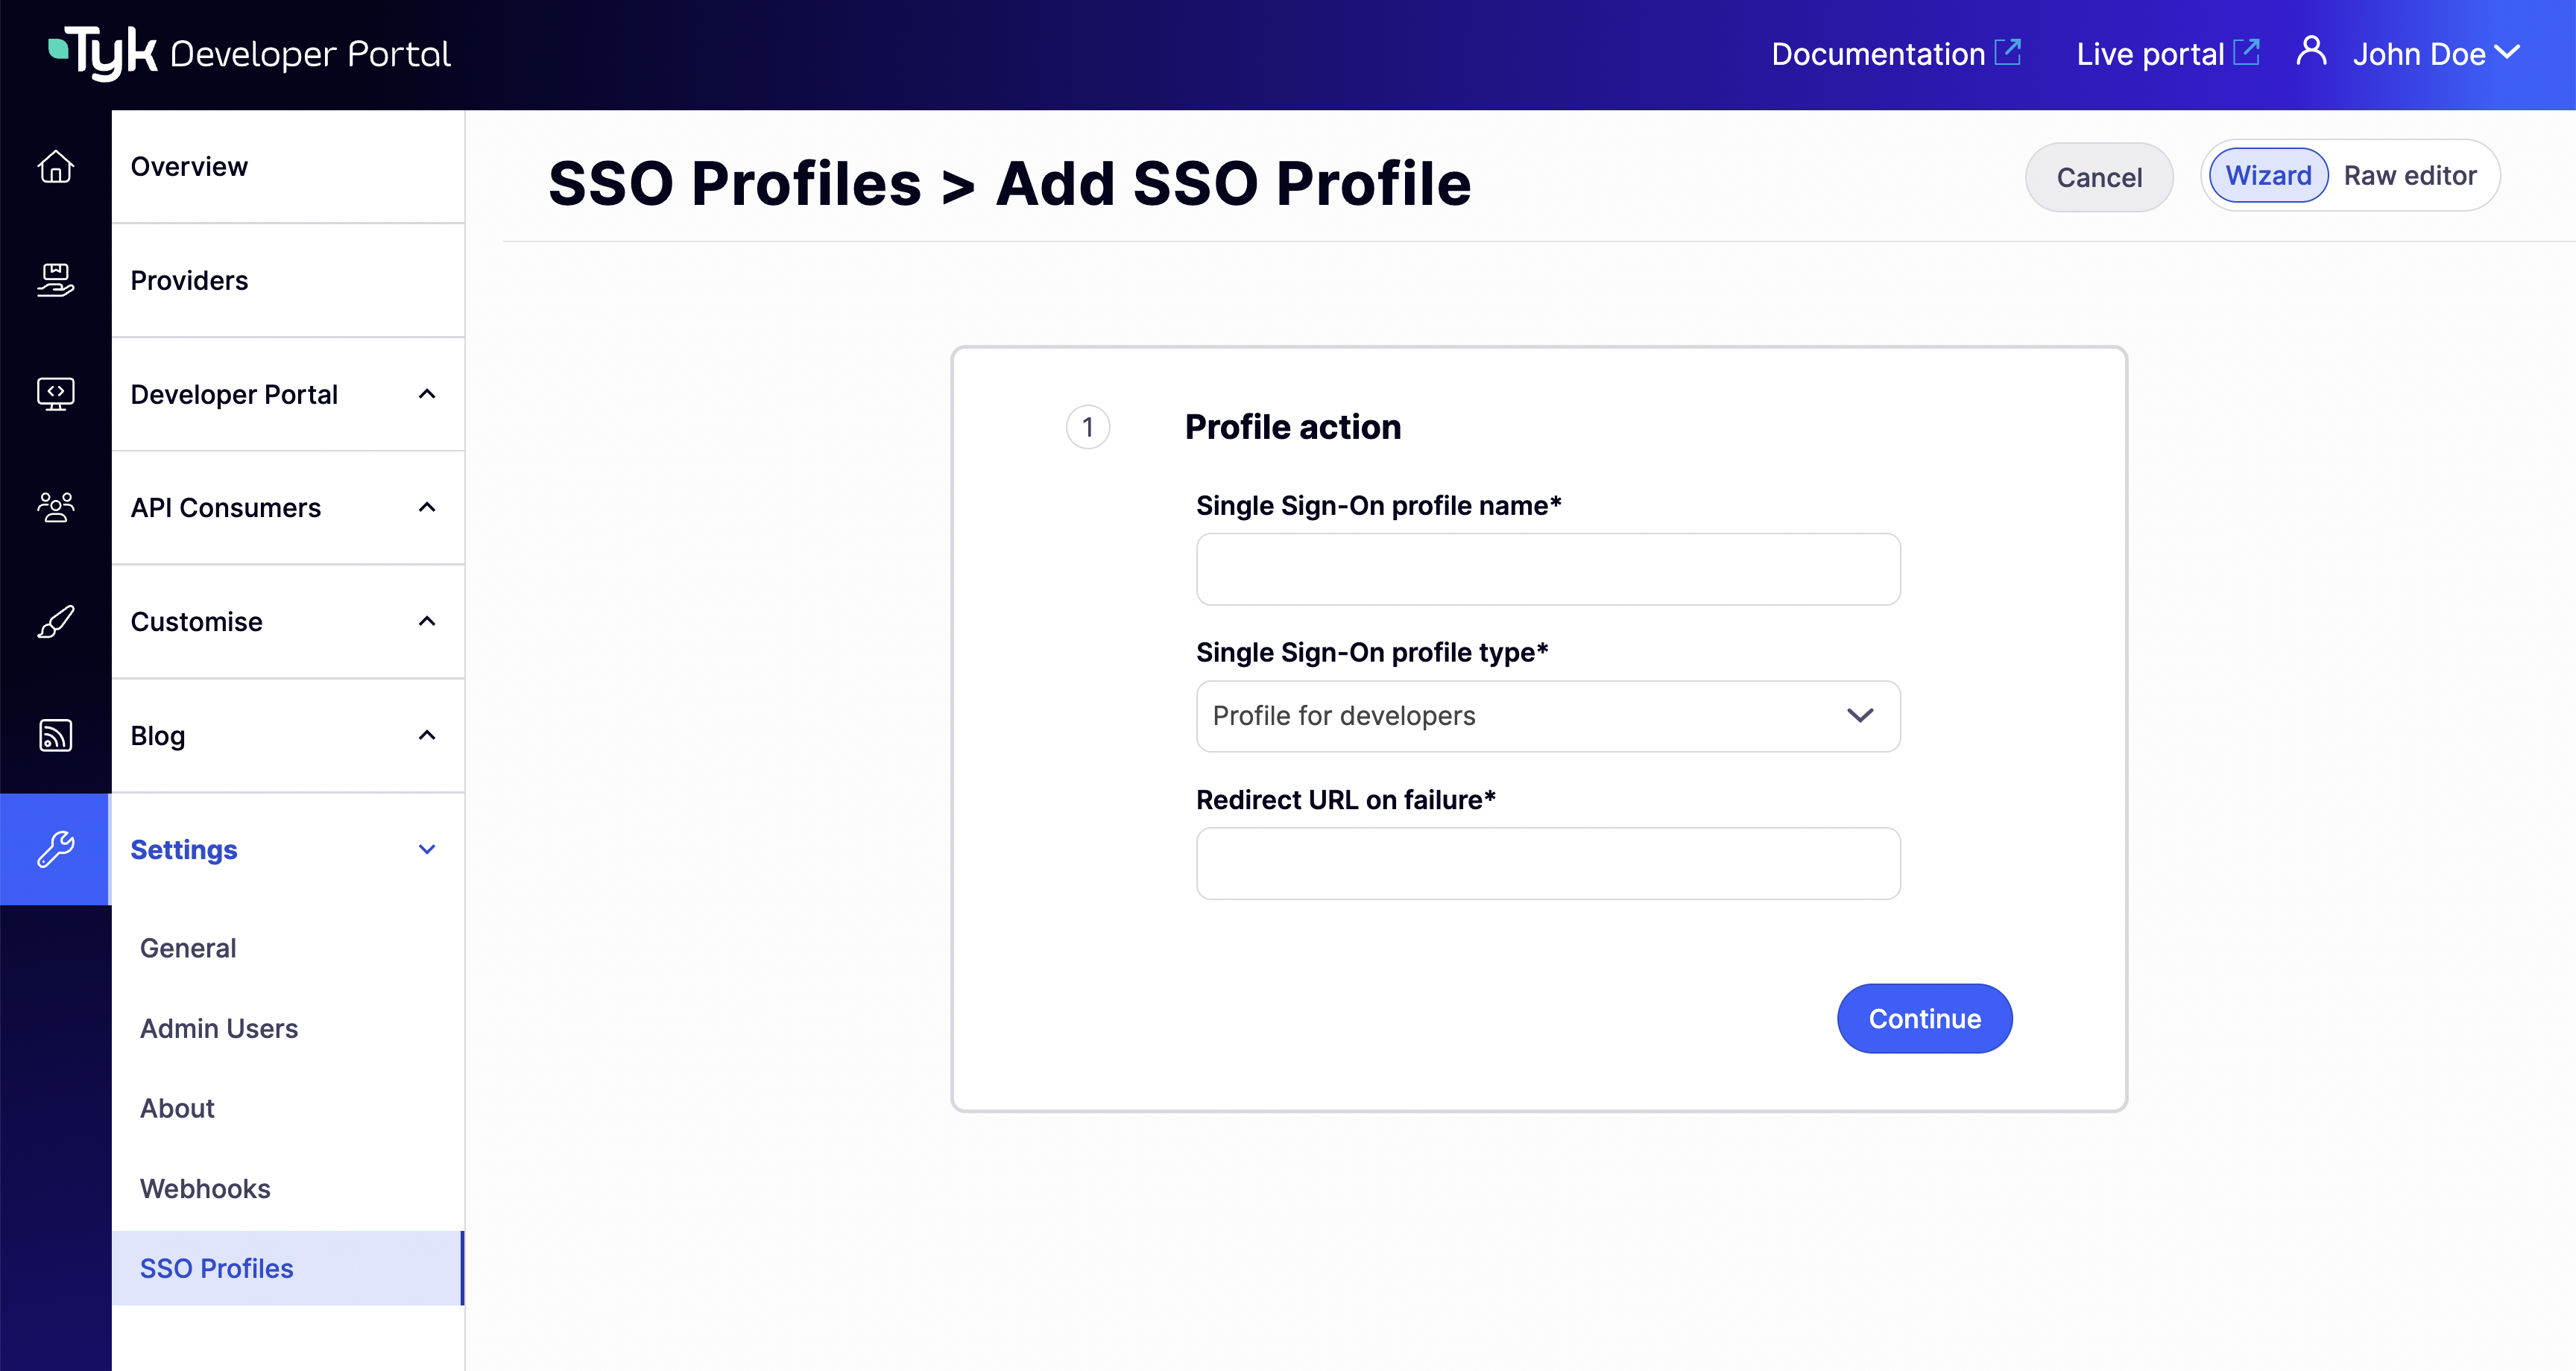
Create a profile for admins:
1. Complete the **Profile action** step. Here you can choose a name (this name will generate the profile ID), the profile type (select **Profile for admin users**) and the redirect url on failure.
### Creating TIB Profile
In the following sections you will learn how to configure the SSO profiles for admins and developers and map developers to the teams.
You can configure the SSO profiles for admins in the Tyk Developer Portal application. Under **Settings** > **SSO Profiles** > **Add new SSO Profile**.
There are two ways of creating SSO profiles:
1. **[Wizard Form](/5.12/#using-the-wizard-form)**: Create a profile using the wizard guided form.
2. **[Raw JSON Editor](/5.12/#using-the-json-raw-editor)**: Create a profile using JSON editor where you can specify your tib raw JSON profile.
#### Using the Wizard Form
You can access the wizard form by switching to the **Wizard** view.
Create a profile for admins:
1. Complete the **Profile action** step. Here you can choose a name (this name will generate the profile ID), the profile type (select **Profile for admin users**) and the redirect url on failure.
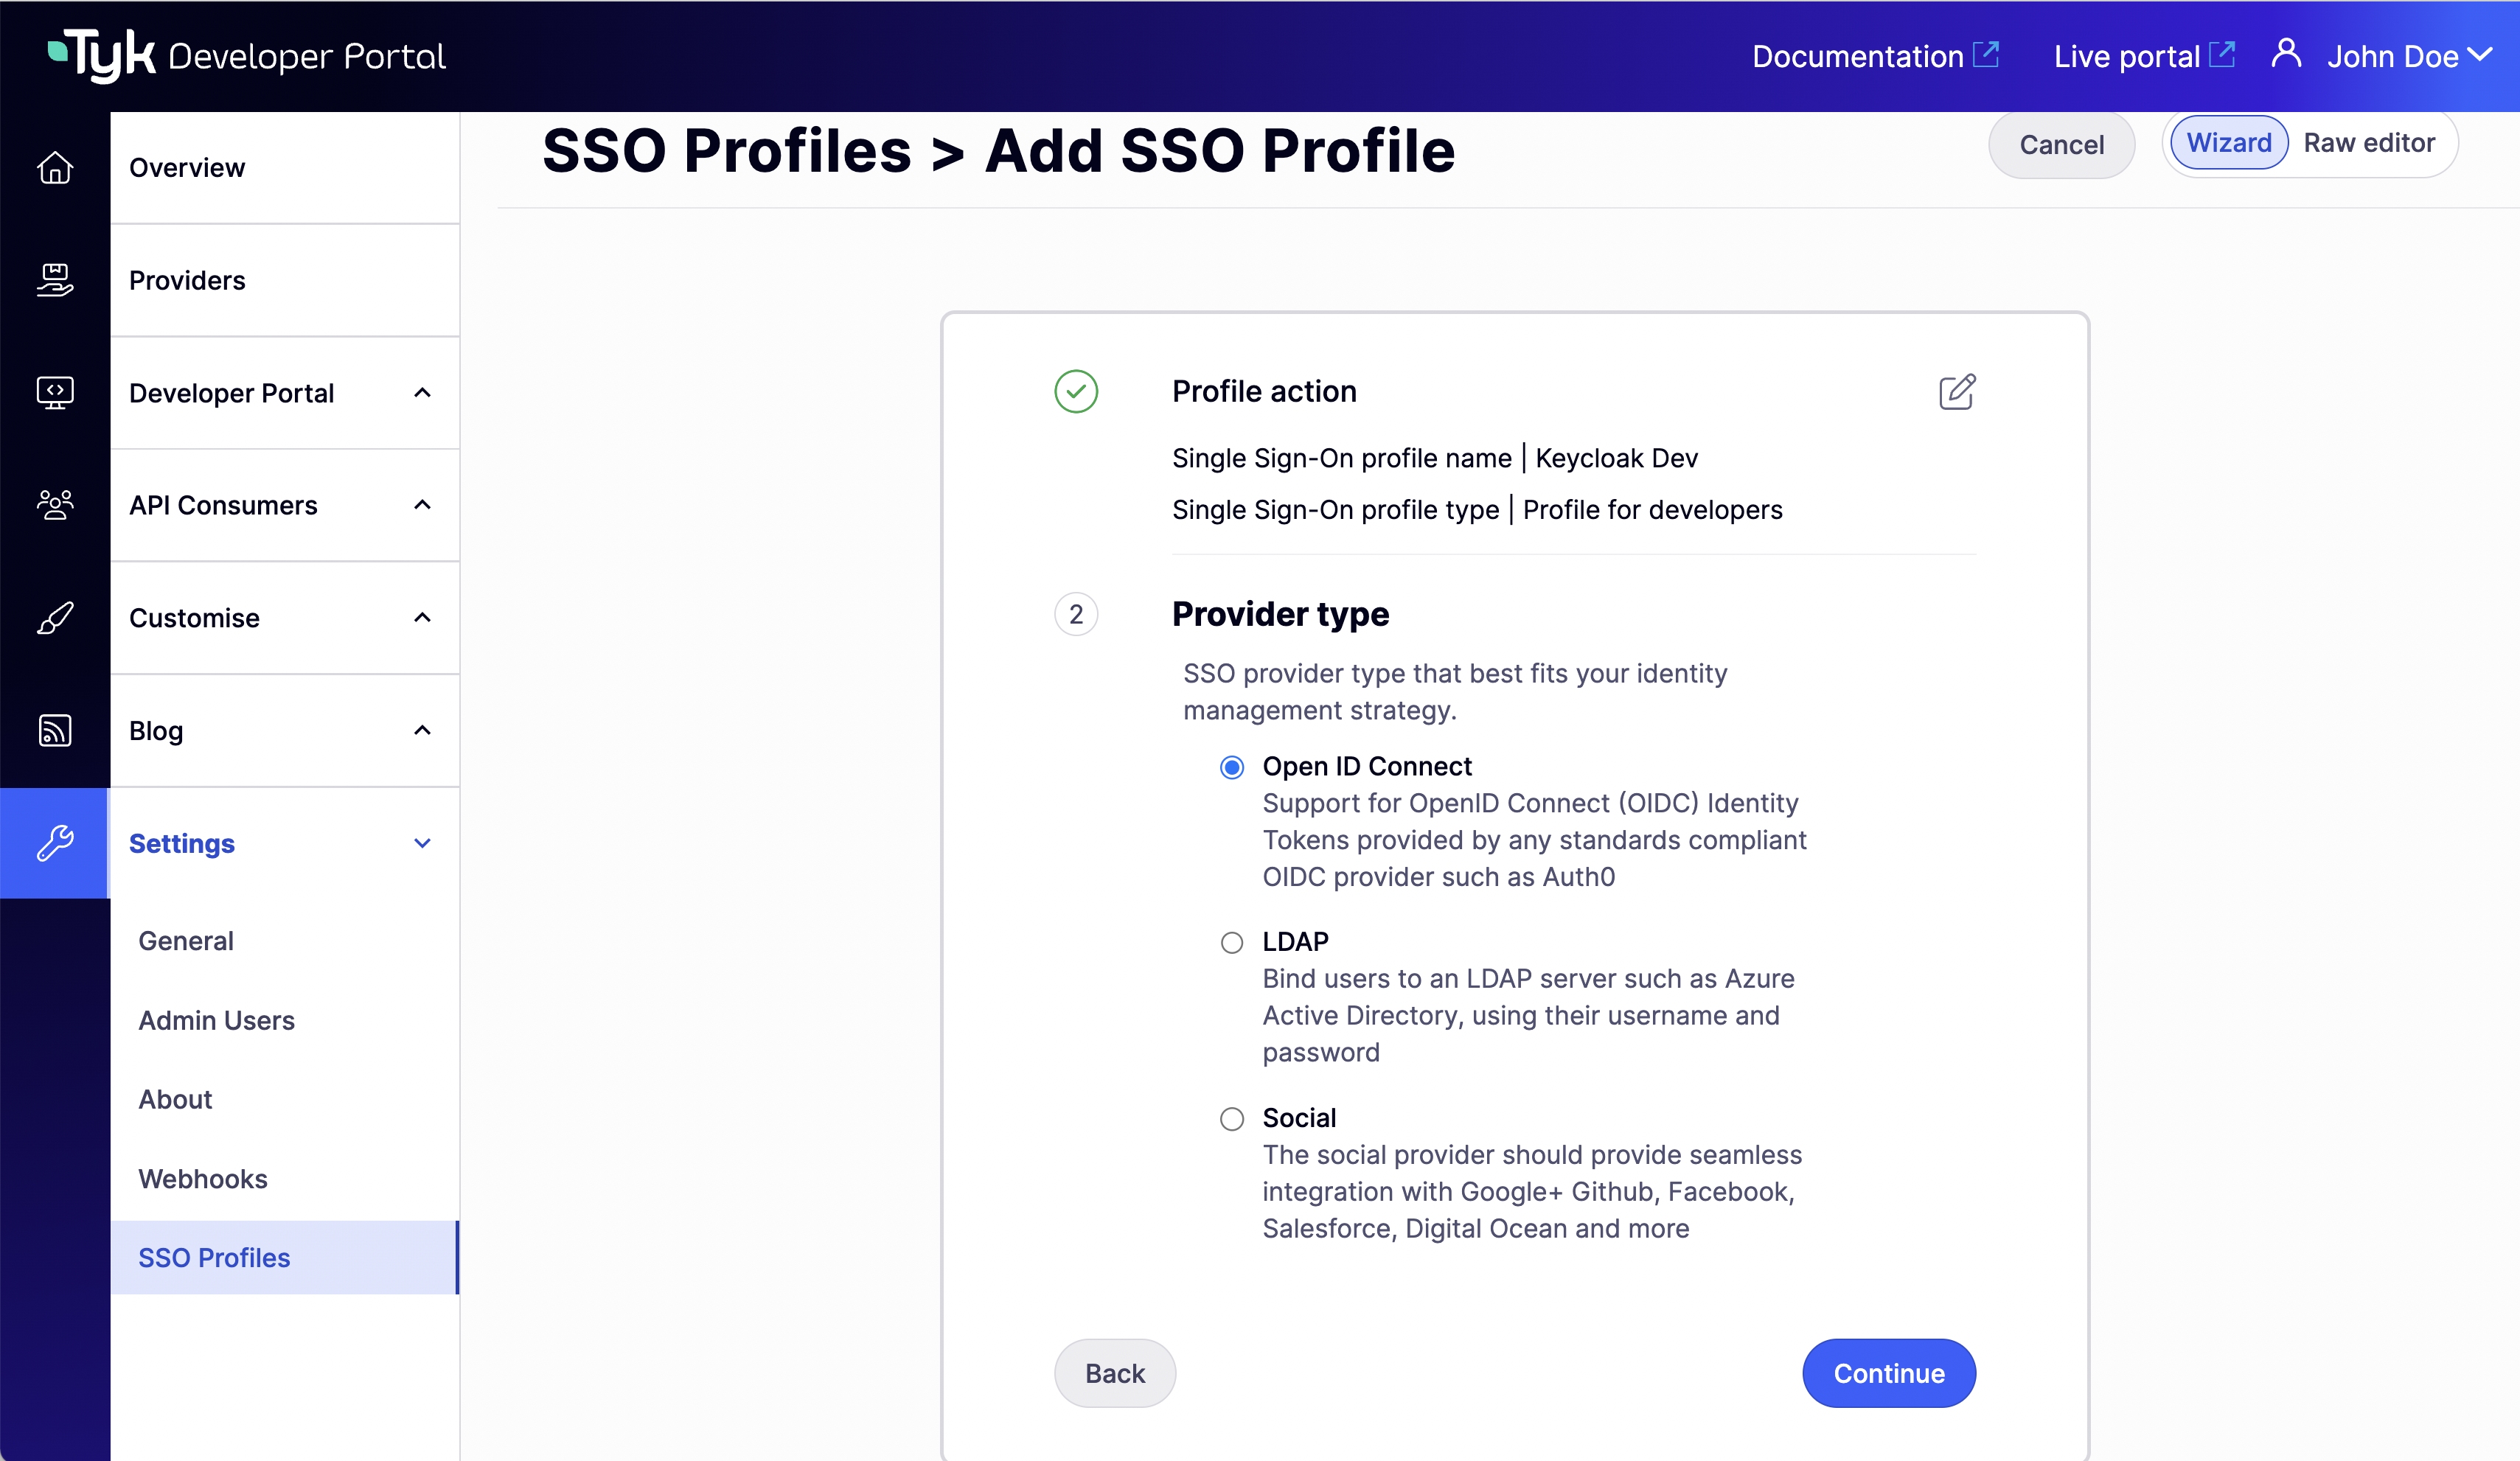
 2. Select a supported **Provider type**.
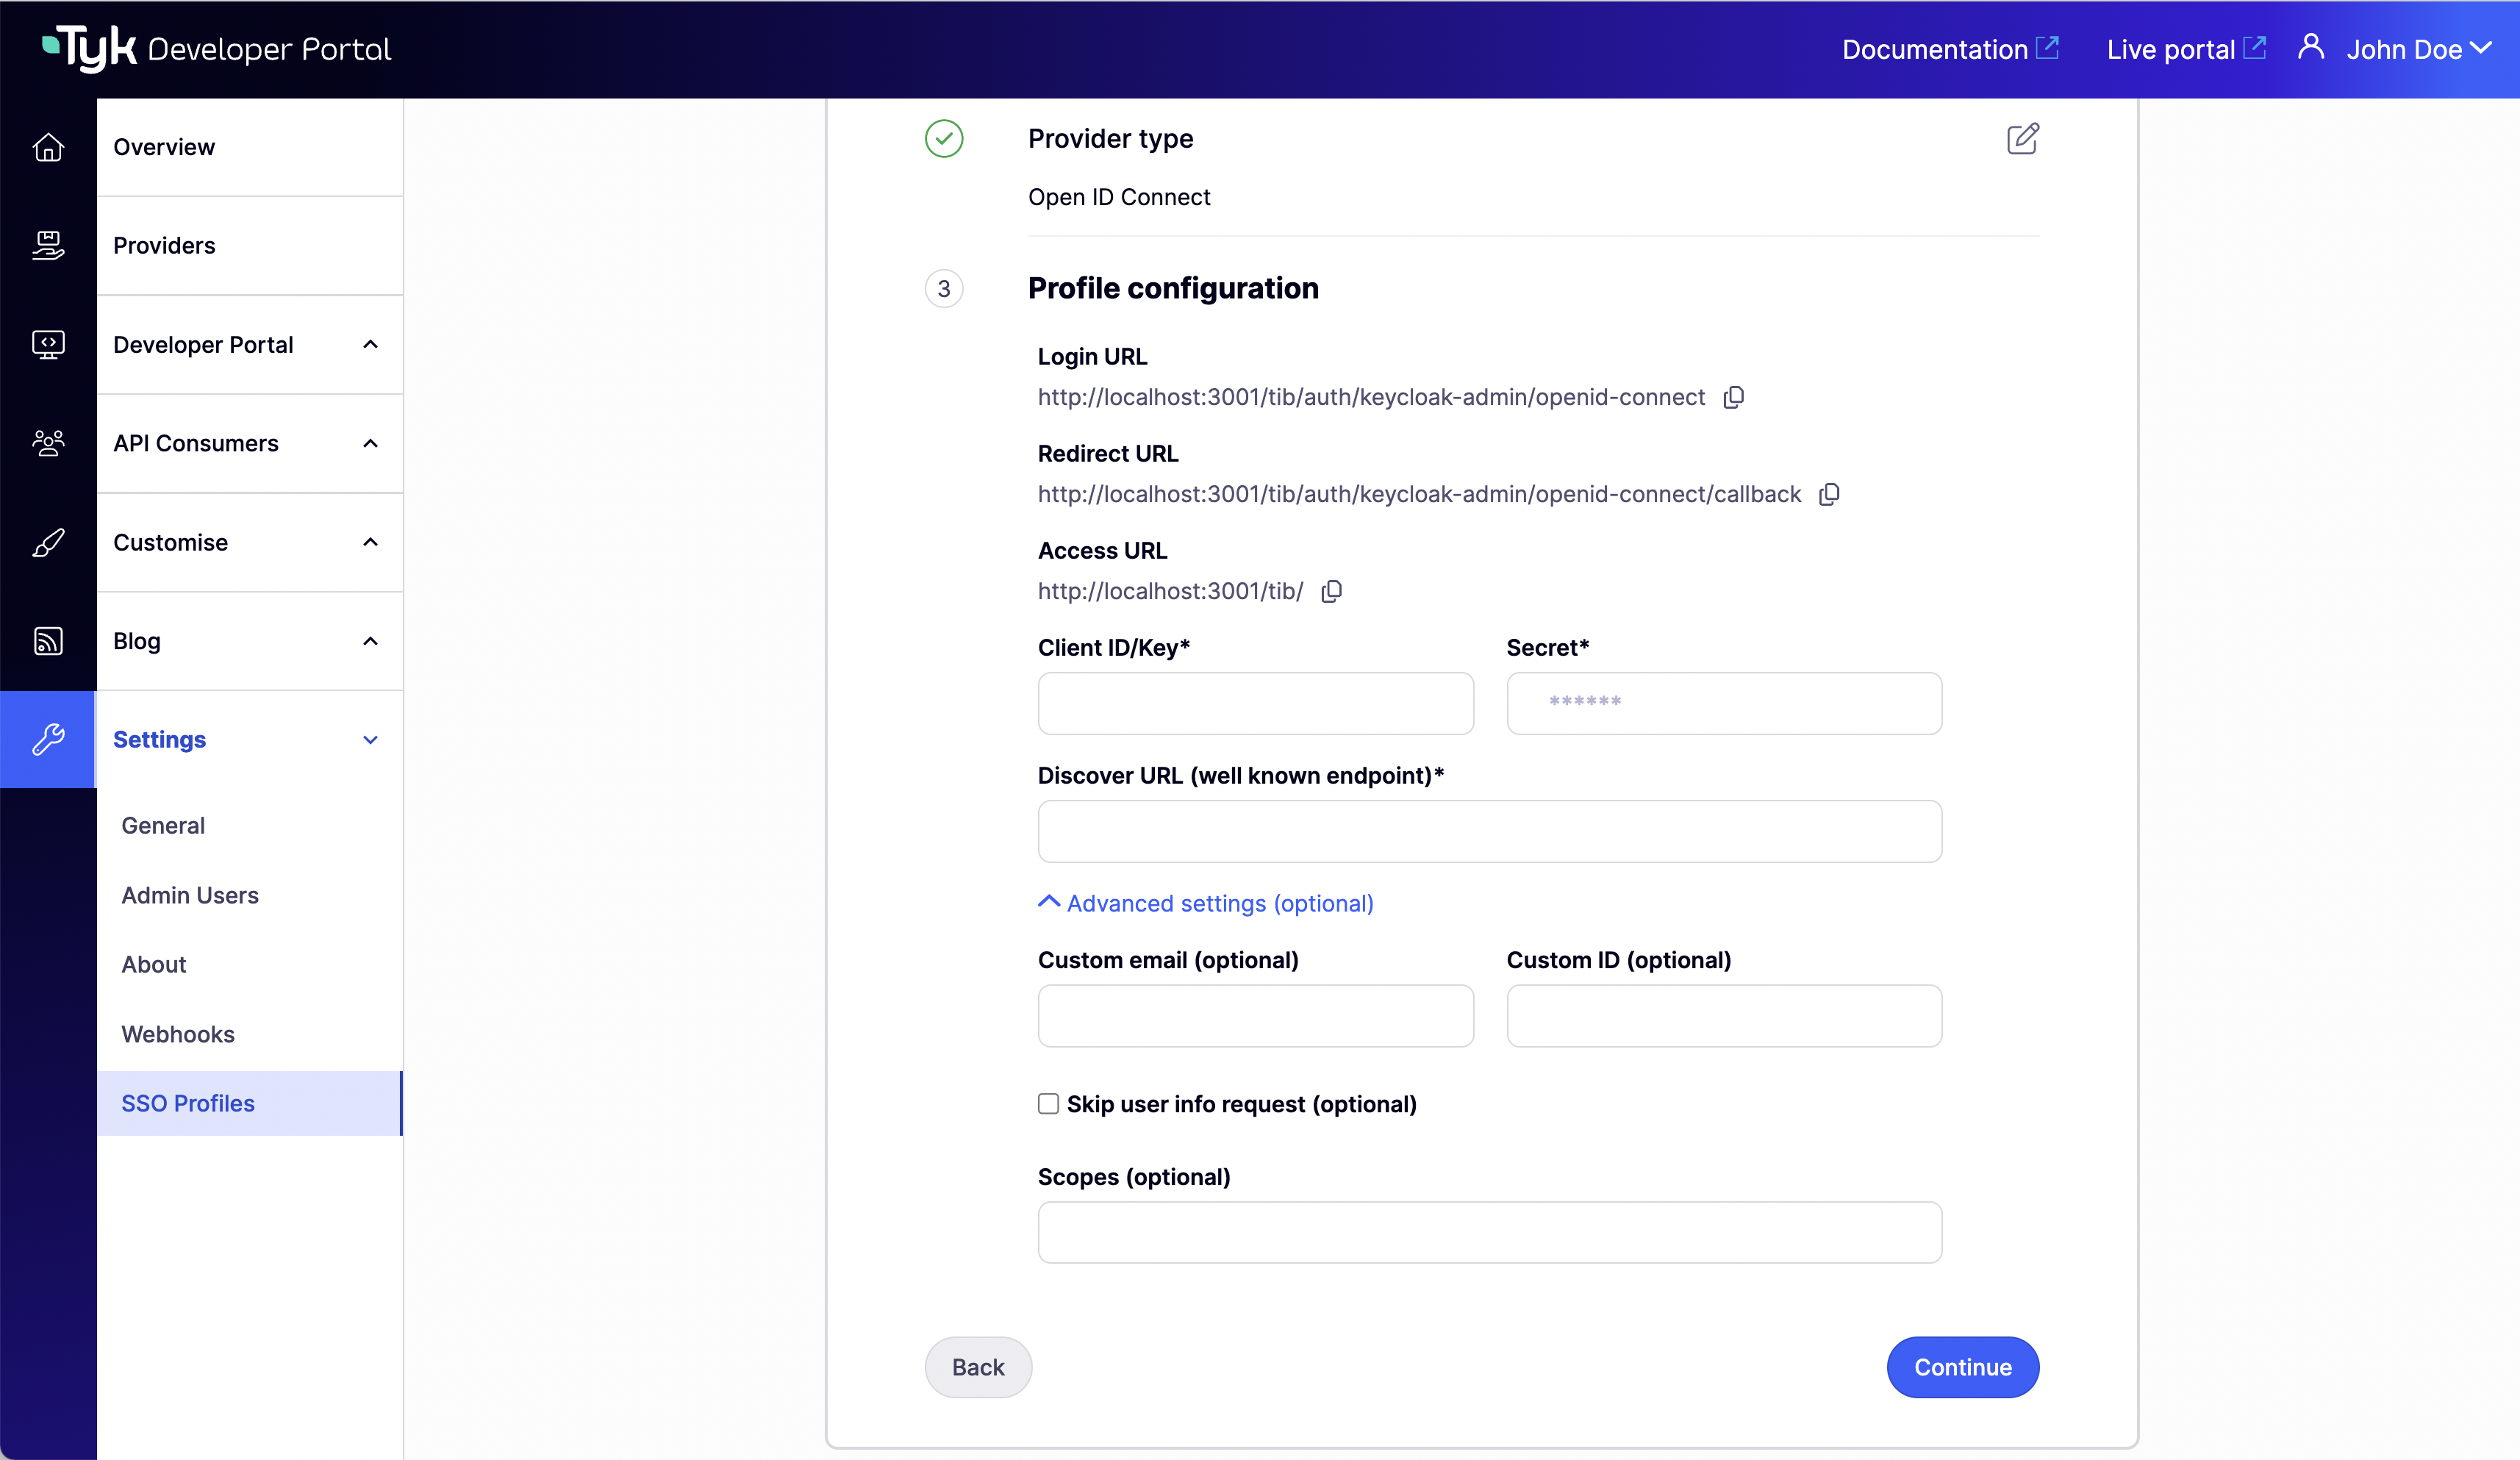
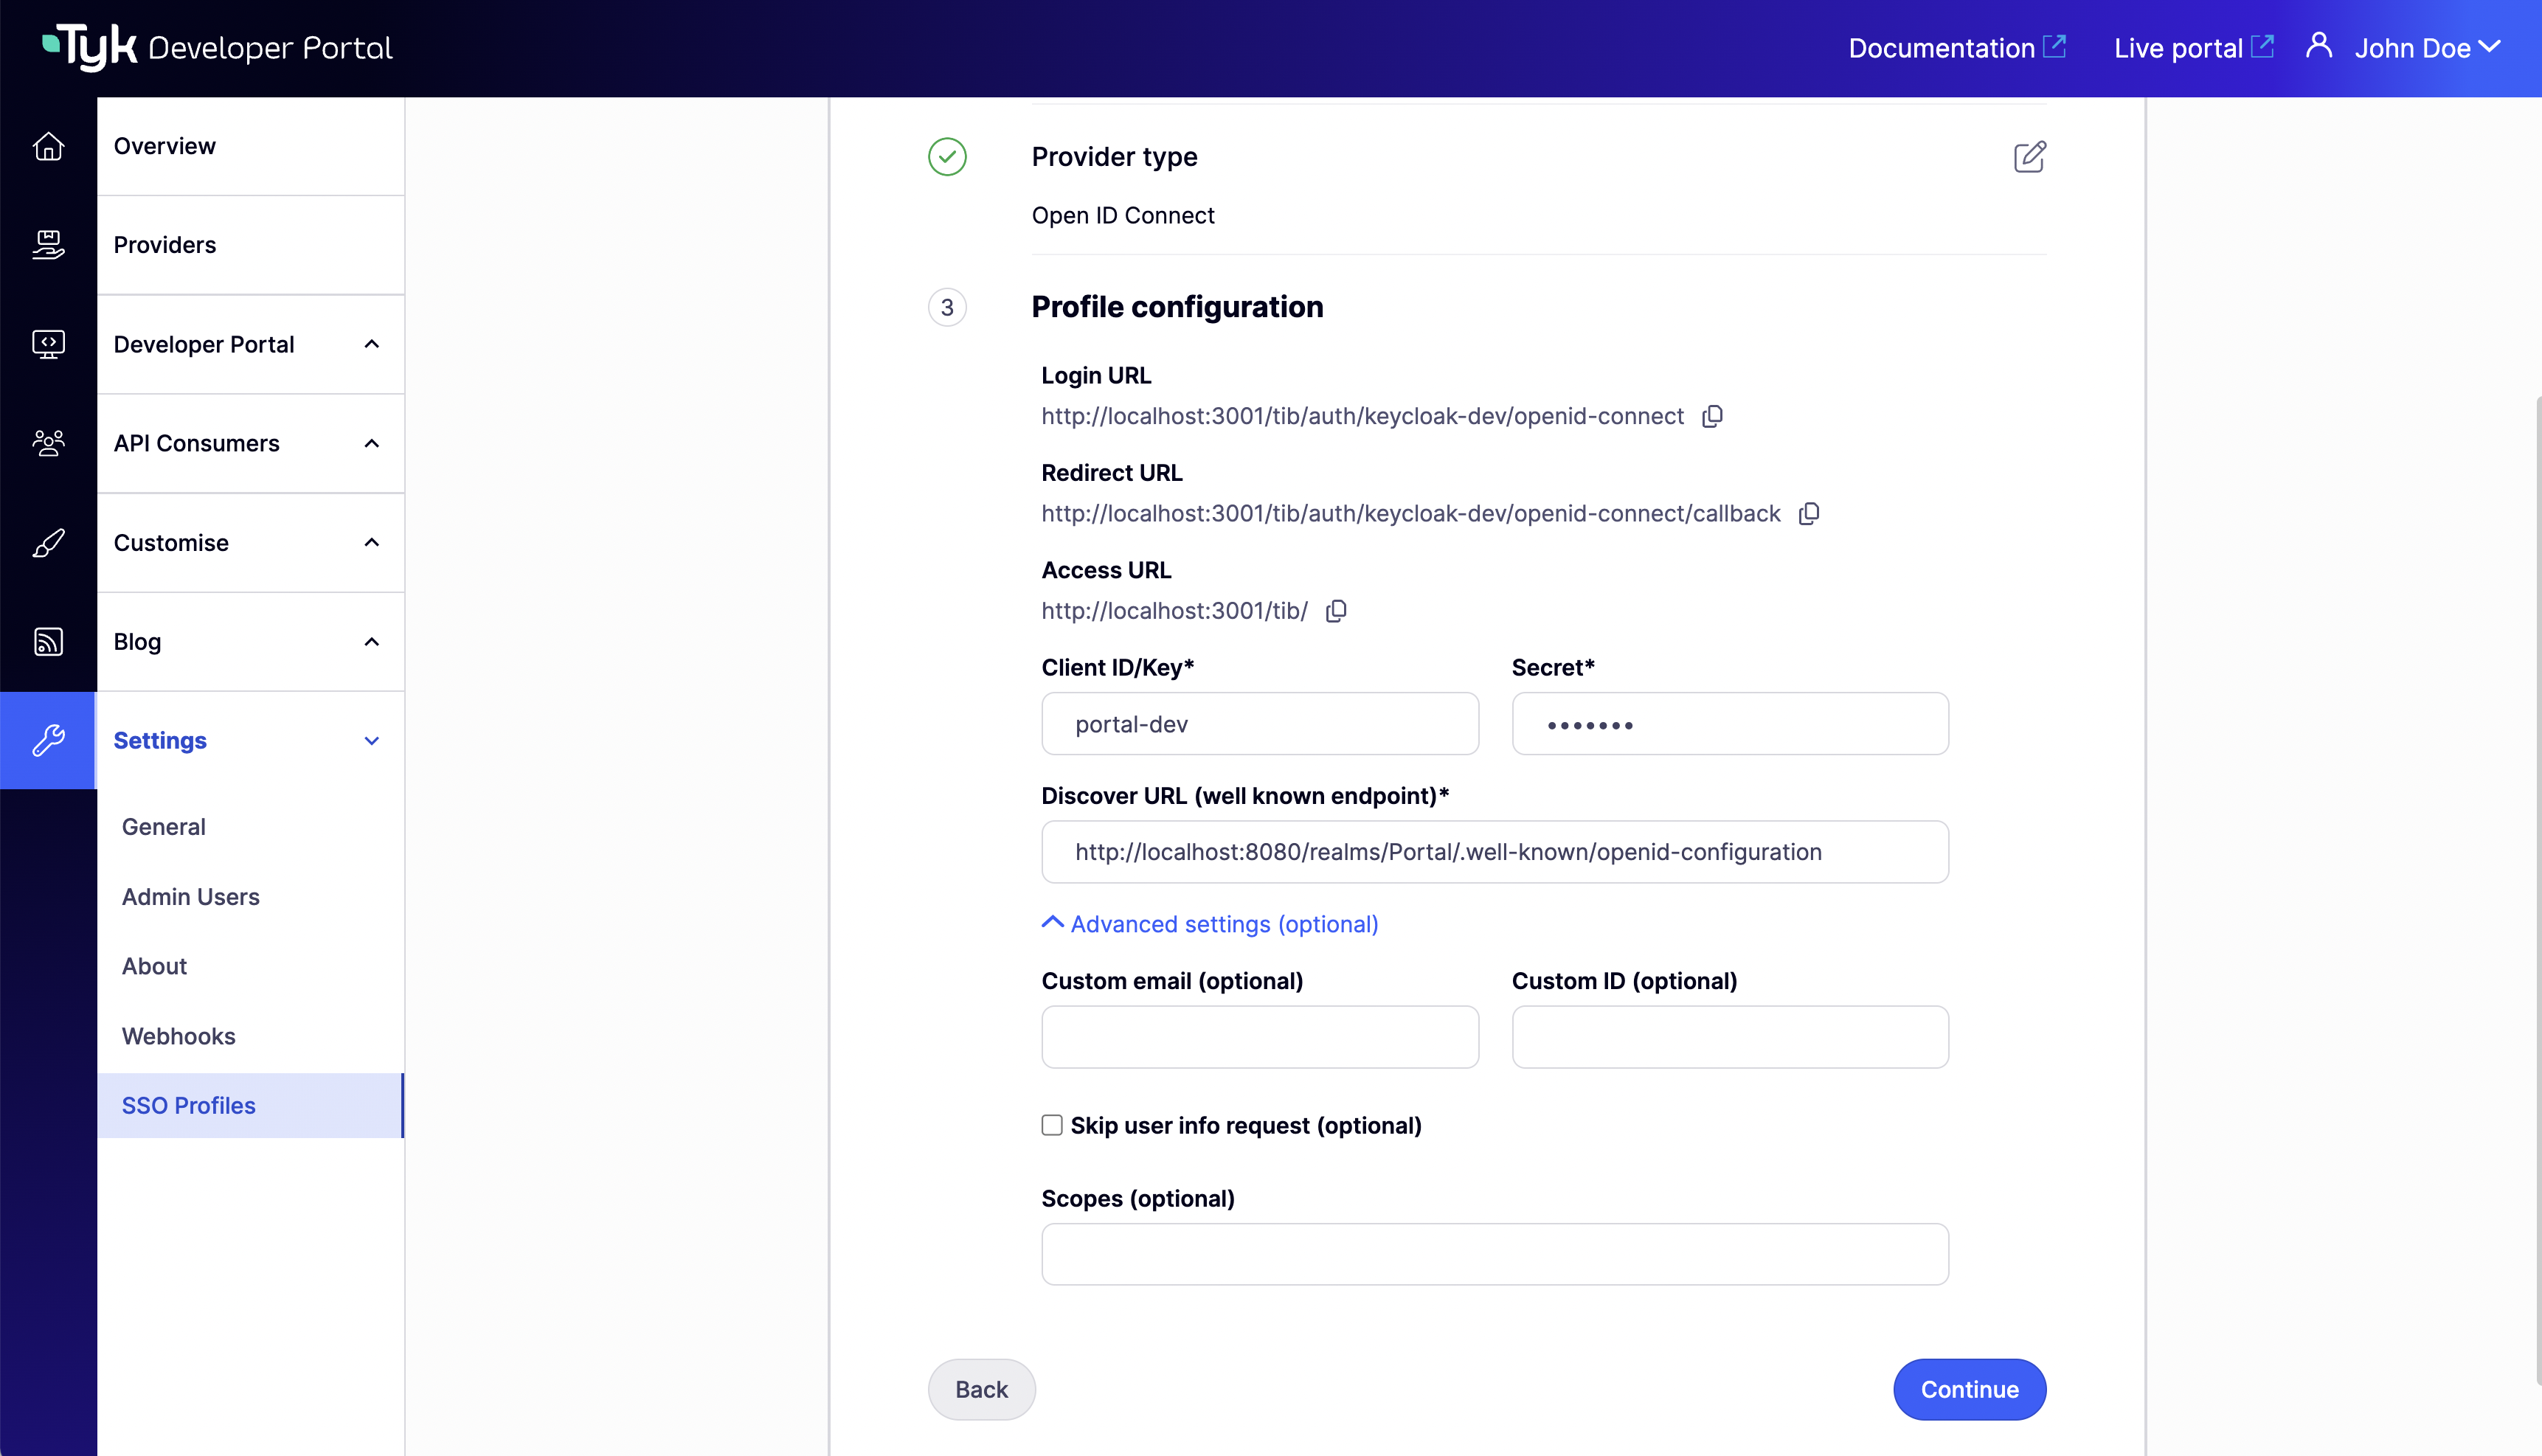
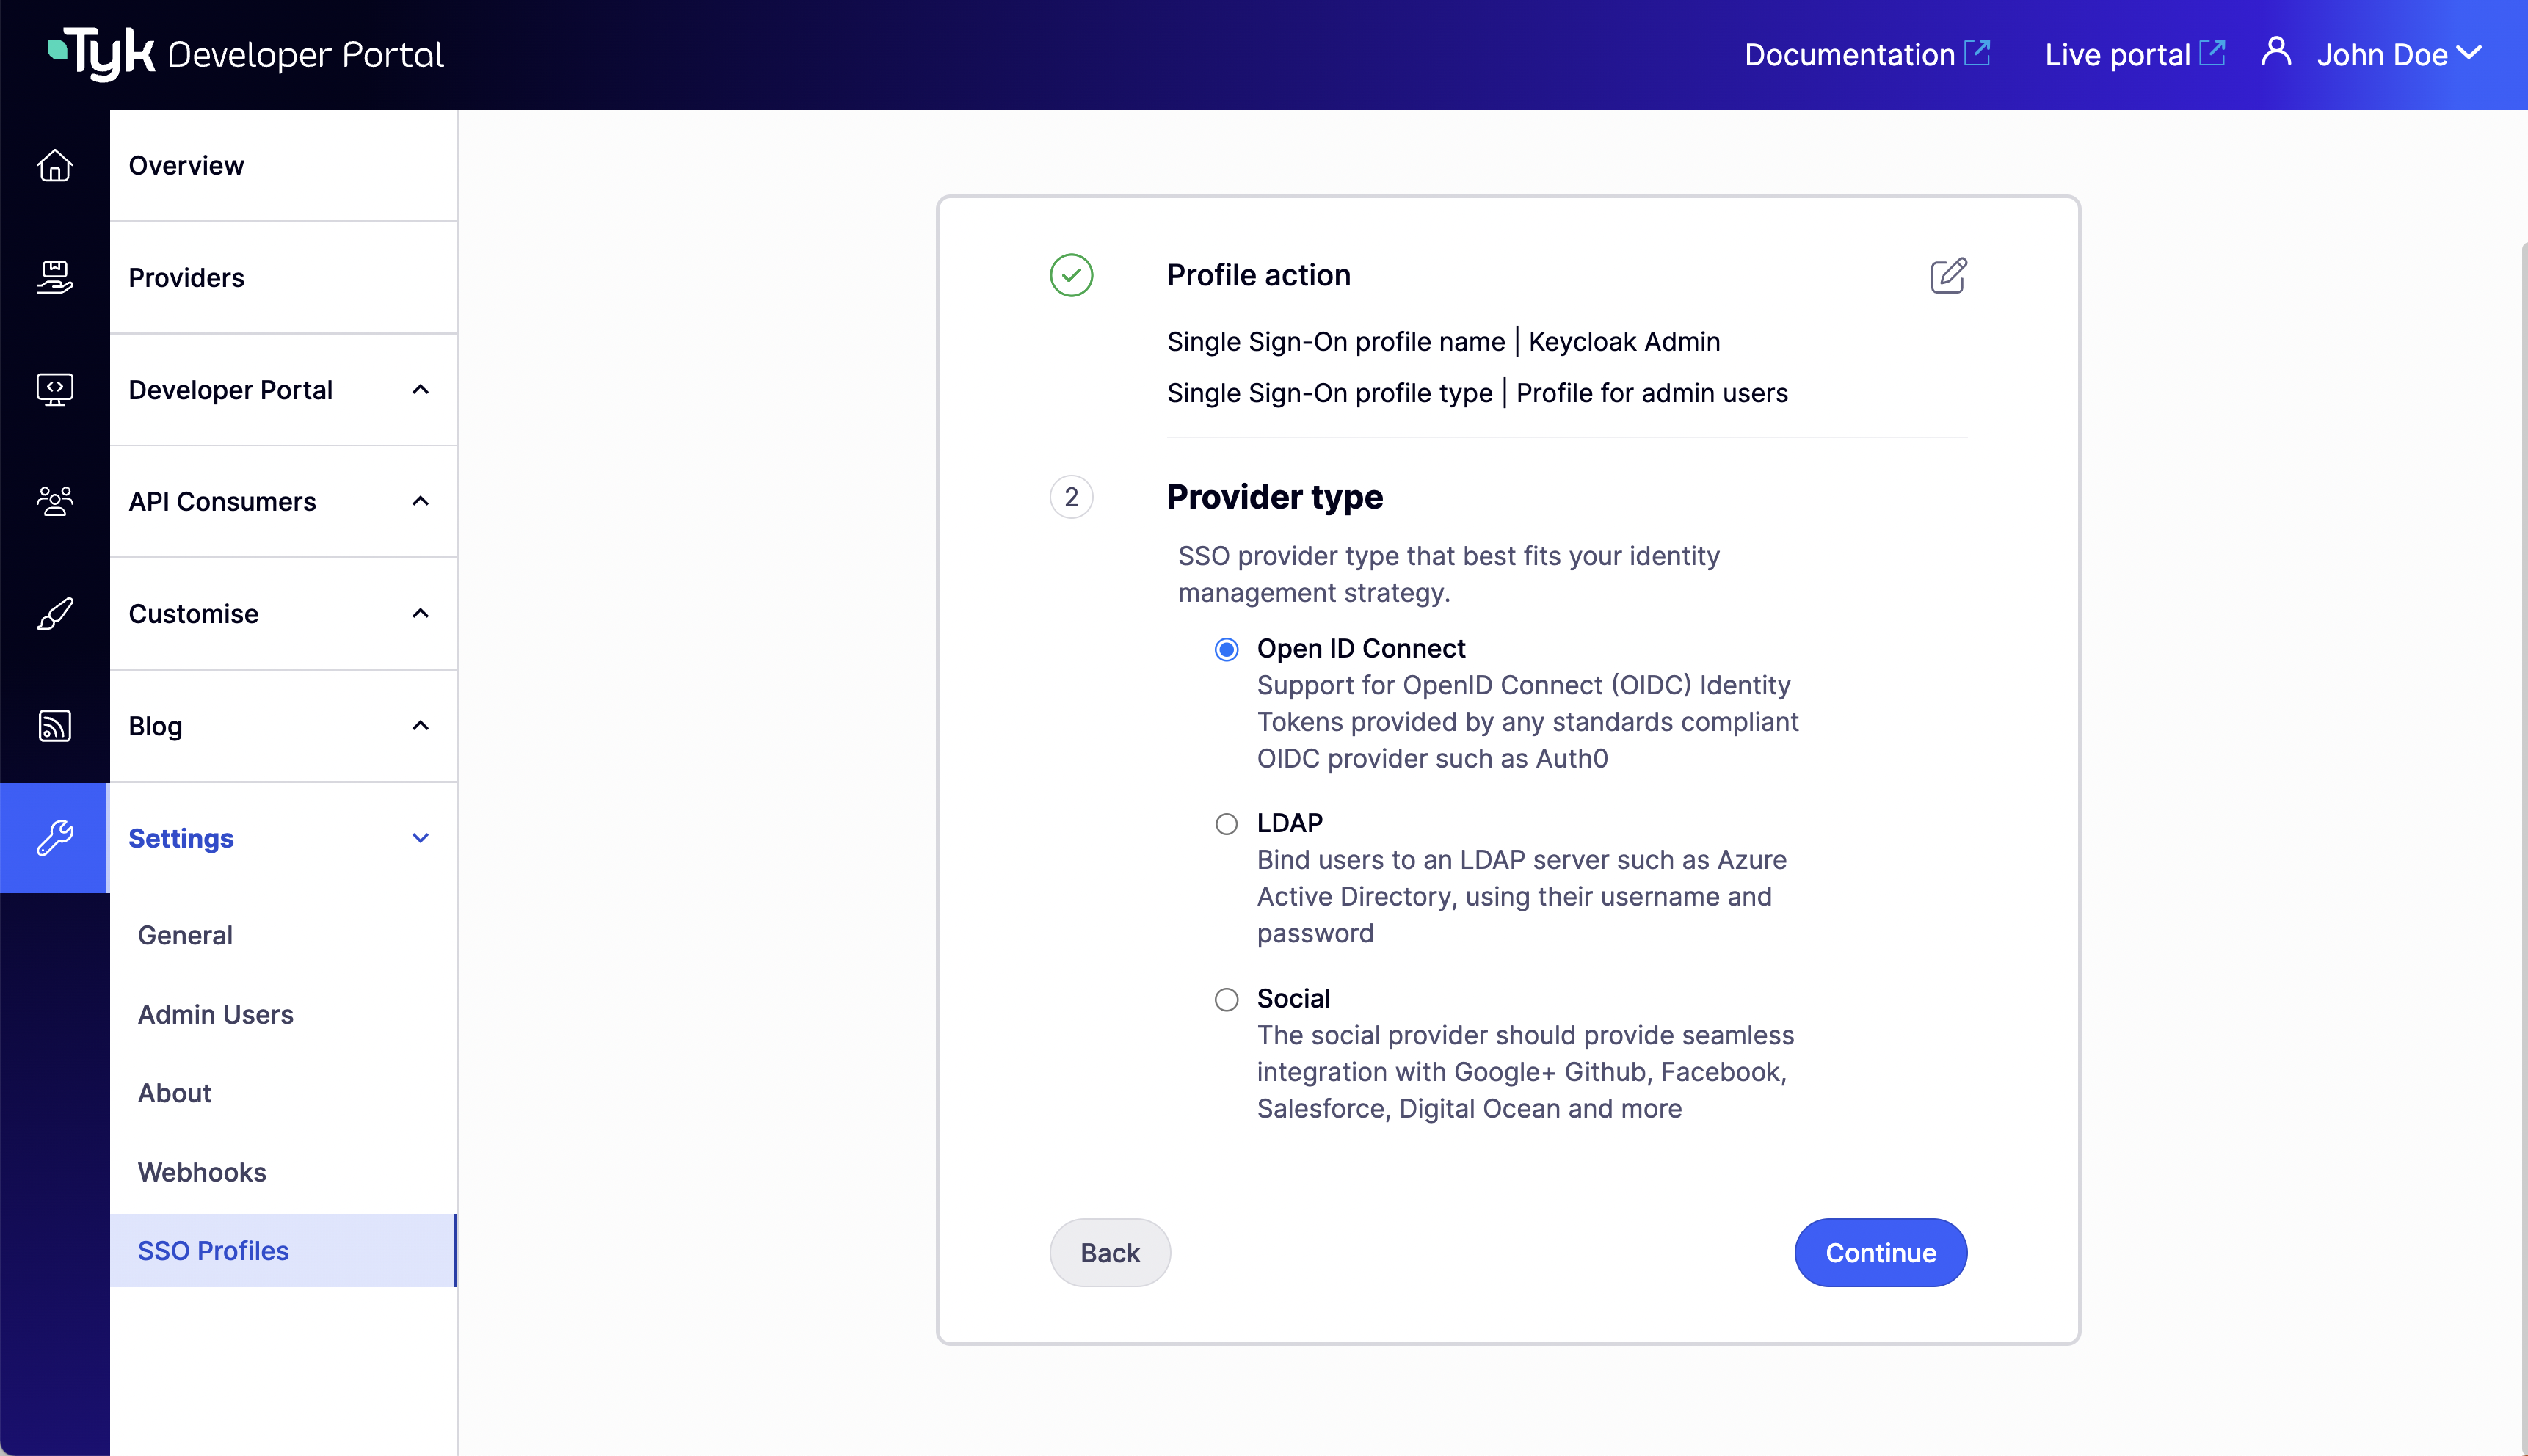 3. Complete the **Profile configuration** step. Here you can specify the access to your idp. And Advanced settings if needed.
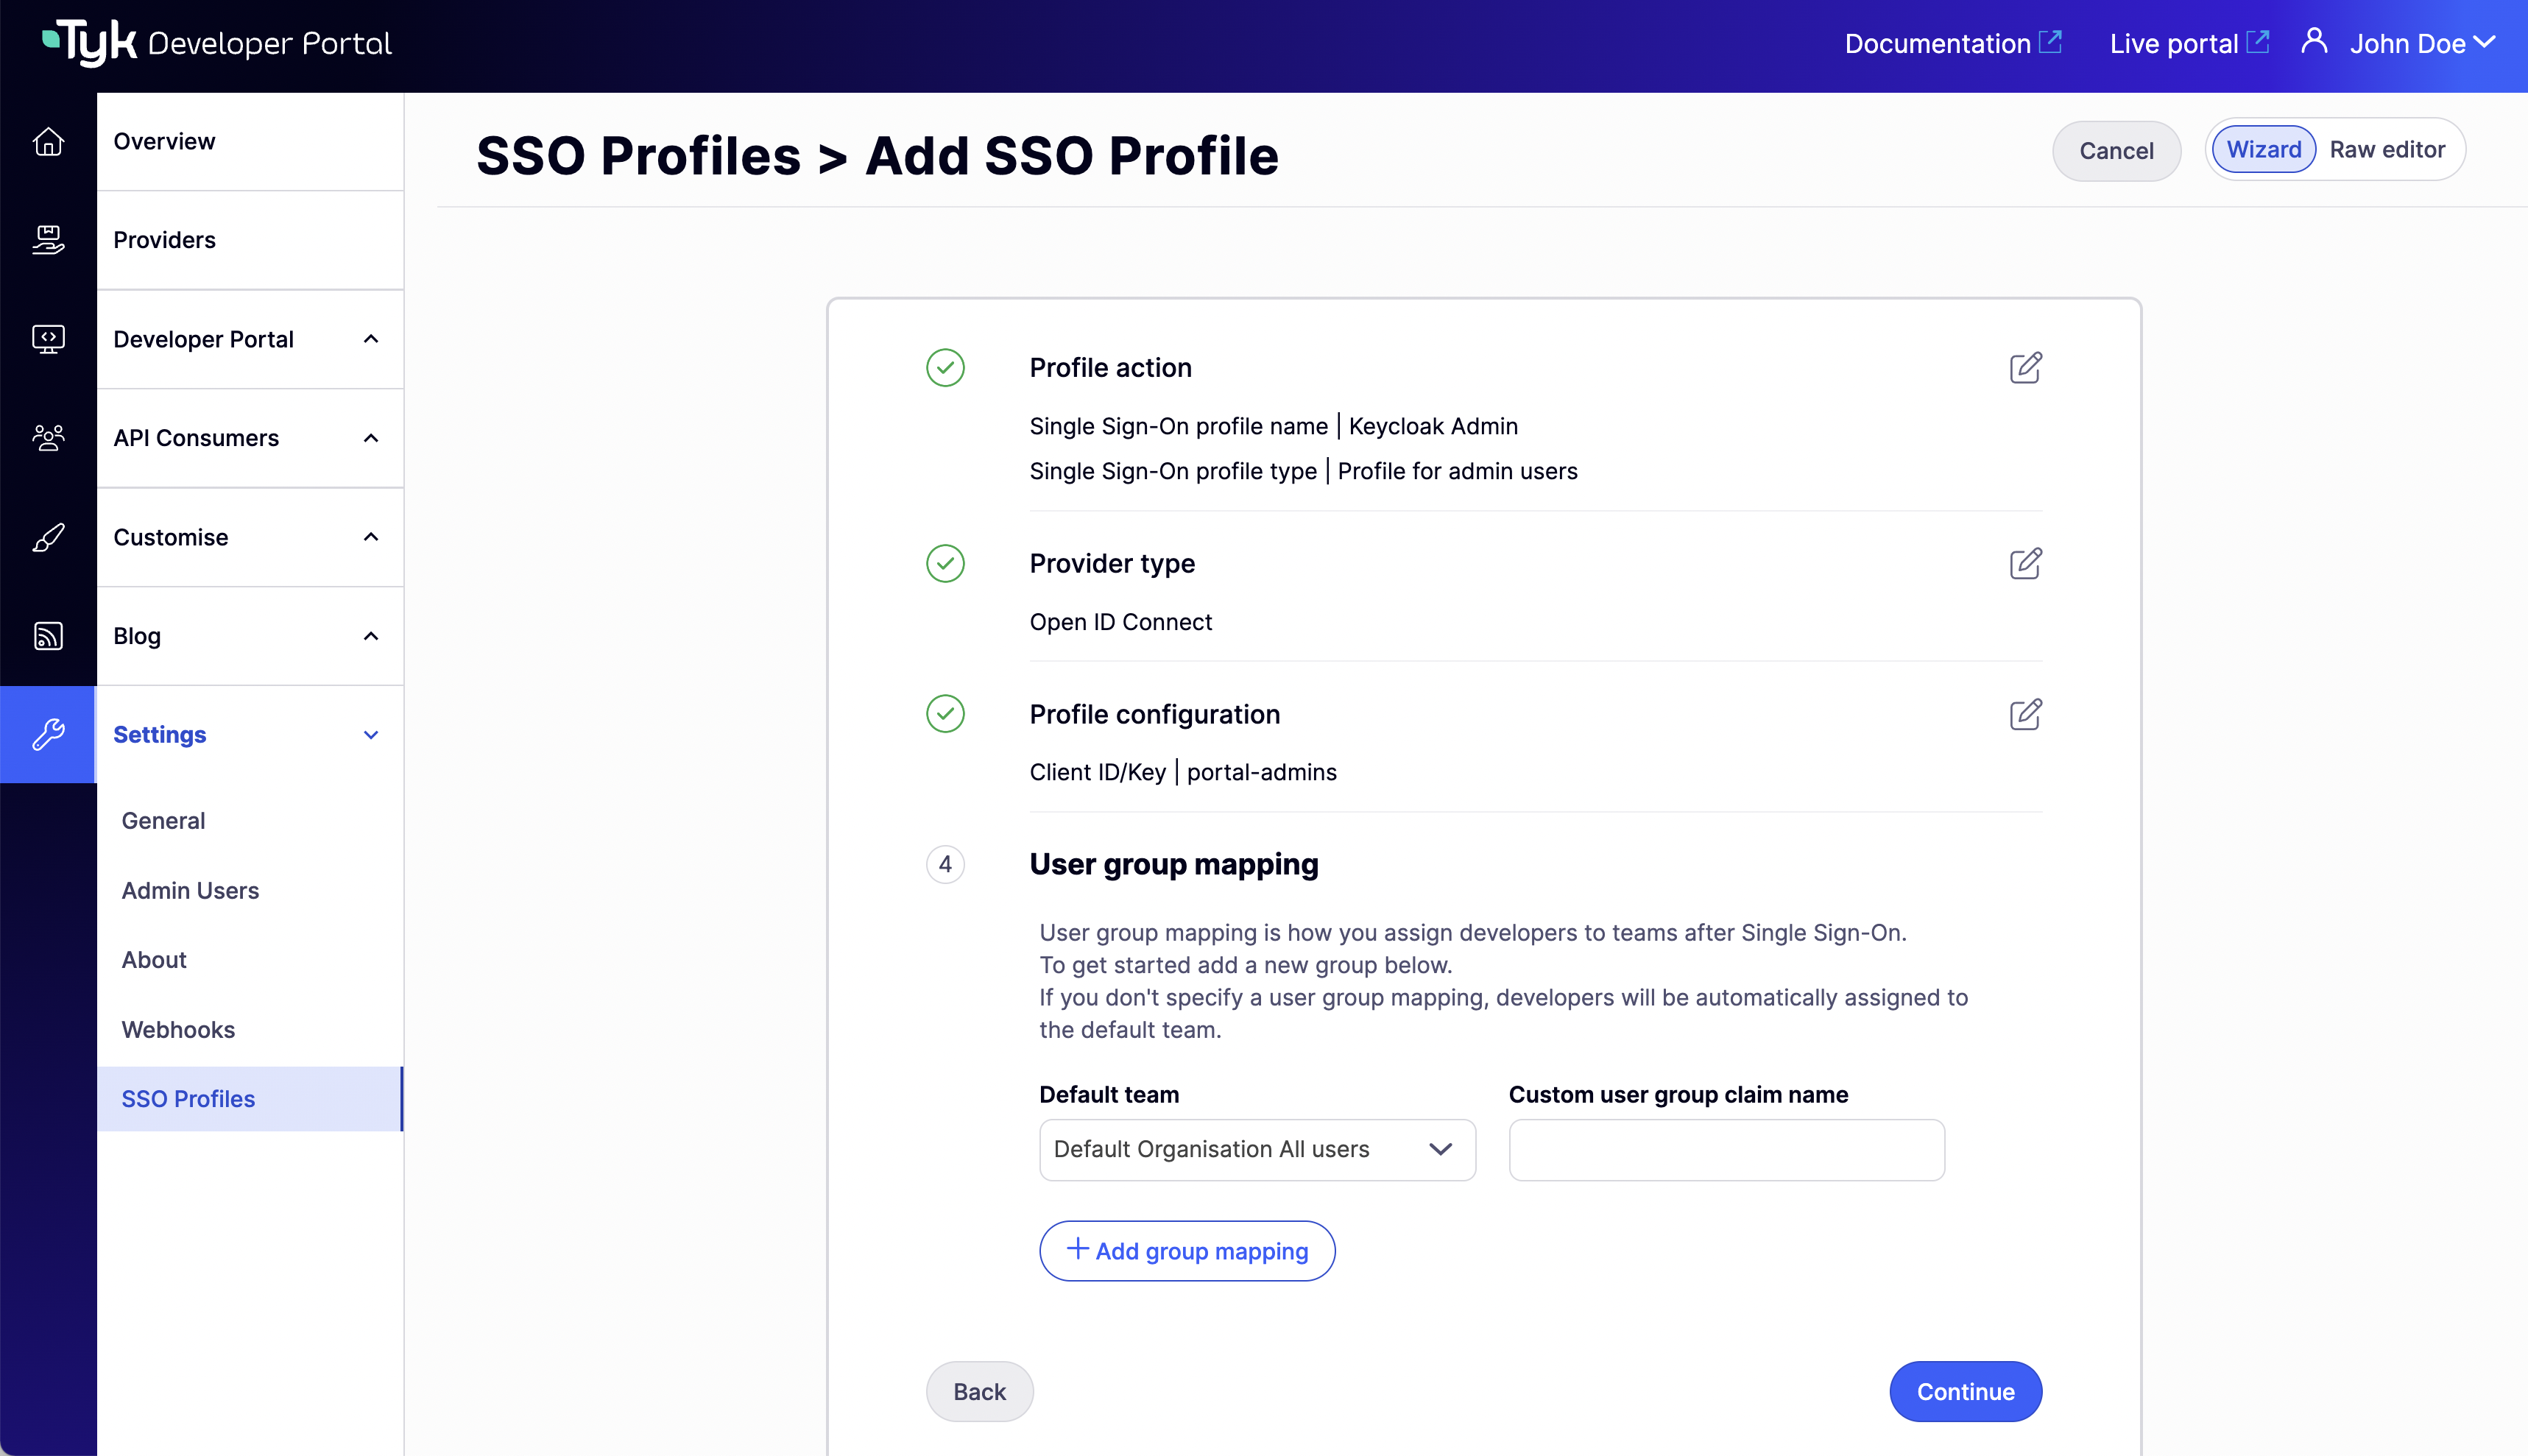
 4. Don't add any group mapping since we are creating a profile for admins and will be ignored if added. Click on **Continue** to create the profile.
 Create a profile for developers:
1. Complete the **Profile action** step. Here, you can choose a name (this name will generate the profile ID), the profile type (select **Profile for developers**), and the redirect URL on failure.
Create a profile for developers:
1. Complete the **Profile action** step. Here, you can choose a name (this name will generate the profile ID), the profile type (select **Profile for developers**), and the redirect URL on failure.
 2. Select a supported **Provider type**.
 3. Complete the **Profile configuration** step. Here you can specify the access to your idp. And Advanced settings if needed.
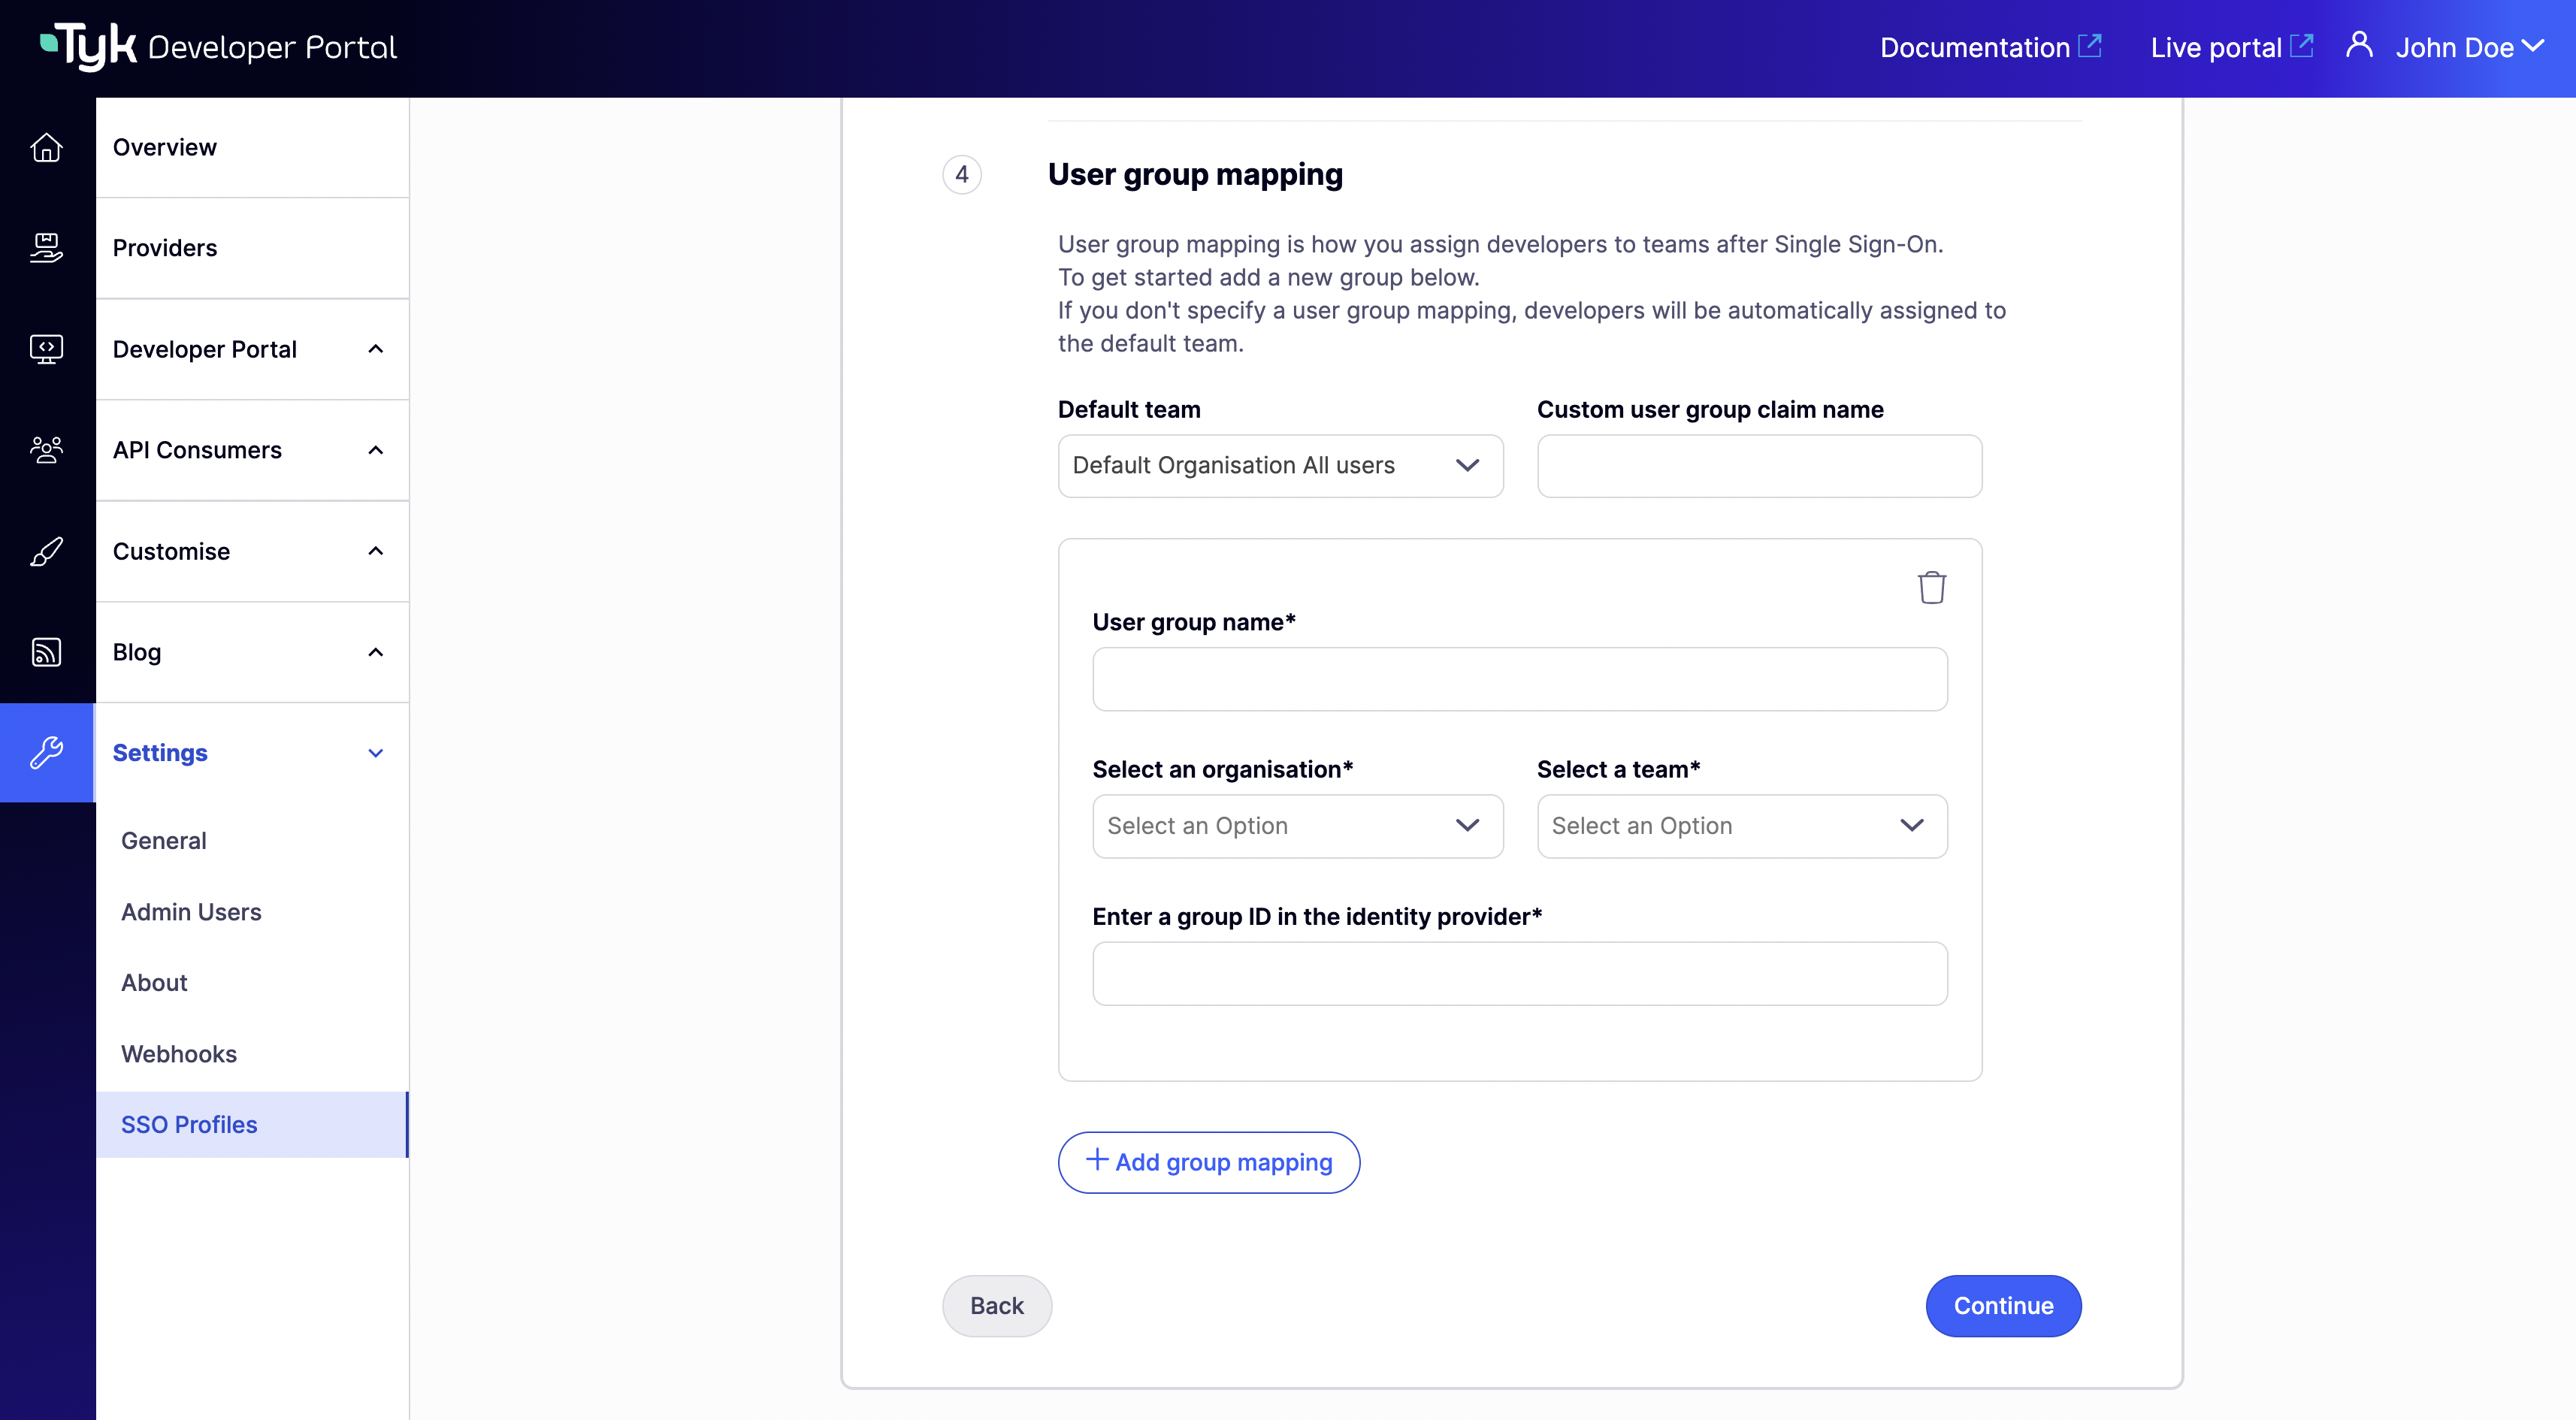
 4. Add the group mapping for the developers. **Custom user group claim name** must equal the JWT claim name that refers to the user group in your IDP.
 5. Click on **Continue** to create the profile.
#### Using the JSON Raw Editor
The Tyk Identity Broker (TIB) uses [profiles](/5.12/api-management/external-service-integration#exploring-tib-profiles) to define details related to the identity provider such as its type and access credentials, and instructs TIB on how to treat users that try log in with that provider.
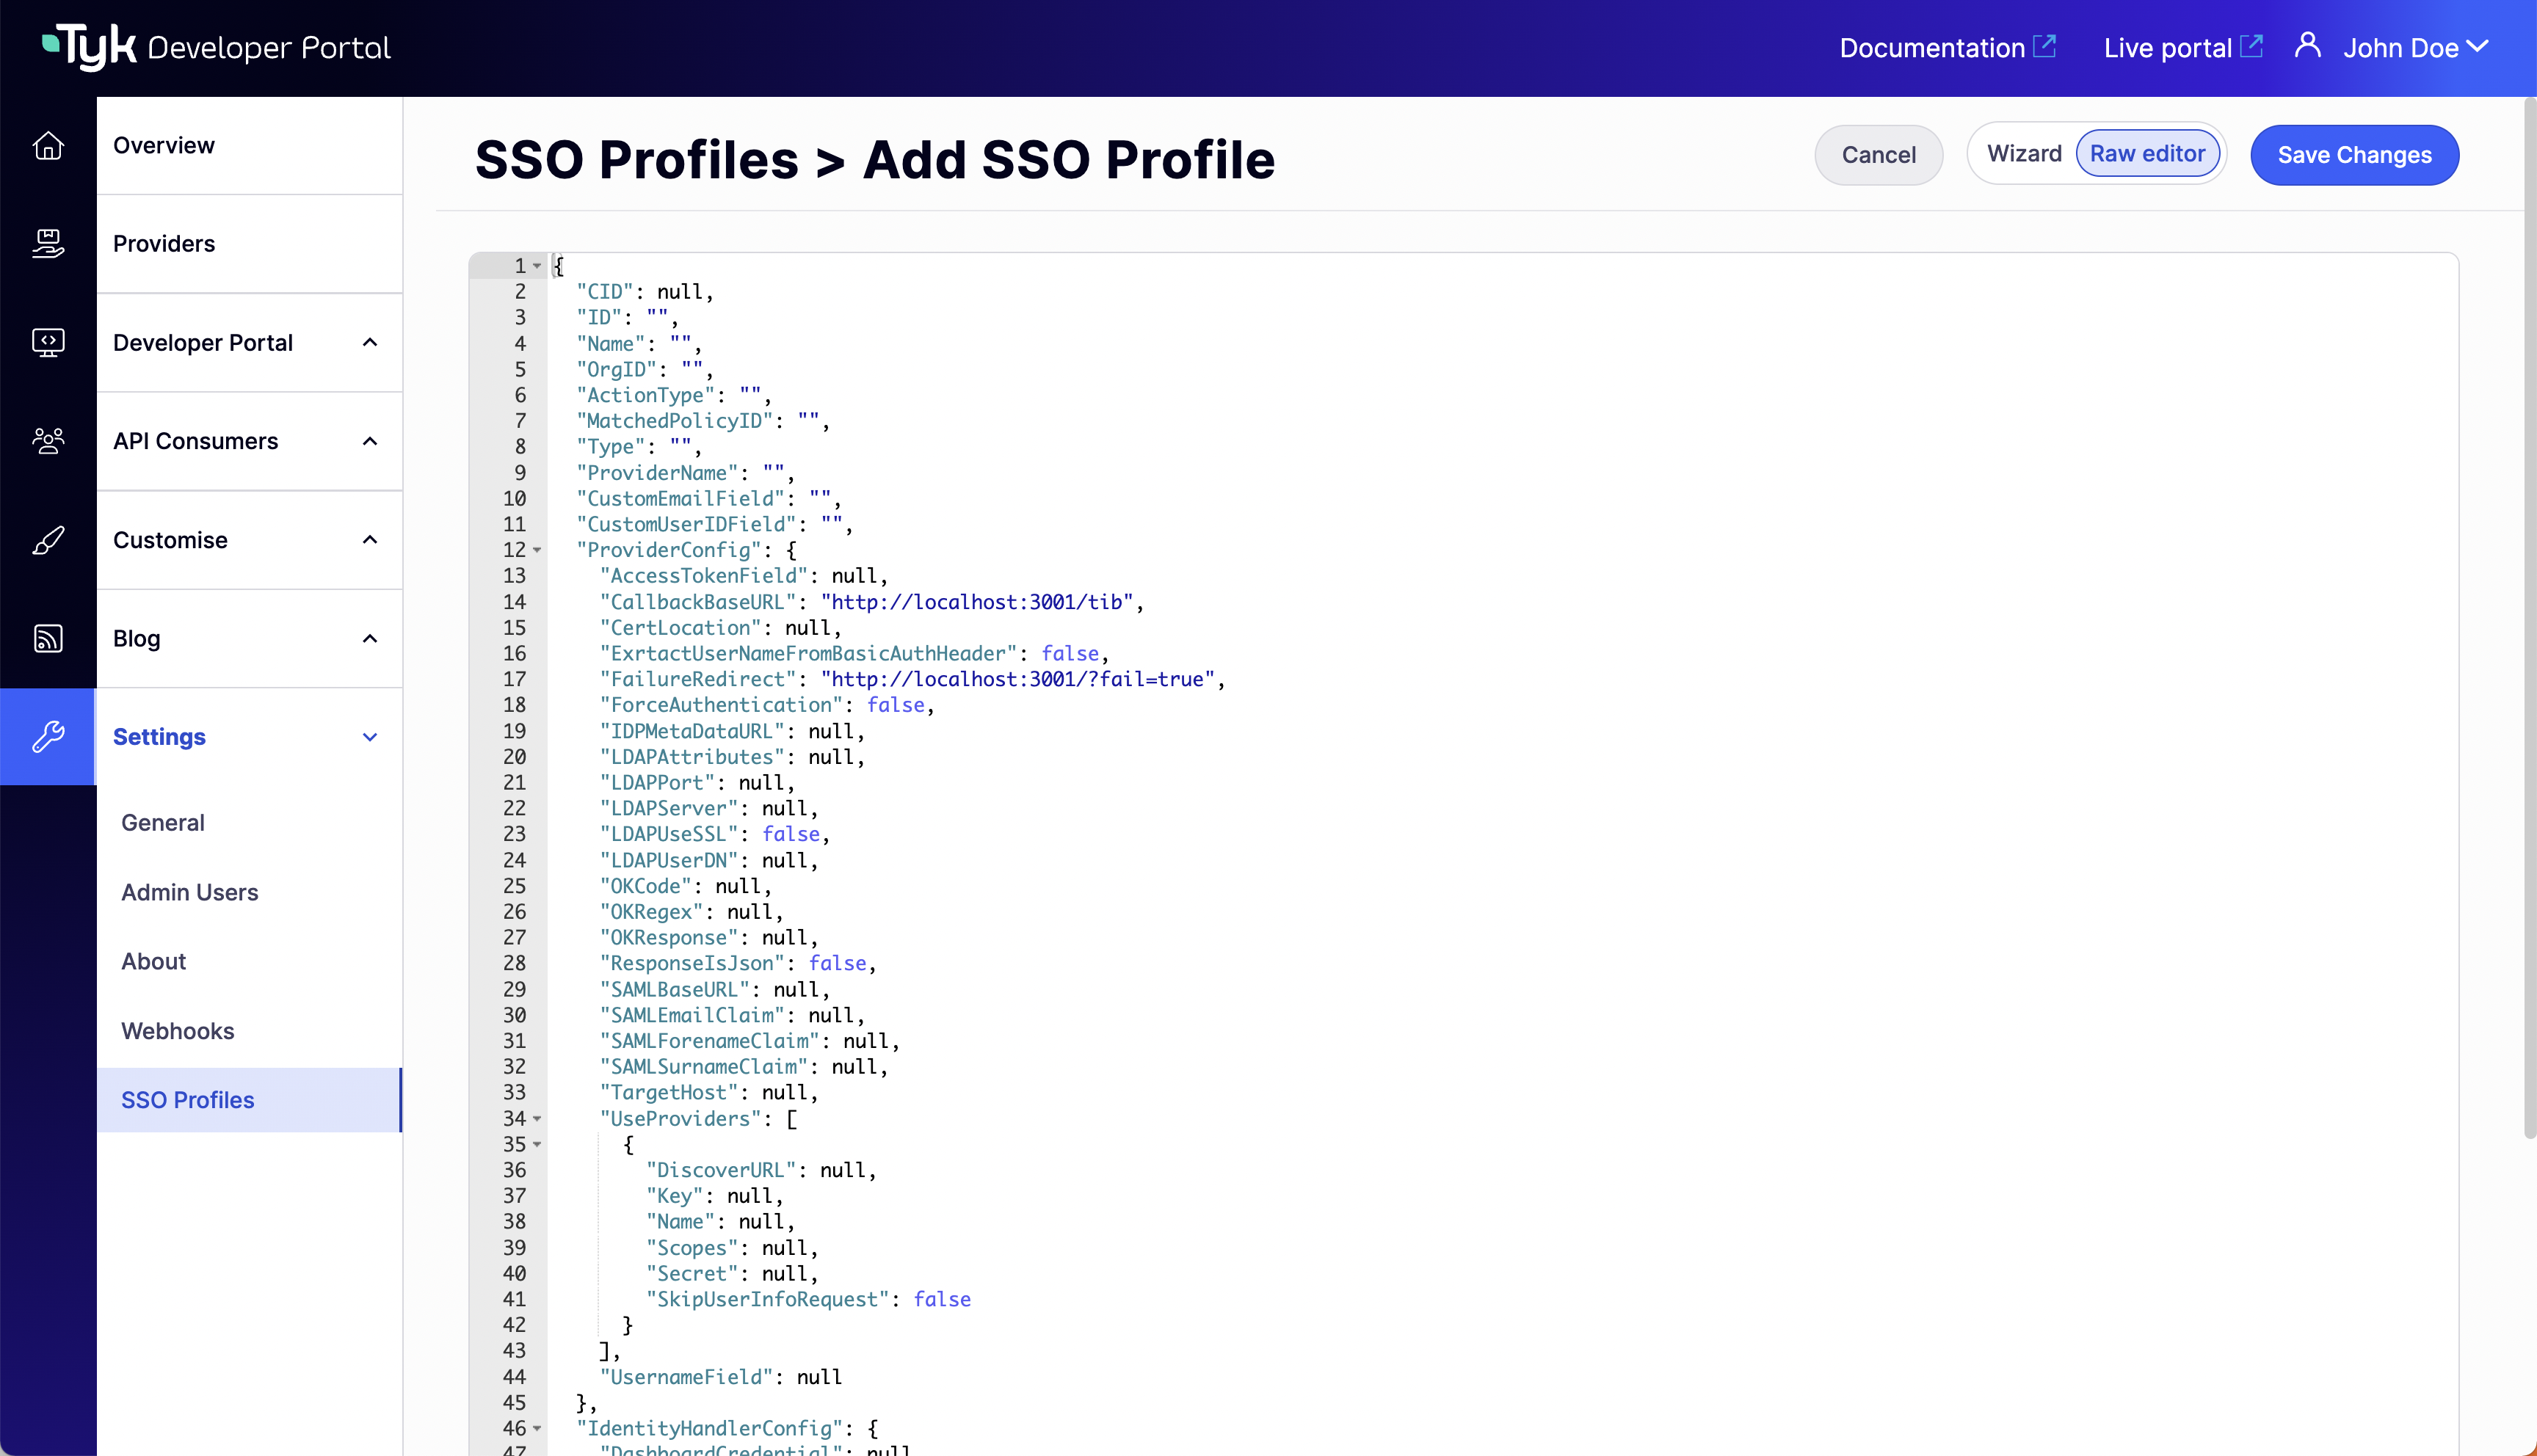
You can access the raw editor by switching to the **Raw editor** view, which displays a JSON editor with an empty TIB profile for guidance.
5. Click on **Continue** to create the profile.
#### Using the JSON Raw Editor
The Tyk Identity Broker (TIB) uses [profiles](/5.12/api-management/external-service-integration#exploring-tib-profiles) to define details related to the identity provider such as its type and access credentials, and instructs TIB on how to treat users that try log in with that provider.
You can access the raw editor by switching to the **Raw editor** view, which displays a JSON editor with an empty TIB profile for guidance.
 Create a profile for admins. Make sure the ActionType is equal to `GenerateOrLoginUserProfile` and the OrgID is equal to “0.”
 In the above example, you need to specify the following parameters:
* `OrgID` must be `"0"` for being accepted as a provider-admin
* `ActionType` must be equal to `"GenerateOrLoginUserProfile"`
* Replace the `host` and `port` in the fields `CallbackBaseURL`, `FailureRedirect` and `ReturnURL` with the actual host and port on which your portal instance is running. Also, replace `http` with `https` for the respective fields if you use https for your portal instance
* Replace the `host` and `port` in the field `DiscoverURL` with the actual host and port on which your IDP instance is running. Also, replace `http` with `https` accordingly
* In the `"ID"` field, specify an ID of this TIB profile. You can select any value for this field that consists of digits, letters, and special signs, no spaces allowed. It is better to pick a human-readable ID for your profile for better maintainability of the configuration
Create a developer profile. Ensure the ActionType is equal to “GenerateOrLoginDeveloperProfile,” and if you define a user group mapping, the team/s exist in the portal.
In the above example, you need to specify the following parameters:
* `OrgID` must be `"0"` for being accepted as a provider-admin
* `ActionType` must be equal to `"GenerateOrLoginUserProfile"`
* Replace the `host` and `port` in the fields `CallbackBaseURL`, `FailureRedirect` and `ReturnURL` with the actual host and port on which your portal instance is running. Also, replace `http` with `https` for the respective fields if you use https for your portal instance
* Replace the `host` and `port` in the field `DiscoverURL` with the actual host and port on which your IDP instance is running. Also, replace `http` with `https` accordingly
* In the `"ID"` field, specify an ID of this TIB profile. You can select any value for this field that consists of digits, letters, and special signs, no spaces allowed. It is better to pick a human-readable ID for your profile for better maintainability of the configuration
Create a developer profile. Ensure the ActionType is equal to “GenerateOrLoginDeveloperProfile,” and if you define a user group mapping, the team/s exist in the portal.
 In the above example, you need to specify the following parameters:
* `OrgID` could be anything as its value is ignored;
* `ActionType` must be equal to `"GenerateOrLoginDeveloperProfile"`
* Replace the `host` and `port` in the fields `CallbackBaseURL`, `FailureRedirect` and `ReturnURL` with the actual host and port on which your portal instance is running. Also, replace `http` with `https` for the respective fields if you use HTTPS for your portal instance
* Replace the `host` and `port` in the field `DiscoverURL` with the actual host and port on which your IDP instance is running. Also, replace `http` with `https` accordingly
* In the `"ID"` field, specify an ID of this TIB profile. You can select any value for this field that consists of digits, letters, and special signs; no spaces are allowed. It is better to pick a human-readable ID for your profile for better maintainability of the configuration
* `CustomUserGroupField` must be equal to the JWT claim name that refers to the user group in your IDP
* `UserGroupMapping` is an object that defines the relationship between user groups in the IDP and teams in the portal. If not specified, the optional parameter will cause the portal to rely on the `DefaultUserGroupID` field to determine which team a developer should log in to. Please refer to the [User group mapping section](/5.12/#user-group-mapping) for guidance
* `DefaultUserGroupID` is the default organization that the portal will use to determine which team a developer should be logged in to if it is not able to find a UserGroupMapping for that developer
**Nuances of OIDC configuration**
To ensure that the portal can log in a user with your OIDC Identity provider, you may need to either explicitly specify the email scopes in a profile
configuration or configure your IDP to include the email claim in the JWT. Failure to include the email scope in the JWT
would result in the portal not having access to the user's email.
As an example, for Okta, you can use the following configuration:
```json theme={null}
"UseProviders": [
{
"Name": "openid-connect",
"Key": "{oAuth2.0 key}",
"Secret": "{oAuth2.0 secret}",
"Scopes": ["openid", "email"],
"DiscoverURL": "{OIDC well-known endpoint}"
}
]
```
Please refer to the [TIB configuration section](/5.12/api-management/external-service-integration#single-sign-on-sso) for step-by-step instructions for setting up the UseProviders section.
### Testing SSO
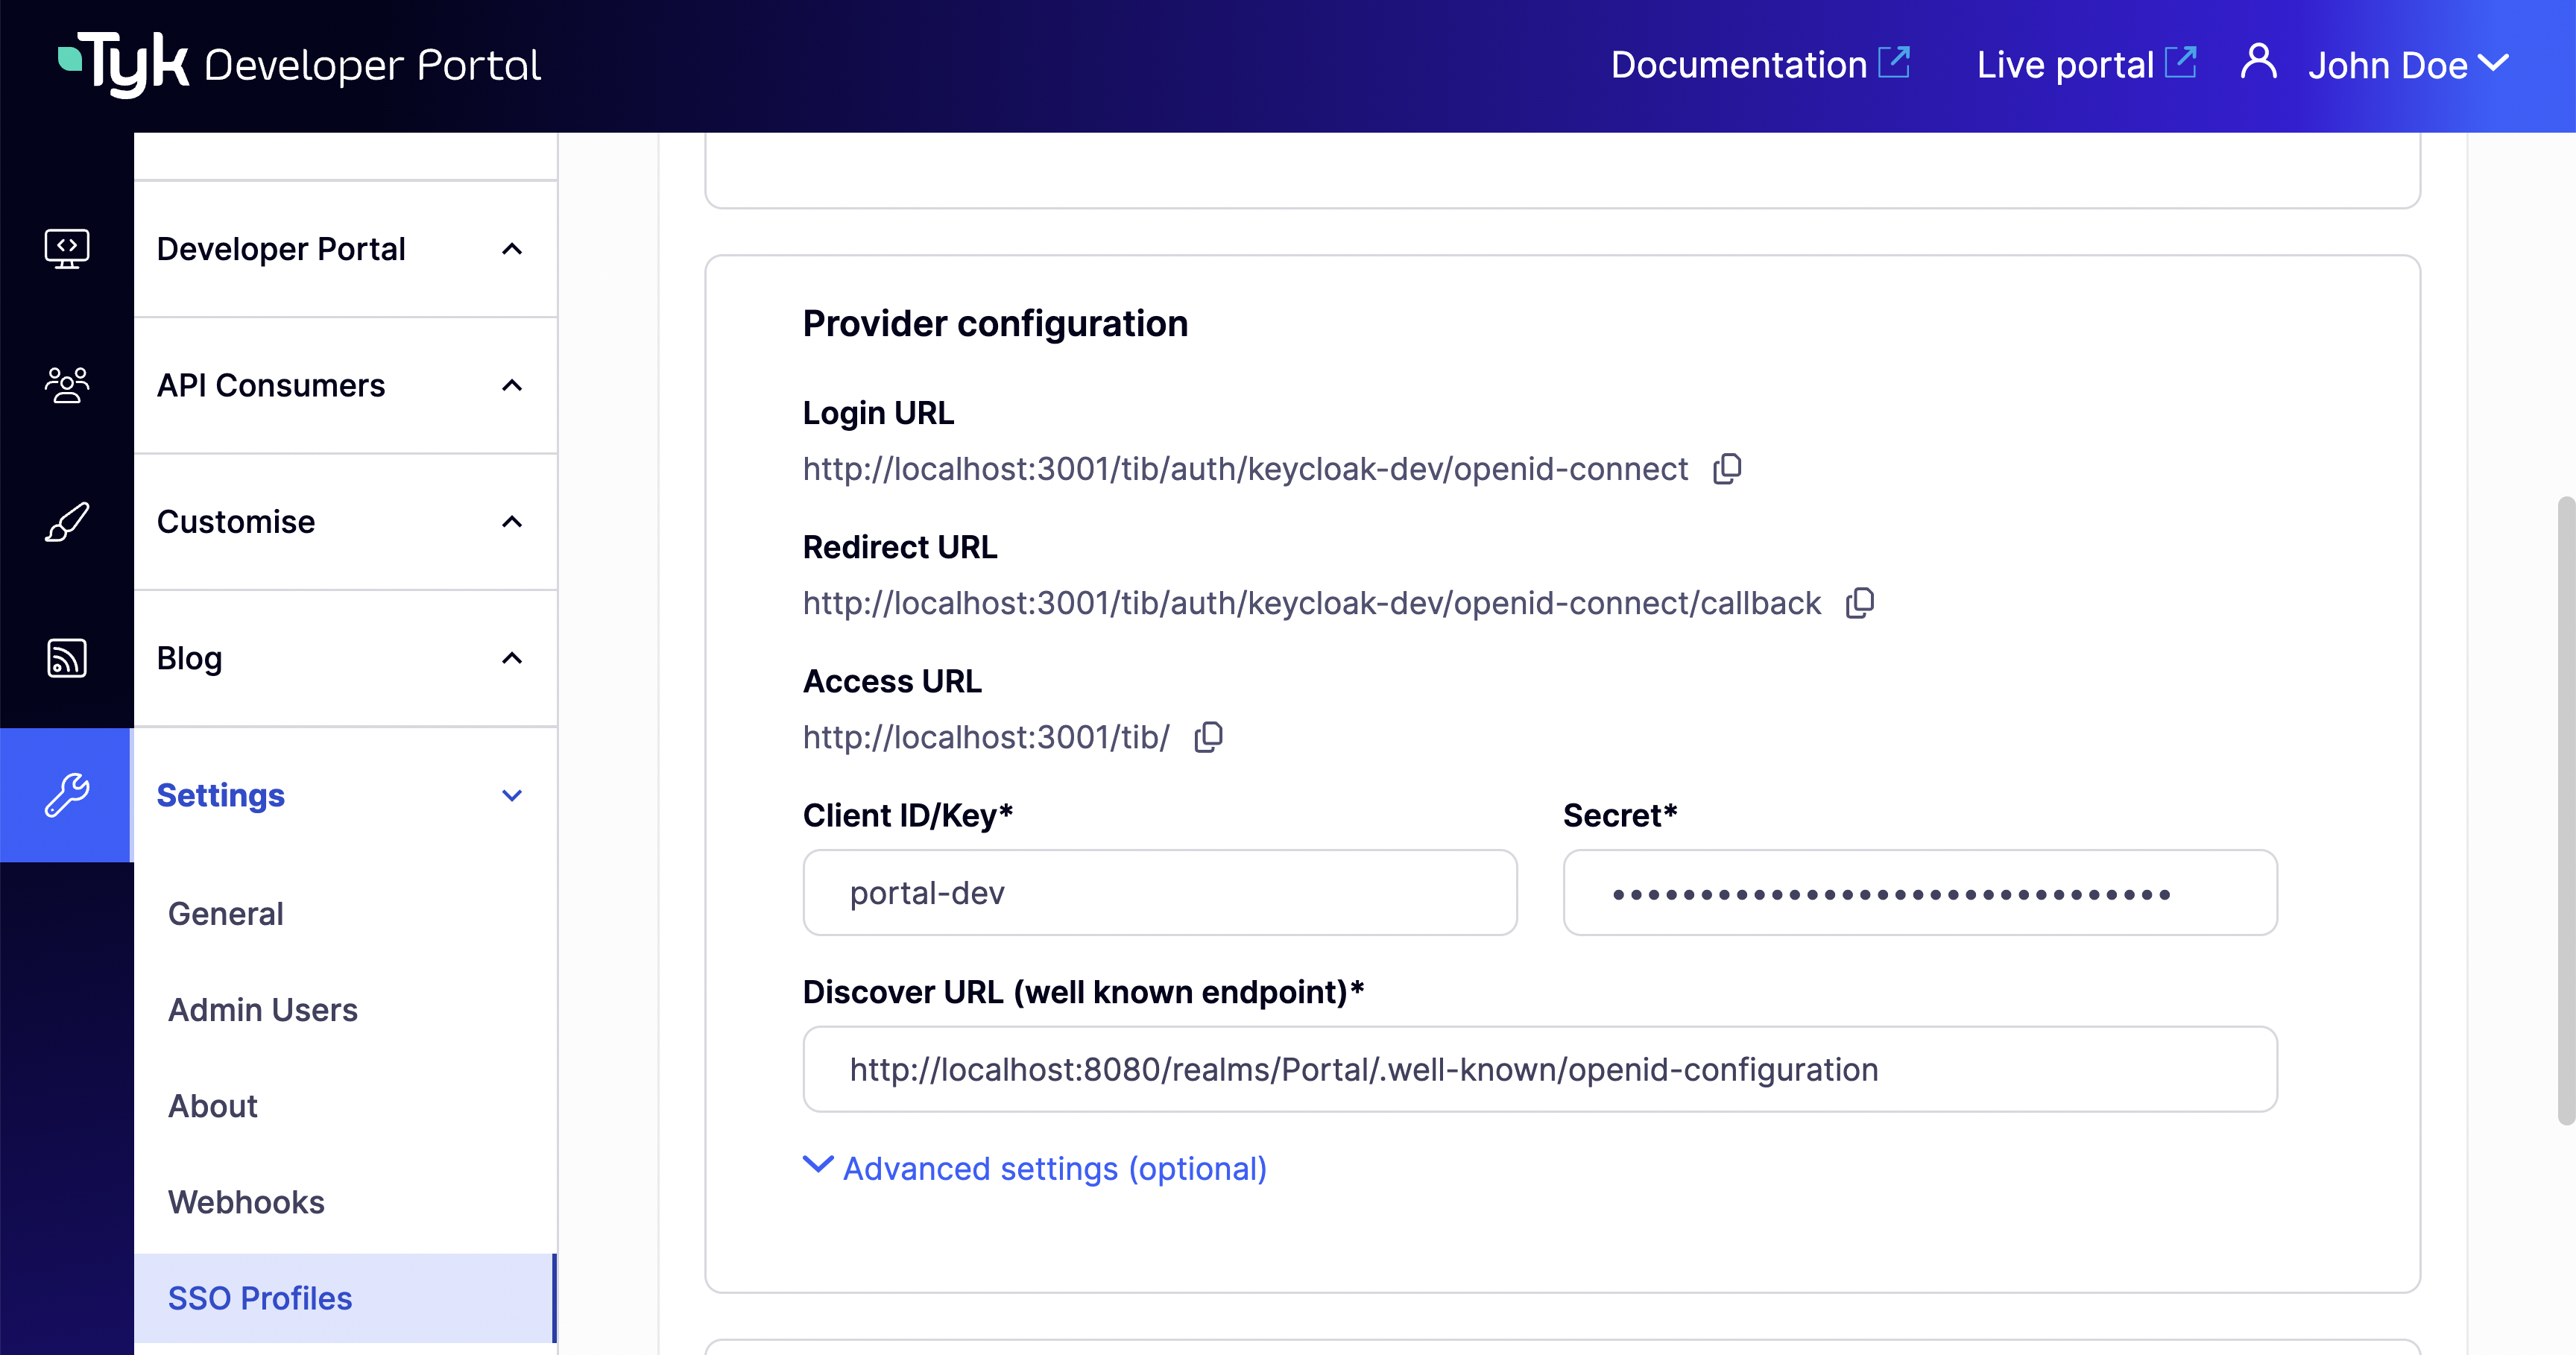
You can access the login URL in your SSO Profile details **Provider configuration** section.
In the above example, you need to specify the following parameters:
* `OrgID` could be anything as its value is ignored;
* `ActionType` must be equal to `"GenerateOrLoginDeveloperProfile"`
* Replace the `host` and `port` in the fields `CallbackBaseURL`, `FailureRedirect` and `ReturnURL` with the actual host and port on which your portal instance is running. Also, replace `http` with `https` for the respective fields if you use HTTPS for your portal instance
* Replace the `host` and `port` in the field `DiscoverURL` with the actual host and port on which your IDP instance is running. Also, replace `http` with `https` accordingly
* In the `"ID"` field, specify an ID of this TIB profile. You can select any value for this field that consists of digits, letters, and special signs; no spaces are allowed. It is better to pick a human-readable ID for your profile for better maintainability of the configuration
* `CustomUserGroupField` must be equal to the JWT claim name that refers to the user group in your IDP
* `UserGroupMapping` is an object that defines the relationship between user groups in the IDP and teams in the portal. If not specified, the optional parameter will cause the portal to rely on the `DefaultUserGroupID` field to determine which team a developer should log in to. Please refer to the [User group mapping section](/5.12/#user-group-mapping) for guidance
* `DefaultUserGroupID` is the default organization that the portal will use to determine which team a developer should be logged in to if it is not able to find a UserGroupMapping for that developer
**Nuances of OIDC configuration**
To ensure that the portal can log in a user with your OIDC Identity provider, you may need to either explicitly specify the email scopes in a profile
configuration or configure your IDP to include the email claim in the JWT. Failure to include the email scope in the JWT
would result in the portal not having access to the user's email.
As an example, for Okta, you can use the following configuration:
```json theme={null}
"UseProviders": [
{
"Name": "openid-connect",
"Key": "{oAuth2.0 key}",
"Secret": "{oAuth2.0 secret}",
"Scopes": ["openid", "email"],
"DiscoverURL": "{OIDC well-known endpoint}"
}
]
```
Please refer to the [TIB configuration section](/5.12/api-management/external-service-integration#single-sign-on-sso) for step-by-step instructions for setting up the UseProviders section.
### Testing SSO
You can access the login URL in your SSO Profile details **Provider configuration** section.
 Tyk Enterprise Developer Portal doesn't supply a login page for Single Sign-On out of the box, so you might need to create one.
From Portal v1.16.0, you can alternatively configure a [custom SSO login URL](/5.12/#custom-sso-login-url) to redirect users directly to your external IdP login page without building one.
Here is an example of such a page that works with a profile for the LDAP identity management system:
```.html theme={null}
Tyk Developer portal login
Login to the Developer portal
```
Configuration on the portal side is quite straightforward. You need to specify the portal SSO API secret that acts as a credential for the APIs that are used by TIB for communication with the portal within Single Sign-On flow.
You can use any value for the portal SSO API secret, but it should be consistent with [TIB configuration](/5.12/#configure-tyk-identity-broker-to-work-with-tyk-enterprise-developer-portal).
To specify the portal SSO API secret, add the `PORTAL_API_SECRET` variable to [the portal .env file](/5.12/product-stack/tyk-enterprise-developer-portal/deploy/configuration#sample-env-file):
```.ini theme={null}
PORTAL_API_SECRET=your-portal-api-secret
```
If you use [the Tyk helm chart](/5.12/tyk-self-managed/install/kubernetes#install-more-tyk-components), it is required to add the `PORTAL_API_SECRET` to extraEnvs:
```.yaml theme={null}
extraEnvs:
- name: PORTAL_API_SECRET
value: "your-portal-api-secret"
```
## Configuring SSO with External TIB
### Configure Tyk Identity Broker to work with Tyk Enterprise Developer Portal
The Tyk Enterprise Developer portal uses the [Tyk Identity Broker](/5.12/api-management/external-service-integration#what-is-tyk-identity-broker-tib-) to work with various Identity Management Systems, such as LDAP,
Social OAuth (e.g., GPlus, Twitter, GitHub), or Basic Authentication providers. Therefore, to configure Single Sign-On for the portal,
you need to install and configure Tyk Identity Broker first. Follow these steps to achieve this:
#### Install Tyk Identity Broker
Please refer to [the TIB installation guide documentation](/5.12/api-management/external-service-integration#install-standalone-tib) for different installation options:
* [Docker](https://hub.docker.com/r/tykio/tyk-identity-broker/#the-tibconf-file)
* [packages](https://packagecloud.io/tyk/tyk-identity-broker/install#bash-deb)
* [Tyk helm chart](/5.12/api-management/external-service-integration#install-standalone-tib)
#### Specify TIB settings to work with the Tyk Enterprise Developer portal
##### Docker or packages
Create tib.conf file for [the Docker installation](https://hub.docker.com/r/tykio/tyk-identity-broker/#the-tibconf-file) or if you use [packages](https://packagecloud.io/tyk/tyk-identity-broker/install#bash-deb) to deploy TIB:
```.json theme={null}
{
"Secret":"test-secret",
"HttpServerOptions":{
"UseSSL":false,
"CertFile":"./certs/server.pem",
"KeyFile":"./certs/server.key"
},
"SSLInsecureSkipVerify": true,
"BackEnd": {
"Name": "in_memory",
"IdentityBackendSettings": {
"Hosts" : {
"localhost": "6379"
},
"Password": "",
"Database": 0,
"EnableCluster": false,
"MaxIdle": 1000,
"MaxActive": 2000
}
},
"TykAPISettings":{
"DashboardConfig":{
"Endpoint":"https://{your portal host}",
"Port":"{your portal port}",
"AdminSecret":"{portal-api-secret}"
}
}
}
```
Setting reference:
* **TykAPISettings.DashboardConfig.Endpoint** is the Developer portal url. Pay attention if any of the elements (TIB or Portal) is running on containers.
* **TykAPISettings.DashboardConfig.Port** is the Developer portal port.
* **TykAPISettings.DashboardConfig.AdminSecret** is `PortalAPISecret` in the configuration file of the Developer portal.
The full reference for the configuration file is in [the TIB section of the documentation](/5.12/tyk-configuration-reference/tyk-identity-broker-configuration).
##### Helm charts
If you wish ot deploy TIB in Kubernetes via [Tyk helm chart](/5.12/api-management/external-service-integration#install-standalone-tib), you need to specify TIB config as extraVars:
```.yaml theme={null}
extraEnvs:
- name: TYK_IB_HTTPSERVEROPTIONS_CERTFILE
value: "./certs/server.pem"
- name: TYK_IB_HTTPSERVEROPTIONS_KEYFILE
value: "./certs/server.key"
- name: TYK_IB_SSLINSECURESKIPVERIFY
value: "true"
- name: TYK_IB_BACKEND_NAME
value: "in_memory"
- name: TYK_IB_BACKEND_IDENTITYBACKENDSETTINGS_HOSTS
value: "redis.tyk-cp:6379"
- name: TYK_IB_BACKEND_IDENTITYBACKENDSETTINGS_PASSWORD
value: ""
- name: TYK_IB_BACKEND_IDENTITYBACKENDSETTINGS_DATABASE
value: "0"
- name: TYK_IB_BACKEND_IDENTITYBACKENDSETTINGS_ENABLECLUSTER
value: "false"
- name: TYK_IB_BACKEND_IDENTITYBACKENDSETTINGS_MAXIDLE
value: "1000"
- name: TYK_IB_BACKEND_IDENTITYBACKENDSETTINGS_MAXACTIVE
value: "2000"
- name: TYK_IB_TYKAPISETTINGS_DASHBOARDCONFIG_ENDPOINT
value: "https://{your portal host}"
- name: TYK_IB_TYKAPISETTINGS_DASHBOARDCONFIG_PORT
value: "{your portal port}"
- name: TYK_IB_TYKAPISETTINGS_DASHBOARDCONFIG_ADMINSECRET
value: "{portal-api-secret}"
```
The full reference for the configuration file is in [the TIB section of the documentation](/5.12/tyk-configuration-reference/tyk-identity-broker-configuration).
### Configure Single Sign-On for admin users and developers
#### What is the Tyk Identity Broker profile
The Tyk Identity Broker (TIB) uses [profiles](/5.12/api-management/external-service-integration#exploring-tib-profiles) to define details related to the identity provider such as its type and access credentials, and instructs TIB on how to treat users that try log in with that provider.
In this guide, you will create two TIB profiles for admins users and developers. This allows you to have different identity providers for admins and developers as well as for internal and external users.
Depending on your installation options for TIB, you need to specify profiles via a json file (for Docker or packages) or via a ConfigMap (for Tyk Helm Chart).
##### profiles.json for Docker or packages installation
Here is an example of profiles.json file for Docker or packages installation:
```.json theme={null}
[
{
"ActionType": "GenerateOrLoginUserProfile",
"ID": "{ID of your TIB profile}",
"OrgID": "0",
"IdentityHandlerConfig": {
"DashboardCredential": "{portal API secret}"
},
"ProviderConfig": {
"CallbackBaseURL": "http://{TIB host}:{TIB port}",
"FailureRedirect": "http://{portal host}:{portal port}/?fail=true",
"UseProviders": [
{
"Name": "openid-connect",
"Key": "{oAuth2.0 key}",
"Secret": "{oAuth2.0 secret}",
"DiscoverURL": "OIDC well-known endpoint"
}
]
},
"ProviderName": "SocialProvider",
"ReturnURL": "http://{portal host}:{portal port}/sso",
"Type": "redirect"
},
{
"ActionType": "GenerateOrLoginDeveloperProfile",
"ID": "{ID of your TIB profile}",
"OrgID": "0",
"IdentityHandlerConfig": {
"DashboardCredential": "{portal API secret}"
},
"ProviderConfig": {
"CallbackBaseURL": "http://{TIB host}:{TIB port}",
"FailureRedirect": "http://{portal host}:{portal port}/?fail=true",
"UseProviders": [
{
"Name": "openid-connect",
"Key": "{oAuth2.0 key}",
"Secret": "{oAuth2.0 secret}",
"DiscoverURL": "OIDC well-known endpoint"
}
]
},
"ProviderName": "SocialProvider",
"ReturnURL": "http://{portal host}:{portal port}/sso",
"Type": "redirect",
"DefaultUserGroupID": "1"
}
]
```
##### ConfigMap for Tyk Helm chart installation
Here is an example of ConfigMap for the Tyk Helm chart installation:
```.yaml theme={null}
apiVersion: v1
kind: ConfigMap
metadata:
name: tyk-tib-profiles-conf
data:
profiles.json: |
[{
"ActionType": "GenerateOrLoginUserProfile",
"ID": "{ID of your TIB profile}",
"OrgID": "0",
"IdentityHandlerConfig": {
"DashboardCredential": "{portal API secret}"
},
"ProviderConfig": {
"CallbackBaseURL": "http://{TIB host}:{TIB port}",
"FailureRedirect": "http://{portal host}:{portal port}/?fail=true",
"UseProviders": [
{
"Name": "openid-connect",
"Key": "{oAuth2.0 key}",
"Secret": "{oAuth2.0 secret}",
"DiscoverURL": "OIDC well-known endpoint"
}
]
},
"ProviderName": "SocialProvider",
"ReturnURL": "http://{portal host}:{portal port}/sso",
"Type": "redirect"
},
{
"ActionType": "GenerateOrLoginDeveloperProfile",
"ID": "{ID of your TIB profile}",
"OrgID": "0",
"IdentityHandlerConfig": {
"DashboardCredential": "{portal API secret}"
},
"ProviderConfig": {
"CallbackBaseURL": "http://{TIB host}:{TIB port}",
"FailureRedirect": "http://{portal host}:{portal port}/?fail=true",
"UseProviders": [
{
"Name": "openid-connect",
"Key": "{oAuth2.0 key}",
"Secret": "{oAuth2.0 secret}",
"DiscoverURL": "OIDC well-known endpoint"
}
]
},
"ProviderName": "SocialProvider",
"ReturnURL": "http://{portal host}:{portal port}/sso",
"Type": "redirect",
"DefaultUserGroupID": "1"
}]
```
#### Configure Single Sign-On for admin users
The Tyk Enterprise Developer portal has two audiences: developers and admins. This section provides guidance on implementing
Single Sign-On for admin users. The configuration is rather straightforward, and you need to take these three steps
to enable Single Sign-On for admin users in your portal instance:
1. Create a profile for the Tyk Identity Broker (TIB) to work on your identity provider. Make sure the ActionType is equal to "GenerateOrLoginUserProfile", and OrgID is equal to "0":
```.json theme={null}
[{
"ActionType": "GenerateOrLoginUserProfile",
"ID": "{ID of your TIB profile}",
"OrgID": "0",
"IdentityHandlerConfig": {
"DashboardCredential": "{portal API secret}"
},
"ProviderConfig": {
"CallbackBaseURL": "http://{TIB host}:{TIB port}",
"FailureRedirect": "http://{portal host}:{portal port}/?fail=true",
"UseProviders": [
{
"Name": "openid-connect",
"Key": "{oAuth2.0 key}",
"Secret": "{oAuth2.0 secret}",
"DiscoverURL": "{OIDC well-known endpoint}"
}
]
},
"ProviderName": "SocialProvider",
"ReturnURL": "http://{portal host}:{portal port}/sso",
"Type": "redirect"
}]
```
In the above example, you need to specify the following parameters:
* `OrgID` must be `"0"` for being accepted as a provider-admin or super-admin
* `ActionType` must be equal to `"GenerateOrLoginUserProfile"`
* `IdentityHandlerConfig.DashboardCredential` must be equal to the `PortalAPISecret` field in the configuration file of the portal
* Replace `{portal host}` and `{portal port}` with the actual host and port on which your portal instance is running. Also, replace `http` with `https` for the respective fields if you use https for your portal instance
* Replace `{TIB host}` and `{TIB port}` with the actual host and port on which your TIB instance is running. Also, replace `http` with `https` for the respective fields if you use https for your TIB instance
* In the `"ID"` field, specify an ID of this TIB profile. You can select any value for this field that consists of digits, letters, and special signs, no spaces allowed. It is better to pick a human-readable ID for your profile for better maintainability of the configuration
**Nuances of OIDC configuration**
To ensure that the portal can log in a user with your OIDC Identity provider, you may need to either explicitly specify the email scopes in a profile
configuration or configure your IDP to include the email claim in the JWT. Failure to include the email scope in the JWT
would result in the portal not having access to the user's email.
As an example, for Okta, you can use the following configuration:
```yaml theme={null}
"UseProviders": [
{
"Name": "openid-connect",
"Key": "{oAuth2.0 key}",
"Secret": "{oAuth2.0 secret}",
"Scopes": ["openid", "email"],
"DiscoverURL": "{OIDC well-known endpoint}"
}
]
```
Please refer to the [TIB configuration section](/5.12/api-management/external-service-integration#single-sign-on-sso) for step-by-step instructions for setting up the UseProviders section.
Any changes to the TIB profile will be effective after restarting your TIB instance.
2. Create a login page for admin users. We don't supply a login page for Single Sign-On out of the box, so you need to create one.
From Portal v1.16.0, you can alternatively configure a [custom SSO login URL](/5.12/#custom-sso-login-url) to redirect users directly to your external IdP login page without building one.
Here is an example of such page that works with a profile for LDAP identity management system:
```.html theme={null}
Tyk Developer portal login
Login to the Developer portal
```
3. Now you should be able to log in to the portal with your identity provider as an admin user
#### Configure Single Sign-On for developers
This section relates to configuration and settings required to set up Single Sign-On for developers. Configuration for developers is also straight forward.
However, for developers there is one additional.
##### User group mapping
In order to land a developer into the right API Consumer organization, it is necessary to configure the UserGroupMapping
in the TIB profile that creates a binding between user groups in your IDP and developer teams in the portal.
To define the user group mapping for your developer audience, you need to add the UserGroupMapping object to the corresponding TIB profile:
```yaml theme={null}
"UserGroupMapping": {
"{IDP groupA ID}": "{portal teamA ID}",
"{IDP groupB ID}": "{portal teamB ID}",
...
}
```
The `UserGroupMapping` object contains keys that refer to group IDs in your IDP, and the corresponding values are team IDs in the portal.
When the Tyk Identity Broker authorizes a user, it searches for a key that matches the user's group ID in the IDP.
If TIB can't find a matching group ID, it logs the user in to the team with an ID equal to `DefaultUserGroupID` in the portal (if `DefaultUserGroupID` is defined).
We recommend always defining `DefaultUserGroupID` and ensuring that it refers to a valid team ID in your portal instance. If `DefaultUserGroupID` is defined but refers to an invalid team ID, the portal will refuse login attempts.
If no matching group ID is found in the `UserGroupMapping` object and `DefaultUserGroupID` isn't defined, the portal logs in the user to the "Default organization | All users" team with an ID of 1.
To determine whether a developer should be allowed to log in and which team they should be logged into, the portal uses the following algorithm:
##### Configure profile to enable Single Sign-On for developers
Follow these steps to enable Single Sign-On for developers:
1. Create a profile for the Tyk Identity Broker (TIB) to work on your identity provider. Make sure the ActionType is equal to "GenerateOrLoginUserProfile", and OrgID is equal to "0":
```.json theme={null}
[{
"ActionType": "GenerateOrLoginDeveloperProfile",
"ID": "{ID of your TIB profile}",
"OrgID": "0",
"IdentityHandlerConfig": {
"DashboardCredential": "{ID of your TIB profile}"
},
"ProviderConfig": {
"CallbackBaseURL": "http://{TIB host}:{TIB port}",
"FailureRedirect": "http://{portal host}:{portal port}/?fail=true",
"UseProviders": [
{
"Name": "openid-connect",
"Key": "{oAuth2.0 key}",
"Secret": "{oAuth2.0 secret}",
"DiscoverURL": "{OIDC well-known endpoint}"
}
]
},
"ProviderName": "SocialProvider",
"ReturnURL": "http://{portal host}:{portal port}/sso",
"Type": "redirect",
"CustomUserGroupField": "{your group ID field}",
"UserGroupMapping": {
"{IDP group ID}": "{portal team ID}"
},
"DefaultUserGroupID": "{portal team ID}"
}]
```
In the above example, you need to specify the following parameters:
* `OrgID` could be anything as its value is ignored;
* `ActionType` must be equal to `"GenerateOrLoginDeveloperProfile"`
* `IdentityHandlerConfig.DashboardCredential` must be equal to the `PortalAPISecret` field in the configuration file of the portal
* Replace `{portal host}` and `{portal port}` with the actual host and port on which your portal instance is running. Also, replace `http` with `https` for the respective fields if you use https for your portal instance
* Replace `{TIB host}` and `{TIB port}` with the actual host and port on which your TIB instance is running. Also, replace `http` with `https` for the respective fields if you use https for your TIB instance
* In the `"ID"` field, specify an ID of this TIB profile. You can select any value for this field that consists of digits, letters, and special signs, no spaces allowed. It is better to pick a human-readable ID for your profile for better maintainability of the configuration
* `CustomUserGroupField` must be equal to the JWT claim name that refers to the user group in your IDP
* `UserGroupMapping` an object that defines relationship between user groups in the IDP and teams in the portal. The optional parameter, if not specified, will cause the portal to rely on the `DefaultUserGroupID` field to determine which team a developer should log in to. Please refer to the [User group mapping section](/5.12/#user-group-mapping) for guidance
* `DefaultUserGroupID` is the default organization that the portal will use to determine which team a developer should be logged in to if it is not able to find a UserGroupMapping for that developer
**Nuances of OIDC configuration**
To ensure that the portal can log in a user with your OIDC Identity provider, you may need to either explicitly specify the email scopes in a profile
configuration or configure your IDP to include the email claim in the JWT. Failure to include the email scope in the JWT
would result in the portal not having access to the user's email.
As an example, for Okta, you can use the following configuration:
```json theme={null}
"UseProviders": [
{
"Name": "openid-connect",
"Key": "{oAuth2.0 key}",
"Secret": "{oAuth2.0 secret}",
"Scopes": ["openid", "email"],
"DiscoverURL": "{OIDC well-known endpoint}"
}
]
```
2. Create a login page for developers. We don't supply a login page for Single Sign-On out of the box, so you need to create one.
Here is an example of such page that works with a profile for LDAP identity management system:
```.html theme={null}
Tyk Developer portal login
Login to the Developer portal
```
3. Now you should be able to log in to the portal with your identity provider as a developer
## Custom SSO Login URL
*Available from Portal v1.16.0. See the [v1.16.0 release notes](/5.12/developer-support/release-notes/portal#1-16-0-release-notes).*
By default, the Developer Portal renders its own login page at `/auth/password/login`. When you set `SSOCustomLoginURL`, the portal automatically redirects all login requests to the URL you specify (typically your identity provider's login page) instead of displaying the built-in form. The Portal's **Log in** button also points to this URL.
Use this setting when you want to delegate authentication entirely to an external IdP without exposing the Portal's default login page to users.
This setting only redirects the login entry point. User registration and password reset pages are not affected.
### Configuration
Set either the environment variable or the equivalent configuration file key:
```ini theme={null}
PORTAL_SSO_CUSTOM_LOGIN_URL=https://your-idp.example.com/login
```
```json theme={null}
{
"SSOCustomLoginURL": "https://your-idp.example.com/login"
}
```
For the full reference, see [`PORTAL_SSO_CUSTOM_LOGIN_URL`](/5.12/product-stack/tyk-enterprise-developer-portal/deploy/configuration#portal_sso_custom_login_url) in the configuration reference.
Tyk Enterprise Developer Portal doesn't supply a login page for Single Sign-On out of the box, so you might need to create one.
From Portal v1.16.0, you can alternatively configure a [custom SSO login URL](/5.12/#custom-sso-login-url) to redirect users directly to your external IdP login page without building one.
Here is an example of such a page that works with a profile for the LDAP identity management system:
```.html theme={null}
Tyk Developer portal login
Login to the Developer portal
```
Configuration on the portal side is quite straightforward. You need to specify the portal SSO API secret that acts as a credential for the APIs that are used by TIB for communication with the portal within Single Sign-On flow.
You can use any value for the portal SSO API secret, but it should be consistent with [TIB configuration](/5.12/#configure-tyk-identity-broker-to-work-with-tyk-enterprise-developer-portal).
To specify the portal SSO API secret, add the `PORTAL_API_SECRET` variable to [the portal .env file](/5.12/product-stack/tyk-enterprise-developer-portal/deploy/configuration#sample-env-file):
```.ini theme={null}
PORTAL_API_SECRET=your-portal-api-secret
```
If you use [the Tyk helm chart](/5.12/tyk-self-managed/install/kubernetes#install-more-tyk-components), it is required to add the `PORTAL_API_SECRET` to extraEnvs:
```.yaml theme={null}
extraEnvs:
- name: PORTAL_API_SECRET
value: "your-portal-api-secret"
```
## Configuring SSO with External TIB
### Configure Tyk Identity Broker to work with Tyk Enterprise Developer Portal
The Tyk Enterprise Developer portal uses the [Tyk Identity Broker](/5.12/api-management/external-service-integration#what-is-tyk-identity-broker-tib-) to work with various Identity Management Systems, such as LDAP,
Social OAuth (e.g., GPlus, Twitter, GitHub), or Basic Authentication providers. Therefore, to configure Single Sign-On for the portal,
you need to install and configure Tyk Identity Broker first. Follow these steps to achieve this:
#### Install Tyk Identity Broker
Please refer to [the TIB installation guide documentation](/5.12/api-management/external-service-integration#install-standalone-tib) for different installation options:
* [Docker](https://hub.docker.com/r/tykio/tyk-identity-broker/#the-tibconf-file)
* [packages](https://packagecloud.io/tyk/tyk-identity-broker/install#bash-deb)
* [Tyk helm chart](/5.12/api-management/external-service-integration#install-standalone-tib)
#### Specify TIB settings to work with the Tyk Enterprise Developer portal
##### Docker or packages
Create tib.conf file for [the Docker installation](https://hub.docker.com/r/tykio/tyk-identity-broker/#the-tibconf-file) or if you use [packages](https://packagecloud.io/tyk/tyk-identity-broker/install#bash-deb) to deploy TIB:
```.json theme={null}
{
"Secret":"test-secret",
"HttpServerOptions":{
"UseSSL":false,
"CertFile":"./certs/server.pem",
"KeyFile":"./certs/server.key"
},
"SSLInsecureSkipVerify": true,
"BackEnd": {
"Name": "in_memory",
"IdentityBackendSettings": {
"Hosts" : {
"localhost": "6379"
},
"Password": "",
"Database": 0,
"EnableCluster": false,
"MaxIdle": 1000,
"MaxActive": 2000
}
},
"TykAPISettings":{
"DashboardConfig":{
"Endpoint":"https://{your portal host}",
"Port":"{your portal port}",
"AdminSecret":"{portal-api-secret}"
}
}
}
```
Setting reference:
* **TykAPISettings.DashboardConfig.Endpoint** is the Developer portal url. Pay attention if any of the elements (TIB or Portal) is running on containers.
* **TykAPISettings.DashboardConfig.Port** is the Developer portal port.
* **TykAPISettings.DashboardConfig.AdminSecret** is `PortalAPISecret` in the configuration file of the Developer portal.
The full reference for the configuration file is in [the TIB section of the documentation](/5.12/tyk-configuration-reference/tyk-identity-broker-configuration).
##### Helm charts
If you wish ot deploy TIB in Kubernetes via [Tyk helm chart](/5.12/api-management/external-service-integration#install-standalone-tib), you need to specify TIB config as extraVars:
```.yaml theme={null}
extraEnvs:
- name: TYK_IB_HTTPSERVEROPTIONS_CERTFILE
value: "./certs/server.pem"
- name: TYK_IB_HTTPSERVEROPTIONS_KEYFILE
value: "./certs/server.key"
- name: TYK_IB_SSLINSECURESKIPVERIFY
value: "true"
- name: TYK_IB_BACKEND_NAME
value: "in_memory"
- name: TYK_IB_BACKEND_IDENTITYBACKENDSETTINGS_HOSTS
value: "redis.tyk-cp:6379"
- name: TYK_IB_BACKEND_IDENTITYBACKENDSETTINGS_PASSWORD
value: ""
- name: TYK_IB_BACKEND_IDENTITYBACKENDSETTINGS_DATABASE
value: "0"
- name: TYK_IB_BACKEND_IDENTITYBACKENDSETTINGS_ENABLECLUSTER
value: "false"
- name: TYK_IB_BACKEND_IDENTITYBACKENDSETTINGS_MAXIDLE
value: "1000"
- name: TYK_IB_BACKEND_IDENTITYBACKENDSETTINGS_MAXACTIVE
value: "2000"
- name: TYK_IB_TYKAPISETTINGS_DASHBOARDCONFIG_ENDPOINT
value: "https://{your portal host}"
- name: TYK_IB_TYKAPISETTINGS_DASHBOARDCONFIG_PORT
value: "{your portal port}"
- name: TYK_IB_TYKAPISETTINGS_DASHBOARDCONFIG_ADMINSECRET
value: "{portal-api-secret}"
```
The full reference for the configuration file is in [the TIB section of the documentation](/5.12/tyk-configuration-reference/tyk-identity-broker-configuration).
### Configure Single Sign-On for admin users and developers
#### What is the Tyk Identity Broker profile
The Tyk Identity Broker (TIB) uses [profiles](/5.12/api-management/external-service-integration#exploring-tib-profiles) to define details related to the identity provider such as its type and access credentials, and instructs TIB on how to treat users that try log in with that provider.
In this guide, you will create two TIB profiles for admins users and developers. This allows you to have different identity providers for admins and developers as well as for internal and external users.
Depending on your installation options for TIB, you need to specify profiles via a json file (for Docker or packages) or via a ConfigMap (for Tyk Helm Chart).
##### profiles.json for Docker or packages installation
Here is an example of profiles.json file for Docker or packages installation:
```.json theme={null}
[
{
"ActionType": "GenerateOrLoginUserProfile",
"ID": "{ID of your TIB profile}",
"OrgID": "0",
"IdentityHandlerConfig": {
"DashboardCredential": "{portal API secret}"
},
"ProviderConfig": {
"CallbackBaseURL": "http://{TIB host}:{TIB port}",
"FailureRedirect": "http://{portal host}:{portal port}/?fail=true",
"UseProviders": [
{
"Name": "openid-connect",
"Key": "{oAuth2.0 key}",
"Secret": "{oAuth2.0 secret}",
"DiscoverURL": "OIDC well-known endpoint"
}
]
},
"ProviderName": "SocialProvider",
"ReturnURL": "http://{portal host}:{portal port}/sso",
"Type": "redirect"
},
{
"ActionType": "GenerateOrLoginDeveloperProfile",
"ID": "{ID of your TIB profile}",
"OrgID": "0",
"IdentityHandlerConfig": {
"DashboardCredential": "{portal API secret}"
},
"ProviderConfig": {
"CallbackBaseURL": "http://{TIB host}:{TIB port}",
"FailureRedirect": "http://{portal host}:{portal port}/?fail=true",
"UseProviders": [
{
"Name": "openid-connect",
"Key": "{oAuth2.0 key}",
"Secret": "{oAuth2.0 secret}",
"DiscoverURL": "OIDC well-known endpoint"
}
]
},
"ProviderName": "SocialProvider",
"ReturnURL": "http://{portal host}:{portal port}/sso",
"Type": "redirect",
"DefaultUserGroupID": "1"
}
]
```
##### ConfigMap for Tyk Helm chart installation
Here is an example of ConfigMap for the Tyk Helm chart installation:
```.yaml theme={null}
apiVersion: v1
kind: ConfigMap
metadata:
name: tyk-tib-profiles-conf
data:
profiles.json: |
[{
"ActionType": "GenerateOrLoginUserProfile",
"ID": "{ID of your TIB profile}",
"OrgID": "0",
"IdentityHandlerConfig": {
"DashboardCredential": "{portal API secret}"
},
"ProviderConfig": {
"CallbackBaseURL": "http://{TIB host}:{TIB port}",
"FailureRedirect": "http://{portal host}:{portal port}/?fail=true",
"UseProviders": [
{
"Name": "openid-connect",
"Key": "{oAuth2.0 key}",
"Secret": "{oAuth2.0 secret}",
"DiscoverURL": "OIDC well-known endpoint"
}
]
},
"ProviderName": "SocialProvider",
"ReturnURL": "http://{portal host}:{portal port}/sso",
"Type": "redirect"
},
{
"ActionType": "GenerateOrLoginDeveloperProfile",
"ID": "{ID of your TIB profile}",
"OrgID": "0",
"IdentityHandlerConfig": {
"DashboardCredential": "{portal API secret}"
},
"ProviderConfig": {
"CallbackBaseURL": "http://{TIB host}:{TIB port}",
"FailureRedirect": "http://{portal host}:{portal port}/?fail=true",
"UseProviders": [
{
"Name": "openid-connect",
"Key": "{oAuth2.0 key}",
"Secret": "{oAuth2.0 secret}",
"DiscoverURL": "OIDC well-known endpoint"
}
]
},
"ProviderName": "SocialProvider",
"ReturnURL": "http://{portal host}:{portal port}/sso",
"Type": "redirect",
"DefaultUserGroupID": "1"
}]
```
#### Configure Single Sign-On for admin users
The Tyk Enterprise Developer portal has two audiences: developers and admins. This section provides guidance on implementing
Single Sign-On for admin users. The configuration is rather straightforward, and you need to take these three steps
to enable Single Sign-On for admin users in your portal instance:
1. Create a profile for the Tyk Identity Broker (TIB) to work on your identity provider. Make sure the ActionType is equal to "GenerateOrLoginUserProfile", and OrgID is equal to "0":
```.json theme={null}
[{
"ActionType": "GenerateOrLoginUserProfile",
"ID": "{ID of your TIB profile}",
"OrgID": "0",
"IdentityHandlerConfig": {
"DashboardCredential": "{portal API secret}"
},
"ProviderConfig": {
"CallbackBaseURL": "http://{TIB host}:{TIB port}",
"FailureRedirect": "http://{portal host}:{portal port}/?fail=true",
"UseProviders": [
{
"Name": "openid-connect",
"Key": "{oAuth2.0 key}",
"Secret": "{oAuth2.0 secret}",
"DiscoverURL": "{OIDC well-known endpoint}"
}
]
},
"ProviderName": "SocialProvider",
"ReturnURL": "http://{portal host}:{portal port}/sso",
"Type": "redirect"
}]
```
In the above example, you need to specify the following parameters:
* `OrgID` must be `"0"` for being accepted as a provider-admin or super-admin
* `ActionType` must be equal to `"GenerateOrLoginUserProfile"`
* `IdentityHandlerConfig.DashboardCredential` must be equal to the `PortalAPISecret` field in the configuration file of the portal
* Replace `{portal host}` and `{portal port}` with the actual host and port on which your portal instance is running. Also, replace `http` with `https` for the respective fields if you use https for your portal instance
* Replace `{TIB host}` and `{TIB port}` with the actual host and port on which your TIB instance is running. Also, replace `http` with `https` for the respective fields if you use https for your TIB instance
* In the `"ID"` field, specify an ID of this TIB profile. You can select any value for this field that consists of digits, letters, and special signs, no spaces allowed. It is better to pick a human-readable ID for your profile for better maintainability of the configuration
**Nuances of OIDC configuration**
To ensure that the portal can log in a user with your OIDC Identity provider, you may need to either explicitly specify the email scopes in a profile
configuration or configure your IDP to include the email claim in the JWT. Failure to include the email scope in the JWT
would result in the portal not having access to the user's email.
As an example, for Okta, you can use the following configuration:
```yaml theme={null}
"UseProviders": [
{
"Name": "openid-connect",
"Key": "{oAuth2.0 key}",
"Secret": "{oAuth2.0 secret}",
"Scopes": ["openid", "email"],
"DiscoverURL": "{OIDC well-known endpoint}"
}
]
```
Please refer to the [TIB configuration section](/5.12/api-management/external-service-integration#single-sign-on-sso) for step-by-step instructions for setting up the UseProviders section.
Any changes to the TIB profile will be effective after restarting your TIB instance.
2. Create a login page for admin users. We don't supply a login page for Single Sign-On out of the box, so you need to create one.
From Portal v1.16.0, you can alternatively configure a [custom SSO login URL](/5.12/#custom-sso-login-url) to redirect users directly to your external IdP login page without building one.
Here is an example of such page that works with a profile for LDAP identity management system:
```.html theme={null}
Tyk Developer portal login
Login to the Developer portal
```
3. Now you should be able to log in to the portal with your identity provider as an admin user
#### Configure Single Sign-On for developers
This section relates to configuration and settings required to set up Single Sign-On for developers. Configuration for developers is also straight forward.
However, for developers there is one additional.
##### User group mapping
In order to land a developer into the right API Consumer organization, it is necessary to configure the UserGroupMapping
in the TIB profile that creates a binding between user groups in your IDP and developer teams in the portal.
To define the user group mapping for your developer audience, you need to add the UserGroupMapping object to the corresponding TIB profile:
```yaml theme={null}
"UserGroupMapping": {
"{IDP groupA ID}": "{portal teamA ID}",
"{IDP groupB ID}": "{portal teamB ID}",
...
}
```
The `UserGroupMapping` object contains keys that refer to group IDs in your IDP, and the corresponding values are team IDs in the portal.
When the Tyk Identity Broker authorizes a user, it searches for a key that matches the user's group ID in the IDP.
If TIB can't find a matching group ID, it logs the user in to the team with an ID equal to `DefaultUserGroupID` in the portal (if `DefaultUserGroupID` is defined).
We recommend always defining `DefaultUserGroupID` and ensuring that it refers to a valid team ID in your portal instance. If `DefaultUserGroupID` is defined but refers to an invalid team ID, the portal will refuse login attempts.
If no matching group ID is found in the `UserGroupMapping` object and `DefaultUserGroupID` isn't defined, the portal logs in the user to the "Default organization | All users" team with an ID of 1.
To determine whether a developer should be allowed to log in and which team they should be logged into, the portal uses the following algorithm:
##### Configure profile to enable Single Sign-On for developers
Follow these steps to enable Single Sign-On for developers:
1. Create a profile for the Tyk Identity Broker (TIB) to work on your identity provider. Make sure the ActionType is equal to "GenerateOrLoginUserProfile", and OrgID is equal to "0":
```.json theme={null}
[{
"ActionType": "GenerateOrLoginDeveloperProfile",
"ID": "{ID of your TIB profile}",
"OrgID": "0",
"IdentityHandlerConfig": {
"DashboardCredential": "{ID of your TIB profile}"
},
"ProviderConfig": {
"CallbackBaseURL": "http://{TIB host}:{TIB port}",
"FailureRedirect": "http://{portal host}:{portal port}/?fail=true",
"UseProviders": [
{
"Name": "openid-connect",
"Key": "{oAuth2.0 key}",
"Secret": "{oAuth2.0 secret}",
"DiscoverURL": "{OIDC well-known endpoint}"
}
]
},
"ProviderName": "SocialProvider",
"ReturnURL": "http://{portal host}:{portal port}/sso",
"Type": "redirect",
"CustomUserGroupField": "{your group ID field}",
"UserGroupMapping": {
"{IDP group ID}": "{portal team ID}"
},
"DefaultUserGroupID": "{portal team ID}"
}]
```
In the above example, you need to specify the following parameters:
* `OrgID` could be anything as its value is ignored;
* `ActionType` must be equal to `"GenerateOrLoginDeveloperProfile"`
* `IdentityHandlerConfig.DashboardCredential` must be equal to the `PortalAPISecret` field in the configuration file of the portal
* Replace `{portal host}` and `{portal port}` with the actual host and port on which your portal instance is running. Also, replace `http` with `https` for the respective fields if you use https for your portal instance
* Replace `{TIB host}` and `{TIB port}` with the actual host and port on which your TIB instance is running. Also, replace `http` with `https` for the respective fields if you use https for your TIB instance
* In the `"ID"` field, specify an ID of this TIB profile. You can select any value for this field that consists of digits, letters, and special signs, no spaces allowed. It is better to pick a human-readable ID for your profile for better maintainability of the configuration
* `CustomUserGroupField` must be equal to the JWT claim name that refers to the user group in your IDP
* `UserGroupMapping` an object that defines relationship between user groups in the IDP and teams in the portal. The optional parameter, if not specified, will cause the portal to rely on the `DefaultUserGroupID` field to determine which team a developer should log in to. Please refer to the [User group mapping section](/5.12/#user-group-mapping) for guidance
* `DefaultUserGroupID` is the default organization that the portal will use to determine which team a developer should be logged in to if it is not able to find a UserGroupMapping for that developer
**Nuances of OIDC configuration**
To ensure that the portal can log in a user with your OIDC Identity provider, you may need to either explicitly specify the email scopes in a profile
configuration or configure your IDP to include the email claim in the JWT. Failure to include the email scope in the JWT
would result in the portal not having access to the user's email.
As an example, for Okta, you can use the following configuration:
```json theme={null}
"UseProviders": [
{
"Name": "openid-connect",
"Key": "{oAuth2.0 key}",
"Secret": "{oAuth2.0 secret}",
"Scopes": ["openid", "email"],
"DiscoverURL": "{OIDC well-known endpoint}"
}
]
```
2. Create a login page for developers. We don't supply a login page for Single Sign-On out of the box, so you need to create one.
Here is an example of such page that works with a profile for LDAP identity management system:
```.html theme={null}
Tyk Developer portal login
Login to the Developer portal
```
3. Now you should be able to log in to the portal with your identity provider as a developer
## Custom SSO Login URL
*Available from Portal v1.16.0. See the [v1.16.0 release notes](/5.12/developer-support/release-notes/portal#1-16-0-release-notes).*
By default, the Developer Portal renders its own login page at `/auth/password/login`. When you set `SSOCustomLoginURL`, the portal automatically redirects all login requests to the URL you specify (typically your identity provider's login page) instead of displaying the built-in form. The Portal's **Log in** button also points to this URL.
Use this setting when you want to delegate authentication entirely to an external IdP without exposing the Portal's default login page to users.
This setting only redirects the login entry point. User registration and password reset pages are not affected.
### Configuration
Set either the environment variable or the equivalent configuration file key:
```ini theme={null}
PORTAL_SSO_CUSTOM_LOGIN_URL=https://your-idp.example.com/login
```
```json theme={null}
{
"SSOCustomLoginURL": "https://your-idp.example.com/login"
}
```
For the full reference, see [`PORTAL_SSO_CUSTOM_LOGIN_URL`](/5.12/product-stack/tyk-enterprise-developer-portal/deploy/configuration#portal_sso_custom_login_url) in the configuration reference.