> ## Documentation Index
> Fetch the complete documentation index at: https://tyk.io/docs/llms.txt
> Use this file to discover all available pages before exploring further.
# Tyk Data Plane Chart
> Install and configure Tyk Data Plane
The `tyk-data-plane` chart provides the default deployment of a Tyk data plane for Tyk Self Managed MDCB or Tyk Cloud users. It will deploy the data plane components that remotely connect to a MDCB control plane.
## What components are deployed with Tyk Data Plane Chart?
It includes the following components:
* *Tyk Gateway*: An open source Enterprise API Gateway, supporting REST, GraphQL, TCP and gRPC protocols.
* *Tyk Pump*: An analytics purger that moves the data generated by your Tyk gateways to any back-end storage.
Furthermore, it has all the required modifications to easily connect to Tyk Cloud or Multi Data Center (MDCB) control plane.
[Supported MDCB versions](/5.12/tyk-cloud/environments-deployments/hybrid-gateways#tyk-cloud-mdcb-supported-versions)
By default, this chart installs following components as subcharts on a [Kubernetes](https://kubernetes.io/) cluster using the [Helm](https://helm.sh/) package manager.
| Component | Enabled by Default? | Flag |
| :---------- | :------------------ | :--------------------- |
| Tyk Gateway | true | n/a |
| Tyk Pump | true | global.components.pump |
To enable or disable each component, change the corresponding enabled flag.
Also, you can set the version of each component through `image.tag`. You can find the list of version tags available from [Docker hub](https://hub.docker.com/u/tykio).
For a quick start guide, please see [deploy hybrid gateway](/5.12/tyk-cloud/environments-deployments/hybrid-gateways).
## Prerequisites
* [Kubernetes 1.19+](https://kubernetes.io/docs/setup/)
* [Helm 3+](https://helm.sh/docs/intro/install/)
* [Redis](/5.12/apim/open-source/installation#configure-legacy-tyk-headless-helm-chart) should already be installed or accessible by the gateway.
* Connection details to remote control plane. See below for how to obtain them from Tyk Cloud or Tyk Control Plane chart.
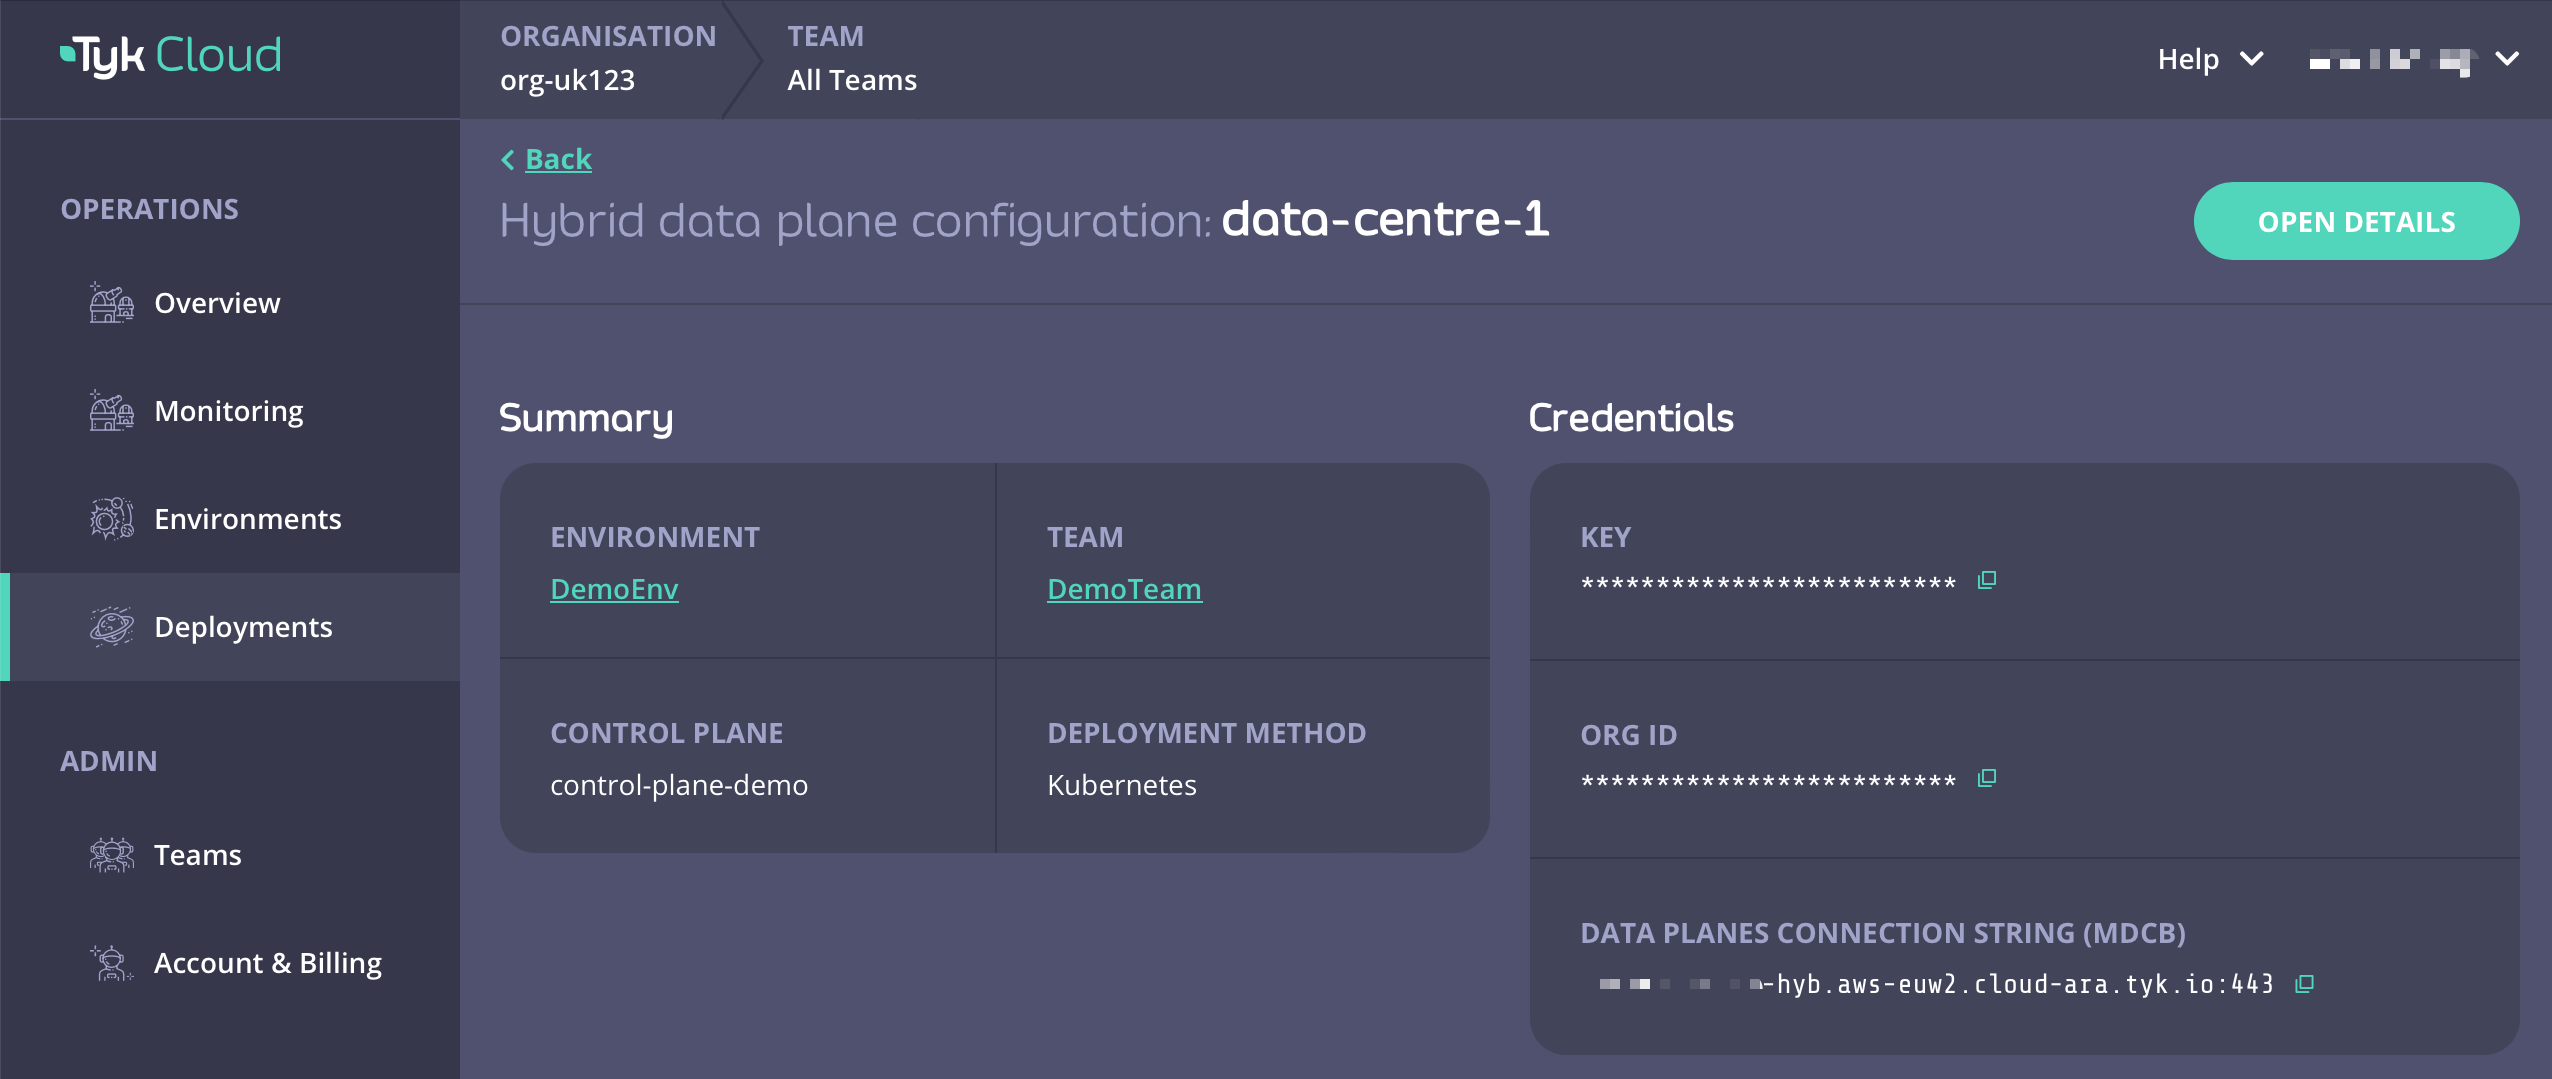
## Obtain Remote Control Plane Connection details from Tyk Cloud
For Tyk Cloud users who want to deploy hybrid data planes, you can easily obtain your remote control plane connection details on Tyk Cloud.
1. Go to Deployment tab and create a Hybrid data plane configuration. You can also select from an existing one.
2. Copy Key, Org ID, and Data Planes Connection String (MDCB) as `global.remoteControlPlane`'s `userApiKey`, `orgId`, and `connectionString` respectively.
 ## Obtain Remote Control Plane Connection Details from tyk-control-plane Chart
For Tyk Self-Managed MDCB users who want to deploy data planes, you can obtain MDCB connection details from the notes
of tyk-control-plane installation output, as listed below.
```
=== Tyk Control Plane Details ===
Before a worker gateway that is deployed in data plane can connect to MDCB, it is important to set remote control plane options.
If the worker gateway will be deployed via Helm, tyk-data-plane chart helps to facilitate this process.
1- First obtain required connection details from Tyk MDCB:
export GROUP_ID=your_group_id # You can use any name for your group.
export USER_API_KEY=$(kubectl get secret --namespace tyk tyk-operator-conf -o jsonpath="{.data.TYK_AUTH}" | base64 --decode)
export ORG_ID=$(kubectl get secret --namespace tyk tyk-operator-conf -o jsonpath="{.data.TYK_ORG}" | base64 --decode)
2- Create a Kubernetes Secret based on credentials in data plane's namespace, e.g. `tyk-dp`.
kubectl create namespace tyk-dp
kubectl create secret generic tyk-data-plane-details \
--from-literal "orgId=$ORG_ID" \
--from-literal "userApiKey=$USER_API_KEY" \
--from-literal "groupID=$GROUP_ID" \
--namespace tyk-dp
3- Refer to this Kubernetes secret (tyk-data-plane-details) while installing worker gateways through
`global.remoteControlPlane.useSecretName` in tyk-data-plane chart.
4- Set `global.remoteControlPlane.connectionString`, `global.remoteControlPlane.useSSL` and
`global.remoteControlPlane.sslInsecureSkipVerify` in tyk-data-plane chart to access MDCB service.
If data plane is deployed in the same cluster, it can be accessed via this connection string:
export MDCB_CONNECTIONSTRING="mdcb-svc-tyk-control-plane-tyk-mdcb.tyk.svc:9091"
If data plane is not deployed in the same cluster as control plane, get the connection string according
to how MDCB service is exposed.
```
1. Follow installation output to export USER\_API\_KEY, ORG\_ID, and MDCB\_CONNECTIONSTRING. The values can be used to set `global.remoteControlPlane`'s `userApiKey`, `orgId`, and `connectionString` respectively.
2. Also verify that the SSL connection configuration is set correctly:
```yaml theme={null}
global:
remoteControlPlane:
# enable/disable ssl
useSSL: false
# Disables SSL certificate verification
sslInsecureSkipVerify: true
```
## Tyk Data Plane Chart Installations
### Installing the Chart
To install the chart from the Helm repository in namespace `tyk-dp` with the release name `tyk-data-plane`, issue the following commands:
```bash theme={null}
helm repo add tyk-helm https://helm.tyk.io/public/helm/charts/
helm repo update
helm show values tyk-helm/tyk-data-plane > values.yaml
```
For further documentation relating to *helm* command usage, please refer to the [helm docs](https://helm.sh/docs/helm/).
At a minimum, modify values.yaml for the following settings:
1. [Set Redis connection details](/5.12/#set-redis-connection-details-required)
Consult the [Configuration](/5.12/#configuration) section for the available configuration options and modify your local `values.yaml` file accordingly. Then install the chart by issuing the following command below:
```bash theme={null}
helm install tyk-data-plane tyk-helm/tyk-data-plane -n tyk-dp --create-namespace -f values.yaml
```
### Uninstalling the Chart
```bash theme={null}
helm uninstall tyk-data-plane -n tyk-dp
```
This removes all the Kubernetes components associated with the chart and deletes the release.
### Upgrading Chart
```bash theme={null}
helm upgrade tyk-data-plane tyk-helm/tyk-data-plane -n tyk-dp
```
## Configuration
To list all configurable options with detailed comments, issue the following command:
```bash theme={null}
helm show values tyk-helm/tyk-data-plane > values.yaml
```
You can update any value in your local `values.yaml` file and use `-f [filename]` flag to override default values during installation.
Alternatively, you can use `--set` flag to set it in Tyk installation.
To configure Tyk components, users can utilize both config files and [environment variables](https://kubernetes.io/docs/tasks/inject-data-application/define-environment-variable-container/). Notably, environment variables take precedence over config files. To maintain simplicity and consistency, the Tyk Helm Charts deploy components with an empty config file while setting container environment variables based on user-defined [values](https://helm.sh/docs/chart_best_practices/values/). This approach ensures seamless integration with Kubernetes practices, allowing for efficient management of configurations. For a comprehensive overview of available configurations, please refer to the [configuration documentation](/5.12/tyk-oss-gateway/configuration).
### Setting Environment Variables
Should any environment variables not be set by the Helm Chart, users can easily add them under the `extraEnvs` section within the charts for further customization. Values set under `extraEnvs` would take precedence over all configurations.
Example of setting extra environment variable to gateway:
```yaml theme={null}
tyk-gateway:
gateway:
extraEnvs:
- name: TYK_GW_LOGLEVEL
value: debug
```
An example is listed below for setting extra [environment variable using ConfigMap data](https://kubernetes.io/docs/tasks/configure-pod-container/configure-pod-configmap/#define-container-environment-variables-using-configmap-data), using gateway:
```yaml theme={null}
tyk-gateway:
gateway:
extraEnvs:
- name: CONFIG_USERNAME
valueFrom:
configMapKeyRef:
name: backend-user
key: backend-username
```
An example is listed below for setting extra [environment variable using secret data](https://kubernetes.io/docs/tasks/inject-data-application/distribute-credentials-secure/#define-container-environment-variables-using-secret-data), using gateway:
```yaml theme={null}
tyk-gateway:
gateway:
extraEnvs:
- name: SECRET_USERNAME
valueFrom:
secretKeyRef:
name: backend-user
key: backend-username
```
In the above example, an extra environment variable `SECRET_USERNAME` will be added to the Gateway container, with a value of `backend-username` associated with the secret `backend-user`. It is useful if you want to access secret data from [Tyk Gateway configuration file (tyk.conf) or API definitions](/5.12/tyk-configuration-reference/kv-store).
### Set Redis Connection Details (Required)
Tyk uses Redis for distributed rate-limiting and token storage. You may use the [Bitnami chart](https://github.com/bitnami/charts/tree/main/bitnami/redis) to install or Tyk's `simple-redis` chart for POC purpose.
Set the following values after installing Redis:
| Name | Description |
| :-------------------------------- | :-------------------------------------------------------------------------------------------------- |
| `global.redis.addrs` | Redis addresses |
| `global.redis.pass` | Redis password in plain text |
| `global.redis.passSecret.name` | If global.redis.pass is not provided, you can store it in a secret and provide the secret name here |
| `global.redis.passSecret.keyName` | key name to retrieve Redis password from the secret |
***Recommended: via *Bitnami* chart***
For Redis you can use these rather excellent charts provided by [Bitnami](https://github.com/bitnami/charts/tree/main/bitnami/redis).
Copy the following commands to add it:
```bash theme={null}
helm upgrade tyk-redis oci://registry-1.docker.io/bitnamicharts/redis -n tyk --create-namespace --install --version 19.0.2 --set image.repository=bitnamilegacy/redis
```
Please make sure you are installing Redis versions that are supported by Tyk. Please refer to Tyk docs to get list of [supported versions](/5.12/tyk-self-managed/install#redis).
Follow the notes from the installation output to get connection details and password.
```
Redis(TM) can be accessed on the following DNS names from within your cluster:
tyk-redis-master.tyk.svc.cluster.local for read/write operations (port 6379)
tyk-redis-replicas.tyk.svc.cluster.local for read-only operations (port 6379)
export REDIS_PASSWORD=$(kubectl get secret --namespace tyk tyk-redis -o jsonpath="{.data.redis-password}" | base64 --decode)
```
The Redis address as set by Bitnami is `tyk-redis-master.tyk.svc.cluster.local:6379`
You can reference the password secret generated by Bitnami chart by `--set global.redis.passSecret.name=tyk-redis` and `--set global.redis.passSecret.keyName=redis-password`, or just set `--set global.redis.pass=$REDIS_PASSWORD`.
```bash theme={null}
helm install --set global.redis.passSecret.name=tyk-redis --set global.redis.passSecret.keyName=redis-password tyk-data-plane tyk-helm/tyk-data-plane
```
or
```bash theme={null}
export REDIS_PASSWORD=$(kubectl get secret --namespace tyk tyk-redis -o jsonpath="{.data.redis-password}" | base64 --decode)
helm install --set global.redis.pass=$REDIS_PASSWORD tyk-data-plane tyk-helm/tyk-data-plane
```
***Evaluation only: via *simple-redis* chart***
Another option for Redis, to get started quickly, is to use our [simple-redis](https://artifacthub.io/packages/helm/tyk-helm/simple-redis) chart.
Please note that these provided charts must never be used in production or for anything
but a quick start evaluation only. Use [Bitnami Redis](https://github.com/bitnami/charts/tree/main/bitnami/redis) or [Official Redis installation guides](https://redis.io/docs/install/) in any other case.
We provide this chart, so you can quickly deploy *Tyk gateway*, but it is not meant for long term storage of data.
```bash theme={null}
helm install redis tyk-helm/simple-redis -n tyk
```
The Tyk Helm Chart can connect to `simple-redis` in the same namespace by default. You do not need to set Redis address and password in `values.yaml`.
### Protect Confidential Fields with Kubernetes Secrets
In the `values.yaml` file, some fields are considered confidential, such as `APISecret`, connection strings, etc.
Declaring values for such fields as plain text might not be desired for all use cases. Instead, for certain fields, Kubernetes secrets can be referenced, and the chart will [define container environment variables using secret data](https://kubernetes.io/docs/tasks/inject-data-application/distribute-credentials-secure/#define-container-environment-variables-using-secret-data).
This section describes how to use Kubernetes secrets to declare confidential fields.
***APISecret***
The `global.secrets.APISecret` field configures a [header value](/5.12/tyk-oss-gateway/configuration#secret) used in every interaction with Tyk Gateway API.
It can be configured via `global.secrets.APISecret` as a plain text or Kubernetes secret which includes `APISecret` key in it. Then, this secret must be referenced via `global.secrets.useSecretName`.
```yaml theme={null}
global:
secrets:
APISecret: CHANGEME
useSecretName: "mysecret" # where mysecret includes `APISecret` key with the desired value.
```
***Remote Control Plane Configuration***
All configurations regarding remote control plane (`orgId`, `userApiKey`, and `groupID`) can be set via
Kubernetes secret.
Instead of explicitly setting them in the values file, just create a Kubernetes secret including `orgId`, `userApiKey` and `groupID` keys and refer to it in `global.remoteControlPlane.useSecretName`.
1. Create a secret that contains `orgId`, `userApiKey` and `groupID` keys in it:
```bash theme={null}
kubectl create secret generic foo-secret -n tyk --from-literal=orgId=[ORGID] --from-literal=userApiKey=[APIKEY]--from-literal=groupID=[GROUPID]
```
2. Refer to it in `global.remoteControlPlane.useSecretName`.
```yaml theme={null}
global:
remoteControlPlane:
useSecretName: "foo-secret"
```
***Redis Password***
The Redis password can also be provided via a secret. Store Redis password in Kubernetes secret and refer to this secret
via `global.redis.passSecret.name` and `global.redis.passSecret.keyName` field, as follows:
```yaml theme={null}
global:
redis:
passSecret:
name: "yourSecret"
keyName: "redisPassKey"
```
### Tyk MDCB Synchroniser (Optional)
If control plane MDCB has enabled [Synchroniser feature](/5.12/api-management/mdcb#mdcb-synchroniser), the following fields should be set accordingly:
```yaml theme={null}
global:
mdcbSynchronizer:
enabled: true
keySpaceSyncInterval: 10
```
### Gateway Configurations
Configure below inside `tyk-gateway` section.
#### Update Tyk Gateway Version
Set version of gateway at `tyk-gateway.gateway.image.tag`. You can find the list of version tags available from [Docker hub](https://hub.docker.com/r/tykio/tyk-gateway/tags). Please check [Tyk Release notes](/5.12/developer-support/release-notes/gateway) carefully while upgrading or downgrading.
#### Enabling TLS
*Enable TLS*
We have provided an easy way to enable TLS via the `global.tls.gateway` flag. Setting this value to true will
automatically enable TLS using the certificate provided under tyk-gateway/certs/.
*Configure TLS secret*
If you want to use your own key/cert pair, please follow the following steps:
1. Create a TLS secret using your cert and key pair.
2. Set `global.tls.gateway` to true.
3. Set `global.tls.useDefaultTykCertificate` to false.
4. Set `tyk-gateway.gateway.tls.secretName` to the name of the newly created secret.
*Add Custom CA Certificates*
To add your custom Certificate Authority(CA) to your containers, you can mount your CA certificate directly into /etc/ssl/certs folder.
```yaml theme={null}
extraVolumes:
- name: self-signed-ca
secret:
secretName: self-signed-ca-secret
extraVolumeMounts:
- name: self-signed-ca
mountPath: "/etc/ssl/certs/myCA.pem"
subPath: myCA.pem
```
#### Enabling gateway autoscaling
You can enable autoscaling of the gateway by `--set tyk-gateway.gateway.autoscaling.enabled=true`. By default, it will enable the `Horizontal Pod Autoscaler` resource with target average CPU utilization at 60%, scaling between 1 and 3 instances. To customize those values you can modify the `tyk-gateway` section of `values.yaml` as shown below:
```yaml theme={null}
tyk-gateway:
gateway:
autoscaling:
enabled: true
minReplicas: 3
maxReplicas: 30
```
Built-in rules include `tyk-gateway.gateway.autoscaling.averageCpuUtilization` for CPU utilization (set by default at 60%) and `tyk-gateway.gateway.autoscaling.averageMemoryUtilization` for memory (disabled by default). In addition to that you can define rules for custom metrics using `tyk-gateway.gateway.autoscaling.autoscalingTemplate` list:
```yaml theme={null}
tyk-gateway:
gateway:
autoscaling:
autoscalingTemplate:
- type: Pods
pods:
metric:
name: nginx_ingress_controller_nginx_process_requests_total
target:
type: AverageValue
averageValue: 10000m
```
#### Accessing Gateway
*Service port*
Default service port of gateway is 8080. You can change this at `global.servicePorts.gateway`.
*Ingress*
An Ingress resource is created if `tyk-gateway.gateway.ingress.enabled` is set to true.
```yaml theme={null}
ingress:
# if enabled, creates an ingress resource for the gateway
enabled: true
# specify ingress controller class name
className: ""
# annotations for ingress
annotations: {}
# ingress rules
hosts:
- host: tyk-gw.local
paths:
- path: /
pathType: ImplementationSpecific
# tls configuration for ingress
# - secretName: chart-example-tls
# hosts:
# - chart-example.local
tls: []
```
*Control Port*
Set `tyk-gateway.gateway.control.enabled` to true will allow you to run the [Gateway API](/5.12/tyk-gateway-api) on a separate port and protect it behind a firewall if needed.
#### Sharding
Configure the gateways to load APIs with specific tags only by enabling `tyk-gateway.gateway.sharding.enabled`, and set `tags` to comma separated lists of matching tags.
```yaml theme={null}
# Sharding gateway allows you to selectively load APIs to specific gateways.
# If enabled make sure you have at least one gateway that is not sharded.
# Also be sure to match API segmentation tags with the tags selected below.
sharding:
enabled: true
tags: "edge,dc1,product"
```
#### OpenTelemetry
To enable OpenTelemetry for Gateway set `gateway.opentelemetry.enabled` flag to true. It is disabled by default.
You can also configure connection settings for it's exporter. By default `grpc` exporter is enabled on `localhost:4317` endpoint.
To enable TLS settings for the exporter, you can set `gateway.opentelemetry.tls.enabled` to true.
#### Liveness and readiness probes
Gateway liveness probes can be customised via `gateway.livenessProbe` field. All fields from PodLivenessProbe object can be added here. If set to empty or nil, the default health check on /health will be performed.
Gateway readiness probes can be customised via `gateway.readinessProbe` field. All fields from PodReadinessProbe object can be added here. If set to empty or nil, the default health check on /health will be performed.
For further details for configuring Tyk Gateway, please consult the [Tyk Gateway Configuration Options](/5.12/tyk-oss-gateway/configuration) guide.
### Pump Configurations
To enable Pump, set `global.components.pump` to true, and configure as detailed below inside `tyk-pump` section.
| Pump | Configuration |
| :------------------------ | :--------------------------------------------------------------------------------------------------------------------------- |
| Prometheus Pump (Default) | Add `prometheus` to `tyk-pump.pump.backend`, and add connection details for prometheus under `tyk-pump.pump.prometheusPump`. |
| Hybrid Pump (Default) | Add `hybrid` to `tyk-pump.pump.backend`, and add remoteControlPlane details under `global.remoteControlPlane`. |
| Other Pumps | Add the required environment variables in `tyk-pump.pump.extraEnvs` |
#### Prometheus Pump
Add `prometheus` to `tyk-pump.pump.backend`, and add connection details for prometheus under `tyk-pump.pump.prometheusPump`.
We also support monitoring using Prometheus Operator. All you have to do is set `tyk-pump.pump.prometheusPump.prometheusOperator.enabled` to true.
This will create a *PodMonitor* resource for your Pump instance.
#### Hybrid Pump
Add `hybrid` to `tyk-pump.pump.backend`, and add remoteControlPlane details under `global.remoteControlPlane`.
```yaml theme={null}
# Set remoteControlPlane connection details if you want to configure hybrid pump.
remoteControlPlane:
# connection string used to connect to an MDCB deployment. For Tyk Cloud users, you can get it from Tyk Cloud Console and retrieve the MDCB connection string.
connectionString: ""
# orgID of your dashboard user
orgId: ""
# API key of your dashboard user
userApiKey: ""
# needed in case you want to have multiple data-planes connected to the same redis instance
groupID: ""
# enable/disable ssl
useSSL: true
# Disables SSL certificate verification
sslInsecureSkipVerify: true
```
```yaml theme={null}
# hybridPump configures Tyk Pump to forward Tyk metrics to a Tyk Control Plane.
# Please add "hybrid" to .Values.pump.backend in order to enable Hybrid Pump.
hybridPump:
# Specify the frequency of the aggregation in minutes or simply turn it on by setting it to true
enableAggregateAnalytics: true
# Hybrid pump RPC calls timeout in seconds.
callTimeout: 10
# Hybrid pump connection pool size.
poolSize: 5
```
#### Other Pumps
To setup other backends for Pump, refer to this [document](https://github.com/TykTechnologies/tyk-pump/blob/master/README.md#pumps--back-ends-supported) and add the required environment variables in `tyk-pump.pump.extraEnvs`
## Obtain Remote Control Plane Connection Details from tyk-control-plane Chart
For Tyk Self-Managed MDCB users who want to deploy data planes, you can obtain MDCB connection details from the notes
of tyk-control-plane installation output, as listed below.
```
=== Tyk Control Plane Details ===
Before a worker gateway that is deployed in data plane can connect to MDCB, it is important to set remote control plane options.
If the worker gateway will be deployed via Helm, tyk-data-plane chart helps to facilitate this process.
1- First obtain required connection details from Tyk MDCB:
export GROUP_ID=your_group_id # You can use any name for your group.
export USER_API_KEY=$(kubectl get secret --namespace tyk tyk-operator-conf -o jsonpath="{.data.TYK_AUTH}" | base64 --decode)
export ORG_ID=$(kubectl get secret --namespace tyk tyk-operator-conf -o jsonpath="{.data.TYK_ORG}" | base64 --decode)
2- Create a Kubernetes Secret based on credentials in data plane's namespace, e.g. `tyk-dp`.
kubectl create namespace tyk-dp
kubectl create secret generic tyk-data-plane-details \
--from-literal "orgId=$ORG_ID" \
--from-literal "userApiKey=$USER_API_KEY" \
--from-literal "groupID=$GROUP_ID" \
--namespace tyk-dp
3- Refer to this Kubernetes secret (tyk-data-plane-details) while installing worker gateways through
`global.remoteControlPlane.useSecretName` in tyk-data-plane chart.
4- Set `global.remoteControlPlane.connectionString`, `global.remoteControlPlane.useSSL` and
`global.remoteControlPlane.sslInsecureSkipVerify` in tyk-data-plane chart to access MDCB service.
If data plane is deployed in the same cluster, it can be accessed via this connection string:
export MDCB_CONNECTIONSTRING="mdcb-svc-tyk-control-plane-tyk-mdcb.tyk.svc:9091"
If data plane is not deployed in the same cluster as control plane, get the connection string according
to how MDCB service is exposed.
```
1. Follow installation output to export USER\_API\_KEY, ORG\_ID, and MDCB\_CONNECTIONSTRING. The values can be used to set `global.remoteControlPlane`'s `userApiKey`, `orgId`, and `connectionString` respectively.
2. Also verify that the SSL connection configuration is set correctly:
```yaml theme={null}
global:
remoteControlPlane:
# enable/disable ssl
useSSL: false
# Disables SSL certificate verification
sslInsecureSkipVerify: true
```
## Tyk Data Plane Chart Installations
### Installing the Chart
To install the chart from the Helm repository in namespace `tyk-dp` with the release name `tyk-data-plane`, issue the following commands:
```bash theme={null}
helm repo add tyk-helm https://helm.tyk.io/public/helm/charts/
helm repo update
helm show values tyk-helm/tyk-data-plane > values.yaml
```
For further documentation relating to *helm* command usage, please refer to the [helm docs](https://helm.sh/docs/helm/).
At a minimum, modify values.yaml for the following settings:
1. [Set Redis connection details](/5.12/#set-redis-connection-details-required)
Consult the [Configuration](/5.12/#configuration) section for the available configuration options and modify your local `values.yaml` file accordingly. Then install the chart by issuing the following command below:
```bash theme={null}
helm install tyk-data-plane tyk-helm/tyk-data-plane -n tyk-dp --create-namespace -f values.yaml
```
### Uninstalling the Chart
```bash theme={null}
helm uninstall tyk-data-plane -n tyk-dp
```
This removes all the Kubernetes components associated with the chart and deletes the release.
### Upgrading Chart
```bash theme={null}
helm upgrade tyk-data-plane tyk-helm/tyk-data-plane -n tyk-dp
```
## Configuration
To list all configurable options with detailed comments, issue the following command:
```bash theme={null}
helm show values tyk-helm/tyk-data-plane > values.yaml
```
You can update any value in your local `values.yaml` file and use `-f [filename]` flag to override default values during installation.
Alternatively, you can use `--set` flag to set it in Tyk installation.
To configure Tyk components, users can utilize both config files and [environment variables](https://kubernetes.io/docs/tasks/inject-data-application/define-environment-variable-container/). Notably, environment variables take precedence over config files. To maintain simplicity and consistency, the Tyk Helm Charts deploy components with an empty config file while setting container environment variables based on user-defined [values](https://helm.sh/docs/chart_best_practices/values/). This approach ensures seamless integration with Kubernetes practices, allowing for efficient management of configurations. For a comprehensive overview of available configurations, please refer to the [configuration documentation](/5.12/tyk-oss-gateway/configuration).
### Setting Environment Variables
Should any environment variables not be set by the Helm Chart, users can easily add them under the `extraEnvs` section within the charts for further customization. Values set under `extraEnvs` would take precedence over all configurations.
Example of setting extra environment variable to gateway:
```yaml theme={null}
tyk-gateway:
gateway:
extraEnvs:
- name: TYK_GW_LOGLEVEL
value: debug
```
An example is listed below for setting extra [environment variable using ConfigMap data](https://kubernetes.io/docs/tasks/configure-pod-container/configure-pod-configmap/#define-container-environment-variables-using-configmap-data), using gateway:
```yaml theme={null}
tyk-gateway:
gateway:
extraEnvs:
- name: CONFIG_USERNAME
valueFrom:
configMapKeyRef:
name: backend-user
key: backend-username
```
An example is listed below for setting extra [environment variable using secret data](https://kubernetes.io/docs/tasks/inject-data-application/distribute-credentials-secure/#define-container-environment-variables-using-secret-data), using gateway:
```yaml theme={null}
tyk-gateway:
gateway:
extraEnvs:
- name: SECRET_USERNAME
valueFrom:
secretKeyRef:
name: backend-user
key: backend-username
```
In the above example, an extra environment variable `SECRET_USERNAME` will be added to the Gateway container, with a value of `backend-username` associated with the secret `backend-user`. It is useful if you want to access secret data from [Tyk Gateway configuration file (tyk.conf) or API definitions](/5.12/tyk-configuration-reference/kv-store).
### Set Redis Connection Details (Required)
Tyk uses Redis for distributed rate-limiting and token storage. You may use the [Bitnami chart](https://github.com/bitnami/charts/tree/main/bitnami/redis) to install or Tyk's `simple-redis` chart for POC purpose.
Set the following values after installing Redis:
| Name | Description |
| :-------------------------------- | :-------------------------------------------------------------------------------------------------- |
| `global.redis.addrs` | Redis addresses |
| `global.redis.pass` | Redis password in plain text |
| `global.redis.passSecret.name` | If global.redis.pass is not provided, you can store it in a secret and provide the secret name here |
| `global.redis.passSecret.keyName` | key name to retrieve Redis password from the secret |
***Recommended: via *Bitnami* chart***
For Redis you can use these rather excellent charts provided by [Bitnami](https://github.com/bitnami/charts/tree/main/bitnami/redis).
Copy the following commands to add it:
```bash theme={null}
helm upgrade tyk-redis oci://registry-1.docker.io/bitnamicharts/redis -n tyk --create-namespace --install --version 19.0.2 --set image.repository=bitnamilegacy/redis
```
Please make sure you are installing Redis versions that are supported by Tyk. Please refer to Tyk docs to get list of [supported versions](/5.12/tyk-self-managed/install#redis).
Follow the notes from the installation output to get connection details and password.
```
Redis(TM) can be accessed on the following DNS names from within your cluster:
tyk-redis-master.tyk.svc.cluster.local for read/write operations (port 6379)
tyk-redis-replicas.tyk.svc.cluster.local for read-only operations (port 6379)
export REDIS_PASSWORD=$(kubectl get secret --namespace tyk tyk-redis -o jsonpath="{.data.redis-password}" | base64 --decode)
```
The Redis address as set by Bitnami is `tyk-redis-master.tyk.svc.cluster.local:6379`
You can reference the password secret generated by Bitnami chart by `--set global.redis.passSecret.name=tyk-redis` and `--set global.redis.passSecret.keyName=redis-password`, or just set `--set global.redis.pass=$REDIS_PASSWORD`.
```bash theme={null}
helm install --set global.redis.passSecret.name=tyk-redis --set global.redis.passSecret.keyName=redis-password tyk-data-plane tyk-helm/tyk-data-plane
```
or
```bash theme={null}
export REDIS_PASSWORD=$(kubectl get secret --namespace tyk tyk-redis -o jsonpath="{.data.redis-password}" | base64 --decode)
helm install --set global.redis.pass=$REDIS_PASSWORD tyk-data-plane tyk-helm/tyk-data-plane
```
***Evaluation only: via *simple-redis* chart***
Another option for Redis, to get started quickly, is to use our [simple-redis](https://artifacthub.io/packages/helm/tyk-helm/simple-redis) chart.
Please note that these provided charts must never be used in production or for anything
but a quick start evaluation only. Use [Bitnami Redis](https://github.com/bitnami/charts/tree/main/bitnami/redis) or [Official Redis installation guides](https://redis.io/docs/install/) in any other case.
We provide this chart, so you can quickly deploy *Tyk gateway*, but it is not meant for long term storage of data.
```bash theme={null}
helm install redis tyk-helm/simple-redis -n tyk
```
The Tyk Helm Chart can connect to `simple-redis` in the same namespace by default. You do not need to set Redis address and password in `values.yaml`.
### Protect Confidential Fields with Kubernetes Secrets
In the `values.yaml` file, some fields are considered confidential, such as `APISecret`, connection strings, etc.
Declaring values for such fields as plain text might not be desired for all use cases. Instead, for certain fields, Kubernetes secrets can be referenced, and the chart will [define container environment variables using secret data](https://kubernetes.io/docs/tasks/inject-data-application/distribute-credentials-secure/#define-container-environment-variables-using-secret-data).
This section describes how to use Kubernetes secrets to declare confidential fields.
***APISecret***
The `global.secrets.APISecret` field configures a [header value](/5.12/tyk-oss-gateway/configuration#secret) used in every interaction with Tyk Gateway API.
It can be configured via `global.secrets.APISecret` as a plain text or Kubernetes secret which includes `APISecret` key in it. Then, this secret must be referenced via `global.secrets.useSecretName`.
```yaml theme={null}
global:
secrets:
APISecret: CHANGEME
useSecretName: "mysecret" # where mysecret includes `APISecret` key with the desired value.
```
***Remote Control Plane Configuration***
All configurations regarding remote control plane (`orgId`, `userApiKey`, and `groupID`) can be set via
Kubernetes secret.
Instead of explicitly setting them in the values file, just create a Kubernetes secret including `orgId`, `userApiKey` and `groupID` keys and refer to it in `global.remoteControlPlane.useSecretName`.
1. Create a secret that contains `orgId`, `userApiKey` and `groupID` keys in it:
```bash theme={null}
kubectl create secret generic foo-secret -n tyk --from-literal=orgId=[ORGID] --from-literal=userApiKey=[APIKEY]--from-literal=groupID=[GROUPID]
```
2. Refer to it in `global.remoteControlPlane.useSecretName`.
```yaml theme={null}
global:
remoteControlPlane:
useSecretName: "foo-secret"
```
***Redis Password***
The Redis password can also be provided via a secret. Store Redis password in Kubernetes secret and refer to this secret
via `global.redis.passSecret.name` and `global.redis.passSecret.keyName` field, as follows:
```yaml theme={null}
global:
redis:
passSecret:
name: "yourSecret"
keyName: "redisPassKey"
```
### Tyk MDCB Synchroniser (Optional)
If control plane MDCB has enabled [Synchroniser feature](/5.12/api-management/mdcb#mdcb-synchroniser), the following fields should be set accordingly:
```yaml theme={null}
global:
mdcbSynchronizer:
enabled: true
keySpaceSyncInterval: 10
```
### Gateway Configurations
Configure below inside `tyk-gateway` section.
#### Update Tyk Gateway Version
Set version of gateway at `tyk-gateway.gateway.image.tag`. You can find the list of version tags available from [Docker hub](https://hub.docker.com/r/tykio/tyk-gateway/tags). Please check [Tyk Release notes](/5.12/developer-support/release-notes/gateway) carefully while upgrading or downgrading.
#### Enabling TLS
*Enable TLS*
We have provided an easy way to enable TLS via the `global.tls.gateway` flag. Setting this value to true will
automatically enable TLS using the certificate provided under tyk-gateway/certs/.
*Configure TLS secret*
If you want to use your own key/cert pair, please follow the following steps:
1. Create a TLS secret using your cert and key pair.
2. Set `global.tls.gateway` to true.
3. Set `global.tls.useDefaultTykCertificate` to false.
4. Set `tyk-gateway.gateway.tls.secretName` to the name of the newly created secret.
*Add Custom CA Certificates*
To add your custom Certificate Authority(CA) to your containers, you can mount your CA certificate directly into /etc/ssl/certs folder.
```yaml theme={null}
extraVolumes:
- name: self-signed-ca
secret:
secretName: self-signed-ca-secret
extraVolumeMounts:
- name: self-signed-ca
mountPath: "/etc/ssl/certs/myCA.pem"
subPath: myCA.pem
```
#### Enabling gateway autoscaling
You can enable autoscaling of the gateway by `--set tyk-gateway.gateway.autoscaling.enabled=true`. By default, it will enable the `Horizontal Pod Autoscaler` resource with target average CPU utilization at 60%, scaling between 1 and 3 instances. To customize those values you can modify the `tyk-gateway` section of `values.yaml` as shown below:
```yaml theme={null}
tyk-gateway:
gateway:
autoscaling:
enabled: true
minReplicas: 3
maxReplicas: 30
```
Built-in rules include `tyk-gateway.gateway.autoscaling.averageCpuUtilization` for CPU utilization (set by default at 60%) and `tyk-gateway.gateway.autoscaling.averageMemoryUtilization` for memory (disabled by default). In addition to that you can define rules for custom metrics using `tyk-gateway.gateway.autoscaling.autoscalingTemplate` list:
```yaml theme={null}
tyk-gateway:
gateway:
autoscaling:
autoscalingTemplate:
- type: Pods
pods:
metric:
name: nginx_ingress_controller_nginx_process_requests_total
target:
type: AverageValue
averageValue: 10000m
```
#### Accessing Gateway
*Service port*
Default service port of gateway is 8080. You can change this at `global.servicePorts.gateway`.
*Ingress*
An Ingress resource is created if `tyk-gateway.gateway.ingress.enabled` is set to true.
```yaml theme={null}
ingress:
# if enabled, creates an ingress resource for the gateway
enabled: true
# specify ingress controller class name
className: ""
# annotations for ingress
annotations: {}
# ingress rules
hosts:
- host: tyk-gw.local
paths:
- path: /
pathType: ImplementationSpecific
# tls configuration for ingress
# - secretName: chart-example-tls
# hosts:
# - chart-example.local
tls: []
```
*Control Port*
Set `tyk-gateway.gateway.control.enabled` to true will allow you to run the [Gateway API](/5.12/tyk-gateway-api) on a separate port and protect it behind a firewall if needed.
#### Sharding
Configure the gateways to load APIs with specific tags only by enabling `tyk-gateway.gateway.sharding.enabled`, and set `tags` to comma separated lists of matching tags.
```yaml theme={null}
# Sharding gateway allows you to selectively load APIs to specific gateways.
# If enabled make sure you have at least one gateway that is not sharded.
# Also be sure to match API segmentation tags with the tags selected below.
sharding:
enabled: true
tags: "edge,dc1,product"
```
#### OpenTelemetry
To enable OpenTelemetry for Gateway set `gateway.opentelemetry.enabled` flag to true. It is disabled by default.
You can also configure connection settings for it's exporter. By default `grpc` exporter is enabled on `localhost:4317` endpoint.
To enable TLS settings for the exporter, you can set `gateway.opentelemetry.tls.enabled` to true.
#### Liveness and readiness probes
Gateway liveness probes can be customised via `gateway.livenessProbe` field. All fields from PodLivenessProbe object can be added here. If set to empty or nil, the default health check on /health will be performed.
Gateway readiness probes can be customised via `gateway.readinessProbe` field. All fields from PodReadinessProbe object can be added here. If set to empty or nil, the default health check on /health will be performed.
For further details for configuring Tyk Gateway, please consult the [Tyk Gateway Configuration Options](/5.12/tyk-oss-gateway/configuration) guide.
### Pump Configurations
To enable Pump, set `global.components.pump` to true, and configure as detailed below inside `tyk-pump` section.
| Pump | Configuration |
| :------------------------ | :--------------------------------------------------------------------------------------------------------------------------- |
| Prometheus Pump (Default) | Add `prometheus` to `tyk-pump.pump.backend`, and add connection details for prometheus under `tyk-pump.pump.prometheusPump`. |
| Hybrid Pump (Default) | Add `hybrid` to `tyk-pump.pump.backend`, and add remoteControlPlane details under `global.remoteControlPlane`. |
| Other Pumps | Add the required environment variables in `tyk-pump.pump.extraEnvs` |
#### Prometheus Pump
Add `prometheus` to `tyk-pump.pump.backend`, and add connection details for prometheus under `tyk-pump.pump.prometheusPump`.
We also support monitoring using Prometheus Operator. All you have to do is set `tyk-pump.pump.prometheusPump.prometheusOperator.enabled` to true.
This will create a *PodMonitor* resource for your Pump instance.
#### Hybrid Pump
Add `hybrid` to `tyk-pump.pump.backend`, and add remoteControlPlane details under `global.remoteControlPlane`.
```yaml theme={null}
# Set remoteControlPlane connection details if you want to configure hybrid pump.
remoteControlPlane:
# connection string used to connect to an MDCB deployment. For Tyk Cloud users, you can get it from Tyk Cloud Console and retrieve the MDCB connection string.
connectionString: ""
# orgID of your dashboard user
orgId: ""
# API key of your dashboard user
userApiKey: ""
# needed in case you want to have multiple data-planes connected to the same redis instance
groupID: ""
# enable/disable ssl
useSSL: true
# Disables SSL certificate verification
sslInsecureSkipVerify: true
```
```yaml theme={null}
# hybridPump configures Tyk Pump to forward Tyk metrics to a Tyk Control Plane.
# Please add "hybrid" to .Values.pump.backend in order to enable Hybrid Pump.
hybridPump:
# Specify the frequency of the aggregation in minutes or simply turn it on by setting it to true
enableAggregateAnalytics: true
# Hybrid pump RPC calls timeout in seconds.
callTimeout: 10
# Hybrid pump connection pool size.
poolSize: 5
```
#### Other Pumps
To setup other backends for Pump, refer to this [document](https://github.com/TykTechnologies/tyk-pump/blob/master/README.md#pumps--back-ends-supported) and add the required environment variables in `tyk-pump.pump.extraEnvs`