> ## Documentation Index
> Fetch the complete documentation index at: https://tyk.io/docs/llms.txt
> Use this file to discover all available pages before exploring further.
# Outbound Email Configuration
**Legacy: Tyk Classic Portal**
You're viewing documentation for the **Tyk Classic Portal**, which is no longer actively maintained.
If you're looking for the latest API documentation for the **new Tyk Developer Portal**, please refer to the
[Postman collection](/5.12/product-stack/tyk-enterprise-developer-portal/api-documentation/tyk-edp-api) or visit the
[Tyk Developer Portal](/5.12/portal/overview/intro) section.
The Classic Portal is in maintenance mode and will be deprecated soon. For questions or support, contact us at
[support@tyk.io]().
### Custom Email Templates
The email templates for the Portal and system messages are located in the `portal/email_templates` directory.
The Tyk Dashboard will need to be restarted for changes to take effect.
### Supported email drivers
* SMTP
* Mandrill
* Sendgrid
* Mailgun
* AmazonSES
To get email set up for your installation, add the following to your `tyk_analytics.conf` file:
```{.copyWrapper} theme={null}
"email_backend": {
"enable_email_notifications": true,
"code": "{PROVIDER-NAME}",
"settings": {
// Client provider specific settings go here. You can find the specific field described below
},
"default_from_email": "jeff@wheresmyrug.com",
"default_from_name": "Jeffrey (The Dude) Lebowski"
}
```
#### SMTP
> Available from Tyk Dashboard version 1.7
```{.json} theme={null}
"code": "smtp",
"settings": {
"SMTPUsername": "email@example.com",
"SMTPPassword": "examplepassword",
"SMTPAddress": "smtp.example.com:587",
"TLSInsecureSkipVerify": "false"
},
```
#### SMTP NoAuth
> Available from Tyk Dashboard version 1.8
If `SMTPUsername` or `SMTPPassword` is omitted, Tyk assumes that authentication is not required for your SMTP server. When starting up and initialising the email driver, the Dashboard should output a log message as follows:
```
[May 6 13:46:41] INFO email: initializing SMTP email driver
[May 6 13:46:41] INFO email: SMTPUsername and/or SMTPPassword not set - smtp driver configured for no-auth
[May 6 13:46:41] INFO email: SMTP email driver initialized
```
#### Mandrill
```{.json} theme={null}
"code": "mandrill",
"settings": {
"ClientKey": "xxxxxxxxx"
},
```
#### Sendgrid
```{.json} theme={null}
"code": "sendgrid",
"settings": {
"ClientKey": "xxxxxxxxx"
},
```
#### Mailgun
```{.json} theme={null}
"code": "mailgun",
"settings": {
"Domain": "KEY",
"PrivateKey": "KEY",
"PublicKey": "KEY"
},
```
#### Amazon SES
```{.json} theme={null}
"code": "amazonses",
"settings": {
"Endpoint": "Endpoint",
"AccessKeyId": "Access-key",
"SecretAccessKey": "KEY"
},
```
### Customize your Welcome Emails
You can customize the welcome email that a developer recieves when they signup to your portal. You can use images and other HTML formatted content. The following video walks you through the process.
1. Select **Settings** from your **Dashboard** > **Portal Management**
2. You can change the from email address and the from email name for your welcome emails.
3. To use customized email content, select **Enable custom welcome email**.
4. You can then add the following custom content:
* Email Subject
* Email Body content
* Welcome email body copy
* Welcome email sign-off
5. Enter your plain text or HTML formatted content. If including an image, the `LINK TO IMAGE` in an image `` link must be a publicly hosted resource.
6. Click **Save** at the top of the Portal Settings screen.
### Customize your Key Approval Emails
#### Editing the Email Body
1. Select **Settings** from your **Dashboard** > **Portal Management**
2. From the "API Key approval email" section, select "Enable custom approval email", and edit the API Key email body.
#### Add an image or logo to the Key Approval Email
1. Select "Enable custom approval email" as above.
2. In the "API Key email body copy" field, enter ``
The `LINK TO IMAGE` must be a publicly hosted resource.
In an Self-Managed installation you have full access to the HTML template, allowing you further customization.
#### Portal Manager Email Settings
1. Select **Settings** from your **Dashboard** > **Portal Management**
2. From the **Portal manager email address** section, enter the email address of the person responsible for approving your developer API subscription requests. See [Portal Key Requests](/5.12/tyk-developer-portal/tyk-portal-classic/portal-concepts#key-requests) for more details.
 5. Enter your plain text or HTML formatted content. If including an image, the `LINK TO IMAGE` in an image `
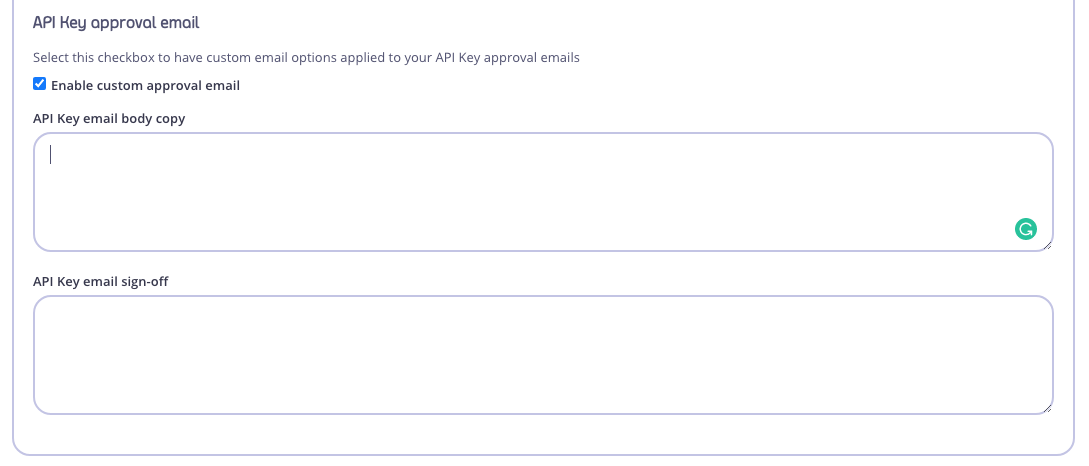 #### Add an image or logo to the Key Approval Email
1. Select "Enable custom approval email" as above.
2. In the "API Key email body copy" field, enter `
#### Add an image or logo to the Key Approval Email
1. Select "Enable custom approval email" as above.
2. In the "API Key email body copy" field, enter `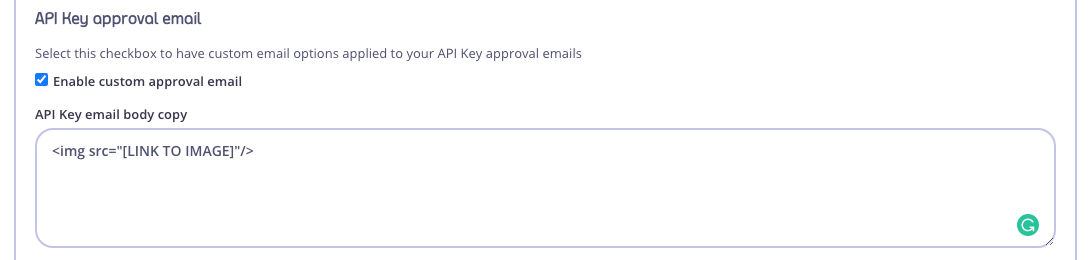
 1. Select **Settings** from your **Dashboard** > **Portal Management**
2. From the **Portal manager email address** section, enter the email address of the person responsible for approving your developer API subscription requests. See [Portal Key Requests](/5.12/tyk-developer-portal/tyk-portal-classic/portal-concepts#key-requests) for more details.
1. Select **Settings** from your **Dashboard** > **Portal Management**
2. From the **Portal manager email address** section, enter the email address of the person responsible for approving your developer API subscription requests. See [Portal Key Requests](/5.12/tyk-developer-portal/tyk-portal-classic/portal-concepts#key-requests) for more details.